Hour 21 Shell Scripting: The Administrator’s Swiss Army Knife

If I had to pick one core skill that differentiated good system administrators from mediocre ones, it would be shell scripting. It’s useful to know the tools in the operating system (or systems) you use, of course, but being able to put those tools together and build something that addresses the specific needs and requirements of your user community is a critical capability.
Throughout this book, you’ve had a chance to see many shell scripts, ranging from simple one-liners to rather sophisticated scripts with loops, conditional execution, return code analysis, and much more.
In this hour, we’ll focus specifically on the language and capabilities of shell scripts, re-examine some of the earlier scripts to see exactly what they accomplish, and introduce some new scripts to expand your programming horizons.
There are tasks that cannot be accomplished in the shell, of course, and for those you’ll want to move to awk, Perl, or C, depending on the task, and of course, your level of familiarity with the development environment.
In this hour, you will learn:
• The basics of shell scripting
• How to control a script’s flow
The Basics of Shell Scripting
The first and most important question for anyone developing shell scripts is: what shell?
The answer to that varies somewhat in the Unix system administrator community, but most sysadmins, myself included, believe that the best scripting environment is the Bourne Shell (sh). Whether you use csh, tcsh, zsh, or whatever, just about every shell script you’ll find uses the Bourne Shell as its interpreter.
![]()
Of course, on many systems /bin/sh is actually a hard link to /bin/bash, meaning that sh is really an instance of bash. That’s fine: bash has the exact same syntax and semantics as the older Bourne Shell, and offers some great capabilities in addition, and a solid, constantly improving code base.
Task 21.1: Basic Shell Scripts
Like any procedural programming language, shell scripts are executed from the first line to the last, and errors in the script are only encountered when the interpreter (the shell) reads the line just prior to execution.
1. By default, all shell scripts are executed by your login shell or the shell specified by the SHELL environment variable, unless you specify otherwise. As a result, all well-written shell scripts do specify otherwise—the first line of all shell scripts should specify the desired shell and any starting arguments desired. A typical first line looks like this:
#!/bin/sh
The #! notation has special meaning in Unix, and the shell that’s reading the script initially uses the information in that first line to ascertain what program should actually execute (run) the script. For example, Perl scripts have
#!/usr/bin/perl
and Python programs might well have
#!/usr/local/bin/python
as their first line.
2. The Bourne Shell1 has a variety of starting flags that can be specified on this first line of the script, with interesting and often valuable results. Foremost among these is the -x flag, which turns on debugging mode. We’ll see an example of this a bit later in the hour.
1Or whatever shell you have that’s emulating the Bourne Shell (for example, bash).
Another useful flag that’s popular with script writers is -f, which disables reading any sort of rc or other configuration file. You won’t have any of your aliases available, but you will have your scripts start out and run quite a bit faster.
To add a starting flag, simply append it to the first line:
#!/bin/sh -f
A third starting flag, one that might not be available in all versions of the Bourne Shell, is -n, which will scan through a script ensuring that the syntax is acceptable, but won’t actually execute the script or any of the commands therein. This probably wouldn’t appear within the script, but rather would be something you invoke on the command line as a special test:
$ sh -n mytestscript
just as you can also turn on debugging conditionally by invoking the shell script as
$ sh -x mytestscript
3. Enough discussion—let’s see a very simple shell script in its entirety to see how they’re organized.
$ cat showaliases
#!/bin/sh
# showaliases - list all current email aliases from NetInfo
nidump aliases .
This very simple shell script has three lines: an indication of what shell should be used, a comment that describes briefly the purpose of the script, and the actual Unix command to run.
A slightly longer example might be more interesting:
$ cat diskhogs
#!/bin/sh
# diskhogs – report which users are taking up the most disk space
echo ″Disk Hogs Report for System ′hostname′″
bigdir2=″‘du -s /Library/* | sed ′s/ /_/g′ | sort -rn | cut -f2- | head -5‘″
echo ″The Five biggest library directories are:″
echo $bigdir2
for dirname in $bigdir2 ; do
echo ″″
echo Big directory: $dirname
echo Four largest files in that directory are:
find ″‘echo $dirname | sed ′s/_/ /g′‘″ -type f -ls |
awk ′{ print $7″ ″$11 }′ | sort -rn | head -4
done
exit 0
Hopefully, you’re starting to see a pattern emerge. The first line is the same, the second line is a brief comment, and the rest of the script is the actual executable section.
Like other programming environments, shell scripts let you define script constants—mnemonic names that represent common directories, programs, commands, or values. In this script, it’s the bigdir2 line near the top. One of the best programming techniques you can practice with shell scripts is to define your constant values at the top of the script. This not only makes it easier to move to a new Unix environment, but it also makes it a lot more readable, too!
Most of the work in this shell script is done in the for loop, which we’ll discuss shortly. The only point that’s important to note here is that structurally, you can see that you can have more than one command on the same line by separating them with a semicolon (notice the ; do at the end of the for line), and that if you have a long, complex pipe or command line, you can split it across multiple lines by simply ending a line with a backslash ().
![]()
If you use backslashes to split long lines, make sure you don’t have any characters after the slash. Even a trailing space or tab character will cause odd and confusing error messages when the script is run.
4. As the previous shell script demonstrates, shell scripts can have variables that are either assigned an initial value that’s constant throughout execution, or have their value change as the script runs.
An example of the latter is the following:
$ cat countfiles
#!/bin/sh
# countfiles - return a count of the files matching the specified pattern
pattern=″${1:-dave}″
locate=/usr/bin/locate
for name in ‘$locate $pattern‘
do
count=″‘expr ${count:-0} + 1‘″
done
echo ″I counted $count files that matched pattern $pattern″
exit 0
This is an interesting script, because it has variables performing three different functions: locate is a constant that makes it easy to reconfigure the script for different Unixes that have the locate command in odd places (or not at all, perhaps replacing it with a find). The count variable is a numeric counter that increments by one each time it’s referenced in the line:
count=″‘expr ${count:-0} + 1‘″
The pattern variable holds the filename pattern that’s being counted, or, if no value is initially specified on the command line, dave as the default pattern.
The unusual notation of ${variable:-default} should be read as a very convenient shorthand for the following logic: if $variable is defined, then $variable; otherwise the default value $default. In the initial assignment to pattern, you can now see that the line
pattern=″${1:-dave}″
really means ″let pattern equal $1 if the user specified a pattern on the command line, otherwise use the default pattern of dave.″
5. This shell script also demonstrates that you can use the helpful expr command for simple math functions, particularly within shell scripts.
For example, here’s a variation on the preceding shell script that calculates the total number of lines, and the average number of lines per file as well:
$ cat countfiles
#!/bin/sh
# countfiles - return a count of the files matching the specified pattern,
# and average line counts too.
pattern=″${1:-dave}″
locate=/usr/bin/locate
for name in ‘$locate $pattern‘
do
count=″‘expr ${count:-0} + 1‘″
lines=″‘wc -l < $name‘″
totalines=″‘expr ${totalines:-0} + ${lines:-0}‘″
done
echo ″$count files, with $totalines lines, match pattern $pattern″
echo ″for an average of ‘expr $totalines / $count‘ lines per file.″
exit 0
When run, this script reports the following:
$ ./countfiles
5 files, with 68 lines, match pattern dave
for an average of 13 lines per file.
Nice and neat.
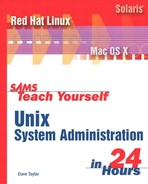
6. Let’s have a closer look at the various special notations you can use with variables, as that’s quite helpful for shell programming. First, let’s look at positional parameters in Table 21.1.
Table 21.1 Shell Positional Parameters
A very common test in shell scripts is one that ensures that the positional parameters are specified as desired. If countfiles insisted on a pattern being specified, an easy test at the top of the script would be
if [ $# -ne 2 ]
then
echo ″Usage: countfiles PATTERN″
exit 0
fi
Nicely, this conditional statement (if condition) will also catch when the user specifies too many positional parameters as well.
![]()
If you’re stepping through positional parameters, a very useful shell function called shift is worth knowing. When invoked, all positional parameters move down one value, so $2 becomes $1, $3 becomes $2, and so on.
Generally, all variables should be referenced with the notation ${name}, but in practice, it’s only necessary when there would be confusion over the exact variable name. Examples: Is $11 really $1 and a 1, or referencing the eleventh variable? Is echo ″$joe:″ referring to $joe, and if so, how does the shell interpret :″ as a special notation? Does $1ish reference $1 and append ish to it, or is it a variable called 1ish?
In all of the preceding cases, the curly brackets resolve the ambiguity: ${1}1, echo ″${joe}:″, and ${1}ish.
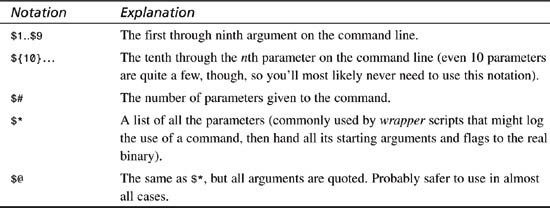
7. There are also some important substitution notations that are well worth knowing for shell scripting, as summarized in Table 21.2.
Table 21.2 Shell Variable Reference Notation
When working with mathematical notation, it’s particularly important to use substitution notation to ensure that you don’t generate out-of-range or undefined result errors. A common technique to avoid dividing by an undefined value, for example, might be:
result=″‘expr $num / ${denom:?Can’t be undefined}‘″
To avoid dividing by zero requires a more elaborate conditional statement:
if [ ${denom:-0} -eq 0 ] ; then
echo ″Can’t divide by zero. Error.″
exit 0
fi
This also demonstrates the value of the :- notation: In this case, even if the variable $denom is undefined, this conditional statement will catch it and avoid the potential problem.
8. It’s worth spending a few minutes looking at the expr statement itself before we move on to conditional statements and loops.
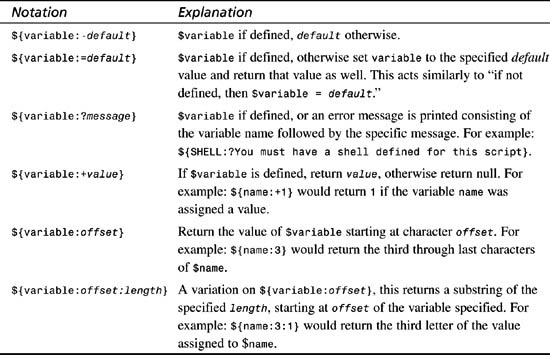
The expr command is one of the hidden gems of Unix. Although it might not be a particularly friendly interactive command, it does let you calculate a wide variety of mathematical and other results, as shown in Table 21.3.
Table 21.3 Common expr Functions
In addition to the helpful mathematical functions, length solves an otherwise tough puzzle: How do you figure out how long a string is within a shell script?
Knowing this function, it’s a straightforward process to find out which login accounts have a login name that exceeds the standard eight-character limit of Unix:
$ cat longname
#!/bin/sh
# longname - scan all login names in /etc/passwd, output any that
# are longer than 8 chars
maxlength=8
for login in ‘cut -d: -f1 /etc/passwd‘
do
if [ ‘expr length $login‘ -gt $maxlength ]
then
echo Warning: login $login exceeds $maxlength character max.
fi
done
exit 0
On a system that’s well organized, there shouldn’t be any problems reported at all. However, one of the systems I use, a FreeBSD box, reports the following:
$ ./longname
Warning: login postmaster exceeds 8 character max.
Something worth fixing.>2 Notice also that the use of maxlength to define the value 8 in one place really clarifies the logic of the script, and also makes it easier if in fact only seven characters were recognized.
2Or not—all this means is that postmast, postmaste, and postmaster are all synonymous, because only the first eight characters of the login are checked. Not a huge crisis, unless you forgot and tried to create postmaster2 and postmaster3 as separate accounts.
![]()
Another way to ascertain the number of characters in a string variable within the shell is to reference ${#variable}; for example, the preceding test could be done with if [ ${#login} -gt $maxlength ] instead.
We can spend quite a bit of time on shell script programming, as you are starting to suspect. Not only is it helpful, it’s just very interesting, and one of my favorite parts of writing this book is creating these nifty little example shell scripts. You could, for example, check out Sriranga Veeraraghavan’s Sams Teach Yourself Shell Programming in 24 Hours, but we’ll go faster than that here and see how it goes!
Flow Control
It’s just about impossible to demonstrate one feature of shell script programming without delving into others along the way, so you have already seen a number of examples of both conditional statements (if-then) and looping mechanisms.
Because there are so many different ways to build complex conditional statements, and because loops are so essential to smart shell script programming, it’s quite helpful to examine them in closer detail. Finally, this section will also briefly introduce shell functions.
Task 21.2: Conditionals, Looping, and Functions
It is certainly possible to have useful shell scripts that move in a linear fashion through a set of steps without any conditional tests or loops needed, but it’s unlikely. Almost every helpful script at least checks to ensure the starting parameters are valid. Let’s see how it’s done.
1. To start, let’s back up a bit and realize that there’s a problem with the version of countfiles shown earlier. To wit: What happens if we specify a pattern that doesn’t have any matches?
$ ./countfiles linda
files, with lines, match pattern linda
for an average of / lines per file.
Ugh. Not too good. What’s happened is, because there were no matches, all the conditional variables were blank (undefined), and the final expr ended up seeing the command
expr /
so it (logically) returned the / as its result.
To fix this, we’ll want to add a conditional test prior to emitting the summary information. This can be done by changing the output lines to wrap them in a test:
if [ $count -eq 0 ] ; then
echo ″No files found that match pattern $pattern″
else
echo ″$count files, with $totalines lines, match pattern $pattern″
echo ″for an average of ‘expr $totalines / $count‘ lines per file.″
fi
Seem correct? Let’s test it:
$ ./countfiles linda
./countfiles: [: -eq: unary operator expected
files, with lines, match pattern linda
for an average of / lines per file.
$
A classic shell scripting error! The count variable isn’t defined, so the test $count -eq 0 ends up being -eq 0, and the conditional test function thinks it’s an error.
To fix this properly, either a substitution operator is needed (if [ ${count:-0} -eq 0]), or the variable should be quoted and the logic of the test should change to a string test, rather than a numeric test:
if [ ″$count″ = ″″ ] ; then
echo ″No files found that match pattern $pattern″
else
echo ″$count files, with $totalines lines, match pattern $pattern″
echo ″for an average of ‘expr $totalines / $count‘ lines per file.″
fi
One more check to see how many files contain the pattern linda:
$ ./countfiles linda
No files found that match pattern linda
Much better!
![]()
Many shell programmers would approach this a slightly different way, writing if [ X$count = X ] ; then to sidestep the odd quote notation. If $count has any value, the value won’t be just X, but if it’s undefined, X$count will be exactly equal to the value X.
2. The Bourne Shell actually invokes a command called test (or has a copy of the code for test compiled directly into the shell for improved performance), which supports a remarkable range of tests, both on files and variables. Table 21.4 summarizes some of the most helpful.
Table 21.4 Conditional Tests
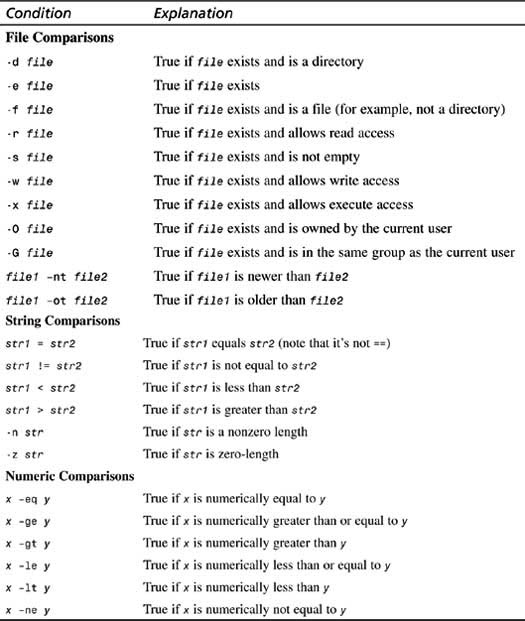
That’s a lot of possible tests listed in Table 21.4, so don’t be too surprised if you find it overwhelming. Let’s explore by writing a script that exercises many of these tests to identify characteristics of a specified file or directory:
$ cat finfo
#!/bin/sh
# finfo - list some information about a specified file or directory
if [ $# -ne 1 ] ; then
echo ″Usage: finfo file-or-directory-name″
exit 0
fi
file=$1
if test -e $file
then
echo -n ″$file exists,″
else
echo ″$file does not exist.″
exit 0
fi
if test -s $file; then
echo -n ″ is not empty, ″
fi
if test -r $file ; then
perm=″and is read″
else
perm=″and is ″
fi
if test -w $file ; then
perm=″$perm+write″
fi
if test -x $file ; then
perm=″$perm+execute″
fi
if test -O $file ; then
info=″$file is owned by $LOGNAME″
else
info=″$file is not owned by $LOGNAME″
fi
if test -G $file ; then
info=″$info, same group as $LOGNAME″
else
info=″$info, and is not in any group that $LOGNAME is in″
fi
echo $perm
echo $info
exit 0
There are other ways to accomplish the tasks that finfo does here, but it’s a terrific example of how all these tests work. Also note that instead of using the [ shortcut, we can call test directly instead. In this latter case, we don’t need a trailing ].
$ finfo $HOME
/home/taylor exists, is not empty, and is read+write+execute
/home/taylor is owned by taylor, same group as taylor
$ finfo baddir
baddir does not exist.
$ finfo countfiles
countfiles exists, is not empty, and is read+write+execute
countfiles is owned by taylor, same group as taylor
$ finfo /etc/passwd
/etc/passwd exists, is not empty, and is read
/etc/passwd is not owned by taylor, and is not in any group that taylor is in
3. There are three basic types of conditional statements: if-then-fi, if-then-else-fi, and if-then-elsif-then-fi, (as is common in the bash shell, the statement reversed is the end-of-statement delimiter, so fi ends an if statement) as exemplified here:
if test -x $file ; then # executable
perm=″$perm+execute″
fi
if test -O $file ; then # owned by user
info=″$file is owned by $LOGNAME″
else
info=″$file is not owned by $LOGNAME″
fi
if test –d $file ; then # is a directory
echo ″$file is a directory″
elsif test –f $file ; then # is a file
echo ″$file is a file″
else
echo ″$file doesn’t exist″
fi
The first is a straightforward conditional; if the condition (test -x $file) is true, the statement following, assigning $perm+execute to variable perm, will be executed. If it’s not true, the shell will skip to the subsequent instruction.
The second is a bit more complicated, but still easy to understand: If test -O $file is true, the second line is executed. If not, the else statement causes the fourth line (for example, not owned by $LOGNAME) to be executed.
Finally, the third example (elsif) is a shorthand way of writing the following loop:
if test –d $file ; then
echo ″$file is a directory″
else
if test –f $file ; then
echo ″$file is a file″
else
echo ″$file doesn’t exist″
fi
fi
The advantage of the elsif is that it helps avoid overly deep nesting on complex statements. You can imagine if we had a script that had four or five else-if conditionals that having the last dozen lines as fi-fi-fi-fi would look odd and be potentially confusing.
4. Of course, one way to address a sequence of elsif statements is to turn the sequence into a case statement, where you can test against a number of different values in a more elegant fashion. This works in some situations, but not others.
Indeed, where each condition is against a different test option, it wouldn’t work, but in many situations, where you’re testing the same variable or value against a number of possible values, a case statement is ideal.
Here’s a considerably longer and more complex shell script to demonstrate the use of a case statement and conditional statements. Pay attention to how the indentation helps clarify the control flow:
$ cat docron
#!/bin/sh
# DOCRON - simple script to run the daily, weekly and monthly
# system cron jobs on a system where it’s likely that
# it’ll be shut down at the usual time of day when
# this would occur For Mac OS X Unix only.
#
# By Dave Taylor <[email protected]>
# Note: most of this is copied from /etc/crontab
SHELL=/bin/sh
PATH=/bin:/sbin:/usr/bin:/usr/sbin
HOME=/var/log
if [ $# -ne 1 ] ; then
echo ″Usage: ‘basename $0‘ [daily|weekly|monthly]″
exit 0
fi
if [ ″‘id -u‘″ -ne 0 ] ; then
echo ″Please enter your ′sudo′ password for authorization″
sudo $0 $1
if [ $? -ne 0 ] ; then
echo ″(didn’t run ‘basename $0‘ because sudo auth failed)″
fi
exit 0
fi
case $1 in
daily )
sh /etc/daily 2>&1 | tee /var/log/daily.out |
mail -s ″‘hostname‘ daily output″ root
;;
weekly )
sh /etc/weekly 2>&1 | tee /var/log/weekly.out |
mail -s ″‘hostname‘ weekly output″ root
;;
sh /etc/monthly 2>&1 | tee /var/log/monthly.out |
mail -s ″‘hostname‘ monthly output″ root
;;
* ) echo ″Usage: ‘basename $0‘ [daily|weekly|monthly]″
esac
exit 0
This is a longer shell script, but if we look at it in sections, it’s really no more complex than the earlier examples. In particular, notice that the case statement structure is
case $1 in
daily ) statements
;;
weekly ) statements
;;
monthly ) statements
;;
* ) statements
esac
This is more or less equivalent to
if [ $1 = daily ] ; then
statements
elsif [ $1 = weekly ] ; then
statements
elsif [ $1 = monthly ] ; then
statements
else
statements
fi
The only difference is that case statement clauses can do wildcard pattern matching, so whereas a conditional test with an if statement that matched dail* would be difficult to write, it’s a breeze as part of a case statement: dail* )
Indeed, you’ll often see complex regular expressions as part of case statements, and a set of choices to allow for, say, both single-character and longer flags is very common, and might look like this:
-a | --append ) statements
Also note that in the case statement that each block is ended with the all important double semicolon (;;), without which the script will drop through into the statements associated with the next condition. On the last case, of course, there is no ″next″ condition, so it can be omitted.
5. The other looping mechanisms in shell scripts are for, while, and until loops. We’ve already seen many examples of the for loop at work, but it’s a real workhorse in scripting, so let’s have another look.
The following simple script searches all the directories in your PATH for a given filename, using a simple for construct. There is one fancy trick here: the IFS variable is the shell’s input field separator, and by changing it to a colon, it lets us very easily chop up the $PATH into its component directories. This neatly also allows us to match directories with spaces in their names without any sort of hiccup:
$ cat search.sh
#!/bin/sh
# search - look for the specified file name in the PATH directories
IFS=:
for directory in $PATH
do
if [ -e $directory/$1 ] ; then
echo Found $1 in directory $directory
fi
done
exit 0
When this is run, the output is succinct:
$ search xterm
Found xterm in directory /usr/X11R6/bin
$ search vi
Found vi in directory /bin
$ search search
Found search in directory /home/taylor/bin
$ search not-found
$
It would be useful to have an error condition so that instead of returning nothing upon failure (as you can see in the last example of the preceding code fragment), it would say not found. That task will resurface as an exercise later in this (rather long!) hour.
An interesting shortcut with the for loop is that if you don’t specify an in clause, it automatically steps through the starting arguments, as demonstrated in the following:
$ cat args
#!/bin/sh
# args - step through starting args
for arg
do
echo got argument $arg
done
$ args this is a test
got argument this
got argument is
got argument a
got argument test
$
![]()
This for loop trick can simplify parsing starting arguments on a more sophisticated shell script, though if you want to have a number of startup options, getopts is a smarter way to go. See man 1 getopts for details.
6. The remaining loop structures are fundamentally the same, the only difference being if they’re testing for a condition that will eventually go false or become true. Consider this example:
$ cat args2
#!/bin/sh
# args2 - step through starting args, stop at ′--′ if seen
while [ ″$1″ != ″--″ -a X$1 != X ]
do
echo … processing flag $1
shift
done
if [ ″$1″ = ″--″ ] ; then
shift # to get past the ′--′
fi
echo Ended loop with post-flag arguments $*
exit 0
This script demonstrates that conditional expressions can actually be quite complex: The test that’s part of the while loop actually is checking to see if $1 is ″--″, which indicates the end of starting flags by Unix convention, or if it simply ran out of starting arguments. The -a is an AND notation, so you could read this as while $1 isn’t ′--′ AND X$1 isn’t X do.
Also note the use of the shift instruction to move all the numeric arguments down one value. That is, $2 becomes $1, $3 becomes $2, and so on.
$ ./args2 a b -- c d
… processing flag a
… processing flag b
Ended loop with post-flag arguments c d
$ ./args2 a b c d
… processing flag a
… processing flag b
… processing flag c
… processing flag d
Ended loop with post-flag arguments
7. The last type of flow control isn’t really a loop, per se, but an approach to taking a block of code and making it a completely different entity—a shell function. Generically, shell functions can be written either as
function functionname
{
shell commands
}
functionname()
{
shell commands
}
What makes this interesting is that you can pass parameters to functions, though they can only return numeric return code values to the calling script. For example:
function listit()
{
if [ -f $1 -a -r $1 ] ; then
cat $1
else
echo ″Error: $1 is not a file, or is not readable″
fi;
}
This simple function will list the contents of a file if it is in fact a file (not a directory) and is readable; otherwise it’ll output a succinct error message.
One point of confusion when working with functions is that you need to ensure that the function is defined prior to its first use in the script, so a typical shell script that uses functions has all the function definitions presented first in the file, then the actual script itself at the end.
A common place to see shell functions is in the /etc/rc.d/init.d files, or in the /etc/rc.d/init.d/functions shared library. Two interesting examples from Red Hat Linux are worth showing:
# Check if $pid (could be plural) are running
checkpid() {
while [ ″$1″ ]; do
[ -d /proc/$1 ] && return 0 # ′&&′ is AND
shift
done
return 1
}
confirm() {
local YES=$″yY″
local NO=$″nN″
local CONT=$″cC″
while : ; do
echo -n $″Start service $1 (Y)es/(N)o/(C)ontinue? [Y] ″
read answer
if strstr ″$YES″ ″$answer″ || [ ″$answer″ = ″″ ] ; then
return 0 # ′||′ is an OR condition above
elif strstr ″$CONT″ ″$answer″ ; then
return 2
elif strstr ″$NO″ ″$answer″ ; then
return 1
fi
done
}
Mac OS X has startup scripts in the /etc/rc.local file (a typical BSD location for them), and within that file there are some interesting additional shell functions:
##
# Print a message to the console and display it in the startup screen
##
ConsoleMessage()
{
local Message=″$*″
echo ″${Message}″
}
##
# Determine if the network is up by looking for any non-loopback
# internet network interfaces. – uses ″sed″, the stream-editor, to
# make simple modifications to information in a pipe. See sed(1)
##
CheckForNetwork()
{
local test
if [ -z ″${NETWORKUP:=}″ ]; then
test=$(ifconfig -a | sed -e ‘/127.0.0.1/d’ | sed -e ‘/0.0.0.0/d’ | sed -
![]() n ′/inet/p′ | wc -l)
n ′/inet/p′ | wc -l)
if [ ″${test}″ -gt 0 ]; then
NETWORKUP=″-YES-″
else
NETWORKUP=″-NO-″
fi
fi
}
Two more examples of shell functions, then we’ll move into exploring some interesting scripts, okay? The following implement the start and stop functionality for the anacron daemon with Red Hat Linux:
start() {
echo -n $″Starting $prog: ″
daemon anacron
RETVAL=$?
[ $RETVAL -eq 0 ] && touch /var/lock/subsys/anacron
echo
return $RETVAL
}
stop() {
if test ″x‘pidof anacron‘″ != x; then
echo -n $″Stopping $prog: ″
killproc anacron
echo
fi
RETVAL=$?
[ $RETVAL -eq 0 ] && rm -f /var/lock/subsys/anacron
return $RETVAL
}
Notice how they conform to the standard function syntax, and that, like most of the other examples shown, they return zero upon success, and nonzero return codes on failure.
We don’t have the space to dig deeply into the specific functionality of these diverse shell functions, but I hope that they make sense to you based on the information presented here.
![]()
It’s well worth learning more about shell script programming if you’re motivated, and there’s no better place to do so than by starting with the shell scripts that are all over your own Unix system.
If you’re starting to suspect that there’s quite a bit to shell script programming, you’re correct. The good news is that once you master the peculiar syntax of the test command and the general structure of if, case, and while/until loops, you’ll be able to read and understand at least 75% of the system shell scripts included with your Unix OS.
Add functions to that list, and you’re ready to read and understand just about every shell script on your system, and, more importantly, create your own. Remember, just like the answer to the immortal question ″How do you get to Carnegie Hall?″ you need to practice writing your own shell scripts before you can really begin to master this critical system administrator skill!
Some Cool Examples
Before we wrap this hour up, it’s valuable to look at a few fully functional shell scripts that offer useful sysadmin features.
Task 21.3: Some Example Scripts
These scripts are all generic and will run on just about any Unix, though they’re each written for the OS specified in the description.
1. One of the programs that I miss the most when I work in the Solaris environment is locate. The locate command itself is simple to create: It’s grep, but the file it searches is slightly more tricky to create. That’s what mklocatedb does:
#!/bin/sh
# mklocate - build the locate database. This is a simple job for the ′find′
# command. Note that we want to ignore everything in the /proc directory on
# this build, so there’s a little bit of trickery needed to ensure we get all
# the top level directories EXCEPT /proc and /xfn
# This should be run by cron every night, or thereabouts
locatedb=/tmp/locatedb
checkall=″‘ls -a / | egrep -v ′(^.$|^..$|^proc$|^xfn$)′ | sed ′s/^///g′‘″
nice find $checkall -print > $locatedb
echo done. Listed ‘wc -l < $locatedb‘ entries in the db.
exit 0
If this is run every night (probably from cron), a simple alias gives you complete functionality:
alias locate=′cat /tmp/locatedb | grep -i′
If you specify an argument to an alias, it’s automatically appended to the end; so a search for, say, locate config is exactly the same as typing cat /tmp/locatedb | grep -i config.
$ mklocatedb
Done. Listed 45426 entries in the db.
$ locate terminal
/.dt/wsmenu/Tools/Terminal
/kernel/misc/terminal-emulator
/usr/openwin/share/include/X11/bitmaps/terminal
/usr/openwin/share/include/images/terminal.icon
/usr/openwin/share/include/images/terminal_mask.icon
/usr/dt/appconfig/help/C/Terminal.sdl
/usr/dt/config/en_US.UTF-8/wsmenu/Tools/Terminal
/usr/dt/config/C/wsmenu/Tools/Terminal
You’d want to run mklocatedb as root so you can access all the directories on the system, but once it’s built, all users can easily be given the locate alias and informed of the new functionality.
2. A longer example that demonstrates many of the control structures discussed in this hour is domaincheck:
#!/bin/sh
# Usage: domaincheck [flags] domain list
# -a show all information
# -d show DNS records
# -e expiration date of domain record
# -r show registrar
case $1 in
-a ) shift
for name
do
whois $name
done
;;
-d ) shift
for name
do
echo ${name}:
whois -n $name | grep -E ′^ Name Server:′
done
;;
-e ) shift
for name
do
echo -n ″${name} ″
whois $name | grep -i ′Record expires on′ |
sed ′s/Record expires on//′
done
;;
-r ) shift
for name
do
echo -n ${name}:
whois -n $name | grep ′Registrar:′
done
;;
* )
echo ″Usage: domaincheck [flags] domain list″
echo ″ -a all information″
echo ″ -d DNS name servers″
echo ″ -e expiration date″
echo ″ -r registrar″
;;
esac
exit 0
This script lets you easily interact with the domain name registration database through the Linux whois command, extracting interesting and relevant information as desired:
$ domaincheck
Usage: domaincheck [flags] domain list
-a all information
-d DNS name servers
-e expiration date
-r registrar
$ domaincheck -r abctv.com
abctv.com: Registrar: NETWORK SOLUTIONS, INC.
$ domaincheck -e nbc.com
nbc.com 16-Jun-2011.
$ domaincheck -d espn.com amctv.com
espn.com:
Name Server: AUTH50.NS.UU.NET
Name Server: AUTH03.NS.UU.NET
amctv.com:
Name Server: STANTZ.CABLEVISION.COM
Name Server: TULLY.CABLEVISION.COM
Notice in the last of the three examples that by using the for loop without any in clause, it automatically lets you step through any number of domain names specified on the command line.
The big result, of course, is the -a flag. Rather than show you all the output, here’s a concise summary of some of the information you can glean about any domain on the Internet:
$ domaincheck -a disney.com
(roughly 50 uninteresting lines removed)
Disney Enterprises, Inc. (DISNEY-DOM)
500 S. Buena Vista Street
Burbank, CA 91521
US
Domain Name: DISNEY.COM
Administrative Contact, Technical Contact, Billing Contact:
idNames, Accounting (IA90-ORG) [email protected]
idNames from Network Solutions, Inc
440 Benmar
Suite #3325
Houston, TX 77060
US
703-742-4777
Fax- - 281-447-1160
Record last updated on 28-Mar-2002.
Record expires on 22-Mar-2008.
Record created on 21-Mar-1990.
Database last updated on 2-Apr-2002 15:46:00 EST.
Domain servers in listed order:
HUEY.DISNEY.COM 204.128.192.10
NS2-AUTH.SPRINTLINK.NET 144.228.254.10
NS3-AUTH.SPRINTLINK.NET 144.228.255.10
NOC.UNT.EDU 129.120.110.1
3. One more quickie: findsuid finds all the setuid scripts, then checks to see whether the files are also owned by root and marked as executable. If all conditions are true, it lists the questionable file in a meaningful and helpful manner:
# cat findsuid
#!/bin/sh
# findsuid - find all SUID files or programs on the system other
# than those that live in /bin and /usr/bin, and
# output the matches in a friendly and useful format.
screen=″egrep -vE ′(^/usr/bin|^/bin)′″
echo ″Executable SUID programs found on the system:″
for match in ‘find / -type f -perm +5000 -print | $screen‘
do
if [ -x $match ] ; then
owner=″‘ls -ld $match | awk ′{print $3}′‘″
lastmod=″‘ls -ld $match | awk ′{print $6″ ″$7″ ″$8}′‘″
echo ″ ″ $match ″ (owner is ″$owner″ and lastmod is $lastmod)″
fi
done
exit 0
When run (as root, of course, so you can see every file on the system), the output looks like this:
# findsuid
Executable SUID programs found on the system:
/usr/bin/suidperl (owner is ″root″ and lastmod is Aug 9 2001)
/usr/bin/sperl5.6.0 (owner is ″root″ and lastmod is Aug 9 2001)
/usr/bin/chage (owner is ″root″ and lastmod is Aug 27 2001)
/usr/bin/gpasswd (owner is ″root″ and lastmod is Aug 27 2001)
/usr/bin/at (owner is ″root″ and lastmod is Aug 2 2001)
/usr/bin/passwd (owner is ″root″ and lastmod is Aug 6 2001)
/usr/bin/chfn (owner is ″root″ and lastmod is Aug 26 2001)
/usr/bin/chsh (owner is ″root″ and lastmod is Aug 26 2001)
/usr/bin/newgrp (owner is ″root″ and lastmod is Aug 26 2001)
/usr/bin/crontab (owner is ″root″ and lastmod is Jun 24 2001)
/usr/bin/kcheckpass (owner is ″root″ and lastmod is Sep 8 2001)
/usr/bin/ssh (owner is ″root″ and lastmod is Sep 6 2001)
/usr/bin/rcp (owner is ″root″ and lastmod is Jul 24 2001)
/usr/bin/rlogin (owner is ″root″ and lastmod is Jul 24 2001)
/usr/bin/rsh (owner is ″root″ and lastmod is Jul 24 2001)
/usr/bin/sudo (owner is ″root″ and lastmod is Jul 23 2001)
/usr/sbin/ping6 (owner is ″root″ and lastmod is Aug 27 2001)
/usr/sbin/traceroute6 (owner is ″root″ and lastmod is Aug 27 2001)
/usr/sbin/sendmail (owner is ″root″ and lastmod is Aug 31 2001)
/usr/sbin/usernetctl (owner is ″root″ and lastmod is Sep 9 2001)
/usr/sbin/userhelper (owner is ″root″ and lastmod is Aug 27 2001)
/usr/sbin/traceroute (owner is ″root″ and lastmod is Jun 25 2001)
/usr/sbin/suexec.old (owner is ″root″ and lastmod is Sep 5 2001)
/usr/X11R6/bin/Xwrapper (owner is ″root″ and lastmod is Sep 5 2001)
/bin/ping (owner is ″root″ and lastmod is Aug 27 2001)
/bin/mount (owner is ″root″ and lastmod is Jul 24 2001)
/bin/umount (owner is ″root″ and lastmod is Jul 24 2001)
/bin/su (owner is ″root″ and lastmod is Jul 23 2001)
/sbin/pwdb_chkpwd (owner is ″root″ and lastmod is Sep 24 2001)
/sbin/unix_chkpwd (owner is ″root″ and lastmod is Sep 24 2001)
Very interesting output, and if you used the helpful diff command and archived earlier output so you could automatically compare, you’ll have a very helpful utility that will help quickly identify possible trojan horses.
4. There are hundreds of different shell scripts on your system, and you can find them with a script:
# cat findscripts
#!/bin/sh
for match in ‘find / -type f -perm +0111 -print‘
do
if [ ″‘file $match | grep -i ′shell script′‘″ != ″″ ] ; then
echo $match is a shell script
fi
done
Red Hat Linux reports 651 scripts present (findscripts | wc -l). Plenty of material for you to study!
Summary
Writing shell scripts is easy—you can start by taking whatever command you’d type on the command line and drop it into a file. Creating truly cool shell scripts, however, is more of an art, and the best system administrators can produce some amazing scripts. Keep your eye out for them, and spend time reading through the many shell scripts on your own system. There’s always lots to learn!
Q&A
Q When do shell scripts get so complex that it makes more sense to switch to a more powerful programming language like Perl?
A This is a question that will garner different answers depending on how comfortable the sysadmin questioned feels about writing shell scripts. There’s no standard rule of thumb, that’s for sure. I’ll switch to a different programming language if I’m doing more data manipulation and relatively little system interaction. Your mileage may vary, of course!
Q What’s the most common error in shell script programming?
A The most common error I make is forgetting either that a conditional test of strings should be a = b rather than a == b, or that it should be a = b rather than a -eq b. Unnecessary spaces after a backslash continuation at the end of a line is another common hiccup.
Workshop
Quiz
1. Does it matter what login shell you have when writing shell scripts?
2. What’s a handy trick for debugging shell scripts?
3. The test command can also be referenced as what common punctuation character? What needs to also be included if you use this shortcut?
4. List both ways that you can ascertain the number of characters stored in a string variable.
5. How do you increment a numeric variable by 3?
6. What does the notation $# indicate?
Answers
1. Your login shell doesn’t matter, as long as you remember to always specify #!/bin/sh as the first line of your scripts.
2. Running a shell script as sh -x script offers lots of useful output for debugging any problems.
3. The test command is also known as [, but if you use the square bracket, you need to include a trailing ] as well, or it’ll be an error.
4. You can invoke ‘expr length $variable‘, or you could use the ${#variable} notation to ascertain the number of characters in $variable.
5. Typically, you’d use var=″‘expr $var + 3‘″.
6. The notation $# indicates the number of arguments given to the script when invoked.
In the next hour we’ll use a combination of awk and Perl to further explore ways to customize the administrative environment and simplify repetitive tasks.