Hour 1 Installing Unix
If you’re reading this book, I bet that you already have a Unix operating system installed on a system you run. Whether it’s a shared server that you’re renting space on for your Web site, a file server in your office, or even a PC that you’ve used as a Unix test platform, this first hour will possibly be the least interesting one in this book.
However, it’s also possible that you’ve read through some Unix books (perhaps even my own Teach Yourself Unix in 24 Hours), and are eager to learn more about the internals of Unix and how you can ensure that yours is stable.
This first hour, therefore, is going to go through a typical Red Hat Linux installation on a PC, with all the default configuration options specified. Then we’ll look at some of the great online Unix and Linux help sites. If you have a different flavor of Unix you’re interested in, your installation will doubtless be different (I have experimented with SuSE, Mandrake, Red Hat, Solaris, AIX, HP-UX, Mac OS X, FreeBSD and NetBSD, to name a few). The basic concepts, however, will prove similar in almost all cases.
And as a reminder, this is the only hour in this book where we’ll only look at a single operating system. All subsequent material will explore Red Hat Linux, Solaris, and Mac OS X as the three reference flavors of Unix.
In this hour, you will learn about
• Unix installation options
• Basic Red Hat Linux installation
• Online installation resources
Unix Installation Options
The first issue of concern is whether your system meets the hardware requirements for a Unix installation. Although Linux (and Red Hat in particular) runs across a wide range of different hardware platforms, there are nonetheless certain requirements to have it run reasonably well:
• A minimum of 350MB of available disk space, and if you want to have the X Window System running, a Web server, developer software, and other standard Unix goodies, you’ll find that the realistic minimum disk space requirement is 1.8–2GB.
• At least 64MB of RAM, though Unix is definitely an operating System where more RAM is always better. I always try for a minimum of 128MB, and if you have 256MB or more, you’ll find greatly increased performance.
• A CPU. Should it be a specific minimum speed, like a 500Mhz Pentium III? Surprisingly, people have successfully run Linux on quite old and slow systems. Does it run well enough that you would enjoy using it? Well, you can answer that question for yourself. Generally, any computer sold since January 1, 2000, has plenty of horsepower to run a Linux distro (jargon for distribution) with good results.
• A CD-ROM drive (hopefully that is self-evident).
• A network card, ideally, so you can connect to the Internet. Be warned, it can be tricky to configure a modem and PPP (the Point-to-Point Protocol), though not at all impossible.
• A graphical display, display card, keyboard, and mouse.
It’s worth noting that, armed with this book, you don’t have to buy anything else to get a copy of Red Hat Linux and install it on your system. Start by going to the Red Hat download area and look for the latest version of their system. As of this writing, it’s 7.2, so the download link is http://www.redhat.com/download/rhlinux72.html. On the other hand, by the time you read this, they’ll likely be shipping 8.0, so your best bet is to start on the Red Hat home page to ensure you get the latest release.
There are good directions online about how to proceed. In general, you’ll download ISOs (installation disk images) that are 650MB a pop, burned to a CD-ROM,1 and used for the installation process. You’ll need a minimum of two CD-ROMs for a good install, so that’s a download of 2×650MB, and if you’re on a 56K modem, you’ll do much better to go to the computer store and buy the official Red Hat distribution box, with CD-ROMs, installation documents, and more, for about $60.
1 Even better, it’s legal. You are explicitly allowed to burn your own CD-ROM install disks from the downloaded ISOs on their site.
![]()
There are also people who download the ISO files, burn CD-ROMs, then sell them online (and yes, it’s legal). A quick search on eBay reveals ″RH Linux 7.2 Brand New 4 CD-ROM Set Enigma″ for a starting bid of only $8.95. Add $2 for shipping, and you can have a complete four-CD-ROM installation set–an exciting new operating system for your computer–for less than the price of a small pizza with anchovies and pineapple!
Other Linux distributors offer very low-cost CD-ROM distributions, if you are nervous about online auction venues. For example, the highly-rated Mandrake Linux (www.mandrakesoft.com) offers a three-CD-ROM Download Edition for $15, including shipping.
Other Unixes are priced differently, as you might suspect. Solaris Intel, from Sun Microsystems, can be downloaded for free from their Web site (www.sun.com/solaris/), or for $45 they have a very nice distribution package that includes 12 CD-ROMs and some (very sparse) documentation. However, there are some conflicting rumors about the long-term health of Solaris on Intel, so don’t be surprised if at some point in the future Sun instead points you to a Linux distro.
Apple distributes Mac OS X on two CD-ROMS in a box with documentation and more. It’s rather more expensive than the other distros discussed so far at $129 (store.apple.com), but if you have a recent Macintosh, you probably already have Mac OS X installed.
There are many other Unixes available, many of which are available as free downloads from online archive sites. You can start at www.download.com, for example. Select Linux, Distributions, and you’ll have 36 matches from which to choose, including Phat Linux, Slackware Linux, Caldera OpenLinux, and the nifty Yellow Dog Linux for Mac systems.
Basic Red Hat Linux Installation
Let’s assume that you want to install Red Hat Linux, as they have one of the best installation packages (called anaconda) out of all the Linuxes I’ve used.
1. The first step is to make sure you have a reliable backup of any information that you already have on your computer. Most likely, you’ll want to just overwrite your entire disk with the new operating system, which will mean that all your existing files will be stomped, mutilated, and otherwise burned beyond recognition.
Once you’re sure you want to proceed, slip the first installation CD-ROM into the CD-ROM drive of your computer and boot up.
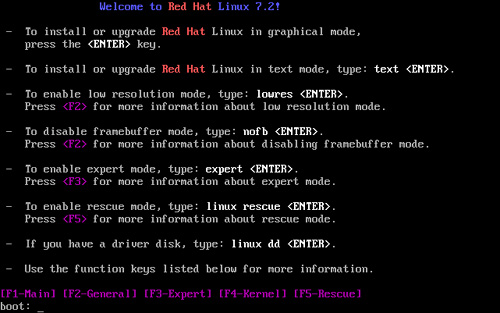
It’s not visually exciting, but the first thing you’ll see is as shown in Figure 1.1, the boot-up screen options. I always choose the default by pressing Enter on the keyboard.
Figure 1.1 Red Hat Linux installation boot options.
2. Linux flashes into graphics mode, enabling your mouse, and the next screen you see lets you choose what language to use for the installation process. You’ll probably choose English, in which case you can just click on the Next button on the bottom right.
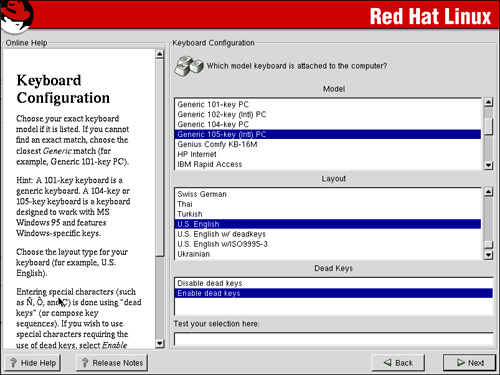
The next step, as illustrated in Figure 1.2, is to pick your keyboard configuration. Most likely, you can again select the default values and proceed to the next step.
The mouse configuration is the third pre-installation step (these steps are just configuring anaconda the installation application), and I’ve always had good results with the default 3 Button Mouse (PS/2).
Figure 1.2 Keyboard configuration.
3. Now we’re ready for the actual installation process to begin. The first selection–and perhaps the most important selection–is to decide what kind of installation you’d like. The choices are Workstation, Server, Laptop, and Custom.
I recommend a workstation installation if you have sufficient disk space (about 2GB), because it’s easier to install software and then not use it than to want to use it and find it wasn’t installed. The server installation skips all the X Window System software packages, though you can add it back by going to the package groupings area.
4. The first major task during the installation process is to decide how you want to slice up your available disk space so that Linux can properly utilize it. In almost all cases, your best bet is to have the system figure out how much space you have and then partition it automatically. You can choose this with Have The Installer Automatically Partition For You.
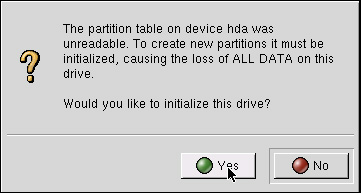
You’ll probably see a dialog box similar to Figure 1.3. Don’t panic. Remember, you’ve already done a complete backup, and we’re planning on replacing the current OS on the computer with Linux.
Next, choose Remove All Partitions On This System, unless you already had a previous Linux installed and want to use that existing partition space. Make sure that if you have multiple drives, it has picked the correct drive for the install we’re about to start!
Figure 1.3 You need to confirm that you want to create new partitions.
The system automatically creates a reasonable partition strategy. For my system, with a 15GB disk available, it split it into /dev/hda1 (to mount as /boot) with 47MB of disk space, /dev/hda3 (to mount as swap space) with 188MB of space, and the remaining 15.1GB as /dev/hda2 (mounting as /).
Rather than accept this, I am going to split /dev/hda2 into two partitions, one that’s 4.1GB and one that’s 11GB. The latter will prove useful later in the book, when we explore disk formatting and the mount command. To accomplish this task, I select the partition in question and click Edit. This produces the dialog box shown in Figure 1.4. Notice that I’ve already specified a fixed size of 4100MB here.
Figure 1.4 Repartitioning to grab some space.
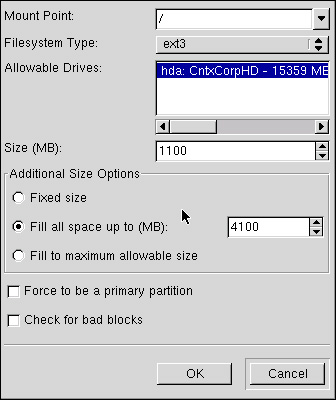
Once accepted (click OK), you’ll now have a free space listed at 11029MB. Click on that, click Edit, and you can specify a mount point if you’d like. Or, leave it as free space and you can perhaps install Windows within and create a dual-boot configuration (see Hour 11, ″Multiple Boot Configurations″).
5. Now you need to pick a boot loader, if any. I prefer grub, but you might like lilo. I will say that there’s really no reason not to pick one of these, just so you have flexibility in your configuration later on. Otherwise, leave all these options alone. If you’d like, you can specify a grub password, which will mean that every time the system is rebooted, the password will be required to proceed with the boot process. Be thoughtful about this option: If you specify this and then have your system in a collocation rack, who will enter the password if it reboots?
The next step is to configure your network interface, as shown in Figure 1.5. If you have DHCP, you’re in luck. Click that box and you’re done! Otherwise, you’ll want to fill out as much of the information specified as possible.
Figure 1.5 Configuring your network connection.
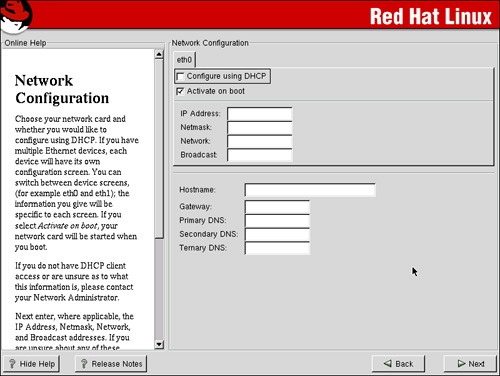
Almost done with the configuration questions. The last network configuration step is to pick a firewall configuration for security. Though the default is to customize your settings, I tend to select Use Default Firewall Rules and leave a security level of Medium.
6. If you want to make your system usable in multiple languages, you can specify them in the Additional Language Support screen that comes next. Even if you only want English (USA), spend a moment to scroll through this list and see just how many different choices there are. Quite impressive!
![]()
There are lots of languages listed, but it’s worth highlighting that it’s up to the individual application to support the language, so don’t be surprised if you install Italian, just to find some richiami del sistema in inglese.
Your time zone should be specified next, and you can click on cities on the world map, select a regional map from the pull-down menu, or scroll until you find a city in your own time zone to select from the list. Living in the Mountain Time zone, I select Denver, Colorado, from the list.
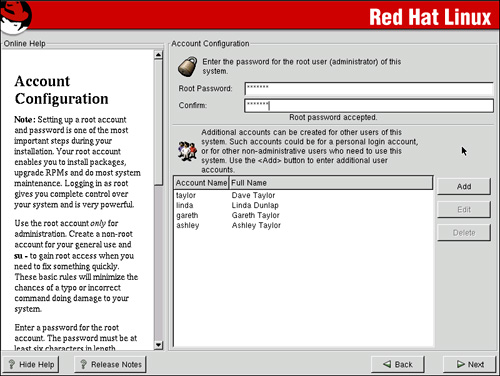
The next screen is the Account Configuration screen. You don’t need to create a number of accounts at this juncture, but if you know multiple people will be using the system, this is a very convenient place to add them. In Figure 1.6 you can see that I’ve created four user accounts, and also set the root password.
As a reminder, you must set a root password here, and it must be something that’s simultaneously complex enough that it would be difficult for crackers to guess, and simple enough that you’ll remember it. Don’t forget what you specify here; it’ll be critical to the long-term health of your Unix system down the road.
Figure 1.6 Account Configuration screen.
7. Finally, we are at the point where we need to select which packages we’d like to install. There are default packages already selected because of our workstation installation specification earlier, but additional material can be added.
As Figure 1.7 shows, I recommend installing KDE in addition to Gnome and the Software Development Tools. Whether you want to include games is up to you.
Notice in particular on the lower right corner the indicator of how big all the combined packages will be (here it’s 1559MB, just about 1.6GB).
Figure 1.7 Selecting additional packages to install.

It’s just about time to go and get a cup of tea and read the paper while anaconda slowly installs each of the hundreds of packages you’ve now selected.
8. The only task left is to configure the screen for X Windows System (which might seem a little weird, since we’ve already been working in a graphical environment with a mouse, but that’s another story). Fortunately, I’ve found that anaconda does a very good job of analyzing hardware configurations, and just about always picks the best setup to match your physical system.
![]()
At this point in the installation process, you can still back out, shut down your computer, eject the CD-ROM, and have your system just as it was prior to booting into the Red Hat world. Once we proceed beyond this, however, all the prior contents of the disk will be destroyed. Please, please ensure you have a good backup before going further!
Enough paranoia, let’s install this baby!
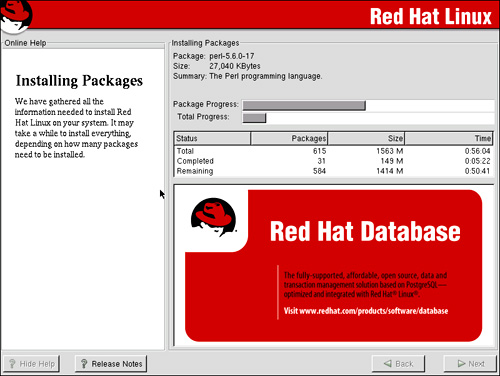
The next screen shows you the progress of the installation process, as anaconda formats the file systems, transfers an install image (the ISO images we discussed earlier in this hour) to the disk, and then begins the actual transfer. Pay particular attention to the Total and Remaining package counts—they’ll give you a very good idea of how much time you have left on the install.
Expect this step to take at least an hour, and possibly quite a bit longer, depending on how fast your system, CD-ROM, and disk are. Figure 1.8 shows how the installation looks just a little ways into the process (about 10 minutes).
Figure 1.8 Installing packages slowly but surely!
Once this process is done, you’ll get a peppy Finished! screen and you can reboot and run your new Red Hat Linux installation on your computer. Congratulations!
The question of what to do after you’ve installed your system is, of course, the topic of the rest of this book. But one thing you might try is just logging in as a regular user, selecting either Gnome or KDE as your desktop environment, then launching a Web browser and surfing the Web. See how it is similar in some ways, and quite different in other ways, to Windows or Macintosh systems.
Installation Help Online
The documentation that’s included with the Red Hat Linux distro is actually pretty good, particularly the Installation Guide, but you might find that there’s useful information available online.
A good place to start your exploration is at the Red Hat Web site itself (www.redhat.com), where they have a complete documentation set available for searching and reading online (and, of course, printing, even if you’re running Windows or Mac OS at the time).
Another valuable source of Linux installation and configuration information is Linux Planet (www.linuxplanet.com), where they also have a nice writeup comparing the different flavors of Linux available. Start by clicking on Tutorials when you visit this site.
A great source for all Unix documentation, though it’s ostensibly focused on Linux, is the Linux Documentation Project (www.linuxdoc.org). It’s out of date, but there’s still helpful information in the Installation and Getting Started Guide in the Guides section of the LDP site. The HOWTO section offers some very specific information that you might find of use too, including a guide to installing Linux on an Acer laptop, booting a Compaq T1500 into Linux, and the useful Config-HOWTO.
The DMOZ Open Directory project has a very nice set of references that’ll be worth a bookmark in your Web browser too, though the starting URL is rather long:
http://dmoz.org/Computers/Software/Operating_Systems/Linux/Support/Tutorials/
In particular, check out ″Dancing with the Penguin,″ a good tutorial with a great title!
If you opted for a Unix other than Red Hat Linux, you’ll find many of these Web sites quite useful. Also check out the vendor Web site, and you can also check out SlashDot (www.slashdot.com) for the latest gossip and discussion about Unix systems and distributions.
Summary
This hour has explored how to install and configure Red Hat Linux on a typical personal computer. Fortunately, the process is quite straightforward, and if you have the network information necessary to connect directly to the Internet prior to installation, you should be online by now, too. If you have another flavor of Unix, you’ll find that the install varies quite a bit: Mandrake Linux is a breeze, Mac OS X Unix is even easier, but Solaris can prove to be tricky. We also discussed some of the top Web sites that can help with installation and configuration.
Q&A
This section contains common questions and answers about the topic covered in this hour. If you have additional questions that aren’t covered, send me an e-mail and maybe it’ll show up in the next edition!
Q Why are there so many different Unixes and Linuxes?
A That’s a very good question. One of the main strengths and weaknesses of Unix has been that it’s been widely distributed in both source and binary form, and that it was built from the beginning for developers, by developers. The combination of these two, coupled with many years of legal wrangling over the ownership of the Unix code, trademarks, intellectual property, and so on, produces a veritable explosion of choices for the Unix-savvy computer user. Even Apple succumbed and made Unix the underpinning of Mac OS X.
Instead of seeing this as a point of confusion—though it is a bit confusing—think of it instead as a terrific advantage. You sure can’t get 20 different free distributions of Windows, and there aren’t even 20 total versions of Mac OS, even if you go all the way back to 1984 when it was released.
Q What Unix distributions do you run on your own systems?
A My main computer is a Mac OS X system with, of course, Darwin as the underpinnings. In addition, I have a PC that dual-boots Windows 2000 and Mandrake 8.1, and a collocated Web server that runs Red Hat Linux 7.2.
Workshop
Quiz
1. What’s the most important first step in the installation process?
2. What’s an ISO and why is it important?
3. If you can download the entire operating system installation data set from the net, why buy it?
4. If you do want prebuilt CD-ROMs for installation, where’s a good place to get ‘em cheap?
5. According to author Douglas Adams, what’s the meaning of life?
Answers
1. Back up any pre-existing information on the disk. And ensure that the backup worked!
2. An ISO is an install system image, a single file that can be copied onto a CD-ROM, making that CD-ROM an instant install disk.
3. Buying it saves an immense amount of time, and as the cost is quite minimal, I think only people with a lot of patience actually download install images.
4. The eBay online auction site always has some Linux install CD-ROMs prebuilt and available for just a few dollars.
5. 42. (See the brilliant book Hitchhiker’s Guide to the Galaxy to figure out what the heck it means!)
Now that we’ve got a Unix distro installed on your system, it’s time to jump in and start looking at the job and responsibilities of Unix system administrator. Because it’s impossible to instantly become a guru, we’ll start next hour by exploring the unsung resource of online documentation and man pages.