Hour 4 File Ownership

After you’ve wrestled with how to figure out how much disk space you have and how to manage it (Hour 3, ″Disk Usage″), the next logical topic is how to change the ownership of files and directories. Although this might seem like a simple topic, this hour demonstrates some of the nuances of file management necessary for a Unix file and system administrator.
In this hour, you will learn
• To use commands like ls and chmod to work with file and directory ownership
• The intricacies of the /etc/passwd file
• The concepts of Unix groups and /etc/group
Starting at the Beginning: Permission Strings
Any discussion of file and directory ownership must begin with a primer on how to use the ls command to ascertain the owner, group, and permissions associated with a specific file. A discussion of permission strings, however, naturally expands to cover a variety of additional topics, including umask, chmod, and more.
Task 4.1: The Basics of File Permissions
To start at the beginning, all directories in Unix are treated as if they were files. Similar to files, directories also have a user owner and group owner, and similar to files, groups have a finite number of possible permissions. Both files and directories have their permissions split into three categories: user, group, and others.
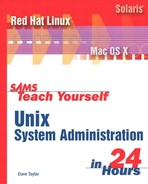
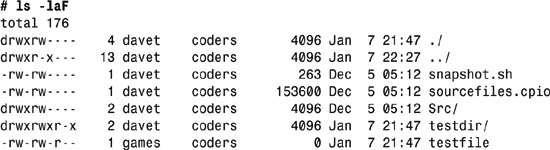
1. To start, here’s a long-format listing of a few files and directories:
The permission string is, of course, the sequence of dashes, r, w, and x at the beginning of each file listed. The owner of each file (or directory) is listed, then the group. In this case, notice that all files are associated with account taylor and group coders.
The .. (parent) directory is an interesting example of permission strings because it offers read, write, and execute permission (rwx) to the owner of the directory (taylor), read and execute permission to other members of the group coders, and no access to anyone else on the system.
2. To change file permissions, use the chmod command. Although you can specify a target octal permission (for example, 0750), it’s probably easiest to use mnemonic change notation instead. To fix the peculiar permissions of the current directory, for example:
chmod u+x .
says ″user plus execute″ (user = file owner, but the o notation is for others, confusingly).
3. To be able to experiment, two useful Unix commands should be highlighted: touch and mkdir. touch updates the last-modified-time of a specific file or directory, but if the file doesn’t exist, touch creates an empty file. mkdir, of course, makes directories.
A quick example. Note the default permissions for the new file and directory that are set up:

4. The default permissions for files and directories are specified by the value of the umask setting. As a user you probably don’t have to worry too much about your umask setting, but as a system administrator, you’ll probably want to figure out a preferred value, and then set that in a shared configuration file like /etc/profile.
A quick peek in /etc/profile shows that there’s no explicit setting for umask, so we’re getting the default, as is every other user who logs in to the system. To ascertain your own default value, simply type umask at the shell prompt:
$ umask
002
If through analysis of your user base, it makes sense to have the default permission be read + write + execute for the owner, read + execute for the group, and nothing for everyone else, it would be time to modify the umask setting.
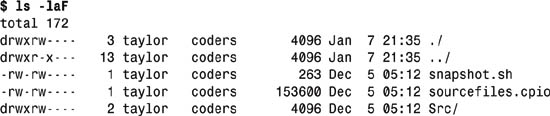
5. You’ll need to stick with me for this explanation, because umask values are the exact octal opposite of the permissions you seek. Octal values range from 0–7, and each value represents a unique permission, as shown in Table 4.1.
Table 4.1 Octal Permission Values
Working with this, the permission represented by the permission string -rwx r-x --- can also therefore be conveyed as 750. The umask to produce this default permission is its inverse: 027.
![]()
The most common umask values are 002, 022, and 027, which translate (thanks to Table 4.1) as ″rwx for owner and group, r-x for others,″ ″rwx for owner, r-x for group and others,″ and ″rwx for owner, r-x for group, and no access for others.″
It’s worth noting also that although most files don’t need execute permission, your best bet is to specify a umask that allows it, and let the individual file creation programs (vi, for example) figure out what settings they need. These umasks are changed with, simply enough, umask newvalue, as in umask 022.
File ownership in Unix is really most akin to a multifaceted diamond. One facet is file permission, with its umask settings and chmod values. Other facets are the owner and group settings, and that’s what we’ll explore next.
Ownership and /etc/passwd
The next concept we need to explore is how file ownership works in Unix. Fortunately, this is straightforward and it all revolves around the entries in the /etc/passwd file.
Task 4.2: Understanding /etc/passwd
All files and directories have a pair of integer values associated with them representing the owner ID and group ID. In fact, your account itself has two similar numeric IDs associated with it (your so-called user ID, or UID, and your group ID or GID). Those are the numbers that are used to tag all the files that you own so the system knows what’s what.
1. To start, find out not only what your user ID and group ID are, but what groups you’re in as well. You can use id to do so:
$ id
uid=502(taylor) gid=502(coders) groups=502(coders),4(adm)
In this output you can see that my account has a UID of 502, and a GID of 502. In addition, it shows me that I am not only a member of the group coders but also have been added to adm, group 4.
2. User accounts are defined in the /etc/passwd file, and here’s what they look like:
$ tail /etc/passwd
radvd:x:75:75:radvd user:/:/bin/false
postgres:x:26:26:PostgreSQL Server:/var/lib/pgsql:/bin/bash
apache:x:48:48:Apache:/var/www:/bin/false
squid:x:23:23::/var/spool/squid:/dev/null
named:x:25:25:Named:/var/named:/bin/false
pcap:x:77:77::/var/arpwatch:/bin/nologin
mthorne:x:500:500:Matt Thorne:/home/mthorne:/bin/bash
mdella:x:501:501:Marcos R. Della:/home/mdella:/bin/csh
taylor:x:502:502:Dave Taylor:/home/taylor:/bin/bash
We’ll examine each of these fields in the next hour, but for the purposes of file permissions, it’s important that we recognize that fields are separated by colons, and that the first field is the account name, the third is the UID, and fourth is the GID.
To split those out is a quick task for awk:
$ awk -F: ′{print $1″ has UID=″$3″ and GID=″$4}′ < /etc/passwd
root has UID=0 and GID=0
bin has UID=1 and GID=1
daemon has UID=2 and GID=2
adm has UID=3 and GID=4
lp has UID=4 and GID=7
sync has UID=5 and GID=0
shutdown has UID=6 and GID=0
halt has UID=7 and GID=0
mail has UID=8 and GID=12
news has UID=9 and GID=13
uucp has UID=10 and GID=14
operator has UID=11 and GID=0
games has UID=12 and GID=100
gopher has UID=13 and GID=30
ftp has UID=14 and GID=50
nobody has UID=99 and GID=99
mailnull has UID=47 and GID=47
rpm has UID=37 and GID=37
xfs has UID=43 and GID=43
ntp has UID=38 and GID=38
rpc has UID=32 and GID=32
gdm has UID=42 and GID=42
rpcuser has UID=29 and GID=29
nfsnobody has UID=65534 and GID=65534
nscd has UID=28 and GID=28
ident has UID=98 and GID=98
radvd has UID=75 and GID=75
postgres has UID=26 and GID=26
apache has UID=48 and GID=48
squid has UID=23 and GID=23
named has UID=25 and GID=25
pcap has UID=77 and GID=77
mthorne has UID=500 and GID=500
mdella has UID=501 and GID=501
taylor has UID=502 and GID=502
By convention, UIDs lower than 100 are system accounts or system IDs and should be ignored. The only exception is UID=0, which is the root or superuser account. You want to keep track of that because anyone with that ID can ignore all file permissions and edit, change, and even delete any file they’d like.
3. A simple awk command to use occasionally to keep track of these UID=0 accounts—since a sysadmin can always set up any number of different accounts with a given UID, and UID=0 is obviously the most important to watch—is
awk -F: ′{ if ($3 == ′0′) print $0 }′ /etc/passwd
Your output should be a single line: the root account. If there are other matches, you need to immediately look into it and ascertain why there’s another superuser account. (We’ll explore this issue further in Hour 5, ″Working with User Accounts.″)
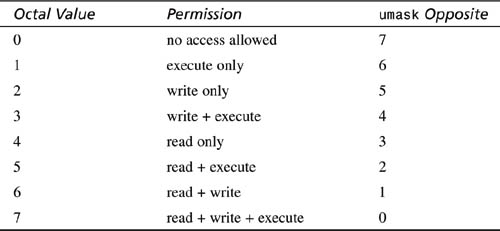
4. To change the owner UID of a file or directory, use the chown command. To demonstrate, let’s try to change the ownership of the testfile file created earlier to games (which you can see in the earlier listing is UID=12):
$ chown games testfile
chown: changing ownership of ′testfile′: Operation not permitted
This error is good news, in fact. This means that Red Hat Linux 7.2 is one of the Unix systems available that prevents users from changing the ownership of their own files. Why? Because otherwise there’s a really sneaky way that users can circumvent quotas. They could change the ownership of a very large file (an MP3 archive, for example) to a+rwx (giving everyone read, write, and execute access), then changing ownership to another user ID. When the quota system analyzes disk usage by UID, the huge file shows up as being owned by someone else. When the user wants to return to their ownership, they copy it into a new filename (which they own by default), and delete the version that had been recorded as owned by the other user. Tricky, eh?
![]()
Both Solaris and Darwin have a similar restriction on chown usage by regular users, so this sneaky trick must be more popular than I thought!
Good news or not, this means that it’s time to become root to be able to change ownership. This can be done a variety of different ways, but I typically use su, which, without any arguments, spawns a subshell as UID=0, after prompting for the root account password.
As you can see, as root I can change ownership of a file with nary a complaint or warning.
5. An interesting observation is that although the Unix system displays the UID by account name, it’s really only storing it by account ID. Which means, if user mdella were to ask me, as sysadmin, to change his login account name to marcos, all I’d have to do is change the first word of the account-information line in /etc/passwd, and all the file listings would magically change as well.
For example, if I change taylor to davet in the password file:
davet:×:502:502:Dave Taylor:/home/taylor:/bin/bash
then the very same ls command has different results:
Working with account IDs in Unix is fairly straightforward, and if you’re already working on a Unix system, it was doubtless a simple review. Unix handles groups in a way that is quite helpful, but understood much less. That’s what we’ll explore next.
Understanding Unix Groups and /etc/group
To fully understand Unix groups, it’s helpful to take some time to talk about the historical roots of the Unix operating system. Unix was developed at AT&T Bell Telephone Labs (also known as Bell Labs, now a core part of Lucent Corporation) during a period when all computers were shared by multiple users. In the jargon of the time, Unix is a multiuser, multitasking operating system.
One of the challenges of multiuser systems is file permission, and a popular research operating system at the time that had gained considerable attention at Bell Telephone Labs (BTL) was Multics. Developed originally by BTL, the Massachusetts Institute of Technology, and General Electric (BTL later dropped out of the project), Multics was an astonishingly complex multiuser system that had a highly sophisticated security model, based on concentric circles of access to files, peripherals, and applications.
Brian Kernighan and Ken Thompson, the inventors of the Unix system, had helped with Multics before BTL quit, and although they liked many of its capabilities, they disliked its complexity. The Unix security model, therefore, has an approximately similar concept of circles of access, but in a much simpler manner.
![]()
It’s worth mentioning that the name Unix is a bit of a poke at Multics. UN-IX, MULT-ICS. The saying at Bell Labs used to be ″Unix is one of whatever Multics was many of.″ Learn more, if you’re curious, at http://www.multicians.org/
On first glance, the Unix security model seems to be three levels of access: owner, group, and everyone else. A glimmer of how this can be more complex was suggested earlier when I used the id command and learned that I was in two groups, not one. Therefore, although files, programs, or directories can only have a single owner and group, a user can be a member of many groups and thereby end up with access privileges that represent the union of all the individual permissions.
![]()
It’s not entirely true that files can only have one owner and group. Creating a hard link to a file can enable the new name to be assigned a different owner and/or group. Yet there’s still only one file on the system, so no additional disk space has been consumed. This is a very important concept for system administrators who are going to develop more sophisticated access control methods on their system.
For our purposes, let’s start by exploring standard Unix groups, then go from there.
Task 4.3: Groups and the /etc/group file
Every user account is assigned what’s called a default group. On many modern Unix systems, the use of groups has become so uncommon that by default every user gets his own group, effectively negating a powerful characteristic of the Unix operating system itself.
1. Look at the last ten lines of the /etc/passwd file for a moment, running it through the awk filter, shown earlier in this hour:
$ awk -F: ′{print $1″ has UID=″$3″ and GID=″$4}′ < /etc/passwd | tail
radvd has UID=75 and GID=75
postgres has UID=26 and GID=26
apache has UID=48 and GID=48
squid has UID=23 and GID=23
named has UID=25 and GID=25
pcap has UID=77 and GID=77
mthorne has UID=500 and GID=500
mdella has UID=501 and GID=501
taylor has UID=502 and GID=502
Notice that every UID has a corresponding GID, and that no two accounts share a default group.
I think this is somewhat silly. It’s akin to buying a Ferrari and never putting it in high gear, or a multifunction stereo and only listening to AM radio. (Well, maybe that’s a bit of an exaggeration!)
Since mthorne and taylor are both administrators, it would actually make more sense to have them in the same administrative group on this system. mdella, by contrast, is a regular user and should not be included in the sysadmin group.
2. To change who is in what group, it’s time to delve into the /etc/group file. Let’s start by examining the file (which does have a tendency to vary in format from flavor to flavor, in case yours isn’t exactly the same):
$ head /etc/group
root:x:0:root
bin:x:1:root,bin,daemon
daemon:x:2:root,bin,daemon
sys:x:3:root,bin,adm
adm:x:4:root,adm,daemon,taylor
tty:x:5:
disk:x:6:root
lp:x:7:daemon,lp
mem:x:8:
kmem:x:9:
As you can see, the file format is quite similar to the /etc/passwd file examined earlier. In this case, the format for each line is
account name : encrypted password : group ID : member list
The first thing to notice is that an encrypted password value of × denotes that there’s a shadow password file stored elsewhere on the system—for security reasons—that has the actual encrypted password string. The next hour explores the password’s /etc/shadow file, but for groups, the relevant group file is /etc/gshadow. Before we look at that, however, just observe that the first group—root—is group ID=0, and has one member: account root. The second, group bin, has three members, adm has four, and so on.
3. A user can be moved from one default group to another by changing the number associated with his default group in the /etc/passwd file, as you might expect.
Adding a user to additional groups is most efficiently done by editing the group file itself. On Linux, there’s a simple tool vigr (vi group) that enables you to safely edit the /etc/group file without worrying about another sysadmin making changes underfoot. If you have that on your system, I recommend using it. Otherwise, you can directly edit the file with the editor of your choice and if you’re the only admin, you should be safe.
To demonstrate, I’m going to add user taylor to the administrative group wheel by simply appending the login ID taylor to the line.
Before the change, wheel looks like this:
# grep wheel /etc/group
wheel:x:10:root
and after the change:
# grep wheel /etc/group
wheel:x:10:root,taylor
Now, when user taylor logs in, the id command reports something slightly different:
$ id
uid=502(taylor) gid=502(coders) groups=502(coders),4(adm),10(wheel)
Voilà! Now taylor is a member of three groups.
![]()
The wheel group is an interesting one: On most Unixes, only users who are part of the group wheel can use the su command to switch user accounts without logging out.
Users can temporarily join a group with the newgrp command, though they’ll need to know the group password if one has been set. (Groups have random, impossible-to-guess passwords by default, by the way.)
A good philosophy to follow is to create mnemonic groups for the teams in your organization, and add and delete members of the group to reflect the current membership. Then, the group members are free to create directories and allow limited access to programs and files without worries about unauthorized access.
Using Groups to Control Access
As a demonstration of how to work with groups in Unix, let’s control access to the printer on this system. We’re going to change permissions on the printing application to only allow access to members of the lp group. To do this, we’re going to add a password to the lp group, then change the permissions of the lp binary to match.
Task 4.4: Access Control with Groups
Using groups to control access to the lp command proves an informative and illustrative example. I should let you know up front that a more common solution to this problem is to rename the lp command something like lp.authorized, then create a shell script called lp that checks user ID against a list of valid, authorized users.
The downside of the authorization list, of course, is that it must be maintained. Creating an lp group is more elegant in many ways because the administrator needs simply to give out the password and a user is authorized. If you want to disable a single user, however, it’s a bit of a problem.
1. The first step is to make sure that there’s an lp group in the /etc/group file. Easily done with grep, fortunately:
# grep lp /etc/group
lp:x:7:daemon,lp
Looks good. Now let’s add user mdella to the list to ensure that he can print whenever he wants without fuss. This can be done in a variety of ways, but the group editing utility vigr is really the optimal solution. So, that’ll let me change the line above (in the non-shadow groups file) to
# grep lp /etc/group
lp:x:7:daemon,lp,mdella
2. Setting the password for a group can be a very hard task on most Unix systems. Linux has the helpful gpasswd program that enables you to specify the password for a group, but most Unixes have no equivalent. As a result you are left changing the password of a regular user account, then copying-and-pasting the encrypted password string into the group file. Ugh.
Making this even more complex, modern Unixes use a shadow password file, meaning that the passwords themselves (encrypted) are kept in a different file than the account information. With the group file, passwords are stored in /etc/gshadow. By default, the lp group password is left blank (unmatchable):
# grep lp /etc/gshadow
lp:::daemon,lp
We’ll want to edit this file by hand to add the new group member. Then, rather than try to add the new encrypted password by hand—a tricky proposition—and since we have the gpasswd command, let’s use it to set the password for the lp group:
# gpasswd lp
Changing the password for group lp
New Password:
Re-enter new password:
# grep lp /etc/group
lp:x:7:daemon,lp,mdella
Notice that there are no changes in the /etc/group file. The shadow password file looks a bit different, however:
# grep -C lp /etc/gshadow
tty:::
disk:::root
lp:0UexIr.hI7TDY::daemon,lp,mdella
mem:::
kmem:::
![]()
A really handy flag for grep is -C (on most modern Unixes), causing the command to show you the context of your matches. By default two lines before and after the line that matched are included in the output.
3. Time to modify the lp command itself. I’ll use the which command to ensure that I’m finding the official copy:
# which lp
/usr/bin/lp
# ls -l /usr/bin/lp
lrwxrwxrwx 1 root root 3 Nov 21 14:36 /usr/bin/lp -> lpr
Aha! Turns out that the lp command is symbolically linked to lpr. So, it’s the lpr command that really must be changed.
# which lpr
/usr/bin/lpr
# ls -l /usr/bin/lpr
-rwxr-xr-x 1 lp lp 408536 Aug 10 18:32 /usr/bin/lpr
Conveniently, the command is already owned by the group lp, so the change required is simply a matter of the permissions.
A moment’s thought should reveal that the desired permissions are read + execute for members of group lp, and no access permission for anyone else. The chmod command can make this change in one easy step:
# chmod o-rx /usr/bin/lpr
# ls -l /usr/bin/lpr
-rwxr-x--- 1 lp lp 408536 Aug 10 18:32 /usr/bin/lpr
Done!
4. To test this new configuration, let’s see if user mdella can execute the lp command:
$ ls | lp
$
Looks like it worked with nary a hitch.
How about user taylor, who isn’t part of the lp group?
$ id
uid=502(taylor) gid=502(coders) groups=502(coders),4(adm),10(wheel)
$ ls | lp
bash: /usr/bin/lp: Permission denied
That’s what we want to have occur—the system rejected the print request because user taylor isn’t part of the lp group, and therefore doesn’t have permission to run the lpr program.
5. To get permission, the user has to know the password and change to the lp group by using the newgrp command:
$ newgrp lp
Password:
$ id
uid=502(taylor) gid=7(lp) groups=502(coders),4(adm),10(wheel)
As you can see, newgrp spawns a new subshell for the user that has the requested group as the primary GID. This does not, however, mean that taylor is part of group lp permanently. Just temporarily. Dangerously, any files or directories created while in this subshell will have lp as the group owner, however. Beware so that doesn’t trip you up.
$ ls | lp
$
That’s exactly the solution we were hoping to create.
Using groups to control access to applications is a great demonstration of the unheralded power of Unix group permissions. The actual implementation of groups within the various programs that comprise the Unix system varies, however. If you find that your explorations come to an occasional dead end, I encourage you to focus on using groups for file and directory access instead. It’s a much more common approach.
Summary
This hour has focused on how file and directory permissions relate to the contents of the /etc/passwd and, especially, /etc/group files. You’ve seen how you can use groups to compartmentalize information on the Unix system you administer through thoughtful use of group membership for users. Finally, the extensive example of using the lp group to control access to the printer through changes to the group and application permission modifications.
Groups are a surprisingly under-utilized feature of Unix. When I’ve administered Unix boxes, I’ve always tried to model the group and team membership of my colleagues with groups on the computer itself.
Q&A
Q Unix essentially has three concentric circles of access as its permission model (owner, group, and other). Did Multics really have more?
A Yes indeed. In fact, Multics was the first computer operating system awarded the B2 security level certification from the United States government.
Q Why use vigr to edit the /etc/group file, rather than just regular old vi?
A Because it’s always dangerous to edit an underlying system file in case someone else is editing it or otherwise tries to alter it simultaneously. Imagine if you’re editing the file while another sysadmin unknowingly runs gpasswd to change a group password. You then save your edit session and their password change is lost. The vigr program creates a lock file that prevents gpasswd from writing to the file while you’re editing it.
Workshop
Questions
1. Why do most modern Unixes automatically place each new user in his own private group?
2. What umask value would create files with read permission for the owner, read + write for the group, and read + write + execute for everyone else? Would this make sense as a umask?
3. I want to end up with an octal directory permission of 754. What umask would I specify?
4. How many accounts do you have on your Unix system with user IDs greater than 100? Less than 100?
5. Changing the spelling of the account name in /etc/passwd has what far-reaching effects?
Answers
1. As best as I can figure, modern Unix systems figure that sysadmins will forget to manage groups. The easiest way to sidestep that possible security problem is to drop each user into their own group, effectively eliminating the entire capability of groups in Unix.
2. Read for owner, read+write for group, and read+write+execute for everyone else is r--rw-rwx, which can be expressed as 467. The umask is the opposite: 310. This would be a really weird umask value, of course, because the person with the least permissions is the owner!
3. If you want to end up with 754, you need the opposite for the umask: 023.
4. On my systems I have 20-30 accounts under UID=100, and no more than five or ten actual user accounts.
5. Changing the spelling of the account not only changes the owner information shown in file listings, but it also forces the user to use the new name when he logs in, and it might also affect his e-mail address on the system.
Next hour will focus on the creation and management of user accounts. We touched on the /etc/passwd file in this hour, but in the next hour we’ll dig deep into the file and learn how to manage and modify the content to implement security and usage policies.