Hour 11 Multiple Boot Configurations

Although it’s true that after you get intimately involved with Unix you probably won’t want to go back, there are times when it’s helpful to boot into a variant of Microsoft Windows or another operating system. If you’re on Solaris, you’re out of luck—Solaris doesn’t play nicely with other operating systems on the disk. If you’re running Mac OS X, the best solution for you is to explore Virtual PC from Connectix.
![]()
If you are using Mac OS X, try holding down the Option key next time you reboot. You’ll find that if you have Mac OS 9 on one disk and Mac OS X on the other, you can easily pick which should boot directly, rather than fussing with the Boot Disk control panel.
If you’re on a PC and you have some flavor of Linux or PC Unix, this hour is for you. You can easily set up your system to boot a variety of different operating systems with a simple switcher screen displayed at boot-time. My PC systems customarily can boot into Red Hat Linux or a version of Windows (usually Windows 2000).
In this hour you will learn
• How to partition your disk for dual-booting
• Dual-boot configurations with LILO
• Dual-boot configurations with GRUB
• The theory of virtual machines
The Theory of Dual-Booting
Upon first glance, it might surprise you that your PC can have multiple operating systems installed simultaneously, without each of them stepping on and otherwise overwriting the other. Certainly, if you come from the world of Windows, you’re used to being asked Reformat disk? (all data will be lost) during the installation process.
Understanding how dual-booting works requires a brief digression into the sequence of events that transpires when a PC is booted.
When you power-on your computer, it does not instantly start reading in the hard disk, even though it seems that way. Instead, the CPU starts by reading the BIOS, the Basic I/O System, which has a set of configuration options set in your PRAM, Programmable Random Access Memory. The PRAM settings indicate which of your multiple disks is the boot disk, the disk with the desired operating system image.
The secret to dual-booting is while the PC BIOS always wants to boot off of the master boot record, ″sector zero″ of the specified disk, the program it boots can be a loader, a program that simply identifies other possible operating systems on the disk and enables you to pick between them.
Both LILO and GRUB are boot loaders; simple, tiny programs that are invoked directly on power-up, they either automatically hand the CPU off to the appropriate operating system image or display a list of possible OS choices for the user to choose.
Sound simple? It is. That’s the good news. The challenge of configuring a system to dual-boot is that you have to partition your disk to allow space for all your operating systems before you install any of them. That’s the biggest hassle of the entire dual-boot process: Typically you won’t decide you want to dual-boot until you already have an OS installed and decide that you want to experiment with another.
This can go in either direction, of course. Perhaps you’re a PC person and have been happily living in Windows ME, but decide you want to explore the world of Linux. Or, you gave up on Microsoft and have a pure Linux system, but you suddenly realize that there are a few key applications (or games) that you can’t run without a native Windows OS.
Either way, you might be forced to back up your system, repartition your hard disk, then reinstall your basic OS. Then, finally, you can install additional operating systems, each in their own partition. A caveat is that Microsoft doesn’t really like this ″other OS″ stuff, so if you want to have a version of Windows, install that first. Otherwise, it’ll stomp on whatever multi-boot information you put in the disk master boot record.
![]()
There is a very cool alternative called VMware. Later in this hour we’ll talk about how virtual machines within an OS let you sidestep a lot of this hassle.
Task 11.1: Partitioning Disks for Dual Boot
Each combination of operating systems requires a different disk-partition structure, with Linux having the most complex. An ideal Linux configuration has three different partitions in use, whereas most other operating systems (that is, Windows) can work just fine with one big partition.
1. The first step to learning about your partition strategy is to find out the name of your boot disk device. This is most easily done with mount:
# mount | grep boot
/dev/sda1 on /boot type ext3 (rw)
#
To check your current partition strategy, use fdisk, giving it the top-level device name:
# fdisk /dev/sda
Command (m for help): p
Disk /dev/sda: 255 heads, 63 sectors, 522 cylinders
Units = cylinders of 16065 * 512 bytes

To add an additional operating system, we would need to have a configuration that included additional partitions—they’re all in use already in the above output, as you can see by comparing the disk statistics with the start and end values of the specific devices.
Given that we’ve consumed the entire disk with this set of partitions, the bad news is that we need to repartition the disk, destroying the /dev/sda2 partition, then reinstall Linux. Or we need to buy, format, and install a new disk.
2. The resultant partition table for a reorganized disk might look like this:
Disk /dev/sda: 255 heads, 63 sectors, 522 cylinders
Units = cylinders of 16065 * 512 bytes

There are other ways to partition your disk too, and many Linux experts recommend that you start with Windows, using the Windows installer to partition the disk into the four partitions needed.
If you’re going to dual-boot, it’s wise to read this section before you begin any installation on your disk. You could also opt for another solution that’s less destructive, such as VMware, covered later in this hour.
Dual-Boot Configurations with LILO
When you have more than one operating system installed on your system, you can select your favorite at boot-time by using either LILO or GRUB. LILO is the Linux Loader, and it’s surprisingly straightforward to configure.
Task 11.2: Configuring LILO
Though it has an important task in the boot sequence, LILO itself is a very simple program. The configuration file isn’t too complex, but there are some nuances that are critical to understand.
1. To start, here’s a lilo.conf file for a system that can dual-boot Red Hat Linux or Windows 2000. There are three possible boot options here: a regular RHL boot, a RHL boot into single-user mode (see Hour 13, ″Changing System State″), and a boot into Windows 2000 Professional, if the user feels the need to see how the other half lives!
# cat /etc/lilo.conf
boot=/dev/sda
default=RHL
prompt
timeout=300
image=/boot/vmlinuz-2.4.7-10
label=RHL
root=/dev/sda2
read-only
image=/boot/vmlinuz-2.4.7-10
label=″RHL-s″
root=/dev/sda2
append=-s
read-only
other=/dev/sda3
label=Windows2000
table=/dev/sda
The boot= line specifies where the master-boot record should be written, default specifies the default image (OS) to boot, and prompt forces LILO to give you a chance to enter your preferred OS at boot-time.
The timeout setting specifies how long before the system automatically picks the boot option specified, but it’s in tenths of a second, so timeout=300 is 30 seconds, not 5 minutes. It’s very important to keep this value large while you’re experimenting!
![]()
Once, a friend and I were experimenting with the settings in the lilo.conf file and accidentally set timeout=10 rather than timeout=100. It wouldn’t have been too bad except the default OS to boot into was Windows, so we couldn’t get to the Linux OS to fix the configuration file. It was quite comical to watch us try and type the appropriate entry to the LILO prompt at just the right moment!
For LILO-friendly operating systems (most Linux and PC-Unix systems), you can then specify the kernel file image name, the label for LILO to display at the prompt, and the root= line, indicating where the partition containing the kernel image is located.
You can see that we specify that the system should be mounted read-only, which might seem a bit weird, but we want to have the disk read-only so that fsck can check it without causing too much trouble (recall that running fsck on a mounted disk is very bad juju!). As the boot sequence proceeds, the disk is automatically unmounted and remounted as read-write.
The second boot option takes advantage of the append= option to force the kernel to boot with the -s flag, which forces single-user mode. You should rarely need something like this in day-to-day operation.
Finally, partition 3 of /dev/sda contains a separate Windows boot environment, so it’s denoted by specifying the partition of the disk upon which the OS is installed, here other=/dev/sda3, and then the disk that the OS itself is found as table=/dev/sda.
There are a few other options to the lilo.conf file, and because they change from version to version (albeit subtly), your best bet is to check the LILO man page for exact details on what your version supports.
2. After you have your configuration file written, you need to install or update LILO in the master-boot record (MBR). Before you do that, however, it’s critical to always test the configuration file first, by specifying -t:
# /sbin/lilo -t
Adding RHL *
Added RHL-s
Added Windows2000
After the configuration file can be read without any errors, really install it by omitting -t:
# /sbin/lilo
Added RHL *
Added RHL-s
Added Windows2000
Not very exciting output, but because it didn’t generate any errors, all is well.
![]()
Note that if you forget to test the configuration and a real install fails partway with an error, you must fix it and reinstall before you reboot! If you don’t, your MBR will be corrupt and you will not be able to boot properly.
3. Rebooting the system now produces the standard PC bootup output messages, then clears the screen and prompts:
LILO boot:
At this point, you can just wait—and after 30 seconds the default entry in the lilo.conf file will be booted (in this case, the one with the RHL label). If you’d rather see your options, type either ? or TAB and you’ll see all your choices:
LILO boot: ?
RHL RHL-s Windows2000
boot:
You can type the operating system you desire, or, again, you can just let the system timeout.
boot: RHL
the long, involved Unix boot sequence begins.
There are many fans of LILO in the Unix world, and for good reason. LILO has been reliably booting Unix and Linux systems for many years with few problems or hiccups. However, in the past few years GRUB has grown in popularity because of its flexibility and more attractive appearance. That’s why Red Hat Linux installs with GRUB as the default boot loader, not LILO.
![]()
In any case, a good rule of thumb before you try anything discussed in this hour is to ensure that you have a boot disk available for your OS, just in case. Oftentimes that can be the install CD-ROM, but most Unixes also let you create explicit boot disks. Check the Unix install documentation if you need help.
Dual-Boot Configurations with GRUB
GRUB is the GRand Unified Boot loader, originally written by Erich Boleyn in part to sidestep the oft-confusing LILO configuration files. The most popular thing about GRUB is that it’s a graphical, menu-based loader (though it does have a simple line-oriented command mode a la LILO).
Task 11.3: Configuring GRUB
Working with GRUB is a little bit easier than LILO, but you still need to be careful and keep in mind the core functionality of a boot loader. You shouldn’t have to change this configuration file too often, but if you do experiment, beware that you might cause lots of trouble, so always make sure you have a copy of the original GRUB configuration for your system as one of the boot-time options.
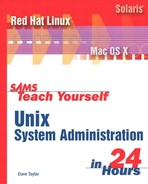
All the GRUB files, including the graphic used as the background image, live in /boot/grub.
1. Here’s what’s in /boot/grub:
Although you should never touch most of this material without protective clothing (just kidding, but you really do want to be an expert before you fiddle with this!), it’s worth highlighting both the GRUB configuration file, grub.conf, and the graphic used as the background image in menu mode, splash.xpm.gz.
![]()
Some versions of GRUB look for the configuration in menu.lst rather than grub.conf. Check the man page for the preferences in your own version of Unix, as needed. Notice in the example that menu.lst is a symbolic link to grub.conf.
If you want to have your own custom splash screen, use a program such as xfig to open splash.xpm.gz (after unzipping it, of course), then duplicate its size, depth (number of colors used) and image format. Then gzip the file and give it the same name, or update the splashimage value in the grub.conf file (see the following).
2. More likely, though, you’ll want to modify the configuration file, and here’s how it looks inside:
# cat grub.conf
# grub.conf generated by anaconda
#
# Note that you do not have to rerun grub after making changes to this file
# NOTICE: You have a /boot partition. This means that
# all kernel and initrd paths are relative to /boot/, eg.
# root (hd0,0)
# kernel /vmlinuz-version ro root=/dev/sda2
# initrd /initrd-version.img
# boot=/dev/sda
default=0
timeout=10
splashimage=(hd0,0)/grub/splash.xpm.gz
title Red Hat Linux (2.4.7-10)
root (hd0,0)
kernel /vmlinuz-2.4.7-10 ro root=/dev/sda2
initrd /initrd-2.4.7-10.img
title Windows 2000
root (hd0,3)
makeactive
chainloader +1
One important note about GRUB is its disk reference notation. The root reference to (hd0,0) means that it’s on hard disk 0, partition 0. If we wanted to boot off partition 3 of hard disk 1, it’d be (hd1,3).
The default parameter specifies which of the operating systems should be booted by default; zero indicates the very first of those listed (Red Hat Linux). The timeout variable specifies how long GRUB displays its menu before booting (in seconds, not the confusing tenths of a second used in LILO), and splashimage indicates the name of the background graphic to use.
Each bootable operating system is then specified with a title and a root partition indicator (again, it’s disk, partition). In the case of a Unix system, you specify the kernel information on the kernel line (note the ro indicating that the disk should be mounted read-only, just as was done in LILO).
The configuration of a non-Unix operating system (for example, Windows 2000) is rather different because there isn’t a kernel per se. Instead, GRUB uses a so-called chainloader, which tells GRUB to step aside and let the boot loader on the specified disk and partition take over.
2. You don’t have to do anything for a new configuration to be installed, but because you don’t want to run into errors in the configuration file format while you’re booting, it’s wise to install the new GRUB configuration explicitly, by running grub-install:
# /sbin/grub-install /dev/sda
Installation finished. No error reported.
This is the contents of the device map /boot/grub/device.map.
Check if this is correct or not. If any of the lines is incorrect,
fix it and re-run the script ′grub-install′.
(fd0) /dev/fd0
(hd0) /dev/sda
Unlike LILO, if the installer finds a problem with the configuration, it won’t leave the system in an unusable state, so you don’t have to be paranoid about running in test mode.
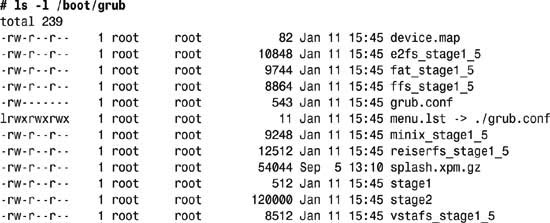
3. Now when you boot you’ll have the choice of the two operating systems, and you’ll have an attractive boot screen as well, shown in Figure 11.1.
Figure 11-1 GRUB boot screen with two operating systems.
Considerably more information can be obtained about GRUB by exploring the GRUB info pages. Type info grub and you can go from there.
Other Solutions for Other Unixes
Although dual-booting and having different operating systems all living in their own partitioned worlds is appealing to many, there’s another alternative if you’re willing to give up 10–30% of the performance of the secondary OS.
Both Windows and Mac OS support virtual machines, the former through some tricky simulation of the boot loader in a protected space, and the latter through an emulation of the Intel hardware architecture on the Apple platform.
It’s beyond the scope of this book to talk too much about these, but it’s worth a few quick screenshots to show you how to create a virtual Unix OS to use for experimentation and practice, without any worries about hurting a live production system.
Task 11.4: Learning About Virtual Machines
The most popular solution for running virtual machines on the Intel platform is VMware, from VMware Corporation (www.vmware.com). With this program installed, you can create virtual Unix-operating environments, and even have multiple Windows operating systems installed for testing. Performance is roughly 80’90% of what you’d have with a native load, so it’s not quite as fast. It’s worth noting that you can also install VMware on your Linux system, enabling you to run Windows within Linux.
On the Macintosh, Virtual PC from Connectix Corporation (www.connectix.com) offers a similar capability, albeit with a higher performance penalty because of the need to emulate the Intel hardware architecture (including CPU). On a very fast Mac OS X system Virtual PC runs like a slightly sluggish PC.
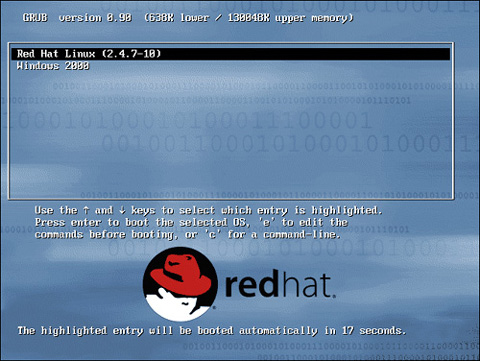
1. When you have VMware installed on your PC, you can install a couple of different operating systems and boot up the one of your choice by simply clicking on the appropriate icon. Figure 11.2 shows a Windows 2000 system running Red Hat Linux 7.2 within VMware.
Figure 11-2 VMware lets you run another OS within your OS.
You can also run the virtual machine in full-screen mode, eliminating all the Windows clutter (or, if you were running VMware within Linux, you could hide all the Linux material and just appear to be running Windows directly).
2. Virtual PC on the Macintosh is quite similar in functionality. Figure 11.3 shows a Macintosh screen with Virtual PC running Red Hat Linux 7.2 again. Although too small to see, Windows 98 SE and Windows 2000 are other available operating systems on this Macintosh setup.
Figure 11-3 Virtual PC lets you run multiple operating systems on Mac OS X.
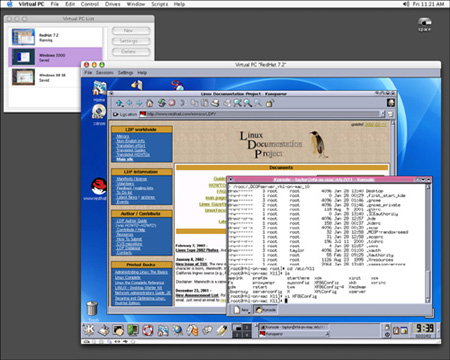
As with VMware, Virtual PC also lets you run a full-screen mode, which slightly improves performance and eliminates any distracting Macintosh visual clutter.
Software testers have been using products such as VMware for years to enable access to many different versions of Windows and Unix, and it’s a really great way to learn Unix system administration in a manner that’s considerably safer than working directly on a physical machine. Worst case, if you completely thrash things to where it won’t even boot, just delete the virtual-machine image and build a new one. Better, it allows easy cut-and-paste between the native operating system and the virtual or emulated one.
Summary
This hour has focused on multiple-OS boot configurations, starting with the specifics of partitioning hard disks with Unix tools, and then examining in depth the most popular boot loaders available, LILO and GRUB. Finally, we ended by discussing the different options available for running one operating system within the environment of another.
Q&A
Q Isn’t it dangerous to play with boot loader configurations?
A Oh yes. In fact, a stray character in a test lilo.conf file during the production of this chapter caused me no end of grief and at least eight lost hours. Again, be careful and methodical with these configuration files, and make sure you have a backup of the original set of boot parameters as one of the options. And always make sure you have boot disks, just in case….
Q Why dual-boot if VMware is so cool?
A VMware and other virtual machine systems offer a very nifty approach to running an OS within a safe environment, but it’s not a native install, and you certainly wouldn’t want to run a Web server from within a virtual machine. There are also some subtle nuances of network and peripheral interaction that don’t matter in the macro, but might become important if you’re administering a machine that people are using to develop device drivers or other low-level solutions.
Q Given that, how many operating systems do you have installed on your systems?
A I’ll simply say that on my Titanium Powerbook, I have it natively booting into Mac OS X, and then with Virtual PC I can switch into full-screen mode with Linux, Solaris, Windows 2000, and Windows 98. It’s sure to cause confusion when people look over my shoulder!
Workshop
Quiz
1. What does LILO stand for? GRUB?
2. The boot sequence is BIOS, PRAM, and what?
3. What is the greatest challenge facing system administrators who want to set up a system for dual-booting?
4. What do you need to watch out for with the timeout parameter in the lilo.conf file?
5. What critical design mistake in LILO did the GRUB developers fix, helping thousands of system administrators avoid a nightmare?
Answers
1. LILO is the Linux Loader, and GRUB is the GRand Unified Boot loader.
2. The BIOS gets the system started, then the PRAM is checked for the specific configuration details. One of the most important snippets of information therein is the boot disk, so the next step is switching control of the system to the code in the master boot record.
3. Having the disk properly partitioned for multiple operating systems before installing any of them.
4. That you’ve set it to a sufficiently large value: The timeout is calculated in tenths of a second, not seconds.
5. The GRUB developers fixed the program so that it won’t install a bad configuration, so testing the configuration is less critical. You should still proceed with caution nonetheless.
In the next hour, you’ll learn about disk quotas, both those that are built in to various Unix flavors, and those you can build yourself with some savvy shell scripts. More importantly, we’ll also look at the find command in detail and explore how it can help with many system administration tasks.