
HOUR 6 Account Management

The last hour explored the steps involved in adding a new user to a Unix system, whether through NetInfo or with additions to /etc/passwd and /etc/shadow. This hour will present the additional tools needed for complete account management, tools that will let you suspend user accounts and delete them.
Additionally, if you are running with shadow passwords, there are some interesting techniques you can use to enable password aging on your Unix system.
In this hour you will learn about
• Suspending user accounts
• Deleting user accounts
• Linux account management tools
• Solaris account management tools
• Password aging
Ways to Suspend User Accounts
There are three basic account management tasks that you’ll perform frequently: account creation, account suspension, and account deletion.
Creating new accounts can be done with the handy but rather long adduser script we’ve already built in the previous hour. Fortunately, suspending and deleting accounts are quite a bit easier.
Task 6.1: Suspending Users
Perhaps your company works with contractors who come and go as projects demand. Or perhaps your school likes to suspend student accounts during breaks to ensure that they really take time off and not get obsessed with modern technology. Then again, the police might have just served a subpoena and you are required to lock down an account to avoid anything changing. Whatever the reason, it’s helpful to know the super-simple trick for suspending user accounts—change the password.
![]()
To suspend a user account in case of an emergency, simply change the password!
A smart way to either suspend or remove an account starts by ensuring that the user isn’t actually logged in. If he is logged in, you’ll probably need to immediately kick him out. Change the user’s password first, though, or he’ll just log in again.
1. The first step on any suspension or deletion is to change the account password. That’s easily done with passwd. For ease of use, I always just enter my own account password: No one knows it, I’m very used to typing it in, and it’s just about impossible to guess or crack.
Then it’s time to check whether the user is logged in, and log him out if necessary. If he’s logged in, the process ID of his login shell must be obtained, and that can be done with the ps processor status command:
# ps -jU testdude
PID PGID SID TTY TIME CMD
11259 11259 11259 pts/1 00:00:00 bash
11380 11380 11259 pts/1 00:00:00 vi
You can see that testdude is running a vi session. Probably not good.
2. To log him out, you want to extract the session ID (or, in BSD terms, the parent process ID, or PPID) and use it as an argument to the kill command. If the script has been called with the account name as its argument ($1), then
if [ ″′who | grep $1′″ != ″″ ] ; then
sid=″′ps -jU $1 | awk ′{print $3}′ | tail -1′″
kill -HUP $sid
echo ″$1 was logged in. Just logged $1 out.″
fi
If you force the logout of a user while he’s logged in, be prepared for an emotional response! A better way to code this is to have the script warn him, then give him a few seconds to promptly exit his apps before being booted off.
To send a message to a user on the system, there’s a faster solution than sending e-mail that might be ignored: Write information directly to the user’s terminal device. Consider the second field in the output of the who command:
$ who
taylor pts/0 Jan 14 05:09 (dsl-132.dsldesigns.com)
testdude pts/1 Jan 14 05:11 (dsl-132.dsldesigns.com)
That’s the terminal device address if you preface it with /dev/ (so testdude is logged in to /dev/pts/1). Obtain that information and you can write a message to the user’s screen directly (then sleep $secs seconds):
tty=″′who | grep $1 | tail -1 | awk ′{print $2}′′″
cat << ″EOF″ > /dev/$tty
*************************************************************
URGENT NOTICE FROM THE ADMINISTRATOR:
This account is being suspended by the request of management.
You are going to be logged out in $secs seconds. Please
shut down any processes you have running immediately.
If you have any questions, please contact your supervisor or
Jane Mansmith, director of corporate computing.
*************************************************************
EOF
echo ″(Warned $1, now sleeping $secs seconds)″
sleep $secs
Another step I like to take when suspending accounts is to close off the user’s home directory. This is also easy:
chmod 000 $homedir/$1
3. In total, and with some useful comments added, the suspend script looks like this:
#!/bin/sh
## Suspend - suspend a user account for the indefinite future
secs=10 # seconds before user is logged out (if logged in)
homedir=″/home″ # home directory for all users
if [ ″$1″ = ″″ ] ; then
echo Usage: ′basename $0′ account
exit 0
fi
if [ ″′whoami′″ != ″root″ ] ; then
echo ′basename $0′: Error. You must be ′root′ to run this command.
exit 0
fi
passwd $1
# Now, let’s see if they’re logged in, and if so, boot ′em
if [ ″′who | grep $1′″ != ″″ ] ; then
tty=″′who | grep $1 | tail -1 | awk ′{print $2}′′″
cat << ″EOF″ > /dev/$tty
*************************************************************
URGENT NOTICE FROM THE ADMINISTRATOR:
This account is being suspended by the request of management.
You are going to be logged out in $secs seconds. Please shut down
any processes you have running immediately.
If you have any questions, please contact your supervisor or
Jane Mansmith, director of information technology.
*************************************************************
EOF
echo ″(Warned $1, now sleeping $secs seconds)″
sleep $secs
sid=″′ps -jU $1 | awk ′{print $3}′ | tail -1′″
kill -HUP $sid
echo ″$1 was logged in. Just logged $1 out.″
fi
# Finally, let’s close off their home directory from prying eyes:
chmod 000 $homedir/$1
echo ″Account $1 has been suspended.″
exit 0
4. When we’re ready to shut testdude out of his account, it’s now easy:
$ suspend testdude
Changing password for user testdude
New password:
Retype new password:
passwd: all authentication tokens updated successfully
(Warned testdude, now sleeping 10 seconds)
testdude was logged in. Just logged testdude out.
Account testdude has been suspended.
The user testdude would have seen the following pop up on his screen:
*************************************************************
URGENT NOTICE FROM THE ADMINISTRATOR:
This account is being suspended by the request of management.
You are going to be logged out in 10 seconds. Please shut down
any processes you have running immediately.
If you have any questions, please contact your supervisor or
Jane Mansmith, director of information technology.
*************************************************************
And, sure enough, ten seconds later testdude would be logged out and unable to log back in.
![]()
Compatibility-wise, the third field of the ps output on BSD systems is the parent process ID (PPID) rather than the session ID. The good news is that it’ll work just as well for this task, so the script works across platforms, with but one small change necessary: homedir must be defined as appropriate for each server.
4. To re-enable an account after you’ve suspended it is sufficiently straightforward enough that I’ll just show you the snippet of the shell script (unsuspend) that does the work:
passwd $1 # change their password back to a known value
chmod 750 $homedir/$1 # and open their home directory back up
There are other ways to suspend accounts on some Unix systems that are worth mentioning. If you’re running Linux, for example, there’s usermod, which lets root change the status of a user account. With the -L flag, it locks the account, disabling the password by prefacing the encrypted password string with a !, and with -U it removes that ! and enables the account again.
Solaris uses the passwd command to enable suspension: passwd -l acct will lock the specified account (specifying a new password with the standard passwd acct will unlock the account again).
On BSD systems, it’s a bit more tricky, because there isn’t a command as accessible as usermod by default. That’s why it’s easier just to change the user’s password to something else, as shown in the script.
Deleting User Accounts
Suspending accounts is helpful, but often you’ll need to completely remove the account from the system, including deleting all the files. Another relatively simple task, but if you want to do everything properly, you might find that there are more nuances than initially expected.
Task 6.2: Deleting User Accounts
The most important step in deleting a user account is to remove the entry from the /etc/passwd file. With that done, the user ceases to exist as far as the Unix system is concerned. However, the user still has files in the system, a home directory, and perhaps also e-mail coming into the system and more. But let’s take one step at a time.
1. It’s time to delete accounts once the word has come down that the person no longer needs, and will never again need, access to the system. This is most easily done by deleting the user’s entry from the /etc/passwd file (or the NetInfo database), then using the dangerous ′-rf′ flags to the rm command to force a recursive deletion of all files and folders within the user’s home directory.
Deleting a line from the password file is superficially easy within a script:
grep -vE ″^${1}:″ /etc/passwd > /tmp/newpasswd
mv /tmp/newpasswd /etc/passwd
chmod 655 /etc/passwd
![]()
The problem with this solution is that you need to prevent any other system administrator from touching or changing the /etc/passwd file while you’re doing this. In Unix terms, it’s called locking the file, and there’s no easy solution to this dilemma overall.
On some Unix systems—including RHL7.2—there’s a user-level command lockfile, but although it will help you ensure that two accounts aren’t deleted at the same time, it only works for scripts that you’ve written. The danger, however, is with all the other commands that might alter the file (including the passwd command on a non-shadow password system).
A better solution is to use vipw, a special file-locking version front end to vi that locks the password file, lets you edit it, then unlocks it when done. Fortunately, vipw is available on Red Hat Linux, Solaris, and Darwin.
2. The second step required is to remove the user’s home directory and all its contents within a script, assuming that $1 is the user’s account name:
rm -rf $homedir/$1
There’s a nuance to this, however, because the user might very well have files elsewhere on the system.
3. Finding these stray files is a job for the find command, which will search throughout the file system for any remaining files or directories that are owned by the user. For example:
$ find / -uid 501 -print
/var/spool/mail/mdella
In this case, you can see that though you’ve stripped all the files in the /home directory, there was still an e-mail mailbox lingering in the spool directory.
One ramification of adding this check for files outside the user’s home directory is that you need to grab the UID of the account before deleting it. This is done with the line
uid=″′egrep ″^${1}:″ /etc/passwd | cut -d: -f3′″
4. Here’s the full script with the exception of stripping the account information out of shadow files. Notice that the first step is to call the suspend script to ensure that the user can’t log in and is logged out if needed. No reason to duplicate that code here!
#!/bin/sh
## Delete - delete a user account without a trace…
homedir=″/home″
if [ ″$1″ = ″″ ] ; then
echo Usage: ′basename $0′ account; exit 0
fi
if [ ″′whoami′″ != ″root″ ] ; then
echo ′basename $0′: Error. You must be ′root′ to run this command.
exit 0
fi
suspend $1 # suspend their account while we do the dirty work
uid=″′egrep ″^${1}:″ /etc/passwd | cut -d: -f3′″
egrep -v ″^${1}:″ /etc/passwd > /tmp/newpasswd
mv /tmp/newpasswd /etc/passwd
chmod 655 /etc/passwd
rm -rf $homedir/$1
echo ″Files still left to remove (if any):″
find / -uid $uid -print
echo ″Account $1 (uid $uid) has been deleted, and their /home ″
echo ″directory has been removed.″
exit 0
5. Upon reflection, however, it seems smarter to move the user’s /home directory to a different, temporary staging area, just in case a request comes the next day for some of the files. To do this, replace the rm -rf call with
mv $homedir/$1 $holdingarea
The variable $holdingarea should be somewhere secure, with minimal access. A good location would be /home/root/pending_deletion or someplace similar.
6. The Darwin version of deleteuser is a bit different, because instead of extracting the line from the /etc/passwd file, you can use the much safer niutil command:
niutil -destroy . /users/$1
One significant advantage to the Darwin version is that there’s no worry about the potential danger from not using a file locking protocol—NetInfo itself automatically ensures that commands don’t step on each other.
![]()
It would be wise to include a test in the deleteuser script to flag and refuse to delete the root account. If you accidentally deleted that account, the results would be very bad. It’s recoverable (boot in single-user mode and fix the password file or NetInfo database), but very, very bad.
Deleting accounts proves to be more than just deleting a line from the /etc/passwd file. Indeed, there’s an additional step necessary for a deleted account that we won’t address until Hour 18, ″Running Your Own Name Server″—setting up an automatic e-mail response informing people that the user is no longer accessible through this system.
Rather than fall too far into the trap of the ″not invented here syndrome,″ however, let’s spend the rest of this hour looking at some of the platform-specific account management tools available in Linux, Solaris, and Darwin.
Linux Account Management Tools
Lurking under the hood of the simple passwd command in Linux (and Solaris, for that matter) is a powerful set of options that can significantly simplify your administrative tasks. They’re different on each platform, alas, but if you’re in a relatively homogeneous environment (or just managing a single Unix system), a thorough knowledge of these options will prove to be a great boon.
There are other administrative commands, too, so let’s examine them all while we’re here.
Task 6.3: Linux Admin Tools
Based on the material discussed last hour and earlier in this hour, you might think that there aren’t any tools available to help you administer user accounts in any of the flavors of Unix available. That would be wrong. As indicated earlier, the problem isn’t that there aren’t any tools, the problem is that there are too many different tools and nothing that exists—in the same form—across all the major platforms.
As a case in point, if you’re running on a Linux system, you can add users with the useradd command, a program that seems to offer much of the power of the shell script developer earlier. Indeed, here’s the synopsis of the command from the Linux man pages:
SYNOPSIS
useradd [-c comment] [-d home_dir]
[-e expire_date] [-f inactive_time]
[-g initial_group] [-G group[,…]]
[-m [-k skeleton_dir] | -M] [-p passwd]
[-s shell] [-u uid [ -o]] [-n] [-r] login
That’s all well and good, but without being able to see what’s going on inside, it’s impossible to know what’s really happening. How does the program pick the UID, and will it work if you have a password file where entries aren’t in ascending numeric order? Nonetheless, there are built-in commands that are worth exploring if you only have to worry about Linux boxes, or if you have the luxury of being able to learn the nuances of each Unix flavor you manage.
The most useful of the built-in account management commands is passwd. Let’s have a look.
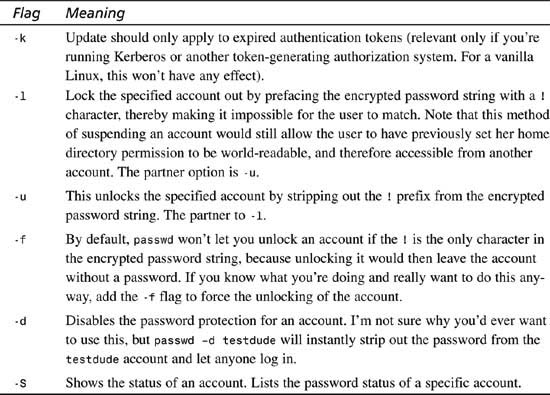
1. The first stop is always the man page, where it’ll no doubt surprise you to learn how many options there are. The command synopsis is
passwd [-k] [-l] [-u [-f]] [-d] [-S] [username]
The meanings of these flags are summarized in Table 6.1.
Table 6.1 Command Flags for Linux passwd
Many of these options are very helpful shortcuts, particularly if you haven’t already typed in the suspend script discussed earlier in this hour.
The -S summary is interesting:
# passwd -S taylor
Changing password for user taylor
Password set, MD5 encryption
The output is a bit awkward, however, because the Changing password line shouldn’t be output. No worries; we’re in Unix, so you can modify the output! Let’s wrap this command in a loop and see the status of some the accounts on the system.
# for name in ′cut -d: -f1 /etc/passwd′
> do
> echo Status of account $name is ′passwd -S $name|tail -1′
> done
Status of account root is Password set, MD5 encryption
Status of account bin is No Password set.
Status of account daemon is No Password set.
Status of account adm is No Password set.
Status of account lp is No Password set.
Status of account sync is No Password set.
… lots of output removed …
Status of account apache is Locked password.
Status of account squid is Locked password.
Status of account named is Locked password.
Status of account pcap is Locked password.
Status of account mthorne is Locked password.
Status of account mdella is Password set, MD5 encryption
Status of account taylor is Password set, MD5 encryption
Status of account taylorsu is Password set, MD5 encryption
Status of account testdude is Empty password.
Lots of output, but the important thing is to be aware of any account that’s similar to operator or ftp where the status is No Password set. In fact, screening all the Locked password lines (which should be the state of all admin daemons) will make this output considerably clearer:
![]()
Notice that when you type in a multiline command, the shell automatically recognizes the continuation and prompts you for subsequent lines with the > prompt. Very helpful!
# for name in ′cut -d: -f1 /etc/passwd′
> do
> echo Status of account $name is ′passwd -S $name|tail -1′ | grep -v Locked
> done
Status of account root is Password set, MD5 encryption
Status of account bin is No Password set.
Status of account daemon is No Password set.
Status of account adm is No Password set.
Status of account lp is No Password set.
Status of account sync is No Password set.
Status of account shutdown is No Password set.
Status of account halt is No Password set.
Status of account mail is No Password set.
Status of account news is No Password set.
Status of account uucp is No Password set.
Status of account operator is No Password set.
Status of account games is No Password set.
Status of account gopher is No Password set.
Status of account ftp is No Password set.
Status of account nobody is No Password set.
Status of account mdella is Password set, MD5 encryption
Status of account taylor is Password set, MD5 encryption
Status of account taylorsu is Password set, MD5 encryption
Status of account testdude is Empty password.
This is another output that would be very useful to monitor! In particular, notice that some accounts have no password set, and the testdude account has an empty password string (functionally the same as having no password set).
![]()
Any account that doesn’t have a password set is a security hole. If someone can get to you via telnet, for example, she could log in using any of the accounts that don’t have a password. Fortunately most of them have /bin/nologin as their shell, but it’s worth checking that very closely. And, needless to say, testdude needs to have a password!
2. The testdude account is the most glaring security problem here, so let’s lock the account:
# passwd –l testdude
Changing password for user testdude
Locking password for user testdude
passwd: Success
# passwd -S testdude
Changing password for user testdude
Locked password.
Much better. When you try to unlock it, notice what happens:
# passwd -u testdude
Changing password for user testdude
Unlocking password for user testdude
Warning: unlocked password for testdude is the empty string.
Use the -f flag to force the creation of a passwordless account.
passwd: Unsafe operation
A very helpful warning and something that would cause a savvy sysadmin to sit up and take notice!
3. Before we leave this, let’s create a quick script that checks to ensure that any account that’s flagged as No Password set has a shell that prevents interactive use:
#!/bin/sh
# CHECKPW - Check the status of all accounts on the system, checking
# to ensure that any account without a password has a shell that
# prevents interactive use. Any others will be flagged in output.
# This only runs on Linux systems with the ′-S′ flag to ′passwd′
temp=″/tmp/tocheck.$$″
trap ″/bin/rm -f $temp″ 0 # remove the file upon exit
for name in ′cut -d: -f1 /etc/passwd′
do
echo ″$name″ ′passwd -S $name|tail -1′ |
egrep -v ″(Locked|encryption)″ | awk ′{print $1}′ >> $temp
done
for account in ′cat $temp′
do
shell=″′egrep ″^${account}:″ /etc/passwd | cut -d: -f7′″
if [ ″$shell″ != ″/sbin/nologin″ ] ; then
echo ″*** WARNING: Account $account has no password and login shell $shell″
fi
done
exit 0
Nothing too fancy in this script, but notice that we’ve had to resort to a temporary file for intermediate output. The results are quite helpful and could easily become part of a daily system status report:
# checkpw.sh
*** WARNING: Account sync has no password and login shell /bin/sync
*** WARNING: Account shutdown has no password and login shell
/sbin/shutdown
*** WARNING: Account halt has no password and login shell /sbin/halt
*** WARNING: Account news has no password and login shell
*** WARNING: Account testdude has no password and login shell /bin/bash
The shells sync, shutdown, and halt are indicative of shortcuts available at the login prompt. Type in shutdown as the account name and—remember that there’s no password—the system will probably be shut down. You might want to disable those accounts if you don’t think you’ll ever need them.
![]()
In more than 20 years of working with Unix systems, most of which had these three administrative logins, I’ve never used them in this manner. I always shut these accounts off when I install a new system.
When there’s no shell listed, that means that the system will default (usually) to /bin/sh as the shell, so news is just as much a security risk as testdude. Both need to be closed, and
passwd –l testdude
does the trick for testdude, but locking the other accounts requires that an initial password be set. That can be done with passwd news . Then use the passwd –l news to lock it.
3. The final command worth viewing is the userdel command, the built-in Linux command to delete users. Scan the man page and you’ll see that it’s straightforward and useable, though it doesn’t log the user out if she’s logged in (instead, the command fails), and it leaves you, the system administrator, on your own trying to figure out how to identify what other files the user might have.
# man userdel
USERDEL(8)
USERDEL(8)
NAME
userdel - Delete a user account and related files
SYNOPSIS
userdel [-r] login
DESCRIPTION
The userdel command modifies the system account files,
deleting all entries that refer to login. The named user
must exist.
-r Files in the user’s home directory will be removed
along with the home directory itself and the user’s
mail spool. Files located in other file systems
will have to be searched for and deleted manually.
FILES
/etc/passwd - user account information
/etc/shadow - secure user account information
/etc/group - group information
A reasonable solution to the problem, but if you looked for an equivalent command in the Darwin/BSD world, you’d be stymied—there is no equivalent command in Darwin. Hence the script that we created earlier in this hour.
There are a lot of smart people who have contributed to the evolution and growth of Unix over its 25+ year life. Many of them have been system administrators who have sought to simplify their lives through the development of sophisticated tools. Unfortunately, because of the erratic and chaotic development of the many different flavors of Unix, no account administration tools have ended up as standard and common across all systems.
Indeed, the greatest challenge as a Unix system administrator isn’t how to accomplish sysadmin tasks on a particular system, but rather how to do those tasks on any system that you’re responsible for maintaining. It’s the bane of all admin people, but an unpleasant fact of life: Installations are much more likely to be heterogeneous than homogeneous. That is, you’re more likely to find that your data center has a legacy IBM AIX system, three Solaris servers, a dozen Linux servers, all but one of which is running Red Hat Linux, and a separate Darwin-based file and print server that doubles as the workstation for the department secretary. In that sort of environment, knowing that userdel is available on Red Hat Linux 7.2 isn’t going to make your life that much easier, alas.
Indeed, there’s no section in this hour entitled ″The Darwin Account Management Tools″ because, frankly, there are none, other than the rather primitive niutils or graphical NetInfo application.
Solaris Account Management Tools
Solaris is quite similar to Linux, fortunately. Well, let me rephrase this to better reflect the evolution of Unix: Linux has been inspired by many of the Solaris utilities. This means that the passwd command in Solaris includes a summary option and the capability to lock accounts, and that most of the scripts presented in the Linux section will work for Solaris.
However, it’s not exactly the same, and that’s a bit of a problem. For example, in Linux passwd -S taylor would show a summary of the password status for account taylor, but Solaris doesn’t know the -S flag and instead uses -s for this function. And did I mention the output is different?
Task 6.4: Solaris Account Administration Tools
The differences between Solaris and Linux are more subtle nuances than dramatic variations with command-line account administration tools. It’s no surprise, then, that the scripts already discussed just need minor tweaks to work within the Solaris world.
1. Adding a user can be done with the useradd command, though the syntax is a little different than the Linux command of the same name:
# man useradd | head -18
Maintenance Commands useradd(1M)
NAME
useradd - administer a new user login on the system
SYNOPSIS
useradd [ -c comment ] [ -d dir ] [ -e expire ] [
-f inactive ] [ -g group ] [ -G group [ , group … ]
] [ -m [ -k skel_dir ] ] [ -u uid [ -o ] ] [
-s shell ] [ -A authorization [ ,authorization… ] ] [
-P profile [ ,profile… ] ] [ -R role [ ,role… ] ]
login
useradd -D [ -b base_dir ] [ -e expire ] [ -f inactive ]
[ -g group ]
Sharp eyes will notice the addition of the -A, -P, and -R flags for authorizations, profiles, and roles, respectively. We don’t have space to get into the Solaris security model, but if you’re running a Solaris system, you’ll find time spent reading the auth_attr(4), exec_attr(4), and user_attr(4) man pages very worthwhile.
![]()
Standard Unix nomenclature with man page entries is to specify the command followed by the section in the man page database where that command can be found. So auth_attr(4) indicates that it’s the auth_attr man page in section four (file formats). You would read this page with man 4 auth_attr at your command line.
2. The real difference in Solaris appears when you look at the passwd man page:
# man passwd
User Commands passwd(1)
NAME
passwd - change login password and password attributes
SYNOPSIS
passwd [ -r files | -r ldap | -r nis | -r nisplus ] [
name ]
passwd [ -r files ] [ -egh ] [ name ]
passwd [ -r files ] -s [ -a ]
passwd [ -r files ] -s [ name ]
passwd [ -r files ] [ -d | -l ] [ -f ] [ -n min ] [
-w warn ] [ -x max ] name
passwd -r ldap [ -egh ] [ name ]
passwd -r nis [ -egh ] [ name ]
passwd -r nisplus [ -egh ] [ -D domainname ] [ name ]
passwd -r nisplus [ -D domainname ] -s [ name ]
passwd -r nisplus [ -l ] [ -f ] [ -n min ] [ -w warn ]
[ -x max ] [ -D domainname ] name
There are a bewildering number of different possible ways to work with the passwd command in Solaris, but if you’re not running LDAP (Lightweight Directory Access Protocol), NIS (Network Information Service) or NIS+ (an improved NIS architecture), you can thankfully ignore them.
To clarify the differences, here’s my own synopsis of the Solaris passwd command, minus all the confusing NIS stuff:
passwd [ -s ] [ -d | -l ] [ -f ] [ -n min ]
[ -w warn ] [ -x max ] name
Quite similar to Linux, but with two notable differences: The -S summary flag is now -s, and although there’s a -l for locking accounts, notice that there isn’t a -u to unlock them.
Indeed, to lock an account in Solaris, you can use the familiar passwd -l account, but to unlock an account there’s no -u flag that resets the password to its original state (as there is in Linux). Instead, to unlock an account, simply set the password to a known value with passwd account.
3. The output of the -s summarize command is a bit more succinct:
# passwd -s taylor
taylor PS
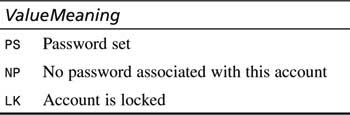
Checking the man page for passwd reveals that there are three possible values for this flag, as summarized in Table 6.2.
Table 6.2 Output States for the passwd Account Summary in Solaris
Armed with this, let’s use the -a (show all entries) flag in combination with the -s flag to analyze the different accounts on the Solaris system. First, here’s the passwd -sa command in action:
# passwd -sa
root PS
daemon LK
bin LK
sys LK
adm LK
lp LK
uucp LK
nuucp LK
listen LK
nobody LK
noaccess LK
nobody4 LK
taylor PS
testtdude LK
testdude NP
Notice that these are shown in the order that they’re listed in the /etc/passwd file.
Screening out the locked accounts is simple:
# passwd -sa | grep -v LK
root PS
taylor PS
testdude NP
It’s not particularly easy to read when compared to the Linux output, but you could fix that if you want to, of course.
5. Another nifty utility in Solaris is the terrific pwck command, which performs a variety of consistency checks against the information in the /etc/passwd file. It will catch a nonexistent home directory, but it doesn’t check to see if no-password accounts have login shells, so you’ll still have to do that by hand.
# pwck
testtdude:x:101:1::/home/testtdude:/bin/sh
Logname too long/short
Login directory not found
testdude:x:102:1::/home/testdude:/bin/sh
Login directory not found
To accomplish the task, you can substantially simplify the shell script that performed the checking in Linux, checkpw.
# cat checkpw.sh
#!/bin/sh
# CHECKPW - Check the status of all accounts on the system, checking
# to ensure that any account without a password has a shell that
# prevents interactive use. Any others will be flagged in output.
# This only runs on Solaris systems with the ′-sa′ flags to ′passwd′
for account in ′passwd -sa | grep NP | awk ′{print $1}′′
do
shell=″′egrep ″^${account}:″ /etc/passwd | cut -d: -f7′″
if [ ″$shell″ != ″/sbin/nologin″ ] ; then
echo ″*** WARNING: Account $account has no password and login shell $shell″
fi
done
exit 0
When it’s run, the results are what you would hope:
# checkpw.sh
*** WARNING: Account testdude has no password and login shell /bin/sh
5. Let’s lock testdude out with the passwd -l option:
# passwd –l testdude
# passwd -s testdude
testdude LK
No feedback was given on the first command, but the -s summarizes the new state as LK (locked), which is correct. To unlock the account again, use passwd testdude, then enter an appropriate new password value.
6. One more quick examination of the userdel command for comparison’s sake proves that it’s 100% identical to the Linux version shown earlier. Hurray!
# man userdel
Maintenance Commands userdel(1M)
NAME
userdel - delete a user’s login from the system
SYNOPSIS
userdel [ -r ] login
DESCRIPTION
The userdel utility deletes a user account from the system
and makes the appropriate account-related changes to the
system file and file system.
OPTIONS
The following options are supported:
-r Remove the user’s home directory from the system. This
directory must exist. The files and directories under
the home directory will no longer be accessible fol-
lowing successful execution of the command.
Again, notice that although it can remove the user’s home directory, it does not explore the rest of the file system to identify what additional files might be owned by the user.
Solaris has traveled a very different path of development. Growing originally from the Stanford University Network (that’s where ″Sun″ comes from), where Scott McNealy had the savvy to take the idea of a networked workstation and build a company around it, Solaris (originally SunOS) started out much more like BSD Unix—their head scientist is Bill Joy of UC Berkeley, after all—but ironically is much more like Linux now.
Being yet another flavor of Unix, however, it has differences that mean it’s yet another variant, and although a command might work perfectly well on Linux, it doesn’t in fact work on Solaris, too. It’s the never-ending challenge of modern Unix systems, and should probably be our mantra for this book.
Password Aging
One more topic before we wrap up this hour, okay? Last hour, we peeked into the /etc/shadow file and found out that there were a bunch of new and intriguing field values associated with a user account. To wit (from the shadow(5) man page):
DESCRIPTION
shadow contains the encrypted password information for
user’s accounts and optional the password aging informa?
tion. Included is
Login nam
Encrypted password
Days since Jan 1, 1970 that password was last changed
Days before password may be changed
Days after which password must be changed
Days before password is to expire that user is warned
Days after password expires that account is disabled
Days since Jan 1, 1970 that account is disabled
A reserved field
The capability that the shadow password system enables that we’re interested in is called password aging. It’s a way to force users to change their password on a given schedule, and to automatically enforce a policy of disabling accounts after a certain period during which users don’t log in.
Task 6.5: Tools for Managing Password Aging
The mechanism for specifying a password aging policy varies by operating system, but that’s probably no surprise! Solaris neatly tucks the options into the passwd command, while Linux uses the command chage. There’s no equivalent mechanism in Mac OS X/Darwin, nor does Darwin support the shadow password file mechanism.
1. Let’s start with chage, because it makes the various possible settings quite obvious:
# man chage | head -12
CHAGE(1) CHAGE(1)
NAME
chage - change user password expiry information
SYNOPSIS
chage [-m mindays] [-M maxdays] [-d lastday] [-I inactive]
[-E expiredate] [-W warndays] user
chage -l user
The -l flag is a good place to start, as it generates a report of password aging information for the specified account and can be used by anyone:
$ chage -l taylor
Minimum: 0
Maximum: 99999
Warning: 7
Inactive: -1
Last Change: Jan 14, 2002
Password Expires: Never
Password Inactive: Never
Account Expires: Never
As you can see, taylor is in luck; the password never expires, and the account never expires, either. The first four fields deserve an explanation, however.
The Minimum and Maximum fields are the minimum and maximum number of days between password changes—quite literally. If the minimum was two days and user taylor changed his password early one morning, he couldn’t change it again until the minimum number of days value had elapsed.
The Warning field indicates the number of days before the password expires that the user will be warned during the login process, and, finally, the Inactive field indicates how many days after a password expires that the account will automatically be locked (similar to passwd -l).
2. Remember our friend testdude? It’s time to make some changes to his account to match the account password policy implemented at our site.
The first update is that passwords must be changed every 30 days, and that if the user doesn’t log in within 14 days of the expiration date of their password, the account should be automatically locked out. The testdude account should have a two-day warning before being forced to change the password upon login, and it’s also due to expire on August 3, 2003, so that’ll be specified too.
# chage -M 30 -W 2 -I 14 -E 2003-08-03 testdude
If all is well, there’s no output, in a typical Unix manner. To verify that it worked:
# chage -l testdude
Minimum: 0
Maximum: 30
Warning: 2
Inactive: 14
Last Change: Jan 12, 2002
Password Expires: Feb 11, 2002
Password Inactive: Feb 25, 2002
Account Expires: Aug 03, 2003
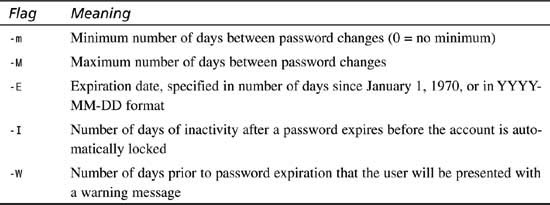
Perfect, and quite simple, once you learn the magic incantation’or refer to Table 6.3 for details of all the flags to chage.
Table 6.3 Command Flags to Linux’s chage Command
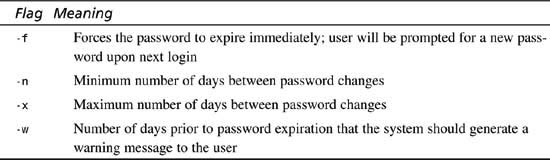
3. By contrast, Solaris slips these flags into the passwd command, as highlighted in Table 6.4.
Table 6.4 Password Aging Flags in Solaris passwd Command
As you can see, to set a specific account expiration date, you need to use the Solaris usermod command, with a -e flag. To accomplish the same task as shown in Linux with the chage command, therefore, requires two steps:
# passwd -x 30 -w 2 testdude
# usermod -e 08/03/2003 testdude
Notice that there’s no way to automatically lock accounts after a certain number of days of inactivity (the -I flag in the Linux chage command).
Checking the settings is yet another Solaris command: logins. There are lots of flags to this useful utility (see the man page for details), but to see the settings for a specific account, use the -x extended output flag:
# logins -xl testdude
testdude 102 other 1
/home/testdude
/bin/sh
NP 011802 0 30 2
The output is a bit cryptic, but remember that NP means ″no password,″ and much of the rest of the information can be inferred by peeking at the /etc/passwd entry:
# grep testdude /etc/passwd
testdude:x:102:1::/home/testdude:/bin/sh
The output of logins shows us that account testdude has UID 102, and a default group of other, which has a GID of 1. The home directory is /home/testdude, the login shell is /bin/sh, and the password expiration information is, in order: date the password last changed, number of days required between changes, number of days allowed before a change is required, and the pre-expiration warning value.
Do you see what’s missing? There’s no clue that the account itself is scheduled to automatically turn off in August of 2003.
Linux offers a succinct and sophisticated password aging capability through its chage command. Solaris offers a similar capability, but the interface is considerably more awkward, split across three different commands. And Darwin—well, as of yet, Darwin doesn’t support password aging.
Regardless of whether it’s easy or difficult, however, the password aging capability is a very good addition to your Unix sysadmin toolkit if it’s available on the systems you administer.
Summary
This hour has explored many facets of account management, with a focus on working with recalcitrant users and shutting them down as needed. It also highlights how much difference there can be between different flavors of Unix. Just because they all have the same OS name doesn’t mean that they’re identical!
Q&A
Q Why is it so important to make sure that someone isn’t logged in if you’re going to disable their account?
A Oftentimes you’ll find that you need to suspend an account because of inappropriate activity by the user, or because the user’s been furloughed temporarily. In those situations, it’s best to avoid any potential copying of confidential files, attempts to sabotage the system, or what have you by simply giving the user the boot.
Q The whole idea of file locking seems pretty critical to the design of a multiuser operating system. Is it?
A Absolutely, and even with file locking, it’s still not uncommon for multiple admins to override each others′ changes (what I’d call ″stepping on each other″). The best policy is to have one person who is empowered to make changes to critical files, then let everyone else feed change requests to them.
Workshop
Quiz
1. What’s the super-fast less-than-a-minute technique for suspending a user account?
2. The passwd command on most Unix systems has heuristics (a fancy word for rules) defining what is an acceptable password. Find out what the rules are on your main system.
3. The built-in usermod -L mechanism for locking accounts consists of simply sticking an ! in front of the encrypted password string. Will that work for any system? Try it.
4. Why might you use passwd -d on a Linux or Solaris system?
Answers
1. Suspending a user account can be done very quickly by changing the password as root.
2. The easiest way to find out what rules the passwd command uses is to check the passwd man page. Here’s the relevant excerpt from the Solaris man page:
Passwords must be constructed to meet the following require-
ments:
o Each password must have PASSLENGTH characters, where
PASSLENGTH is defined in /etc/default/passwd and is
set to 6. Only the first eight characters are signifi-
cant.
o Each password must contain at least two alphabetic
characters and at least one numeric or special charac-
ter. In this case, ″alphabetic″ refers to all upper or
lower case letters.
o Each password must differ from the user’s login name
and any reverse or circular shift of that login name.
For comparison purposes, an upper case letter and its
corresponding lower case letter are equivalent.
o New passwords must differ from the old by at least
three characters. For comparison purposes, an upper
case letter and its corresponding lower case letter
are equivalent.
3. Prefacing an encrypted password string with a new character will definitely make the password unmatchable, effectively turning the account off. It’s another trick you can use if there’s no locking mechanism available.
4. If you set up an account with a shell of, say, lpq or something similar, you might make it general access by informing users that they can log in to the lpq account from any login prompt to see the state of the printer queue.
In the next hour, we’ll have a close look at backup and archiving tools with Unix, focusing specifically on gzip and tar, two tools that every Unix system administrator should know like the proverbial back of the hand. We’ll also compare compression packages to see which does the best job of saving disk space and making transfers more speedy.