
Creating a Finance Cube
A finance department often deals in terms of financial reporting—profit and loss statements, balance sheets, and so forth. Creating an OLAP cube for use in financial analysis is tricky because of the way account values aggregate: sometimes accounts sum to a parent, sometimes an account is subtracted from its parent, and sometimes an account does not aggregate into the parent value at all. Consider, for example, a profit and loss report.

The components of Net Profit are Gross Profit and Expenses. Both are positive numbers. But, to calculate Net Profit Total, you must subtract the Expenses Total value from the Gross Profit Total value. Likewise, to calculate Gross Profit Total, you must subtract the Cost Of Goods value from the Revenue value. Often, a Labor section of the report contains a line for Head Count, but the values from the Head Count line are for information only; they should not be added into the Labor Total value. In this section, you’ll learn how to create a simple finance cube.
Create an Initial Finance Cube
The process for creating the initial finance cube is similar to the process you used to create a Sales cube in earlier chapters; it doesn’t require much elaboration.
1. | In the Chapter 4 database, right-click the Cubes folder, point to New Cube, and click Wizard. |
2. | Click Next to skip the welcome screen. Select FinanceFact as the fact table, and click the Browse Data button. The FinanceFact table has two columns containing dimension keys and one column containing measure values. The Month_ID column is suitable for use with the Time dimensions you created in “Working with Time Dimensions” in Chapter 3, “Dimension and Cube Editors.” The Account_ID column will require a new dimension. You can create the Account dimension as a private dimension, since no other cubes in the database will need to use it. The values in the Amount column are all positive values, regardless of whether they will be added or subtracted within the report.
|
3. | Close the Browse Data window, and click Next. Double-click Amount as the measure column, and click Next. |
4. | Double-click the Time.Calendar shared dimension to include it in the new cube. Then click the New Dimension button. |
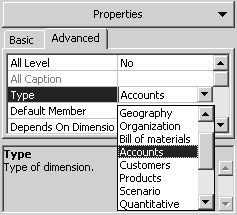
5. | Select parent-child as the dimension type, and click Next. Select Account as the dimension table, and click Next. Select Account_ID as the member key, Parent_ID as the parent key, and Account as the member name. Then click Next twice. |
6. | Type Account as the name of the dimension, clear the check box that creates a shared dimension, and click Finish to close the Dimension Wizard. |
7. | Back in the Cube Wizard, click Next. Click Yes when warned about counting fact table rows, type Finance as the name of the cube, and click Finish. |
8. | Click the Process Cube button, decline the offer to design storage, and accept the default processing method. Close the Process log window, click the Data tab, and expand all the levels of the Account dimension. 
|

The initial cube layout looks roughly like a profit and loss report, but the numbers in the Amount column are all wrong—they’re added when they should be subtracted—and the order of the accounts seems a little nonstandard.
Refine the Formatting of an Account Dimension
For a moment, ignore the values in the Amount column and look only at the Account member labels. The All Account member is redundant with the Net Profit member, and Gross Profit should appear before Expenses in the report. You can refine the formatting of the dimension while reviewing skills you learned in Chapter 3.

The dimension members are now in the proper order. Even with sample data displayed, you can see that the values are not summarized properly because Expenses are added to Gross Profit rather than subtracted.
Use Custom Rollup Operators
To properly aggregate the values along the Account dimension, each member of the dimension needs its own aggregation rule. The rule for Benefits should be “add me to my parent.” The rule for Expenses Total should be “subtract me from my parent.” The rule for Head Count should be “don’t aggregate me at all.” With a parent-child dimension, you can include a column in the dimension table that specifies a unique rule for each member.
The aggregation rule consists of a single-character code. The codes are simply the arithmetic operators: plus (+) for addition, minus (-) for subtraction, asterisk (*) for multiplication, and slash (/) for division. In addition, a tilde (~) is used to prevent the member from aggregating at all. These codes are called unary operators because each value gets its own operator.
|
The word unary is related to the word unit and means “one.” |
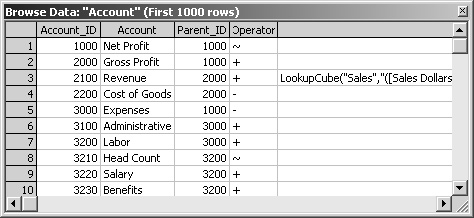
1. | Click the Schema tab to see the dimension tables. Then right-click the heading of the Account table, and click Browse Data.
|
2. | Close the Browse Data window. |
3. | In the cube tree, select the Account Id level, and scroll to the bottom of the Advanced tab of the Properties pane. Select the Unary Operators property, and click the ellipsis button. |
4. | |
5. | Click the Process Cube button, accept the offer to save the cube, decline the offer to design storage, accept the default processing method, and close the Process log window. Click the Data tab to browse the cube. 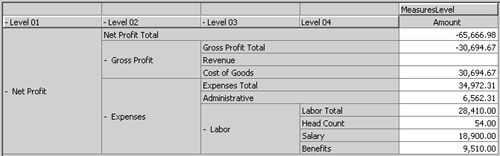
|

The operators appear to work correctly. The Head Count value is not included in Labor Total, and the Cost Of Goods and Expenses Total values are appropriately subtracted from the parent total. The only problem is that the Revenue line is empty, so the net profit picture appears bleaker than is probably true.
Use a Custom Member Formula
The FinanceFact table does not include Revenue values. That’s because Revenue values already exist in the Sales cube. You can’t use a rollup operator to retrieve the Revenue value because a rollup operator tells how to aggregate the value of a member up to its parent but doesn’t tell how to get a value for the member if it’s not in the fact table.
A single member of a dimension (in this case, Revenue) needs special handling. All the other leaf-level members have values in the fact table. As with a rollup operator, however, you need a special rule for obtaining the value for just one member. Again, as with a rollup operator, the solution is to store the rule in the dimension table. This time, the rule must be stored as a multidimensional expressions (MDX) expression. The expression must retrieve a different Revenue value for each member of the Time.Calendar dimension. In Chapter 6, “MDX Values,” you’ll learn how to make an MDX expression vary with the current member of a dimension. For now, the formula is already stored in the Account dimension table, and you can learn how to apply the rule within a cube.
1. | Click the Schema tab to display the dimension tables. Right-click the Account table, and click Browse Data.
| |
2. | Close the Browse Data window. | |
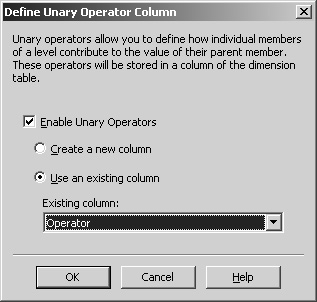
3. | In the cube tree, select the Account Id level. On the Advanced tab of the Properties pane, select the Custom Members property and click the ellipsis button. | |
4. | Select the Enable Custom Members check box, click the Use An Existing Column option, and select Formula from the Existing Column dropdown list. Then click OK.
| |
5. | Click the Process Cube button, accept the offer to save the cube and continue, close the Process log window, decline the offer to design storage, click the Full Process option, click OK, and close the Process log window. | |
6. |


The Revenue value is in place, and all the financial values calculate correctly. A financial style cube requires sophisticated rules, and a parent-child dimension allows you to create and apply those rules.