

IBM Advanced Job Scheduler for i enhancements
This chapter describes the new functions available in IBM i 7.1 that are related to job scheduling, through the 5770-JS1 IBM Advanced Job Scheduler for i licensed program.
This chapter describes the following topics:
12.1 Advanced Job Scheduler capabilities
The IBM Advanced Job Scheduler for i (AJS) can be used to schedule complex batch job flow, distribute spooled files as an email attachment, and send job status notifications. Jobs can run based on a schedule or an event. Jobs can run on local or remote IBM i systems and commands can be processed on non- IBM i platforms.
12.1.1 Scheduling a job
Jobs can be scheduled with a simple schedule (such as every week Monday through Friday) or more complex schedules (such as the seventh working day every month). If the standard scheduling conventions within the AJS are not enough, you can create a scheduling calendar that contains all the dates that a job is to run. Holiday calendars can be used for holidays or exceptions to the normal scheduling. These dates are the dates that you do not want a job to run. These calendars can be used in multiple jobs.
12.1.2 Job groups
Job groups are made up of AJS jobs that are grouped to run consecutively in the order that is specified in the group sequence field. This dependency is one form of dependency in the AJS. A normal completion is required before the next job in the group is submitted.
12.1.3 Notification and report distribution
You can use the notification feature in the AJS to notify people of the status of jobs by email. Important messages can be sent with an escalation list attached that specifies the length of time that passes before the next person in the list is notified. Escalation continues until someone stops escalation. You can use notification, which is coupled with report distribution, to distribute spooled files to one or more email addresses or to one or more output queues automatically.
12.1.4 Remote command jobs
Commands can run on non- IBM i platforms such as PCs. They can be processed on a single system or a group of systems. The Run Remote (RUNRMTCMD) command is used to run the commands on the remote systems. You can run RUNRMTCMD to run a command on a remote system that is running the target portion of this function. The target portion of this function can be a Remote Executing Daemon (REXECD). Use the incoming remote command (IRC) service of the IBM i Access for Windows on the remote systems to process the commands.
12.1.5 Multiple scheduling environments
The AJS manages multiple scheduling environments. A scheduling environment is all the objects in the QUSRIJS data library that is duplicated into another library. QUSRIJS is the main data library that is created during the installation of AJS. It contains the physical files that store all the information about the scheduled jobs. Each scheduling environment is its own entity and can be accessed and managed by using the AJS interfaces. When you define a scheduling environment within the AJS, a monitor switch is available to designate whether the scheduling environment can be active. A scheduling environment must be active to submit jobs automatically.
12.2 IBM Navigator for i AJS support
IBM Navigator for i (formerly known as IBM Systems Director Navigator for i5/OS) is a web console interface for IBM i administration where you can work with the web-enabled actions of the System i Navigator client.
IBM Navigator for i includes a number of welcome pages that enable the user to find the action that they want to perform quickly. Most functions found in IBM Navigator for i are also found in IBM Systems Director, which handles multiple IBM i systems and non- IBM i system platforms.
In IBM i 6.1, the AJS function in IBM Systems Director for i5/OS was limited to viewing. Viewing options include the following elements:
•Activity logs for the system, for a scheduled job, and for a specific execution of a job
•Configured jobs, their properties, and their status
•Configured groups, their properties, and their status
•Scheduled jobs and their status
The major limitation of the IBM i 6.1 function was that it could not change anything, and it could not add, change, hold, or remove scheduled jobs.
The new IBM i 7.1 AJS functions in the IBM Navigator for i interface now include most of the same functions that are found in the System i Navigator Windows client, with the advantage that the interfaces are web-based, not client-based. Additionally, as IBM i 7.1 has matured since release, more improvements to navigation and function have been implemented.
The rest of this section walks through the AJS web pages and describes the new functions during the walkthrough.
12.2.1 Getting to the AJS menu
The link to access the Advanced Job Scheduler menu is at the bottom of the Work Management menu. It is not shown on the left navigation bar, so detailed instructions follow.
IBM Navigator for i navigation
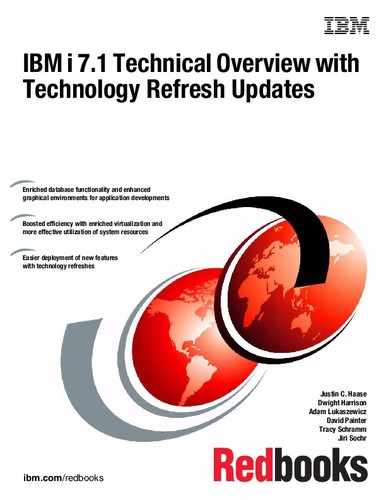
After you log on to the IBM Navigator for i web page, the Welcome window opens, as shown in Figure 12-1. On initial access, the IBM i Management option (indicated by the top arrow) might be collapsed. When this option is expanded, the list of IBM management functions is shown. One of these functions is Work Management, indicated by the second arrow.
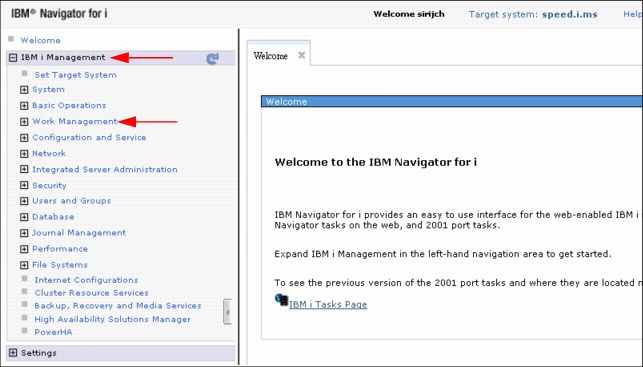
Figure 12-1 Welcome window with IBM i Management item expanded
When the Work Management function is selected, the Work Management main menu that is shown in Figure 12-2 opens. The Work Management menu includes many of the operations-level actions of IBM i work management. To access the Advanced Job Scheduler functions, click Advanced Job Scheduler.

Figure 12-2 Work Management main menu
The Advanced Job Scheduler main menu is shown in Figure 12-3. See 12.2.2, “AJS menu” on page 509, for details of each of these tasks.
Figure 12-3 Advanced Job Scheduler main menu
IBM Systems Director navigation
After you log on to the IBM Systems Director, you must navigate to an IBM i system. Complete the following steps:
1. Click the Navigate Resources task in the Navigation window.
2. Select the All Systems systems group from the Navigate Resources window, as shown in Figure 12-4.

Figure 12-4 Selecting Navigate Resources and the All Systems resource group
3. Select an IBM i system from the All Systems group list window.
In the example, the All Systems group shown in Figure 12-4 on page 507 is selected and the All Systems group systems window is opened. You can then scrolled down in search of a specific IBM i system.
Figure 12-5 shows the All Systems group list, with the check box selected for the wanted IBM i system.

Figure 12-5 Selecting an IBM i system from the All Systems group list
4. Click Actions after the system is selected. A drop-down menu opens.
5. Select the IBM i Management item from the Actions menu. A second menu opens. On this second menu, select Work Management, as shown in Figure 12-6.
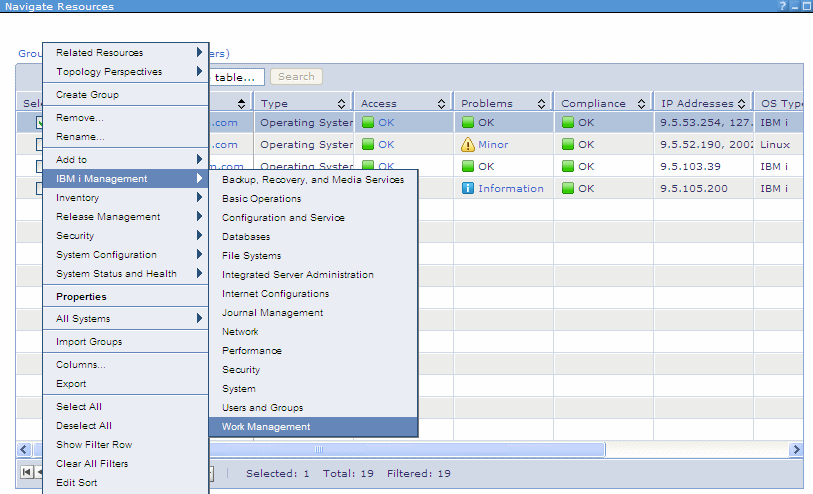
Figure 12-6 Selecting Work Management from the Actions drop-down menu
When you click Work Management, the remaining function and steps are similar in look and feel to those in IBM i Navigator.
12.2.2 AJS menu
The Advanced Job Scheduler menu that is shown in Figure 12-3 on page 506 contains the following tasks:
•Properties
•Start Scheduler
•Stop Scheduler
•Scheduled Jobs
•Scheduled Job Activity
•Activity Log
The AJS menu contains items of system-wide scope, rather than of individual job scope. This menu is the location where the job scheduler functions themselves are configured and maintained. Deeper within various sections, more specific and granular definitions of jobs and actions are performed. In the following sections, the Advanced Job Scheduler menu actions are reviewed.
12.2.3 AJS properties menu
Click the picture of the single gear or the word “Properties” to access the section of Advanced Job Scheduler that allows for administration of global settings.
The AJS properties are divided into six tabs in the left pane as shown in Figure 12-7. The following sections describe each tab.
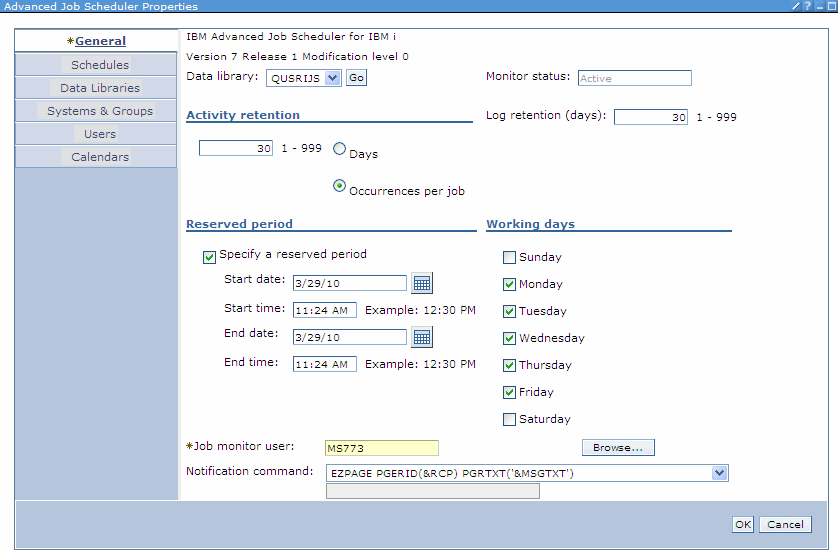
Figure 12-7 AJS properties - General tab
General tab
The General tab that is shown in Figure 12-7 is used to view and set the general properties of the job scheduler. You can specify the following options:
•How long to retain activity
•How long the log remains
•The period during which scheduled jobs are not allowed to run
•The working days that jobs are allowed to process
•The notification command that sends a notification whenever a job completes successfully or fails
Schedules tab
The Schedules tab that is shown in Figure 12-8 provides a display of the existing schedules on your system. The buttons at the right of the page provide the following functions
•New: Enables you to create a schedule.
•New Based On: Enables you to create a schedule that is based on an existing one.
•Remove: Removes an existing schedule.
•Properties: Enables modification of an existing schedule.
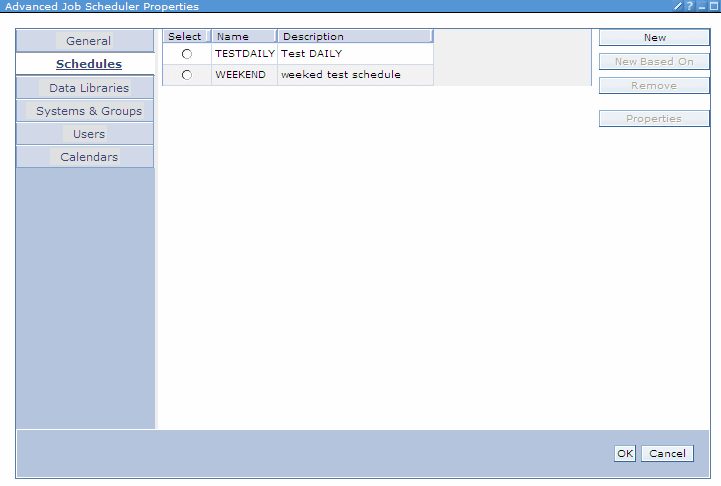
Figure 12-8 AJS Properties - Schedules tab
Clicking New in Figure 12-8 opens the New Schedules window that is shown in Figure 12-9. A schedule is a specification of days on which a job can run. No times are listed. With scheduled jobs and group jobs, you can select a schedule rather than make one when you create the jobs.

Figure 12-9 AJS Properties - New Schedule window
Data Libraries tab
The Data Libraries tab displays all job scheduler data libraries. As shown in Figure 12-10, you can add, remove, and modify a data library, and can start and end the job scheduler monitor job for a specific data library.
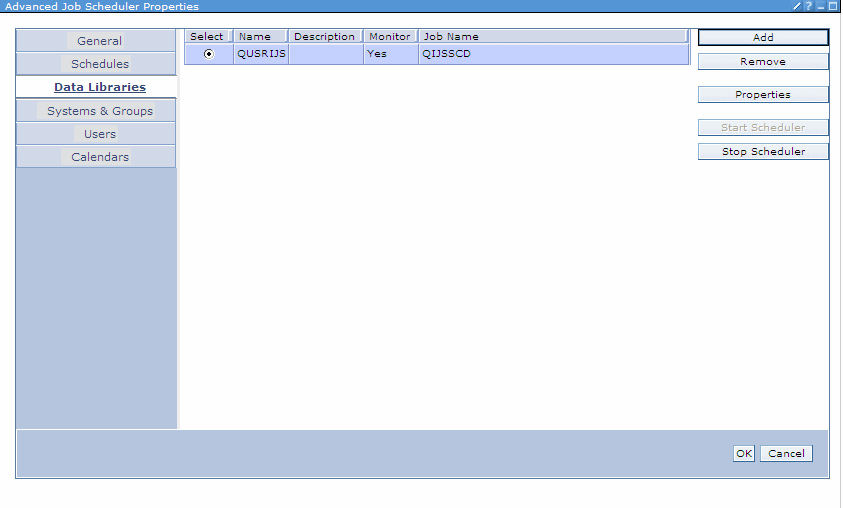
Figure 12-10 AJS Properties - Data Libraries tab
Clicking Add opens the New Data Library window that is shown in Figure 12-11.
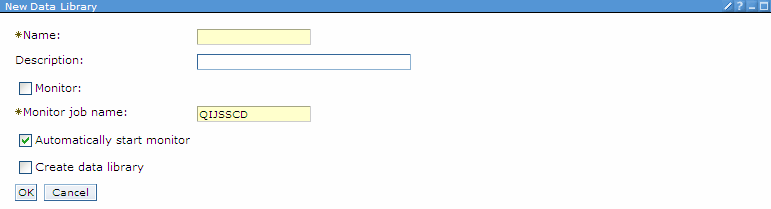
Figure 12-11 AJS New Data Library window
From the New Data Library window, you can accomplish the following tasks:
•Create a jobs scheduler data library.
•Specify a job scheduler monitor.
•Specify a monitor job’s name.
•Start the job scheduler monitor automatically.
A system can have multiple job scheduler data libraries, and each library can have a monitor job that is running simultaneously. You can switch from one job scheduler that is running a production environment to the other job scheduler library that is running a test environment. This capability is covered in more detail in 12.3.2, “Multiple Scheduling Environments function” on page 536.
Systems & Groups tab
You can use the Systems & Groups tab (Figure 12-12) to add, remove, and change existing IP addresses and other information for IBM i and non- IBM i systems that are used by the AJS.
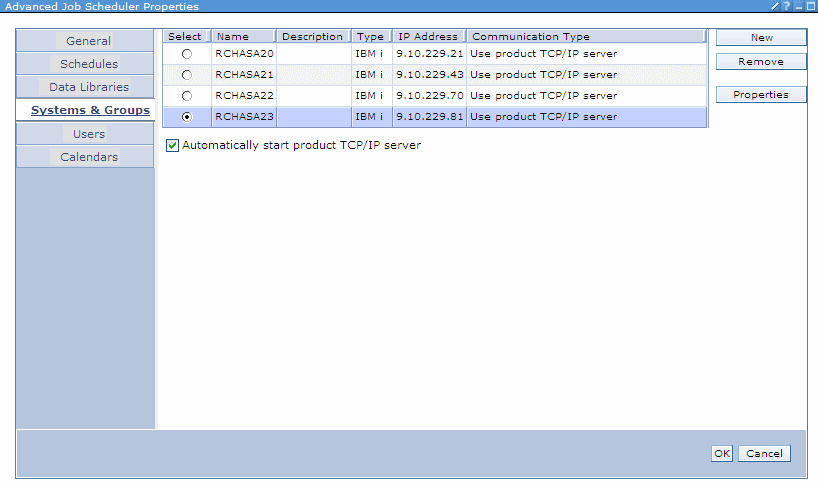
Figure 12-12 Job Scheduler properties - Systems and Groups tab
Users tab
The Users tab (Figure 12-13) enables maintenance of a list of job scheduler users that are associated with a job scheduler data library. The Add button adds users, the Properties button changes the properties of a user, and the Remove button removes a user.
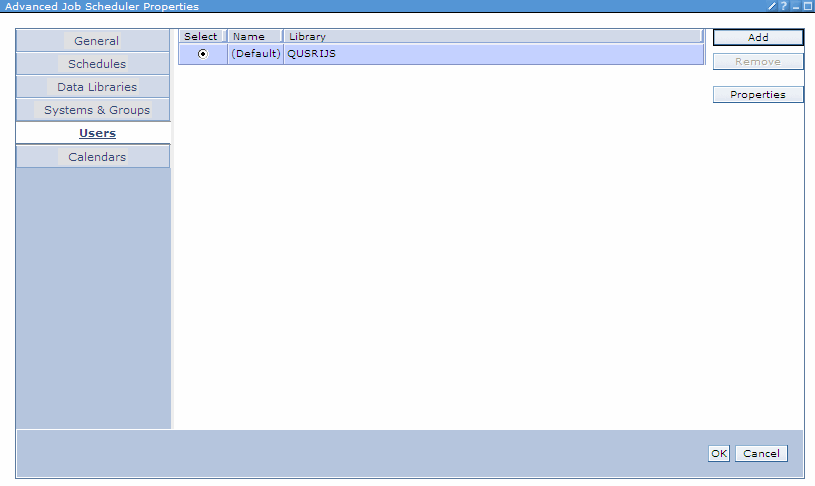
Figure 12-13 AJS Properties - Users tab
Suppose that there is a system with multiple applications and each application’s personnel are not allowed to access the scheduled jobs of other applications. The system administrator can set up each application with their own job scheduler data library.
The system administrator uses the Users tab function to assign each application’s personnel to their own job scheduler data library. Because a user can access only one job scheduler data library, the administrator effectively locks the users to their own application’s job scheduler while locking access to the others. Other security considerations should also be implemented, but this is an additional layer of protection and segregation available within AJS.
Calendars tab
The buttons in the right pane of Figure 12-14 provide the following functions:
•New: Create a calendar.
•New Based On: Create a calendar that is based on an existing one.
•Remove: Remove calendars.
•Properties: Maintain calendars.
Scheduling calendars and holiday calendars use different windows because they have different parameters.
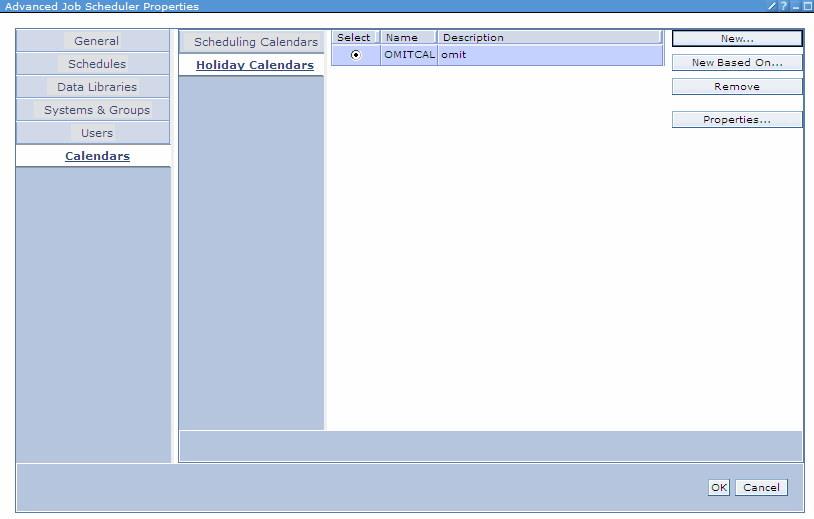
Figure 12-14 AJS properties - Calendars tab
The Holiday Calendar Properties window is shown in Figure 12-15.
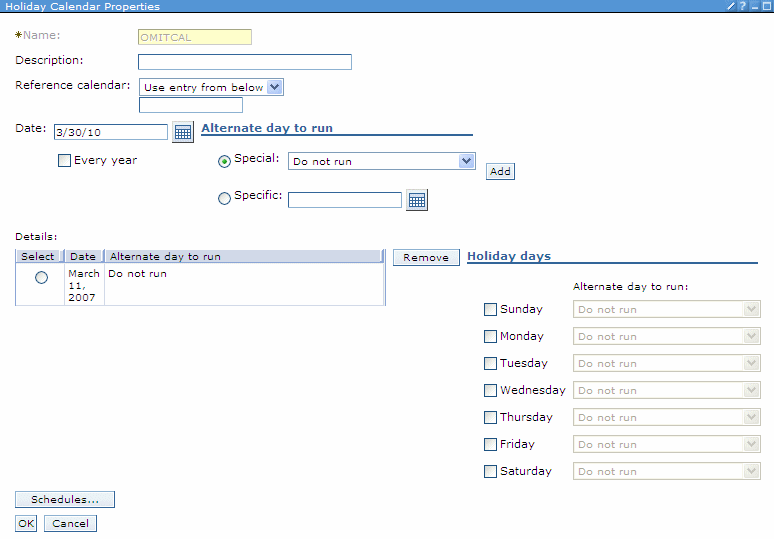
Figure 12-15 Holiday Calendar Properties window
12.2.4 Start Scheduler action
Complete the following steps to start the AJS monitor:
1. In the Advanced Job Scheduler menu, click the green arrow icon or Start Scheduler.
2. The Advanced Job Scheduler Properties window contains a list of monitored libraries. The default installation of Advanced Job Scheduler provides only one called QUSRIJS. An example is shown in Figure 12-16.
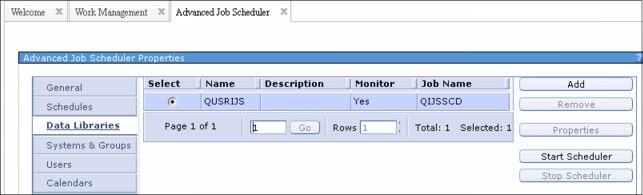
Figure 12-16 Advanced Job Scheduler Properties window with a stopped default instance
3. Ensure the radio button to the left of the scheduler you want to start is selected and click Start Scheduler on the right side of the window.
4. A confirmation window like the one shown in Figure 12-17 is displayed. Clicking Yes starts the monitor. Clicking No returns you to the window shown in Figure 12-16 on page 515.

Figure 12-17 Start AJS monitor confirmation window
12.2.5 Stop Scheduler action
Complete the following steps to stop the AJS monitor:
1. In the Advanced Job Scheduler menu, click the red stop sign icon or End Scheduler.
2. The Advanced Job Scheduler Properties window contains a list of monitored libraries. The default installation of Advanced Job Scheduler provides only one called QUSRIJS. An example is shown in Figure 12-18.
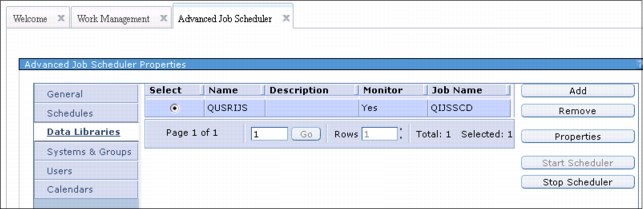
Figure 12-18 Advanced Job Scheduler Properties window with a running default instance
3. Ensure that the radio button to the left of the scheduler you want to start is selected, and click Stop Scheduler on the right side of the window.
4. After clicking Stop Scheduler, the confirmation window shown in Figure 12-19 is displayed. Clicking Yes stops the monitor. Clicking No returns you to the window shown in Figure 12-18.

Figure 12-19 Stop AJS monitor confirmation window
12.2.6 Scheduled Jobs menu
This section reviews the various actions of the Scheduled Jobs menu. This menu is accessed through the Advanced Job Scheduler menu (Figure 12-3 on page 506) by clicking the icon that looks like gears or Scheduled Jobs.
The Scheduled Jobs menu is shown in Figure 12-20. The menu offers the following options with the row of icons that are located near the top:
•Refresh: Click the blue swirling arrows to refresh the view of the data.
•Export: Click the icon with a small grid and a green swooping arrow to export the list data in HTML format.
•Configure options: Click the icon with a small grid and a picture of sliders to choose which fields are displayed on the view of the scheduled jobs.
•Actions. Click Actions to see these additional options:
– New
– Reset scheduled jobs
– Properties
– Refresh
– Advanced Filter
– Export
– Configure options
|
Note: The options available when clicking Actions is different based on if a job, multiple jobs, or no jobs are selected. The above listing of available actions is for when no jobs are selected.
|
•Filter and Advanced Filter
– Use the text box to filter based on simple text.
– Use the Advanced Filter icon (blue and green offset arrows) to filter with greater precision.
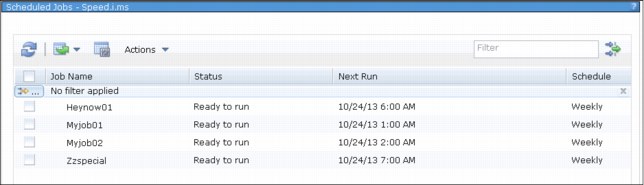
Figure 12-20 Sample display of the Scheduled Jobs window
12.2.7 Using the scheduled jobs actions
In Figure 12-20 on page 517, the Scheduled Jobs window is shown. After selecting a job and clicking Actions, a list of available functions are displayed as shown in Figure 12-21.
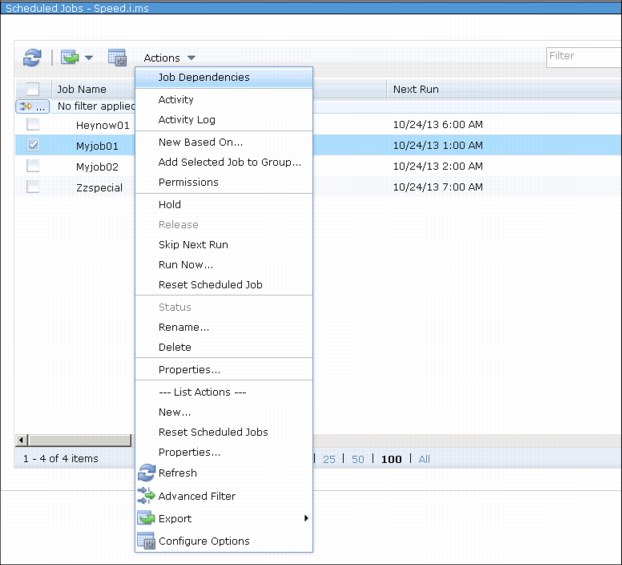
Figure 12-21 Scheduled Jobs actions available
You can select multiple jobs by selecting their check boxes. There are options that enable selection of all jobs. For now, review what you can do to a specific job.
To illustrate the many tasks you can accomplish in a specific job, see the menu for the MYJOB01 job that is shown in Figure 12-21. Although it is beyond the scope of this book to describe each of these actions in detail, a brief description of each action follows:
•Job Dependencies: This action enables the display and updating of job dependencies, including predecessors and successors, and whether all or just one dependency must be met.
•Activity: This action enables listing of the job activity (history) for a specific job scheduler entry. A specific job can be selected from the job activity, which has another menu of actions.
•Activity Log: This action enables listing of entries in the job scheduler log for a specific job scheduler entry.
•New Based on: This action creates a new scheduled job that is based on the selected job. You can override any of the based on job’s parameters.
•Add Selected Job to Group: You can use this action to add the selected job to a job group.
•Permissions: You can use this action to set the permissions and authorities to the scheduled job, including which users can submit, manage, and set permissions.
•Hold: This action allows a scheduled job to be held. This action is shown only for jobs that are not already held.
•Release: This action allows a held scheduled job to be released. This action is shown only for jobs that are held.
•Skip Next Run: You can use this action to skip (omit) the next scheduled run for the job.
•Run Now: You can use this action to run a scheduled job now. You can also use it to run a job at a specified date and time and at a certain number of minutes from now. The action can also override the first command to be run and the last command to be run. You can also check and update job dependencies.
•Reset Scheduled Job: This action resets the selected scheduled job.
•Status: This action is available when a job is running and shows the following status items: Job name, group name, sequence in group, started, running time, command sequence number, command, command step, and estimated completion time.
•Rename: This action renames the selected scheduled job.
•Delete: This action deletes the selected scheduled job.
•Properties: You can use this action to view and change virtually every parameter and value for a scheduled job. The parameters are divided into nine pages of parameters:
– General: Specifies the type of scheduled job, job name, job (text) description, and the commands and sequence to be run.
– Schedule: Specifies when the job is to be run.
– Batch Information: Specifies the information that is required to submit the job, such as run on a single system or system group; basic submission parameters such as the job queue, job description, and job user; and advanced submission parameters such as job accounting code, job and run priorities, routing data, and command logging.
– Notification: Specifies options and parameters for the notification of the job status.
– Documentation: Provides a field for the job documentation.
– Problem Recovery: Specifies the maximum run time, alternative job in case of failure, action to take when a job cannot be started at the specified time, handling of inquiry messages, and message logging parameters to be used when a job fails.
– Communication: Specifies communications parameters, such as local device, local location name, remote device, and remote location name.
– Local Data Area: Specifies what the scheduled job places in the local data area when run.
– Last Run: Shows the last run details.
The Scheduled Jobs properties and display windows are described in 12.2.9, “Adding a scheduled job” on page 521.
12.2.8 Using the Scheduled Jobs table
This section reviews the Scheduled Jobs table shown in Figure 12-22 (including the sorting, changing columns, and using filtering tasks).
Figure 12-22 Scheduled Jobs Table
•Basic sorting: Each column can be sorted by clicking the particular section of the header row. Each click toggles between ascending and descending sort.
•Quick filter: Entering data in the field in the upper right of the scheduled jobs table immediately subsets the listing. The text is searched in all visible columns. No further action is necessary other than entering text for this basic filter function. To remove the filter, either delete the text or click the small X that appears after text has been entered in the field.
•Advanced filter: Clicking the arrows icon in the upper-right portion of the scheduled jobs table or to the left of the “no filter applied” text produced a smaller window showing filtering options. You can add multiple levels of filtering based on your needs.
•Clear filter: If a filter is active, a link with the words “clear filter” is visible at the top of the listing in the place of “no filter applied”. Click the Clear Filter text to perform the action.
Resizing columns
Columns can be resized by dragging the column separator in the table column header line.
Configuring table columns
The table in its initial format includes all columns. However, you can remove columns and change the order of the columns by using the Configure Options option of the Table actions menu or by clicking the Configure Options icon. When Configure Columns is clicked, a small pane is displayed with the columns available for use as shown in Figure 12-23.

Figure 12-23 Table column selection and reordering
The window has a slide, which is used to scroll through the list.
If you want a selected column to not appear in the table, click to clear the corresponding check box. Alternatively, to have it appear in the table, ensure that the check box is selected. To select all, click the icon at the upper left of the pane. To clear all entries, click the icon without the check picture.
Clicking OK puts the column changes into effect and the table is displayed again.
To return the table back to its original format, close the page and reopen it.
12.2.9 Adding a scheduled job
This section describes the functions and windows that are used to add a scheduled job.
To add a scheduled job, complete the following steps:
Figure 12-24 Preparing to create a new scheduled job
2. In Figure 12-25, the job name is set to NEWJOB. The job is a scheduled job (not an alternate job or non-scheduled job), and the job (text) description is entered. Add one or more commands by clicking Add.

Figure 12-25 New Scheduled Job General window
3. In the Command Properties window (Figure 12-26), specify the command. In this example, RTVDSKINF is entered into the Command box and there are no messages to monitor, so those fields are left blank. To check the RTVDSKINF command parameters, click Prompt.

Figure 12-26 Command Properties window
4. On the Retrieve Disk Information (RTVDSKINF) window (Figure 12-27), check the RTVDSKINF command parameters. There is one field, ASP Device, with a default value of *SYSBAS. This window shows only the basic parameters.

Figure 12-27 Basic parameters window
5. Check the advanced parameters by clicking Advanced. The window refreshes with another RTVDSKINF command parameter displayed with a default value, as shown in Figure 12-28.
Figure 12-28 Advanced parameters window
Figure 12-29 View menu
7. Click the Keywords option. If you want to see the keywords rather than the text descriptions for the fields, or see all parameters, or see the command string, select those options. The window refreshes and the window that is shown in Figure 12-30 opens.
Figure 12-30 Keywords option window
8. The last thing of note about command prompting is the command help. Figure 12-31 shows the Help menu.
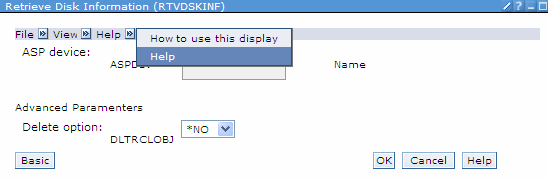
Figure 12-31 Help menu
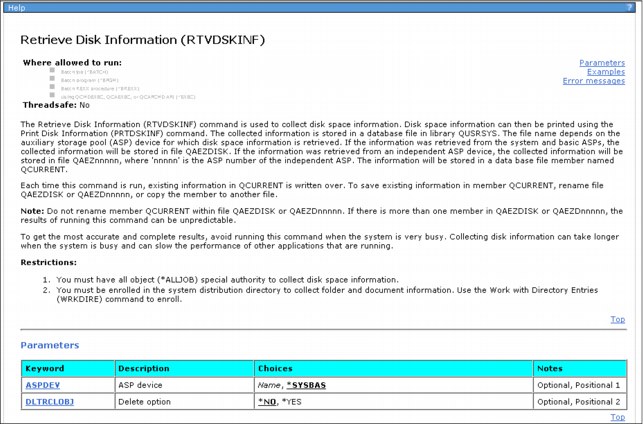
Figure 12-32 RTVDSKINF Command help
10. Now that the correct command is specified, click OK to close the Help window. Click OK on the RTVDSKINF command prompt display to accept the RTVDSKINF command. Click OK on the Command Properties window to accept the command properties for RTVDSKINF usage. The General window of the New Scheduled Job function opens.
11. In Figure 12-33, two more commands were added to the scheduled job, but the second command (CHGJOB) is out-of-order. It needs to be the first command to be run. Select the radio button next to the out-of-order second command, and click Move Up to move the second command to the first run position.

Figure 12-33 Moving a command to change the run order
12. Figure 12-34 shows the three commands in the wanted order. Now that the command order is correct, click OK.

Figure 12-34 Commands shown in the correct order
New scheduled job: Schedule window
The New Schedule window is shown in Figure 12-35. It is used to specify when and how often the scheduled job runs. There are many detailed scheduling options that are beyond the scope of this book and are included in documentation of the product. For a simple example, the job being defined here is scheduled to run every Sunday at 6:00 am system time.
To make this occur, complete the following steps as indicated in the Schedule window:
1. Click Weekly for the frequency.
2. Click Sunday for the details.
3. In the Times to run section, enter the time (6:00 AM) and click Add.
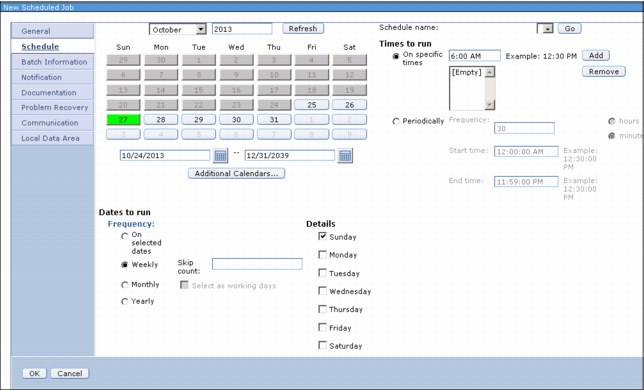
Figure 12-35 New Scheduled Job Schedule window
In the upper-right corner of the window, in addition to basic scheduling by time, you can specify to repeat a run periodically during a time range. You can also apply a schedule name, which uses a previously created schedule.
The Dates to run section has a set of radio buttons to specify the frequency at which the job is to run. The Details section varies depending on the selected Frequency button. In this example, the options were selected to run the scheduled job at 6:00 AM weekly and on Sundays.
If you have other changes to make to the jobs, use the selections along the left side of the pane. If you click OK on this window, you are brought back to the main listing of all scheduled jobs. If you inadvertently clicked OK, select the new job in the list of scheduled jobs and use the Properties action to come back to this view.
New Scheduled Job: Batch Information window
Typically, when a job is submitted, a host of parameters must be specified for the job to run. Use the Batch Information window that is shown in Figure 12-36 to set these parameters for the new scheduled job.
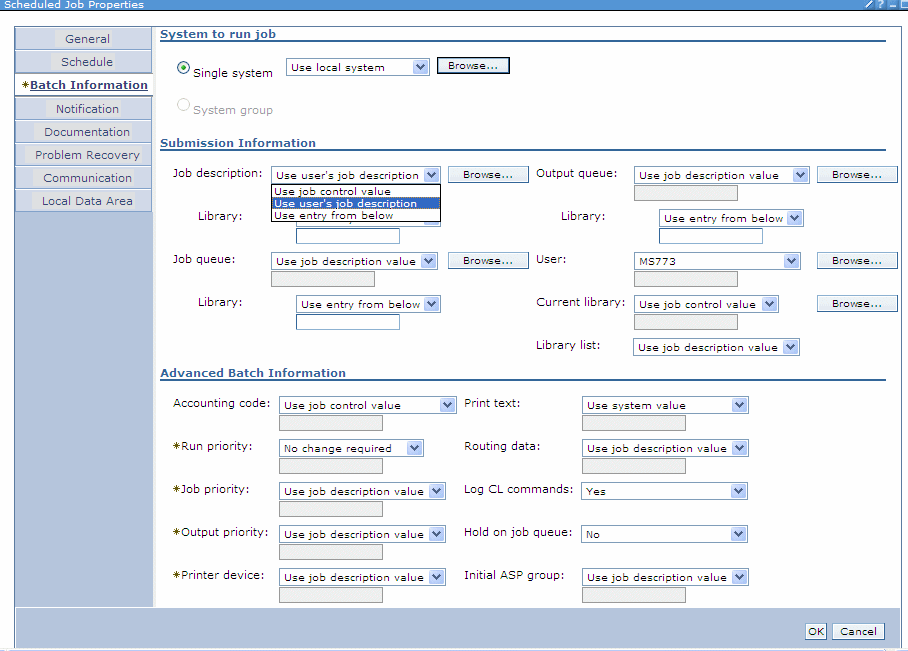
Figure 12-36 New Scheduled Job Batch Information window
In the Batch Information window, the fields have drop-down options and, in most cases, include a blank field to enter the correct values manually. Parameters such as Job description and User have Browse buttons that open a list window from which a selection can be made.
If you have other changes to make to the jobs, use the selections along the left side of the pane. If you click OK on this window, you are brought back to the main listing of all scheduled jobs. If you inadvertently clicked OK, select the new job in the list of scheduled jobs and use the Properties action to come back to this view.
New Scheduled Job: Notification window
You can use the Notification window that is shown in Figure 12-37 to set up various methods of notification for various job conditions.
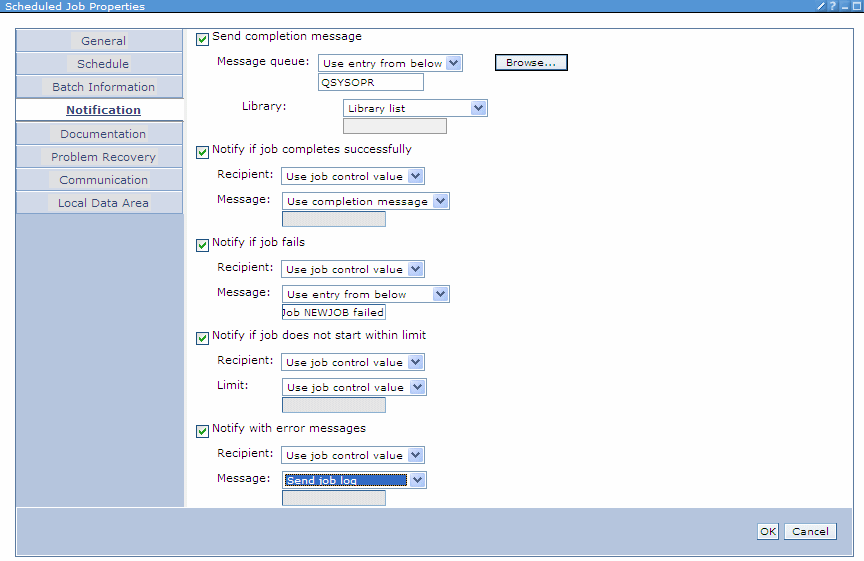
Figure 12-37 New Scheduled Job Notification window
There are five notification options in the Notification window. Each option has a check box for enabling or disabling the notification.
The drop-down menus prevent you from entering incorrect options.
If you have other changes to make to the jobs, use the selections along the left side of the pane. If you click OK on this window, you are brought back to the main listing of all scheduled jobs. If you inadvertently clicked OK, select the new job in the list of scheduled jobs and use the Properties action to come back to this view.
New Scheduled Job: Documentation window
The Documentation window, which is shown in Figure 12-38, has a large text field that can be used for job documentation (such as who owns the job, what the job actually does, and what an operator does when it fails).

Figure 12-38 New Scheduled Job Documentation window
New Scheduled Job: Problem Recovery window
The Problem Recovery window is shown in Figure 12-39. On this window, the user specifies problem handling parameters and the message logging parameters for the scheduled job.

Figure 12-39 New Scheduled Job Problem Recovery window
If you have other changes to make to the jobs, use the selections along the left side of the pane. If you click OK on this window, you are brought back to the main listing of all scheduled jobs. If you inadvertently clicked OK, select the new job in the list of scheduled jobs and use the Properties action to come back to this view.
New Scheduled Job: Communication window
Figure 12-40 shows the New Scheduled Job Communications window.
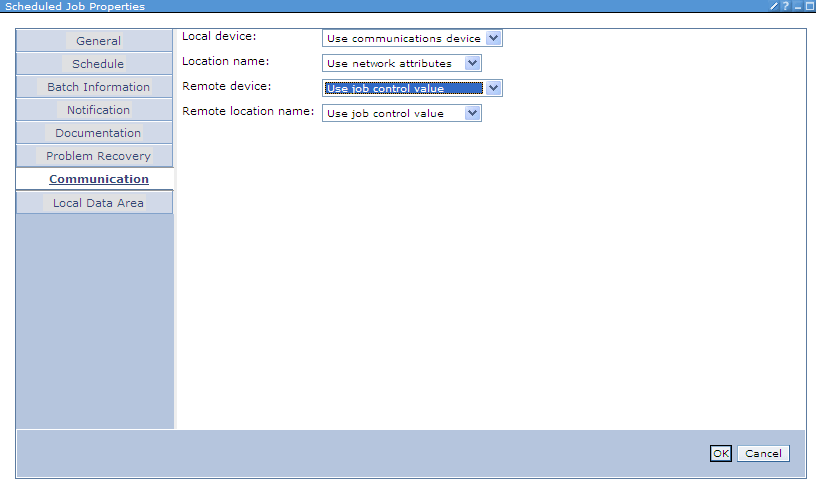
Figure 12-40 New Scheduled Job Communication window
If you have other changes to make to the jobs, use the selections along the left side of the pane. If you click OK on this window, you are brought back to the main listing of all scheduled jobs. If you inadvertently clicked OK, select the new job in the list of scheduled jobs and use the Properties action to come back to this view.
New Scheduled Job: Local Data Area window
Figure 12-41 shows the New Scheduled Job Local Data Area window.
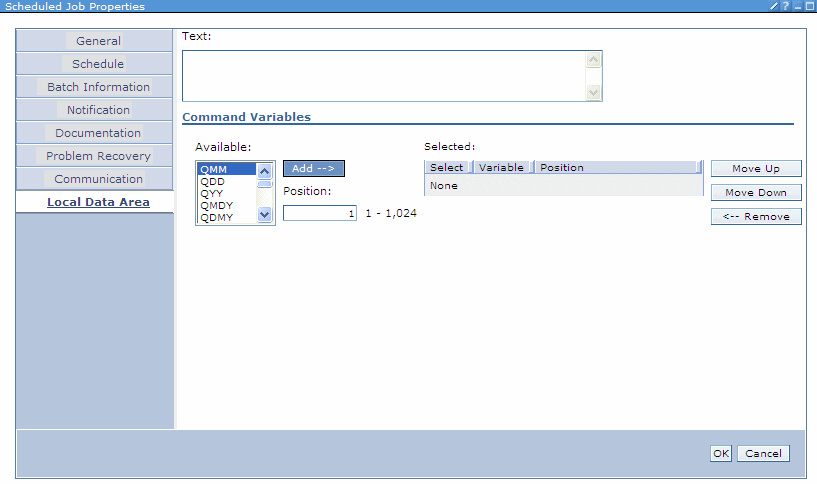
Figure 12-41 New Scheduled Job Local Data Area window
If you have other changes to make to the jobs, use the selections along the left side of the pane. If you click OK on this window, you are brought back to the main listing of all scheduled jobs. If you inadvertently clicked OK, select the new job in the list of scheduled jobs and use the Properties action to come back to this view.
The same sets of options are available to you when changing properties of an existing scheduled job.
12.2.10 Scheduled job activity
Click the picture of the single gear or Scheduled job activity to access the section of Advanced Job Scheduler that allows for viewing activities of all scheduled jobs
The window that appears is similar in format and function to the Scheduled Jobs window shown in Figure 12-24 on page 521, but contains different options for the listed items. The filtering and sorting functions are the same. Figure 12-42 shows an example of the Scheduled Jobs Activity window.

Figure 12-42 Options available from the Scheduled Job Activity window
The options available for the selected job or jobs vary based on if they are active or completed, and whether they produced a job log. They are still shown in the list, but are unavailable for selection if they are not applicable to the situation.
•Printer Output: Opens new window with a listing of printer output if it exists. See a sample view of this window in Figure 12-43. In addition to the functions available, the output is in the same type of table as the rest of AJS, so it can be sorted and filtered in an identical manner.

Figure 12-43 Printer output available options
•Activity Log: Opens a view of the AJS log with all entries subsetted for this job only.
•Job Log: Opens a new window with a job log for this job, if it exists.
•Hold, release, and end: Available for jobs that are currently active. Holds, releases, or ends the selected jobs.
•Distribute reports: This option gives the ability to distribute spooled files created by the job to a distribution list.
•Status: Available only for active jobs, this shows the status of the scheduled job.
•Delete: This option deletes the history of the selected job. You are asked to confirm deletion of the history before the system removes it.
12.2.11 Activity log
To access the activity log, from the AJS main entry page in IBM i Navigator, click the yellow scroll with a small blue gear, or click Activity Log.
The window that appears has the same sorting and filtering functions as the other AJS tables. These functions have been described in previous sections of this chapter.
The output provided on this window as shown in Figure 12-44 is the same as produced when running the Display Log for Job Scheduler (DSPLOGJS) command. It can be filtered and sorted in different ways using the web interface versus the character-based interface.

Figure 12-44 View of the activity log along with a selected entry and its available action
The only available option for selected entries is the Properties action. Figure 12-45 shows the results of viewing the properties of an entry.
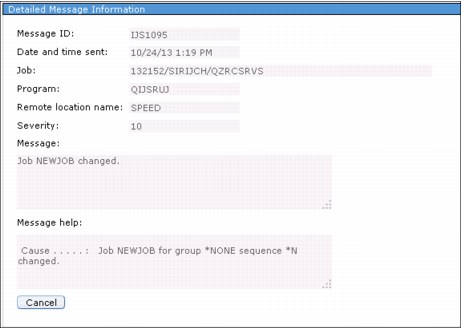
Figure 12-45 Output from viewing properties of an entry in the activity log
12.3 Other AJS enhancements
This section covers other IBM Advanced Job Scheduler for i enhancements.
12.3.1 Notification enhancements
Notification capabilities are enhanced by the ability to send a spooled file to an IFS path name with the option to replace the file if it exists. You can use replacement variables to make the file and the path unique. The path name is specified in a recipient file, as shown in Figure 12-46 on page 536.
The window in the background shows the New Recipient menu and its General window, as accessed through IBM Navigator for i. The window in the foreground shows the New Recipient Path window and the path parameter. The path value shows the use of substitution variables. This function is also available through IBM i Access client, but is not available through the character-based interface.

Figure 12-46 The Path window of the Create Recipient menu
12.3.2 Multiple Scheduling Environments function
With the Multiple Scheduling Environments (MSE) function, you can set up any number of scheduling environments that run at the same time. The environments use different job scheduler data libraries. This function is helpful for having a test and production set of scheduled jobs or when you replicate live data from a production system to a backup system.
In the character-based interface, use the Change Data Library using JS (CHGDLJS) command to start more environments, as shown in Figure 12-47.
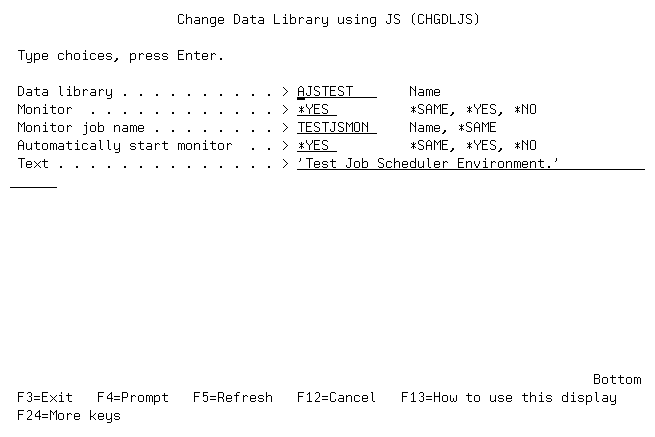
Figure 12-47 Starting an addition job schedule environment by using the CHGDLJS command
You can also specify which users can use which job scheduler environment by issuing the Set Data Library (SETDLJS) command, as shown in Figure 12-48.

Figure 12-48 Setting user MSRJJ’s access to a job scheduler data library
|
Consideration: A user profile can be associated with only one job scheduler data library at a time. Ensure that this is planned carefully, as you can be prevented from accessing the default QUSRIJS data library.
|
The equivalent multiple scheduling environments function is also available through the System i Access (GUI) and IBM Navigator for i (web) interfaces.
12.3.3 Scheduling and running jobs
This section describes the enhancements for scheduling and running jobs.
Predefined schedules
Jobs in a group with a sequence number greater than 1 (jobs other than the first one in a group) can now use a predefined schedule. This option is helpful when you have a group of jobs where you want a subset of the jobs in the group to run on another schedule than the rest. For example, if you have a group of jobs that run on a daily schedule, but one in the group must run on Fridays only, a schedule can be used for the Friday job that overrules the daily schedule of the group. The schedule can also be a holiday calendar. This function adds flexibility for configuring which jobs in a group run on different days and dates without breaking up the group.
Start Group job enhancements
Starting group jobs was enhanced to add new “Based on” parameters to enable the user to specify an override capability of which jobs are run in a group.
The Start Group using JS (STRGRPJS) command was changed to add “Based on” parameters, as shown in Figure 12-49.

Figure 12-49 New Based on parameters of STRGRPJS command
The “Based on” parameters enable you to use the day of week, the date, or both to override which jobs are run in the group job.
If *FRI (Friday) is specified for the “Based on day of week” parameter, the group jobs, other than the first one, run as though the day were a Friday. Jobs in the group that list *FRI as a day to run and jobs in the group that use a predefined schedule specifying to run on *FRI run even if the STRGRPJS command was issued on a Wednesday.
The “Based on date” parameter works similarly. If the specified date is December 1, 2009, the job scheduler determines which of the jobs in the group can run on that date and runs them when the STRGRPJS command is run.
The new “Based on” function is also found in the System i Access (GUI) and IBM Systems Director Navigator for i (web) interfaces.
New time offset added to the Submit Scheduled Job function
When you submit a scheduled job manually, you can now specify a submit time offset. Suppose that it is 6 p.m., and you want to submit a scheduled job to run at 9 p.m., but do not want to change the job’s schedule, as this job is a one-time need. You can specify a time offset of 180 minutes, causing the job to run at 9 p.m.
The Submit Job using Job Scheduler (SBMJOBJS) command in Figure 12-50 has a new “Submit time offset” parameter.
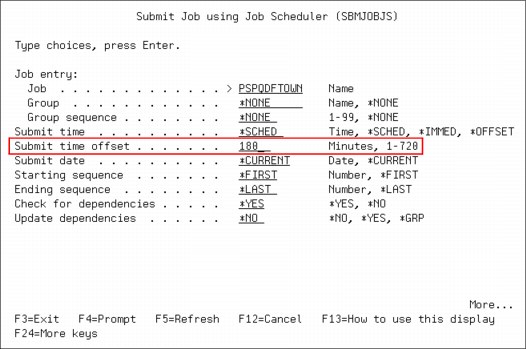
Figure 12-50 Submit Job using Job Scheduler with new Submit time offset parameter
The user can specify the amount of time in minutes 1 - 720 to determine the submit time. A similar function is available as the Minutes from new parameter through IBM Navigator for i, as shown in Figure 12-51. This function is also available through the System i Access.
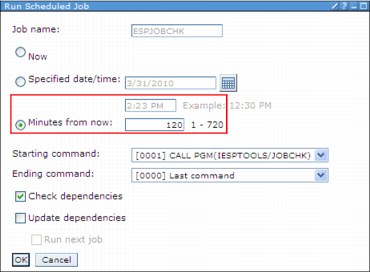
Figure 12-51 Run scheduled job minutes from now
Job dependency enhancements
Jobs can now depend on the contents of a data area or a value that is returned from a program. When you specify a resource dependency for an object type data area, you can specify a value that must exist in the data area before the associated job runs. A starting position and a length can be used in case the value to be checked is smaller than the data in the object. The value can be up to 50 alphanumeric characters. This new function is found in the System i Access (GUI), IBM Navigator for i (web) interfaces, and character-based interfaces.
12.4 References
For more information about the topics that are covered in this chapter, see the following IBM i 7.1 Knowledge Center topics:
•Advanced Job Scheduler
•System i Navigator
..................Content has been hidden....................
You can't read the all page of ebook, please click here login for view all page.