
6. Printing
In This Chapter
• Including a header or footer
• Printing headings and row/column borders
• Centering a printout on the page
• Printing cell contents and gridlines
After you spend all that time setting up and editing a spreadsheet, you may want to print it so that you can share it with the world—or, at a minimum, with business associates or friends who might find it useful.
Printing isn’t really a difficult activity; when the spreadsheet is onscreen, you click the Print button. But getting a spreadsheet to print the way you want can be a challenge. In this chapter, you’re going to learn the details associated with printing a spreadsheet. You’ll learn how to print row and column headings on each page of the printout, how to include headers and footers, how to change the margins, and how to scale a printout to fit on one page. You’ll also learn how to insert and delete page breaks, preview before printing, and print all or only part of a notebook.
Setting Up the Spreadsheet for Printing
Printing a spreadsheet is a straightforward matter—with the spreadsheet open onscreen, you click the Print button on the Notebook toolbar. However, there is a variety of settings you may want to explore to get a printout that looks just the way you want it to look. You can select a paper type, print row and column headings on each page of the printout, include headers or footers, set margins, and more.
Selecting a Paper Type
Although a plethora of paper types exist, you’ll probably use mostly letter size, which is 8 1/2 by 11 inches—the default paper size in Quattro Pro—or legal size, which is 8 1/2 by 14 inches. But, you certainly can select some other paper type if it suits your needs; Quattro Pro supports Executive, A4, A5, B5, index cards (3×5 inch cards, 4×6 inch cards, and 5×8 inch cards), 4×6 inch photo size, A6 card, number 10 envelopes, A2, C6, and DL envelopes, letter-size and A4-size banners, Hagaki cards, and, if the size you want doesn’t appear in that list, you can define your own paper size.
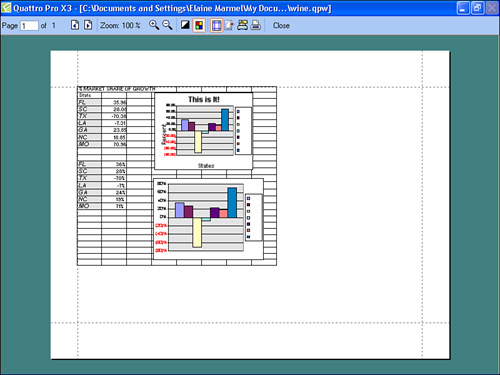
When you select a paper type, you also can select the orientation for the printout. In Figure 6.1, you see a preview of a printout in portrait orientation, and in Figure 6.2, you see a preview of the same printout in landscape orientation.
Figure 6.1. View information on a portrait orientation of a letter-sized sheet of paper by holding the sheet along the 8 1/2 inch borders.

Figure 6.2. View information on a landscape orientation of a letter-sized sheet of paper by holding the sheet along the 11-inch borders.
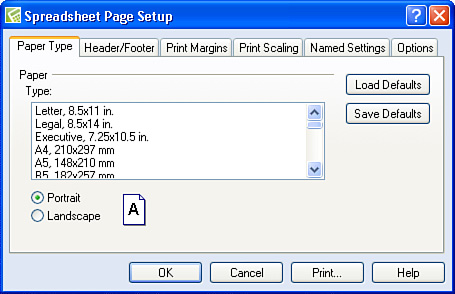
To select a paper type and orientation, open the File menu and click Page Setup. Quattro Pro displays the spreadsheet Page Setup dialog box shown in Figure 6.3. Click the Paper Type tab.
Figure 6.3. Select the paper type and set the page orientation on the Paper Type tab of the spreadsheet Page Setup dialog box.
Including a Header or Footer
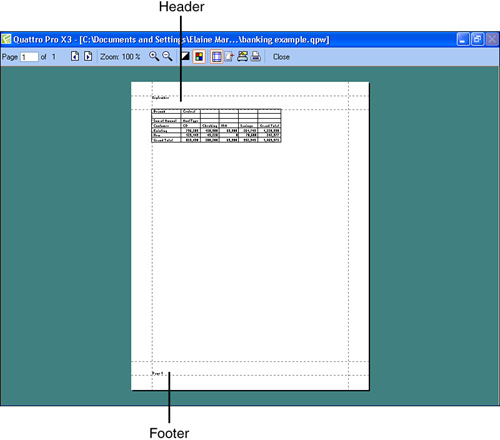
Headers and footers contain information in the top or bottom margin of a printout that repeats at the top and bottom of each page of a printout, as shown in Figure 6.4.
Figure 6.4. Headers and footers appear in the top and bottom margins of the printout.
Headers (and footers) differ from the headings described in the next section because you do not select information stored in cells of the spreadsheet to display in headers and footers. Instead, you supply the information you want displayed when you define the header and footer.
Tip

Using links, you can include information stored in spreadsheet cells in headers or footers. Creating these types of links is beyond the scope of this book.
To define header and footer information, open the File menu and click Page Setup. In the Spreadsheet Page Setup dialog box that appears, click the Header/Footer tab (see Figure 6.5).
Figure 6.5. Use this tab of the Spreadsheet Page Setup dialog box to define header and footer information.

Place a check in the Create box of either the Header section or the Footer section (yes, you can check both boxes and create both a header and a footer, as I did in Figure 6.5) and Quattro Pro enables the associated text box. Type the information that you want to appear as the header or footer. You can use different fonts for the header, the footer, and the spreadsheet information; click the Font button to select a font. Using the Height box, you can change the distance between the header or footer and the spreadsheet data.
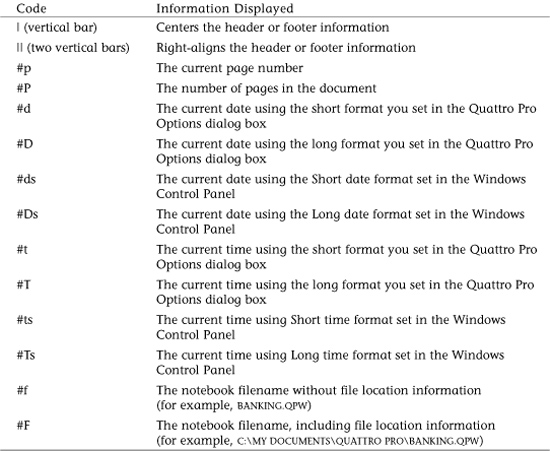
Quattro Pro enables you to include special codes in headers or footers to display special information such as the page number of the spreadsheet (as I did in Figure 6.5). In Table 6.1, you’ll find a list of some of the most commonly used codes and the information they display.
Table 6.1. Commonly Used Codes in Headers and Footers
Printing Headings
Don’t confuse headings with headers described in the preceding section; headings provide information contained in rows or columns of the spreadsheet that you decide to print on each page. Headers, which you can read about in the preceding section, contain information that repeats at the top of each page but the information is not stored in spreadsheet cells.
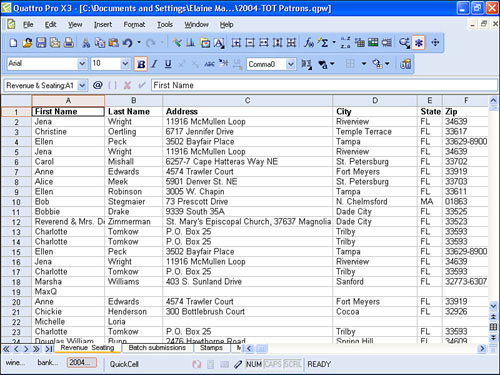
In a spreadsheet like the one shown in Figure 6.6, printing the column headings stored in row 1 on each page of the printout would be very useful in helping the reader to identify the information stored in each column of the spreadsheet.
Figure 6.6. When the data spans multiple pages, printing column or row headings on each page can be most helpful to the reader.
Similarly, you may have spreadsheets where the reader would find it most useful to view the information contained in column A on each page of the printout. You can tell Quattro Pro to print row or column headings on each page. Follow these steps:
- Open the File menu and click Page Setup.
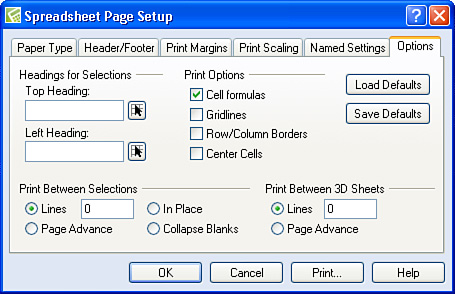
- In the Spreadsheet Page Setup dialog box that appears, click the Options tab (see Figure 6.7).
Figure 6.7. Use the Options tab of the Spreadsheet Page Setup dialog box to print row or column headings on each page of the printout.
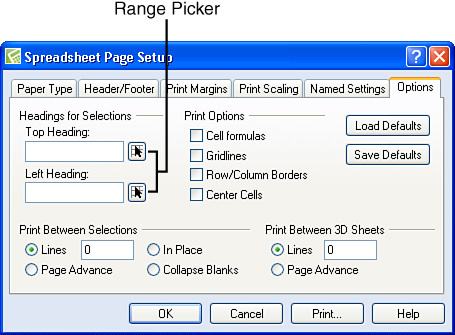
- To add titles that appear in row 1, click the Range Picker button of the Top Heading box. Quattro Pro compresses the Spreadsheet Page Setup dialog box to just a title bar (see Figure 6.8).
Figure 6.8. Select the row containing the titles you want to print on each page.
- Click the number of the row containing the titles you want to print on each page. Quattro Pro selects the row.
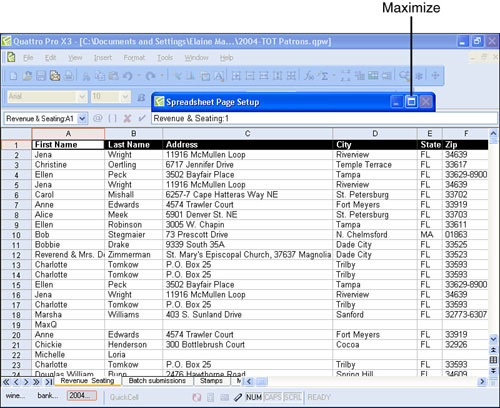
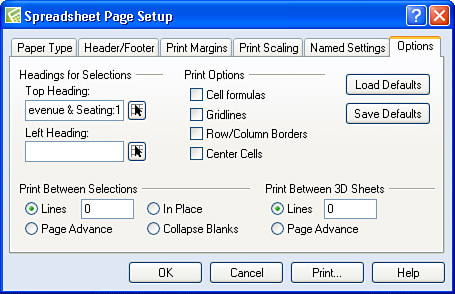
- Click the Maximize button in the Spreadsheet Page Setup dialog box. Quattro Pro redisplays the complete Spreadsheet Page Setup dialog box, and the row you selected appears in the Top Heading box (see Figure 6.9).
Figure 6.9. The row you selected appears in the Top Heading box.
- Click OK.
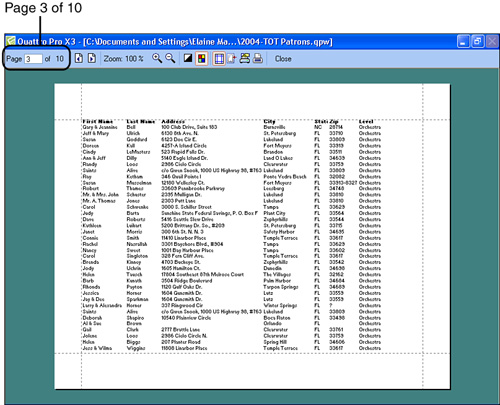
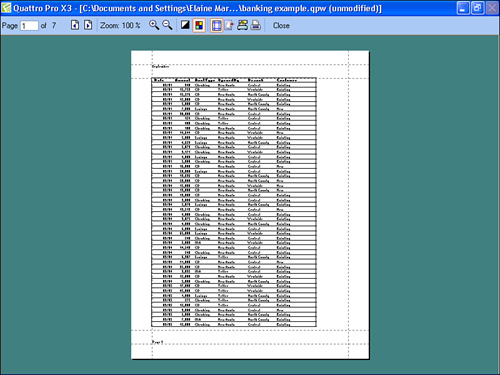
When you print the spreadsheet, the selected row will appear on each page of the printout. In Figure 6.10, you’re viewing page 3 of 10, and the first row of the spreadsheet appears at the top of the page.
Figure 6.10. The row containing headings prints on each page.
Printing Row/Column Borders
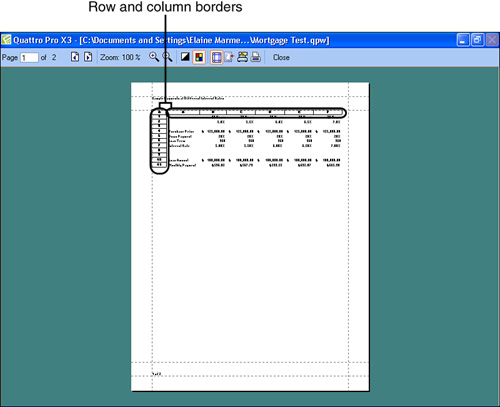
When you are editing a large spreadsheet, it sometimes helps to print the spreadsheet and include row numbers and column letters so that you can easily find the location of a particular piece of information from your printout. In Figure 6.11, I’ve displayed row numbers and column letters.
Figure 6.11. When you display row and column borders, Quattro Pro prints the row numbers and column letters of the print area.
To display row and column borders, open the File menu and click Page Setup. In the Spreadsheet Page Setup dialog box that appears, click the Options tab and place a check in the Row/Column Borders check box (see Figure 6.12).
Figure 6.12. Turn on row and column borders from the Options tab of the Spreadsheet Page Setup dialog box.

Setting Print Margins
You can set the print margins for a spreadsheet using either the keyboard or the mouse.
To set margins using the keyboard, open the File menu and click Page Setup. In the Spreadsheet Page Setup dialog box that appears, click the Print Margins tab (see Figure 6.13).
Figure 6.13. Set print margins by typing the margin setting you want to use in the appropriate box.
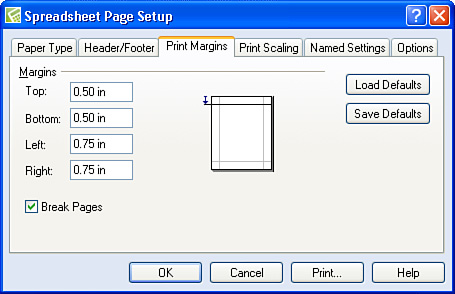
Type the margin settings you want to use in inches in the Top, Bottom, Right, and Left boxes and click OK.
If you prefer to use your mouse, you can drag margin settings while viewing a preview of the spreadsheet. To view a preview of the spreadsheet, open the File menu and click Print Preview. Quattro Pro displays the spreadsheet as it will print, including headers and footers (see Figure 6.14).
Figure 6.14. You can drag any margin indicator to change print margins.
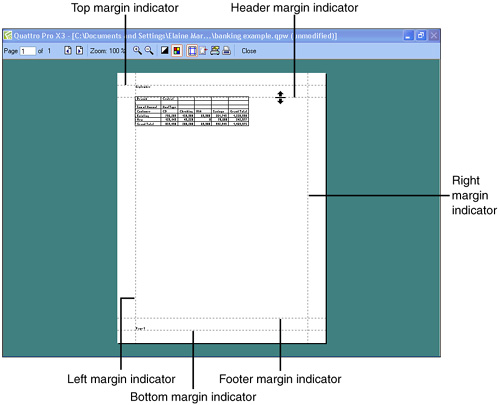
Drag any margin indicator toward the center of the spreadsheet to increase the margin or away from the center to decrease the margin.

Be aware that your printer may limit the minimum margin you can set; for example, many laser printers will not print margins smaller than .5 inches. If you choose not to print headers or footers, Quattro Pro removes the area reserved for the header or footer, enabling you to fit more text on the page.
Centering a Printout on the Page
Sometimes, it’s easier to center the information on a page than it is to mess with margins. Quattro Pro enables you to easily center information.
Open the File menu and click Page Setup. In the Spreadsheet Page Setup dialog box that appears, click the Options tab (see Figure 6.15).
Figure 6.15. Checking the Center Cells box centers spreadsheet information between the left and right margins simultaneously.
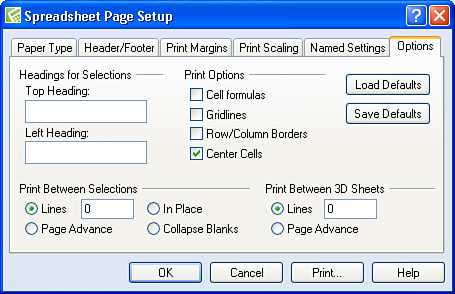
Place a check in the Center Cells box and click OK. In Figure 6.16, you see the results of enabling the Center Cells check box.
Figure 6.16. Compare this figure with Figure 6.14 to see the results of centering cells between the right and left margins.
Scaling the Printout
It happens to all of us. You build a spreadsheet that almost fits on one page. You know that if you fiddle with the margins and the font sizes, you’ll be able to get it all onto one page. But scaling the printout is easier than messing with margins and font sizes.
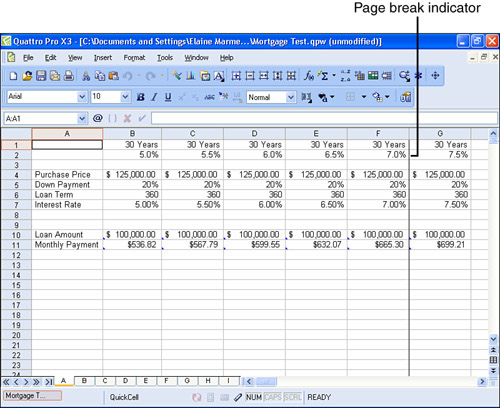
By viewing a spreadsheet in Page Breaks view, you can see where the page breaks fall given the current margin and font size settings (see Figure 6.17).
Figure 6.17. The heavy blue lines indicate page breaks.
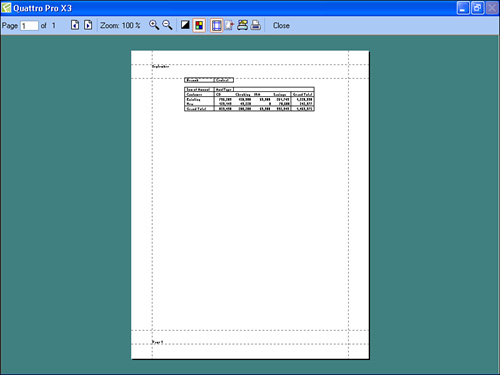
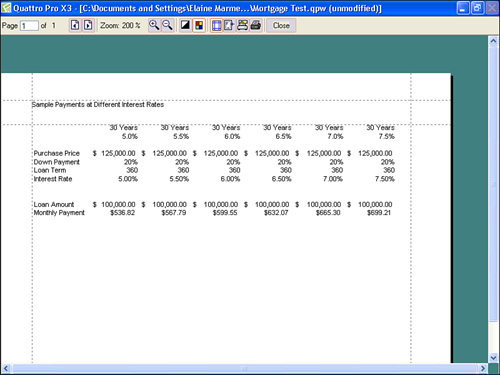
When you view the spreadsheet in Print Preview mode (see Figure 6.18), you get a sense of the expected font size and page count for the spreadsheet.
Figure 6.18. The anticipated printout before scaling its size.
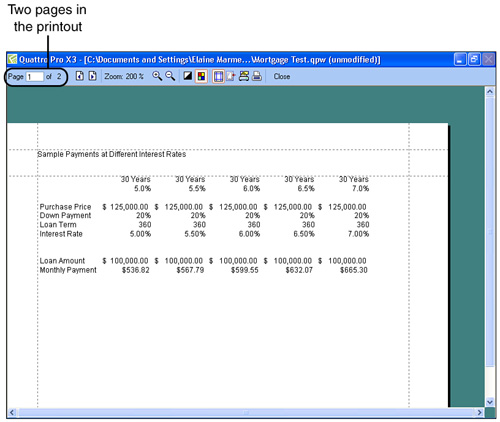
In Figure 6.19, I’ve scaled the printout to fit on one page without making any changes to margins or font sizes. By scaling the printout, I let Quattro Pro do the work for me.
Figure 6.19. The spreadsheet shown in Figure 6.16 after scaling it to fit on one page.
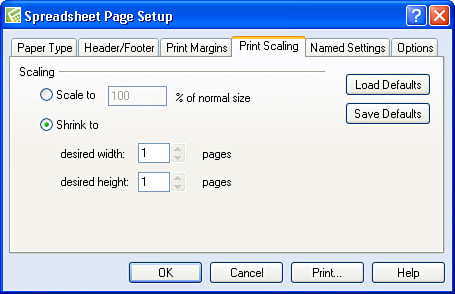
To scale a printout to fit on one page, open the File menu and choose Page Setup. In the Spreadsheet Page Setup dialog box that appears, click the Print Scaling tab (see Figure 6.20). Click the Shrink To option and set the number of pages for the width and height you desire. For example, suppose that you have a printout that would ordinarily be five pages long but one column is dropping onto a new page, doubling the length of the printout to 10 pages. You can scale the printout to 1 page wide and 5 pages long by changing the desired height from 1 to 5.
Figure 6.20. Set shrink options to force a printout to fit on a specified number of pages.
Positioning Page Breaks
Okay, suppose that you have a spreadsheet that would print on one page, but, because of one fairly wide column, the spreadsheet prints on two pages, with a single column on the second page. Suppose further that you don’t want to scale the printout to fit on one page because the print would be too small to read. In this case, you might want to override the page breaks Quattro Pro inserts so that you don’t have one lonely column on a page by itself. Instead, you can force two columns to print on the second page, making the distribution of information more equal.
Tip
Be aware that scaling a printout to fit it on a specified number of pages can make the font size so small that the spreadsheet becomes difficult to read. If you want others to evaluate the spreadsheet information, use common sense when scaling to keep the spreadsheet printout readable.
To move a page break as I’ve described, display the spreadsheet in Page Breaks view by opening the View menu and clicking Page Break (see Figure 6.21).
Figure 6.21. A spreadsheet in Page Breaks view.
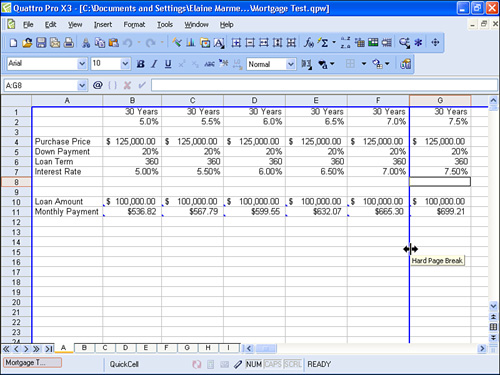
Then, move the mouse pointer over the page break on the right side of the spreadsheet until you see the mouse pointer change to a two-headed arrow pointing left and right. Then, drag the mouse pointer left to move columns from page 1 to page 2. The further you drag, the more columns Quattro Pro moves from page 1 to page 2.
Printing Cell Contents
By default, when you print a spreadsheet, Quattro Pro prints the results of cell formulas just as Quattro Pro displays the results of cell formulas. However, using the Cell Formulas printing option, you can have Quattro Pro print a list of the contents of each cell; if a cell contains a formula, Quattro Pro prints the formula rather than its result. This feature can be very useful when a spreadsheet contains a lot of formulas and you want to confirm that the right formula appears in the right cell. Follow these steps to set up a spreadsheet to print its cell contents.
- Open the File menu and click Page Setup. Quattro Pro displays the Spreadsheet Page Setup dialog box shown in Figure 6.22.
Figure 6.22. Check the Cell Formulas box to display cell contents when you print a spreadsheet.
- Click the Options tab.
- Place a check in the Cell Formulas check box.
- Click OK.
When you print the spreadsheet, it will appear similar to the one shown in Figure 6.23.
Figure 6.23. When you enable the Cell Formulas option, Quattro Pro prints a list of cell addresses and their contents.

Printing Gridlines
Under ordinary circumstances, when you print a spreadsheet, Quattro Pro doesn’t print the row and column borders that surround cells onscreen. And, when the spreadsheet contains a lot of data, it can be difficult to read without lines for the eye to follow, as you can see in Figure 6.24.
Figure 6.24. By default, Quattro Pro doesn’t include row and column borders when you print a spreadsheet.

However, you can include row and column borders to make the same spreadsheet look like the one shown in Figure 6.25 when you print it.
Figure 6.25. You can add cell borders to your spreadsheet printout to increase readability.
Open the File menu and click Page Setup. In the Spreadsheet Page Setup dialog box that appears, click the Options tab. On the Options tab, click the Gridlines check box (see Figure 6.26) and click OK.
Figure 6.26. Click the Gridlines check box to print borders around each cell on the spreadsheet.

Saving Print Settings
You may find that you need a variety of different print settings for a single notebook. Instead of spending lots of time changing the print settings to get them the way you want them each time you need to print, you can save sets of print settings. Then when you want to print, you can quickly select the correct settings and print the notebook.
To save a set of printing options, establish the options using the techniques I’ve described in this chapter. When you have things the way you want them, follow these steps to save the settings:
- Open the File menu and click Page Setup. Quattro Pro displays the Spreadsheet Page Setup dialog box.
- Click the Named Settings tab.
- In the New Set box, type a name that describes the important features of the settings (see Figure 6.27).
Figure 6.27. Type a name for the print settings and click the Add button.
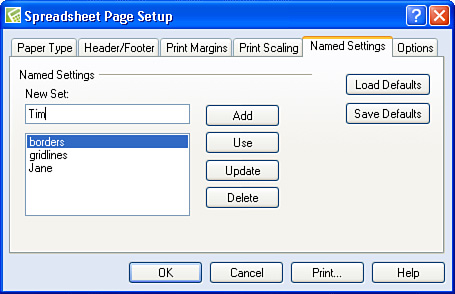
- Click the Add button. Quattro Pro adds the name to the list of available named print settings.
- Click OK.
Tip
Name print settings using a name that will help you recognize the settings. For example, if the set includes row and column borders, you could name it “Borders.” Or, if you use the settings when you print for a particular person, you might use that person’s name.
To use a particular set of print settings, repeat steps 1 and 2. On the Named Settings tab, click the settings you want to apply and then click the Use button (refer to Figure 6.27).
Tip
If you need to adjust a set of print settings to add or delete printing options, select the settings you want to adjust and click Use on the Named Settings tab. Make the adjustments and then click Update on the Named Settings tab.
Printing All or Part of a Notebook
When your notebook contains information on more than one spreadsheet, you can choose to print the entire notebook, a particular spreadsheet in the notebook, or selected cells on a spreadsheet. Open the File menu and click Print. Quattro Pro displays the Spreadsheet Print dialog box shown in Figure 6.28.
Figure 6.28. Use this dialog box to specify the portion of a notebook that you want to print.
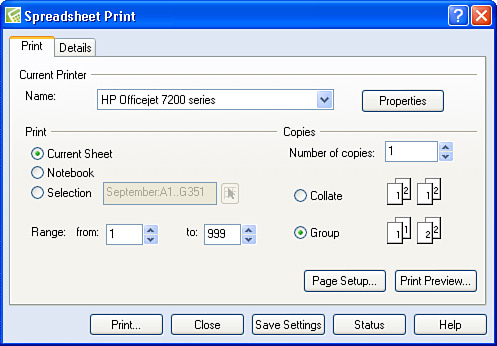
To print the entire notebook, click the Notebook option. To print the spreadsheet you are viewing, click the Current Sheet option. To print selected cells, click the Selection option.
As with all Windows-based programs, Quattro Pro uses the default printer defined on your computer. If you have defined more than one computer, you can select it from the Name list box in the Spreadsheet Print dialog box.
When you select the Selection option, the Range Picker button becomes available. Click it, and Quattro Pro minimizes the Spreadsheet Print dialog box to just a title bar so that you can select the cells you want to print. When you finish selecting cells, click the Maximize button in the Spreadsheet Print title bar to redisplay the Spreadsheet Print dialog box.
To print your choice, click the Print button.