
CHAPTER 29. Network Name Resolution
SOME OF THE MAIN TOPICS IN THIS CHAPTER ARE
Hardware Versus Protocol Addresses 525
Installing and Configuring WINS on Windows 2000/2003 Servers 534
Installing DNS on a Windows Server 552
Network Information Service 553
Computers use hardware addresses when exchanging data on the local subnet. These addresses are burned into the network adapter and are often referred to as MAC (Media Access Control) addresses. MAC addresses produce a flat address space, so network protocols, such as IP, are typically used to create a hierarchical address space. However, for humans, both MAC and IP addresses (or IPX/SPX addresses, for that matter) are difficult to remember. Names are convenient for use by humans who have to operate computers. So, besides identifying a computer or network device using a protocol address, it’s also important to be able to give a name to a computer, a network device, or a service, and then have that name resolved to the address so that data communications can take place on the network.
Understanding how name resolution works on your network will better prepare you to troubleshoot the problems users encounter when trying to locate resources.
This chapter deals with standard name resolution techniques ranging from the simple LMHOSTS files to the Windows Internet Name Service (WINS) for NetBIOS names and HOSTS files and the Domain Name System (DNS) service for IP names. For most networks, such as those that have Unix, Linux, or Windows computers, the name resolution methods described in this chapter will suffice. However, Windows 2000, Windows XP, or Windows Server 2003—when deployed using the Active Directory—adds a whole new dimension to name resolution. The Active Directory stores objects that can represent everything from a user account to a resource on the network, such as a computer or a printer. If you employ Windows 2000 or 2003 Servers in your network, you might find Chapter 30, “Using the Active Directory,” to be an important resource.
In a similar fashion, Novell Directory Services—NDS, now called the eDirectory—is a directory-based solution that maintains information about and provides access to every resource on the network.
Note
Active Directory and eDirectory can be used to quickly locate resources on the network. They do, however, take the concept of name resolution farther down the road in that you can locate a resource using its name as well as by specifying attributes of the resource you need to use. For example, if you don’t know the name of a printer, directory servers enable you to specify search criteria to locate it (or any resource). In the case of a printer, you can specify that it be a color printer, a printer stationed at a particular location, or even such criteria as whether it prints in duplex mode or has three-hole paper installed.
Another important factor to consider when using a directory service is that it is not a replacement for the name resolution techniques described in this chapter. This is easy to understand when you consider that that, in a Windows Server environment, a client computer uses a DNS entry to locate a domain controller so that it can authenticate itself to the network before it can even begin to use the Active Directory.
For Unix/Linux systems, the upgrade path from the older HOSTS file was Sun’s Network Information System (NIS), which was formerly called Yellow Pages, until trademark issues forced a name change. Later versions of NDS, which provide additional security and other facilities, are now called NFS+.
You’ll find both NIS commands as well as commands that start with the letters yp on some Unix systems. Today there is a growing movement to move authentication and other information to an LDAP-based directory server. A number of LDAP-enabled directory servers can be used with different operating system platforms, and a quick search on the Internet can reveal a lot of information. In addition, there’s an open source version of an LDAP server that you can review at http://www.openldap.org. For a basic overview of LDAP, see Appendix D, “The Lightweight Directory Access Protocol.”
When working in a multiprotocol environment, there are several ways in which you can create a single namespace using an LDAP-enabled directory to provide a single directory service for Windows, Unix, Linux, and NetWare clients. You’ll find a discussion of these topics and the utilities that can help you get there in Part XI, “Migration and Integration,” later in this book.
Hardware Versus Protocol Addresses
When communicating on the same network segment, a computer can communicate directly by sending directed Address Resolution Protocols (ARP) packets to another computer using the network card’s unique MAC address. In TCP/IP networks, the ARP is used in a local broadcast domain to determine the hardware address of another computer by sending out a broadcast packet that contains the computer’s IP address. When a computer recognizes an ARP packet that has its IP address, it responds to the ARP request with another packet that tells the original computer what the destination computer’s MAC address is. For more information about hardware addresses, which are stored in the local ARP cache and ARP, see Chapter 24, “Overview of the TCP/IP Protocol Suite.”
The TCP/IP protocol is pretty much the standard today for local area networks. NetBIOS has been adapted to run over IP, and beginning with NetWare 5, IP is now the preferred protocol used in NetWare LANs. To begin, however, let’s look at the older NetBIOS namespace and NetBEUI protocol that were used on Microsoft’s first offerings in the LAN environment.
NetBIOS
The NetBIOS and NetBEUI protocols are described in “NetBIOS and NetBEUI,” which is on the upgradingandrepairingpcs.com Web site. Although the original specifications were sufficient for use on only very small LANs (fewer than 200 nodes), NetBIOS has been a mainstay in most Microsoft network products. Until Windows 2000, NetBIOS names were integral to the Windows operating systems’ management functions. For example, domain names and host names are made up of NetBIOS names. The Server Message Block (SMB) protocol that’s used for resource access and administrative duties in LAN Manager and the Windows operating systems’ networking software modules are based on NetBIOS names.
Note
The Server Message Block protocol is now called the Common Internet File System (CIFS), which is discussed later in this chapter. To provide for interoperability with Windows networks, many vendors created SMB/CIFS products. The Unix and Linux communities have ventured into this territory with Samba. Samba is an SMB/CIFS client/server system that you can install on Unix and Linux clients or servers and use to access typical Windows NetBIOS-based resources. You can read up on the latest version of Samba or download the software using the URL http://www.samba.org.
The LMHOSTS File
In the %systemroot%SYSTEM32DRIVERSETC directory on Windows NT 4.0, Windows 2000, XP, and Windows Server 2003 computers is a file named LMHOSTS.SAM. For Windows 95 and Windows 98 clients, this file is found in the WINDOWS directory. It’s used to map NetBIOS names to IP addresses. The .SAM filename extension indicates that this is a sample file. If you’re going to use the file, you have to copy it or rename it LMHOSTS with no file extension. Because it’s always a good idea to keep the original copy in case things become confused along the line, making a copy is a good choice.
To rename the file from the command line, set your working directory to the directory in which the file resides and enter
ren lmhosts.sam lmhosts
To copy the file (and preserve the original sample file), enter
copy lmhosts.sam lmhosts
The Windows files are basically the same for all versions of Windows, except for a few of the comment lines. The following is the version you’ll find in Windows Server 2003:
# Copyright (c) 1993-1999 Microsoft Corp.
#
# This is a sample LMHOSTS file used by the Microsoft TCP/IP for Windows.
#
# This file contains the mappings of IP addresses to computernames
# (NetBIOS) names. Each entry should be kept on an individual line.
# The IP address should be placed in the first column followed by the
# corresponding computername. The address and the computername
# should be separated by at least one space or tab. The "#" character
# is generally used to denote the start of a comment (see the exceptions
# below).
#
# This file is compatible with Microsoft LAN Manager 2.x TCP/IP lmhosts
# files and offers the following extensions:
#
# #PRE
# #DOM:<domain>
# #INCLUDE <filename>
# #BEGIN_ALTERNATE
# #END_ALTERNATE
# �xnn (non-printing character support)
#
# Following any entry in the file with the characters "#PRE" will cause
# the entry to be preloaded into the name cache. By default, entries are
# not preloaded, but are parsed only after dynamic name resolution fails.
#
# Following an entry with the "#DOM:<domain>" tag will associate the
# entry with the domain specified by <domain>. This affects how the
# browser and logon services behave in TCP/IP environments. To preload
# the host name associated with #DOM entry, it is necessary to also add a
# #PRE to the line. The <domain> is always preloaded although it will not
# be shown when the name cache is viewed.
#
# Specifying "#INCLUDE <filename>" will force the RFC NetBIOS (NBT)
# software to seek the specified <filename> and parse it as if it were
# local. <filename> is generally a UNC-based name, allowing a
# centralized lmhosts file to be maintained on a server.
# It is ALWAYS necessary to provide a mapping for the IP address of the
# server prior to the #INCLUDE. This mapping must use the #PRE directive.
# In addition the share "public" in the example below must be in the
# LanManServer list of "NullSessionShares" in order for client machines to
# be able to read the lmhosts file successfully. This key is under
# machinesystemcurrentcontrolsetserviceslanmanserverparameters
ullsessionshares
# in the registry. Simply add "public" to the list found there.
#
# The #BEGIN_ and #END_ALTERNATE keywords allow multiple #INCLUDE
# statements to be grouped together. Any single successful include
# will cause the group to succeed.
#
# Finally, non-printing characters can be embedded in mappings by
# first surrounding the NetBIOS name in quotations, then using the
# �xnn notation to specify a hex value for a non-printing character.
#
# The following example illustrates all of these extensions:
#
# 102.54.94.97 rhino #PRE #DOM:networking #net group's DC
# 102.54.94.102 "appname �x14" #special app server
# 102.54.94.123 popular #PRE #source server
# 102.54.94.117 localsrv #PRE #needed for the include
#
# #BEGIN_ALTERNATE
# #INCLUDE \localsrvpubliclmhosts
# #INCLUDE \rhinopubliclmhosts
# #END_ALTERNATE
#
# In the above example, the "appname" server contains a special
# character in its name, the "popular" and "localsrv" server names are
# preloaded, and the "rhino" server name is specified so it can be used
# to later #INCLUDE a centrally maintained lmhosts file if the "localsrv"
# system is unavailable.
#
# Note that the whole file is parsed including comments on each lookup,
# so keeping the number of comments to a minimum will improve performance.
# Therefore it is not advisable to simply add lmhosts file entries onto the
# end of this file.
As you can see from the sample file, you can place comments anywhere on a line by using the # character. Using comments aids in managing the file when there are multiple administrators. However, as the last bit of text explains, the entire file is parsed (read) each time it’s consulted for a name lookup. For this reason, when you copy the file to create your LMHOSTS file, you should delete all the default introductory comments, populating the file with only hostnames and comments applicable to your needs. If the number of entries in this file becomes quite large and full of both name translations and comments, it has probably outgrown its usefulness and you need to look to another means of name resolution, such as WINS or DNS.
Note
WINS can perform name translation for NetBIOS names to IP addresses. The LMHOSTS file is considered to be a legacy holdover from earlier Microsoft LANs—for example, those using Windows 95/98 or Windows NT 4.0. The LMHOSTS file can be used to override entries stored on a WINS server, or can be used in a very small network that doesn’t use a WINS server. This chapter describes this file for historical purposes, as well as to point out that if you’re still using it, it’s time to upgrade. The exception to this advice is a network based on those older operating systems where the software application still works and there is no upgrade path.
In addition to serving as the comment character, the # character can be used to specify several keywords that have specific functions when used in this file. The keywords are
![]()
#PRE—Load this entry into the NetBIOS name cache.
![]()
#DOM—This entry is a domain controller.
![]()
#INCLUDE—Use the filename following this keyword to get name-to-address mappings.
![]()
#BEGIN_ALTERNATE and #END_ALTERNATE—The #INCLUDE commands within this block are to be processed in order until one of them succeeds in performing the name translation.
For small networks that have several subnets separated by a router, using the #DOM keyword for an entry can enable a client to locate a domain controller on another subnet. Although it’s preferable to have a backup domain controller on each subnet (for Windows NT 4.0 and earlier versions of Microsoft’s operating systems), this workaround can be helpful for special conditions.
In Figure 29.1, you can see the logical steps that a b-node goes through when trying to resolve a name to an IP address. The NetBIOS name cache is consulted first, followed by broadcasting. Finally, if those two methods fail, the LMHOSTS file is checked.
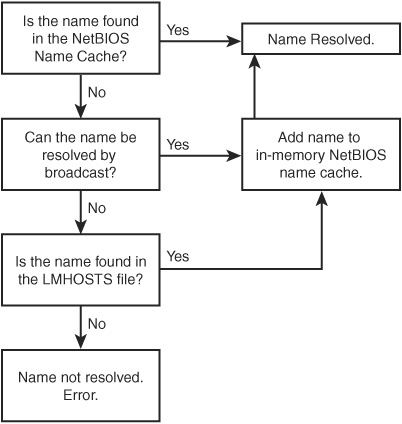
Figure 29.1. In Microsoft networks, a b-node consults the LMHOSTS file when other methods fail.
![]() You can find more information about b-nodes and other node designations that are used with NetBIOS names by reading “NetBIOS and NetBEUI” on the
You can find more information about b-nodes and other node designations that are used with NetBIOS names by reading “NetBIOS and NetBEUI” on the upgradingandrepairingpcs.com Web site.
The in-memory NetBIOS name cache is always consulted first. This cache can hold up to 100 entries. When a name is successfully resolved by the broadcast method or by a lookup in the LMHOSTS file, it’s added to the name cache and can be resolved there from that point onward.
You can ensure that an entry will be placed in the name cache when the workstation boots by using the #PRE keyword for that entry in the LMHOSTS file:
175.110.32.31 yoko.ono.com #PRE
This can be useful for ensuring that servers that are accessed often by clients are resident in the memory cache, eliminating the need to perform a disk access to look up the entry in the LMHOSTS file.
Tip
You can force an update to the NetBIOS cache by using the command nbtstat -R to reload the cache from the LMHOSTS file. This is useful if you’ve just made edits to the file. Also note that if an identical name exists in both the HOSTS file and LMHOSTS file, the definition in the LMHOSTS file will be used.
Windows Internet Name Service
WINS is Microsoft’s NetBIOS Name Server (NBNS) developed according to the details set forth in RFCs 1001 and 1002, and is based on a client/server architecture. Only Windows server operating systems can run the WINS service, and the server does not have to be a domain controller. In the traditional DNS server that originated on Unix systems, an administrator is responsible for manually editing files to maintain address-to-name mappings. WINS is a dynamic database. Name registrations are performed by unicast messages (direct contact) between the server and the WINS client. Because the WINS server does not have to be on the same network segment as the client, and because no broadcast messages clutter up network medium, WINS is a more efficient method of name resolution when compared to b-node functionality.
Note
If your network contains clients or applications that need a WINS server for name resolution, and they won’t work with DNS, consider upgrading the clients or keeping a WINS server. More likely, consider replacing the client or NetBIOS applications.
The following are some of the important benefits of using WINS:
![]() Ease of administration—Updates to the database are dynamic. When a computer is moved to a different location and acquires a new address, it updates the WINS server when it boots. If DHCP is used on the network, moving the client computer requires nothing more than hooking it up to the network and booting the computer, provided the client has been configured to use Dynamic Host Configuration Protocol (DHCP) and WINS.
Ease of administration—Updates to the database are dynamic. When a computer is moved to a different location and acquires a new address, it updates the WINS server when it boots. If DHCP is used on the network, moving the client computer requires nothing more than hooking it up to the network and booting the computer, provided the client has been configured to use Dynamic Host Configuration Protocol (DHCP) and WINS.
Tip
WINS was developed to provide name resolutions services for NetBIOS names. WINS is a dynamic database, so clients can obtain configuration information from a DHCP server and register this information in one or more WINS servers. Modern implementations of DNS servers also support dynamic updates. Therefore, this first benefit that WINS provides is no longer as important as it once was. In an all-TCP/IP network, you shouldn’t have to use WINS unless you have older applications that require it.
![]() Interaction with DNS—Beginning with Windows NT 4.0, WINS has the capability to interact with Microsoft’s DNS server, provided that you configure the client to do so. If properly configured, a non-Windows client can query the DNS server, which can then query the WINS server to obtain the address of a NetBIOS client if the DNS server does not find a name translation in its own database.
Interaction with DNS—Beginning with Windows NT 4.0, WINS has the capability to interact with Microsoft’s DNS server, provided that you configure the client to do so. If properly configured, a non-Windows client can query the DNS server, which can then query the WINS server to obtain the address of a NetBIOS client if the DNS server does not find a name translation in its own database.
![]() Static mappings—If WINS is not set up to interact with the DNS server, you can place static mappings in the database for clients that do not have WINS client functionality. In a network composed of different operating systems, static mappings can help to integrate them into the Windows environment, making it easy for WINS clients to locate these computers.
Static mappings—If WINS is not set up to interact with the DNS server, you can place static mappings in the database for clients that do not have WINS client functionality. In a network composed of different operating systems, static mappings can help to integrate them into the Windows environment, making it easy for WINS clients to locate these computers.
![]() Replication—Although not specified in the RFCs, WINS servers are typically set up with replication partners. This means that over a given convergence time, all WINS servers in the network are updated with changes made on any one of them.
Replication—Although not specified in the RFCs, WINS servers are typically set up with replication partners. This means that over a given convergence time, all WINS servers in the network are updated with changes made on any one of them.
![]() Fault tolerance—Clients are typically configured to locate a primary WINS server and a secondary WINS server. Because the database is replicated at intervals, the secondary WINS server can continue to service all clients until the primary server is brought back online.
Fault tolerance—Clients are typically configured to locate a primary WINS server and a secondary WINS server. Because the database is replicated at intervals, the secondary WINS server can continue to service all clients until the primary server is brought back online.
When to Use WINS
WINS was a good solution for resolving names before Windows 2000 came along. Beginning with Windows 2000, you don’t necessarily need to install a WINS server on the network. This is because Windows 2000 clients can use DNS and the Active Directory to find out about other hosts on the network. However, if you have a network that’s composed of multiple operating systems, such as Windows 98 or Windows NT computers, WINS can still be useful because all versions of Windows prior to Windows 2000 require NetBIOS name support. Some applications, such as SMS, might require NetBIOS.
Of course, NetBIOS name support doesn’t mean that you need to install WINS. It depends on the topology of your network. On a small office LAN with only one physical cable segment (or a hub/switch) and just a few computers, NetBIOS broadcasts are probably sufficient for name resolution for these older clients and will not use up a large amount of bandwidth. However, if you operate a larger network that contains many segments and a large number of computers, or if you’re just starting to introduce Windows 2000 or Windows Server 2003 servers into a network that already has older legacy clients or applications that use NetBIOS names, WINS is a good interim solution until you can plan an upgrade to remove these older clients and applications.
Configuring WINS Clients
To use WINS, a client must first be configured with the address of a WINS server. This can be done in one of two ways. First, you could configure the client manually, using a network properties page for the particular Windows operating system. Second, you could configure a DHCP server to provide the name of one or more WINS servers to a client if you use DHCP in your network. For more information about configuring WINS options using a DHCP server, see Chapter 28, “BOOTP and the Dynamic Host Configuration Protocol (DHCP).”
If your network consists of nothing but Windows 2000, Windows XP, or Windows Server 2003 computers, you won’t need the WINS service. The Active Directory combined with DHCP and a dynamic DNS server provide all the name registration and resolution functionality you need. However, Windows 2000 clients can still be configured to use WINS. This might be necessary if you have a mixed network using clients from Windows 98, Windows NT, or even Unix or Linux clients that have Samba installed.
To configure a Windows 2000 client to use WINS, follow these steps:
1. Click Start, Settings, Network and Dialup Connections.
2. Right-click on the network connection you want to set up to use WINS and select Properties from the menu that appears.
3. Click once on Internet Protocol (TCP/IP) and click the Properties button.
4. Click the Advanced button at the bottom of the Properties page. The Advanced TCP/IP Settings Properties page is displayed. Click the WINS tab (shown in Figure 29.2).
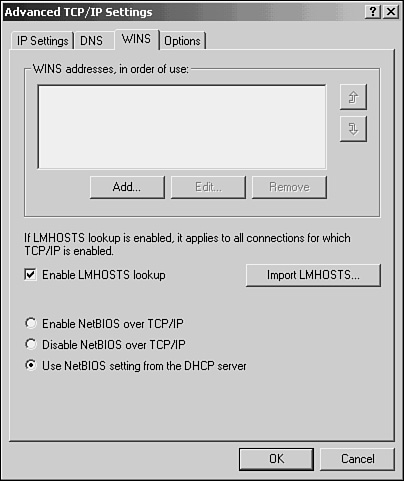
Figure 29.2. Use the Advanced TCP/IP Settings Properties page to configure Windows 2000 clients to use WINS.
5. Click the Add button. A dialog box pops up that you can use to enter the IP address of a WINS server. Enter the address and click OK. Continue using the Add button to add more WINS servers, if they’re present on your network for backup purposes.
You’ll also notice in Figure 29.2 that you can use the Edit and Remove buttons. To remove a WINS server, simply highlight the server you want to remove by clicking on it once and then click the Remove button. The Edit button can be used to change an entry. Highlight the entry and click the Edit button, and the same dialog box used for adding WINS servers pops up. The WINS server you’ve selected to edit appears in the fields on this dialog box. You can change any part of the IP address and click OK.
One final note about Windows 2000 clients that network administrators will appreciate: You don’t have to perform a reboot of the computer after you add, edit, or remove WINS servers.
Client Name Registration and Release
For a client computer to register a name with the WINS server, it sends a name registration request to the server. This is a directed message, not a broadcast message—that’s why you have to configure the client to know the address of one or more WINS servers. If the name is not found in the database, the WINS server returns a positive name registration response to the client. The record is given a timestamp, and a renewal interval is also recorded in the record. The record is given an owner ID as well, which identifies the WINS server that originated (or in other words, owns) the record. When the record is replicated to other WINS servers, they use this ID to identify the original server.
After half of the renewal period has elapsed, a Windows client attempts to reregister its ownership of the name by sending the server a name refresh request. The re-registration process functions the same as the initial registration. By setting a time-to-live (TTL) value on each record, the WINS database can eventually be purged of records that are no longer valid.
Note
The term time to live is used by many protocols and services. Don’t confuse the TTL value described here with the TTL field used in the IP packet header, for example. For IP packets, the TTL field is used to prevent a packet from getting stuck in a routing loop. Each time the IP packet passes through a router, this field is decremented by at least one and the packet is dropped when the TTL value reaches zero. WINS uses a TTL value to determine when to begin the process of getting rid of records that appear to no longer be in use because the client has not renewed the record registration. Later in this chapter, you’ll see that DNS servers also use a TTL value.
The state of the name record changes over time depending on the status of the client. At any time, a record is either in the active state or it can be marked as released or extinct. At each state, a TTL is marked on the record and is used to determine when to change it to the next state.
A name can be released in two ways:
![]() The name can be released explicitly if the client computer is shut down in a proper manner. The client sends a message to the server telling it to release the name.
The name can be released explicitly if the client computer is shut down in a proper manner. The client sends a message to the server telling it to release the name.
![]() The name is set to a released state by the WINS server if it does not receive a name refresh request before the renewal period expires.
The name is set to a released state by the WINS server if it does not receive a name refresh request before the renewal period expires.
When the name is released, the WINS server does not yet delete the record from the database. Instead, it marks the record as released, adds another timestamp (showing the time of the release), and then adds an extinction interval to the record. If the WINS server that receives the release is the original owner of the record, it does not propagate a record update to other WINS servers, which reduces replication traffic. If another WINS server that still has a record showing the name is active receives a request from another computer to use the name, it tries to contact the original owner and find out whether the name can be reused.
At certain intervals, the WINS server scavenges the database. If it finds a record whose extinction interval has expired, it marks the record as extinct. This state is often referred to as the tombstone state. When a record is marked as extinct, it receives another timestamp and an extinction time-out value. If a record has not been re-registered by the end of this final time-out interval, the scavenge process will finally remove it from the database.
If a WINS server receives an explicit release request from a client and the server is not the original owner of the record, it makes itself the new owner of the record. Instead of placing the record into the released state, it proceeds directly to the extinct state. Unlike records in the released state, records in the extinct state do get replicated at replication time. The reason that a WINS server immediately marks a record it does not own as extinct is so that the record will be replicated quickly and will get back to the WINS server that originated the record.
If a name is already in the database, the client can still be awarded ownership of it, depending on certain factors. If the name is in the released or extinct state, the server knows that it can reassign the name because the previous owner has released it. If the name is in the active state, the WINS server tries to contact the original owner. If the original owner does not respond, the WINS server reassigns the name to the node that’s requesting it.
Note
In general, static entries made to the WINS database aren’t subject to the scavenge process and remain in the database. However, the administrator can configure the server to operate differently by setting the Migrate On switch in the WINS Administrator Utility. If this switch is set, the static entry can be overwritten by a new name request if the original owner does not answer a challenge from the WINS server. The Migrate On switch is meant to be used when migrating a network from static entries to dynamic entries. This might be the case when you’re upgrading your network with new client software, for example, and relieves the administrator of the burden of having to remove the static entries manually.
When a client workstation is moved to a new subnet and receives a new address, it sends a name registration request to the WINS server. The WINS server queries the old IP address, determines that the name is no longer in use, and then grants the name to the new IP address.
Tip
Not sure whether your workstation is using NetBIOS names? Use the NBTSTAT command at the Command Prompt. NBTSTAT -n will list the NetBIOS names in the workstation’s local cache.
Static Name Entries
You can enter static entries into the WINS database using the WINS Manager utility. This is usually done for non-WINS clients, such as Unix workstations. Although you can configure the Windows client to use DNS to resolve these names, a static entry into the WINS database does two things. It makes name resolution faster because the client only has to query the WINS server. It also helps to prevent errors by preventing a WINS client from registering a name that’s already in use by a non-WINS enabled client.
Name Queries
In Figure 29.3, you can see the process that a client computer goes through when trying to resolve a name using WINS servers. The steps it takes depend on whether it has one or two WINS servers in its configuration (primary and secondary WINS servers) and whether the node is configured as a p-node or an h-node.
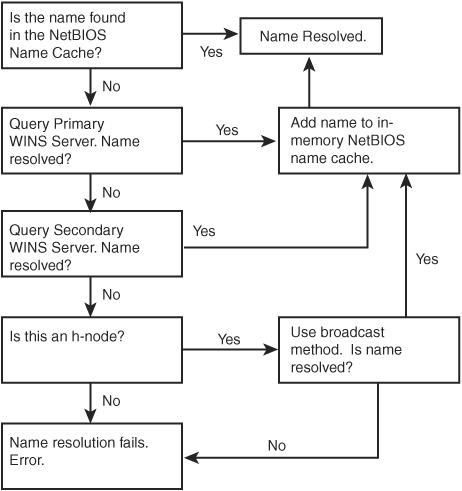
Figure 29.3. Name resolution using WINS servers for p-node and h-node clients.
When a WINS server receives a name query request from a node, it returns a positive name response with one or more IP addresses associated with the NetBIOS name to the requestor via a UDP packet. If the WINS server does not have a record for the name, it sends a negative name response. If the client is configured with the address of a secondary WINS server, it attempts to resolve the name by contacting that server.
If the secondary server also returns a negative name response, the client either fails to resolve the name (if it’s a p-node) or it uses a broadcast message as a last resort (if it’s an h-node). If the computer that the client wants to contact is on the local network segment, the broadcast can succeed. If not, the client is unable to resolve the name to an IP address and will be unable to contact the other computer.
What Is the WINS Proxy Agent?
To provide access to the WINS server information for b-nodes that cannot query the WINS server directly, the concept of a proxy server was created. A proxy server listens to broadcast messages issued by a b-node on the local network segment and if the name being sought is in the proxy server’s name cache, it returns a response to the b-node. If the name isn’t in the proxy server’s cache, it queries the WINS servers it knows.
When a proxy server is also configured to monitor name registration broadcast messages, it listens for these messages and sends a negative response to a b-node that attempts to register a name that exists in the WINS database. However, the proxy server does not make name registrations into the WINS database for a b-node. It merely responds to name registrations that conflict with the database.
To resolve names for b-nodes, the proxy server examines the subnet address of the b-node that’s performing the name query. This is done so that the proxy server does not respond to name queries for nodes that are on the local subnet and can respond for themselves.
Installing and Configuring WINS on Windows 2000/2003 Servers
If you’re running a network that has Windows NT 4.0 and earlier versions of Microsoft operating systems, you can continue to use the WINS servers you’ve already installed. However, you can also set up Windows 2000 Server or Windows Server 2003 to offer the WINS service to your network. Installing the WINS service is a simple matter. You can choose to install the WINS service during the initial installation of Windows 2000 Server, as you would with other networking services. You can also install the WINS service after you’ve completed the operating system installation by using the following steps:
1. Click Start, Programs (All Programs for Server 2003), Control Panel.
2. From the Control Panel, double-click the Add/Remove Programs icon.
3. When the Add Remove Programs window pops up, click Add/Remove Windows Components that you’ll see on the left part of the window. The Add Remove Programs window now displays a Components button in the upper-right side of the window. Click the Components button, and the Windows Components Wizard dialog box pops up.
4. Scroll down until you find Networking Services and highlight it by clicking on it once. Then click the Details button (see Figure 29.4).

Figure 29.4. Highlight Networking Services and click Details.
5. When the Networking Services dialog box appears, scroll down until you find Windows Internet Name Services (WINS). Click the check box next to the component and click the OK button, as shown in Figure 29.5.
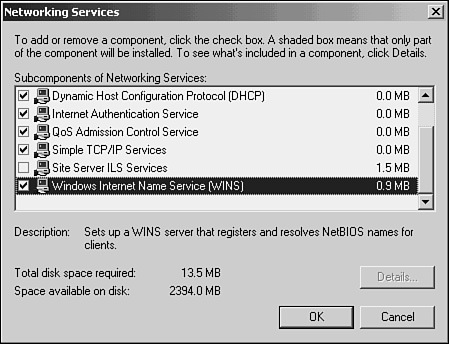
Figure 29.5. Select the WINS service from this dialog box and click OK to install the service.
6. When prompted, insert the Windows 2000 or Server 2003 source CD into your CD-ROM drive and then wait a minute or so while files are copied to your hard drive. When the Windows Components Wizard window reappears, click Next.
7. Another window, titled Completing the Windows Components Wizard appears. Click the Finish button.
8. When the Add Remove Programs window reappears, click OK.
After you’ve installed the service, you won’t have to reboot the computer. Instead, you can start managing the WINS service immediately.
Managing the Windows 2000 WINS Server
The Microsoft Management Console (MMC)—discussed throughout this book because it’s Microsoft’s newest innovation in management interfaces introduced with Windows 2000—is used to manage the WINS server, and you’ll find a new utility in the Administrative Tools folder. Simply click Start, Programs/Administrative Tools and then select WINS from the available tools.
When the MMC console appears, you’ll see your server name and IP address listed in the tree in the left pane of the console. Click the server name and it will expand to show you two additional folders: Active Registrations and Replication Partners (see Figure 29.6).
Figure 29.6. WINS is managed on a Windows 2000 server using the MMC console.
To see a list of computers and group names in the WINS database, simply click the Active Registrations folder. Similarly, to see any other servers you’ve configured to be a replication partner, just click the Replication Partners folder.
Of course, you’ll first have to set up clients and reboot them before you’ll see any computers registered in the database. And you’ll have to set up replication partners before anything will show up in that folder.
Adding Servers and Replication Partners
Most of the management capabilities for WINS servers can be accomplished through either the Action menu or by using properties pages. For example, to start or stop the WINS service, click the server once to highlight it and from the Action menu select Start or Stop. You can also use the Pause and Restart functions found there. These options work just as they did in the Windows NT 4.0 WINS server.
The MMC console enables you to manage multiple WINS servers from a single console. Simply click the WINS entry in the left pane (refer to Figure 29.6) and then, from the Action menu, select Add Server. The Add Server dialog box pops up and prompts you to enter the NetBIOS name or IP address of the server you want to add to the management console. Once it’s added, you can select which server you want to manage by simply clicking it once in the left pane tree of servers.
To add a replication partner, open the Replication Partners folder found under the server you want to set up for replication and, from the Action menu, select New Replication partner. A dialog box again prompts you for the name or IP address of the server with which you want to enable replication.
Using the Action Menu to Configure MMC Properties
The first entry in the tree structure found in the left pane of the MMC console is WINS. Click WINS and, from the Action menu, select Properties. Or you can right-click WINS and select Properties from the menu that pops up. In Figure 29.7, you can see the general properties page for the MMC WINS console.
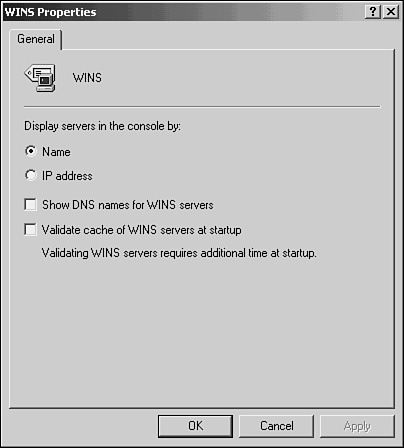
Figure 29.7. Use the WINS server’s properties page to configure general properties for the server.
From this properties page, you can select to have WINS servers in the console tree be displayed using either their NetBIOS name or the IP address of the server. You can also select to show a DNS-style name for the server. Finally, you can configure the server to validate its cache of WINS servers when the server starts up to ensure that they’re still online and that the list is accurate. Because this involves sending a message to each server, this can take some time if you manage a lot of servers or if they’re connected by slow links.
Using the Action Menu to Manage Individual WINS Servers
You can perform most of the basic management tasks associated with WINS servers by selecting the WINS server from those you’ve added to the tree structure in the left pane and then using options from the Action menu. Alternatively, you can right-click on a server and select the same options from the menu that pops up. The things you can manage from the Action menu for any server are
![]() Display Server Statistics—This option enables you to see when the server was started, statistics about replication, name registrations, releases, and so on.
Display Server Statistics—This option enables you to see when the server was started, statistics about replication, name registrations, releases, and so on.
![]() Scavenge Database—This starts the scavenging process, as described earlier in this chapter. You can determine when this process has finished by looking in the event log.
Scavenge Database—This starts the scavenging process, as described earlier in this chapter. You can determine when this process has finished by looking in the event log.
![]() Verify Database Consistency—This function pulls records from other WINS servers by examining records in the local database to determine the owner of each record. If the record still exists on the owner-WINS server and is identical to the local record, the timestamp for the record is updated. Otherwise, if the record pulled from the owner-server has a higher version ID than that of the local record, the local record is marked for deletion and the new record is added to the local database.
Verify Database Consistency—This function pulls records from other WINS servers by examining records in the local database to determine the owner of each record. If the record still exists on the owner-WINS server and is identical to the local record, the timestamp for the record is updated. Otherwise, if the record pulled from the owner-server has a higher version ID than that of the local record, the local record is marked for deletion and the new record is added to the local database.
Caution
Using the Verify Database Consistency option should be done during nonpeak hours on your network because it can produce a large amount of network traffic, depending on the number of records in the database and the number of WINS servers on the network. Don’t do this during rush hour at work! Note that you can schedule this operation for another time by using the properties page for the server.
![]() Verify Version ID Consistency—This is similar to the previous function, but the server checks to see that, for the records it owns, the local record has the highest version ID among other WINS servers on the network. This operation can take some time to complete.
Verify Version ID Consistency—This is similar to the previous function, but the server checks to see that, for the records it owns, the local record has the highest version ID among other WINS servers on the network. This operation can take some time to complete.
![]() Start Push Replication—Use this to start an immediate replication, pushing records to a replication partner. This can be useful if you’ve made changes to the database (such as adding static records) and you don’t want to wait for the next scheduled replication interval. A dialog box prompts you for the server to which you want to push records.
Start Push Replication—Use this to start an immediate replication, pushing records to a replication partner. This can be useful if you’ve made changes to the database (such as adding static records) and you don’t want to wait for the next scheduled replication interval. A dialog box prompts you for the server to which you want to push records.
![]() Start Pull Replication—Similar to the previous menu item, but you use this to force another server to immediately begin the replication process by sending records to your server.
Start Pull Replication—Similar to the previous menu item, but you use this to force another server to immediately begin the replication process by sending records to your server.
![]() Back Up Database—Use this to back up the database. A dialog box prompts you to enter the location that you want to use to store the database file backup. When the process is finished, another dialog box pops up to inform you.
Back Up Database—Use this to back up the database. A dialog box prompts you to enter the location that you want to use to store the database file backup. When the process is finished, another dialog box pops up to inform you.
![]() Restore Database—Use this to restore a WINS database that you have previously backed up. Again, you’ll be prompted to enter the location of the backup files and will be informed when the process has finished.
Restore Database—Use this to restore a WINS database that you have previously backed up. Again, you’ll be prompted to enter the location of the backup files and will be informed when the process has finished.
![]() All Tasks—Start, stop, pause, resume, or restart the WINS server.
All Tasks—Start, stop, pause, resume, or restart the WINS server.
![]() Delete—Use this to delete a WINS server from the MMC console list. Note that this does not delete any data on that WINS server, but merely removes it from the list of servers you manage using MMC on the local computer.
Delete—Use this to delete a WINS server from the MMC console list. Note that this does not delete any data on that WINS server, but merely removes it from the list of servers you manage using MMC on the local computer.
![]() Refresh—Use this to refresh data displayed on the MMC console.
Refresh—Use this to refresh data displayed on the MMC console.
![]() Export List—This menu item enables you to export a list of records stored in the WINS database. You’re prompted for the location in which the file will be created. You can create ASCII text files or Unicode files, and can select that the file be either tab or comma delimited. This function is useful for exporting the WINS database records for use in another application, such as a spreadsheet.
Export List—This menu item enables you to export a list of records stored in the WINS database. You’re prompted for the location in which the file will be created. You can create ASCII text files or Unicode files, and can select that the file be either tab or comma delimited. This function is useful for exporting the WINS database records for use in another application, such as a spreadsheet.
![]() Properties—This displays the properties sheet for the selected server.
Properties—This displays the properties sheet for the selected server.
![]() Help—Use this when all else fails!
Help—Use this when all else fails!
The properties page for a server (which can be displayed using the Action menu as just described) can be used to further configure the server. The properties page has four tabs:
![]() General—Here you can select the time interval used to automatically refresh the statistics shown on the MMC Console for the WINS server. You can also specify a location to store the database during a backup, and use a check box to enable backing up the database automatically when the server is shut down.
General—Here you can select the time interval used to automatically refresh the statistics shown on the MMC Console for the WINS server. You can also specify a location to store the database during a backup, and use a check box to enable backing up the database automatically when the server is shut down.
![]() Intervals—This tab allows you to set the time intervals used for record renewals, deletions, and verification.
Intervals—This tab allows you to set the time intervals used for record renewals, deletions, and verification.
![]() Database Verification—Use this tab to set a time for scheduling database verification. You can specify that it be done every so many hours or you can set a specific time for verification to begin. This function performs the database consistency check described earlier. If you have a large database, a field on this tab enables you to enter the maximum number of records to be verified during each interval.
Database Verification—Use this tab to set a time for scheduling database verification. You can specify that it be done every so many hours or you can set a specific time for verification to begin. This function performs the database consistency check described earlier. If you have a large database, a field on this tab enables you to enter the maximum number of records to be verified during each interval.
![]() Advanced—This tab (shown in Figure 29.8) enables you to perform many functions.
Advanced—This tab (shown in Figure 29.8) enables you to perform many functions.
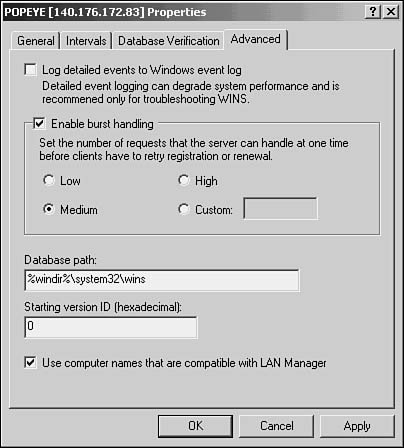
Figure 29.8. The Advanced tab of the server’s properties page enables you to configure important server properties, such as the location of the database.
The Advanced tab is singled out here for special mention because it contains some important configuration items. For example, you can specify the path to use for the database files. You can decide to enable logging detailed events to the event log for troubleshooting purposes. This is not a feature you should leave enabled unless you’re having problems with WINS.
The Enable Burst Handling check box enables you to customize (low, medium, high, or specify a number) the number of client registrations and renewals that the server can handle at a single time. This can be useful if you have a server that you want to use mainly as a backup for your primary WINS server. You can set its burst mode to low and then change this property to high on the server you want to handle the most requests.
You can enter a starting version ID in a field at the bottom of this dialog box. Finally, you can use a check box to enable the use of computer names that are compatible with LAN Manager if you have older Microsoft clients on your network.
Managing the Windows Server 2003 WINS Service
Open the WINS MMC management console by selecting it from the Administrative Tools folder (Start, Administrative Tools, WINS). In Figure 29.9, you can see that the MMC console looks the same as that used for Windows 2000. You can use this MMC snap-in to manage WINS just as you did in Windows 2000.

Figure 29.9. The WINS MMC Console application looks the same in Windows Server 2003 as in Windows 2000.
Using the MMC interface to manage WINS servers on Windows Server 2003 is, for all practical matters, the same as discussed in the previous section about Windows 2000. However, if you’re still managing WINS in a network running Windows Server 2003, it might be time to consider an upgrade to the client systems or applications that still rely on the WINS infrastructure.
Using netsh Commands to Manage WINS
Both Windows 2000 Server and Windows Server 2003 enable you to use the netsh command (Netshell) set to manage WINS as well as other network services, such as DHCP and other network configuration utilities. This can be useful for those who are accustomed to using a command-line interface (such as the Command Prompt), or when you want to include commands in a batch file or other scripting file to manage WINS servers. The netsh commands can be used to manage a wide variety of other utilities. They can even be useful when troubleshooting a server via a Telnet link.
The netsh command is not limited to use with just WINS. Instead, netsh can serve to manage many other network services. Each different management scope is called a context. For example, after you enter the netsh> command prompt interpreter, you can enter the command WINS to set the Netshell command environment to enable you to manage WINS components. A selection of other contexts (which are discussed in much greater detail in their respective chapters) are
![]() DHCP—To manage the Dynamic Host Configuration Protocol
DHCP—To manage the Dynamic Host Configuration Protocol
![]() DIAG—To execute diagnostic commands that are useful for troubleshooting operating system or application problems
DIAG—To execute diagnostic commands that are useful for troubleshooting operating system or application problems
![]() IP—An interface into managing the Internet Protocol configuration
IP—An interface into managing the Internet Protocol configuration
![]() RAS—To manage any Remote Access Servers on your network
RAS—To manage any Remote Access Servers on your network
In this section, you learn about some simple tasks you can perform using netsh for WINS. However, it’s important to understand that the command-line interface, which greatly expands on the simple DOS and newer commands available in the Command Prompt, means that many of you can continue to write script files to control logins, network functions, and so forth.
Tip
netsh commands can also be useful when you’re administering a server across a wide area network link. In many instances, netsh commands can be accomplished more quickly than when using the GUI MMC interface.
The following list shows you some of the more important netsh commands for Windows Server 2003 that relate to WINS. To enter an interactive command session using commands available using the WINS context, use netsh and then at the netsh> prompt, enter wins.
Note
The syntax listed here for netsh is almost identical to that used for Windows 2000. You can check to be sure by entering the command netsh /? at the Windows 2000 Command Prompt. For help on an individual command, use netsh <command> /? instead. This second syntax can be useful in determining the commands available for a certain context, for example. From the help topics displayed, you can further drill down to find out more specifics of this well-implemented addition to the standard command-line utilities offered in early Windows operating systems.
You can create quite complex script files using netsh that can be used to manage many different aspects of a computer. Here you’ll learn about some of the commands used with WINS. For example, the two following commands select a WINS server that will be the target of the netsh commands:
![]()
server—This shows the name of the current WINS server as well as your access (read/write) for the server.
![]()
server \<servername>—This syntax enables you to specify the remote WINS server that subsequent commands will be executed on. Use this to change the context to another WINS server other than the local host. You can use either a hostname or an IP address for servername.
After you enter server or a remote server name, the prompt will change to netsh <wins server> prompt (to reflect the server you’re now managing). From this prompt you can enter commands specific to this context, which are
![]()
Add—Use to add a filter, add a name to the WINS database, add a replication partner, add a pgserver (Persona Grata servers), add a pngserver (Persona Non Grata server), or add another server to the WINS console utility. Persona Non Grata servers are those to block from sending records, and Persona Grata servers are ones to accept records from.
![]()
Check—Check the WINS database for consistency, check a list of name records with a set of WINS servers, and check the version ID numbers for record owners in the database.
![]()
Delete—Delete a name from the WINS database, delete records for particular owner from the database, delete replication partners, delete pgservers and pngservers, delete records from the database or mark them as in the tombstone state, or delete a WINS server from the MMC console interface.
![]()
Init—This command has many uses, from initiating a backup of the WINS database to starting other functions, such as scavaging, searching, and pulling and pushing records.
![]()
Reset—Reset the statistics counter for the local WINS server.
![]()
Set—Use this command to set many options for WINS, from the default log parameters to a backup path for the database.
![]()
Show—Similar to Set, this command will display a great deal of information about the current WINS server.
The complete syntax of the commands available is too vast to cover in a single chapter. The topic of the netsh command syntax could very well be a good reference book on its own because it can be used in other contexts to control other utilities, such as DHCP, and to perform diagnostics on the system.
TCP/IP Names
The address space for IP addresses is a hierarchical one that allows computers to be grouped into networks and sub-networks. The flat address spaces created by MAC addresses don’t allow for any kind of grouping because they only provide an address for the host physical adapter and do not provide any sort of organization that can be used outside a LAN. In a small LAN, it doesn’t matter that MAC addresses are not ordered. Each node can recognize a packet that’s destined for it by examining the MAC address for every packet that passes on the LAN. This concept would not work on a larger network because every packet would have to be forwarded to every node for examination. Imagine having every packet on the Internet sent to every node! It’s also possible to create a hierarchical namespace for nodes on a TCP/IP network by concatenating the hostname with a domain name. For example, the host computer named zira in the domain named nirvana.com is zira.nirvana.com as a fully qualified name.
Names are more convenient for humans than the numerical address format implemented in the TCP/IP suite. Just as the numerical address space is a hierarchical one, so is the namespace. However, it’s important to understand that the two do not have to be directly related on a one-to-one basis. For example, suppose that a computer named printserver.ono.com has an address of 193.220.113.10. This is a class C IP address, so the network portion of the address is 193.220.113. You might be inclined to think, then, that a computer with a name of fileserver.ono.com is also located in the same network and has an address that begins with 193.220.113. However, there is no direct relation between the two.
Not that there can’t be. It might be very convenient to set up a small network with a few subnets and create host computer names that all match up to a particular network address or subnet. In practical terms, however, this is hard to maintain as the network grows and changes.
Instead, use the TCP/IP namespace to create a logical arrangement of computers that matches some kind of business layout or other type of function. It makes sense to use names such as the following:
susan.accounting.zira.com
heather.accounting.zira.com
holly.shipping.zira.com
penny.research.zira.com
foster.research.zira.com
It’s clear from these names that the company or organization is called Zira and that there are computers in the accounting, shipping, and research departments. In this case, however, it might be that Susan works out of the company’s office located in the heart of downtown, whereas Heather works in a suburban office. Their TCP/IP hostnames reflect the business organizational unit in which they work. However, their IP addresses can be on completely different subnets or networks, depending on the physical location or other factors.
The rules for creating a hostname are not as carefree as those used for NetBIOS names. You cannot use spaces in a TCP/IP name, for example. The following rules must be followed when creating a hostname:
![]() You can use alphabetical characters (a–z) or numeric characters (0–9), and the first character of the name must be a letter or a digit.
You can use alphabetical characters (a–z) or numeric characters (0–9), and the first character of the name must be a letter or a digit.
![]() You can use the minus sign (dash), but this cannot be the last character in the name.
You can use the minus sign (dash), but this cannot be the last character in the name.
![]() Periods are allowed, but are used to separate hostnames from domain or subdomain portions of the name. This is covered in RFC 921, “Domain Name System Implementation Schedule.” Because the period is used to separate components, it cannot be the last character in the name either.
Periods are allowed, but are used to separate hostnames from domain or subdomain portions of the name. This is covered in RFC 921, “Domain Name System Implementation Schedule.” Because the period is used to separate components, it cannot be the last character in the name either.
![]() Names are not case sensitive. An uppercase A is the same as a lowercase a.
Names are not case sensitive. An uppercase A is the same as a lowercase a.
![]() The host portion of the name should not be longer than 24 characters. In practice, you can exceed this limit most of the time, but doing so is not a good idea if you’re connected to the Internet where there are other computers and devices that do stick to the strict limit.
The host portion of the name should not be longer than 24 characters. In practice, you can exceed this limit most of the time, but doing so is not a good idea if you’re connected to the Internet where there are other computers and devices that do stick to the strict limit.
Note
These restrictions apply to names you enter in the HOSTS file. When using a DNS server, the restrictions are a little different, as is explained in the following sections.
Although you can use names in the TCP/IP networking environment to conveniently organize your host computers, there must again be a mechanism for resolving these names to the actual IP addresses that are associated with the computer. TCP/IP provides the HOSTS file, which was originally a central file maintained by a central authority and periodically distributed to nodes throughout the Internet. You can probably guess that this method—as with the LMHOSTS file used on NetBIOS networks—has been outgrown by the rapid growth of the Internet, and is now used only on small networks or for special cases.
The Domain Name System is now the primary means for resolving IP addresses to hostnames on the Internet. In some Unix shops, the Network Information System (NIS) is used. NIS was originally called Yellow Pages, but had to change its name due to a trademark infringement.
The HOSTS File
On Unix systems, the HOSTS file is usually found in the /etc or /etc/inet directory. Like the LMHOSTS file, it has no filename extension. It is a text file that contains IP addresses followed by the hostname or names associated with the address. The # character is used to denote comments. Each line should have only one IP address, followed by a space or tab character, and then the hostname. You can place more than one name on the line (each separated by a space or tab character) to provide multiple names for a host (sometimes called nicknames). For example:
#This is the HOSTS file
#
127.0.0.1 localhost
10.1.22.13 pkd.ubik.com # Server at Atlanta office.
10.1.22.46 psi.ubik.ocm # Joe's workstation.
192.208.46.158 www.compaq.com # Compaq's homepage.
Note that the first entry in the file is the loop-back address for the local adapter. You will find this in many HOSTS files, but it isn’t a requirement.
The HOSTS file has the same limitations as the LMHOSTS file. Mainly, it doesn’t scale very well. Each time a change is made in the network, you need to update the file on each machine to reflect the change. This makes it easy to get different copies out-of-sync on a larger network.
In a very small TCP/IP network that doesn’t change very often and doesn’t use NetBIOS names, using the HOSTS file might be preferable to using DNS. You can get a decent DNS server from everyone from Microsoft to Novell to any Unix/Linux server. But if it means that you have to purchase a server operating system to provide for a small number of clients, you might be better off using a simple LAN without a DNS server. For a growing network or one in a fast-paced business environment where employees are always on the move, DNS or NIS should be used.
However, even in a SOHO office, there should be little need to keep using this legacy HOSTS file. If you’re connected to the Internet, network names can be translated using a DNS server provided by your Internet provider. Names on the local LAN can be resolved using NetBEUI.
Domain Name System
When TCP/IP became the standard protocol used on ARPAnet (which evolved into the Internet), the HOSTS file was maintained by SRI-NIC at a central location. Changes were periodically made to the file as administrators emailed requests to SRI-NIC. The updated HOSTS file then had to be distributed to every node, making the maintenance of this file a major administrative chore. For a few thousand computers in the beginning, this was a difficult enough task. But just imagine trying to coordinate the distribution of text files containing IP to name translation files in today’s Internet environment, where there are many millions of users all over the world.
In 1984, the Domain Name System (DNS) was adopted for the Internet. DNS is not only a hierarchical database, but also a distributed one. WINS servers use replication with partners to keep a full copy of the WINS database on each WINS server. On the Internet, each registered domain (for example, zira.com or microsoft.com) has a DNS server, which is responsible for managing the database of hostnames within that domain or subdomains. This distribution of the database makes it easier to scale to a larger size than with the WINS model. Administration can also be delegated so that no central management of the entire database is needed.
Tip
One of the first implementations of DNS was developed at Berkeley for its BSD Unix (version 4.3) operating system. Therefore, you’ll often see the term BIND (Berkeley Internet Name Domain) used in place of DNS on many Unix and Linux systems.
The topmost entry in the DNS hierarchy is called the root domain and is represented by the period character (.). Underneath this root domain are the top-level directories that fall into two groups: geographical and organizational. Geographical domains are used to specify specific countries. For example, .au for Australia and .uk for the United Kingdom. Under each of the geographical domains, you might find organizational domains. Organizational domains include
![]()
com—Used for commercial organizations
![]()
edu—Used for educational institutions
![]()
gov—Used for U.S. government entities
![]()
mil—Used for U.S. military organizations
![]()
int—Used for international organizations
![]()
net—Used for network organizations such as Internet service providers
![]()
org—Used for nonprofit organizations
![]()
arpa—Used for inverse address lookups
The structure of the Domain Name System is similar to an inverted tree. In Figure 29.10, you can see that at the top is the root domain with the com through arpa domains underneath. Under the com domain are individual business organizations that each have their own domain. Under any particular domain there can be subdomains.

Figure 29.10. The Domain Name System is a distributed hierarchical structure.
At each level, a fully qualified domain name (FQDN) is created by concatenating the local name with the names of the entities above it in the hierarchy. Thus, msdn.microsoft.com is used to name the msdn subdomain in the microsoft.com domain that falls under the com domain. By using the FQDN, it’s possible for a hostname to be used multiple times, as long as it produces a unique FQDN. For example, fileserver.twoinc.com names a host called fileserver. This host cannot become confused with another host of the same name that resides in a different domain such as fileserver.acme.com.
There are a number of restrictions to the names you can use in the DNS system:
![]() The maximum length of a domain name or a host label is 63 characters.
The maximum length of a domain name or a host label is 63 characters.
![]() The maximum length for the FQDN is 255 characters.
The maximum length for the FQDN is 255 characters.
![]() There can be up to 127 subdomains.
There can be up to 127 subdomains.
![]() Text is not case sensitive.
Text is not case sensitive.
New Top-Level Domains
Since ICANN took over responsibilities for handling names and numbers used on the Internet, several new top-level domains have been created. Over the next few years, you can expect to see additional top-level domains added to this list. The most recent additions were made in 2000. These are
![]()
aero—Intended for use by the air-transport industry
![]()
biz—For use by businesses
![]()
coop—For use by cooperatives
![]()
info—Anything you want
![]()
museum—Guess?
![]()
name—For registration of individual names
![]()
pro—Accountants, lawyers, and physicians
Note
In 2003, NeuStar, Inc. was asked by the U.S. congress to set up a new domain name called .kids.us. All content on any Web site registered for a domain name in .kids.us will be screened to ensure that it contains no adult or other information that might be harmful to kids.
Of these domains, some are unsponsored (biz, info, name, and pro), which means that they will be governed by the global Internet community through ICANN, whereas the others (aero, coop, and museum) are sponsored domains. That means they’ll be governed by specific entities. For example, the coop domain is sponsored by the National Cooperative Business Association.
Note
You might have noticed recently that there are other domains that appear to be new, such as the popular tv domain. However, note that the .tv domain is not a new top-level domain. Instead, tv is the country code domain for the country of Tuvalu (a small island in the Pacific Ocean), which has allowed an enterprising company to use its country-style domain name for a fee. The company can market the tv domain to register domains that are associated with, of course, television. However, remember that this is just a country code domain. It isn’t one of the new top-level domains that ICANN has authorized. There is nothing that requires a particular country to use its own domain designation for just its use. Whoever thought up this method for establishing what appears to be a new domain should be named Capitalist of the Year!
To stay up-to-date on what the current top-level domains are, visit the ICANN Web site at www.icann.org. You’ll also find a lot of other valuable information at this site if you administer a network that makes heavy use of the Internet. If you want to use the Internet to increase your business, it’s important that the networking staff understand who is responsible for the network numbers, protocols, and so forth on the Internet. Therefore, as many others mentioned in this book, the previous URL should be something you put in your bookmarks or favorites folder.
Primary, Secondary, and Caching-Only Name Servers
For each domain on the Internet, there must be a primary server and a secondary server. The primary DNS server for the domain contains a collection of resource records that contain the address mappings for hostnames in the domain. The primary DNS server is the final authority for these mappings. The secondary DNS server contains a copy of the database maintained by the primary server and can continue to resolve names when the primary server is offline. It’s important to note that the primary DNS server is where changes are made to the database. Through the use of the zone transfer mechanism, the data is copied to secondary servers.
In many cases, a DNS server answers name queries for domains for which it isn’t the authority. In that case, the DNS server contacts a DNS server further up the hierarchy until one is found that can resolve the name or that can point to another DNS server that is the authority for the name. The DNS server maintains a cache of names that have been resolved by this method so that it doesn’t have to continually poll other servers for names that are frequently queried.
A third type of DNS server is a caching-only server. This type of server does not maintain a database for a particular zone. To put it in other terms, a caching-only server isn’t authoritative for any zone or domain and does not use the zone transfer mechanism to keep a current copy of the entire database. Instead, a caching-only name server has to contact another DNS server to initially resolve a name, but like the other servers it maintains a cache of names it has resolved so that it doesn’t have to keep forwarding the query to another server. This type of server is normally used on a network segment that’s connected to the rest of the network by a slower link (or a more expensive one) and is used to reduce network traffic.
Zones
In many cases, it isn’t efficient to have a single server maintain the database for an entire domain. Instead, a primary DNS server can be authoritative for only a zone in the domain. A zone is a partition of the domain into subdomains. For example, one DNS server might be the authority for the zone zira.twoinc.com, whereas another might serve as the authority for the zone research.twoinc.com. Both subdomains exist within the same domain: twoinc.com. However, by dividing the domain into subdomains, it becomes easier to manage not only the DNS servers but also the individual business or organizational units that the domain services.
A zone transfer occurs when a secondary DNS server contacts a server that is primary for the zone and finds that it needs to obtain changes to the database. This is accomplished by using serial numbers contained in the database. If the secondary server has a lower serial number, a new copy of the database is copied to it.
Standard DNS Database Files
There are three basic types of files used by DNS servers. In most DNS implementations, you need to use a text editor to make changes to these files. Most newer DNS servers, such as Microsoft’s DNS server, provide a graphical interface that can be used for adding or changing information in the DNS files. The basic files are
![]() Database File—This is the file that stores the resource records for the zones for which the DNS server is responsible. The first record in this file is the Start of Authority (SOA) record.
Database File—This is the file that stores the resource records for the zones for which the DNS server is responsible. The first record in this file is the Start of Authority (SOA) record.
![]() Cache File—This file contains information for other name servers that can be used to resolve queries that are outside the zone or domain for which the server is responsible.
Cache File—This file contains information for other name servers that can be used to resolve queries that are outside the zone or domain for which the server is responsible.
![]() Reverse Lookup File—This file is used to provide a hostname when the client only knows the IP address. This can be useful for security purposes. For example, a Web server that receives a request from a client can query the DNS with the name of the client to find out whether the hostname associated with the IP address is correct.
Reverse Lookup File—This file is used to provide a hostname when the client only knows the IP address. This can be useful for security purposes. For example, a Web server that receives a request from a client can query the DNS with the name of the client to find out whether the hostname associated with the IP address is correct.
Resource Records
Until recently, most DNS databases were usually composed of ASCII text files containing records that could be used to translate a name to an IP address. Several types of records can be used in the database, with each representing a specific type of resource, such as a computer hostname or a mailserver name. Today, many fast DNS servers maintain a database with far greater capabilities than those that used a flat-file format. Therefore, newer DNS servers also contain many newer capabilities, such as dynamic updates.
When representing a domain name in DNS, a specific syntax is used. The term label is used in RFC 1035, “Domain Names—Implementation and Specification,” when describing this syntax. A label is a one-byte length field followed by a data field. The length field indicates the number of characters in the data field. A domain name is represented by a series of labels and the entire domain name string is terminated with a length field of zero. For example, Figure 29.11 shows the layout of a series of labels that would be used to define the domain name zira.twoinc.com.

Figure 29.11. The domain name is represented by a series of labels in DNS.
Tip
You can find other RFCs, both standards and proposed standards, by entering DNS as a keyword in the search capability offered on the Web’s own archive for RFCs: http://www.rfc-editor.org.
Although the string is only 13 bytes long, excluding the periods, it takes 17 bytes to represent it in the database because of the length fields and the terminator field. To avoid repetition for domain names that are used a lot in the database, a pointer record can be used.
The general format used for a resource record contains the following fields:
![]()
Name—The owner name. This is the name of the domain to which this record belongs.
![]()
Type—A 2-byte field that specifies the resource record type code.
![]()
Class—A 2-byte field that specifies the resource record class code.
![]()
TTL—A 32-bit signed integer that specifies the time-to-live value. The TTL value specifies the amount of time a record can be cached before its value needs to be refreshed from the authoritative source. 0 indicates that the record cannot be cached.
![]()
RDLENGTH—An unsigned 16-bit integer that indicates the length of the data field that follows.
![]()
RDATA—The data field. This part of the record describes the resource. The contents depend on the values of the type and class fields.
The Type field indicates the type of resource record. Table 29.1 contains a list of the standard record types used in most DNS implementations, along with a description of their use.
Table 29.1. DNS Resource Records
In earlier implementations of DNS, other record types were also used. For instance, MD and MF were used to specify mail destination and mail forwarder records. RFC 1035 made obsolete three other RFCs: 882, 883, and 973. Four other record types that are considered experimental are
![]()
MB—Mailbox domain name
![]()
MG—Mail group member
![]()
MR—Mail rename domain name
![]()
NULL—Null resource record
In addition, RFC 2782, “A DNS RR for Specifying the Location of Services (DNS SRV),” added a new record type that figures heavily into a Windows 2000/.NET network: the SRV or service record. This type of record is used to store records in a DNS database that clients can use to look up services. For example, Windows servers use this type of record to enable clients to use DNS to locate domain controllers and other services. We’ll get into more details about that in the next chapter.
The Start of Authority (SOA) record is used at the beginning of the database and is used to describe the database. It’s used mostly by secondary DNS servers to get zone information. The fields in this record are
![]()
Domain name—Name of the domain for which this database is the authority.
![]()
IN—The class type of Internet.
![]()
SOA—The Start of Authority record type indicator.
![]()
Primary server—The FQDN of the primary DNS server for this domain.
![]()
Email address—The email address of a person who is responsible for this domain.
![]()
Serial number—A 32-bit value that shows the revision number of the database file. It is incremented each time a change is made to the database so that secondary servers can detect the change.
![]()
Refresh rate—A 32-bit value used by secondary servers. After this interval has elapsed, the data for a record needs to be checked again in the primary server database.
![]()
Retry rate—A 32-bit value indicating the amount of time to wait before retrying to refresh data after a failed attempt.
![]()
Expire rate—A 32-bit value indicating the maximum amount of time a secondary server is to try to refresh data before it stops processing DNS data for this zone.
![]()
Minimum TTL—The minimum amount of time for a resource record’s TTL. This value can be overridden by the TTL value specified in the record itself.
All time values in the SOA record are in seconds.
The NS record type can be used to indicate that another name server is authoritative for this subdomain. For example, the record
zork.twoinc.com IN NS zira.twoinc.com
indicates that the name server whose FQDN host name is zira.twoinc.com is the authoritative name server from which to get information about the subdomain zork.twoinc.com. To get the address of the name server zira.twoinc.com, an A type record is needed:
zira.twoinc.com IN A 216.65.33.219
The CNAME record is used to specify aliases or nicknames that can be used in addition to a hostname; for example:
ftp.zira.twoinc.com IN CNAME zira.twoinc.com
Pointer records (PTR class) are used to get the name that’s associated with an IP address—a reverse translation. For example
219.33.65.216 IN PTR zira.twoinc.com
can be used to perform a query to get the name of this host when only the IP address is known. However, notice that the IP address has been reversed in this record. It is represented in a pointer record as 219.33.65.216 instead of 216.65.33.219. The reverse format is used to make a key lookup in the database function properly. The special domain IN-ADDR.ARPA contains the data used when a server needs to look up the hostname for an address in the domain.
The Class field is generally IN, which stands for Internet. The numeric value for this code is 1. In addition to this class type, you might see references to CS, which stands for the obsolete CSNET class. The CH class stands for the CHAOS class and the HS class code stands for the Hesiod class.
Configuring a Unix DNS Server
On most Unix systems, configuring a DNS server involves editing ASCII text files and making the appropriate entries. The actual files to edit depend on the brand of Unix you’re using. The most common is the Berkeley Internet Name Domain (BIND) implementation. This server uses a daemon called in.named.
In addition to the actual zone database files, you also have to edit
![]()
/etc/named.boot—This file provides information for the in.named daemon when it starts up. The Directory directive specifies the directory that holds the zone database files (usually /var/named). The Cache directive tells the server to load a cache of initial hostnames. The Primary directive tells the server that it will function as the primary DNS server for the zone and the Secondary directive tells the server that it will function as the secondary DNS server for the zone.
![]()
/var/named/db.cache—This is the usual name for the cache file.
To start the BIND service daemon after you’ve edited all the appropriate files, you only need to enter the command in.named at the system command prompt (or in a startup file). If you’ve edited the /etc/named/boot file or its equivalent on your Unix/Linux variant, the server automatically starts the next time the system is booted.
The most time-consuming task is the editing of the zone database files and making entries for the hosts in the domain.
Configuring DNS Clients
Unix/Linux clients usually get their information about name servers from the /etc/resolv.conf file. (Note that this might be different for your variant of the “universal” Unix operating system. Check the manual pages.) To configure the client, edit this file. To place comments in this file, you can use the semicolon (;) character. The three directives that you configure in this file are
![]()
Domain—The default domain name. This name is appended to any names that are partially qualified.
![]()
Search—This is a search list of domains used to look up names that are not fully qualified. You can specify up to six domain names with a total of 256 characters for this directive.
![]()
Nameserver—You can specify up to three DNS servers by IP address with this directive. Note that if you don’t specify a nameserver address, the default is the local domain.
For example:
;This is the /etc/resolv.conf file for local workstations
domain twoinc.com
; Name servers
nameserver 199.45.32.38
nameserver 151.197.0.39
nameserver 216.645.33.219
; search lists
search twoinc.com biznesnet.com
; end of file
A client using this file to try to resolve the name of a host named zira would first search the domain twoinc.com and then the domain biznesnet.com. The first match found is the one that will be used to resolve the name to an IP address.
To configure a Microsoft client to use a DNS server, you only need to enter the IP addresses of the DNS servers when you perform the initial client network setup (or set your DHCP server to provide this information to the client).
Using nslookup
The nslookup utility is generally employed to find the IP address associated with a name. However, the utility can be used to interrogate the DNS database to find not only IP addresses, but also information stored in other records in the database. The utility can be used either in interactive mode, where the user can continue to issue commands, or in a one-shot, non-interactive mode where a single query is executed. The basic syntax for the command is
nslookup [[-option ...] [hostname to locate]] - [server]
If you omit the last item in this syntax (- server), the local DNS server is queried. However, when you have multiple servers or if you want to query a server outside your organization, specify it with this parameter.
A simple example of the command is nslookup twoinc.com, which returns the following information:
Name: twoinc.com
Address: 216.65.33.219
If you want to retrieve more information about the server, you can use options and specify the info records:
nslookup -query=hinfo -timeout=10 www.twoinc.com
twoinc.com
primary name server = ns1.tentex.com
responsible mail addr = hostmaster.twoinc.com
serial = 1342
refresh = 3600 (1 hour)
retry = 600 (10 mins)
expire = 86400 (1 day)
default TTL = 3600 (1 hour)
As you can see, this tool is useful for looking up addresses, but can also be used to query the DNS database and help you debug configuration problems. With this simple query, you can see the serial number of the current database along with other information stored in the SOA record. The syntax for the options of this command varies depending on your operating system.
Dynamic DNS
Earlier in this chapter, I discussed Microsoft’s WINS servers. These NetBIOS name servers can be used to dynamically accept information from clients so that the network administrator does not have to make edits to the database each time a node is added to the network or a workstation is moved to a new location. The Dynamic Host Configuration Protocol (DHCP) has eliminated the necessity of manually configuring each computer host with network information. Microsoft’s DNS server can be configured to query the WINS server when it needs to resolve a name it cannot find in its own databases.
This solution does not help if you have a multivendor network with workstations running different operating systems. There are several relevant RFCs that address these problems associated with standard DNS implementations, such as
![]() RFC 2136, “Dynamic Updates in the Domain Name System (DNS UPDATE)”—This RFC describes a method that can be used for dynamic updates to DNS. It provides for an atomic (all-or-nothing) update mechanism that can be used to add, delete, or modify one or more resource records in a zone file. This RFC was updated by a proposed standard, RFC 3007, “Secure Domain Name System (DNS) Dynamic Update,” among others.
RFC 2136, “Dynamic Updates in the Domain Name System (DNS UPDATE)”—This RFC describes a method that can be used for dynamic updates to DNS. It provides for an atomic (all-or-nothing) update mechanism that can be used to add, delete, or modify one or more resource records in a zone file. This RFC was updated by a proposed standard, RFC 3007, “Secure Domain Name System (DNS) Dynamic Update,” among others.
![]() RFC 1995, “Incremental Zone Transfer in DNS”—Incremental zone transfer means that only portions of the zone database file that have been modified need to be transferred from primary DNS servers to secondary servers. This process conserves network bandwidth and decreases the latency time for changes to be distributed throughout the Internet.
RFC 1995, “Incremental Zone Transfer in DNS”—Incremental zone transfer means that only portions of the zone database file that have been modified need to be transferred from primary DNS servers to secondary servers. This process conserves network bandwidth and decreases the latency time for changes to be distributed throughout the Internet.
![]() RFC 1996, “A Mechanism for Prompt Notification of Zone Changes (DNS NOTIFY)”—The third piece of the solution enables the primary DNS server to notify the secondary servers that changes have been made to the zone database. Currently, zone transfers can occur only after a refresh interval has passed.
RFC 1996, “A Mechanism for Prompt Notification of Zone Changes (DNS NOTIFY)”—The third piece of the solution enables the primary DNS server to notify the secondary servers that changes have been made to the zone database. Currently, zone transfers can occur only after a refresh interval has passed.
Offerings for a DNS server that’s truly dynamic and a corresponding DHCP server capable of making updates are becoming more widespread at this time. Portions of the technology are implemented here and there, while some vendors offer both and DNS and DHCP solutions that work well together. For example, The Internet Software Consortium (ISC), which maintains BIND, released—on March 4, 2003—version 9.2.2 of BIND, which supports RFC 2136. You can download documentation or the kit files from the ISC Web site at http://www.isc.org.
At the same site, you will also find a version of DHCP, along with a list of products developed by other developers that are based on or can work with these products.
For network administrators who already have DNS servers running on the network but are concerned about whether these servers can be used in conjunction to the Windows 2000 version of DNS, please note that Windows 2000 DNS server also supports the following RFCs in addition to the dynamic update RFCs listed previously:
![]() RFC 1034, “Domain Names—Concepts and Facilities”
RFC 1034, “Domain Names—Concepts and Facilities”
![]() RFC 1035, “Domain Names—Implementation and Specification”
RFC 1035, “Domain Names—Implementation and Specification”
![]() RFC 1123, “Requirements for Internet Hosts—Application and Support”
RFC 1123, “Requirements for Internet Hosts—Application and Support”
![]() RFC 1886, “DNS Extensions to Support IP Version 6”
RFC 1886, “DNS Extensions to Support IP Version 6”
![]() RFC 2181, “Clarifications to the DNS Specification”
RFC 2181, “Clarifications to the DNS Specification”
![]() RFC 2308, “Negative Caching of DNS Queries (DNS NCACHE)
RFC 2308, “Negative Caching of DNS Queries (DNS NCACHE)
Check the documentation for your BIND or DNS server to see which RFCs it supports. You might be surprised to find that this new and improved DNS server from Microsoft might be as good as, or perhaps better than, your current version.
Installing DNS on a Windows Server
Because it’s so closely tied to the Active Directory and Windows 2000, installing and managing the DNS server for Windows 2000 Server and Windows Server 2003 when using the Active Directory is covered in greater detail in the next chapter. Windows clients in the network use DNS to locate domain controllers, which hold the Active Directory database. When you decide to promote a Windows server to become a domain controller, you’ll be prompted to install a DNS server as well, unless another DNS server already exists on the network. After the domain controller has been properly configured, it will register records in DNS that enable clients to find the domain controllers in the domain.
However, you can always install a DNS server on Windows Server whether or not you decide to use the Active Directory. For example, you might have a few Windows servers in a Unix network and decide to use Microsoft’s version of DNS because you find the graphical interface easy to use (tired of editing those text files and making a mistake?). Or you might want to install additional DNS servers to provide a backup for a primary DNS server. You don’t have to install the DNS service on just a domain controller, but the system must run Windows 2000 Server or Windows Server 2003.
Installing the service is just as simple as installing the WINS service:
1. Click Start, Programs, Control Panel (Start/Control Panel for 2003).
2. From the Control Panel, double-click the Add/Remove Programs icon.
3. When the Add Remove Programs window pops up, click Add/Remove Windows Components (on the left part of the window). The Add Remove Programs window now displays a Components button in the upper-right side of the window. Click the Components button, and the Windows Components Wizard dialog box pops up.
4. Scroll down until you find Networking Services and highlight it by clicking it once. Then click the Details button.
5. When the Networking Services dialog box appears, scroll down until you find Domain Name System (DNS). Click the check box next to the component and click OK.
6. When prompted, insert the Windows Server source CD into your CD-ROM drive and then wait a minute or so while files are copied to your hard drive. When the Windows Components Wizard window reappears, click Next.
7. Another window appears, titled Completing the Windows Components Wizard. Click Finish.
8. When the Add Remove Programs window reappears, click OK or Close.
Chapter 30, “Using the Active Directory,” looks more closely at how managing DNS on a Windows 2000/2003 server is done using the MMC console, as well as how DNS can be installed at the same time, and integrated into the Active Directory.
Network Information Service
As mentioned earlier in this chapter, Sun developed Network Information Service (NIS) as a client/server system that allows for the sharing of information on a network, including not only hostnames and addresses, but also other information, such as password files. The goal of NIS is to reduce administrative overhead problems associated with having multiple copies of files on hosts throughout the network.
NIS is based on a flat namespace design, whereas NIS+ more closely resembles the Domain Name System in its hierarchical structure. NIS+ uses a concept of NIS domains, which might or might not be paired with DNS domains. It also uses a concept called maps for storing data using a simple keyword/data concept. NIS+ uses a more traditional database format with tables containing multicolumned rows of data.
NIS is mentioned in this chapter not because it is a name resolution mechanism, but because on many Unix networks, NIS is responsible for keeping synchronized other files that perform name resolution. If you use NIS (or NIS+), I recommend you become familiar with its installation and configuration. Security on Unix systems can be a difficult task if you just install NIS and forget about it. You need to understand how it works, and you should consider the security implications of keeping important information on different servers throughout the network.