In this chapter, I review many of the Terminal Server changes that need to be implemented prior to installing any applications or letting any users access the system. It has always been my preference to implement these changes first, perform the necessary testing to ensure stability, and then move on to add the desired server extensions (such as MetaFrame) and applications. I have found that issues are much easier to troubleshoot when following this approach.
TIP:
MetaFrame-specific configuration and tuning options are discussed in Chapter 14, “MetaFrame Presentation Server Configuration.”
One of the most important things you should remember when configuring your server is to perform systematic changes. Always know what changes are being made and why. Document these changes to ensure that not only you but also anyone else who may become involved in the project knows and remembers exactly what has been done. As part of a complete change management strategy, the importance of this cannot be stressed enough.
I recommend that you review this entire chapter before you begin to make any changes to your server. This will give you an idea as to what changes are appropriate for your deployment and let you decide which ones you will implement. Don’t simply proceed from the beginning of the chapter to the end, applying every listed change. Many changes need to be made only in certain situations and others only if certain issues arise when you begin to test your implementation. For example, if your Terminal Server environment involves only local users connecting over a 100MB local area network, you likely will not need to modify the default TCP/IP KeepAlive option.
NOTE:
In response to feedback from readers of the previous edition of this book, I’ve included a summary checklist of all the changes discussed in this chapter, which you can use as an easy reference for tracking what changes you have made to your Terminal Server. Not only does this list the suggested changes, but it also flags whether the change is “recommended” or “optional” and if it applies to Windows 2003, Windows 2000, or both. You will find this checklist in Appendix D, “Terminal Server Stability and Tuning Configuration Checklist.” An electronic version of this checklist can be downloaded from the Web site for this book at <Web site link goes here>
While performing any kind of configuration change, you likely will not want to allow users access to your Terminal Server. If the server you are configuring is not yet in production, this should not be an issue and you will not need to worry about modifying any connection options.
If the machine is or was recently a production server, you may need to take some extra precautions to ensure user connections are properly restricted. While the easiest way to ensure this is to perform your configuration changes outside normal business hours, this is not always possible depending on the nature of your business. The restrictions that need to be implemented will depend very much on how users are accessing your server. In general, users can access a Terminal Server in one of three ways:
By directly connecting to the server using the Terminal Server RDP or Citrix MetaFrame Presentation Server Client—. In this configuration the client is hard-coded to point to a specific Terminal Server.
By connecting to a Terminal Server via Microsoft’s Network Load Balancing service—. The client is assigned the address of the cluster, not the individual Terminal Server, and connectivity is determined based on connection load.
By establishing a connection via a MetaFrame Presentation Server published application—. The client requests access to a published application, and MetaFrame determines what server will actually service the request.
TIP:
The different connectivity options available are discussed in Chapter 5, “Client Hardware and Software Planning.” Specific installation information can be found in Chapter 19, “RDP Client Installation and Configuration,” and Chapter 20, “ICA Client Installation and Configuration.”
Direct connections are most common in one or two server implementations where no load balancing is being performed to dictate what servers are available to service a connection request. Direct connections are also commonly used by an administrator when they need to service a specific Terminal Server.
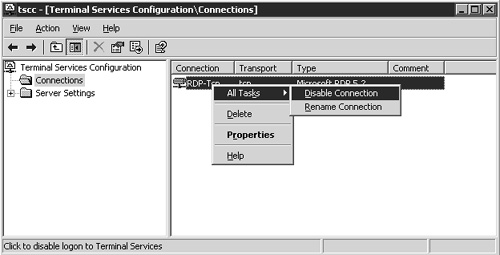
If you’ll be performing your entire configuration directly from the server’s console (which I normally recommend), you can disable these direct RDP or ICA connections using the Terminal Services Configuration tool, found under Administrative Tools on the Start menu. Under the Connections folder, you will see all installed connection types. If you right-click the desired connection, select All Tasks, and then choose Disable Connection, you will prevent all users, including administrators, from connecting remotely.
Please note that all active user connections via this protocol will be immediately terminated when you disable a connection type. Figure 11.1 shows the disabling of RDP connections on a Windows Server 2003 Terminal Server. Anyone attempting to connect to a Terminal Server using a protocol that has been disabled will receive an error message stating that the specified protocol type may be disabled or that the server itself is unavailable. Once disabled, a connection protocol will remain disabled until it has been explicitly re-enabled. A server reboot will not change the protocol’s current state.
TIP:
This behavior differs from the CHANGE LOGON command, which disables logons only until the next time the server is rebooted, or until they are once again enabled. It is also worth noting that disabling logons using CHANGE LOGON won’t automatically terminate any active users currently on the server but will prevent any new connections from being made. New logons are disabled by issuing the command
change logon /disable
They are once again enabled either by rebooting the server or issuing the command
change logon /enable
The CHANGE LOGON command is also discussed in Appendix A, “Terminal Services Command Reference.”
If you want to perform at least some of your server configuration through a remote client connection, then disabling remote connections obviously is not an option. Alternatively you can restrict the connection permissions, thereby limiting who can establish a Terminal Server connection. The process by which you can do this differs slightly between Windows 2003 and Windows 2000:
If you have a Windows 2003 Terminal Server (or a Windows 2000 Terminal Server configured with a local Remote Desktop Users group), you can simply remove any users or groups that you don’t want accessing the server from the local Remote Desktop Users group.
By default, in order for any non-administrator to log on to a Windows 2003 Terminal Server, they must belong to this local security group.
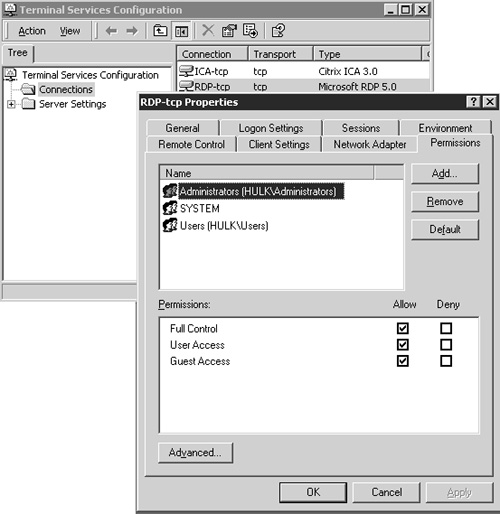
On a Windows 2000 Terminal Server with the default connection permissions, you will need to manage the security within the Permissions tab of the appropriate connection protocol.
From the Terminal Services Configuration utility, right-click the desired connection (RDP or ICA) and select Properties; then select the Permissions tab. You can either remove the desired non-administrative groups from here or modify the group memberships as required. Figure 11.2 shows the RDP permissions for a Windows 2000 Terminal Server. If you’re running MetaFrame Presentation Server, be sure to verify the security of all available connection types (RDP and ICA) when restricting connection permissions to a Terminal Server. On more than one occasion I’ve seen a server where the administrator has the ICA protocol locked down, but the RDP protocol has been left with its default permissions.
TIP:
I discuss security in detail, including protocol connection permissions, in Chapter 16, “Terminal Server Security.”
If you have implemented Microsoft Network Load Balancing (NLB) to distribute client connections amongst multiple Terminal Servers, you will want to remove any machines you will be servicing from the load-balancing cluster prior to making any system changes.
The preferred method of removing an active host from an NLB cluster is to place the host into “drainstop” mode. Drainstopping allows the host to continue to service existing connections, while preventing any new connections originating from the cluster to be serviced by this host. Drainstopping will not prevent direct connections to the Terminal Server from still being allowed. In order to prevent direct connections, you will need to disable or restrict connection access as described in the previous section of this chapter.
Drainstopping can be initiated directly from a command prompt. The following syntax will work on either a Windows 2000 or 2003 NLB cluster:
wlbs drainstop <cluster name | ip address>:<host>
On a Windows Server 2003, you can also use the NLB command, which is exactly the same as WLBS. If you have configured your NLB cluster to require a password, then you will need to append the /PASSW <password> parameter to the end of your command in order to properly manage the cluster.
The following example would remove the server MF03 from the NLB cluster called TS.NOISYRIVER.COM. Note that TS.NOISYRIVER.COM must resolve to an IP address within DNS for this to work properly.
wlbs drainstop ts.noisyriver.com:mf03 /passw password
Once all the desired changes have been completed to the server; it can be reassigned to the cluster by issuing the command
wlbs start <cluster name|ip address>:<host>
Windows Server 2003 also provides a GUI tool for managing an NLB cluster. Figure 11.3 shows an example of this tool, called the Network Load Balancing Manager. You can drainstop hosts (and entire clusters) using this tool simply by right-clicking the desired object and selecting Drainstop from the Control Hosts menu.
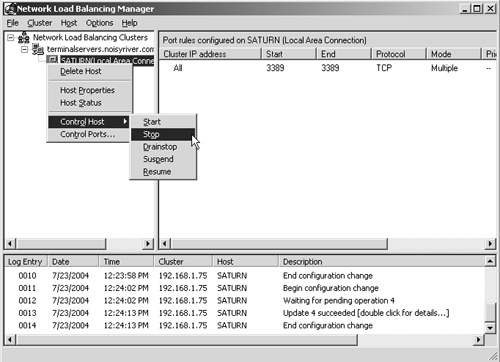
Whether using the command line or the GUI tool, you need to be sure to wait for the convergence process to complete and all existing connections to terminate before taking the server offline.
NOTE:
An overview of Network Load Balancing and load management with Windows Terminal Server is discussed back in Chapter 1, “Microsoft Windows Terminal Services.” More detailed information on the actual implementation of Network Load Balancing is covered in Chapter 22, “Server Operations and Support.”
When running MetaFrame Presentation Server, you likely are providing your users with access to the server via one or more published applications instead of through a direct, server-specific connection. In this situation, disabling or restricting access at the connection level, as described earlier, will not alter how MetaFrame directs users to the desired published applications. What can result is that the user is still directed by MetaFrame to the Terminal Server you are servicing, but they fail to gain access to the published application because of the connection restrictions. They will then receive an error message, which likely will initiate a call to your help desk.
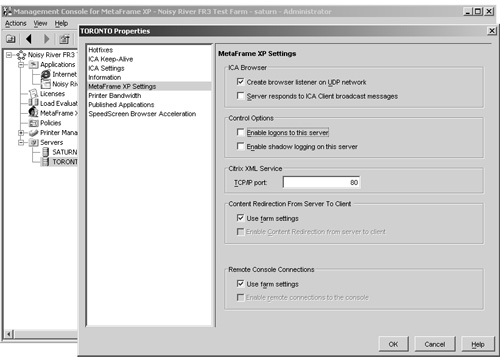
Instead of trying to restrict access at the connection level, you should manage the server access through the Citrix Management Console (CMC). One way to temporarily restrict access to a server is to completely disable remote logons from within the CMC. Figure 11.4 shows the settings for the MetaFrame XP server Toronto. This is accessed by right-clicking the appropriate server within the CMC and selecting Properties. Click MetaFrame XP Settings, and the settings will appear on the right-hand side. You will see the Control Options group box, where the Enable Logons to This Server checkbox exists. When logons have been disabled (unchecked), no one can remotely access the server, either via a published application or through a direct connection to the server (RDP or ICA). This includes administrators.
While existing connections are not affected, unless you have access to the server’s local console, you likely will not run the risk of locking yourself out of the server by using this approach.
Restricting access in this manner is identical to using the
CHANGE LOGON /DISABLE
command from a command prompt. As a consequence, if the server is rebooted, logons will automatically be re-enabled.
TIP:
When connections have been disabled in this manner, MetaFrame Presentation Server is aware of this configuration change and automatically omits that server from participating in any application publishing. This can easily be verified by running the following command from a command prompt:
QUERY FARM /APP
This command will display a list of all applications that are published, what servers they are available on, and what their current server load level is. If a server’s logons have been disabled, the server should disappear from all application-publishing lists.
Instead of disabling logons, another option to consider is simply stopping the Citrix Independent Management Architecture (IMA) service on the Terminal Server. Once stopped, this server will no longer be able to participate in any Citrix-based services, and it will appear in the offline list when the following command is run:
QUERY FARM /OFFLINE
It may take a few minutes once the service has stopped for the server farm to be updated with this information, but once the update has occurred, the server will no longer service any published application or direct server connection requests until the IMA service is restarted. RDP connections are in no way affected by the IMA service and will continue to function normally.
When the IMA service is eventually restarted, the server will once again appear in the online server list, and all previously published applications will automatically become available again for use on this server. No additional configuration steps are required.
NOTE:
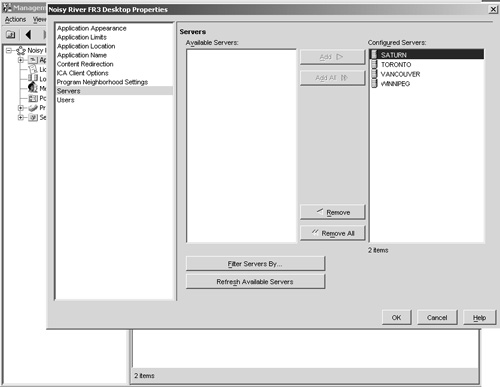
One option that is commonly considered is revoking the server’s participation in all applications published. This is performed on an application by application basis in the Management Console, as shown in Figure 11.5. One of the biggest drawbacks to this approach is that you need to be certain you have properly recorded all published application associations so they can all be restored when the server is returned to production. While this approach may work well if there are only a couple of applications published on the server, if the application count is large, the restoration job can become very time consuming and prone to error. In this situation I recommend choosing one of the other options for disabling access.
In Chapter 9, “Service Pack and Hotfix Management,” I discussed selection, installation, and management of service packs and hotfixes in your Terminal Server environment. One of the first configuration tasks you need to perform will be installation of the desired service pack. If you have not yet reviewed Chapter 9, I recommend doing so before proceeding with service pack and hotfix installation.
If this is a new Terminal Server installation, you likely will want to install the latest available service pack, as discussed in Chapter 9. The installation itself can be performed a couple of ways:
Download, or order on CD-ROM, the full installation (known as the Network Installation) directly from the Microsoft Web site. This download is typically around 125MB or more in size. The installation can be performed from a CD-ROM, directly from a network share point, or even “pushed” out to target machines using Windows Installer and Group Policy in a Windows 2000/2003 Active Directory domain.
Perform an express installation directly from the Microsoft Web site. An express installation will detect the components installed on your server and apply only the necessary updates. While the total amount of data downloaded during an express installation will typically be less than that of a full network installation, if you are planning to apply the service pack to multiple servers, repeated installations using the express installation method will be more time consuming. The express installation method is best suited for personal computers in a small office or home environment, not for a production Windows Terminal Server environment.
When managing or building even a single Terminal Server, I recommend that you download the full network installation and store it locally on your network. This not only makes it easier to apply (or reapply, as the case may be) the service pack to one or more servers, but it also is required if you wish to integrate the service pack directly into the base OS installation. See the “Integrating Service Packs with Server Installation Files” section in Chapter 10, “Installing Windows Terminal Services” for more information on this.
The service pack installation is straightforward. Once you have initiated the installation, you are presented with the service pack setup wizard. As you proceed through the setup wizard, you eventually are given the opportunity to archive any files that might be required to uninstall the service pack at a later time.
Be aware that this backup process will only archive the current system files. If you perform a reinstallation of the same service pack at a later date, the archive option will attempt to overwrite the original backup with a backup of the most current system files on the server. The setup wizard will warn you if this situation does arise and ask for confirmation before proceeding.
Once the service pack installation has completed, you are required to reboot the server before the changes take effect.
The hotfix installation is also straightforward. If you’re using an automated deployment tool (Windows Update, SUS, HFNetChkPro, and so forth), you simply need to select the desired updates to deploy and then the tool manages the installation and any reboots required.
If you’re manually installing the necessary updates, you will need to download all the patches and run them on the desired Terminal Server. The necessary files are extracted and updated, and then you are prompted (in most cases) to reboot the server in order to complete the install. For example, if you wanted to apply the patch for knowledgebase article Q816093, an update to the Microsoft Virtual Machine (VM), you would download the file Q816093_W2K_SP4_X86_EN.exe and execute it on your Terminal Server. After the installation completed, you would be required to reboot the server for the changes to take effect.
Obviously the need to reboot after the installation of each hotfix becomes completely unacceptable if you are installing more than a couple of fixes on a server. In a situation where you needed to apply multiple hotfixes to a Terminal Server, it would be nice if there were a way to install all the patches at once with a single reboot at the end.
When you are looking to streamline the manual installation of multiple hotfixes, the most common solution is to create a batch script that runs the hotfix installation files one after the other. Once this is completed, you can either reboot the server manually or have it reboot automatically as part of the script.
The one problem you have to be concerned with is the order in which the hotfixes are installed. For example, if you install hotfix A followed by hotfix B, and they both update the same file (with A’s version being more recent), you may end up with B’s version of the file on the system, which is not the desired result.
To address this problem, Microsoft originally developed a tool called QChain, which lets you install multiple hotfixes (in any order) with only a single reboot and ensures that only the most recent version of the files actually get installed on the server. For this to work properly, the QChain command had to be executed once all the desired patches were applied.
All patches released since December 2002 have the QChain functionality integrated directly into the installation file, so QChain is not required when chaining any of these hotfixes together. While patches released between May 2001 and December 2002 also were supposed to include this functionality, a bug was found that could cause these to fail in certain situations. Because of this, Microsoft recommends that QChain be used whenever chaining together patches released prior to December 2002.
TIP:
The QChain utility, along with a detailed knowledgebase article explaining the tool’s functionality (with examples) can be found by searching the Microsoft Web site for article number 296861.
Automated deployment tools such as Microsoft Software Update Services (SUS) or HFNetChkPro include the necessary QChain functionality so multiple patches can be applied to a target machine with only a single reboot.
Once you’ve completed the patch installations and rebooted the server, I recommend that you perform another security patch scan to ensure that they all have been properly applied. Your server should now be up to date with the desired service pack and hotfixes.
TIP:
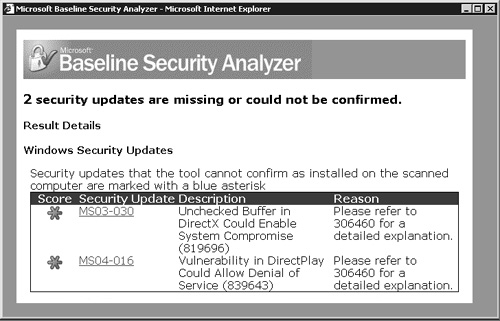
In certain situations you will find that your patch scan tool is unable to determine whether a particular security update is actually installed or not. For example, Figure 11.6 shows the Microsoft Baseline Security Analyzer (MBSA) results window with a number of security updates that it could not confirm as being installed. You will need to perform a manual confirmation, details of which are described in knowledgebase article 306460, for each of the listed updates. The MBSA tool was discussed in Chapter 9.
There are a number of changes that should be made to a Terminal Server in order to improve its overall stability and availability. Most, in one way or another, modify the default configuration of the Windows server to better suit the multiple concurrent user sessions existing on a Terminal Server. With each iteration of Microsoft’s Terminal Server offering, more and more multiuser configuration requirements are finding their way into the default Terminal Server configuration. This is one of the reasons why typically you will find there are more configuration changes suggested for a Windows 2000 Terminal Server than for a Windows 2003 Terminal Server. A similar trend existed when comparing a Windows 2000 Terminal Server to a Windows NT 4.0, Terminal Server Edition, server. In this chapter, unless otherwise stated, all change suggestions apply to both Windows 2000 and Windows 2003.
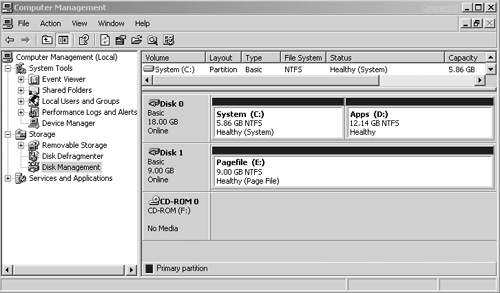
If you have not already done so, now is a good time to partition and format the remaining disks on your system using the Disk Management snap-in. You can access this by clicking My Computer, selecting Manage from the pop-up menu, and then selecting Disk Management from under the Storage folder. You should format both your application volume and pagefile volume (if applicable) as NTFS. Remember, you do not want to use the FAT file system on any of the drives on your Terminal Server, since you will have no way of restricting user access. Figure 11.7 shows a sample disk configuration on a Windows 2003 Terminal Server. When formatting a drive, you will have the option to select a quick format.
TIP:
A common Windows tuning tip is to increase the cluster size of an NTFS partition when it is being formatted to realize a small gain in disk performance. An NTFS hard disk is organized into clusters, which represent the smallest space that can be allocated for a file on the disk. For example, if you have a file that is 16KB in size, then it would occupy four clusters of 4KB, or 32 clusters of 512 bytes. By storing files in larger cluster sizes, you can decrease the time required to retrieve that data. Of course additional space on the disk can be wasted if you are storing a large number of files smaller than the cluster size. For example, files less than 4KB in size would still occupy the entire 4KB cluster.
When formatting an NTFS drive, if the allocation unit size is left as Default, any drive over 2GB in size will have the cluster size default to 4KB, which is the optimal cluster size for a Windows NTFS disk partition. I do not recommend that you adjust this size from the default.
TIP:
Many people have asked what the difference is between a regular disk format and the Perform a Quick Format option. A regular or full disk format purges the volume of all files and then performs a check to determine if the drive has any bad sectors or not. A quick format performs only the file purge and skips the bad sector check. The process of scanning for bad sectors is what takes the majority of time during an NTFS disk format. I recommend that you always perform a full disk format the first time you format any drives in your Terminal Server.
While the pagefile could technically be considered a performance factor, the importance of a properly configured pagefile on a Terminal Server is the reason I have chosen to discuss it now. Configuring the pagefile now is particularly important if you’re planning to set it up on a partition where other data or files will exist. This helps ensure that the pagefile occupies contiguously allocated space on the disk.
As I discussed in Chapter 6, “Terminal Server Hardware Planning,” the ideal location and size for the pagefile is
On a single drive or partition other than the system partition
On a non-fault tolerant drive configuration
As close as possible to the beginning of the physical disk
Occupying a contiguous space on the physical drive
Approximately 1.5 to 2 times the physical memory on the server
The pagefile configuration screen can be found under the System properties dialog box as follows:
Right-click My Computer and select Properties from the pop-up menu.
Click the Advanced tab and then click the Settings button under Performance. On a Windows 2000 Server, the button will be labeled Performance Options instead of Settings.
(Windows Server 2003 only.) Select the Advanced tab on this dialog box.
Click the Change button under Virtual Memory to open the Virtual Memory dialog box, shown in Figure 11.8. While the Virtual Memory screens differ slightly between Windows 2003 and Windows 2000, the basic pagefile configuration remains the same.
When you first open this dialog box, the default configuration has an initial size of 1.5 × physical memory and a maximum size of 3 × physical memory. You are going to need to change this to optimize your pagefile configuration.
Highlight each of the volumes that will not contain a pagefile and set the initial and maximum pagefile size to zero (or simply click No Paging File, on a Windows 2003 server). A message appears warning you that debug information can’t be created if a STOP error occurs. As I discuss in more detail shortly, by default we are not going to have the server perform full system dumps, so select Yes if prompted.
Now select the drive where you maintain your pagefile. Enter the initial and maximum size for this pagefile, making sure they are set to the same value. This will “lock” the pagefile at the designated size and help ensure it occupies a contiguous space on the disk. For example, on my test server with 1GB of RAM, I would create a 2GB (2 × physical memory) pagefile on my dedicated pagefile drive (E:).
Click Set to store the change and then click OK. You will be required to reboot the server in order for the change to take effect.

NOTE:
On a Windows 2003 server you will see there are two additional paging file options: System Managed Size and No Paging File. The No Paging File is equivalent to setting your initial and maximum pagefile to zero on all drives. The System Managed Size tells Windows 2003 to choose the best paging file size for you. This simply causes Windows to use the defaults of 1.5 × physical memory for the initial size and 3 × physical memory for the maximum size.
This change applies only to Windows 2000 Servers.
Depending on the number of concurrent users you expect your Terminal Server to support, you may need to look at increasing your server’s registry size limit (RSL) from the default. Typically each user hive loaded into the registry takes approximately 0.8 to 1.5MB of space. An initial RSL calculation would be something like
0.8MB × (number of concurrent users) = RSL
For example, if you expected to have 120 concurrent users on the server, your initial registry size would be
0.8MB × 120 users = 96MB
You will want to monitor the growth of the registry during testing and piloting to see if you need to increase the registry size further.
While it may seem reasonable to simply set the registry size to an arbitrarily large value, Windows 2000 does have an upper limit on the registry size. Windows 2000 restricts the size of the registry to be no more than 80 percent of the paged pool size, which itself has a maximum size. The paged pool size is set dynamically by Windows based on the amount of physical memory in the server. Table 11.1 shows the maximum possible paged pool size and the corresponding maximum registry size that can be set for Windows 2000 without making special system kernel modifications.
If you attempt to set the RSL to greater than 80 percent of the current paged pool size on the server, you’ll receive a message similar to the one shown in Figure 11.9. Clicking OK causes Windows to do two things:
Increase the maximum size of your pagefile as required.
Increase the paged pool size (up to the maximum listed in Table 11.1) so that it is 20 percent greater than the RSL value you specified. This paged pool size is then hard-coded into the registry. Once this value is hard-coded, Windows no longer dynamically adjusts the paged pool size based on the physical memory in the system.

Figure 11.9. When attempting to set the RSL to greater than 80 percent of the current paged pool size on a Windows 2000 Server, you receive this message.
If you attempt to set the RSL greater than the maximum value listed in Table 11.1, Windows ignores your value and simply uses the listed maximum. For a Windows 2000 Server with 512MB or more RAM, the maximum paged pool size will automatically be used, so your maximum registry size limit will be 296MB. For more information on the actual paged pool calculations, see the Microsoft knowledgebase, article 124594.
NOTE:
Through special kernel modifications, an upper maximum of 400MB for the paged pool size (320 for the RSL) can be attained if space is taken away from the System Page Table Entry (System PTE) memory area and assigned to the paged pool. Details on performing this nontrivial operation can be found in the Microsoft knowledgebase, article 247904. I highly recommend that additional hardware be considered instead of trying to tweak the kernel in order to squeeze an additional 10 to 20 users onto an existing server.
If we took the estimate of around 1MB per user of registry usage, this would limit a Windows 2000 Terminal Server with a nontuned kernel to around 300 concurrent users (or less), regardless of how much physical memory was actually in the server. The Microsoft document “Windows 2000 Terminal Services Capacity and Scaling” provides an example where a limit of 350 script-controlled user sessions was encountered due to the page pool size limitation on a server with a tuned kernel. You can find the complete document at the following address:
http://www.microsoft.com/windows2000/techinfo/administration/terminal/tscaling.asp
The registry size on a Windows 2000 server is modified in the same Virtual Memory dialog box as the paging file. Figure 11.10 shows the Windows 2000 Virtual Memory dialog box.
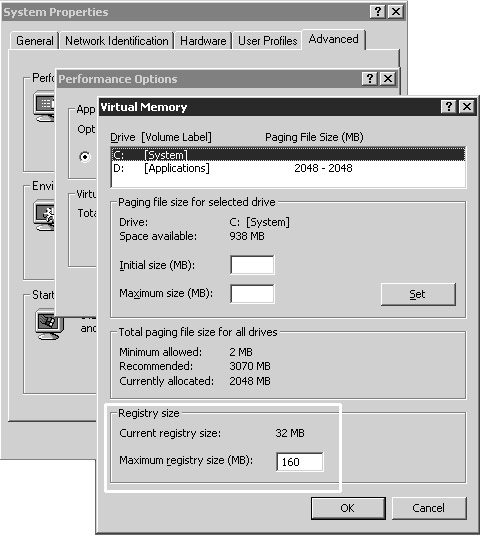
Figure 11.10. The registry size is modified in the Virtual Memory dialog box on a Windows 2000 server.
NOTE:
With the release of Windows Server 2003, the registry contents are no longer contained in the paged pool but instead are mapped into the system cache space. This change effectively removes the limits previously existing for the maximum registry size and eliminates the need for an administrator to manually manage a proper size configuration. As a result, the Virtual Memory dialog box on a Windows 2003 server no longer provides an option where an administrator can adjust the registry size.
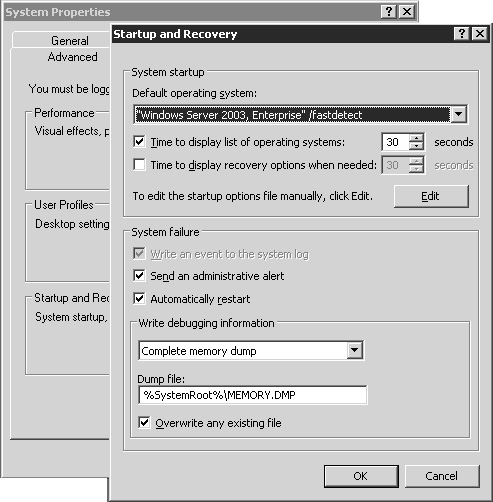
Windows lets you configure the startup and recovery options for your server, which dictate how it will respond in the event that the system halts with a STOP error, also known as the infamous Blue Screen of Death (BSOD). Figure 11.11 shows the default configuration for these settings on a Windows 2003 Terminal Server.
The number of production Terminal Servers, the requirements for availability, physical accessibility to the servers, and personal preference will all play a large part in influencing your decision on how these settings will be configured. Basically there are two configurations from which to choose. The first configures the Terminal Server to halt when a STOP error is encountered, and the server remains inaccessible until it is physically restarted by an administrator. The other configuration instructs the Terminal Server to automatically recover in the event the system halts with a STOP error. Here are some of the questions you will want to consider:
Do you have enough capacity in your environment to continue functioning if a Terminal Server were to unexpectedly go offline? If you are load-balancing multiple Terminal Servers, then ideally you will have sufficient capacity to continue supporting your concurrent user load even if one (or possibly two) of the servers were to go offline. In this situation you may have the ability to allow a server with a STOP error to remain offline until you or another administrator has had time to review the STOP message displayed on the screen. If you are working in a one or two server configuration, you will likely not be able to allow the server to remain down, so you will need to configure the server to automatically attempt to restart on a system failure.
Do you employ system monitoring that will alert you if a Terminal Server goes offline due to a STOP error? Regardless of the size of your environment you should have some form of monitoring in place that will alert you to the situation where a server has become inaccessible. In a large-scale production environment this is an essential part of effective server management. Without proper monitoring, a stopped server could remain down for an extended period of time before you would even notice. If adequate capacity exists this may be acceptable, but you will likely want to configure the server to automatically reboot to ensure server uptime and availability.
Are you physically able to access your Terminal Servers, or are they located in a remote office that requires travel time to access? If your Terminal Servers are physically located in a remote location that you cannot quickly access, they will have to remain hung until you can arrive to access them, or some form of hardware-based remote access will need to be employed to allow you to restart the machine. You likely would want to configure the servers to automatically restart, and you would have to rely on event log monitoring, in addition to user feedback, to alert you when a server had crashed.
When you have decided on the appropriate configuration for your environment, you can modify the settings by opening the properties for My Computer, selecting the Advanced tab, and then choosing the settings for Startup and Recovery. I suggest the following steps:
I recommend that you begin by reducing the display time for the operating systems list from the default of 30 seconds down to 5 seconds. This speeds up booting of the server but allows enough time to select an alternate OS or recovery option if desired.
If you’re not using Windows alerts, you can deselect Send an Administrative Alert. Chapter 22, “Server Operations and Support,” discusses configuration of Windows alerts.
Now choose whether to enable or disable the Automatically Restart option.
Finally, choose the desired level of debugging information to record. The default option of Complete Memory Dump will save a complete copy of all memory contents to the specified dump file. It can take a significant amount of time to write this file, depending on how much memory is in the server. A full memory dump will also consume disk space equal to the amount of physical memory plus 11MB. My preference is to select (none) and adjust this only if a BSOD occurs more than once on the server, although the small memory dump option will record additional crash information without consuming too much space or taking up too much time.
On a Windows 2000 server, you are required to reboot the server before these changes take affect. A Windows 2003 server does not require a reboot.
TIP:
Although you can change the location of the dump file, Windows 2000/2003 will always write the debug information to a pagefile on the %systemroot% partition first and then move it to the location you have specified. If you want to enable the complete memory dump, you must have sufficient space on your system partition to accommodate creation of a pagefile equal to the amount of physical memory on your server plus 11MB.
While adding the Recovery Console to the startup menu is not necessarily essential to the stability of the server, I’ve found that having the Windows Recovery Console added to the list of options on the startup menu can be invaluable if you ever find yourself in the situation where the server will not boot properly. Even though you can access the Recovery Console by booting from a setup CD-ROM or a floppy diskette, it is certainly more convenient to have it already configured on the server.
Adding the Recovery Console to the server is straightforward. Simply place the Windows Server CD into the drive, traverse into the i386 folder from a command prompt, and run the following command
winnt32.exe /cmdcons
A Windows setup wizard appears, letting you install the Recovery Console. During the installation, Microsoft’s Dynamic Update tool attempts to download the latest versions of the installation files. You can cancel Dynamic Update and continue the installation with the existing files by pressing the Esc key.
Once installation has completed, the next time you reboot your server you will see the Recovery Console as an option on your startup menu. An entry containing the Recover Console information is added to the boot.ini file located in the root of the system drive. The specific entry added is
C:CMDCONSBOOTSECT.DAT=”Microsoft Windows Recovery Console” /cmdcons
For details on functionality and use of the Windows Recovery Console, see the Microsoft knowledgebase article “Description of the Windows Recovery Console,” article number 229716.
An area often overlooked during configuration of any Windows server (not just a Terminal Server) is the proper sizing of the event logs. Proper log sizing is even more important on a Terminal Server, where many extra log events (particularly security events) can be generated as users work on the system. While both Windows 2000 Server and Windows Server 2003 have default log settings, these settings are not the same. Table 11.2 summarizes the default settings for the two operating systems.
Table 11.2. Default Event Log Properties for Windows Server 2003 and Windows 2000 Server
Operating System Windows 2000 | Windows 2003 | |
|---|---|---|
Application | Maximum size = 512KB Overwrite events older than 7 days. | Maximum size = 16384KB Overwrite events as needed. |
Security | Maximum size = 512KB Overwrite events older than 7 days. | Maximum size = 16384KB Overwrite events as needed. |
System | Maximum size = 512KB Overwrite events older than 7 days. | Maximum size = 16384KB Overwrite events as needed. |
As you can see, the default log sizes for Windows Server 2003 are quite a bit larger (16MB as opposed to 0.5MB) than the Windows 2000 Server default sizes. While I would consider the 2003 default settings much more appropriate for a Terminal Server, Table 11.3 lists my recommended configuration for both 2003 and 2000 Terminal Servers.
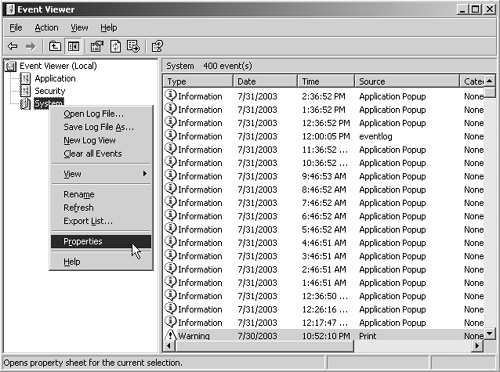
The Event Viewer can be found in the Computer Management snap-in or launched directly from a command prompt by executing eventvwr.exe. Individual properties for each log can be accessed by right-clicking and selecting Properties, as shown in Figure 11.12.
Of course, event logging is pointless unless there is actually a mechanism in place where entries are reviewed and logs cleared on a regular basis. A number of simple tools exist that can be used to schedule the automatic archiving of the event log data. Once again, SysInternals (http://www.sysinternals.com) provides an excellent tool that not only allows for contents of both local and remote event logs to be dumped but also automatically clears a log once the information has been retrieved. The tool in question is called PsLogList and is available free as part of the PsTools suite of utilities.
This is the preferred way of dealing with event logs, as it provides a way to preserve past log information without having to resort to maintaining event logs with large maximum sizes and then having to manually review and clear the contents on a regular basis.
TIP:
I provide more detailed information on event log management, including examples of use of PSLogList in Chapter 22.
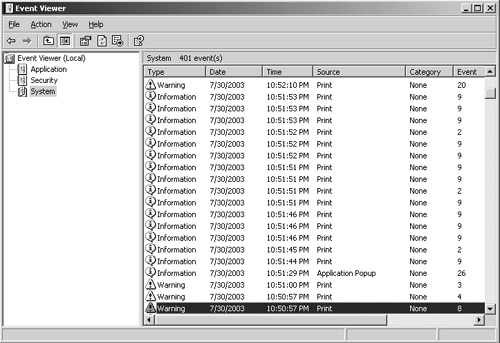
The default print spooler configuration on a Terminal Server can result in a large number of informational print events being logged to the System event log, particularly when client printer connections have been enabled. Figure 11.13 shows a portion of the System event log with printer-related entries generated when logging on to and off of a Windows 2003 Terminal Server with MetaFrame Presentation Server.
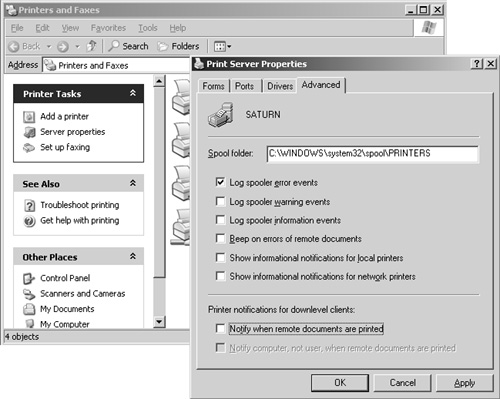
The log information generated by printer events can be managed through Print Server Properties, which is found under the File menu of the Printers and Faxes (just “Printers” on Windows 2000) folder. In Figure 11.14 you can see this dialog box with all event options deselected except for logging of spooler error events. This is the configuration I use unless I suspect there may be an issue with client printer mappings. If that is the case, I re-enable the appropriate logging options to assist in troubleshooting the issue. Once the problem has been resolved, I once again revert back to my default configuration.
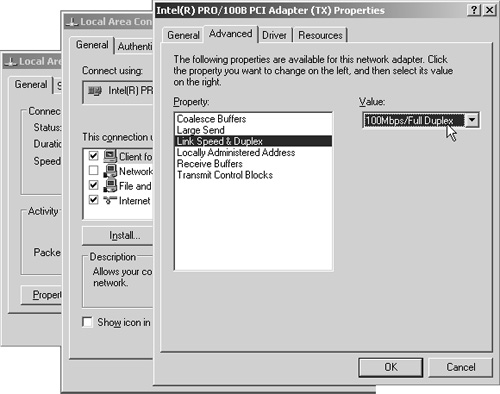
Another recommended change is to verify that the network interface card (NIC) on the server has been configured specifically for the appropriate speed and duplex as opposed to having it set to auto-detect these features. Most network administrators agree that this is preferred, particularly in a switched environment.
The exact interface for making this change depends on the NIC manufacturer, but in general the change is made by selecting Network Connections from under the Control Panel, double-clicking the appropriate local area connection, and then clicking the Properties button. The top portion of the dialog box shows the NIC information along with a Configure button. Clicking this button brings up the properties for the NIC. Figure 11.15 shows an example of the properties for an Intel PRO/100B card. The property changes you make here take effect immediately and don’t require a reboot.
WARNING:
Make sure you configure the NIC to match the specifications of the network. Improperly configuring the NIC can result in severe network performance degradation. If you are unsure of the network configuration, I recommend leaving the NIC in auto-detect mode until you can confirm the proper settings with a network administrator.
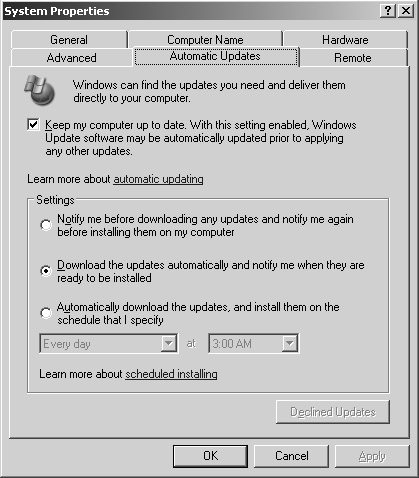
The default configuration on a Windows 2003 server has the Automatic Updates option enabled with the settings shown in figure 11.16. While the purpose of Automatic Updates is to ensure timely delivery of critical security and system patches, without proper testing, the introduction of a change into your production Terminal Server environment could result in stability issues on the server. In an environment with multiple administrators, allowing Automatic Updates to download and prompt for installation confirmation can easily result in a patch being applied without proper consideration for the implications it may have to the environment.
The Automatic Update settings on Windows Server 2003 are accessed under the System Properties for My Computer. On Windows 2000 Server they are found under Automatic Updates on the Control Panel. In order to have access to the Automatic Update feature on a Windows 2000 server, you must be running Windows 2000 Service Pack 3 or later.
TIP:
For a thorough treatment of patch management, refer to Chapter 9.
This is a change I’ve become accustomed to making on all Terminal Servers I’ve worked with and is more of a usability and convenience issue for the administrator than anything else. This change won’t help improve the stability of your server, but from an administrative standpoint, some of the default options are unnecessarily restrictive. Folder Options can be found in Control Panel; the specific tab we are interested in is the View tab, shown in Figure 11.17.
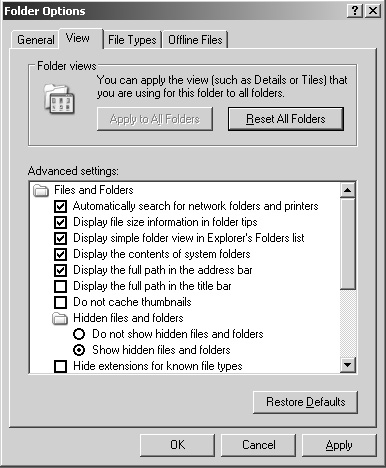
Table 11.4 summarizes my suggested settings for the View tab. If an option is not listed, you can assume that it can be set as desired.
Table 11.4. Suggested Folder Option View Settings
Checked | Option | Notes |
|---|---|---|
Yes | Display the full path in the address bar. | This can be handy if, for example, you want to cut and paste the path into a command prompt or application. |
Yes | Show hidden files and folders. | This makes finding files and folders easier through Explorer. |
No | Hide extensions for known file types. | As an administrator you should always be aware of what type of file you are accessing. This helps you avoid falling for the trick of double-naming a file with two extensions; for example: CheckItOut.jpg.exe. |
No | Hide protected operating system files. (Recommended.) | Through Explorer, the only way to see files that have their hidden and system file attributes set is to deselect this option. |
The very first time a user with administrative privileges logs on to a 2000/2003 server they are presented with the Manage Your Server (“Configure Your Server,” on Windows 2000) wizard. While some people may find this wizard helpful, I feel it is a tool better left on the Start menu and accessed only when required.
You can disable automatic startup of this tool by modifying the registry as follows:
From a command prompt, open REGEDT32.EXE.
Select HKEY_USERS and then, from the Registry menu, click the Load Hive option. In the Load Hive dialog box load the file
c:Documents and SettingsDefault User tuser.dat
This is a hidden folder, so if you haven’t enabled Show Hidden Files and Folders as discussed earlier, you can still type the above path into the File Name field and hit Enter.
You can enter any name you wish for the key name, but I suggest using “Default User.”
Navigate into the key HKEY_USERSDefault UserSoftwareMicrosoftWindows NTCurrentVersionSetupWelcome and change the value for srvwiz from 0x1 to 0x0.
Now click the root of your loaded hive (Default User) and select Unload Hive from the Registry menu. Manage Your Server will no longer load the first time an administrator logs on to the Terminal Server.
This change applies only to Windows 2000 Servers.
Probably the most annoying thing that happens the first time you log on to a Windows 2000 Server and try and access an Internet resource is being presented with the Internet Connection wizard (ICW). Contrary to what some people may think, the ICW is not required to access the Internet, and disabling it will not impact your connectivity.
The ICW can be disabled in one of two ways. The first is to implement the change using group policies. If you’re deploying your Terminal Servers in an Active Directory, using a group policy is a straightforward means of manually changing a number of configuration settings for your users. The specific policy to disable the ICW is called Disable Internet Connection Wizard and is located under
User ConfigurationAdministrative TemplatesWindows ComponentsInternet Explorer
For more information on group policies, see Chapter 15, “Group Policy Configuration.”
The other method of disabling the ICW is to modify the registry settings for the default user, similar to how the changes to Manage Your Server were done earlier.
Begin by running REGEDT32.EXE.
Select HKEY_USERS and then, from the Registry menu, click the Load Hive option. In the Load Hive dialog box load the file
c:Documents and SettingsDefault User tuser.dat
This is a hidden folder, so if you haven’t enabled Show Hidden Files and Folders as discussed earlier, you can still type the above path into the File Name field and hit Enter.
You can enter any name you wish for the key name, but I suggest using “Default User”.
Now navigate into the key HKEY_USERSDefault UserSoftwareMicrosoftWindowsRunonce and delete the value ^SetupICWDesktop. This prevents the ICW icon from being created on the desktop.
Next create the key “Internet Connection Wizard” under HKEY_USERSDefault UserSoftwareMicrosoft and add a value to this key with the label “Completed” a type REG_DWORD and a numeric value of 0x1. This prevents ICW from appearing when you try and run applications such as Internet Explorer.
Finally, click the root of your loaded hive (Default User) and select Unload Hive from the Registry menu. The Internet Connection wizard no longer appears the first time you try to run an application such as Internet Explorer.
Very few people have not encountered the good doctor at least once during their use of Windows. Dr Watson is the default application debugger in Windows that’s automatically launched to trap all unhandled application errors. Most often, these are memory exception errors that occur when an application attempts to access a memory location that hasn’t been allocated for it by the operating system.
When the exception is raised, Windows automatically starts Dr Watson to gather information about the application error. This usually involves writing a crash dump file and a log file containing information such as the application’s stack and symbol table contents. While this is similar to the behavior of a system STOP error (Blue Screen of Death), the two are not the same, and their configuration options are completely distinct from each other.
The current options for Dr Watson on your Terminal Server can be viewed anytime by running DRWTSN32.EXE from a command prompt. The default configuration for Dr Watson is the same in both 2003 and 2000, with the only exception being that Windows Server 2003 allows for the selection of an alternate crash dump type instead of a full dump. The options managed by this application are stored in this registry key:
\HKEY_LOCAL_MACHINESoftwareMicrosoftDr Watson
Note that this key won’t exist until the first time you actually run DRWTSN32.EXE.
Unless you’re debugging a recurring application problem, I suggest completely disabling use of Dr Watson. Windows looks in the following registry location to determine what debugger it should run in the event of an application error:
HKEY_LOCAL_MACHINESoftwareMicrosoftWindows NTCurrentVersionAeDebug
The particular value in question is Debugger. After a clean Windows installation, the value usually contains the following text:
drwtsn32 -p %ld -e %ld -g
To disable Dr Watson, simply delete this registry key. You can also delete the Dr Watson key mentioned earlier, which is located under the key
\HKEY_LOCAL_MACHINESoftwareMicrosoftDrWatson
If you ever want to restore the Dr Watson registry values, simply run DRWTSN32 –I from a command prompt.
TIP:
Dr Watson will default to writing crash dump and log file information to the following folder, based on the specific operating system:
Windows 2000: %ALLUSERSPROFILE%DocumentsDrWatson
Windows 2003: %USERPROFILE%Local SettingsApplication DataMicrosoftDrWatson
As you can see, Windows Server 2003 will write dump information into each user’s personal profile folder, while Windows 2000 attempts to write dump information for all users to the same common folder.
If you’re debugging a user’s problem on a Windows 2000 Terminal Server, you’ll probably want to edit this entry so the user is pointed to a location where they are sure to have write access. The easiest way to do this is to run DRWTSN32 and change the file paths to use the user’s home or root drive setting (H:, for example) instead of the All Users profile path. I talk more about use and configuration of the root drive a little later in this chapter.
Under certain conditions, if the operating system or an application encounters a critical error, they may display what is known as a hard error message. Hard error messages remain on the screen and typically prevent an application from completely terminating until acknowledged by the user. A common example of this is the display of an exception error such as the following:
Application popup: Excel.exe - Application Error
The instruction at "0x100ff373" referenced memory at "0x04310f30".
The memory could not be "read".

Click on OK to terminate the application
In this situation, the application will not properly terminate until the user clicks the OK button. In most situations, if a user encounters this problem, they click OK and restart the application or possibly contact their help desk to report the problem.
Where real problems can develop is if these messages appear on the console because a running service has generated a hard error, or if a user logs off while a hard error is being displayed. In the first scenario, the service will remain hung until an administrator acknowledges the error pop-up message from the console. In the second scenario, a user’s profile may fail to unload properly because the server is delayed in completing the logoff of their session. Hard errors rarely prevent a Terminal Server session from completely resetting, but they can cause issues with unloading and saving profile information.
Microsoft does provide a way to control how hard errors are processed through modification of a registry key. You can control display of hard errors by modifying the ErrorMode REG_DWORD registry value, located under the following registry key:
HKEY_LOCAL_MACHINESYSTEMCurrentControlSetControlWindows
The three possible values for ErrorMode are
0 | (Default.) All error messages are displayed and handled normally. |
1 | Application-generated hard errors are displayed normally, but all system-generated hard errors are suppressed. An error event is written to the system log for system-generated hard errors only. |
2 | All hard errors are suppressed from the screen, but an error event is written to the system log regardless of the error’s source (application or system). |
I recommend that hard errors be suppressed only after all desired applications have been installed on your Terminal Server and you have completed at least your preliminary application testing. Suppressing visual notification of hard errors may make it more difficult to troubleshoot application issues.
When managing multiple Terminal Servers, very often an administrator needs to quickly verify which server they are currently logged on to. While this question can be answered by opening the Computer Name properties for My Computer, it is a cumbersome way to retrieve this information. I prefer to modify the actual text portion of the My Computer icon to include the name of the server (and sometimes the user ID).
Quick and consistent access to this information also makes it easy for a user to provide information on what server they are currently on when attempting to resolve an issue with support staff. Figure 11.18 shows an example of the My Computer icon on a Windows 2003 server customized to include the server name in parentheses.
The registry location where this information is modified is the same on both a Windows 2003 and a Windows 2000 server. The registry key in question is
HKLMSoftwareClassesCLSID{20D04FE0-3AEA-1069-A2D8-08002B30309D}
The specific value that controls the My Computer name is LocalizedString. On a Windows 2000 server, this value must be deleted and replaced with a value with the same name but of type REG_EXPAND_SZ. On Windows 2003, you simply need to delete the current text and replace it with the desired My Computer name.
The text assigned to LocalizedString to produce the result shown in Figure 11.18 was
My Computer (%COMPUTERNAME%)
The REGINI script shown in Listing 11.1 updates this registry key to include the server name in parentheses after the My Computer text on either a Windows 2000 or 2003 server.
WARNING:
Be sure to back up the information stored in LocalizedString prior to making this change so you can revert back to the original configuration if desired. The easiest way to back up this information is to launch the REGEDIT utility and then traverse to the registry key under HKLMSoftwareClassesCLSID listed above, being sure to highlight the key you wish to back up. Now select Export Registry File from the Registry menu. You can now save the file as a .REG file.
The settings can be restored simply by double-clicking the file from within Explorer. This automatically writes the registry information stored in the file back to the registry.
Example 11.1. A REGINI File to Update the Registry Key
HKEY_LOCAL_MACHINESoftwareClasses
  CLSID
    {20D04FE0-3AEA-1069-A2D8-08002B30309D}
        LocalizedString = DELETE
        LocalizedString = REG_EXPAND_SZ My Computer (%COMPUTERNAME%)
The script in Listing 11.1 is executed simply by opening a command prompt and running the command
REGINI <script file name>
This script provides an example of the types of information you could display with the My Computer icon. The user ID could also be displayed by using the %USERNAME% environment variable. The file containing this script (MyComputerUpdate.2000_2003.ini) can be downloaded from the Web site for this book at (<include web link here>).
As discussed in Chapter 8, “Server Installation and Management Planning,” it is not so much a question of whether or not you will schedule automatic reboots as it is a question of how frequently you will do so. Frequency and sophistication of this schedule depend on the applications in your environment and the system behavior you observe during testing and piloting.
I recommend that the reboot scheduling not be implemented until you’ve performed at least some preliminary testing with the applications on your Terminal Server. Only then can you determine the requirements for your reboot schedule. The stability of your environment will dictate whether reboots need to be performed nightly, weekly, monthly, or at even longer intervals.
NOTE:
As Terminal Services has matured from the days of Windows NT 4.0, Terminal Server Edition, to the latest incarnation in Windows Server 2003, I’ve noticed a significant increase in the average server uptime between reboots. Reboot intervals of 21–35 days or more are not uncommon.
Conveniently, Windows 2000/2003 come with a command line tool called TSSHUTDN, which can be used in conjunction with the Scheduler Service and the AT command (or Scheduled Tasks) to automate shutdown and restart of your server. The full syntax of the TSSHUTDN command is described in Appendix A. The simplest implementation is as follows:
tsshutdn /reboot
This command shuts down and restarts the Terminal Server 60 seconds after being executed. Immediately after starting, it issues a message to all users on the Terminal Server, stating that the system will restart in 60 seconds. It sends another message at the 30-second mark and then restarts the server. For example, to schedule a Terminal Server to automatically reboot at 11 p.m. every Saturday with a 2-minute wait period, you could issue the following AT command:
at 23:00 /every:S "tsshutdn 120 /reboot"
The same task could be scheduled using the Scheduled Tasks tool, located under the Control Panel in both Windows 2000 Server and Windows Server 2003.
In a Windows domain, the Windows Time Service (WTS) is automatically enabled and configured to retrieve the time settings for the local machine from a domain controller in the Active Directory domain. The purpose of WTS is to ensure that the system time on the local computer is synchronized with an external time source (in this case, the domain controller), which is assumed to be maintaining accurate time itself.
If your Terminal Server is or will be in an Active Directory domain, you have nothing further to do. WTS will be configured automatically. If your servers will not participate in a domain and instead will run in a workgroup, you may want to configure this service to ensure your Terminal Servers maintain accurate time. This can be performed using the w32tm command line tool. Issuing the following command forces the Terminal Server to synchronize its time with the provided WTS name(s).
w32tm /config /syncfromflags:manual /manualpeerlist:<"local or remote
time service>"
Once the basic stability and availability options have been configured, you can move on to apply a number of (sometimes subtle) changes to Terminal Server to help boost its overall performance. The same things apply here as for the stability and availability changes. Make sure you have a clear idea as to which changes are appropriate for your environment before you begin to actually implement the changes.
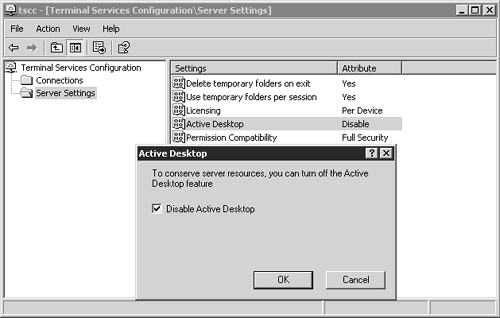
On a Windows 2000 Terminal Server, the Active Desktop feature is enabled by default, while on a Windows 2003 Terminal Server it is not. I recommend disabling the Active Desktop, as it can consume unnecessary resources and doesn’t add any real value to use of applications on the server. To disable the Active Desktop, launch Terminal Services Configuration from the Administrative Tools option on the Start menu. Next click the Server Settings folder and then double-click the Active Desktop option and disable it, as shown in Figure 11.19.
Windows provides a number of visual effects that, while attractive, can have a negative impact on the perceived speed and usability of a Terminal Server session. Even on a local area network, animated windows and menus may appear choppy and sluggish through an ICA or RDP client session. Through a combination of registry, profile, and policy changes, not only can you effectively eliminate (or minimize) all these visual effects, but you can also prevent your users from modifying these settings. The end result is a much smoother and perceptually faster user experience.
NOTE:
Regardless of the changes you make in order to optimize performance of your Terminal Server, the only way most users will measure the speed of your system is through the responsiveness of the graphical interface. Even the slightest delay in how their remote session responds to their input can have the user complaining about how “slow” the system appears.
For now, I concentrate on the visual effects controlled through registry changes. Details on the associated profile and policy changes are discussed in detail in Chapter 15, “Group Policy Configuration,” and Chapter 18, “User Profile and Account Configuration.”
Terminal Server provides a registry key you can use to override the desktop and application behavior settings for all users who remotely log on to the Terminal Server. Any information that would normally appear under the registry key
HKEY_CURRENT_USERControlPanelDesktop
can be overridden by placing the appropriate value in the following key:
HKEY_LOCAL_MACHINESystemCurrentControlSetControlTerminalServerWinStations<Winsta Connection Name>UserOverrideControl PanelDesktop
where <Winsta Connection Name> is the connection name that appears in Terminal Server Configuration. For example, the default RDP connection name is RDP-Tcp, so the corresponding registry key would be
HKEY_LOCAL_MACHINESystemCurrentControlSetControlTerminalServerWinStationsRDP-TcpUserOverrideControl PanelDesktop
Figure 11.20 shows the RDP-Tcp registry key with the recommended options defined. Many of these settings are equivalent to the default values found under HKEY_CURRENT_USERControl PanelDesktop but are duplicated here to ensure that a user does not try and change them. Table 11.5 lists these recommended settings along with a brief description of what they do.
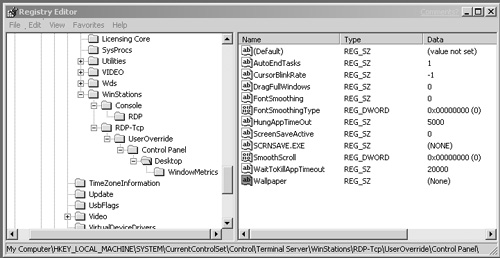
Table 11.5. Recommended WinStation Overrides
Key/Value Name | Value | Description | |
|---|---|---|---|
AutoEndTasks | REG_SZ | 1 | Automatically closes down any tasks that are “not responding.” The wait time before these tasks are terminated is defined by WaitToKillAppTimeout. |
CursorBlinkRate | REG_SZ | –1 | The default value of 1200 sets the cursor to blink once every 1.2 seconds. Setting the value to –1 completely stops the blinking cursor. The value is in milliseconds. |
DragFullWindows | REG_SZ | 0 | When set to 0, dragging a window will show only the outline instead of all contents. |
FontSmoothing | REG_SZ | 0 | Turns off smooth edges for screen fonts. |
FontSmoothingType | REG_DWORD | 0×0 | The specific smoothing type employed. |
HungAppTimeout | REG_SZ | 5000 | This is the final amount of time that Windows will wait after it has decided to terminate an application before it actually does. The value is in milliseconds. |
ScreenSaveActive | REG_SZ | 0 | Flags whether the screen saver is active or not. |
SCRNSAVE.EXE | REG_SZ | (NONE) | The default screen saver for the user. |
SmoothScroll | REG_DWORD | 0 | Turns off Smooth Scrolling in Windows. This does not disable Smooth Scrolling in Internet Explorer. That will be discussed in Chapter 15. |
WaitToKillAppTimeout | REG_SZ | 20000 | The time that Windows will wait to see if a process will honor a shutdown request before it is considered to be “not responding.” |
Wallpaper | REG_SZ | (NONE) | This is the default for both 2003 and 2000. Users will not have a desktop wallpaper. |
WindowMetricsMinAnimate | REG_SZ | 0 | Turns off window animation when minimizing and maximizing. |
Once these settings have been applied, the next time a user logs on using the corresponding connection type (RDP-Tcp, in this example), these settings automatically override any settings already set in the user’s profile. If there are any users logged on when you make these changes, they will not pick up the settings until the next time they log off and back on.
While we are on the subject of Windows visual effects, it is worth discussing briefly the Visual Effects properties on a Windows 2003 server. Under the AdvancedPerformance settings on the System Properties dialog box, you will find the new Visual Effects tab for Windows Server 2003 (see Figure 11.21). This tab allows you easy access to fine-tune the appearance and behavior of the Windows 2003 desktop. Some of the options discussed in the previous section (“Define Winstation User Overrides”), are also listed here.
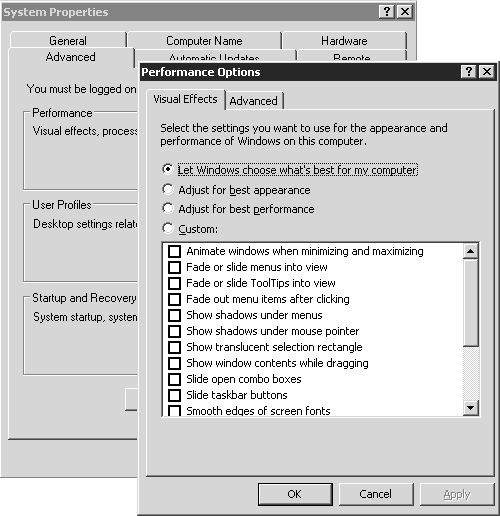
The default option Let Windows Choose What’s Best for My Computer recognizes a Terminal Server configuration and disables all but one of the visual effects listed on this screen. Although it may not be immediately clear, any changes made within this dialog box will affect only the user who is making the change. No other users are affected by any changes made here. Managing configuration and access to these settings for all users will require the use of group policies and user profiles, both discussed in detail in Chapters 15 and 18, respectively.
The memory in a Windows 2000 or 2003 server is divided between the file system cache and the individual process working sets. The file system cache is used to store recently accessed data from the file system for quick retrieval. A working set is the portion of memory allocated by a process currently accessible in physical memory. If a process attempts to access memory currently not in physical memory, one of two things happens:
A soft-page fault occurs if the page of memory being sought was recently reclaimed by the virtual memory manager but was not yet reallocated. Soft-page faults are processed relatively fast, although there is still a delay while the page is reallocated to the working set.
A hard-page fault occurs if the memory must be retrieved from the pagefile. This impacts performance since the process must wait for the page to be retrieved from disk and assigned to the working set before it can be used.
The default configuration for both Windows 2000 and 2003 is to allocate more space to the system cache. This configuration is optimal when the server’s role is that of a file and print server, since file system data can be retrieved quickly and there are a low number of processes running on the server. This is not the desired configuration for a Terminal Server. Instead of allocating the additional memory to the system cache, you want to maximize the available memory that can be used by process working sets, and thereby minimize the occurrence of hard-page faults.
The system cache allocation is controlled through the single registry value entitled LargeSystemCache, which is located in the registry key
HKEY_LOCAL_MACHINESystemCurrentControlSetControlSessionManagerMemory Management
While this value can be modified directly, both Windows Server 2003 and Windows 2000 Server provide a GUI interface that can modify this value appropriately.
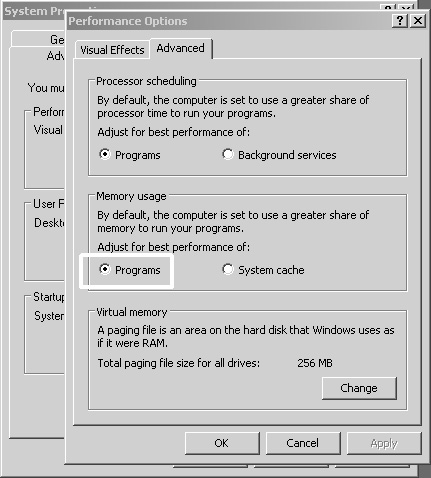
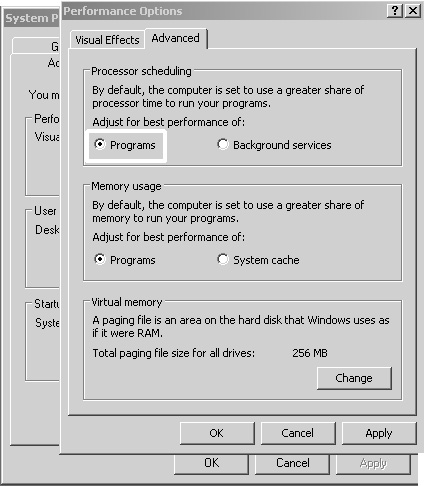
The memory usage on Windows 2003 Server is controlled on the Advanced Performance Options screen, located under System Properties (see Figure 11.22). The recommended option is to select Programs versus selecting System Cache. Setting the memory usage option to Programs will set the LargeSystemCache value to 0. A reboot is required before this change takes effect.
On Windows 2000 Server there is no obvious Memory Usage dialog box. Instead you need to look in the most unlikely place, which is under the properties for File and Printer Sharing for Microsoft Networks. You can get to this dialog box by first opening Network and Dial-Up Connections, next opening the properties for Local Area Connection, and finally opening the properties for File and Printer Sharing for Microsoft Networks. Figure 11.23 shows the default option for Windows 2000 Server, while Table 11.6 summarizes how the different File and Printer Sharing properties affect the state of the LargeSystemCache registry entry.
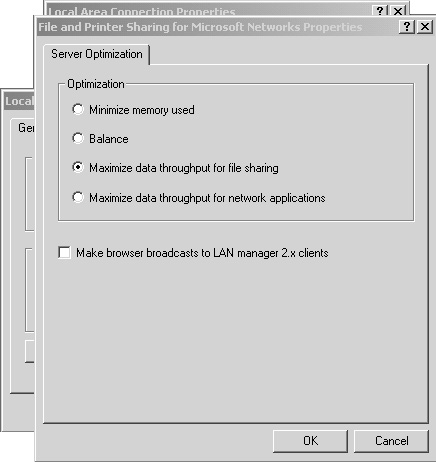
Figure 11.23. The File and Printer Sharing properties for Microsoft Networks is where the system cache setting is managed.
While conflicting information exists about whether Minimize Memory Used or Maximize Data Throughput for Network Applications is the ideal Optimization selection for a non–file and print server, I have had continued success selecting the latter. The Windows 2000 Server must be restarted before changes to the system cache will take effect.
NOTE:
Microsoft knowledgebase articles 308186 and 228766 both discuss selecting the Maximize Data Throughput for Network Applications option to optimize performance of systems that would make extensive use of TCP/IP-based connections (as Terminal Server would).
On Windows Server 2003, toggling between the two Memory Usage options Programs and System Cache will toggle the Optimization setting between Maximize Data Throughput for Network Applications and Maximize Data Throughput for File Sharing, respectively.
An important configuration option for a Terminal Server is the optimization of the timeslicing for foreground thread execution. Before getting into the details on the configuration, there are some details I feel are important to understand.
As you know, Windows 2000 and 2003 Server are preemptive multitasking operating systems, whose thread execution is priority-based. This means that the highest priority thread that is in the ready state will always be the next to access the processor.
Once a thread has been selected to run, it has a maximum timeslice in which it is allowed to execute. This timeslice is measured in quantums. A thread’s quantum is decremented by the system at specific intervals during the thread’s execution. Once the thread’s quantum has been reduced to zero, if there is another thread at the same priority level, then the current thread enters a wait state and the other thread is allowed to execute. If there are no other threads at the current priority level, the thread is assigned a new quantum value and allowed to immediately return to the processor.
I should mention that any higher priority threads that become ready to execute are immediately able to preempt a lower priority thread and begin execution on a processor. Once that higher priority thread has completed, the preempted thread is the first to be able to resume processing.
A thread’s quantum is in no way associated with the priority of the thread. Regardless of a thread’s priority it will receive the same initial quantum length as any other thread. When a thread is created it will inherit the base priority of its parent process, but unlike a process its priority may be temporarily increased by the system in order to service a request that needs immediate attention.
In order to see the current priority of a process’s individual threads you will need to use Performance Monitor. Figure 11.24 shows an example of the base and current priorities for a Microsoft WordPad process and its associated threads. You can clearly see the temporarily elevated priority of 12 assigned to a thread as it responds to mouse activity and keyboard input, followed by a decline back down to the base priority of 8 as the boost is decremented by the system.
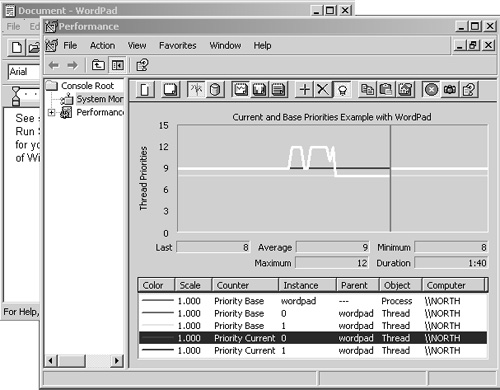
After receiving a priority boost, a thread will run at that priority level for one quantum unit, at which time the thread will drop back down one priority level. This continues until the thread is once again at its base priority. Looking again at Figure 11.24 we clearly see the priority decrementing, indicating the thread has expended quantum units of processing. You may notice threads that seem to run at an elevated privilege for quite a while before being decremented. This is actually because the thread is awaiting some input and is not running. Until it returns from the wait and consumes a quantum, it remains at the same priority level. You are probably wondering: Then, how many quantum units does Windows assign to each thread? Table 11.7 lists the default quantum units assigned to a thread for Windows 2000/XP Professional and for a Windows 2000/2003 server prior to its beginning execution.
The number of assigned quantum units is set higher by default on a Windows 2000/2003 server in order to try and give a thread sufficient time to complete the execution of a client request before its quantum expires and it is forced to relinquish execution to another thread. On Windows XP or 2000 Professional, shorter quantum values are assigned in order to make applications more responsive to user input and also to allow more threads to be serviced in a timely fashion.
In addition to using the shorter quantum values, 2000/XP Professional also institutes quantum boosting for foreground applications versus background applications. Initially all threads are assigned the same quantum length of 6, but when an application is running in the foreground (the window that currently has focus), the system will immediately boost the quantum values for all of that process’s threads to be 1 to 3 times the base quantum length. By default, this boost will triple the thread’s current quantum from 6 to 18.
Boosting the quantum for the foreground threads provides more favorable access by lengthening the processing time without adversely affecting the execution of other threads. Because the priority of these threads has not been changed, other background processes still get their opportunity to execute, but just not as much time as the foreground threads.
NOTE:
A common question asked is, “So how long is a quantum?” A quantum is not an actual unit of time. Quantum units are consumed based on different execution states in the system. Some examples under which quantum are consumed include the following:
During each clock interval the currently running thread has its quantum decremented by 3. This occurs even if the thread has not run for an entire interval. So one thread may have its quantum reduced after running for only 2 milliseconds (ms), while another may run for 9 ms before it loses 3 quantum units.
When a thread goes into a wait state, its quantum is typically (but not always) decremented by 1.
Because quantums are decremented by 3 during every clock interrupt, they are usually treated as being equal to one-third of a system’s clock interval. The clock interval is dependent on the server’s hardware, but typically it is 10 milliseconds on a uniprocessor Intel x86 system and 15 milliseconds on a multiprocessor x86 system.
On a Windows 2000/2003 server you have the option of switching the server to favor applications over background processes. This is done on the Advanced tab of the Performance Options dialog box, which is accessed through the properties for My Computer, shown in figure 11.25. Changing this option will immediately affect the quantum assignments for all threads on the server. You are not required to perform a reboot. When a Windows 2000/2003 server is configured as a Terminal Server, the Programs option (labeled “Applications” on Windows 2000) is selected by default, and the server is configured to use the same quantum configuration settings as a Windows 2000/XP Professional installation.
TIP:
Changing between the Programs option and the Background Services option will update the registry value Win32PrioritySeparation located in this registry key:
HKEY_LOCAL_MACHINESystemCurrentControlSetControlPriorityControl
The numeric value stored here specifies the default quantum value assigned to all threads as well as the boost that should be applied to the foreground applications on the server. This two-digit hexadecimal value is used to create an index into an in-memory quantum table, where the appropriate quantum information to use is stored. By changing this registry entry you can affect how quantum values are assigned. Table 11.8 summarizes the different values for Win32PrioritySeparation and how these affect the default quantum value for all processes, as well as the boosted value for foreground processes. The value 0×26 corresponds to the Programs option, while 0×18 corresponds to the Background Services option.
Table 11.8. Default and Boosted Quantum Values Based on the Win32PrioritySeparation Value
Win32PrioritySeparation Value (Hexadecimal) | Default Thread Quantum | Boosted Foreground Thread Quantum |
|---|---|---|
0x24 | 6 | 6 |
0x25 | 6 | 12 |
0x26 (Programs) | 6 | 18 |
0x14 | 12 | 12 |
0x15 | 12 | 24 |
0x16 | 12 | 36 |
0x28, 0x29, 0x2A | 18 | 18 |
0x18 (Background Services), 0x19, 0x1A | 36 | 36 |
So, for example, setting the Win32PrioritySepartion to 0×15, would assign all threads the default quantum of 12, and all foreground threads the boosted quantum of 24. When the boosted value is the same as the default value, this means that no boost is actually assigned.
The information I have touched on here is only the tip of the complete story on how Windows 2000/2003 manages thread scheduling and priority assignment. For more detailed information on this subject, including a more thorough treatment on exactly how the values for Win32PrioritySeparation are derived, please see the following:
Description of performance options in Windows—Microsoft knowledgebase article number 259025.
Win2K quantums, system internals—http://www.sysinternals.com/ntw2k/info/nt5.shtml.
“Inside the Windows NT Scheduler”—Windows and .NET Magazine, instant doc #302, http://www.winntmag.com.
Inside Microsoft Windows 2000, Third Edition—David A. Solomon and Mark E. Russinovich. Probably the ultimate Windows architecture reference.
Now that you have a clear understanding of how thread timeslicing works and how quantum values are assigned, we can look at what settings are appropriate for a Terminal Server. Table 11.9 summarizes my suggested settings based on a couple of Terminal Server configurations. Under almost all circumstances, the Performance Options setting of Programs is appropriate for a Terminal Server.
Table 11.9. Suggested Quantum Tuning for Different Terminal Server Configurations
Terminal Server Configuration | Suggested Setting | Comments |
|---|---|---|
Dedicated Terminal Server providing only user sessions and running no additional services. | Programs setting under the Performance Options dialog box. Equivalent to setting Win32PrioritySeparation to 0×26. | This configuration is appropriate for most standard Terminal Server installations. Uses a default and boosted quantum of 6 and 18, respectively. |
Small Terminal Server deploy ment running both user sessions and additional services such as IIS. | Win32PrioritySeparation set to 0×15 or 0×16. | This raises the default quantum setting from 6 to 12, which will benefit background processes while still boosting foreground apps to minimize the impact on user sessions. |
NOTE:
In the past, many people (including myself) have configured Terminal Servers to use Background Services as the preferred configuration, with the assumption that this would even the playing field for all processes and prevent any kind of backlog of boosted foreground sessions waiting for access to the CPU that might result from using the Programs option. At least for myself, part of this reasoning was a result of the false assumption that foreground tasks were actually receiving a priority boost, not just a quantum boost.
In actual fact, all this change was doing was lengthening the default quantum assigned to all threads on the system (up to 36 from 6). In most situations there was no discernible difference to the users, since they typically ran Office-type applications such as Word or Excel, and no additional processor-intensive background applications were running on the server. So even though background processes were running with a longer quantum, most were simply waiting for user input while the foreground task was running. The thread scheduling on Windows ensured that applications still responded in a timely fashion by boosting the priority of a process when necessary.
Where this change may have caused problems was if poorly behaved applications were looking to acquire processor time even while in the background. The longer quantum value would permit this application to hog the processor for longer periods of time before having to relinquish execution.
This change applies only to Windows Server 2003.
A new feature available with Windows Server 2003 is the Error Reporting service. This tool monitors the system for any user-mode or kernel-mode exception errors that may occur. When a user-mode error occurs, the service displays a dialog box (see Figure 11.26) asking the user choose between Send Error Report and Don’t Send. Clicking Send Error Report immediately sends the error report anonymously to Microsoft via the Internet, using SSL.
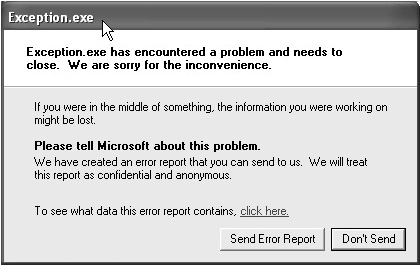
Figure 11.26. User-mode exception errors will prompt the user to choose whether to report the problem to Microsoft or not.
When a kernel-mode exception occurs (Blue Screen of Death), the next time the system boots up and you log on, a dialog box appears prompting you to provide an explanation as to why the system shut down unexpectedly. The Error Reporting service then generates a report that can be sent to Microsoft. While the kernel-mode feature might be useful in troubleshooting a recurring problem, I suggest that this feature not be enabled by default. Not only does the service provide additional overhead, but also you may end up with users sending reports to Microsoft concerning internal application issues.
This feature can be configured on the Error Reporting screen, located at the bottom of the Advanced tab on the System Properties dialog box, as shown in figure 11.27. Select the Disable Error Reporting option. If you check the option But Notify Me When Critical Errors Occur, a user will still see the exception error message displayed, but minus the Send/Don’t Send options.
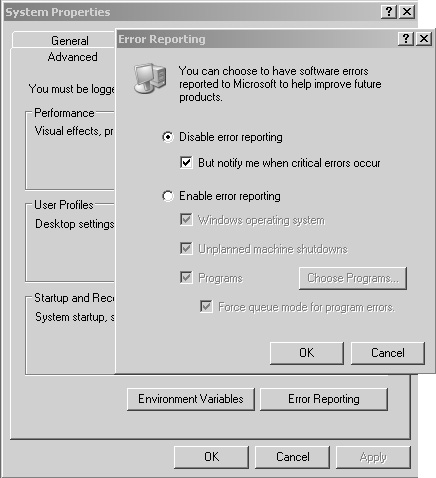
Even after minimizing the number of components installed on your Terminal Server, there still are a few additional services that can be stopped in order to free up additional processor and memory capacity. You can quickly view the list of running services by right-clicking My Computer, selecting Manage, and then selecting the Services icon located under Services and Applications, as shown in figure 11.28.
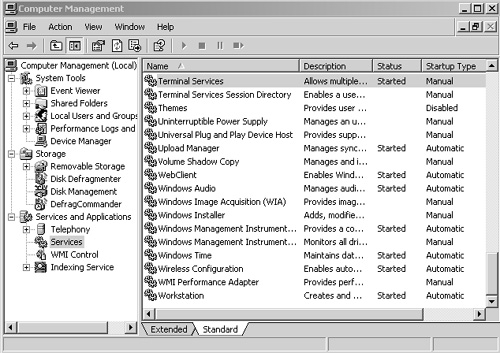
Table 11.10 summarizes the services that will typically be running after a standard Terminal Server installation and are good candidates for being stopped. Make sure that you verify that a service is not required in your configuration before you decide to stop it.
Table 11.10. Services to Consider Stopping on a Terminal Server
Service Name | Description |
|---|---|
If you are not using administrative alerts, you can stop this service. This service is disabled by default in Windows 2003. | |
Enables downloading and installing Windows updates. Even if you have turned off Automatic Updates, this service will run. Depending on how you are managing critical updates to your server, this service may not be required. See Chapter 9 for details on properly managing updates in a Terminal Server environment. | |
Unless your server is using DHCP to acquire an IP address, you can stop this service. | |
This service is responsible for gathering link source information and transmitting any changes back to the distributed link-tracking server, which would run on a domain controller. This service is not required on Terminal Server and can be disabled. | |
(2003 only.) Even if you have disabled error reporting, this service continues to run. If you are not using the Error Reporting features of this service, it can be disabled. You will not be able to immediately stop this service, but setting it to Manual prevents it from starting on a reboot. | |
(2003 only.) This persistent service is a core component of the new Help and Support option available from the Start menu on Windows Server 2003. Even if you have stopped and disabled this service, it immediately restarts the next time anyone runs Help and Support. The only way to stop this for good is to hide the Help option through use of a group policy and then stop this service. In a production Terminal Server environment, you probably will not want to run the Help and Support Center service. | |
This service monitors and records client access license usage on the server. It does not manage Terminal Server client access licenses, only the traditional Windows access licenses. This service also automatically replicates license information to the licensing service on a domain controller. Disabling this service halts license monitoring but not license enforcement. | |
Messenger is responsible for transmission of “net send” and Alerter service messages. Stopping this service will not affect usage of the Terminal Server MSG function. See Appendix A for a complete description of the MSG messaging command. This service is disabled by default on Windows 2003. | |
(2003 only.) Retrieves serial numbers from connected portable music devices. Not needed on a Terminal Server. | |
Remote Access Auto Connection Manager | This service becomes active when there is no network connection and offers to make connections to dial-up or VPN networks if necessary to establish connections with a remote address. Not normally required on a Terminal Server. |
Don’t attempt to disable the other similarly named service, Remote Access Connection Manager, as this is a required component of the Network Connections folder. | |
Allows remote users to modify the registry settings on this server. Definitely a good candidate to be stopped, not only to conserve resources but also as a security consideration. This service is disabled by default on Windows 2003. | |
(2003 only.) Handles the detection and notification of AutoPlay events. Disabling this prevents the standard AutoPlay of CDs from occurring. | |
(2003 only.) Allows for discovery of UPnP (Universal Plug and Play) devices on your network. Not a service that is necessary on a Terminal Server. | |
(2003 only.) This is part of the wireless zero configuration support for wireless devices by Microsoft. Unless you are running an 802.11 wireless adapter in your server, you will not require this service. |
When stopping a service, make sure that you also configure it to have a startup type of either Manual or Disabled. My suggestion would be to select Manual the first time you have stopped the service and check upon reboot to see whether it has been enabled again or not. If it has restarted, there may be another service or application that is dependent on this service in order to run. If this is the case, you may not be able to stop this service. To change the startup type for a service, simply right-click the service, select Properties, and then go to the General tab.
Many applications today add one or more entries to the registry during installation so that instances of certain processes are running every time a user logs on to the system. What happens is that you have multiple users all running instances of the same application, which typically is not necessary and ultimately results in waste of system resources.
For each of the following registry keys, you should examine the entries and remove any not required for your configuration. Fortunately, both Windows 2000 and 2003 do not have any entries in these locations after a base installation.
The most common location where applications are defined to run during a user’s logon is this registry key:
HKLMSoftwareMicrosoftWindowsCurrent VersionRun
Applications defined in this location will be launched for every user who logs on to the Terminal Server. The associated registry location to examine is
HKLMSoftwareMicrosoftWindows NTCurrentVersionTerminal ServerInstallSoftwareMicrosoftWindowsCurrentVersionRun
This location is where any Run entries created on a per-user basis are added during an application installation. Removing them from here ensures that they are not replicated into the user’s profile the next time they log on. In Chapter 21, “Application Integration,” I talk in detail about application installation and how Windows handles the necessary file and registry replication.
After a base Windows 2000/2003 installation, a couple of registry locations will contain startup entries that should not be modified. First, the registry key HKLMSoftwareMicrosoftWindows NTCurrentVersionWinLogonAppSetup will contain the entry UsrLogon.cmd, which is the main Application Compatibility Script (ACS). This entry should not be changed unless you wish to completely disable the ACS feature. If you have installed MetaFrame, you will also find the entry cmstart.exe. This executable is responsible for launching the various client device-mapping processes.
The final location to review is
HKLMSoftwareMicrosoftWindows NTCurrentVersionWinLogonUserInit
Normally there should be only one entry here. This is %SystemRoot%System32userinit.exe. This entry is responsible for launching the Explorer shell when a user first logs on. It is not a common location to add startup processes, so you may want to view any entries here with some suspicion.
TIP:
A good habit to get in to is reviewing these registry keys on a regular basis to ensure that there are no applications launching within your user sessions that you’re not aware of. I normally review these keys immediately after installing a new application onto a Terminal Server, particularly an application I’m not already familiar with.
On Terminal Servers with large amounts of physical memory, you can provide a response boost to the server by forcing drivers (user-mode and kernel-mode) and system code to remain in memory, even if they were written to be “pageable.” Even on large memory systems, these pageable components may be swapped out to disk unless this option is set. The following registry key handles this option:
HKEY_LOCAL_MACHINESYSTEMCurrentControlSetControlSession ManagerMemory Management
The REG_DWORD value to modify is DisablePagingExecutive. Setting this value to 0×1 will turn off the paging of these drivers and system code to disk.
WARNING:
This option consumes additional physical memory, so you should ensure that your server is not operating at full physical memory utilization under regular user load before configuring this setting. Doing so will result in less physical memory being available for the user sessions and increased pagefile usage. Enabling this option on a server with insufficient physical memory can result in an unstable server.
By default, Windows updates the last access time on each directory when traversed. You can provide a slight disk-read performance increase by disabling this option, since users on a Terminal Server will mostly be performing file reads on the server. You can turn off this default behavior. For the registry key
HKLMSystemCurrentControlSetControlFileSystem
add the new value:
NTFSDisableLastAccessUpdate REG_DWORD
and set it to 0×1. A reboot is required in order for this change to take effect.
Over time, as files (and folders) are created and deleted on a disk volume, the files tend to become fragmented. When a file is fragmented, it does not occupy a single contiguous space on the disk but instead is broken down into multiple pieces (clusters) that are spread out across the disk. The result is the need for multiple disk reads in order to retrieve all the information for a file. Fragmentation is also a problem with write operations. As files are deleted, small “holes” of free space develop on the disk. When a new file is written, the file system attempts to fill these holes with the contents of the file. If the file is too large to occupy the first hole, a portion of the file’s contents are written to the first hole, and the remainder is written to the next available hole(s).
As a volume becomes more and more fragmented, the performance of the server can be adversely impacted, particularly when a large amount of read and write operations are occurring. Typically, file servers are the most susceptible to high amounts of fragmentation as users read, write, and delete files. On a Terminal Server, the amount of fragmentation is usually lower, since users have limited access to perform write and delete operations on the server. Even so, each of the separate disks and partitions on your server should be examined individually to determine its defragmentation requirements:
System volume—. This is where the majority of fragmentation usually occurs, since each user’s profile and temporary folders are stored here. Typically I suggest performing a defragment on the system volume once every month or so, although the schedule frequency for your environment will depend on your fragmentation reports. Ideally you should schedule the defrag to occur either when the server is out of production or during off-peak times so as not to affect users.
Pagefile volume—. Typically, very little file fragmentation will occur when the pagefile is located on its own physical disk. If the pagefile is maintained on a volume with other data or applications, fragmentation can be more of an issue. The pagefile and other system files such as the registry hives or event logs cannot be defragmented during normal server operation, as these files are in use. These files can be defragmented only during system startup. I discuss this further in the “Manage Pagefile and Registry Fragmentation” section of this chapter.
Application volume—. Very little fragmentation should occur on the application volume, since users should have no (or only minimal) write or delete access. Normally I suggest that you defragment the application volume after you have completed installation and configuration of all the applications on your Terminal Server. A scheduled defrag is not normally required.
Software solutions are available to remedy the situation of fragmented volumes. Windows 2000 and 2003 ship with a tool called Disk Defragmenter, which is a limited version of the full commercial product called Diskeeper from Executive Software. To start Disk Defragmenter, open Administrative Tools from the Start menu and then select Disk Defragmenter after opening the Computer Management application. A dialog box appears, similar to the one in Figure 11.29.
Before defragmenting a disk you should analyze the drive to determine whether a defrag is required. Simply select the drive you want to analyze from the top portion of the Disk Defragmenter tool and then click the Analyze button located near the bottom. A pop-up box indicates whether the volume should be defragged; if you want to continue with the defrag, click the Defragment button to begin.
While the Disk Defragmenter tool that’s included in Windows 2000/2003 is useful, there are a few limitations (see Table 11.11), particularly with the Windows 2000 version.
Table 11.11. Limitations in Windows Disk Defragmenter
Limitation | Windows 2000 | Windows 2003 |
|---|---|---|
Can defragment only local volumes. | True. | True. |
Can defragment/analyze only one volume at a time. | True. | True. |
This includes the command line version, which can have only one running instance at a time. | ||
Cannot be scheduled. | True. | False. |
The command line version of Disk Defragmenter can be scheduled using the task scheduler. | ||
Cannot be configured from a command prompt. | True. | False. |
Windows Server 2003 ships with a command line version of Disk Defragmenter called DEFRAG.EXE.
The addition of the command line version of Disk Defragmenter in Windows Server 2003 lets you schedule the unattended defragmentation of volumes on a Windows 2003 Terminal Server without the need to buy third-party software. For example, the following would schedule the automatic defrag of the C: drive every Sunday morning at 1:23 a.m.
at 1:23 /every:Su defrag c:
The only thing you won’t get with this is an output report summarizing what was done. The solution to this is to schedule a batch file containing DEFRAG.EXE, as shown in Listing 11.2, instead of scheduling DEFRAG.EXE directly.
Example 11.2. Using the RUNDEFRAG.CMD File to Capture DEFRAG.EXE Output
ECHO OFF
REM ** Pipes the DEFRAG.EXE output to a file that can then be examined
REM ** to ensure the scheduled job ran properly. The output goes into
REM ** the c:DefragReport folder.

defrag.exe c: > c:DefragReportdefrag.output.txt
The batch is scheduled by running:
at 1:23 /every:Su RUNDEFRAG.CMD
If the batch file is not located in the SYSTEM32 folder, you will need to include the full path in the AT scheduler command.
The lack of support in Windows 2000 for scheduling, either through the GUI or the command prompt, is what limits this tool’s effectiveness in a Windows 2000 Terminal Server environment. In order to defragment a volume, you need to log on to the Terminal Server, launch the tool, and then perform the defrag one at a time on each desired volume. In order to schedule disk defragmentation, you need to look at third-party tools. Two products I have used in the past on Terminal Server are
Defrag Commander (Winternals Software)—. A simple yet effective tool that provides all the key features missing from the Windows Disk Defragmenter. From within a single MMC snap-in you can configure and schedule defragmentation jobs on all your servers without having to install any client software on them. The number of remotely manageable servers is dependent on the number of licenses purchased. A 30-day trial version is available from http://www.winternals.com.
Diskeeper (Executive Software)—. The full version of Diskeeper provides a number of enhancements over the basic version that ships with Windows 2000/2003, including boot-time defragmentation of the pagefile, movement of directories to the front of a volume, and multiple simultaneous volume defragging. A licensed version of Diskeeper must be installed on each server. A 30-day trial version is available from http://www.diskeeper.com.
As I alluded to briefly in the previous section, system files such as the pagefile or the registry hives cannot be defragmented during normal system operation and must be processed during system startup. To ensure that fragmentation is kept to a minimum, I recommend periodic defragmentation of these files (either manual or automated). While Windows 2000/2003 provides no built-in mechanism for compacting these resources (Windows Disk Defragmenter is not able to defragment the pagefile or registry files), alternate solutions are available:
Diskeeper (Executive Software)—. In addition to this full-featured commercial product’s supporting standard file defragmentation, it is able to automatically defragment the pagefile during system startup. A 30-day trial version is available from http://www.diskeeper.com.
PageDefrag (SysInternals)—. This freeware utility lets you view the current state of fragmentation in the registry hive files, event log files, and pagefile and provides the option of automatically scheduling a defragmentation either during the next restart or after every future restart. Figure 11.30 shows the main window for PageDefrag. This utility is available free from http://www.sysinternals.com.