
Documenting Online Evidence
This chapter describes various tools available to document online evidence and the procedures for validating and verifying that evidence. Many of the tools described are free or inexpensive or built right into an operating system. Additionally, some of the tools examined include functions that are great for authentication and chain of custody issues, such as incorporating the system date/time, into a file name capturing online ESI. All of the utilities are very user friendly. Details are provided on how to create a portable field investigative thumb drive. Finally, pointers are provided for capturing data where the investigator’s tools are not available or accessible.
Keywords
Internet investigation tools; documenting online evidence; protocol identification; collection methodology; screenshots; save as; website capture; hash value; MD5; SHA1; portable applications; tool validation
The guy who knows about computers is the last person you want to have creating documentation for people who don’t understand computers.
Adam Osborne (1939–2003, American Author and entrepreneur, who introduced the world’s first portable computer)
Documenting online evidence, as described in Chapter 4, is legal requirement. Screenshots or digital camera shots alone are no longer valid documentation methods for online investigations. Authentication is a legal hurtle that must be overcome to getting online ESI admitted into any legal proceeding. The bits and bytes we find on the Internet are no different than those we are familiar with when found on a hard drive or a cell phone we physically possess. Internet data exists on a hard drive or memory storage space somewhere in the world. The difference between traditional digital forensic collection and Internet evidence collection is the methods available to us to document the data. In this chapter, we will discuss those methods and procedures that can be used and introduce various tools that can make this process verifiable and authenticated.
Process for documenting online ESI
Documenting Internet ESI involves understanding the various protocols in use and ensuring that you are collecting the information that the protocol makes available. We discussed in Chapter 3 how the Internet and its various protocols work. Understanding these protocols is critical for investigators to comprehend the importance of the processes discussed in this chapter. In Chapter 4, we outlined a basic process to consider when collecting Internet ESI to maximize its admittance as evidence. Using that format we will discuss specifically what procedures need to be conducted to accomplish those processes.
Collection
Collection is the basic function of documenting Internet evidence. Collection includes the actual gathering of the data of interest as well, if possible, the metadata surrounding that data. Metadata is information that describes the source data. It can include various time stamps, author information, the program used to make the code or many other file-specific pieces of information. The process begins with identification of the data to be gathered, its protocol determination, collection methodology and location identification.
Internet ESI collection processes can be broken into two types: (1) those conducted from the investigator’s office equipment (i.e., from his desktop or laptop) and (2) those collections conducted in the field on the victim’s or witness’s computer. Always, online ESI collection requires some forethought on the investigator’s part regarding the method, the process, and its validity. Online ESI collection can require the inclusion of your agency’s or company’s digital forensic examiners. Consultation with the digital forensic examiners may be required before collecting digital evidence in a particular case. The following collection tools and processes describe how the Internet investigator can collect online ESI in an effective and valid method. Decisions to use these methods should include consultation with agency or company policy on digital evidence, agency or corporate legal and technical advisers and management acknowledgment of these methods.
Identification
Identification of the items to be collected comes from the investigator’s understanding of the case facts. If a complaint received is about data found on a website the investigator needs to get clear and concise information as to the website involved in the complaint. This includes the complete website (URL) address involved in the complaint. If the complaint is about an auction site posting the complete details about the site, auction item name or number, seller and any relevant information regarding the sale are needed. If the complaint is about a chatroom, the details of the specific chat program used, the chatroom involved and the suspect’s username and chat details need to be collected.
Protocol/application determination
Identifying the protocol used provides the investigator with an understanding of the requirements needed to collect that particular type of Internet data. These include but are not limited to:
a. HTTP (Hyper Text Transfer Protocol)
b. SMTP (Secure Mail Transfer Protocol)
Protocol identification is determined quickly based on the initial interview with the victim. The victim should know where on the Internet they were victimized, i.e., a chatroom, threatening emails sent to them, or an auction site with a known URL. The collection process for each different protocol determines the approach the investigator needs to take to collect the data. The investigator needs to be aware that specific applications used by the victim may cause difficulty in the collection process. The application used in the victim’s allegation may often be required to complete any further assessment or evidence collection. The reason is that many of the application manufacturers use proprietary coding to prevent easy access to the program, log files, and other potentially useful data.
Collection methodology
Once the first two steps are completed the investigator needs to develop a collection methodology. This critical third step lays out a plan and identifies tools/procedures for its successful execution. The plan for collecting Internet evidence includes several factors not just identifying details of the target location and going there. Prior to actually going to the Internet offense location investigators need to consider the following:
1. Collection of target intelligence
a. After the victim interview collection of suspect information can be accomplished through basic research on search engines. The investigator should attempt to locate any other Internet references on the target (See Chapters 12 and 14 for further details). Other mentions of the suspect’s real name, username, screen name, or email address can provide a better perspective of the target’s intentions. Also consider searches on other information, such as telephone/cell numbers, business names, or any other specific information. These efforts can also provide the investigator with additional potential victims or associates or avenues for identifying the target.
2. Determine the tools required to document the type of protocol used on the target (multiple protocols might be in use).
a. Tools will be dictated by the protocol.
b. Simple video recording or snapshots of the protocol may be the only valid options to collect the data from the target site.
c. Some protocols may require the investigator to collect the storage container of the data on the victim’s computer such as a Microsoft Outlook PST (email personal storage file) which contains the email. We will discuss further in Chapter 8 how email collection can be accomplished effectively by the Internet crimes investigator.
d. Determine if the investigator has access to commercial tools designed for the collection of evidence from the Internet.
e. Identify inexpensive or freeware tools that can assist with the collection of data from the Internet. Be aware that just because its free on the Internet does not mean it is safe to use. Many free Internet tools can come with spyware or adware that could compromise an investigation.
3. Determine if undercover activities will be required to further the investigation.
a. Refer to agency/company policy for undercover operation initiations.
b. Assume the victim’s or co-conspirator’s identity, with proper approval or prepare an undercover identity.
c. Prepare undercover computer.
d. Prepare online documentation tools for collection process.
a. How much time will be needed to properly collect the online ESI?
Collection methodology’s importance cannot be overstated. If the investigator attempts to collect online ESI with improper tools they may miss important data, such as metadata, that could have been gathered. Probably more problematic is attempting to gather online ESI with a tool that just can’t accomplish the task at all, such as the use of personal computer-based tools in some online gaming environments. Additionally, some investigators may not adequately consider the time needed for some online ESI collection. They allot a small window right before lunch or at the end of the day, when the task is best accomplished in a larger time frame, particularly when chain of custody is of importance. After all, law enforcement does not go to a crime scene, execute a search warrant, start gathering evidence, only to stop and come back after lunch. Plan to collect online ESI data so that it can be done with as little interruption as possible. Obviously, some scenarios, such as those involving undercover online operations, will require uninterrupted operations, which can be accounted for by good planning and forethought. The point is one must consider these issues so that the proper collection methodology is used for the Internet crime being investigated.
Location identification
Locating where something is physically on the Internet is more art than science. It requires finding both the Internet location and the physical address. The Internet location is the website address or URL and IP address, or email account. It can lead you to the service provider for the email account such as Gmail or Hotmail. Tracing the IP address from the URL or the email can provide the investigator with the leads required to identify the target. Tracing IP addressing will be discussed at length in Chapter 8 and is one of the basic skills of the Internet investigator. Locating the actual physical location of the IP address involves tracing it, serving legal service on ISP that own that address and investigations of the target identified by the ISP and the location(s) associated with the target.
Preservation
Preservation of Internet ESI is based on the standards law enforcement already uses when it deals with digital ESI. This includes segregating the data and hashing that data set. In the digital forensics field this is done by forensic examiners who image (make a complete bit for bit copy) of the acquired data into a unique evidence file. This allows the investigator to then use a tool to hash the single data set. Commonly used in digital forensics are tools such as EnCase®, FTK Imager®, ProDiscover®, X-Ways or the open source DD command, to make these data sets. However, tools commonly adopted for use as Internet investigative tools do not generally allow for this kind of collection. The investigator can copy the data into a folder and then use one of the available tools for forensic imaging to acquire the data in a logical image file. These tools will then provide a hash value for the data set and provide the authentication of the data collected. To overcome these issues the investigator can purchase a commercial product such as WebCase® by Vere Software (2013) or follow a standard methodology for documenting and authenticating their data collection. We will be discussing in detail hashing and its importance to the Internet investigation later in this chapter under the section Authenticating the Collected Evidence.
Presentation
Presenting collected Internet ESI is not as easy as easy as printing an email and producing it in court (although a printed email can be authenticated by the sender). Internet evidence in its native form is just electronic bits and bytes. Presenting this kind of information requires the evidence to be viewed in its native form on a computer in a browser or an application designed to view the particular protocol, e.g., IRC. Compilation of the information is best done in some form of HTML formatted report to allow for linkage to images, webpages, and videos as collected during the investigation. Building an HTML page with the attachments can often be difficult for average users. Searching online for a free HTML builder can make the process much easier.
Tools/techniques for documenting Internet evidence
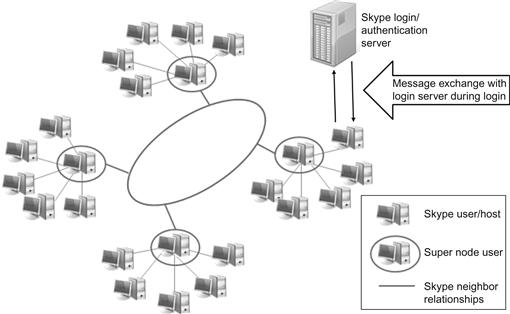
Tools for documenting online ESI have historically been those found on the Internet intended for other purposes and adopted by investigators for collection purposes. A good example of this has been the taking of snapshots of webpages, or portions of pages, relevant to the investigation. Many tools have been available for accomplishing this task. One of the early adopted tools was Techsmith®’s SnagIt (TechSmith, 2012). SnagIt was an early on favorite of Internet investigators because of its easy use and its ability to save images in multiple formats. Techsmith® also makes the popular program Camtasia (TechSmith, 2012) for recording video of screens on a computer. Camtasia has also has been popular with investigators primarily due to its availability and support. Additional tools required for the Internet investigators include those designed to collect protocol-specific information. IRC and various chat programs require applications that can interact with the protocol from that program. A good example of that is Skype™, currently owned by Microsoft®. Skype™ is a well-accepted chat/video messaging program built around a hybrid peer-to-peer1 concept and client/server2 concept (Singh & Schulzrinne, 2005). Investigating a case involving Skype™ would generally include using Skype™ in some fashion to attempt to identify or contact the suspect. Additionally, Skype™ proprietary program encrypts its communication tunnel requiring use of its tool for the investigation (Figure 5.1).
Save As
Capturing a webpage can be done simply in your favorite browser by using the “Save As” function found in Windows Internet Explorer, Mozilla’s Firefox, or Google’s Chrome. Simply select the “single file” in Internet Explorer or the “complete” function in Firefox or Chrome to collect a full copy, which includes the source code to copy the file to your investigative machine (see Chapter 13 for further details). This process only captures the current page being viewed and not an entire website. From a documentation point of view the investigator is collecting what he sees and not what a tool determines is important.
Pictures and video
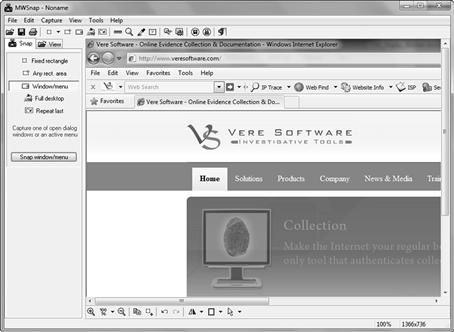
Documenting what you see on the Internet can simply be done through camera shots, screenshots and/or video recording. These tools will not capture source code, like Save As. However, they nevertheless are important to show what the site looked like to the investigator at the time of capture. Additionally, there are cases where the Save As feature will not work, such as capturing an instant message. The use of digital cameras is sometimes required, such as when capturing a message or chat in a gaming console environment. As mentioned above investigators have also been using various screen capture tools for collecting Internet evidence. Tools such as MWSnap3 easily allows the investigator to capture portions of a screen or the entire desktop during the evidence collection process. Other screenshot capture tools include HoverSnap,4 Greenshot,5 and LightScreen.6 All of these tools will capture screenshots. However, they also have options that are important for authentication purposes. Specifically, they have features that allow the user to name the image and to include the date and time of creation to be included in the file name.7 Additionally, they allow screenshots to be taken quickly, in succession, and to be saved in an investigator-selected folder (Figures 5.2).
Tools such as Camtasia or CamStudio allow the investigator to video record anything they are investigating on the Internet. This can include a chat session, lengthy websites, or even videos playing on a website so they are viewed in the context they are playing on the website. CamStudio is an open source tool available for download from http://camstudio.org/. CamStudio’s operation is very simple. Click the red start button and the tool asks you what window to record and it begins recording. Click on the pause or stop button to stop recording. CamStudio also allows the user to include the system date and time in the file name and permits the user to sequentially save the files in an investigator-selected folder. One additional feature allows the investigator to include and show a date and time stamp in the recording being made. Again, these are great features for investigators concerned about authentication and chain of custody issues. One caveat to using some of these tools is they will not capture the audio portion, particularly if the system has no microphone. This can be remedied with the use of a digital recorder (Figures 5.3).

Hashing evidence
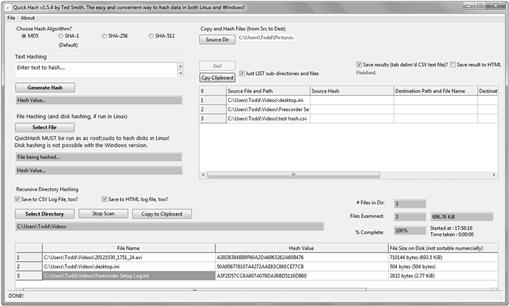
Hashing as previously discussed is the digital fingerprinting of a set of data. In this case that data is the ESI we collect. We can ensure the data is not changed later by using a hashing tool such as Quick Hash (http://sourceforge.net/projects/quickhash/) that can hash an individual file or a directory and then produce a report of the files hashed. The hashes listed can then be added to your investigative report detailing your actions. The hash values can be provided with the evidence items on a CD or DVD and validated by the opposing counsel by running their own hashing program against the files. Copies of the files can be shared and discussed with parties, with the hash values ensuring they are not altered. This allows for authentication of the files and leads to their introduction in legal proceedings (Figure 5.4).
Collecting entire websites
The process of documenting entire websites is not a trivial matter. Many discussions can be found on this topic and numerous tools can be found to assist the investigator in this process. We will discuss several here and the pro’s and con’s of collecting entire websites from an evidentiary viewpoint. We will discuss further in Chapter 13 the makeup of a website in more detail. Look ahead to that chapter for a better understanding of websites protocols.
Website collection can easily be done by the investigator who has access to the server containing the data. However, that is not the case when the investigator is looking at website over the Internet. The investigator observes the Internet website through the interpretation of a web browser. Whether the Investigator is using Microsoft’s Internet Explorer, Mozilla’s FireFox or Google’s Chrome, the browser interprets the data found on the server containing the website of interest. Collecting the website depends on the browser’s ability to interpret the data, the security found on the web server, and the ability for the tools to access the web server data and document what it finds there. Additionally, an investigator should be aware that how a website is presented on his computer can be effected by the cookies previously stored there by a website. Prior to making any assumptions about the data on a website the investigator should clear the collection machines web cache and cookies to ensure a correct and current view of the site.8 Modern websites have become increasingly complicated and webpages and websites refer to data not stored on just one server. Links to images and videos embedded on a webpage are commonly not stored on the same server as the webpage, but links to data stored elsewhere on the Internet. Also, webpages contain a variety of code versions that include active content.
Active content is a type of interactive or dynamic website content that includes programs like Internet polls, JavaScript applications, stock tickers, animated images, ActiveX applications, action items, streaming video and audio, weather maps, embedded objects, and much more. Active content contains programs that trigger automatic actions on a Web page without the user’s knowledge or consent.
Web developers use active content to visually enhance the Web page or provide additional functionality beyond basic HTML. All Web users are regularly exposed to active content.
(Techopedia.com, 2012)
Tools to collect websites are many and varied. Few of these website collectors are effective in their collection and documentation of entire websites. This has to do with the active content and the fact that data on websites is hosted at these other locations on the Internet and not just the server the website is hosted. Website downloaders commonly have issues with Flash, Javascript, and common gateway interface (CGI). They also will not download any server side code such as php, asp.net, databases, etc. This is because the hosting server prevents access to these kinds of server side operations.
Other issues when downloading a website can include copyright and robot.txt rule violations. Copyright marks on the Internet on websites and elsewhere are as enforceable as any copyright mark found in the real world. Robot.txt files are found on websites and tell webcrawlers, such as Google and Bing, whether or not the site authorizes the sites to be crawled by their bots. Of course this can be easily circumvented because the file is just a polite method of saying please don’t crawl my site. It is not any actual block to the site and most crawlers can be set to ignore the Robot.txt file. A review of the sites Terms of Service (ToS) might be required by the investigator before making any attempt at crawling a website. This might be important information to know, even if you ignore the ToS on the site, when you testify about your data collection methods. Here is an example of what can be found in the Robot.txt file:
The term User-agent: * refers to all robots (if you only wanted to stop Google from crawling the site you could add Googlebot) and the term Disallow says what not to search. In our example it is everything on the website. Common tools for conducting website collections include free tools such as HTTrack and Wget and commercially there are tools like Offline Explorer™ from Metaproducts™ (www.metaproducts.com) and Teleport Pro from Tenmax (http://www.tenmax.com). Each of these tools assists the Internet investigators collect data from websites. They all have various settings included in their formats that allow the investigator to collect from a single page to numerous pages within the targeted URL.
Investigative Tip
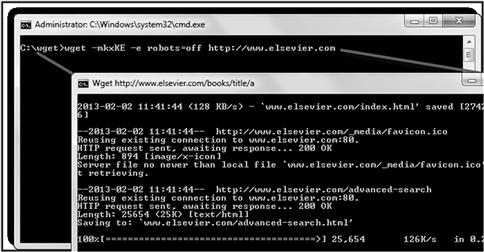
Using Wget
Wget is a command line tool that allows the investigator to collect a website’s data.
Setup Wget
Create directory for Wget C:wget
Download Wget from http://www.gnu.org/software/wget/ to the C:wget directory.
Run Wget from the Command Prompt
Open a command prompt by clicking on the windows and typing “cmd” in the search box. You could also go to the Windows Start Button|All Programs|Accessories|Command prompt to get to the command prompt.
Set “Path” to run Wget from command prompt by typing in the command prompt “path C:wget;%path%.” This tells Windows to look in the folder c:wget for the command.
In the command prompt type the following command:
Wget –mirror –p –html-extension –convert-links www.examplewebsite.com
The following is an explanation of the commands (Figure 5.5):
| -p | Get all images, etc. needed to display HTML page. |
| --p | Get all images, etc. needed to display HTML page. |
| --mirror | Make a mirror copy of the website. |
| --html-extension | Save HTML documents with.html extensions. |
| --convert-links | Make links in downloaded HTML point to local files. |
| www.examplewebsite.com | Add the targeted website to copy here in place of the example. |
Authenticating the collected evidence
Authentication of online ESI requires the investigator document the “fingerprinting” of the data collected. Investigators in the digital forensic process do this same procedure through hashing. Hashing is taking the data set collected9 and applying a mathematical algorithm to the data set and getting a numerical value. This numerical value, hash value, or simply hash, is unique to that data set. Several different types of hashing algorithms exist. Most commonly used in the collection and authentication of digital files are the hashing algorithms Message-Digest Algorithm (MD5) and Secure Hash Algorithm (SHA) SHA-1.10
Hashing can be accomplished with various tools. A quick search of the Internet will find various free hashing tools the investigator can run against their collected data sets to identify and document their collection process. Most of these tools are fairly simple to use and require the investigator to simply point to tools to the file and the tool will produce a numerical value such as:
This numerical value will change when as little as a single bit from the original data set has been altered. This way the receiver of the data can validate that the data has not changed once it is received from the investigator. The receiver can run the same algorithm against the data set and obtain the same hash value. A different value means something was changed.
Hashing for authentication is unique because that single bit of data that is changes causes not just a slight variation in differences but a significant change in the value produced. As shown in Figure 5.6, the various spellings of there, their, and they’re all produce a very different output. Using this kind of hashing can ensure that the investigator’s data when produced during any legal proceeding can be properly validated by any parties reviewing the data and checking the hash value against the one listed in the investigator’s report.

Validation of online evidence collection tools
Tool validation is a standard process in the digital forensics field. Validation is done by comparing a tool’s output against a known data set. Within the data set are known files and artifacts that can be used to benchmark the tool’s collection and analysis efforts. Tool validation allows the investigator to report their familiarity with their tool’s operation and the level of its output accuracy.
However, validating tools in the Internet investigations arena is a horse of a different color. We have learned the data on the Internet is (1) not under the investigator’s control and (2) has a high potential to change, making tool validation methods normally conducted by digital forensic personnel impossible for the Internet crime investigator. Live Internet investigation does not lend itself to validation in the same manner as the digital forensic tools. The “known” data set has to be located somewhere within the control of the investigator.
However, all is not lost. Tool validation can still occur with some care and planning. A website can be set up specifically for validation purposes. The website should contain known artifacts that are documented and that can be later identified in the tool’s collection process. By doing this the investigator can validate the contents of the collection.
Webcase®
WebCase® is a tool designed by retired law enforcement to assist investigators in the collection of Internet information in a legally defensible and reportable manner. WebCase® was designed specifically to assist the Internet investigator overcome several common problems. These issues include:
• The amount of training time required to make an individual competent and confident enough to investigate crimes occurring online.
• The lack of tools specifically designed for online investigations.
• Proper evidence handling procedures for Internet ESI.
• Secure storage of Internet ESI.
• Undercover identity management.
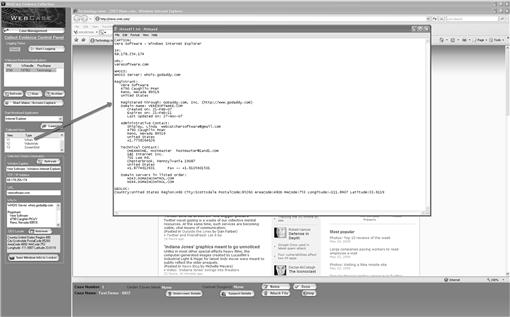
The WebCase® user interface (Figure 5.7) is intended to assist the online investigator record and store online investigations. WebCase® provides the investigator with an easy to use format, with an initial case interface to assist the investigator add required data. The case format allows the investigator, new to WebCase®, to add the required initial information needed to properly identify a case, including agency-/company-specific information and the addition of an agency or company logo for the reporting application. The investigator utilizes the evidence collection screen to record and manage online investigative activity. The saved data is hashed and stored in a secured environment within the tool. Reports based on the evidence collected can then be published in HTML and burned to CD/DVD for distribution.
Field collection of online ESI
Field collection of online ESI is an often overlooked investigative function. The reason has been that simplified collections processes have often been ignored in lieu of complete digital forensic collections. However, in many situations this might not be practical and resources for the complete forensic image collection may not be possible. Shutting down a live computer may make a threatening instant message irretrievable. Seizing a victim’s or witness’s computer is very disruptive and a bit heavy handed to retrieve a couple threatening emails or messages from a suspect. For non-cybercrime cases, such as a car vandalism, police do not seize the car nor do they search the victim’s home. Why would police seize or search a victim’s computer to recover a few bytes of data the compliant is willing to provide? Investigator must also be aware that a complete forensic examination, depending upon an agency’s workload, can take several weeks or months. Waiting for this examination may needlessly delay the investigation. So what’s the investigator to do? Well, collect the evidence! Internet ESI in the field is most likely going to be found on a victim’s or witnesses’ computer. The decision to conduct field collection depends on the case, the collection environment, such as an on or off computer, the victim or witness’s cooperation and the investigator’s ability to properly effect the collection.
Making an online evidence field collection USB device
Using tools on a USB device, on a running Windows computer systems, allows for the investigator to access the live computer with minimal intrusion or changes to the computer system. The most significant change is likely to be a new entry in the Registry,11 which occurs when an investigator plugs a USB device into the computer. However, turning on a dead system will significantly make more changes to data on the drive than accessing a live system. This is due to the processes involved in the startup of the computer commonly referred to as the “boot” process. The boot process during the Windows startup changes numerous operating system files needed to start the operating system. However, this process does not change the user-created files on the system. From the investigator’s point of view they are documenting user accessible files and things observed through their victim’s web browser. Investigators must consider the effects of these changes, in view of the case, the victim or witness’s cooperation and the investigator’s ability to properly effect the collection. For instance, if a victim reports that they have the saved communication and merely need to turn on their computer to retrieve it, than it likely makes sense to turn on the computer and capture the ESI. The investigator knows what he or she needs to retrieve. Contrast this scenario, with a missing child or murder case, where the investigator has no idea what evidence is on the computer or what might be destroyed by turning on the computer in a Windows environment. The file dates and times of its last shutdown might be relevant to the investigation. Booting the system might affect the retrievable operating system data. Again, investigators should consult their respective agency or company policy on digital evidence as well as agency or corporate legal and technical advisers on accessing an on versus off computer.
If the investigator properly sets up a USB device, it can be used to document certain types of information from a victim or suspect’s computer. The general type of information to be documented are emails, chats, or other things resident temporarily only on the victim’s or witnesses’ computer. Using the following tools, the investigator can make a collection USB device capable of documenting ESI on the victim or witnesses’ computer. Tools required to build the USB collection device include an USB device, sufficient in size to collect the requisite data and tools necessary to capture ESI in a variety of formats.
To begin, we suggest first using PortableApps to build your USB tool kit. The PortableApps.com Installer (http://portableapps.com/apps/development/portableapps.com_installer) quickly and easily allows the investigator to build a field portable USB collection device. Using PortableApps installer the investigator can install applications that can accomplish functions necessary for good collection processes. We include the following suggestions but the investigator may find additional valuable tools based on his own training and experiences. Most if not all of these tools are available from portableapps.com. Others can be found at pendriveapps.com. These tool’s usefulness is not limited to the field. They can be used in the office for agencies with limited resources. One caveat is in order. Prior to using any of the applications you install, read the software’s ToS to ensure that you are complying with the software’s agreement. Purchase of the software may be required for government or commercial use.
1. System information for Windows (SIW) portable (http://www.gtopala.com/SIW): This program allows the investigator to collect information on the system that evidence is being collected. SIW produces a report that can be added to the investigator’s collection documentation.
2. NotePad2 portable (http://www.flos-freeware.ch/notepad2.html): This application provides the investigator with a small program for note collection or copying, pasting and saving text from programs such as email headers.
3. IrfanView portable (http://www.irfanview.com/IrfanView portable): This tool allows the investigator to view image files.
4. Lightscreen portable (http://lightscreen.sourceforge.net/Lightscreen): This screen capture utility allows the investigator to take screenshots of the victim’s or witnesses’ computer. This program can be set to save files with the system date and time included in the file name.
5. CamStudio portable (http://sourceforge.net/projects/portableapps/files/CamStudio%20Portable/) allows the investigator to video record anything on the screen related to the investigation on the victim or witnesses’ computer. The program can be set to save the files with the system date and time included in the file name. Additionally, it has a time stamp feature, allowing the data and time to be included in the recording.
6. Checksum control portable (http://sourceforge.net/projects/checksumcontrol/): This is an easy to use MD5 hashing tool to allow the investigator to hash the collected evidence.
7. Forensic imager (http://www.accessdata.com/support/product-downloadsAccessData): produces a forensic imaging tool that can be run from a thumb drive. The Forensic Tool Kit Imager Lite allows the investigator to make targeted forensic collection of data from a victims/witnesses’ hard drive. Included in the collection process is a hash of the data collected.
Investigative Tip
How to Set up and Use PortableApps
1. Start with a new USB thumb drive or one that has been formatted and wiped.
2. Download the PortableApps platform from the website PortableApps.com.
3. Run the downloaded file by double-clicking it.
4. Select the root of your thumb drive as the installation location.
6. Upon the completion of the installation navigate to your USB drive through Windows Explorer.
7. Double-click on the program “StartPortableApps.exe.”
8. The PortableApps icon will appear in the system tray of the computer.
9. The PortableApps menu will also appear. If the PortableApps menu doesn’t appear click the tray icon.
10. In the PortableApps menu click the “Apps” button. To add additional applications click on “Get more Apps” button.
11. An installed application will launch and present a list of the available that you can install.
12. Select the listed PortableApps for inclusion on your thumb drive and download each to your computer.
13. Each App is downloaded through the program and will automatically install onto the thumb drive.
14. Once the installation is complete all the installed applications will appear in PortableApps menu list.
15. Once installation is completed you can take this device to another computer and use all of these programs. Upon plugging in the device to another computer, it may Autorun, and the PortableApps menu will appear. Be patient because before the program will start the system must first recognize the USB device. If Autorun feature is disabled, you will have to repeat steps 6 and 7, noted above. You can also just access the programs directly from the device without using the PortableApps menu (Figure 5.8).

Why use FTK imager?
Many of those reading this, particularly those with a digital forensic background, maybe wondering why include FTK Imager as part of a USB Tool Kit. It is after all a commercial forensic imaging software tool distributed by AccessData Corporation It is a forensic tool designed specifically for the preview of hard drives and making forensic images. Why would an Internet investigator be involved in making forensic images?
The portable version of this tool, FTK Imager Lite, can be used to make a targeted collection of data from a victim/witnesses’ computer that will not be generally examined further by digital forensic lab examiners. Its use is generally done to collect specific targeted data on the victims/witnesses’ computer that has been identified for the investigator. For example, the victim reports they have been saving all the threatening chat messages to a folder/directory called Threats under My Documents. The option to use this tool depends on the circumstances presented and the need to acquire the evidence in a timely fashion. The investigator should ensure that they have consent to conduct the evidence acquisition and conduct the collection according to the facts know at the time.
FTK Imager Lite is a free download that can be found on AccessData’s website at http://accessdata.com/. However, registration is required to download the installation file. Once the file is downloaded double-click on the installer to install the program on your investigative USB device. After you have installed FTK Imager Lite, click on the FTK Icon on the USB device to open FTK Imager. Click “File” in the top tool bar and select “Add Evidence Item,” this will open a pop up box. Select the Logical Drive radial button and select “Next.” The select “C” drive for the local machine or other logical drive letter where the evidence to be acquired is and click open and then “Finish.”
In the tool you will now see on the left side, the drive letter selected. Click on the + sign to open it for viewing. Keep clicking on the + signs to open up the folders of the computer. This view allows you to see the folders and in the right panels you can click and view files. Browse to the folder location of the evidence acquired and in the right pain select the item and right click on the file. Select “Add to Custom Content Image (ADI).” The selected file will appear in the lower left panel “Custom Content Sources.” Repeat this for every file or folder to collect. To make a forensic image of the selected items click “Create Image” in the lower right corner of the “Custom Content Sources” pane. Select the “Add” button and complete the case information. Select “Next” and identify the investigators USB drive to send the image to. Add a file name and select finish. Select the “Start” button to begin acquisition of the data. You can verify the files in the image by adding the image as an evidence item. You can then go through the various folders to review the files the image contains.
Field process for using the investigative USB device
The investigator in a field situation can document evidence as the victim or witness presents the information during the investigation on a Windows-based computer. The following is a general process to use during field investigations (The Appendix C also has a sample worksheet which can be used to document information, noting times/dates, tools used, etc.):
1. Obtain written permission from the victim or witness to access their computer and run applications to document the evidence.
2. Note the computer’s state, on or off, and document the date and time of the system, as well as the actual date and time.
3. Insert the USB device in the targeted Windows system, and document the time.
4. Start the PortableApps program on the USB device.
5. If not previously done make an evidence folder on the USB device with the case number/name for the investigation.
6. Start the SIW portable application and save the HTML report regarding the system to the evidence folder on the investigative USB device.
7. Start the desired program to document the information on the victims/witnesses’ Windows-based computer.
8. Save the collected system information to the evidence folder on the investigative USB device.
9. Examine your USB drive to make sure you have captured everything and hash the saved files with the PortableApp hashing program.
10. Properly eject the USB device with the evidence. It is very important that you properly eject the USB device as failure to do so may ruin your device as well as destroy your data. Find your device under My Computer, right click the device, and select “Eject.” You should see a message that it is save to eject. Document when you ejected the tool. (Note: If you are using PortableApps, the menu has a feature to eject the device as well.)
11. Upon returning to the office, the investigator should burn the collected files to CD/DVD for adding to the evidence file.
Collection from Apple Macintosh
Apple Macintosh computers may not have the market share size of Microsoft Windows but they are still a significant area of potential evidence collection. The Internet investigator should be prepared to deal with the potential for collecting evidence from Apple computers.
Apples in the field
The collection from Apple Macintosh computer is not as easily done using the listed methods. There are currently no portable applications designed for the collection and documentation process in the field. However using the same concepts for the Windows machines we can build a portable collection device on a thumb drive for use on a Macintosh computer. The Apple Macintosh OS X user can find the PortableApps to use at FreeSMUG (www.freesmug.org). The following apps can be used by the investigator on newer Apple Macintosh computers. The directions for adding them to a thumb drive can be found on the FreeSMUG website.
1. Portable Gimp http://www.freesmug.org/portableapps:gimp/
This program allows the investigator to take screenshots of the evidence to be collected.
2. Abiword http://www.freesmug.org/portableapps:abiword/
This program is a word processor that can allow the investigator to keep notes and copy data on the screen into a text document.
3. Portable VLC OS X http://www.freesmug.org/portableapps:vlc
This program allows the investigator to take video of the screen of the evidence to be collected.
Apple office collection
Apple computers are becoming regular additions to office networks. Investigators may have at their disposal an Apple computer for conducting their Internet-based investigations. The following tools can be employed by the investigator to aid in his documentation and screen capture of evidence from the Apple Macintosh. Capturing the screen on an Apple Macintosh is as simple as pressing the Command (Apple) key+Shift+3. Hold each key until you hear the sound of a picture being taken. A new icon on the local desktop will appear called “Picture 1.” There are other tools available that can also be added to the computers applications. Here are some tools that can assist the investigator document Internet evidence from their Apple office system:
1. Capture Me http://www.chimoosoft.com/products/captureme/
Capture Me is a free tool that allows the user to save the files in various formats. This is its single biggest advantage over the built-in Apple tools.
2. Jing http://www.techsmith.com/download/jing/
Jing is a free tool from the makers of Snagit that allows for the capture of screenshots and video on both Mac Windows systems.
1. LittleSnapper http://www.realmacsoftware.com/littlesnapper/
LittleSnapper is a commercial tool for taking screenshots and video on Apple computers.
2. Camtasia:Mac http://www.techsmith.com/camtasia.html
Camtasia:Mac is a tool to video record the screen on Apple computers.
Table 5.1 is a comparisons of the various collection concepts for each protocol.

Organizing your online ESI
Internet evidence collection and documentation does not lend itself easily to be put into a document report. The most common way to produce this kind of collected evidence is to simply burn the files to a CD or DVD and turn them over to your supervisor or legal counsel. Organization of the files is important and documenting the location on the disk and reference to the contents helps the user understand the evidence and makes the collected evidence easy to understand.
When saving file a good naming convention for saving the file is the case number, the investigator’s name or badge number, the date and the evidence item number. As an example:
A consistent naming convention lets the collecting investigator understand when the evidence was collected and what case the evidence is from. It also helps the reader later identify and differentiate between the evidence items. Included in the folders should be a document containing the hash values for each of the evidence items. The collected items in the folder would look something like:
---------10022013_0894_20131001_Report.doc
-------------------------10022013_0894_20131001_001
-------------------------10022013_0894_20131001_002
-------------------------10022013_0894_20131001_003
-------------------------10022013_0894_20131001_004
-------------------------10022013_0894_20131001_005
-------------------------10022013_0894_20131001_006
-------------------------10022013_0894_20131001_007
The investigative report
The Internet investigations report is no different than any other investigative report. It includes the initial cause for conducting the investigation and the Internet ESI. It also includes the methods used to collect and document the online ESI found. The report should also reflect the hash values of the collected ESI. Included in the report should also be the authority the investigation was conducted and reference any appropriate investigative statute or policy. If the e-investigation was conducted in an undercover capacity the policy and authority for such operations should be noted as well. (Refer to Chapter 10 for further discussion on model policies). Included in this section of the report should be the investigator’s undercover identity (if the investigation is complete ensure the report is not for wide dissemination), documentation of any contacts with the target of the investigation and any information regarding the target as identified during the investigation.
Making a report with links in Microsoft Word is fairly straight forward. Open a new document in Word and type the report. The references can then be linked simply by highlighting the text to requiring the link. Select the “Insert” tab and then select “Hyperlink” to a webpage or other page within the document. The links can be to the evidence items in a separate folder which can include images taken or video files. Repeat this until you have all the hyperlinks you need. Using HTML to make a similar report is a little more complicated than making links in a Word document.
Conclusion
This chapter was designed to provide the reader with a basic understanding of how and why Internet evidence is documented. It also provided some of the basic tools adopted for this purpose or designed intentionally for documenting Internet ESI the investigator might encounter. The tools and methods mentioned in this chapter are designed on the premise that digital evidence on the Internet is still digital evidence and needs to be handled in a manner consistent with the process of traditional digital evidence collection. We encourage that before anyone uses these tools on a real case they try them out and get used to how they function and operate. We also strongly encourage users to take the extra step and validate the tools they intend to use. By doing so, they prepare themselves in case anyone questions their methods or tools used to collect online ESI.
Further reading
1. AccessData. (n.d.). e-Discovery, Computer Forensics & Cyber Security Software|AccessData. Retrieved from <http://www.accessdata.com/>.
2. Active Content. 2012. Retrieved from <http://www.techopedia.com/definition/4847/active-content/>.
3. Abiword—FreeSMUG. (n.d.). Welcome to online free open source software Mac user group—FreeSMUG. Retrieved from <http://www.freesmug.org/portableapps:abiword/>.
4. CamStudio—Free Screen Recording Software. (n.d.). CamStudio—free screen recording software. Retrieved from <http://www.camstudio.org/>.
5. Capture Me—Screen Capture Software for Mac OS X. (n.d.). Chimoosoft—Freeware and shareware software for Mac OS X. Retrieved from <http://www.chimoosoft.com/products/captureme/>.
6. Download Jing, Free Software for Screenshots and Screencasts. (n.d.). TechSmith—Screen capture and recording software. Retrieved from <http://www.techsmith.com/download/jing/PortableGimp.app/.
7. EnCase Forensic—Computer Forensic Data Collection for Digital Evidence Examiners. (n.d.). Retrieved from <http://www.guidancesoftware.com/encase-forensic.htm/>.
8. Free Portable Software USB Flash Drive Applications|Pendriveapps. (n.d.). Free portable software USB flash drive applications|pendriveapps. Retrieved from <http://pendriveapps.com/>.
9. FreeSMUG. (n.d.). Welcome to online free open source software Mac user group—FreeSMUG. Retrieved from <http://www.freesmug.org/portableapps:gimp/>.
10. Giles, C., Sun, Y., &Council,I. Measuring the web crawler ethics. In: Proceedings of the international world wide web conference 2010 (WWW 2010). pp. 1101–1102. Retrieved from <https://clgiles.ist.psu.edu/pubs/WWW2010-web-crawler-ethics.pdf/>.
11. Greenshot—A free and open source screenshot tool for productivity. (n.d.). Retrieved from <www.getgreenshot.org/>.
12. HoverSnap Freeware download and reviews from SnapFiles. Retrieved from <http://www.snapfiles.com/get/hoversnap.html>.
13. How to Capture Screenshots on Your Phone and Computer—Techlicious. (n.d.). Home—We make tech simple—Techlicious. Retrieved from <http://www.techlicious.com/how-to/how-to-create-screenshots-on-your-phone-and-computer/>.
14. How to Clear Your Browser’s Cache (with screenshots)—wikiHow. Retrieved from <http://www.wikihow.com/Clear-Your-Browser’s-Cache/>.
15. How to Clear Your Browser’s Cookies (Windows or Mac)—wikiHow. (n.d.). Retrieved from <http://www.wikihow.com/Clear-Your-Browser’s-Cookies...>.
16. How to Take a Screenshot|Apple Gazette. (n.d.). Apple gazette—Your ultimate guide to thinking differently. Retrieved from <http://www.applegazette.com/mac/how-to-take-a-screenshot/>.
17. HTTrack Website Copier—Free Software Offline Browser (GNU GPL). (n.d.). Retrieved from <http://www.httrack.com/>.
18. Information Security Information- SearchSecurity.com. ((n.d.)). Retrieved from <http://searchsecurity.techtarget.com/definition/MD5/>.
19. Lightscreen. (n.d.). Retrieved from <http://www.lightscreen.sourceforge.net/>.
20. Long, J. (2008). Google hacking for penetration testers. Burlington, MA: Syngress Pub..
21. MD5 Hash. (n.d.). Digital Volcano. Retrieved from <www.digitalvolcano.co.uk/>.
22. Microsoft Corporation. (n.d.). Explorer. Retrieved from <http://www.microsoft.com/>.
23. Mirek’s Free Windows Software. (n.d.). MW Snap. Retrieved from <http://www.mirekw.com/winfreeware/mwsnap.html/>.
24. Offline Browsing, Stream Downloading and Productivity Software—MetaProducts Systems. (n.d.). Retrieved from <http://metaproducts.com/>.
25. Osborne, A. Retrieved from <http://www.brainyquote.com/quotes/quotes/a/adamosborn200906.html/>.
26. PortableApps.com—Portable Software for USB, Portable and Cloud Drives. (n.d.). PortableApps.com. Retrieved from <http://portableapps.com/>.
27. Portable VLC OS X—FreeSMUG. (n.d.). Welcome to online free open source software Mac user group—FreeSMUG. Retrieved from <http://www.freesmug.org/portableapps:vlc/>.
28. Quick Hash GUI|Free Security & Utilities software downloads at SourceForge.net. (n.d.).Retrieved from <http://sourceforge.net/projects/quickhash/>.
29. Requirement, L. (n.d.). NIST.gov—Computer security division, computer security resource center. Retrieved from <http://csrc.nist.gov>.).
30. Screenshot & Website Capture For Mac—LittleSnapper. (n.d.). Realmac software—Creative software for Mac & iPhone. Retrieved from <http://www.realmacsoftware.com/littlesnapper/>.
31. Scrivano, G. (n.d.). GNU Wget. The GNU Operating System. Retrieved from <http://www.gnu.org/software/wget/>.
32. Sheldon B. Forensic Analysis of Windows Systems. In: Casey E, ed. Handbook of computer crime investigation: Forensic tools and technology pp 133–165. San Diego, CA: Academic Press; 2004.
33. Singh K., & Schulzrinne, H. (2005). Peer-to-peer Internet telephony using SIP. In: Proceedings of the international workshop on network and operating systems support for digital audio and video (NOSSDAV ’05). ACM. New York, NY, pp. 63–68. http://doi.acm.org/10.1145/1065983.1065999.
34. Skitch|Evernote. (n.d.). Evernote|Remember everything with Evernote, Skitch and our other great apps. Retrieved from <http://evernote.com/skitch/>.
35. Skype. (n.d.). Free Skype Internet calls and cheap calls to phones online. Retrieved from <http://skype.com/>.
36. Software for Computer Forensics, Data Recovery, and IT Security. (n.d.). Retrieved from <http://www.x-ways.net/>.
37. Software for Screen Recording and Video Editing (n.d.). TechSmith—Screen capture and recording software. Retrieved from <http://www.techsmith.com/camtasia.html/>.
38. Technology Pathways—Computer Forensics, Digital Discovery, Auditing, Incident Response. (n.d.). Retrieved from <http://www.techpathways.com/>.
39. TechSmith—Screen Capture and Recording Software. (n.d.). Retrieved from <http://www.techsmith.com>.
40. Tennyson Maxwell Information Systems, Inc.—Downloads. (n.d.). Retrieved from <http://www.tenmax.com/company/downloads.htm/>.
41. The Web Robots Pages. Retrieved from <http://www.robotstxt.org/>.
42. Use Snipping Tool to capture screenshots. (n.d.). Microsoft windows. Retrieved from <http://windows.microsoft.com/en-US/windows7/Use-Snipping-Tool-to-capture-screen-shots/>.
43. Vere Software—Online Evidence Collection & Documentation. (n.d.). Retrieved from <http://www.veresoftware.com/>.
44. Welcome to online Free Open Source Software Mac User Group—FreeSMUG. (n.d.). Retrieved from <http://www.freesmug.org/>.
1“Peer to peer is from user to user. Peer to peer implies that either side can initiate a session and has equal responsibility.” http://www.pcmag.com/encyclopedia_term/0,1237,t=peer-to-peer&i=49053,00.asp.
2“Client/server describes the relationship between two computer programs in which one program, the client, makes a service request from another program, the server, which fulfills the request.” http://searchnetworking.techtarget.com/definition/client-server.
3http://www.mirekw.com/winfreeware/index.html.
4http://www.snapfiles.com/get/hoversnap.html.
6http://lightscreen.sourceforge.net/.
7Note that these tools use the system date and time for the file name. If the system date and time are incorrect that value will be placed in the file name.
8For details on clearing your browser cache and cookies go to http://www.wikihow.com/Clear-Your-Browser’s-Cache and http://www.wikihow.com/Clear-Your-Browser’s-Cookies.
9Data sets collected include not only Save As files, website capture, and screen shots but also images taken with digital cameras of screens or digital audio recordings.
10Message-DigestAlgorithm (MD5) is an algorithm developed by Professor Ronald L. Rivest of MIT. (Source: Information Security Information—SearchSecurity.com. (n.d.). Retrieved from http://searchsecurity.techtarget.com/definition/MD5). SHA-1 was actually the first algorithm developed in cooperation with the National Institute of Standards and Technology (NIST) under the category called Secure Hash Algorithm (SHA). However, there was a flaw found in this algorithm in 2005. This has lead to numerous improvements in the value, with the most recent being called SHA-3, which was announced on October 2, 2012. (Source: Requirement, L. (n.d.). NIST.gov—Computer Security Division, Computer Security Resource Center. Retrieved from http://csrc.nist.gov.)
11Windows registry is… “a repository for hardware and software configuration information.” (Sheldon, 2004, p. 159) It can contain what software has been installed, how recently some programs have been used, user passwords, and what devices have been accessed by the system. For instance, every time a new USB device is plugged into a Windows computer that device will be recorded in the registry. The device’s type, including its serial number, will be recorded in the registry.