Chapter Two: Designing Web Pages in Dreamweaver with CSS Styles
Between Dreamweaver CS5 and CSS (Cascading Style Sheets), you can create Web-page designs much as you would design a print page in InDesign, wireframe (draw a rough mockup of a page) in Illustrator or Photoshop, or even draw a sketch of a page on a scratch pad.
And by saving all your CSS in an external style sheet file, all your formatting can be controlled by a single or a small number of style sheets. This makes it easy to manage page layout and design sitewide. When you change a style in an external style sheet, be it a page design (which we’ll explore in this chapter) or other elements like the page and image format (which we’ll explore in Chapter 3), you update the entire site.
External style sheets, by the way, are the basic element of content management system (CMS) themes. So you can use Dreamweaver’s CSS tools to format Web pages generated by CMS applications like Drupal, WordPress, and Joomla! We’ll explore that process in detail in Chapter 3, but as we survey different CSS techniques, I’ll include references to how they apply to CMS as we go.
Before diving into page layout with CSS, just a note on degraded techniques: In the evolution of Web design, before CSS was as developed and accessible as it is now, tables were used for page layout. There is no reason to use tables at this point for page layout except that they remain a part of our evolutionary past, and we’ve inherited a world with many existing sites that do use tables for page design. I can’t justify an exploration of using tables for page design in this book, but I did cover this sufficiently in Adobe Dreamweaver CS4 How-Tos: 100 Essential Techniques. Using tables to organize data is explored in Chapter 5, “Adding Effects and Interactivity with Spry and JavaScript” (#29, “Creating a Spry Data Source Table”).
#9 Using Design Tools (Grids, Zoom...)
Before you start designing page layouts with CSS in Dreamweaver, avail yourself of useful layout tools in Dreamweaver’s Design window. I’ll introduce you here to tools like grids and zoom, and walk you through the process of creating a “960” layout—a 960-pixel-wide Web page divided into 16 columns that is used universally in designing pages for CMSs and has wider applicability to any page design using columns.
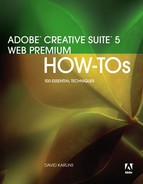
Dreamweaver CS5’s rulers, guides, and gridlines display much like those in Illustrator, InDesign, and Photoshop. To display rulers in an open document, choose View > Rulers > Show. The Rulers submenu also allows you to choose pixels, inches, or centimeters. For example, to facilitate generating a “960” page grid, choose pixels (Figure 9a).
Figure 9a. Choosing a pixels unit of measurement for rulers.
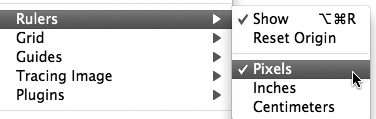
Grids are perhaps the most widely applicable layout tool in Dreamweaver. For example, to create a 960-pixel-wide page layout, you set the grid spacing at 60, making it easy to create 60-pixel-wide columns.
To display grids, choose View > Grid > Show Grid. To make grids magnetic, select View > Grid > Snap to Grid. Define grid properties by choosing View > Grid > Grid Settings. The Grid Settings dialog allows you to change the color of gridlines, spacing between grids, grid display and snap properties, and display (dots or lines). Click Apply to preview changes to the grid, or click OK to close the dialog and change grid settings in the Document window (Figure 9b).
Figure 9b. Defining grid settings for working in a 960-pixel-wide page.
#10 Creating and Linking a Style Sheet
The “control panel” for the look and feel of your Web site is the set of external style sheets (complex sites use more than one, but you can build a very inviting and robust design with a single style sheet).
The easiest way to generate a CSS file in Dreamweaver is to create a new style. As you do, you’ll have the option of including that style in a new CSS file. In the following steps, you’ll define a style and save it in a new style sheet and, in the process, create a style that defines the Body tag.
To define a new external CSS style sheet, with a Body tag that controls page margin, page background, and basic font appearance, follow these steps. They can be adapted to generate a CSS file using any tag as the initiating style.
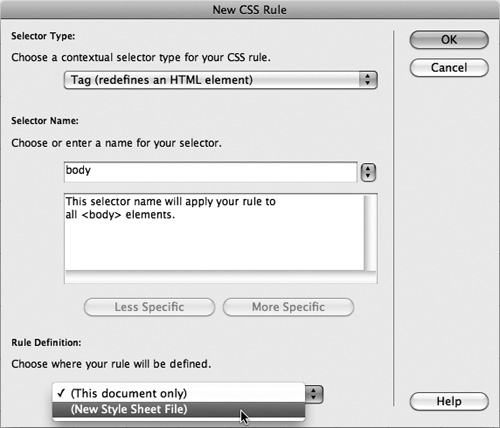
- In the Document window, click the New CSS Rule icon at the bottom of the CSS Styles panel (Figure 10a). The New CSS Rule dialog appears.
Figure 10a. The New CSS Rule icon in the CSS Styles panel.
- In the Selector Type area of the dialog, choose the type of style you want to define. To define the Body tag, choose Tag.
• Choose Class to apply formatting rules, which are independent of tags, to any selected text. If you are creating a Class style, enter a name for your style in the Name box.
• Choose ID to define a style that will apply to just one HTML tag.
• Choose Tag to define formatting for HTML elements, such as headings, paragraphs, images, tables, or pages. When the Tag radio button is selected, every HTML tag appears in a pull-down menu next to the Tag field.
• Choose Compound to define a style that will apply to everything you had selected in the Design window.
- Choose (New Style Sheet File) from the Rule Definition pop-up menu to save the style you are defining to a new external style sheet (Figure 10b).
Figure 10b. Generating a new style sheet with a new Body tag style.
- Click OK in the New CSS Rule dialog. The Save Style Sheet File As dialog appears. This is a typical Save As dialog except that it automatically generates a CSS file with a .css file extension and translates any formatting you define into CSS coding. Navigate to the folder in which you want to save the style sheet and enter a filename in the Save As field. If you wish to use this and other How-Tos in this chapter as a recipe, assign the filename newstyles.css. Then click Save to generate the new CSS file.
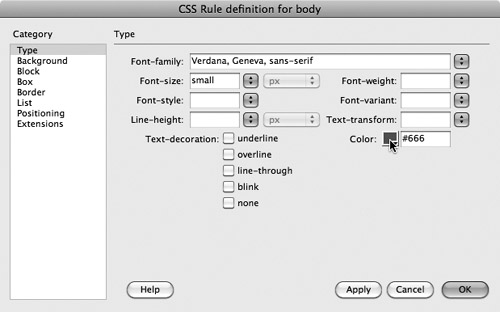
- After you click Save, the CSS Rule Definition dialog for the style you are defining opens. Different categories in the Category list offer formatting options for different kinds of page elements. We’ll explore defining fonts in detail in Chapter 3, but you’ll note now that you can define a global basic font family (a preferred font, along with substitutes if that font is not supported in a viewing environment), font size, color, and other attributes (Figure 10c).
Figure 10c. Defining a basic font style with the Body tag.
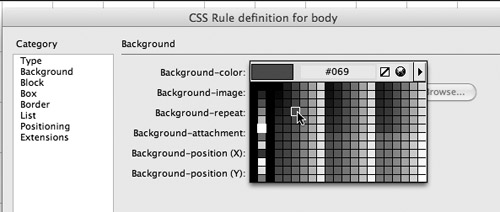
- You can use the Background category to assign a background color (or image) to all pages to which the style is linked (Figure 10d). Click the Apply button to preview the result.
Figure 10d. Defining a page background color.
- Page margins are controlled by the Body tag. By default, Web pages display with a 10-pixel top and left margin, but this can be changed, and should be changed if you are using the 960 pixel-width page layout standards. In the Box category of the “CSS Rule Definition for body” dialog, enter 0 (zero) in the Top Margin box, and leave the Same for All check box selected.
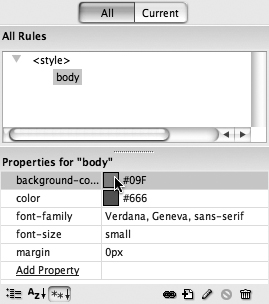
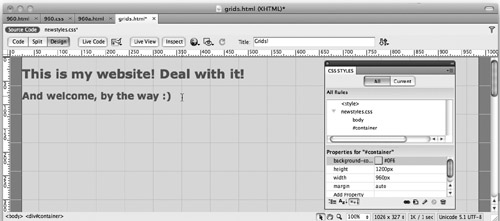
- After you create a style sheet file, the file is visible in the CSS Styles panel. When you expand the CSS file (click the triangle next to it to toggle to expand), all styles within the style will display. Formatting attributes display at the bottom of the CSS Styles panel (Figure 10e). You can edit styles in the CSS Styles panel by changing the attributes in the bottom half of the panel, or you can double-click on a style in the top half of the CSS Styles panel to edit it in the CSS Rule Definition dialog.
Figure 10e. Viewing attributes for the Body tag in the CSS Styles panel.
#11 Creating Page Layouts with ID Styles
The essential building blocks of page design are div tags. These are HTML tags with no inherent properties—you get to assign any attributes you want to them, including size, location, background color, and float (alignment).
The div tag styles come in two basic flavors: ID and Class. ID div styles (ID styles for short) appear just once on a page, while Class div styles (Class styles for short) can be used over and over on a page. ID styles work well for defining page-layout elements, such as a container that will hold all the page content. In the following steps, I’ll walk you through creating a single div tag to do just that.
To create an ID container and center it, follow these steps:
- Open a document or create a new one. Attach an existing style sheet (see #10, “Creating and Linking a Style Sheet” earlier in this chapter).
- In the CSS Styles panel, click the New CSS Rule icon. The New CSS Rule dialog opens.
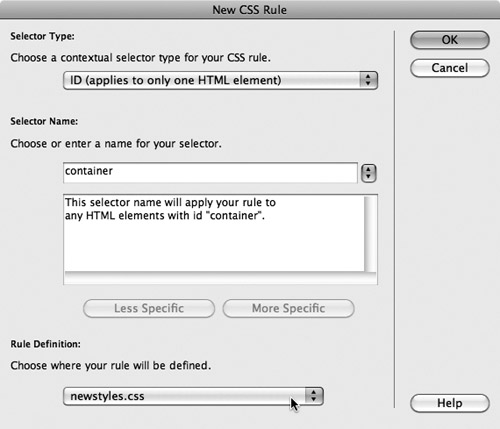
- In the Selector Type area of the dialog, choose ID. In the Selector Name area, enter a name with no spaces or special characters—if you want to follow my recipe here, call the style container.
- Choose your linked style sheet from the Choose Where Your Rule Will Be Defined pop-up menu (Figure 11a).
Figure 11a. Preparing to define a new ID div tag.
- Click OK in the New CSS Rule dialog. The CSS Rule Definition dialog for the style you are defining opens.
- In the Background category, you can assign a background color (or image).
- In the Box category in the CSS Rule Definition dialog, enter a width and height for the container—to create a 960-pixel-wide container, enter 960 px in the Width boxes. Enter a height value as well. To center the div on a page, enter Auto for all margins.
- There are a couple of options in the Positioning category relevant to defining a basic div container for a page. Visibility defines whether the div is visible. Unless you are designing div tags for a JavaScript application, leave the default setting at Visible. The Overflow pop-up menu defines how text that does not fit in the positioning object will appear in a browser.
- Once you have defined the options in the Positioning category, you have defined the basic location and size of your div container. Use the Border category to apply borders to your object. Use the Box category to define buffer spacing between content and the box (Padding) or spacing between objects (Margin). Spacing is usually unnecessary with divs, but allowing 6 pixels of padding is often a good way to keep the content of different divs from bumping into each other.
- When you have finished defining options for your div, click OK.
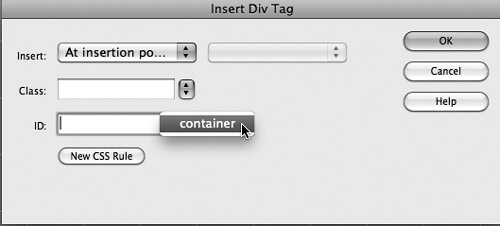
With your div defined, insert it on a page by choosing Insert > Layout Objects > Div Tag and selecting your div from the ID pop-up menu (Figure 11b).
Figure 11b. Inserting a div.
Enter content in your positioned div by clicking inside it and typing or by inserting images (Figure 11c). Or move on and work through #12, “Designing a Three-Column Layout,” to increase the complexity of your page layout.
Figure 11c. Inserting content into a positioned div.
#12 Designing a Three-Column Layout
In this How-To, I’ll provide a recipe for implementing one of the most frequently used page layouts: a layout with three columns; two sidebars that are 25 percent of the width of the container; a center column that is 50 percent of the width of the container; a header; and a footer. Check the sidebar for instructions on how this can be adapted to other common layouts, like a 1/3, 1/3, 1/3 column layout.
To create the first layout, follow these steps:
- Create the 960 container style in the previous How-To. That set of steps led you to create an external style sheet with a style called container.
- Create a new page: select File > New, and from the Blank page category in the New Document dialog, choose HTML in the Page Type column and <none> in the Layout column. Save the page. If you’re sticking with my recipe, call the page 960_model.html. To reinforce the habit of assigning titles to all pages, even practice ones, enter a title in the Title box in the toolbar (something like 960 Grid Model).
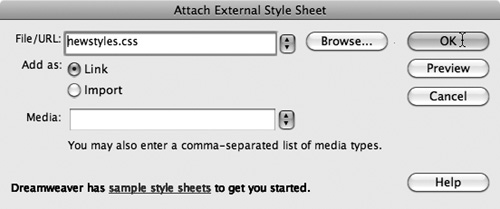
- In the CSS Styles panel, click the Attach Style Sheet icon. The Attach External Style Sheet dialog opens. Navigate to and select the newstyles.css style sheet you created in the previous How-To. Or use another style sheet that has a 960-pixel-wide container style like the one defined in the previous How-To (Figure 12a).
Figure 12a. Attaching a style sheet.
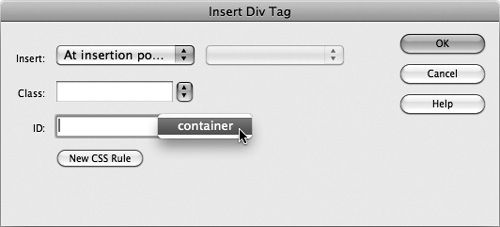
- With your cursor at the top of your new blank page, choose Insert > Layout Objects > Div Tag. From the Insert Div Tag dialog, choose Container from the ID pop-up menu. Or select another style if your 960-pixel-wide container has another style name (Figure 12b). A 960-pixel-wide ID style container appears on your page. This container will constrain the additional ID styles that will be used to create the header, footer, and three columns on your page.
Figure 12b. Applying a 960-pixel-wide container style on a page.
- Next, we’ll place a style for the page header. Click and drag to select the text “Content for id ‘container’ Goes Here.” You will replace this text with a new style for the header. Choose Insert > Layout Object > Div Tag. The Insert Div Tag dialog appears. Leave the Insert field set to Wrap Around Selection. In the ID field, type header (Figure 12c). Do not click OK. You still have to define the style. Click the New CSS Rule to open the New CSS Rule dialog.
Figure 12c. Creating a new layout style.

- The New CSS Rule dialog is already filled out correctly based on what you entered in the Insert Div Tag dialog. Just click OK in this dialog (now you can click OK) to open the CSS Rule Definition dialog.
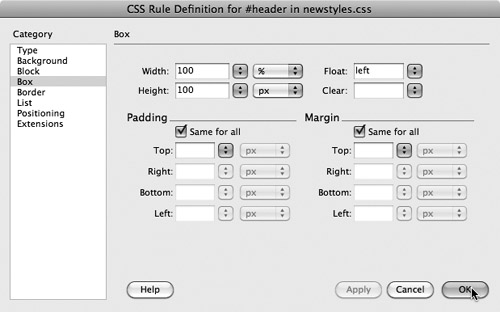
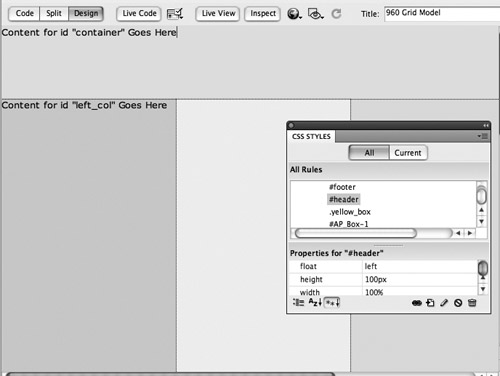
- In the Background category, you can select a background color (or tiling image) if you wish. In the Box category, enter 100% in the Width field and 100 pixels in the Height box, and then choose Left from the Float pop-up menu (Figure 12d). Click OK to generate the style.
Figure 12d. Defining a header style.
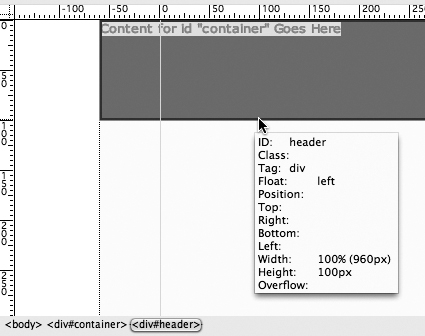
- Next, we’ll create a left-column style that takes 25 percent of the container width. There’s a bit of a tricky step involved here. Remember, we are compiling CSS coding, and it’s important that the coding for the column not be embedded in (inside of) the header you just created. You might want to jump to #16, “Using CSS Layout Pages,” at this point for tips on understanding where you are generating code. Here’s how to place the code properly: Hover over an edge of the header until your cursor becomes an arrow, and click to select the header. Then, use your right-arrow key on your keyboard to move just past this coding (Figure 12e).
Figure 12e. Selecting a div tag.
- Choose Insert > Layout Object > Div Tag. The Insert Div Tag dialog appears. Enter left_col in the ID box and click the New CSS Rule button to open the New CSS Rule dialog. Click OK in this dialog and open the CSS Rule Definition dialog. In the Background Category, you can select a background color (or tiling image) if you wish. In the Box category, enter 25% in the Width field and 600 pixels in the Height box, and then choose Left from the Float pop-up menu. Click OK to generate the style. Click OK again to insert it on the page.
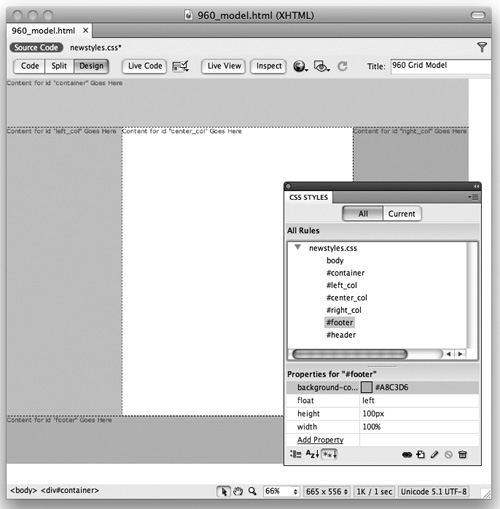
- Generate the next column (call it center_col) the same way, but enter 50% in the Width field. Then, generate a third column (call it right_col), again the same way but enter 25% in the Width field. Finally, generate the footer the same way you created the header in steps 5–7 (name this style footer). The trick is to pay attention to where your cursor is when you generate the CSS code and insert divs—for the footer, the cursor should be inside the main container div (Figure 12f).
Figure 12f. A page design with header, footer, and three columns, ready for content.
#13 Designing with Class Styles
Class tags are more flexible than ID styles in that they can be reused multiple times on a page. In the next chapter, we’ll explore how to use them to create font attributes, like highlighting, italics, or special type styles. Here, we’ll create a box that can be placed anywhere on a page, with type flowing either to the left or the right of the box.
We will continue to work with and expand on the CSS file you created in #10, “Creating and Linking a Style Sheet.” You can work with an existing page to which all the div tag styles created in this chapter have been applied, or with a blank page. But in either case, make sure you’ve linked your page to an external style sheet (or you can create a new one).
To create a Class style, click the New CSS Rule icon at the bottom of the CSS Styles panel. In the New CSS Rule dialog, choose Class from the Selector Type pop-up menu. In the Selector Name field, enter a name (avoid spaces or special characters). In the Rule Definition pop-up menu, choose your linked style sheet. Click OK in the New CSS Rule dialog to open the CSS Rule Definition dialog for your Class style.
The two categories you’ll use to define a Class style for layout are Background (where you assign a background color or image) and Box, where you define the size of the layout box. Use Right float to flow type to the left of the box and Left float to flow type to the right of the box.
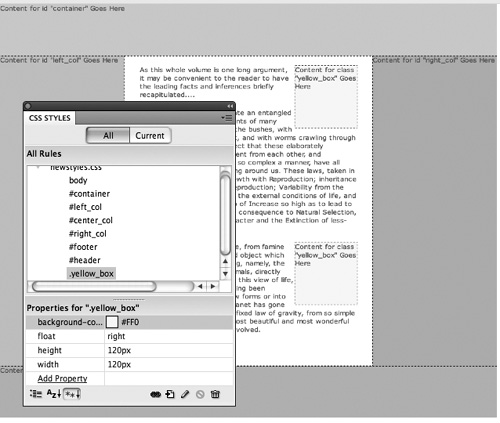
Once created, you can insert a Class style box anywhere by choosing Insert > Layout Object > Div Tag and selecting a Class style from the Class pop-up menu in the Insert Div Tag dialog. Figure 13a shows a 120-pixel-square Class style with a yellow background and Float defined as Right. The style box has been inserted twice.
Figure 13a. A Class style used twice on a page.
#14 Using Absolute Placement
Up to this point in this chapter, we’ve created page-layout styles (ID and Class styles associated with div tags) that are placed on a page at the insertion point. That is, they appear wherever they are inserted on a page. An alternate way of designing pages is to create div tags with absolute placement styles. Those styles appear at an exact point on a page—like 10 pixels from the top of the page, and 10 pixels from the left edge.
There are both design and accessibility implications for using absolute placement for div tags. They are easier to design, in Dreamweaver CS5 at least, because you can draw them, as you’ll see shortly. They are less flexible than relatively placed divs. You cannot, for example, make one “25 percent” of the width of a page or container; they are of fixed widths.
To create an absolutely positioned div tag style, choose Insert > Layout Object > Div Tag. Because each absolutely positioned div will have a unique position, you will generally want to make them ID divs, not Class divs. Enter a name for the div in the ID field of the Insert Div Tag dialog, and click New CSS Rule (not OK). Click OK in the New CSS Rule dialog to jump to the CSS Rule Definition dialog.
You can define a background color for the div in the Background category of the CSS Rule Definition dialog. In the Positioning category, enter any values in the Width and Height fields (100 px works fine), and choose Absolute from the Position pop-up menu. Then click OK in the CSS Rule Definition dialog.
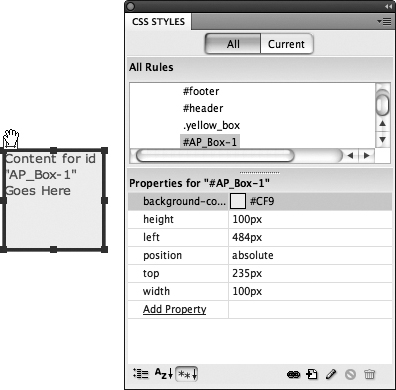
The div that appears can be moved and resized directly in the Design window, interactively, without recourse to the CSS Styles panel. When you click to select the box, sizing handles appear on the corners and sides. Use them to resize the div. Use the grabber handle in the upper-left corner of a selected absolutely positioned div to move it (Figure 14a).
Figure 14a. Moving an absolutely positioned div.
#15 Identifying and Editing CSS Elements
Dreamweaver CS5 allows you to apply identifying color backgrounds to CSS design boxes. These colors do not appear in a browser, but they help you sort through a page full of CSS div tags and figure out what’s what so you can edit your page layout more easily.
To apply generated colors to CSS boxes, choose View > Visual Aids > CSS Layout Backgrounds. With CSS Styles Backgrounds turned on, CSS styles used as content containers display with distinct background colors (Figure 15a).
Figure 15a. Identifying CSS containers with colors.
Assigning backgrounds to CSS boxes makes it easier to select those CSS styles, and view (or edit) their attributes in the CSS Styles panel. With a CSS container identified, you can easily edit style rules (attributes)—like box width, background color, padding, and so on—in the bottom of the CSS Styles panel, or by double-clicking on the applicable CSS Rule in the top of the panel to open the Rule Definition dialog. Either technique works.
To turn off layout background colors and view actual background colors on your page, choose View > Visual Aids, and deselect CSS Layout Backgrounds.
#16 Using CSS Layout Pages
Dreamweaver CS5 includes an updated and revamped set of CSS-based layout pages. To create a new page using these layouts, choose File > New, select the Blank Page category, and choose HTML in the Page Type list.
If you’ve worked through this chapter, you’ll recognize that these CSS page layouts are built on the same kinds of defined div tags explored in the previous How-Tos.
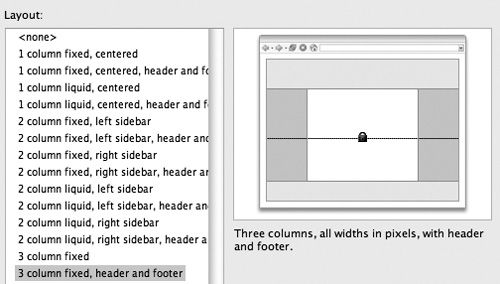
You can preview the available CSS page layouts, like “3 column fixed, header and footer” selected in Figure 16a, by clicking on them once.
Figure 16a. Previewing a CSS layout.
The CSS Layouts available in the New Document dialog are well documented. There’s no need to study the coding; you just study the provided dummy text, which explains how the style works.