3. Creating Your First Blog
Objective: To sign up for Blogger and create a new blog.
Visiting blogs is one thing; creating your own blog is something else. When you decide that you want to become a blogger, you need to find a blog hosting service—a website that lets you create your blog, and then hosts your blog and all your posts.
This is where Blogger comes in. Blogger is one of the biggest blog hosting services on the Web—and the service I personally use. Signing up for Blogger is free, and then it’s just a few steps to create your own blog. You can create as many blogs as you like or have time for; Blogger lets you manage them all from a central Dashboard.
Signing Up for Blogger
Blogger is part of the Google empire but has its own website, located at www.blogger.com. If you’re new to Blogger, the home page you see looks like the one shown in Figure 3.1. From here, you can opt to create a new account or sign in to Blogger with an existing account.
Figure 3.1. Blogger’s home page for new users.

Tell Me More: Media 3.1—Blogger Versus Other Blog Hosting Services

Want to learn more about the other blog-hosting services on the web? Listen to the audio file titled “Blogger versus Other Blog Hosting Services” on the companion Using website, my.safaribooksonline.com/9780132119603/media.
Show Me: Media 3.2—How to Create a Google Account

To learn how to create a Google account, see the video titled “How to Create a Google Account” on the companion Using website, my.safaribooksonline.com/9780132119603/media.
 LET ME TRY IT
Creating a Google Account
To use Blogger, you must have a Google account. There’s no charge to create a Google account; just follow these steps:
- From the Blogger home page (www.blogger.com), click the Create a Blog button.
- When the Create a Google Account page appears, as shown in Figure 3.2, enter your email address into the Email Address box, and then re-enter it into the Retype Email Address box.
Figure 3.2. Creating a new Google account.
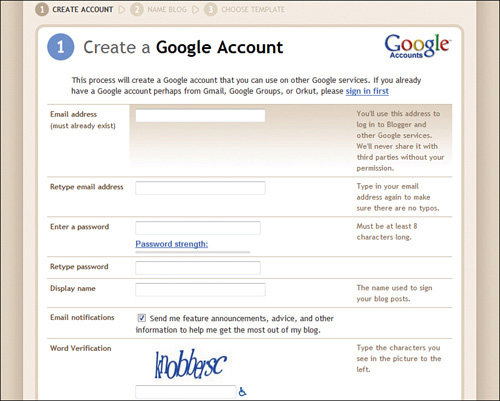
- Enter your desired password into the Enter a Password box, and then re-enter it into the Retype Password box.
- Enter the name you want displayed on your blog posts into the Display Name box.
- Check the Email Notifications box if you want to receive promotional and informative emails from Google; uncheck this box if you don’t want to receive said messages.
- Enter the verification word into the Word Verification box.
- Check the Acceptance of Terms box.
- Click Continue.
At this point you’ve created your Google account. When you click Continue, you proceed to create your first blog, which we’ll discuss in the next section.
Creating Your Blog
With Blogger, creating a new blog is a simple step-by-step process. Fill in a few forms, enter a few pieces of information, and your new blog is up and running; piece of cake.
As noted in the previous section, you’re prompted to create your first blog as the second step in the sign-up process. We’ll continue with this process here.
Show Me: Media 3.3—How to Create a New Blog
To learn how to create a new blog, see the video titled “How to Create a New Blog” on the companion Using website, my.safaribooksonline.com/9780132119603/media.
LET ME TRY IT
Creating Your First Blog
Once you’ve entered the information to create your Google account, click Continue and then follow these steps to create your first blog:
- When the Name Your Blog page appears, as shown in Figure 3.3, enter the desired name for your blog into the Blog Title box.
Figure 3.3. Naming your new blog.

- Enter the desired address for your blog into the Blog Address (URL) box. This is the part of the blog’s URL that goes before Blogger’s blogspot.com domain.
- Click Continue.
- When the Choose a Template page appears, as shown in Figure 3.4, select the template you want to use for your blog.
Figure 3.4. Choosing a blog template.
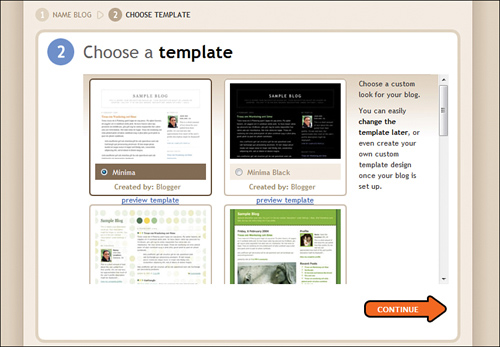
- Click Continue.
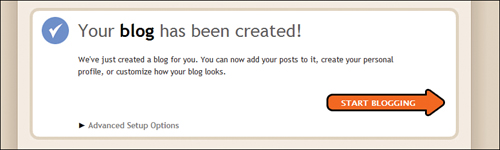
Blogger now creates your blog and displays the confirmation page shown in Figure 3.5. Click the Start Blogging link if now is a good time to write your first blog post. Otherwise, you can create posts later.
Figure 3.5. Congratulations—you’re the proud parent of a bouncing baby blog!
Viewing Your Blog
You can view your blog by entering the previously assigned URL, or by going to the Blogger Dashboard (www.blogger.com), clicking the blog name, and then clicking the View Blog link. As you can see in Figure 3.6, a typical blog has the title of the blog at the top of the page, often with a subtitle or description just below that. Blog posts take up the balance of the page, with assorted personal information in a sidebar column to the right or left of the postings.
Figure 3.6. A typical Blogger blog.

Each blog post is accompanied by a date and time stamp (sometimes above the post, sometimes below), as well as links to any reader comments or other blogs that have linked to this post. Click the Comments link to read any comments; click the Links to This Post link to see the links.
Using the Blogger Dashboard
Show Me: Media 3.4—How to Use the Blogger Dashboard
To learn how to use the Blogger Dashboard, see the video titled “How to Use the Blogger Dashboard” on the companion Using website, my.safaribooksonline.com/9780132119603/media.
Once you’ve created a Google account, you sign in to Blogger by going to the Blogger home page (www.blogger.com) and entering your email address and password. When you click the Sign In button, you see the Blogger Dashboard, shown in Figure 3.7.
Figure 3.7. The Blogger Dashboard.
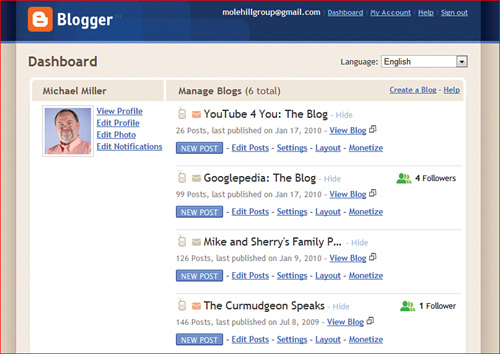
The Dashboard is your gateway to all your blog activity. All of your blogs are listed here; you can change each blog’s settings and layout, create new blog posts, and view each blog directly from the Dashboard. You can also use the Dashboard to create new blogs, manage your Blogger account and profile, and access Blogger’s help system.