
15. Printing Documents
In this chapter, you learn how to choose and save print settings.
If you output to different printers or print different job types on a daily basis, you can automate your print jobs by saving the output settings as print presets. By utilizing presets, you can print your documents quickly and successfully without having to stop and reenter any settings in the Print dialog box.
You can save and load your print presets, making it easy to back them up or to make them available to your clients, or others in your workgroup.
Choosing Print Settings
To access the Print dialog box, choose File, Print. From the Printer drop-down list located at the top of the dialog box, choose any of the printers available on your system. InDesign automatically displays the PostScript Printer Driver (PPD) associated with the chosen printer in the PPD list. A PPD is a printer driver that contains information about the printer you are currently using.
You can access print settings via the Print dialog box panels: General, Setup, Marks and Bleed, Output, Graphics, Color Management, Advanced, and Summary. Whenever you print a document for the first time, you should inspect each panel of the dialog box to make sure the proper settings are applied. You can display any of these panels in the dialog box by clicking its name in the category list on the left. The sections that follow detail which settings you need to check and how they affect the printing process.
Tell Me More: Media 15.1—Using the Print Dialog Box Page Preview
![]()
Access this video file through your registered Web edition at my.safaribooksonline.com/9780132174541/media.
The General Panel
The General panel is the first to appear when you open the Print dialog box (see Figure 15.1). You can access it by selecting General in the category list or by pressing Cmd-1 (Mac) or Ctrl+1 (Win).
Figure 15.1. Choose the preferred settings from the General panel of the Print dialog box.
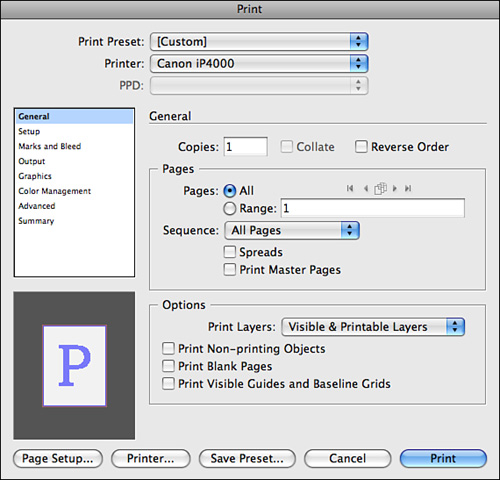
There are quite a few relevant options in the General panel of the Print dialog box. The following list describes what each one controls:
• Copies: Enter the number of copies you would like to print (from 1 to 999).
• Collate: Enable this option to collate the print job. Collate means to assemble multiple printed sheets in a certain order. Note that doing so can slow down the printing process considerably.
• Reverse Order: Enable this option to print the last page first.
• Pages: Choose to print all the pages in the document or a range of specific pages. In the Range field, enter the page numbers in numerical order, separated either by commas (to indicate individual pages) or dashes (to indicate a series of pages).
• Sequence: Choose to print All Pages (even and odd), Even Pages Only, or Odd Pages Only. Each option prints the chosen sequence within the specified range. These options are not available when printing spreads or master pages.
• Spreads: Enable this option to print each spread on a single sheet of paper or other media. A spread is two pages that face each other.
• Print Master Pages: Enable this option to print master pages rather than document pages. InDesign does not allow you to specify a page range when printing master pages (see Chapter 4, “Working with Master Pages”).
• Print Layers: Choose which document layers you would like to print from the drop-down list provided. Options include All Layers, Visible Layers, and Visible & Printable Layers (for more info about using layers, see Chapter 6, “Working with Objects”).
• Print Nonprinting Objects: Enable this option to override the Nonprinting option chosen in the Attributes panel and print every object placed on the pages specified.
• Print Blank Pages: Enable this option to print any blank pages positioned within the specified page range.
• Print Visible Guides and Baseline Grids: Enable this option to allow any visible margin guides, page guides, and baseline grids to print. InDesign does not allow you to print the document grid (for more about working with grids and guides, see Chapter 3, “Working with Documents”).
The Setup Panel
To display the Setup panel (see Figure 15.2), select Setup from the category list or press Cmd-2 (Mac) or Ctrl+2 (Win).
Figure 15.2. Choose the preferred settings from the Setup panel of the Print dialog box.
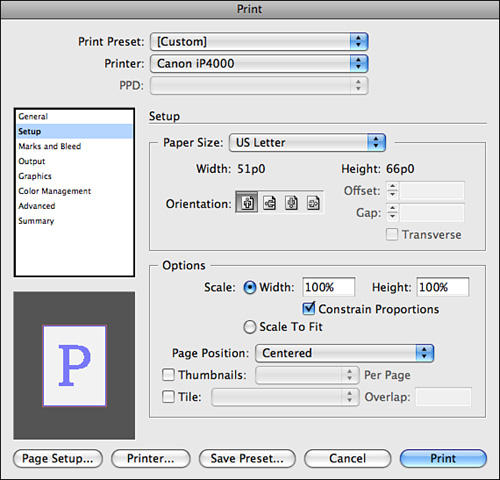
The options in the Setup panel control print options such as paper size, scale percentage, page position, and orientation. The following list describes these settings:
• Paper Size: Choose a paper size from the drop-down list. The available options are defined by the chosen printer’s driver (PPD). Note that when you choose a non-PostScript printer, the list automatically displays Defined by Driver.
• Orientation: To control how the page is rotated on the paper, click one of the four 90° rotation buttons. Refer to the page preview in the bottom left for a visual representation of each option.
• Offset: The value you enter here determines the placement of the document relative to the edge of the paper or film.
• Gap: When printing to a roll-fed printer, the value you enter here defines the amount of blank space placed between each document page.
• Transverse: When printing to a roll-fed printer with Paper Size set to Custom, enable this option to place the width of the paper along the length of the roll.
• Scale: Enter a scale percentage (from 1 to 1000) in the Width and Height fields. Refer to the page preview in the bottom left for a visual representation of the current scale value.
• Constrain Proportions: Enable this option to force both the scale width and scale height settings to reflect the same percentage.
• Scale to Fit: Enable this option to allow InDesign to scale the page to fit the chosen paper size, including any printer’s marks selected in the Marks and Bleed panel.
• Page Position: When selecting a paper size larger than the document, choose an option from the Page Position list to specify where InDesign should position the page: Upper Left, Center Horizontally, Center Vertically, or Centered.
• Thumbnails: Enable this option to print an overview of the document. Specify a number of thumbnails to place per page (for example, 1×2, 2×2, 3×3). Refer to the page preview in the bottom left for a visual representation.
• Tile: A document does not always match the paper sizes used by printers. When you enable the Tile option, InDesign divides your oversized document into one or more pages. After they are output, you can assemble them into one large page.
• Choose Auto from the drop-down list to fit as much of the document as possible on the selected paper size, starting from the upper-left corner. You can specify an overlap amount for printing successive tiles by entering a value in the Overlap field.
• Choose Auto Justified to tile the document the same way as with Auto Tiling, but without having to enter an overlap amount, and without leaving any extra whitespace to the right or under the image.
• Choose Manual to print only one tile per document page and use the ruler zero point as the origin for printing. To print successive tiled pages, you must manually move the zero point.
The Marks and Bleeds Panel
When you prepare a document for printing, you might want to include a number of marks to determine where the paper should trim, how color plates should align, and so on. Selecting any of these options expands the page area to allow for these marks. Bleeds are the parts of text or images that extend past the page, such as a color or graphic that you want to extend to the very edge of the page. The slug area contains instructions for your commercial printer and is located on the outside area of the page.
To display the Marks and Bleed panel (see Figure 15.3), select Marks and Bleed from the category list or press Cmd-3 (Mac) or Ctrl+3 (Win).
Figure 15.3. Choose the preferred settings from the Marks and Bleeds panel of the Print dialog box.
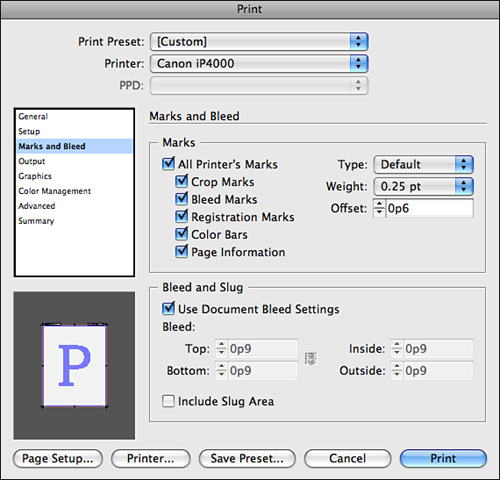
The following list of options are available on the Marks and Bleeds panel:
• All Printer’s Marks: Enable this option to print all printer’s marks (Crop, Bleed, Registration, Color Bars, and Page Info).
• Crop Marks: Enable this option to print lines that indicate the page area (also referred to as trim marks).
• Bleed Marks: Enable this option to print lines that indicate the bleed area.
• Registration Marks: Enable this option to print small targets around the edge of each page; used for lining up color separations (see Chapter 13, “Working with Color, Transparency, and Effects”).
• Color Bars: Enable this option to print small, square color samples outside the bleed area; used for matching colors on press.
• Page Information: Enable this option to print the filename and publication date on every page of the document. When printing separations, enable this option to also print the name of the color plate.
• Type: From the drop-down list, select additional sets of printer’s marks created by other developers (InDesign ships with only one default set of printer’s marks).
• Weight: To change the stroke weight of the printer’s marks, choose 0.125 pt., 0.25 pt., or 0.50 pt. from the Weight drop-down list.
• Offset: Enter a value to indicate how far from the page edge the printer’s marks should print.
• Use Document Bleed Settings: Enable this option to apply the Bleed settings entered in the Document Setup dialog box.
• Bleed: Enter values in the respective fields to define the amount of bleed area to print off the top, bottom, inside, and outside edges of the page. Click the chain link icon to apply the same setting in every field.
• Include Slug Area: Enable this option to print the slug area defined in the Document Setup dialog box.
The Output Panel
The Output panel contains options for handling color output. From this panel, you can choose to print a composite proof, or print CMYK color separations. There are also options for handling trapping, printing text as black, and simulating overprint. To display the Output panel (see Figure 15.4), select Output from the category list or press Cmd-4 (Mac) or Ctrl+4 (Win).
Figure 15.4. Choose the preferred settings from the Output panel of the Print dialog box.
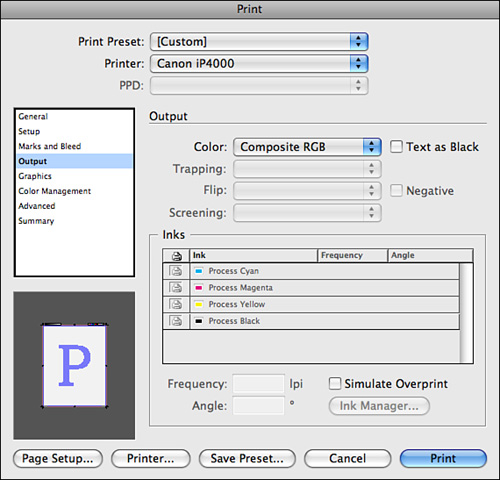
• Color: Enable this option to print a color composite or color separations. Most inkjet printers require Composite RGB data. PostScript printers prefer Composite CMYK data. Choosing Separations activates the Inks list.
• Text as Black: Enable this option to print all colored text as black, except text filled with white, Paper, or None.
• Trapping: Trapping consists of creating small overlaps between colors to avoid problems on the printing press later on in print production.
• If you’ve chosen to set trapping manually in the document using fills and strokes, choose Off from the drop-down list (see “Creating and Assigning a Trap Preset” in Chapter 13).
• Choose Application Built-In to allow InDesign to handle trapping as you send the document to the printer (see “Creating and Assigning a Trap Preset” in Chapter 13).
• Choose Adobe In-RIP to let your commercial printer’s RIP software handle trapping.
• Flip: Choose Horizontal, Vertical, or Horizontal and Vertical to mirror the image. Choose None to leave the Flip option off.
• Negative: Enable this option to invert the page.
• Screening: When printing color separations, choose an option from the list to define the halftone frequency and screen angle for the inks shown in the Inks list below. These numbers are defined by the chosen printer’s PPD.
• Inks: Enable this option to display the four process inks (CMYK) and any defined spot inks as well as their halftone frequency and screen angle. You can override the optimized screen settings for any ink by selecting it and entering a new value in the Frequency and Angle fields. Click the printer icon to the left of the ink name to tell InDesign not to print that separation.
• Simulate Overprint: Enable this option when printing to a printer that does not support overprinting (such as laser printers or inkjets). The Simulate Overprint feature is helpful when proofing your documents.
• Ink Manager: Click this button to open the Ink Manager dialog box, where you can manage spot color conversion (see “Converting Spot Colors to Process” in Chapter 13).
The Graphics Panel
The options in the Graphics panel allow you to choose how you would like to send the document’s graphics and font information to the selected printer. To display the Graphics panel (see Figure 15.5), select Graphics from the category list or press Cmd-5 (Mac) or Ctrl+5 (Win).
Figure 15.5. Choose the preferred settings from the Graphics panel of the Print dialog box.
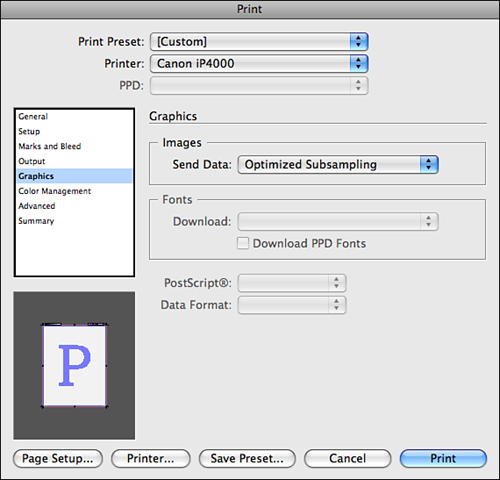
• Send Data: From the drop-down list, choose how you would like to send the document image data to the printer.
• Choose All to send all of the image data to the printer and slow down the printing process.
• Choose Optimized Subsampling to send only as much information as is necessary to produce a quality print, and thereby speed up the printing process.
• Choose Proxy to send only the low-resolution preview images displayed onscreen using Typical Display Performance.
• Choose None to send no image data.
• Download: Choose how you would like to send the document font data that is not available in the printer PPD to the printer.
• Choose None to send no font data and replace the font with the printer’s default font (for example, Courier).
• Choose Subset to speed up the printing and send only the characters required to print the document.
• Choose Complete to automatically enable the Download PPD Fonts option and send all fonts used in the document to the printer’s memory. Disable the Download PPD Fonts option to send all fonts used in the document that are not listed in the PPD. Note that InDesign downloads fonts once for each page, which adds significantly to the time it takes to print.
• PostScript: InDesign generally reads the printer’s PostScript Level from the PPD, so you do not have to choose one. Therefore, this option is available only when you are creating a device-independent PostScript file. Select Level 2 or Level 3 from the drop-down list.
• Data Format: From the drop-down list, choose a format for sending bitmap image data. Options include Binary or ASCII. ASCII text is compatible with older networks and parallel printers and is usually the best choice for graphics used on multiple platforms (Mac OS X and Windows). Binary code is more compact than ASCII but might not be compatible with all systems.
The Color Management Panel
The Color Management panel contains options for applying color management to your print (for more about color management, see “Understanding Color Management Principles” in Chapter 13). To display the Color Management panel (see Figure 15.6), select Color Management from the category list or press Cmd-6 (Mac) or Ctrl+6 (Win).
Figure 15.6. Choose the preferred settings from the Color Management panel of the Print dialog box.
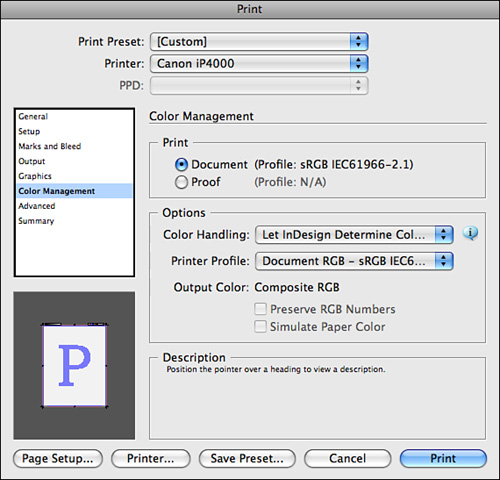
• Print: Enable this option to print a color-managed document or proof.
• Color Handling: From the drop-down list, choose whether to handle color management in the application or in the output device. Options include Let InDesign Determine Colors or PostScript Printer Determines Colors. To color manage the print using InDesign’s Color Settings, choose Let InDesign Determine Colors. To let the printer’s driver color manage the print, choose Postscript Printer Determines Colors.
• Printer Profile: From the drop-down list, choose a valid profile for your printer.
• Output Color: Displays the name of the option selected in the Output panel of the Print dialog box.
• Preserve RGB/CMYK Numbers: Enable this option to send color information for objects (such as placed graphics) directly to the printer. Disable this option to allow InDesign to convert the color information to the color space of the printer. You should choose to preserve numbers when proofing CMYK documents, not when printing RGB documents.
• Simulate Paper Color: Enable this option to simulate how colors will print on various types of paper (such as newspaper, which is more porous) or film.
• Description: Position the cursor over any Color Management panel option to view a description of it in this area.
The Advanced Panel
The Advanced panel contains options for outputting transparency and working with an OPI Image Replacement workflow. To display the Advanced panel (see Figure 15.7), select Advanced from the category list or press Cmd-7 (Mac) or Ctrl+7 (Win).
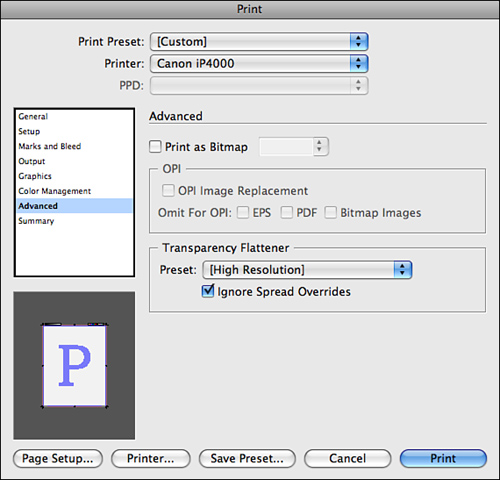
• Print as Bitmap: Enable this option to rasterize all graphics in the document when printing to a non-PostScript printer. Rasterizing is the process of converting vector graphics (such as Adobe Illustrator files) into raster images (comprised of pixels). You can specify a resolution for bitmap printing by entering a dpi value (dots per inch) in the neighboring field or by choosing a preset dpi value from the drop-down list. 300 dpi is considered the industry standard for high-resolution print output.
• OPI Image Replacement: Allows InDesign to replace low-resolution EPS versions of graphics with high-resolution versions when printing the document. Doing so can reduce the file size of large documents, making it less taxing to work with them on slower systems. Enable this option to allow InDesign to act as an OPI server when printing.
• Omit for OPI: Choose which image formats to replace with low-resolution proxy OPI links: EPS, PDF, and/or Bitmap Images. InDesign must have access to a disk containing high-resolution versions of these images to link to them.
• Preset: From the drop-down list, choose a default transparency flattener setting for the print job (see “Creating a Transparency Flattener Preset” in Chapter 13).
• Ignore Spread Overrides: Enable this option to tell InDesign to disregard any Transparency Flattener settings applied via the Pages panel override option (see “Creating a Transparency Flattener Preset” in Chapter 13).
Figure 15.7. Choose the preferred settings from the Advanced panel of the Print dialog box.
The Summary Panel
To display the Summary panel (see Figure 15.8), select Summary from the category list or press Cmd-8 (Mac) or Ctrl+8 (Win). The Summary section of the panel displays a summary of every setting chosen from all panels of the Print dialog box. Click the Save Summary button to save the Summary list as a text file (.txt).
Figure 15.8. You can view a list of the chosen print settings in the Summary panel of the Print dialog box.

Saving a Print Preset
After the Print dialog box setup is complete, you can save it as a Print Preset to use again and again, without having to reenter any settings.
![]() LET ME TRY IT
LET ME TRY IT
Save a Print Preset from the Print Dialog Box
Follow these steps to create a print preset directly from the Print dialog box:
- Click the Save Preset button located at the bottom of the dialog box.
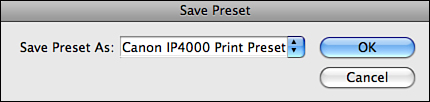
- In the Save Preset dialog box that appears, enter a name for the setup.
- Click OK to add the preset to the Print Preset drop-down list (see Figure 15.9).
Figure 15.9. Enter a name for the print preset and click OK.
Show Me: Media 15.2—Saving a Print Preset from the Print Dialog Box
![]()
Access this video file through your registered Web edition at my.safaribooksonline.com/9780132174541/media.
You can also save print settings as a preset without displaying the Print dialog box. To do so, choose File, Print Presets, Define. In the Print Presets dialog box that appears, click New (see Figure 15.10). Doing so displays the New Print Preset dialog box. Use the different panels to choose the preferred print settings, just as you would with the Print dialog box.
Figure 15.10. Choose the preferred settings via the panels available in the New Print Preset dialog box.
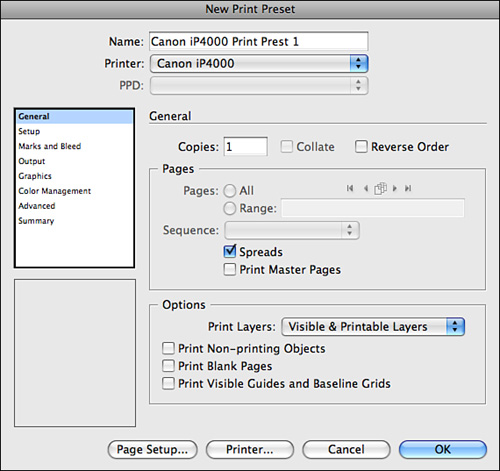
When you are finished choosing the preferred print settings, enter a name for the preset in the Name field and click OK. InDesign adds the new print preset to the Presets list.