
Chapter 1. Composite in After Effects

All science touches on art; all art has its scientific side. The worst scientist is he who is not an artist; the worst artist is he who is no scientist.
—Armand Trousseau
This book is about creating visual effects using Adobe After Effects, the world’s most ubiquitous compositing application. It helps you create believable, fantastic moving images using elements from disparate sources, and do so with the least possible effort. This first section offers a jump-start (if you’re relatively new) or a refresher (if you’re already an After Effects artist) on the After Effects workflow.
Effective visual effects compositing uses your best skills as both artist and engineer. As an artist, you make creative and aesthetic decisions that are uniquely your own, but if you are not also able to understand how to implement those decisions effectively, your artistry will suffer. If I had to say what most often separates a great result from mediocrity, the answer is iteration—multiple passes—and solid technical skills enable these to happen most quickly and effectively, so your creative abilities can take over.
Notes
![]()
If this book opens at too advanced a level for you, see the Introduction for more resources to help you get up to speed with the basic operations of After Effects.
This chapter and the rest of Section I focus on how to get things done in After Effects as effortlessly as possible. It is assumed that you already know your way around the basics of After Effects and are ready to learn to fly.
A over B
After Effects is full of so many panels, effects, and controls, not to mention custom tools and powerful modifiers such as scripts and expressions, that it’s easy to feel overwhelmed. Let’s take a look at a simple yet real-world composite to help reveal the true essentials of the application.
You may have heard the expression, “If you can imagine it, you can create it in After Effects.” I first heard it working alongside Trish Meyer in the era of After Effects 3.0, and I’m sure you can appreciate that it has only become more true with time. So the following example is by no means comprehensive, nor is adding an element to a scene in this manner even necessarily what you’ll be doing in After Effects. But the basic principle is that After Effects lets you go beyond what you can otherwise do editing footage by actually changing what appears in the scene itself.
Let’s suppose that your independent film just got a great opportunity from a commercial sponsor to add its product into a scene. The challenge is that the scene has already been shot, and so you must “fix it in post”—a process that has become so common it’s now an on-set joke. It’s also the reality of how all of the top-grossing movies of our time have been made, not to mention virtually every commercial and many television, Internet, industrial, and student projects.
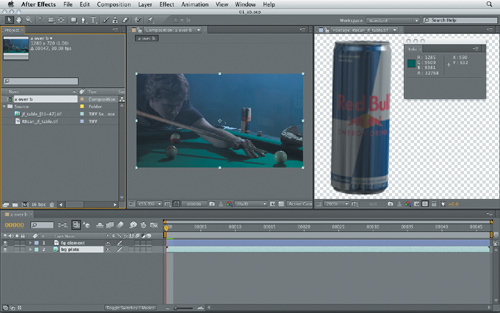
Figure 1.1 on the next page shows the elements we have to work with: a background plate image sequence and the foreground element to be added. Your author was in fact paid to create the 3D model as a viral product endorsement a few years back.
Figure 1.1. This comp begins as simple as can be, with element A (the can image with alpha channel, where source is displayed in the footage channel) laid over element B (the background clip).
Notes
![]()
The term “plate” stretches back to the earliest days of optical compositing (and even further to still photography) and refers to the glass plate that held the source footage. It now generally means the background onto which foreground elements are composited, although the foreground can also be the plate, and there are other kinds of plates such as effects plates.
Workspace Setup
To get to this starting point, try this: Navigate (in the Windows Explorer or Mac Finder) to the source elements you moved from this chapter’s folder on the book’s disc to your local drive. Find the 01_a_over_b example project. Arrange your windows so that you can see both that Explorer/Finder window and the After Effects Project panel, then drag both source items—jf_table and RBcan_jf_table.tif—into that panel. (You can actually drag them anywhere onto the After Effects user interface (UI), and they should end up there.) If this presents any difficulty, you can instead choose File > Import > Multiple Files (Ctrl+Alt+I/Cmd+Opt+I), choose the single TIFF image, and then go into the jf_table folder to select any of those TIFF images with TIFF Sequence checked at the bottom of the Import Multiple Files dialog—but see how much more complicated that is?
Make a folder by clicking on the New Folder icon along the bottom of the Project panel, typing Source or src in the live text field to label it. Drag those elements into that folder. If you’ve done it right, your project panel should look something like the one you see in Figure 1.1.
How After Effects looks at program startup depends on its most recent usage, if any. You probably see a menu labeled Workspace; if not, reveal the Tools panel (Ctrl+1/Cmd+1) or just use Window > Workspace instead (most everything in the application exists in more than one place, allowing you to pick your favorite approach and find the controls more easily). Choose the Standard workspace and then, further down the same menu, pick Reset “Standard”—you are now back to the factory defaults.
Does the user interface seem complicated? You can make it even more so—go to Window > Workspace (or the Workspace menu in the toolbar) and choose All Panels. You’re likely to see a bunch of tabs crammed up and down the right side of the screen. Now breathe a sigh of relief, since I can tell you that there are a few in there I no longer even use—Wiggler and Smoother being two that have been effectively rendered obsolete by expressions (Chapter 10). In any case, I would never recommend leaving so many controls open at once. To swing radically in the opposite direction, try the Minimal workspace (and if necessary, Reset “Minimal”). This is closer to my own optimum, but then, I don’t generally object when labeled a minimalist.
The Standard workspace is also a fine place to start. In Standard, click on the Audio tab and close it—unless you’re timing animations to sound or mastering an entire movie in After Effects you won’t need that panel.
Now try tearing off the Info panel—hold down Ctrl (Cmd) as you drag it by its tab away from its current position. You can do this with any panel: It is now undocked. I often work with Info this way, letting it float above my Composition viewer panel so that the pixel and position values are directly adjacent. This may be too much hot-rodding for you right away, so now try dragging it over a few of the other panels without letting go. You’ll see violet-colored hit areas—six of them—on each panel, and at the four edges of the screen, teal-colored gutters.
If you actually drop the Info panel into any of these areas you may notice a pretty major flaw in all of this freedom—poorly placed, the Info panel can generate a lot of extra wasted space. You can drag it elsewhere or Ctrl (Cmd) drag and drop it to tear it off again. You can combine it with the Preview panel to save space: Drag the Info panel over the Preview panel or vice versa using the tab at the upper left.
Now try Window > Effects & Presets, or even better, use the shortcut Ctrl+5 (Cmd+5). The Window menu contains all of the panels, and each can be toggled here. The need for the Effects & Presets panel is only occasional, so why take up space with it when you could instead have a bigger Composition panel (or a couple of viewers side-by-side as shown in Figure 1.1)?
Set Up the Composition
This is all a little abstract without working on the actual elements. I have done whole After Effects animations that have no source elements at all, but these are typically type animations with solid, shape, and particle-based effects created right in the application—in other words, they are more motion graphics than visual effects, which are almost always based on source footage—on the effects plate.
Tip

Watch out for the default 30-fps setting for image sequences; it’s highly unlikely to be the setting you want, but until you change it, 30 fps is the rate set by default under Preferences > Import > Sequence Footage.
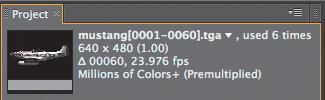
Let’s have a look. Select jf_table in the Project panel and take a look at the info at the top of the panel (Figure 1.2). Listed are its pixel dimensions (1280 x 720), pixel aspect ratio (1 or square), duration (in frames or time, depending on your project settings—more on all of these later), frame rate, and color depth. If the frame rate isn’t 24 fps (Figure 1.1 shows the After Effects default of 30 fps), click the Interpret Footage icon along the bottom of the panel and change it by typing 24 and clicking OK.
Figure 1.2. Highlight an item in the Project panel and useful information appears adjacent to that item’s thumbnail at the top.

Now select the other layer, RBcan_jf_table.tif. It differs from the first in a couple of significant ways. As a still image, it has no duration or frame rate, although because it was rendered specifically for this scene it does have matching pixel dimensions and aspect. Most significantly for our purposes, its pixel depth is Millions of Colors+-–(that is After Effects-speak for 8-bit RGBA, a 32-bit-per-pixel image with four 8-bit channels instead of three). This image includes an alpha channel to store transparency data, which is covered in depth in Chapter 3.
To get to work, place your elements in a composition, or comp. Start with whichever layer contains the plate—in this case, jf_table—by dragging it to the New Composition icon. With no extra effort you automatically set a comp whose size, aspect, duration, and frame rate match those of the source.
Notes
![]()
If details such as pixel aspect ratio seem arcane at this point, don’t worry—they will be covered in greater detail later in the chapter, and you’ll have more practice with them throughout the book.
Now add the Red Bull can. There are a few ways to do this. You can simply drag it into the Timeline panel to where you see a black line above the existing layer and drop it. Instead, you can drag it to the Composition icon in the Project panel, or, easiest of all, you can select the image and use Ctrl+/ (Cmd+/).
Just like in Photoshop, simply positioning one layer above another in the stack—in this case, the Timeline panel (instead of a Layer panel) creates a composite image. The operation is seamless only because the can was generated with an alpha channel, but this isn’t the only way to combine layers in After Effects—not by a long shot. Chapter 3 introduces the full variety of options beyond this no-brainer, and even illustrates how this simplest of composites actually works.
Preview and Refine
Now is a good time to preview the composition and see how it looks. Here you can make use of the Preview panel, at least until you learn the one essential shortcut from it—0 (zero) on the numeric keypad (which is on the side or, on a laptop, embedded with the function key shortcuts) stands in for the RAM Preview icon ![]() . Beginners often mistakenly hit the spacebar to play compositions in After Effects. With faster and faster systems, this increasingly works, but only a RAM preview buffers the composition into memory and locks its playback to the correct frame rate, and only it includes audio playback.
. Beginners often mistakenly hit the spacebar to play compositions in After Effects. With faster and faster systems, this increasingly works, but only a RAM preview buffers the composition into memory and locks its playback to the correct frame rate, and only it includes audio playback.
Tip
You can tear off any panel and make it float by holding down Ctrl (Cmd) as you drag it away; I like to tear off the Render Queue panel and toggle it on and off via its shortcut (Alt+Ctrl+0/Opt+Cmd+0).
Once the shot is looping, you can use the spacebar to stop it at any point, and then, with your cursor over the Composition panel, click the key at the upper left of your keyboard, just below Esc—it’s usually called the tilde (~) key even though it’s actually the backward accent (`) key. We’ll call it the tilde—that’s easier to say and remember. It brings the panel up full screen for easier examination.
The shot needs work. What do you see? If you said
• color matching—that is covered in Chapter 5
• motion tracking, so that it matches the slight camera move in the source shot—Chapter 8
• adding a cast shadow—this has a few components, which are addressed in Chapters 3, 7, and 12
• foreground smoke—fully addressed in Chapter 13
• grain matching—Chapter 9
Just to complete the workflow, you can render this composition as a work-in-progress. With the composition selected, Composition > Make Movie or Ctrl+M (Cmd+M) will bring up the Output Movie dialog the first time you use it; here you’re asked to choose where to save the composition. You can also use Ctrl+/ (Cmd+/) to simply place it in the render queue without the dialog, or you can even drag the Composition icon to the Render Queue panel from the Project panel. Once you’ve specified at least a name and location, as well as any other parameters (covered later in this chapter), click Render and an output file is created. We’ve made it from start to finish in just a few steps with an After Effects project (Figure 1.4). We’ll now spend the rest of the book refining that process.
Close-up: Maximize the Screen
![]()
Which is best for After Effects, one big monitor or two smaller ones? Many After Effects artists like two HD-resolution displays side by side (Figure 1.3, top), although a single display can be optimal if it’s large enough (Figure 1.3, bottom). However, you may notice that a floating panel (Ctrl/Cmd-drag the tab to make it float) lacks the Zoom button along the top to send the window to full screen. The shortcut Ctrl+ (Cmd+) maximizes and centers any window. Press it again and even the top menu bar toggles off, filling the entire screen.
Figure 1.3. The preferred After Effects monitor setup seems to be a pair of 2K or larger displays (top), although a single 30-inch display at a high resolution (bottom), used with the tilde key to zoom panels to full screen, is also quite luxuriant.

Figure 1.4. You don’t even have to start with source footage, as we’ve done here, but for effects compositing work it’s typical to at least begin with a foreground and background, work with them in a comp, and render that as a new moving image.

If you’re stuck with a single small display you can press the tilde key (~) to maximize a single panel and do a RAM preview in full-screen mode by checking the Full Screen box in the Preview panel.
Organization
Now let’s proceed more deliberately through the workflow, considering more variables at each step and reducing the extra steps you may take many, many times in a normal After Effects workday.
Tip
Prefer your workspace customizations to the defaults? Choose New Workspace in the Workspace menu and enter a new name to overwrite it; now After Effects will reset to your customized version.
Import and Organize Source
Getting a source file into After Effects so you can use it is no big deal. You can choose File > Import > File (or Multiple Files), or just drag footage directly from the Explorer or Finder into the Project panel. You can also double-click in an empty area of the Project panel.
Image sequences have a couple of specific extra rules but there are benefits that make them more reliable than QuickTime movies:
• An image sequence is less fragile than a QuickTime movie; if there is a bad frame in a sequence, it can be replaced, but a bad frame will corrupt an entire movie.
• You can interrupt and restart an image sequence render without then having to splice together multiple movies.
• QuickTime in particular has its own form of color management that isn’t entirely compatible even with Apple’s own applications, let alone the Adobe color management pipeline (explained in depth in Chapter 11).
Unfortunately, none of the Adobe applications has ever become “smart” about recognizing sequences, let alone playing them back the way an application like Iridas Frame-Cycler (a version of which is included with Nuke) can.
Script
![]()
Immigration by Lloyd Alvarez (http://aescripts.com/immigration) transforms the process of importing or substituting image sequences from a pain into an absolute breeze. It is particularly good at incrementing new versions of multiple sequences all at once, selecting subsets of frames, and finding multiple sequences in a single folder.
Any single image sequence in a folder can simply be dragged in, if you’re certain its frame rate is correct at the top of the Project panel (if not, see the sections on settings later in this chapter for the fix). If you instead intend to bring in that folder’s contents as individual files, hold down the Alt (Opt) key as you drag it in.
Things get more complicated if you are dealing with multiple image sequences in a single folder. With the Import dialog, it doesn’t matter which specific image in a sequence you select; they are all imported, provided you select only one. By holding the Shift or Ctrl (Cmd) key as you select more than one frame, however, you can
• specify a subset of frames to be imported instead of an entire sequence
• select frames from more than one sequence in the same folder; a Multiple Sequences check box appears as an option below to make certain this is really what you want to do
• specify sets of frames from multiple sequences (a combination of the above two modes)
This is, in many ways, a work-around for the fact that the After Effects importer doesn’t group a frame sequence together the way other compositing applications do.
By default, if a sequence has missing frames (anywhere the count doesn’t increment by 1), a color bar pattern is inserted with the name of the file presumed missing, which helps you track it down (see “Missing Footage” later in this chapter).
The Force Alphabetical Order check box in the Import dialog is for cases in which the frame does not increment by 1. Suppose you render “on twos,” creating every other frame from a 3D application; check this box and you avoid color bars on every other frame.
Want to be rehired repeatedly as a freelancer or be the hero on your project? Make it easy for someone to open your project cold and understand how it’s organized. On a more ambitious project, it’s worth organizing a project template so that items are easy to find in predictable locations. Chapter 4 offers suggestions.
Tip
Waiting for a long 3D render from Maya or Cinema 4D? Render the first and last 3D frames only, with their correct final sequence numbers, and import them using the Import dialog with Force Alphabetical Order unchecked. You now have a placeholder of the correct length that is fully set up as soon as the file is rendered.
Context-Clicks (and Keyboard Shortcuts)
As you advance in your skills, by all means avoid the bar like a recovered alcoholic—the top menu bar, that is. I often refer to context-clicking on interface items. This is “right-clicking” unless you’re on a Mac laptop or have an ancient one-button mouse, in which case you can hold down Ctrl. Here’s what happens when you context–click on
• a layer in the Timeline: access to the full Layer menu, minus a few less useful items, such as the Adobe Encore submenu; useful additional items include Reveal Layer Source in Project and Reveal Expression Errors
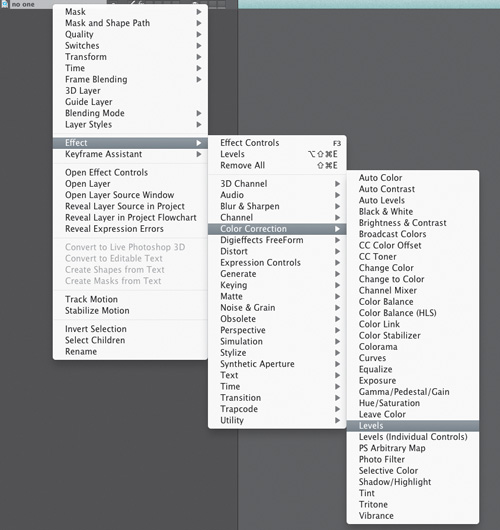
• a layer in a Composition viewer: Many of the same items appear, plus the Select option at the bottom of the menu displays a list of all of the items below your pointer (Figure 1.5)
Figure 1.5. One of the biggest productivity boosts in After Effects comes from using the context menus that exist throughout After Effects and are always right under your cursor. This Layer context menu contains everything you’d want from the Layer menu, plus a couple of extra Timeline-specific commands. Display context menus by right-clicking the mouse (Windows) or Ctrl-clicking (Mac).
• a panel tab: The Panel menu (also found at the upper right) houses a bunch of options that even advanced users hardly know exist can be found, such as the View Options that allow you to, for example, show only motion tangents
• an item in the Project panel: Besides the File menu, you can reveal a file in the Explorer or Finder, the system counterpart to the Project panel
Keep these options right under your cursor and you may find yourself more focused as you work.
Missing Footage
After Effects links to any source footage file that can be located on your system or network. Any source can become unlinked if it moves or changes its name or location (Figure 1.6). To re-link an item, find it in the Project panel and double-click it (or Ctrl+H/Cmd+H), or context-click and choose Replace Footage > File.
Figure 1.6. Missing Footage displays the telltale color bars.

Tip
If source needs replacing with an element that’s not yet available, note a couple of extra options under the Replace Footage menu item, including Placeholder, which inserts color bars.
If instead, you need only to reload or update a source, context-click and choose Reload Footage (Ctrl+Alt+L/Cmd+Opt+L). You can even edit a file in its source application and update it automatically in After Effects with Edit > Edit Original (Ctrl+E/Cmd+E), as long as you don’t try anything tricky like saving it as a new file.
Sometimes it’s difficult to locate a missing file or frame in your project. You may have used the Find Missing Footage check box in older versions, and you may wonder where it has gone. You’re not alone.
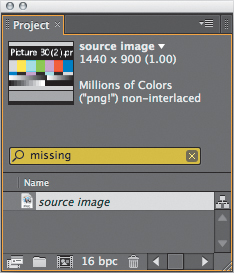
To search for particular types of footage in your project, including missing source, use the search field (Ctrl+F/Cmd+F) in the Project panel and the following commands (Figure 1.7):
• missing is the replacement for the Find Missing Footage check box.
• unused gets you all of the source that isn’t in any composition.
• used is, self-evidently, just what it says.
• text strings that appear in the Project panel (say, tif or Aug 26).
Figure 1.7. Missing footage is replaced with color bars, both in the Project thumbnail and anywhere the footage appears in the project. You can reveal all missing files in a Project by typing the word “missing” in the Project search field, highlighted in yellow.
The date column in the Project panel may be hidden by default; context-click to reveal it, then type in yesterday’s date using a three-letter month abbreviation; the Project panel now displays only the items that were introduced or updated yesterday.
Because every project is likely to be moved or archived at some point (you are making backups, right?), it’s best to keep all source material in one master folder. This helps After Effects automatically re-link all of the related files it finds there at once, thus avoiding a lot of tedium for you.
Move, Combine, and Consolidate Projects
At some point you probably will need to
• move an entire After Effects project, including its source, or archive it
• merge or combine two projects
• clean up a project, getting rid of unused files or extra instances of a single file
To move or archive a project with only its linked sources, choose File > Collect Files. This command allows you to create a new folder that contains a copy of the project and all of its source files. The source files are reorganized with a directory structure identical to that of the Project panel (Figure 1.8).
Figure 1.8. Collect Files resaves all source files from your project using the same organization and hierarchy as the project itself.

Let the computer do what it does best and automate a cleanup of your sources. Choose Collect Source Files > For Selected Comps; After Effects collects only the footage needed to create that composition. If you check Reduce Project as well, the unused source is also removed from the collected project.
Select the master compositions in your project and choose File > Reduce Project; After Effects eliminates project items not used in the selected compositions. You even get a warning dialog telling you how many items were removed—not from the disk, only from your project.
Script
![]()
If the projects being combined are organized using the same set of subfolders, you can merge them with Redefinery’s Merge Projects script, which is included on the book’s disc (Figure 1.9).
Figure 1.9. Load the highly useful rd_MergeProjects.jsx script from the scripts folder on the book’s disc into Adobe After Effects CS5 > Scripts > ScriptUI Panels, and you can then reveal it at any time from the bottom of the Window menu. This script takes nested folders with the same name as those closer to the root and merges them, while consolidating duplicate footage. It’s great for importing a project and maintaining a tidy structure.

You can also reduce only the source footage (keeping compositions and solids) with File > Remove Unused Footage, which deletes from the project any footage that hasn’t made its way into a composition. If the same clips have been imported more than once, File > Consolidate All Footage looks for the extra instances and combines them, choosing the first instance, top to bottom, in the project. File > Remove Unused Footage rids a project of footage not included in any composition (but the files do remain on your drive).
Need to combine two or more projects? Import one into the other (just drag it in), or drag several into a new project. The imported project appears in its own folder labeled with the source name.
Advanced Save Options
After Effects projects are saved and overwritten completely separate from the elements they contain. They tend to be small, making it easier to save often so that you don’t lose your work.
File > Increment and Save attaches a version number to your saved project or increments whatever number is already there, at the end of the filename. It helps the automation process if you make a habit of naming files with the version number at the end, right before the .aep extension.
Preferences > Auto-Save fills in the spaces between incremented versions; toggle it on and you’ll never lose more than the number of minutes you specify (Save Every 20 Minutes is the default), along with whatever number of most recent versions you prefer (Figure 1.10).
Figure 1.10. Auto-Save must be enabled (in Preferences > Auto-Save) in order for a folder to be created adjacent to the project that will contain the most recent saves of the project—you specify the number and gap between saves.

Tip
Use Increment and Save when you reach a point where you’re happy with a project and ready to move on to the next step; you can then choose File > Revert to get back there in one step instead of using a series of undos.
Take Control of Settings
After Effects includes a bunch of settings that you must understand in order to avoid getting in a fight with them. These have to do with essentials such as how time, color depth, transparency, pixel aspect ratio, and field data are handled. It’s not necessarily fun—but it’s the law.
Project Settings
As shown in Figure 1.11, the Project Settings dialog (Ctrl+Alt+Shift+K/Cmd+Opt+Shift+K) contains three basic sections:
Figure 1.11. When getting started, be certain to set Display Style and Color Depth the way you want them. The other Color Settings are elucidated in Chapter 11.
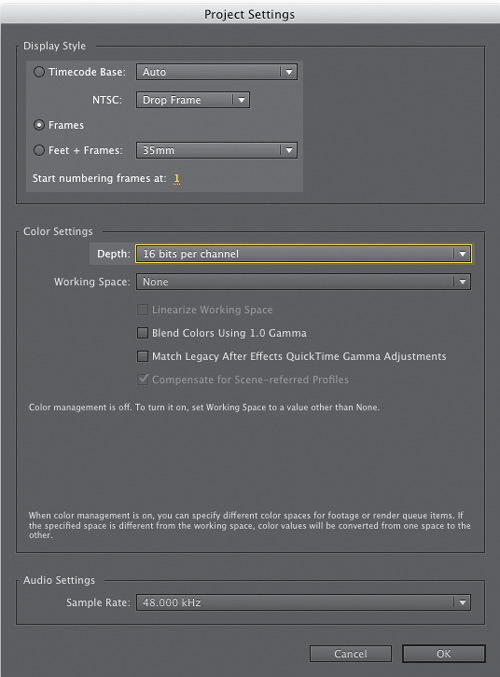
• Display Style determines how time is displayed—predominantly whether a composition’s frame count is kept in integers (frames) or in timecode (hours, minutes, seconds, and frames). Broadly, film projects tend to work in frames, broadcast video projects in timecode. This won’t affect the frame rates of your footage or compositions.
• The Color Settings section includes the project-wide color depth (8, 16, or 32 bits per channel), as well as color management and blend settings. Chapter 11 covers this in ample depth.
• Audio Settings affects only previews; lowering the rate can save RAM. I never touch this.
If you’re displaying timecode, you’ll almost never want to change the default Auto setting unless you’re working with footage containing more than one frame rate and need to conform everything to a particular standard.
Tip
Instead of opening Project Settings, change Display Style by Ctrl- or Cmd-clicking on the timecode indicator in the timeline; change color depth by Alt- or Opt-clicking the bpc indicator in the Project panel.
If you’re working with frames, it’s often most helpful to start numbering them at 1, although the default is 0. This applies to imported image sequences, not compositions. Numbering in a composition is determined by the Start Frame number in Composition Settings (Ctrl+K/Cmd+K).
Interpret Footage
This book generally eschews the practice of walking through After Effects menus, but a well-designed UI helps you think, so focusing on the material in this section allows access to the best analytical tools. Decisions about how footage is interpreted are both vital and somewhat tedious. This makes the Interpret Footage dialog (Figure 1.12), where you can specify details for any source clip, even more vital as a preflight checklist for source footage. Here you’ll determine
Figure 1.12. The Interpret Footage dialog is a checklist for getting footage settings correct before you ever assemble a composition. Alpha determines transparency settings, Frame Rate is essential with an image sequence, Fields and Pulldown and Pixel Aspect Ratio (under Other Options) convert footage optimized for playback. The Color Management tab (purple) gets a complete treatment in Chapter 11.
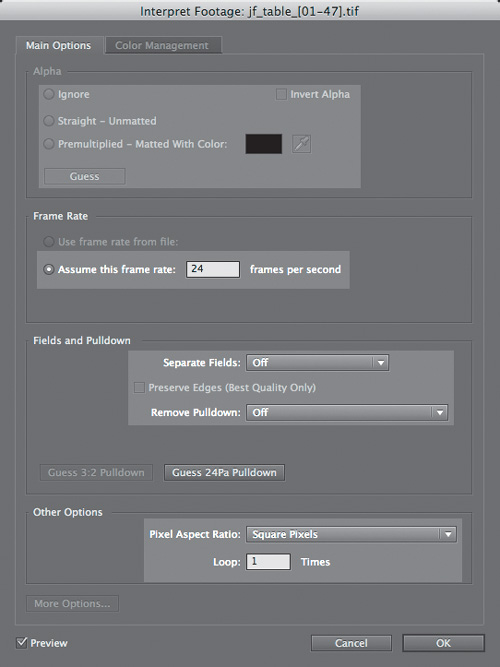
• Alpha interpretation
• Frame Rate
• Fields and Pulldown
• Pixel Aspect Ratio (under Other Options)
• Color Management (under More Options with certain file types and the Color Management tab)
The Interpret Footage icon in the Project panel ![]() is the easiest way to open the Interpret Footage dialog. Select a clip in the Project panel and click it, or press Ctrl+Shift+G (Cmd+Shift+G). Or, you can context-click and select Interpret Footage > Main.
is the easiest way to open the Interpret Footage dialog. Select a clip in the Project panel and click it, or press Ctrl+Shift+G (Cmd+Shift+G). Or, you can context-click and select Interpret Footage > Main.
Alpha
Effective compositing requires a thorough understanding of alpha channels, but only when something goes wrong with them. Figure 1.13 shows the most visible symptom of a misinterpreted alpha channel: fringing.
Figure 1.13. It’s not hard to distinguish a properly interpreted (left) from an incorrect (right) alpha channel. The giveaway is the contrasting fringe, caused in this case by the failure to remove the black background color premultiplied into edge pixels. The left image is unmultiplied; the right is not.

You can easily avoid these types of problems:
• If the alpha channel type is unclear, click Guess in the mini Interpretation dialog that appears when importing footage with alpha. This often (not always) yields a correct setting.
• Preferences > Import contains a default alpha channel preference, which is fine to set on a project with consistent alpha handling. If you are in any doubt about that, set it to Ask User to avoid forgetting to set it properly.
More information on alpha channels and how they operate is found in Chapter 3.
Tip
After Effects does not interpret an alpha unless you specifically click Guess; if you merely clear the dialog (Esc) it uses the previous default.
Frame Rate
I have known many experienced artists to be bitten by careless errors with frame rate, myself included. Misinterpreted frame rate is typically an issue with image sequences only, because unlike in QuickTime, the files themselves contain no embedded frame rate (not even formats like .dpx, which have this capability). You can also override the QuickTime frame rate, which is exactly what After Effects does with footage containing any sort of pulldown (see next section).
Tip
You can change the default Frames Per Second setting for Sequence Footage under Preferences > Import. This should be among the first things you check when you are starting a new project so you don’t have to continually change it.
The following two statements are both true:
• After Effects is flexible in allowing you to mix clips with varying frame rates and to change the frame rate of a clip that’s already in a composition.
• After Effects is precise about how those timing settings are handled. If your true frame rate is 23.976 fps or 29.97 fps, don’t round those to 24 and 30, or strange things are bound to happen: motion tracks that don’t stick, steppy playback, and more.
The current frame rate and duration as well as other interpretation information is displayed at the top of the Project panel when you select a source clip (Figure 1.14).
Figure 1.14. Useful information about any selected item appears atop the Project panel. The caret to the right of the filename reveals specific compositions in which it is used.
Fields, Pulldown, and Pixel Aspect Ratio
One surprise for the novice is that video images are not typically made up of whole frames containing square pixels like stills. A video frame, and in particular one shot for broadcast, is often interlaced into two fields, and its pixels are stored nonsquare, for the purpose of faster and more efficient capture and delivery.
A frame combines two fields by interlacing them together, vertically alternating one horizontal line of pixels from the first with one from the second. The result is half the image detail but twice the motion detail. Figure 1.15 shows this principle in action.
Figure 1.15. If a perfect ellipse were to travel horizontally at high speed, the interlaced result would look like this on a single frame. This contains two fields’ worth of motion, alternating on vertical pixels of a single frame. If you see something like this in your composition, interlacing hasn’t been removed on import.

Close-up: Why an Image Sequence?
![]()
Movie formats, which these days usually means QuickTime (.mov), have the following flaws compared with image sequences:
• A bad frame in a rendered image sequence can typically be quickly isolated and replaced; a bad frame will sink an entire QuickTime movie, sometimes costing hours of rework.
• It’s easy to update a section of an image sequence precisely by overwriting a subset of frames instead of re-rendering the whole movie, cutting and pasting, or opening a nonlinear editor.
• Still image formats have more predictable color management settings than QuickTime. If QuickTime is fast food—convenient but potentially bad for the health of your project, causing bloat and slowness—then image sequences are a home-cooked meal, involving more steps but offering more control over how they are made and consumed.
It’s not always practical, particularly when making quick edits to video footage, to convert everything to image sequences, which don’t play back so easily on your system or in your nonlinear editor. However, on larger or longer-form projects, they will preserve your work more effectively.
If you’re doing any compositing, transformation, paint/masking, or distortion—pretty much anything beyond basic color correction—match the Separate Fields setting to that of the footage, causing After Effects to recognize the interlaced frame as two separate frames of video.
Notes
![]()
To see interlaced footage in action with clips that contain interlacing, check out 01_interlaced_footage on the book’s disc.
Pulldown allows 24-fps film footage to play smoothly at 29.97 fps by repeating one field every five frames (Figure 1.16). This creates a pattern that After Effects can accurately guess if there is sufficient motion in the first few frames of the footage. If not, the backup option (which still works) is trial-and-error. Do the following:
Figure 1.16. Pulldown allows 24-fps footage, the film frame rate, and enables it to play smoothly at 30 fps; without interleaving it into fields in this manner, the motion stutters, as it does if you try to go straight from 30 fps (no pulldown) to 24.
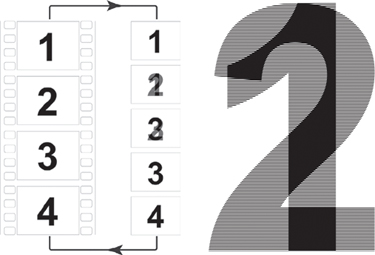
• Create a 23.976 composition with the source file in it.
• Try each initial pattern listed under Remove Pulldown until the field artifacts disappear.
There are two basic types of pulldown (3:2 and 24 Pa), each with five potential initial patterns, so if none of these works to remove interlacing, there is some other problem with the footage.
Pixel aspect ratio (PAR) is another compromise intended to maximize image detail while minimizing frame size. The pixels in the image are displayed nonsquare on the broadcast monitor, with extra detail on one axis compensating for its lack on the other.
Your computer monitor, of course, displays square pixels, so any clip with a nonsquare PAR will look odd if displayed without compensating for the difference. Therefore, After Effects includes a toggle (![]() ) below the viewer panels to stretch the footage so that its proportions preview correctly (Figure 1.17) although the footage or composition itself isn’t changed.
) below the viewer panels to stretch the footage so that its proportions preview correctly (Figure 1.17) although the footage or composition itself isn’t changed.
Figure 1.17. Think all of your problems with Pixel Aspect Ratio are gone with the demise of standard definition? Think again. DVCPRO HD footage with Pixel Aspect Ratio Correction on (left) and off (right) via the toggle (circled in red). If subjects look anamorphic—long and skinny—toggle this, and if it looks OK, After Effects is handling it for you; no need to render a square pixel version.

Notes
![]()
3:2 pulldown is the traditional format designed to make footage that originated at 24 fps play smoothly at 29.97 fps; telecine conversions from film to television use this. 24P Advance Pulldown was introduced to reduce field artifacts by grouping 24 whole frames with 6 interlaced frames, which are essentially filler and can be discarded on removal (see the diagram in Figure 1.16).
With some digital formats such as DV, field order and pixel aspect are standardized and set automatically in After Effects. With other formats, you may need to know the correct field order and pixel aspect as specified by the camera or software that generated the image.
Source Formats
After Effects is capable of importing and exporting a wide array of footage formats, yet only a small subset of these occur regularly in production. Table 1.1 contains a rundown of common raster image formats and some advantages and disadvantages of each. Which formats will you use most? Probably TIFF or DPX for source and JPEG (with a Quality setting of 7 or higher) for temporary storage when file space is at a premium.
Table 1.1. Raster Image Formats and Their Advantages

TIFF offers lossless LZW compression, giving it an advantage over Adobe Photoshop format, especially when you consider that TIFF can even store multiple layers, each with its own transparency. Other formats with lossless compression, such as TGA, don’t support multiple bit depths and layers like TIFF does. PNG is more limited and slower, but the file sizes are smaller.
Notes
![]()
One oddity of the PNG format is that it specifies that an alpha channel is saved and interpreted as Straight, with no explicit option to change the default, although After Effects lets you override this.
For film and computer graphics, it is normal to pass around CIN and DPX files (essentially the same format) and EXR, designed (and open-sourced) by ILM specifically to handle high-dynamic-range (HDR) renders with multiple channels of data (and these can be customized to contain useful information such as Z depth and motion data). More on these formats is found in Chapters 11 and 12, which also include information on working with camera raw CRW images.
Photoshop Files
Although the PSD format does not offer any type of compression, it has a few unique advantages when used with After Effects. Specifically, PSD files can
• be imported directly as virtually identical After Effects compositions, with blending modes, layer styles, and editable text. In the Import File dialog, choose Composition or Composition-Retain Layer Sizes using the Import As pop-up menu (Figure 1.18)—you get a second chance in the Photoshop dialog that appears in After Effects itself after you click Import.
Figure 1.18. Composition-Retain Layer Sizes means “just like in Photoshop.” The other option, Composition, reframes everything to the image area (all with the same center point)—and crops any pixels that fall outside frame. Choose Retain Layer Sizes to ensure that each layer has its own unique anchor point—and is not cropped.

• be created from After Effects (File > New > Adobe Photoshop File or even Layer > New > Adobe Photoshop File).
• include moving footage. More about why you might want to work with video in Photoshop (for its paint tools) is included in Chapter 7.
• include Live Photoshop 3D layers: 3D models with lighting, material, and surface characteristics created in Photoshop that can be manipulated in After Effects. More about this feature is found in Chapter 9.
Once your source footage is imported and organized (Chapter 4), the next step is to place it in a composition.
Composition Settings
My advice is to begin with your plate: the main footage, whether a background shot or a foreground yet to be keyed. To ensure that composition settings are exactly as they should be with the least effort, try one of the following:
• Use a prebuilt project template that includes compositions whose settings match the intended output; you can even create and save your own (see Chapter 4).
• Create a new composition by dragging the plate footage (often the background plate) to the Create a New Composition icon ![]() . This automatically matches pixel dimensions, Pixel Aspect Ratio, Frame Rate, and Duration, all of which are crucial.
. This automatically matches pixel dimensions, Pixel Aspect Ratio, Frame Rate, and Duration, all of which are crucial.
Composition Settings also contains an Advanced tab. This pertains to temporal and spatial settings (Chapter 4) and motion blur and 3D (Chapter 9).
View Panels and Previews
How exactly does a professional work with footage in After Effects? I’ve noticed some good habits that experienced pros tend to share.
Notes
![]()
A 2K plate is the minimum typical horizontal film resolution: approximately 2000 pixels, or more precisely 2048 pixels in width. HD video is 1920 pixels horizontal resolution.
Resolution and Quality
First, keep in mind that you might never work at full resolution, but you should almost always leave layers set to Best quality. There are several effective ways to speed up previews and interactivity without ever setting a layer to Draft quality, which creates inaccurate previews by rounding off crucial values.
In rough order of preference, you can
• lower viewer Resolution to Half, or in extreme cases, Quarter (see Note)
• set Region of Interest (ROI) to isolate only the area that needs to be previewed
• use Shift+RAM Preview to skip frames (the default setting of 1 skips every second frame—details in “Caching and Previewing,” later in this chapter)
Half resolution allows four times as much data to fill a RAM preview, and Shift+RAM Preview can reduce overhead further by skipping every nth frame (according to the Skip setting in the Preview panel). The default setting of 1 plays every other frame (Figure 1.19).
Figure 1.19. Shift+RAM Preview is a secondary previewing option with unique settings. The default difference is a Skip setting of 1, which previews every other frame but can be changed to the pattern of your preference. To set a preview this way, either press Shift+0 (on the numerical keypad) or switch to Shift+RAM Preview in the Preview panel.
![]()
Notes
![]()
The Auto setting under the Resolution menu in the Composition panel downsample the image so that resolution is never higher than magnification.
To quickly change the display resolution in the Composition panel, use the keyboard shortcuts shown in Table 1.2.
Table 1.2. Display Resolution/Size Shortcuts

Activate the Hand tool (H, spacebar, or middle mouse button) to move your view of a clip around. To zoom in and out, you can use
• Ctrl+= (Cmd+=) and Ctrl+- (Cmd+-)
• Zoom tool (Z) and Alt (Opt) Z
• comma and period keys
• a mouse with a scroll wheel, or scrolling options on a track pad or tablet
Tip
With the cursor over a specific area of the frame, hold the Alt (Opt) key as you zoom to keep that point centered.
Ever notice yourself focusing only on a particular section of a huge image? Use the Region of Interest (ROI) tool (Figure 1.20) to define a rectangular preview region. Only the layer data needed to render that area is calculated and buffered, lengthening RAM previews.
Figure 1.20. Region of Interest crops the active view region. Want to keep this view? Crop Comp to Region of Interest (in the Composition menu).
Responsiveness
Has your After Effects UI slowed to a crawl as you work on a big shot? Here’s a quick triage you can try:
• Deactivate Live Update (Figure 1.21). On by default, this toggle (![]() ) enables real-time update in the viewers as you adjust controls. Deactivate it and updates occur only when you release the mouse.
) enables real-time update in the viewers as you adjust controls. Deactivate it and updates occur only when you release the mouse.
Figure 1.21. Disabling Live Update and enabling Caps Lock could be seen as desperation moves when interactivity becomes unacceptable, but the former is rarely necessary (you can do it temporarily with Alt/Opt) and the latter can actually be a handy way to do setup as quickly as possible without worrying about previews. The frame goes black as soon as you make an adjustment.

• Hold Alt (Opt) as you make adjustments. With Live Update on, this toggle prevents views from updating. Deactivate Live Update and the behavior is inverted; the modifier keys instead enable real-time updates.
• Activate Caps Lock. If you don’t mind working “blind” for periods of time, pressing the Caps Lock key on your keyboard prevents updates to any viewer.
Tip
OpenGL in After Effects can have undesirable side effects; most power users tend to leave it off most of the time.
• Enable OpenGL. Preferences > Previews includes the Enable OpenGL option, off by default (and unavailable with older graphics cards). Enable it, and OpenGL-Interactive mode in a viewer panel is accelerated in certain cases, for example, when positioning layers in 3D space. There are two OpenGL options, Interactive and Always On; the former will help you with fast scene setup, especially in a complicated 3D scene, and the latter will give you the look of OpenGL at all times as you work.
In general, the more responsive you can make your user interface, the better will be the result because you can make more decisions in a shorter period of time. Just leave time to double-check the result if you are in the habit of disabling screen viewers.
Multiprocessing
Multiprocessing, which allows After Effects to use all of the processor cores on your system, is disabled by default. This does not mean that After Effects doesn’t use all of your processors, just that by default it doesn’t work on more than one frame at a time, and thus doesn’t maximize usage of your system. CS5 is the first version of After Effects for which I would wholeheartedly recommend you go into Preferences > Memory & Multiprocessing and enable Render Multiple Frames Simultaneously if you’re running a system with more than the barest of resources. Ideally, your system should have more than a couple of processors and at least 4 GB of physical memory (RAM).
The great thing about multiprocessing in a 64-bit application is that it actually works. Gone are the days when this option tied up your system while it started and created a bunch of render cores that locked up system resources, forcing a restart. Today, not only can this option be enabled on the fly, but in most cases it will speed your RAM previews and renders significantly. Try it yourself—preview a processor-intensive animation with this option off, then on, and notice the difference when you click 0 on the numeric keypad or with the render time required. You now don’t even need to restart the application.
There are a couple of other adjustments you can make to tune this option. Since it’s likely these days that you are running a system with eight or more cores, reserve a couple of them for other applications by setting CPUs Reserved for Other Applications in that same Preferences panel. Ideally, you can assign 2 GB per background CPU and still have a few GB of memory to reserve for other applications, as in Figure 1.22.
Figure 1.22. This dynamic Preferences panel contains useful information about how After Effects can use the resources on your specific system. Refreshingly, there’s little here you need to adjust, other than enabling Render Multiple Frames Simultaneously and then optionally adjusting the amount of memory and number of processors reserved for other applications.

Tip
Initial results show that After Effects actually runs faster with fewer than the full number of cores on a system with eight or more cores. Reserve two for other applications and see if you get a speed boost.
Note that few other Adobe applications share the same protected memory pool as After Effects. Premiere Pro, Encore, and Adobe Media Encoder don’t count as “other applications” but have been tuned to cooperate using the same settings you give After Effects, so you can work between these memory-hungry applications, editing and encoding simultaneously to compositing, without the need for further adjustments.
For more information on how the application is using your system resources you can click the Details button at the bottom of Preferences > Memory & Multiprocessing. It won’t monitor all of your applications, just the four that fall into its managed pool: the CS5 versions of Premiere Pro, Encore, and Media Encoder.
Caching and Previewing
After Effects automatically caches footage as you navigate from frame to frame (Page Up/Page Down) or load a RAM preview (0 on the numeric keypad). The green line atop the Timeline panel shows which frames are stored for instant playback. You can extend the cache from physical memory (RAM) to physical media (ideally a high-speed local drive) by enabling Disk Cache in Preferences > Memory & Cache. This locks away a portion of your drive for use only by After Effects. A blue line shows frames loaded in the Disk Cache (Figure 1.23).
Figure 1.23. Enable Disk Cache and you may see your previews extended; the blue areas of the timeline have been cached to disc in addition to the green areas cached into physical memory (RAM).

Disk Cache saves the time required to re-render a frame but doesn’t necessarily deliver real-time playback and often is not invoked when you might think it should be. The cache is not saved between After Effects sessions.
Preview Settings
Here are some cool customizations to a RAM preview:
• Loop options (Preview panel). Hidden among the playback icons atop Preview is a toggle controlling how previews loop. Use this to disable looping, or amaze your friends with the ping-pong option.
• From Current Time (Preview panel). Tired of resetting the work area? Toggle this on and previews begin at the current time and roll through to the end of the composition.
• Full Screen (Preview panel). Self-explanatory and rarely used, but a cool option, no?
Tip
The shortcut for Shift+RAM Preview is, naturally enough, Shift+0 (on the numeric keypad). To set the Work Area to the length of any highlighted layers, use Ctrl+Alt+B (Cmd+Opt+B).
• Preferences > Video Preview lets you specify the output device and how it is used. If you have an external video device attached with its own monitor, you can use it to preview. Third-party output devices, such as Kona and Blackmagic cards, are supported as well.
If refined motion is not critical, use Shift+RAM Preview—this skips frames according to whatever pattern is set in the Preview panel under the Shift+RAM Preview Options menu.
Backgrounds
You need to see what you’re doing, and when you use a contrasting background it’s like shining a light behind layer edges. You can customize the background color of the Composition viewer right in Composition > Compositing Settings or toggle the Transparency Grid icon ![]() beneath the Composition panel to evaluate edges in sharp relief.
beneath the Composition panel to evaluate edges in sharp relief.
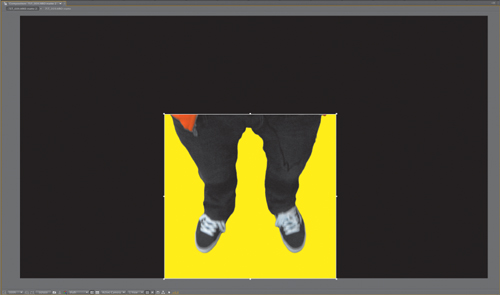
You can even insert background or reference footage or a custom gradient background that you created (Figure 1.24). If it’s set as a Guide Layer ![]() (Layer > Guide Layer or context-click the layer), it does not show up when rendered or nested in another composition.
(Layer > Guide Layer or context-click the layer), it does not show up when rendered or nested in another composition.
Figure 1.24. If the gradient behind a matted object is made a guide layer, you can clearly see the edge details of the foreground, but the gradient doesn’t show up in any subsequent compositions or renders.

Several other modes and toggles are available in the viewer panels. Some are familiar from other Adobe applications:
• Title/Action Safe overlays determine the boundaries of the frame as well as its center point. Alt- or Opt-click on the Grid & Guide Options icon ![]() to toggle it.
to toggle it.
• View > Show Grid (Ctrl+“/Cmd+”) displays an overlay grid.
• View > Show Rulers (Ctrl+R/Cmd+R) displays not only pixel measurements of the viewer, but allows you to add guides as you can in Photoshop.
Tip
Use Preferences > Grids & Guides to customize the Safe Margins in the Title/Action Safe overlay or the appearance of grids and guides.
All of these are toggled via a single menu beneath the viewer panel (the one that looks like a crosshair). To pull out a guide, choose Show Rulers and then drag from either the horizontal or vertical ruler. To change the origin point (0 on each ruler), drag the crosshair from the corner between the two rulers.
Masks, keyframes, and motion paths can get in the way. You can
• hide them all using View > Hide Layer Controls (Ctrl+Shift+H/Cmd+Shift+H)
• use the Toggle Mask and Shape Path Visibility button at the bottom of the Composition panel
• customize what is shown and hidden with View > View Options (Ctrl+Alt+U/Cmd+Opt+U)
Beginning in Chapter 5 you’ll be encouraged to study images one color channel at a time. The Show Channel icon exists for this purpose (keyboard shortcuts Alt+1 [Opt+1] through Alt+4 [Opt+4] map to R, G, B, and A, respectively). An outline in the color of the selected channel reminds you which channel is displayed (Figure 1.25).
Figure 1.25. The green border indicates that only the green channel is displayed.
(Image courtesy of Mark Decena, Kontent Films.)
Effects: Plug-ins and Animation Presets
After Effects contains about 200 default effects plug-ins, and third parties provide plenty more. Personally, I use less than 20 percent of these effects around 80 percent of the time, and you probably will too. So my opinion is that you don’t need to understand them all in order to use the most powerful ones. And even cooler, once you thoroughly understand the core effects, you can use them together to do things with After Effects that you might have thought required third-party plug-ins.
Script
![]()
Opened a project only to discover a warning that some effects are missing, and wondering which ones, and where to find them? The script pt_EffectSearch by Paul Tuersley (http://aescripts.com/pt_effectsearch/) helps you locate missing plug-ins and where they are used.
To apply an effect to a layer, my advice is to avoid the Effect menu and either context-click that layer, then use the Effect context menu, or double-click it in the Effects & Presets panel. The Effects & Presets panel helps beginners and pros alike by displaying effects alphabetically (without their categories) as well as offering a search field to help you look for a specific effect by name or for all the effects whose names include a specific word, such as “blur” or “channel” (Figure 1.26).
Figure 1.26. Type the word blur in the Effects & Presets search field and only effects with that text string in the name appear. You can also choose to display only effects with higher bit depths (when working at 16 or 32 bits per channel—see Chapter 11 for more on that).

Animation presets allow you to save specific configurations of layer properties and animations, including keyframes, effects, and expressions, independent of the project that created them. Save your own by selecting effects and/or properties and choosing Animation > Save Animation Preset. Save to the Presets folder (the default location) and your preset will show up when After Effects is started.
Output and the Render Queue
As you know, the way to get a finished shot out of After Effects is to render and export it. Here are a few things you might not already know about the process of outputting your work.
To place an item in the render queue, it’s simplest either to use a shortcut (Ctrl+M or Cmd+M, or Ctrl+Shift+/ or Cmd+Shift+/) or to drag items from the Project panel.
Each Render Queue item has two sets of settings: Render Settings (which controls how the composition itself is set when generating the source image data) and Output Module (which determines how that image data is then written to disk).
Tip
Convert raw footage by dragging it directly to the Render Queue panel, no composition required (one is made for you). This is a quick and easy way to convert an image sequence to a QuickTime movie, or vice versa.
Render Settings: Match or Override the Composition
Render Settings breaks down to three basic sections (Figure 1.27):
Figure 1.27. The Composition area of the Render Settings dialog gives details on how an individual frame is rendered while the Time Sampling section determines the timing of the whole sequence.

• Composition corresponds directly to settings in the Timeline panel; here you choose whether to keep or override them. The more complex options, such as Proxy Use, are described in Chapter 4.
• Time Sampling gives you control over the timing of the render; not just frame rate and duration but the ability to add pulldown and fields—say, when rendering a 24-fps film composition for 29.97 video—as well as motion blur and frame blending (Chapter 2).
• Options contains one super-important feature: Skip Existing Files, which checks for the existence of a file before rendering it. This is useful for splitting image sequences between sessions (see Chapter 4 for details on how to use this feature).
Tip
Need to render several items to one location? Set up one item, then add the rest. The location of the first becomes the default.
If you find that rendered output doesn’t match your expectations, Render Settings is generally the place to look (unless the problem involves color management, compression, or audio). The output modules handle writing that output to a file.
Output Modules: Making Movies
Output modules convert the rendered frame into an actual file. The main decisions here concern
• format—what file type is being created?
• size—should the pixel dimensions of the output differ from those of the composition being rendered?
• audio—on or off, and in what format?
• color management—unavailable for some formats (QuickTime), essential for others (DPX and EXR)
Tip
Want the best looking half-resolution render? Use Stretch in Output Module, instead of half resolution in Render Settings (which typically renders faster).
Several elegant and easily missed problem-solving tools are embedded in output modules:
• Multiple output modules per render queue item avoid the need for multiple passes (Figure 1.28).
Figure 1.28. It’s easy to miss that you can add multiple output modules to a single render queue item via Composition > Add Output Module or this context menu shown here. This is an immense time-saver, as each frame is rendered once and written as many times as you like.

• Separate output modules can be changed at once by Shift-selecting the modules themselves (not the render queue items that contain them).
• A numbered image sequence can start with any number you like (Figure 1.29).
Figure 1.29. Custom-number a frame sequence here; no convoluted workarounds needed.

• Scaling can be nonuniform to change the pixel aspect ratio.
• Postrender actions automate bringing the result back into After Effects. Chapter 4 tells all.
• A numbered image sequence must contain a string in the format [###] somewhere within its name. Each # sign corresponds to a digit, for padding.
• The Color Management tab takes effect with many still image formats. Chapter 11 tells all.
• Rendered files can include XMP metadata (if toggled on, as by default); this includes information that the file came from After Effects.
Save output modules early and often using the Make Template option at the bottom of the pop-up menu. If you intend to render with the same settings even once more, this will save time. Unfortunately, these cannot be easily sent to another user.
Close-up: Naming Conventions
![]()
Part of growing a studio is devising a naming scheme that keeps projects and renders organized. It’s generally considered good form to:
• Use standard Unix naming conventions (replacing spaces with underscores, intercaps, dashes, or dots).
• Put the version number at the end of the project name and the output file, and make them match. To add a version number to a numbered sequence, you can name the image sequence file something like foo_bar_[####]_v01.tif for version 1.
• Pad sequential numbers (adding zeros at the beginning) to keep things in order as the overall number moves into multiple digits.
And remember, After Effects itself doesn’t always handle long filenames and paths particularly well, so a system that is concise makes key information easier to find in the Project panel.
Optimized Output
Following are some suggested output settings (in Render Settings and Output Module) for specific situations:
• Final output should match the delivery format; it’s usually an editor who decides this. Lossless, which is only 8 bit, is not sufficient if, for example, you’ve been working in 16 bpc to render a 10-bit final. For sending files internally, TIFF with lossless LZW compression is solid and can handle higher bit depths and color management.
• Low-loss output could be QuickTime with Photo-JPEG at around 75 percent. It works cross-platform and at 100 percent quality, it provides 4:4:4 chroma sampling, and at 75 percent, 4:2:2 (see Chapters 6 and 11 for details on what that means).
• Online review typically should be compressed outside of After Effects; such aggressive compression formats as H.264 are most successful on multiple passes.
Notes
![]()
Chapter 4 tells more about how to send your project to Adobe Media Encoder for multipass encoding; this requires Adobe CS5 Production Premium.
Assemble the Shot
Seasoned visual effects supervisors miss nothing. Fully trained eyes do not even require two takes, although in the highest-end facilities, a shot loops for several minutes while the team picks it apart.
This process, though occasionally hard on the ego, makes shots look good. A Chinese proverb in an earlier edition of this book read, “Men in the game are blind to what men looking on see clearly.” That may even go for women, too, who knows?
Tip
After Effects offers a number of output formats and can be useful for simple file conversion; you need only import a source file and drag it directly to Render Queue, then add settings and press Render.
You can and should scrutinize your shot just as carefully in After Effects. Specifically, throughout this book I encourage you to get in the following habits:
Close-up: Working with QuickTime
![]()
QuickTime is the most ubiquitous and universal playback format among video professionals, despite the fact that it is proprietary. There are design decisions behind QuickTime that don’t change unless Apple decides to change them.
Some of these amount to a gotcha:
• Color management of QuickTime remains (at this writing) a moving target, with MOV files appearing differently when they are moved from one platform, application, or even monitor, to another. “Application” includes those from Apple itself, which has not always been consistent on how to display the format.
• High Quality in QuickTime Player is unchecked by default. Direct your unhappy client to Window > Show Movie Properties > Video Track > Visual Settings and the little toggle to the lower right.
• There’s no reliable way to rescue a QuickTime movie with a corrupt frame.
On the other hand, QuickTime is a great review and delivery format that benefits from having been well designed at its inception and having stood the test of time. One great integration with After Effects: If you’ve rendered a QuickTime movie and wonder what project was used to create it, import the rendered QuickTime file and select Edit > Edit Original (Ctrl+E/Cmd+E). If the project can still be found on the available drives, it will open in the source After Effects project.
• Keep an eye on the Info panel (Figure 1.30).
Figure 1.30. By moving the cursor over the area that appears black and examining the pixel values (here shown as Percentage), it becomes apparent that the black levels are not pure 0 percent black.

• Loop or rock-and-roll previews (or as Adobe likes to say, ping-pong previews).
• Zoom in to the pixel level, especially around edges.
• Examine footage and compositions channel by channel (Chapter 5).
• Turn the Exposure control in the Composition viewer up and down to make sure everything still matches (Chapter 5).
• Assume there’s a flaw in your shot; it’s the only way around getting too attached to your intentions.
• Approach your project like a computer programmer and minimize the possibility of bugs (careless errors). Aspire to design in modules that anticipate what might change or be tweaked.
This list may not mean a lot you on the first read-through, I suggest you check out the rest of the book and come back to it as your work continues to progress.