
9. Word Games: Hangman and Word Search
• Hangman
Using letters and words for games has been popular since the mid-20th century with board games, such as Scrabble, and paper games, such as crosswords and word searches.
These games work well as computer games and as web-based games. This chapter looks at two traditional games: hangman and word search. First, however, we need to take a closer look at how ActionScript handles strings and text fields.
Strings and Text Fields
Source Files
A3GPU209_TextExamples.zip
Before trying to make word games, it is worthwhile to see how ActionScript 3.0 handles strings and text fields. After all, we’ll be using them quite a bit in the games.
ActionScript 3.0 String Handling
A String variable in ActionScript is a sequence of characters. We’ve been using strings throughout the book so far, without thinking much about how to perform advanced operations on them.
Creating a string is as simple as assigning some characters, surrounded by quotes, to a variable of type String:
var myString:String = "Why is a raven like a writing desk?";
String Deconstruction
We can deconstruct the string with a variety of functions. To get a single character at a location, we can use charAt:
myString.charAt(9)
This returns “r.”
Note

ActionScript starts counting character positions in strings at character 0. So, the 0 character in the example is "W", and the ninth character is "r."
We can also use substr to get one or more characters from the string. The first parameter is the starting position, and the second parameter is the number of characters to return:
myString.substr(9,5)
The substring function is an alternative that takes the start and end position as parameters. Then, it returns the character from the start position to one less than the end position:
myString.substring(9,14)
This also returns “raven.”
The slice function acts like the substring function, except for a how the values of the second parameter are interpreted. In substring, if the second parameter is less than the first, the parameters are reversed. So, myString.substring(9,14) is the same as myString.substring(14,9).
The slice function enables you to use negative values for the second parameter. It then counts backward from the end of the string. So, myString.slice(9,-21) will return “raven.”
Both substring and slice allow you to leave out the second parameter to get the remainder of the string:
myString.slice(9)
This returns “raven like a writing desk?”
Comparing and Searching Strings
To compare two strings, you just need to use the == operator:
var testString = "raven";
trace(testString == "raven");
This returns true. However, it is case sensitive, so the following returns false:
trace(testString == "Raven");
If you want to compare two strings, regardless of case, it is just a matter of converting one or both strings to only lower- or only uppercase. You can do this with toUpperCase and toLowerCase:
testString.toLowerCase() == "Raven".toLowerCase()
To find a string inside another string, you can use indexOf:
myString.indexOf("raven")
This returns 9. We can also use lastIndexOf to find the last occurrence of a string inside another string:
myString.indexOf("a")
myString.lastIndexOf("a")
The first returns a 7, and the second returns a 20. These match the first and last positions of the letter a in the string “Why is a raven like a writing desk?”
Note
You can also give indexOf and lastIndexOf a second parameter. This number tells it where in the string to start looking, instead of starting at the very beginning or very end.
Most of the time when you are using indexOf, you are not looking for the position of the string, but whether the string is there at all. If it is, indexOf returns a number, 0 or greater. If not, it returns a -1. So, you can determine whether one string is found inside another like this:
(myString.indexOf("raven") != -1)
Another way to find a string inside another string is the search function:
myString.search("raven")
This returns 9.
The search function can take a string as a parameter, as previously mentioned, but it can also take something called a regular expression:
myString.search(/raven/);
Note
A regular expression is a pattern used to find/replace strings inside of other strings. Regular expressions are used in many programming languages and tools.
The subject of regular expressions is deep. So deep, in fact, that several 1,000+ pages books exist that only cover regular expressions. There are also plenty of websites that go into detail. Check out http://flashgameu.com for a page of links on the subject.
This example is the simplest type of regular expression and is identical to the previous use of search. Notice that the / character is used rather than quotes to surround the characters.
You can also give the regular expression some options after the last slash. The most useful here would be an i for case insensitivity:
myString.search(/Raven/i);
This example returns 9, even though there is a capital R.
You can also use wildcards in regular expressions. For instance, the period character represents any character:
myString.search(/r...n/)
This returns 9 because the word raven matches the pattern of r followed by any three characters, followed by n:
myString.search(/r.*n/)
This also returns a 9 because the pattern is r followed by any number of characters, followed by an n.
Building and Modifying Strings
You can append to a string by using a + operator. ActionScript will figure out that it is a String, not a number, and append rather than add. You can also use += to perform a simple append:
myString = "Why is a raven like";
myString += " a writing desk?";
To place something before an existing string, you use code like this:
myString = "a writing desk?";
myString = "Why is a raven like "+myString;
Whereas the search function searches and returns an index value, the replace function takes a regular expression and uses it to replace a portion of the string:
myString.replace("raven","door mouse")
The result would be “Why is a door mouse like a writing desk?”
You can also use a regular expression in the first parameter. This allows things to get very complex, such as moving text around inside a string rather than bringing in replacement text:
myString.replace(/(raven)(.*)(writing desk)/g,"$3$2$1")
This code example looks for raven and writing desk within the string, separated by any number of characters. It then reorders the string, with the writing desk coming first, the raven coming last, and the same characters in between.
Converting Between Strings and Arrays
Both strings and arrays are useful for storing lists of information. It is useful, therefore, to be able to convert between them.
For instance, if you have a string "apple,orange,banana", you might want to create an array from it. To do this, you can use the split command:
var myList:String = "apple,orange,banana";
var myArray:Array = myList.split(",");
You can reverse the process by using the join command:
var myList:String = myArray.join(",");
In both cases, the character passed into the function represents the character used to divide the items in the string. If you use the join command, the resulting string is patched together with commas between the items.
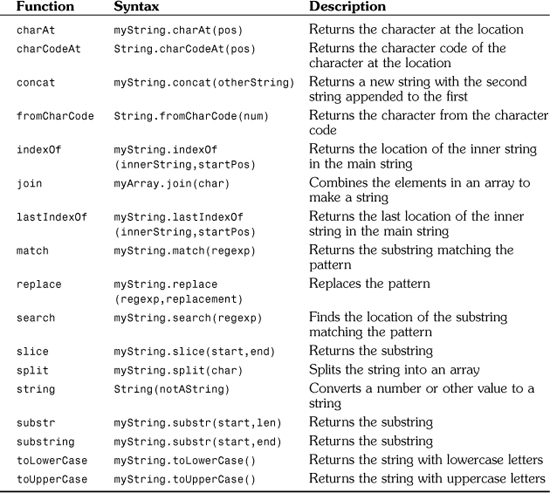
Summary of String Functions
Table 9.1 contains all the String functions we have discussed, plus a few more.
Applying Text Formatting to Text Fields
To place text on the screen, you need to create a new TextField. We’ve used these fields in previous chapters to create text messages and score displays.
If you want to use anything but the default font and style, you also need to create a TextFormat object and assign it to the text field. And for the advanced use of text in games, we also need to look at including fonts in our movies.
The TextFormat Object
Creating a TextFormat object is usually done just before creating a TextField. Or, it could be done at the start of a class if you know you’ll be using that format for several of the text fields you’ll be creating.
All TextFormat really is, is a holder for a set of properties. These properties control the way text looks.
Note
In ActionScript, you can also create style sheets, similar to CSS used in HTML documents. But these are only useful for HTML-formatted text fields. We’ll only be using plain text fields in our games.
You have two choices when creating a TextFormat. The first is to simply create a blank TextFormat object, and then set each of the properties in it. The other choice is to define many of the most common properties in the TextFormat declaration.
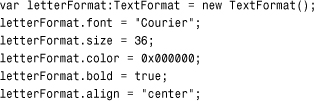
Here is an example of the quick way of creating a TextFormat:
![]()
It is, of course, important to remember the exact order of parameters for TextFormat. It goes like this: font, size, color, bold, italic, underline, url, target, and align. You can include as few or as many of these as you want, as long as they are in order. Use null to skip any properties you don’t want to set.
Note
In fact, the list of parameters is more extensive, but I have left them out of the preceding example: leftMargin, rightMargin, indent, and leading.
Here is the longer way of doing things:
Notice that I left out the italic and underline properties, because false is the default value for both.
Table 9.2 summarizes all the TextFormat properties.
Table 9.2 TextFormat Properties

Creating TextField Objects
After you have a format, you need a text field to apply it to. Creating a TextField is like creating a Sprite. In fact, they are both types of display objects. They can both be added to other Sprites and movie clips with addChild:
var myTextField:TextField = new TextField();
addChild(myTextField);
To assign a format to a field, the best way is to use the defaultTextFormat property:
myTextField.defaultTextFormat = letterFormat;
The alternative is to use the function setTextFormat. The problem with this is that when you set the text property of the field, the text formatting reverts to the default for that field:
myTextField.setTextFormat(letterFormat);
The advantage of setTextFormat is that you can add second and third parameters to specify the start and end characters for the formatting. You can format a piece of the text rather than the whole thing.
In games, we commonly use small text fields for things such as score, level, time, lives, and so on. These fields don’t need multiple text formats, and they are updated often. So, setting the defaultTextFormat is the best way to go in most cases.
Beside defaultTextFormat, the next most important property for us is selectable. Most of the text fields we’ll be using for games are for display purposes only, or are not meant to be clickable. We want to turn off selectable so that the cursor doesn’t change when over the field and the user can’t select the text.
Note
The border property of a text field is a useful way to check the size and location of a text field you create with ActionScript. For instance, if you only place one word or letter in a field, you won’t be able to see how big the field really is without setting the border to true, at least temporarily while testing.
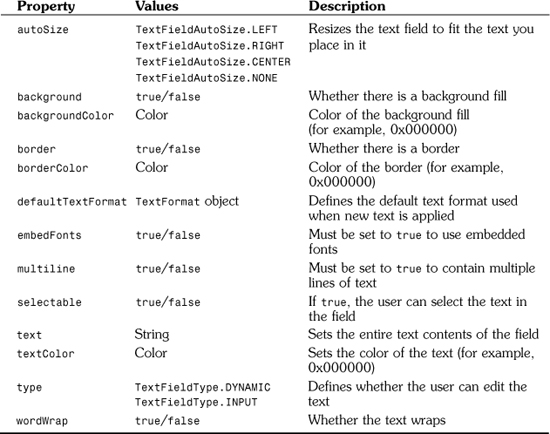
Table 9.3 points out some useful TextField properties.
Table 9.3 TextField Properties
Fonts
If you are making a quick game as an example, or to show your friends, or just to prove a basic concept, you can stick with basic fonts. Most of the games in this book do that just to keep them simple.
If you are developing something for a client, however, or for your website, you should really import the fonts you are using into the library. Doing so makes your game independent of the fonts the users have on their machine. It will also allow you to use more advanced effects with fonts, such as rotation and alpha.
To import a font, go to the library and choose New Font from the Library drop-down menu. (We’ve done this before, in Chapter 7, “Direction and Movement: Air Raid II, Space Rocks, and Balloon Pop.”)
After importing the font and naming it, make sure you also give it a linkage name in the library so it is rolled into the movie when you publish.
Note
Forgetting to set the Linkage name for a font is a common mistake.. When testing your movie, look for errors in the Output panel and for missing text in your running movie where your ActionScript should be creating it.
Even after you embed some fonts, your text fields will not use them until you set the embedFonts property to true.
Now by using the fonts that are in your library, you can manipulate and animate text in various ways.
Animated Text Example
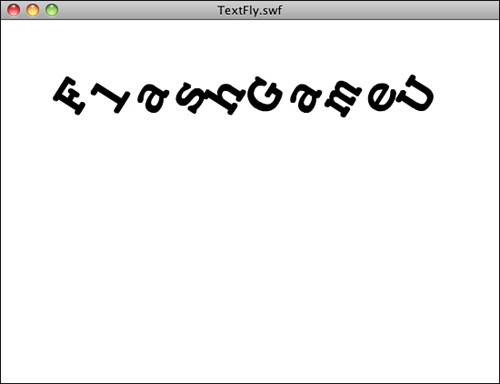
The files TextFly.fla and TextFly.as show a use of strings, text format, and text fields to create an animation. Nothing is in the movie file except the font. The stage is empty.
The TextFly.as class takes a string and breaks it into characters, producing a single TextField and Sprite for each character. It then animates these Sprites.
The class begins by defining a bunch of constants that will determine how the animation will perform:
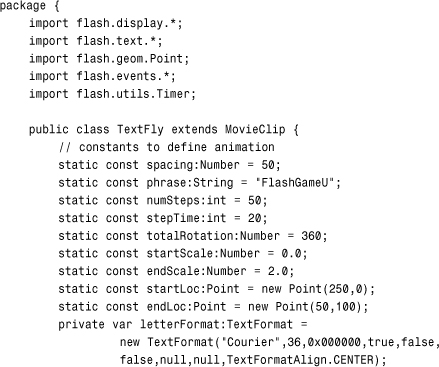
Note
Notice the use of the Courier font. This is a standard font on many computers, but not all. If you do not have Courier on your computer, use a monospaced font of your choice.
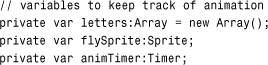
It then goes on to define some variables to hold the Sprites, and the state of the animation:
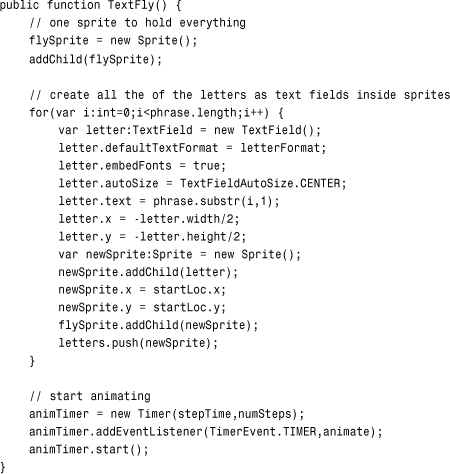
The construction function creates all the TextField and Sprite objects. It also starts off the animation by creating a Timer:
Then, with each step of the animation, the rotation and scale of the Sprites will be set:
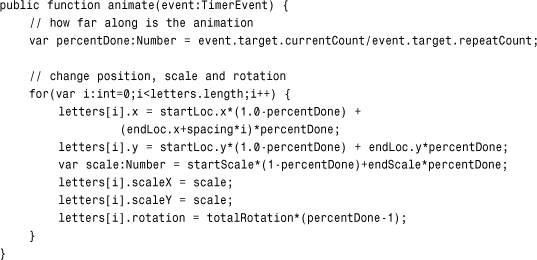
Figure 9.1 shows this animation in mid-action.
Figure 9.1 The TextFly program animates characters in text to have them fly in.
The ability to control text fields and formats at this level is important if you plan on making any games that use letters or words as playing pieces. Next, we take a look at hangman, perhaps the simplest letter game you could create.
Hangman
Source Files
A3GPU209_Hangman.zip
Hangman is not only one of the simplest word games, it is also very simple to program.
In keeping with the spirit of simplicity, the following example will be a no-frills version of hangman.
Setting Up the Hangman
Traditionally, the game of hangman is played with two people. The first person makes up a word or phrase, and the second makes letter guesses. The first person draws out the word or phrase, using a blank space (underline) in place of each letter.
When the guesser guesses a letter used in the phrase, the first person fills in all the blank spaces where the letter is supposed to be. If the guesser picks a letter that is not used at all, the first person draws a bit more of a hanging man in a picture. Typically, it takes seven incorrect answers to complete the hanging man, which means the guesser loses.
Note
Hangman originated in the 19th century, around the time that gallows were used to punish criminals. This unusual image is still used in the game today, although any seven-part sequence can be substituted.
In our game, we’ll use a seven-part sequence that differs a little from a hangman. Figure 9.2 shows our mascot character hanging on to a branch. If you make seven incorrect guesses, he’ll fall.
Figure 9.2 This seven-frame sequence can be substituted with just about any other similar idea.
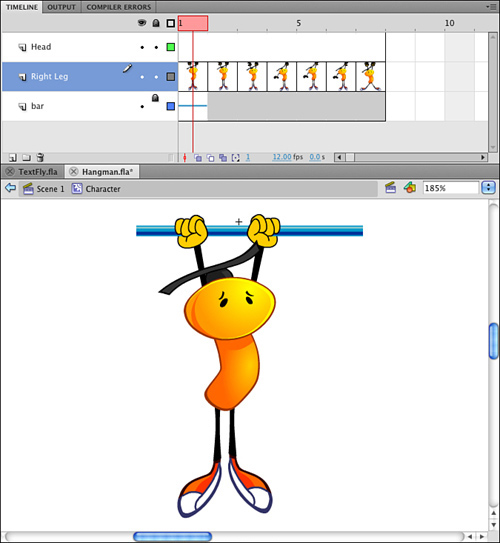
So, the Hangman.fla movie has this one movie clip in it, and it is placed on the stage on the right side. Other than that, there isn’t any other aspect to the movie except setting its class to Hangman.
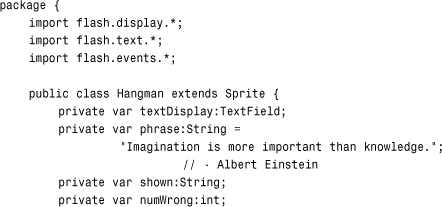
The Hangman Class
This entire game is only about 50 lines of code. Only four class variables are needed.
It is good to see that a fairly interesting game can be created so quickly and easily in ActionScript 3.0.
Two strings are needed: one to hold the phrase, and another to hold the display text, which will start with an underscore where the letters should be. Then we’ll have one variable hold a reference to the text field, and another to keep track of the number of wrong guesses:
When the class starts, it creates a copy of the phrase by running it through the replace function with a regular expression. The expression /[A-Za-z]/g matches any letter character (A to Z and a to z, globally). It replaces these matches with an underscore:

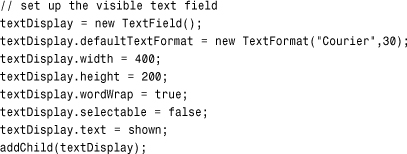
The text field we’ll set up will use a simple text format for Courier font, 30 point. It will set the width and height so that the text will not interfere with the hangman graphic to the right.
Note
The reason I chose Courier is that it is a monospaced font. This means that each letter has the same width. Other fonts have different widths for different letters (for example, l and w). By using a monospaced font, the text characters will not change positions as we substitute letters for the underscores.
The pressKey function will be assigned to the KEY_UP event for the stage:
![]()
When the player presses a key, we’ll use the event.charCode returned to get the letter pressed:
![]()
After the letter is known, the phrase is searched for any matches. We’re careful to use toLowerCase so that the key pressed will match both upper- and lowercase versions in the phrase.
When a match is found, the shown variable is updated by replacing the underscore in that position with the actual letter from phrase. This way, the uppercase letter is used if that is what is in phrase, and the lowercase letter if that is what is in phrase:
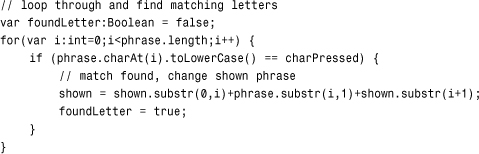
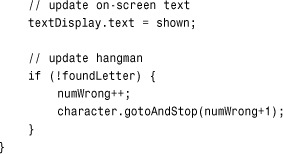
The foundLetter Boolean is set to false when this search starts, and it is reset to true if any match is found. So, if it remains false, we know the letter wasn’t in the phrase, and the hangman image will advance.
But first, we’ll update the onscreen text by setting the text field to shown:
Note
When testing in Flash, be sure to choose the menu option Control, Disable Keyboard Shortcuts. Otherwise, your key presses will not go through to the game window.
This short and simple game can be expanded to include the normal game elements we are used to: like a start and gameover screen. This quick game shows that you don’t need to invest more than a few hours to create a fun game experience.
Now let’s look at a more robust word game, the popular word search.
Word Search
Source Files
A3GPU209_WordSearch.zip
You would think that word searches have been around for a long time. In fact, they have only been here since the 1960s. They are popular on puzzle pages of newspapers, and sold in book collections.
Computer-based word search games can be generated randomly from a list of words or dictionaries. This makes them easier to create; you only need to come up with a list of words.
However, there are many challenging aspects to creating a computer word search game, such as displaying the letters; allowing for horizontal, vertical, and diagonal highlighting; and maintaining a word list.
Development Strategy
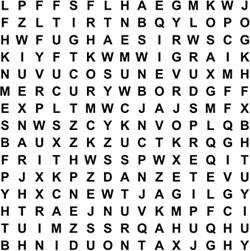
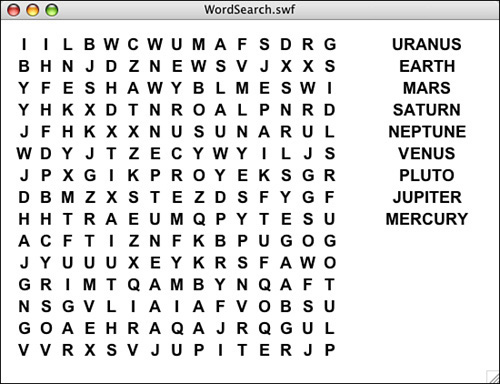
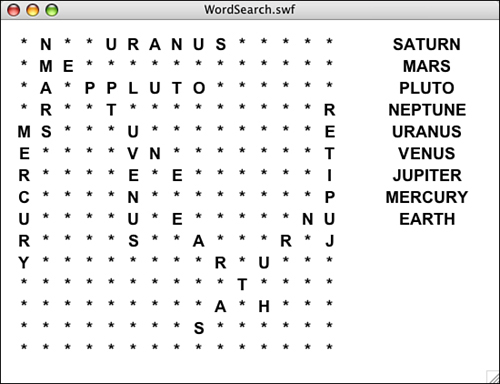
Our game will take a list of words and create a 15×15 grid of letters with those words hidden among other random letters. Figure 9.3 shows a complete grid.
Figure 9.3 The grid at the starting point, with the list of words to the right.
So we’ll start with an empty grid and select random words from the list, random positions, and random directions. Then, we’ll try to insert the word. If it doesn’t fit, or it overlaps letters already placed into the grid, the placement is rejected and another random word, location, and direction are tried.
Note
Not all word search puzzles use all eight directions. Some do not have words backward, and others don’t use diagonals. It is a matter of skill level. Simpler puzzles are good for young children, but are much too easy for adults.
This loop repeats until either all the words are placed or a preset number of attempts have been performed. This will avoid cases where there is no more space left for a word. So, there is no guarantee that all the words will make it into the puzzle.
Our example uses only nine words, so it is unlikely to happen; but longer word lists will have trouble. Huge word lists will only use a sample of the words available each time, making the game more replayable by the same person.
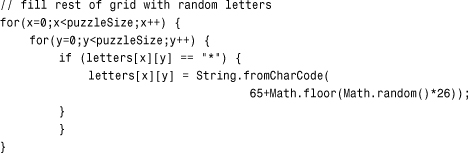
After the words have been placed, all the unused letter positions are filled with random letters.
Also, a list of the words included are placed on the right side of the screen. As words are found, the ones in this list change color.
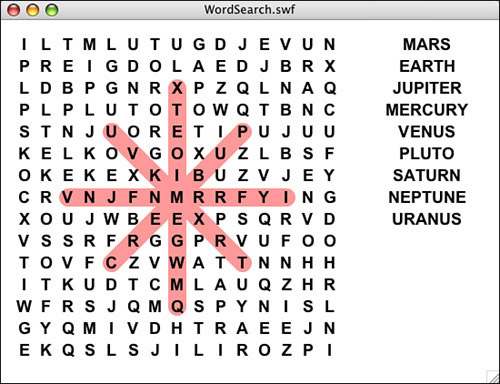
The player uses the mouse to click and drag on the grid. We’ll be drawing a line under the letters to indicate which ones are selected. But, we’ll only be doing this for valid selections. A valid selection would be horizontal, vertical, or at a 45-degree diagonal. Figure 9.4 demonstrates the different directions in which a word can be placed.
Figure 9.4 Valid selections can go in eight different directions.
After all the words have been found, the game ends.
Defining the Class
The game frame in the movie is completely blank. Everything will be created with ActionScript. To do this, we need the flash.display, flash.text, flash.geom and flash.events class libraries:
Several constants will make it easy to adjust the puzzle size, spacing between letters, outline line size, screen offset, and the text format:

To keep track of the words and the grid of letters, we’ll be using these three arrays:
The dragMode keeps track of whether the player is currently selecting a sequence of letters. The startPoint and endPoint will define that range of letters. The numFound will keep track of all the words found:
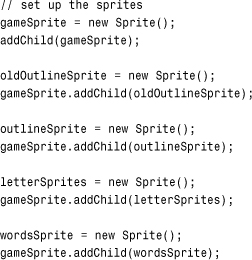
This game will use several Sprites. The gameSprite holds everything. The others hold a particular type of element:
Creating the Word Search Grid
The startWordSearch function has a lot of work to do in order to create a puzzle grid for use in the game. It will rely on the placeLetters function to do some of the work.
The startWordSearch Function
To start the game, we’ll create an array with the words used in the puzzle. In this example, we’ll use the nine planets, ignoring the International Astronomical Union’s feelings about Pluto:

Next, the Sprites are created. They are in the order in which they should be layered onto the stage. The outlines should be under the letters. Only the gameSprite is added to the stage; all the others are added to the gameSprite:
The letter Sprites will be stored in the array grid. But, we’ll first call placeLetters to get a nested array with the characters to be placed in these Sprites.
So, we are essentially dividing up the task of creating the game board into two steps. The first step will create a virtual grid of letters as a nested array. This will take care of adding the words from the word list and filling in the rest with random letters:
![]()
Now that we know where the letters will be placed, we need to create the Sprites, one for each letter. First, each letter gets a TextField. Then, this field is added to a new Sprite:

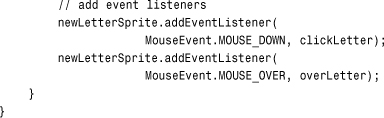
In addition to being created and added to letterSprites, each Sprite must get two events attached to it: MOUSE_DOWN and MOUSE_OVER. The first starts a selection, and the second allows the selection to be updated as the cursor moves over different letters:
When players release the mouse button, we can’t be sure that they are over a letter at that moment. So, instead of attaching the MOUSE_UP event listener to the letters, we’ll attach it to the stage:
![]()
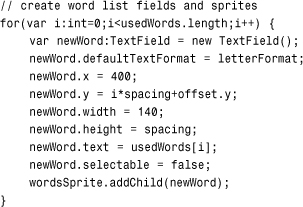
The last thing that needs to be created is the list of words to the right. This is just a collection of TextField objects placed in the wordsSprite. One is created for each word in the usedWords array. This array will be created by placeLetters and contain only the words that could fit into the puzzle:
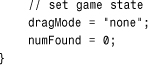
The game is ready to play, except for the dragMode and numFound variables that need to be set:
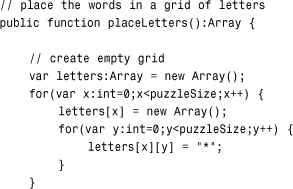
The placeLetters Function
The placeLetters function performs some challenging tasks. First, it creates an empty grid of 15×15 characters as a nested array. Each spot on the grid is filled with an *, which will signify an empty space in the puzzle:
The next step is to make a copy of the wordList. We want to use a copy, rather than the original, because we’ll be removing words as we place them in the grid. We’ll also be placing the words we use into a new array, usedWords:
![]()
Now it is time to add words into the grid. This is done by choosing a random word, random location, and a random direction. Then, an attempt will be made to place the word into the grid, letter by letter. If any conflict arises (for example, the edge of the grid is reached, or an existing letter in the grid doesn’t match the letter we want to place there), the attempt is aborted.
We’ll keep trying, sometimes fitting a word in, and sometimes failing. We’ll do this until the wordListCopy is empty. However, we’ll also track the number of times we’ve tried in repeatTimes, which will start at 1,000 and decrease with every attempt. If repeatTimes reaches zero, we’ll stop adding words. At that point, the chances are that every word that will fit into the puzzle is already there. We won’t be using the rest of the words in this random build.
Note
We’ll be using the technique of labeling the loops so that we can use the continue command to force the program to jump to the start of a loop outside of the current loop. Without these labels, it would be much harder to create the following code.

Now that we’ve got real words in the grid, the grid looks something like Figure 9.5, which is a game that leaves out this next step.
Figure 9.5 This grid has * characters where the random letters will be placed.
The next loops look at every character in the grid and replaces the * with a random letter:
When the placeLetters function is done, it returns its array so that the Sprites can be built from it:
return letters;
}
User Interaction
We’ll be using listeners to track three different mouse actions: click down, roll over a new Sprite, and release.
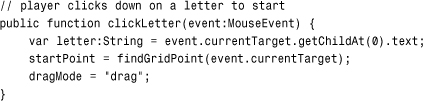
Mouse Click
When the player clicks down on a letter, the position on the grid is determined and placed into startPoint. Also, dragMode is set to "drag".
The findGridPoint function returns a Point with the position of the letter in the grid. We’ll build that function later:
Cursor Drag
Every time the cursor passes over a letter on the screen, the following overLetter function is called. However, it first checks for dragMode to be equal to "drag". So, the bulk of the function only happens after the player has clicked down on a letter.
The current point is stored in the endPoint. Now that we have both a startPoint and an endPoint, we can check the range to see whether it is valid. We’ll assume it isn’t, by clearing the outlineSprite graphic layer first. If it is a valid range, however, drawOutline sets the outlineSprite graphic layer with a new line.
So, basically, the outline is removed and redrawn each time the cursor changes letters:

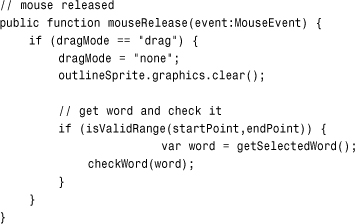
Mouse Release
When the player releases the mouse over a letter, the dragMode is set to "none", and the outline is cleared. Then, assuming the range is valid, two functions are called to deal with the selection.
The getSelectedWord function takes the range and returns the letters in it. Then, the checkWord function will see whether this word is in the list and take action if it is:
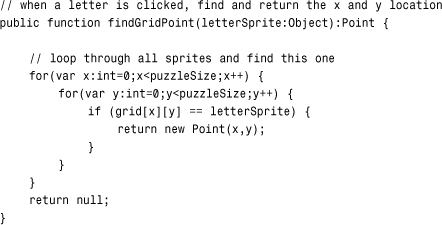
Utility Functions
The findGridPoint function takes a letter Sprite and figures out which location it is at. Because the Sprites are created from scratch, they cannot have dynamic variables attached to them. Therefore, we can’t store each Sprite’s x and y value with it.
Instead, we’ll just look through the grid and find the item in the grid that matches the Sprite:
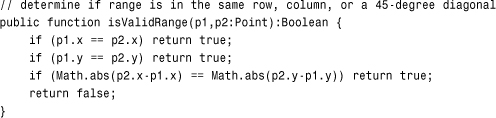
To determine whether two points in the puzzle make up a valid range, we perform three tests. If they are both on the same row or column, the range is valid. The third test looks at the x and y difference. If they are equal, regardless of being positive or negative, the selection is a 45-degree diagonal:
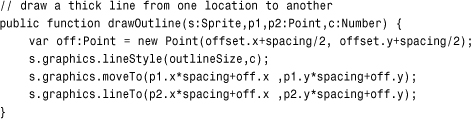
Drawing an outline behind the letters should be one of the more challenging aspects of this game. But sometimes you get lucky. Thanks to the rounded ends that are the default for lines, we can simply draw a line from one location to the other, make it nice and thick, and end up with a great-looking outline.
Note that some compensation is needed to place the ends of the line in the center of the letters. The locations of the letters corresponds to the upper left of the TextField, and thus the Sprite of the letters. So, half the spacing constant is added to compensate:
Dealing with Found Words
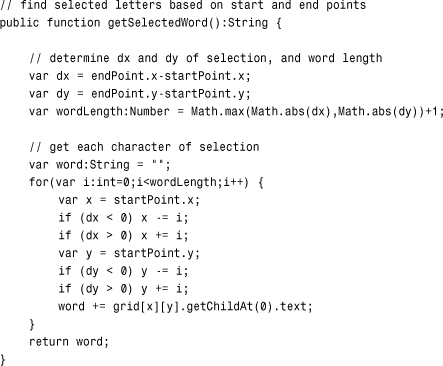
When players finish a selection, the first thing that happens is a word must be created from the letters in their selection. To do this, we’ll determine the dx and dy between the two points, which helps us pick the letters from the grid.
Starting from the startPoint, we’ll move one letter at a time. If the dx value is positive, each step means moving over one column to the right. If negative, it means a step to the left. Same for dy and up and down. This will take us in any of the eight possible directions of a valid selection.
The end result is a string of letters, the same letters seen in the selection on screen:
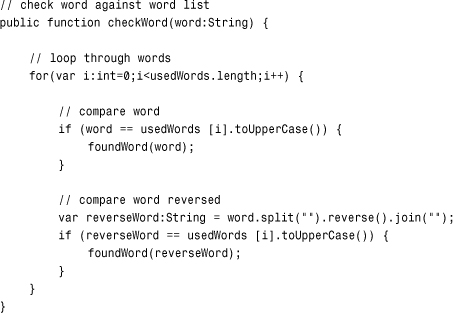
After we know the word the user thinks he has found, we can loop through the usedWords array and compare the found letters to the words. We must compare them both forward and backward. We don’t want to place the restriction on the players that they must select the first letter first, especially because we’ll be showing them some words reverse on the grid.
To reverse a word, a quick way to do it is to use split to convert the string to an array, then reverse to reverse the array, and then join to turn the array back into a string. Both split and join take "", a blank string, as the separator, because we want every character to be its own item in the array:
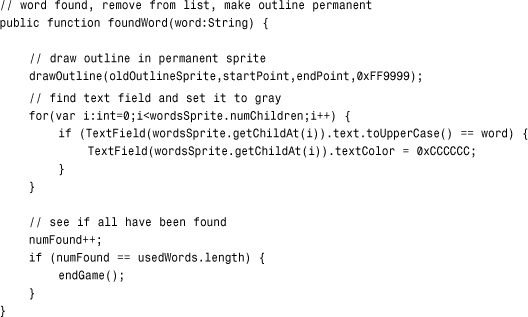
When a word is found, we want to permanently outline it and remove it from the list on the right.
The drawOutline function can draw the line on any Sprite. So, we’ll have it draw the line this time to oldOutlineSprite (using a lighter shade of red).
Then, we’ll loop through the TextField objects in wordsSprite and look at the text property of each. If this matches the word, the TextField’s color is changed to a light gray.
We’ll also increase numFound and call endGame if all the words have been found:
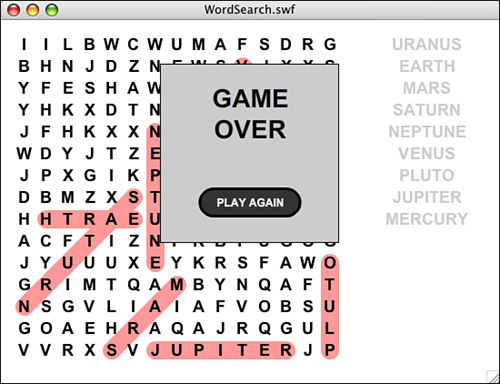
The endGame function simply takes the main timeline to "gameover". We don’t want to erase the game Sprites yet, but rather have them appear under the Game Over message and Play Again button.
To make these items stand out better, I’ve placed them on a solid rectangle. Otherwise, they would just blend in with the grid of letters (see Figure 9.6).
Figure 9.6 The rectangle helps the “Game Over” text and button stand out.
![]()
The Play Again button will call cleanUp, as well as go to the play frame to restart the game. Because we stored all our Sprites in the single gameSprite Sprite, we can just get rid of that and clear the grid to clean up:
Modifying the Game
Players’ interest in this game may be strongly related to their interest in the words. You can create a puzzle for any subject. All it takes is a comma-separated word list.
In fact, you can use the technique from Chapter 2, “ActionScript Game Elements,” on including variables in the HTML code of a web page to pass in a short word list. Thus, a single word search game can be used on many pages of your site with a different word list.
You can also easily adjust the dimensions of the puzzle and the size and spacing of the letters. Doing so makes easier puzzles for children.
Another way to get word lists is to import them from external files. We’ll look at how to import external data in the next chapter.