
11. Action Games: Platform Games
A3GPU211_PlatformGame.zip
Side-scrolling games, also called platform games, first appeared in the early 1980s, and soon became the standard way to produce video games until 3D took over in the 1990s.
Side-scrolling platform games allow the player to control a character who is shown in side view. He can move left and right and usually can jump. As he moves off the screen to one side, the background scrolls to reveal more of the play area.
Note

Platform games almost always feature a jumping character. The most famous is, of course, Nintendo’s Mario. He appeared in dozens of games, from Donkey Kong to numerous adventures on Nintendo’s consoles.
In this chapter, we build a fairly simple side-scrolling platform game with a main character that can move left and right and can jump. There are walls, platforms, enemies, and items to collect.
Designing the Game
Before we begin programming, let’s think through all the aspects of the game. We need a hero, enemies, items, and a way to build levels.
Level Design
An important aspect of platform games is level design. Like the trivia game in the preceding chapter can’t exist without content, a platform game needs content, too. The content in this case is level design.
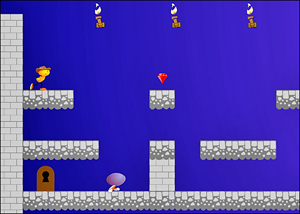
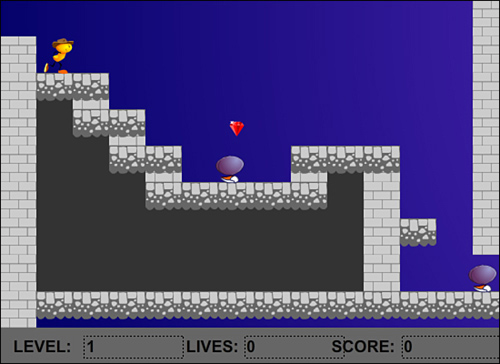
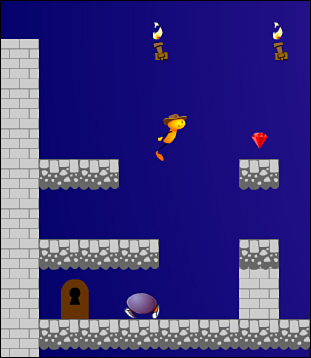
Someone—the programmer, an artist, or a level designer—needs to build levels. Figure 11.1 shows such a level, in fact the first level for our game.
Figure 11.1 Level 1 of our platform game features three enemies, several treasures, a key, and a door.
More sophisticated platform games might also have a level editor. This would allow a level designer to create many different levels and try them out, while programmers and artists work on the rest of the game.
For our simple example, however, we design the levels right in Flash, by building a movie clip containing the various game pieces.
The movie PlatformGame.fla contains various game pieces in its library. Here is a list:
• Floor—A simple 40×40 block that the hero can stand on. It blocks the hero on the left and right side.
• Wall—Identical to the floor in use, but visually different.
• Hero—The player’s character. Includes stand, walk, jump, and die animations.
• Enemy—A simpler character with a walk animation.
• Treasure—A simple jewel with animated sparkles.
• Key—A simple key graphic.
• Door—A door with an open animation.
To create a level from these objects, they simply need to be dragged around and placed within a movie clip.
Figure 11.1 showed such a movie clip. It is the movie clip gamelevel1 in the library of the movie PlatformGame.fla.
Wall and Floor Pieces
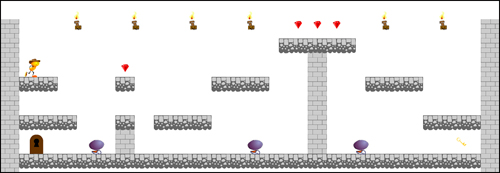
To make it easy to build this level, I set a grid up using View, Grid, Edit Grid set to 40 by 40. Then, I drag floor and wall pieces from the library and place them along this grid.
Figure 11.2 shows the level with the background hidden so you can see the grid marks.
Figure 11.2 Placing the wall and floor pieces along the grid makes it much easier to set up a level.

The wall and floor pieces in this game differ visually, but both are seen as the same type of object in the code. You can add more “building block” pieces like this to make the game more diverse.
Note
An idea not used in this game is to have many different versions of the wall and floor blocks, all stored in different frames of the movie clip. Then, at the start of the game, a random frame is chosen for each block.
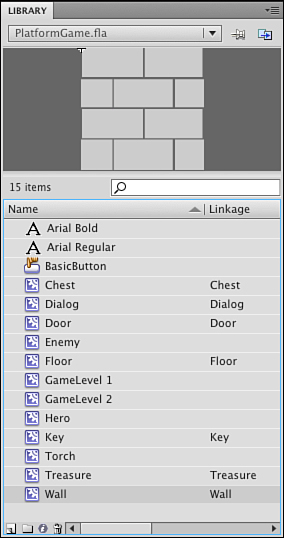
The walls and floor don’t need to be named anything special. However, the library elements have linkage names in the library, as you can see in Figure 11.3. This is vitally important because our code is looking for Floor and Wall objects.
Figure 11.3 The library has many game elements with linkage names that are needed so our code can refer to those classes.
The Hero and Enemies
The hero is seen in Figures 11.1 and 11.2 at the upper left. He has been placed carefully so that he is standing right on a Floor block.
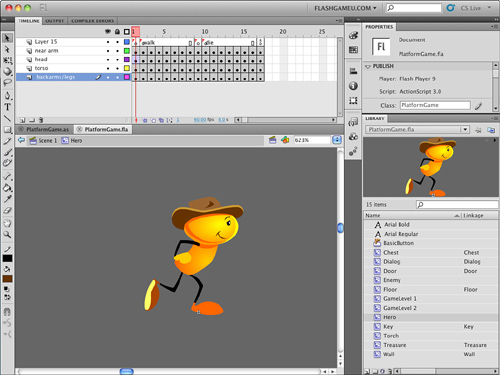
The hero’s movie clip has several different animated sections. Take a look at Figure 11.4.
Figure 11.4 The hero has frames for stand, walk, jump, and die.
Notice that the registration point for the movie clip rests at the bottom of the character’s feet. We matching this with the top of the Floor piece that the character is resting on. Horizontally, the character is centered.
When placing the hero, you want the y position to match the y position of the Floor right underneath him. This way, the hero starts off standing. If you place him above a Floor block, he starts by falling onto the Floor. This is another way to go, as you might envision the character falling into the scene.
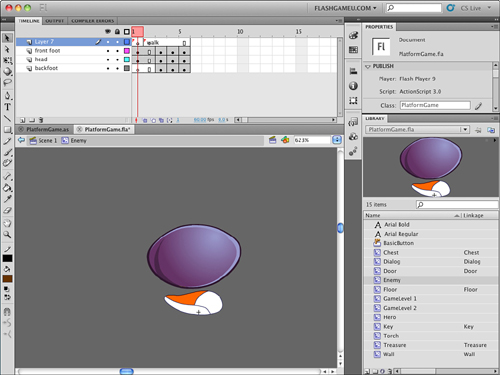
The enemy is a similar movie clip, but with just a stand and walk sequence. Figure 11.5 shows him. Note that the registration point for the enemy is also at the bottom of his foot.
Figure 11.5 The enemy character has just stand and walk labels.
These little guys are designed to be jumped on. In fact, that’s how the hero gets rid of them. So, they are short and squat. We don’t need a “die” sequence because we remove them from the screen the instant that they are destroyed and use the PointBurst from Chapter 8, “Casual Games: Match Three and Collapsing Blocks,” to show a message in their place.
The enemies should also be placed directly matching a Floor piece. If not, they drop down to the next Floor, which works out fine if that is how you want them to start.
The enemies also need to have instance names. The three shown in the Figures 11.1 and 11.2 are named enemy1, enemy2, and enemy3.
Another thing about enemies: They will be programmed to walk back and forth, turning around when they hit walls. So, you should place them in an area with walls on both sides. If they have a drop off to one side, they will fall down that drop off at the first opportunity. They will keep dropping down every time they get the opportunity, until they stabilize going back and forth in an area with walls on either end.
Treasures and Items
In Figures 11.1 and 11.2, you can see various other objects. The ruby-looking items are treasures that can be obtained for points. There is nothing remarkable about the Treasure movie clip, other than the fact that it has many frames to accommodate a looping sparkle animation. This does not affect the game in any way; it is just for visual interest.
Note
If you want more than one type of treasure, the easy way to accomplish it is to place several treasures, one per frame, in that one movie clip. Otherwise, you must create a variety of different objects, such as Diamond, Coin, TheOneTrueRing, and so on. Then, you need to look for each one in the code.
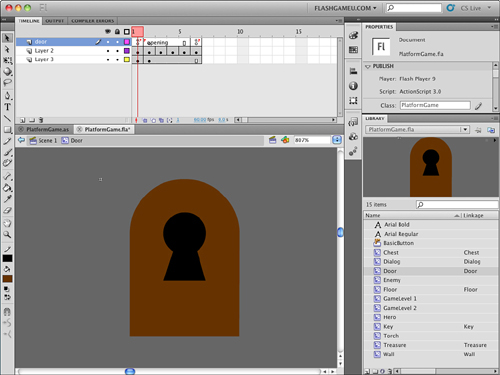
The Key and Door movie clips are similar. The Key has some frames for animation only. The Door, on the other hand, has an “open” sequence starting on frame 2. Figure 11.6 shows this movie clip.
Figure 11.6 The Door movie clip has a static frame 1, and then a short animated sequence of it opening.
The items don’t need to be placed perfectly on the grid. They just need to be put in reach of the hero as he walks by, or in other cases, jumps. It does help visually if the door is resting on the ground, however.
Note
Pay attention to the layering of your game elements. This is maintained while the game is being played. For instance, if the hero is behind a wall or other object, the wall appears in front of the hero graphic when the hero is close to it.
On the other hand, you can have objects appear in front of the player, like a semitransparent pane of glass or a small piece of furniture.
The Treasure, Key, and Door movie clips are all set up with linkage names as we saw in Figure 11.3. Our code is looking for them by class. The movie clip instances themselves don’t need to have any names.
One other item in the game is the Chest. This is a two-frame movie clip of a treasure chest closed, then open. It is the object of the player’s quest, and the game ends when the player finds it.
Background Art
The game levels also include a layer in the movie clip with background art. In this case, it is a shaded gradient rectangle. However, there could be more. Anything you add to the background is visible, but not yet active.
So, you can color in the scene however you want. There can be pictures hanging on the walls, animated torches, messages, and signs.
Figures 11.1 and 11.2 show torches hanging up high at the top. These are placed on the same background layer as the gradient. Our game code doesn’t even need to acknowledge these because they scroll along with the background.
The Dialog Box
This movie includes a dialog box that we can bring up at any time to convey some information to players and await their input. You can see the dialog box movie clip in Figure 11.7.
Figure 11.7 The Dialog movie clip is used to wait for the player to click a button before continuing.
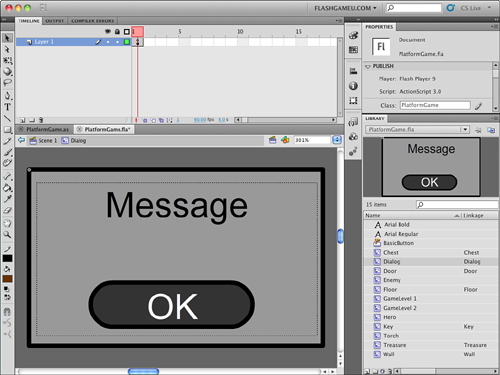
The dialog box is displayed when the player dies, the game is over, a level is complete, or the player wins. When any of these events happen, the game halts and a dialog box displays. We include the dialog box as a separate movie clip, complete with a dynamic text field and a button.
The Main Timeline
The main timeline features a “start” frame with instructions. After that, each frame contains one game level movie clip. This makes it easy to jump from level to level, both while the game is playing and while you are creating the levels.
The second frame contains GameLevel1, which has an instance name of simply gamelevel. The third frame contains GameLevel2, which also has an instance name of gamelevel.
When the ActionScript executes, it looks for the movie clip with the instance name gamelevel on the current frame. This enables us to place different game level movie clips on different frames.
On the game level frames, we have three dynamic text fields: one for the level, one for the number of lives remaining, and one for the score. Figure 11.8 shows what the screen looks like after the game begins.
Figure 11.8 There are three text fields at the bottom of the screen.
Designing the Class
The class starts by examining the gamelevel movie clip. It loops through each of the children in this movie clip and figures out what it does and how it needs to be represented in the game class.
For instance, if a child is a Wall or Floor, it is added to an array of such objects. Then, when the characters move around, these objects are checked for collisions.
The hero and the enemies are also looked for. It is assumed that the hero has an instance name of hero, and the enemies are named enemy1, enemy2, and so on.
Note
To determine what type of object a movie clip is, we use the is operator. This operator compares the object type of a variable against an object type (for instance, (ThisThing is MyObject)).
The largest part of the code, by far, is the part that deals with movement. The hero can move left, right, and he can jump. But, he is also affected by gravity and can fall off of edges. He can collide with walls and be stopped and also collides with floors, which prevent him from falling through them.
The enemies do the same thing, except that their movements are not affected by the arrow keys, but they still follow the same rules as the hero.
Instead of having the hero and the enemies use different movement code, we have them share a single character movement function.
Horizontal scrolling is another movement factor. The hero and enemies move inside the gamelevel movie clip. If the hero’s relative position on the stage goes too far to the left or right, however, we move the entire gamelevel movie clip to make it scroll. The rest of the code can ignore this because nothing actually moves inside the gamelevel.
Planning Which Functions Are Needed
Before we begin programming, let’s take a look at all the functions that we use in the class and which ones rely on each other.
• startPlatformGame—Initializes the score and player lives.
• startGameLevel—Initializes the level, calling the next three functions:
• createHero—Creates the hero object, looking at the placement of the hero movie clip instance.
• addEnemies—Creates the enemy objects, looking at the enemyX movie clips.
• examineLevel—Looks for walls, floors, and other items in the gamelevel movie clip.
• keyDownFunction—Notes key presses by the user.
• keyUpFunction—Notes when the user is done pressing a key.
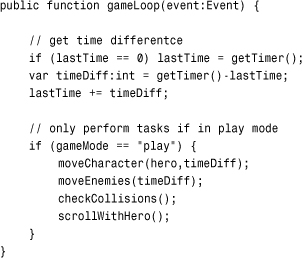
• gameLoop—Called every frame to calculate the time passed and then call the next four functions:
• moveEnemies—Loops through all enemies and moves them.
• moveCharacter—Moves the character.
• scrollWithHero—Scrolls the gamelevel movie clip depending on the location of the hero.
• checkCollisions—Checks to see whether the hero hit any enemies or items. Calls the next three functions:
• enemyDie—Enemy character is removed.
• heroDie—Hero loses a life, game possibly over.
• getObject—Hero gets an item.
• addScore—Adds points to the score, displays the score.
• showLives—Shows the number of lives left.
• levelComplete—Level is done, pause and display dialog.
• gameComplete—Treasure is found, pause and display dialog.
• clickDialogButton—Dialog button clicked, perform next action.
• cleanUp—Removes the gamelist to prepare for the next level.
Now that we know the functions we need to write, let’s build the PlatformGame.as class.
Building the Class
The package file is not particularly long, especially considering all that this game does. Because of that, we keep everything in one class, even though it can be useful for a larger game to have separate classes for characters, items, and fixed objects.
Class Definition
At the start of the class, we can see our standard import listing, including the flash.utils.getTimer that we need for time-based animation:
We need only a few constants. The first is gravity, and then also the distance to the edges of the screen is needed to start horizontal scrolling.
Note
The gravity constant is achieved through trial and error. Knowing that it can be multiplied by the number of milliseconds between steps, I start with a low fraction. Then, I adjust it after the game is complete, until the jump and fall behavior seem right.
When the gamelevel is scanned, all the objects found are placed in one of two arrays. The fixedObjects array holds references to any objects that the player can stand on or be blocked by. The otherObjects array holds items like the Key, Door, Chest, and Treasure:
![]()
The hero movie clip is already named “hero” and can be accessed through gamelevel.hero. But the hero object in our class holds that reference, and many other pieces of information about the hero character. Similarly, the enemies array holds a list of objects with information about each enemy:
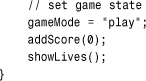
A number of variables are needed to keep track of the game state. We use playerObjects as an array to store objects that the player has picked up. The only one in the game is the Key, but we store it in an array anyway to pave the way for more objects to be added.
The gameMode is a string that helps convey to various functions what has happened to the hero. It starts with a value of "start" and then gets changed to "play" when the game is ready to go.
The gameScore and playerLives correspond to the number of points scored and the number of lives remaining for the player.
The lastTime variable holds the millisecond value of the last step of game animation. We use it to drive the time-based animation used by game elements:
Starting the Game and Level
When the game starts, we need to set some of the game state variables. This is done by calling the startPlatformGame function on the frame that contains the first game level. We have some other variables that need to be reset every level. Those are set when the startGameLevel is called on the next frame:
Figure 11.9 shows the game start screen with a button that the player must press to continue.
Figure 11.9 The start screen for the platform game.

The startGameLevel Function
The startGameLevel function is called on every frame that contains a gamelevel movie clip. It then delegates the tasks of finding and setting the hero, enemies, and game items:
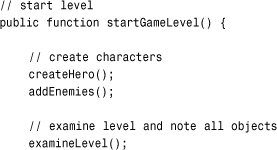
The startGameLevel function also sets up three event listeners. The first is the main gameLoop function, which executes each frame to push forward the animation. The other two are the keyboard event listeners we need to get player input:

Finally, the gameMode is set to "play", and two functions are called to set up the display of the score and lives. The score display is updated with a call to addScore, which adds a number of points to the score and updates the text field. If we add 0 points, it acts just like a display function:
The createHero Function
The hero movie clip is already in the gamelevel movie clip and ready to go. But, we need to set and use many properties, so we create a hero object in the class to store these properties:
![]()
The first property is a reference to the movie clip that is the visual representation of the hero. Now, we can refer to the hero as hero.mc rather than gamelevel.hero. This fits better when we are using the hero object for all our manipulations of the player’s character:
hero.mc = gamelevel.hero;
Next are two properties that describe the velocity of the hero:
hero.dx = 0.0;
hero.dy = 0.0;
The hero.inAir property is set to true when the hero is not resting on solid ground:
hero.inAir = false;
The hero.direction property is either −1 or 1, depending on the direction the hero is facing:
hero.direction = 1;
The hero.animstate property holds either "stand" or "walk". If it is "walk", we know that the character should be moving along its walk sequence. The frames in this sequence are stored in hero.walkAnimation. In this case, the walk sequence is on frames 2 through 8. To keep track of which step in the animation is currently showing, we use hero.animstep:
![]()
The hero.jump property is set to true when the player presses the spacebar. Similarly, the hero.moveLeft and hero.moveRight toggles between true and false depending on whether the arrow keys are pressed:
![]()
The next few properties are constants used to determine how high the character jumps and how fast the character walks:
hero.jumpSpeed = .8;
hero.walkSpeed = .15;
Note
These constants are also determined with trial and error. I start with educated guesses, such as the character should walk about 100 to 200 pixels per second. Then, I adjust as I built the game.
The hero.width and hero.height constants are used when determining collisions. Instead of using the actual width and height of the character, which varies depending on which frame of animation is shown, we use the following constants:
hero.width = 20.0;
hero.height = 40.0;
When the hero does have a collision, we reset him to his starting position in the level. So, we need to record this location for use at that point:
![]()
The addEnemies Function
The enemies are stored in objects that look just like the hero object. With the hero and enemy objects having the same properties, we can feed either one into the moveCharacter function.
The addEnemies function looks for a movie clip named enemy1 and adds it to the enemies array as an object. It then looks for enemy2 and so on.
One of the few differences between enemies and heroes is that enemies don’t need the startx and starty properties. Also, the enemy.moveRight property starts off as true, so the enemy starts by walking to the right:
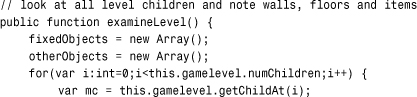
The examineLevel Function
After the hero and all the enemies have been found, the examineLevel function looks at all the children of the gamelevel movie clip:
If the object is a Floor or Wall, it is added to the fixedObjects array as an object with a reference to the movie clip, but it also has some other information. The locations of all four sides are stored in leftside, rightside, topside, and bottomside. We need quick access to these when determining collisions:
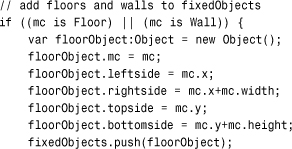
All other objects are added to the otherObjects array:
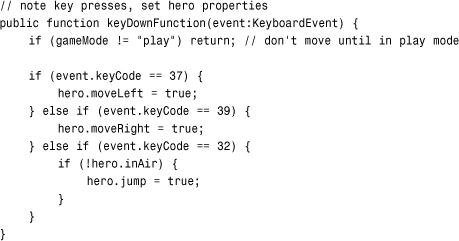
Keyboard Input
Accepting keyboard input works as it did in previous games, using the arrow keys. However, we directly set the moveLeft, moveRight, and jump properties of the hero. We only allow jump to go to true if the hero isn’t already in the air:
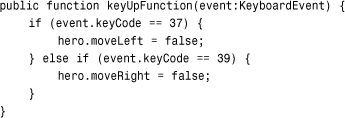
The keyUpFunction recognizes when the player releases the key and subsequently turns off the moveLeft and moveRight flags:
The Main Game Loop
Thanks to the EVENT_FRAME listener, the gameLoop function is called once per frame. It determines how many milliseconds have passed since the last time it was called.
If the gameMode is "play", it calls a variety of functions. First, it calls moveCharacter with the hero as the object. It also passes in the timeDiff to moveCharacter.
Next, it calls moveEnemies, which basically loops though the enemies and calls moveCharacter for each enemy.
The checkForCollisions function sees whether any enemies collide with the hero or if the hero gets an item.
Finally, the scrollWithHero keeps the gamelevel movie clip in pace with the hero’s position, if needed:
The moveEnemies function checks hitWallRight and hitWallLeft properties of each enemy. These are special properties assigned to a character object when it is processed by moveCharacter. We don’t use them with regard to the hero object, but we do for enemies.
When an enemy hits a wall, we reverse its direction:
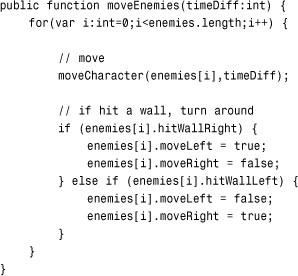
Note
It might be desirable for different enemies to have different behaviors. For instance, you could check to see whether the hero is to the left or the right of the enemy and only move in that direction. Or, you could check the distance between the hero and the enemy and only move if the hero is close.
Character Movement
Now it is time to examine the heart of the game: the moveCharacter function. It takes a character object, either the hero or an enemy, and stores it in char. It also takes the number of milliseconds that have elapsed and stores that in timeDiff:
public function moveCharacter(char:Object,timeDiff:Number) {
At the start of the game, the lastTime variable is initialized, and the resulting time difference is 0. A value of 0 does not play well with some of the velocity calculations, so we cut out of the function at this point if timeDiff is 0:
if (timeDiff < 1) return;
Note
If the timeDiff is 0, the verticalChange is 0. If the verticalChange is 0, the new vertical position and the old vertical position is the same, which makes it hard to tell whether the character is resting on the ground or hanging in mid-air.
The first thing we need to do is calculate vertical change due to gravity. Gravity is always acting on us, even when we are standing on the ground. We calculate what the change is to the character’s velocity and vertical position, based on the gravity constant and the amount of time that has passed.
To determine the amount of vertical change due to gravity in time based animation, we take the current vertical speed (char.dy) and multiply it by the timeDiff. This includes the up or down speed that the character currently has.
Then, we add the timeDiff times gravity to estimate the distance traveled since the last time vertical speed, dy, was updated.
Then, we change the vertical speed for future use by adding gravity*timeDiff:

Note
Notice that the verticalChange is limited to 15.0. This is what is known as terminal velocity. In real life, this happens when wind resistance counteracts the acceleration due to gravity and the object cannot fall any faster. We add this in here because if the character falls from a high distance, he accelerates quite a bit, and the effect doesn’t look quite right to the eye.
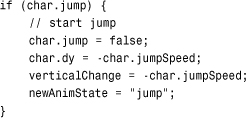
Before we look at left and right movement, we make some assumptions about what is going to happen. We assume that the animation state is "stand", and the new direction for the character is the same as the current direction. We also assume that there are no horizontal changes in position:
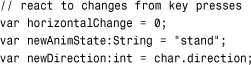
Then, we immediately test that assumption by looking at the char.moveLeft and char.moveRight properties. These can be set in the keyDownFunction if the player has either the left- or right-arrow key pressed.
If the left key is pressed, the horizontalChange is set to negative the char.walkSpeed*timeDiff. Also, newDirection is set to −1. If the right key is pressed, horizontalChange is set to positive char.walkSpeed*timeDiff, and the newDirection is set to 1. In either case, newAnimState is set to "walk":
The next thing we check for is char.jump, which is set to true when the player presses the spacebar. We immediately set that to false so that the action only occurs once per spacebar press.
Then, we change char.dy to a negative value of the char.jumpSpeed constant. This gives the character an upward push, which is the initial force of the jump.
We also set the newAnimState to "jump". Figure 11.10 shows the hero’s jump state.
Figure 11.10 Whenever the hero is in the air, it appears this way.
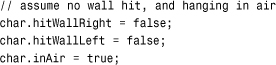
Now we are about to look at the fixedObjects in the scene to check for movement collisions. Before we do that, we assume that there is no left or right wall collision and that the character remains in the air:
We calculate the new vertical position of the character, based on the current position and the verticalChange set earlier:
// find new vertical position
var newY:Number = char.mc.y + verticalChange;
Now, we look at each fixed object and see whether any are right under the character’s feet. To do this, we first look to see whether the character is horizontally aligned with the object. If it is too far to the left or right, we don’t have to examine the object further.
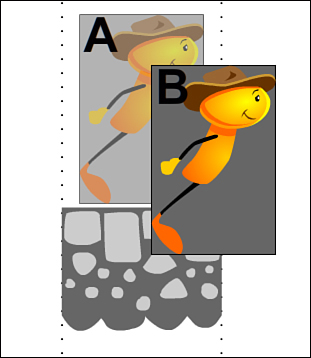
Figure 11.11 shows an example of this. Rectangle A shows the character in the current position, and rectangle B shows the character in a future position. You can see that the bottom of the character is on top of the floor in A and below the floor in B.
Figure 11.11 In one step, the character can pass through the floor if our code did not stop it.
Next, we see whether the character is currently above the object and whether its newY location is below it. This means that the character can normally pass through the object. Remember that the registration point for the characters is at the bottom of their feet, and the registration point for the walls and floors is at the top.
Instead of letting the character pass through the object, we stop it right on the object’s top surface. The char.dy property is set to 0, and the char.inAir property to false:
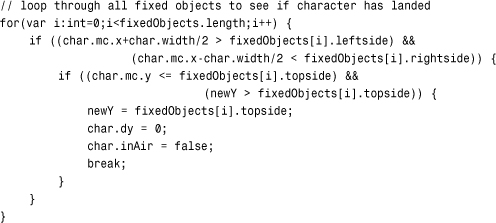
Note
While a character is resting on top of a Floor or Wall piece, this vertical test is being performed with each step, and with each step it results in the character remaining on top of the floor piece.
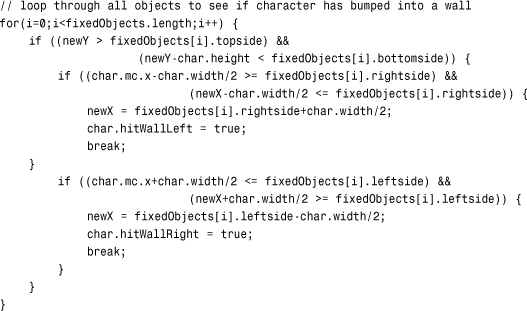
Next, we perform a similar test with the horizontal position. We create a newX variable with the new horizontal location, assuming no collisions:
// find new horizontal position
var newX:Number = char.mc.x + horizontalChange;
Now, we look at each Wall and Floor object and see whether any match up vertically. If they do, we see whether any are being crossed with the transition from the current position to the new one.
We need to look both to the left and right. If either test is true, the x position is set to match the wall exactly and char.hitWallLeft or char.hitWallRight is set to true:
Now we know the new position of the character, taking into account horizontal and vertical speed, gravity, and floor and wall collisions. We can set the location of the character:
![]()
The rest of the function deals with the appearance of the character. We check the char.inAir value; if it is true at this point, we need to set the newAnimState to "jump":

We are done changing the newAnimState. This variable started as "stand". Then, it changed to "walk" if either the left- or right-arrow key was pressed. It could also change to "jump" if the player presses the spacebar or if the character is in the air. Now, we set the animstate to the value of newAnimState:
char.animstate = newAnimState;
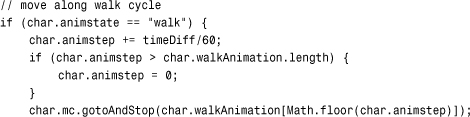
Next, we use the animstate to decide how the character should look. If the character is walking, the animstep is increased by a fraction of the timeDiff, and a check is made to see whether the animstep should loop back around to 0. Then, the frame of the character is set according to the frame specified in walkAnimation:
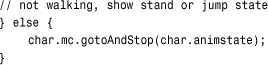
If the character is not walking, we set the frame to either "stand" or "jump" depending on the value of animstate:
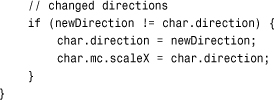
The last thing that moveCharacter needs to do is set the orientation of the character. The direction property is −1 for facing left and 1 for facing right. We populate it with the newDirection that was determined previously. Then, we set the scaleX property of the character.
Note
Setting the scaleX of a sprite or movie clip is a simple way to flip any object. However, if you have shadows or 3D perspective in the object’s graphics, you need to draw a separate version to face the other direction; otherwise, the flipped character does not look quite right.
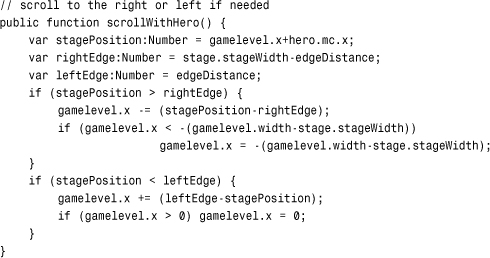
Scrolling the Game Level
Another function performed every frame is the scrollWithHero. This checks the position of the hero relative to the stage. The stagePosition is calculated by adding the gamelevel.x to the hero.mc.x. Then, we also get the rightEdge and leftEdge based on the edges of the screen, minus the edgeDistance constant. These are the points at which the screen begins to scroll if needed.
If the hero is past the rightEdge, the position of the gamelevel is moved the same distance to the left. However, if the gamelevel is too far to the left, it is restricted from moving so that the right end of the gamelevel is at the right side of the stage.
Likewise, if the hero is far enough to the left, the gamelevel movie clip moves to the right, but only far enough so that the side of gamelevel doesn’t move to the right of the left side of the screen:
Checking for Collisions
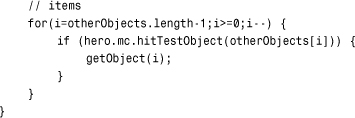
The checkCollisions function loops through all the enemies and then all the otherObjects. It uses a simple hitTestObject function per object to perform the collision tests.
If the hero and enemy collision occurs while the hero is in the air and traveling downward, the enemy is destroyed by calling enemyDie. However, if that is not the case, heroDie is called:

If the hero collides with an object in the otherObjects list, getObject is called with the number of the item in the list:
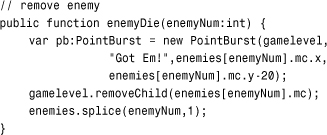
Enemy and Player Death
When an enemy object is destroyed, it is removed from the gamelevel movie clip and from the enemies list. That’s all it takes for it to disappear.
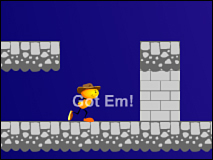
However, we throw in a special effect. By using the PointBurst class from Chapter 8, we can have some text appear at the location where the enemy is removed. In this case, the words Got Em! appear. Figure 11.12 shows the screen right after an enemy is destroyed.
Figure 11.12 The words Got Em! appear in the space where the enemy was and scale up and fade away quickly.
Note
To use the PointBurst class, you need to drag a copy of it into the same folder as the PlatformGame.fla and PlatformGame.as. You also need to add the Arial font to the PlatformGame.fla library and set it to Export with ActionScript.
When the player dies as a result of running into an enemy, we get the chance to bring up the dialog box that was created earlier.
To create the dialog, we need to create a new Dialog object and assign it to a temporary variable. Then, we set the x and y position and addChild to put it on the stage.
Next, we check the number of playerLives. If it is at 0, we set the dialog box text to Game Over! and the gameMode to "gameover". However, if there are still lives left, we subtract one and set the message to He Got You! and the gameMode to "dead".
The gameMode plays an important part in what happens when the player presses the button inside the dialog box:
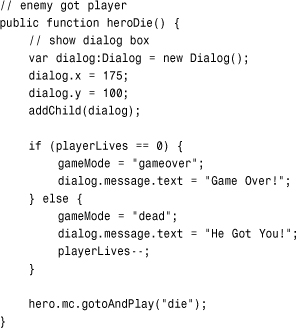
The last thing that the heroDie function does is to tell the hero movie clip to play from the frame die. This function begins an animation that shows the player falling down. There is a stop command at the end of the hero timeline so that the movie clip does not loop back around. Figure 11.13 shows the hero dead, and the dialog box displayed.
Figure 11.13 The hero is dead, and now the player must press the button to start a new life.

Collecting Points and Objects
When the player collides with an object in the otherObjects array, he either gets points, an inventory item, or the level ends.
If the object type is Treasure, the player gets 100 points. We use the PointBurst again here to show 100 at the location. Then, we remove the object from gamelevel and from otherObjects. We call the addScore function to add 100 points and update the score:
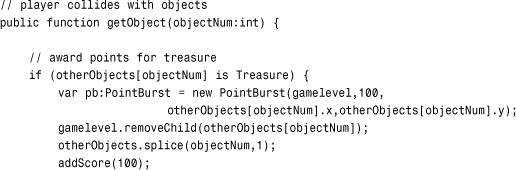
Note
One easy way to have different point values for different Treasures is to use the instance name of the Treasure. As the game stands, that is not being used by anything else. So, you could set one Treasure’s name to "100" and another to "200". Then, you could look at otherObjects[objectNum].name to assign a point value.
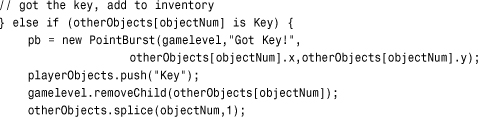
If the object is a Key, we use PointBurst to display the message Got Key! We add the string "Key" to the playerObjects array, which acts as an inventory. The object is then removed from gamelevel and otherObjects:
Another possibility is that the object is a Door. In this case, we check the playerObjects inventory to see whether "Key" is there. If the player has gotten the key, the door opens. We do this by telling the Door to play starting at frame open. Then, we call levelComplete, which displays a dialog box:
The final possibility is that the player has found the Chest. This signals the end of the second level, and the end of the player’s quest. This movie clip also has an open frame, although we use gotoAndStop because there is no animation there. Then, gameComplete is called:
Showing Player Status
Now it is time to look at some utility functions. These are called at various places in the game when needed. This first one adds a number of points to the gameScore, and then updates the scoreDisplay text field on the stage:
This next function places the value of playerLives into the text field livesDisplay:
Ending the Levels and the Game
The first level ends when the player gets the key and opens the door. The second level ends when the player finds the treasure chest. In either case, a Dialog object is created and placed in the center of the screen.
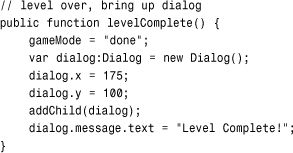
In the case of opening the door and completing level one, the dialog says Level Complete! and the gameMode is set to "done":
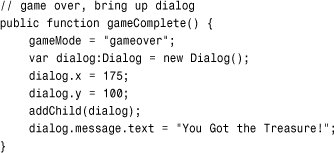
In the case of the end of level two, when the player finds the chest, the message reads You Got the Treasure! and gameMode is "gameover":
The Game Dialog Box
The dialog box appears when the player has died, completed a level, or completed the game. When the player presses the button in the dialog box, it calls the clickDialogButton function in the main class. Here is the code from inside the Dialog object:
okButton.addEventListener(MouseEvent.CLICK,MovieClip(parent).clickDialogButton);
The first thing the clickDialogButton function does is to remove the dialog itself:
![]()
The next thing it does depends on the value of gameMode. If the player is dead, the display of lives is updated, the hero is put back to the position it was in when the level started, and the gameMode is set back to "play" so that play can continue:

If the gameMode is "gameover", which happens if the player dies for the last time or if the player finds the treasure chest, the cleanUp function is called to remove the gamelevel movie clip, and the movie is sent back to the start:
![]()
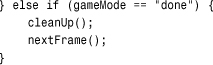
The other option is that the gameMode is "done". This means it is time to go to the next level. The cleanUp function is called again, and then the movie is sent to the next frame, where a new version of gamelevel awaits:
One last thing that must be done is to return the keyboard focus to the stage. The stage loses focus when the button is clicked. We want to make sure that arrow keys and the spacebar are routed back to the stage again:
![]()
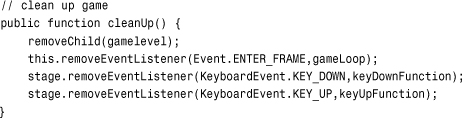
The cleanUp function that the clickDialogButton function calls removes the gamelevel, the listeners that are applied to the stage, and the ENTER_FRAME listener. These are re-created in startLevel if the player is to go on to the next level:
Modifying the Game
For this game to become something real and challenging, more levels with more elements need to be added. You can add as many levels as you want.
Right now, the first level ends when the key is in the inventory and the door is found. You probably want to alter the code to add other options, like a door that doesn’t need a key or a door that needs more than one.
Another feature that can make the game more interesting can be more ways to die. Right now, you can only die if an enemy touches you while you are not jumping. And, it is pretty easy to kill them off.
What if there are blocks or objects that could kill you, too? For instance, there could be pits of animated lava that you need to jump over perfectly to make it to a goal.
There could also be more animated hazards, like spears that shoot out of the walls. These can be just like enemies, but when they collide with the opposite wall, they “die.” Then, you could set a Timer to create a new spear at regular intervals.
The possibilities are literally endless. Although it is easy to make a creative and fun platform game, it is also easy to make a bad one. So, think carefully about your game design and test and tweak your design along the way.