
1. What iPhoto ’11 Is and What It Does
Learn why iPhoto ’11 is the perfect tool to view, organize, edit, enhance, print, share, and archive all your digital images, as well as create impressive photo projects.
iPhoto ’11 is an extremely powerful, robust, yet surprisingly intuitive software package that is part of Apple’s iLife suite of applications. It comes bundled with all iMacs and MacBooks and can be used to help you manage all aspects of digital photography.
iLife also includes powerful software for editing and sharing video (iMovie), producing music (GarageBand), and creating DVDs using your multimedia content (iDVD). It also provides tools for designing and publishing personal websites and sharing your multimedia creations (iWeb).
Using iPhoto ’11 focuses on the latest version of Apple’s iPhoto software. This chapter introduces you to the many uses of this software, which, like the Macs themselves, has evolved over the past few years. Each new version of iPhoto has added new features and functionality, plus has included major enhancements to existing features, giving you even more creative control over your digital photos.
Whether you consider yourself to be a serious photographer, or you’re someone who simply enjoys taking and sharing photos of your kids, pets, family members, and friends, you’re about to discover that iPhoto ’11 allows you to manipulate and share your digital images in many exciting new ways.
What iPhoto ’11 Can Do for You
Not long ago, if you wanted to take pictures, you needed a film-based camera. Each roll of film inserted into your camera allowed you to snap up to 36 images. When that roll of film was fully shot, it needed to be developed into negatives and then into 4" × 6" or 5" × 7" standard-size prints, for example. You could then share those prints with friends, insert them into an album, frame and display them, or store them in a shoebox.
Because the cost of film and having it developed was somewhat high, photographers were often reserved and highly selective when it came to snapping photos. Thanks to digital photography, however, there’s no film, no processing charges, and a typical memory card for a digital camera can store hundreds or even thousands of photos at a time. Using your digital camera, you may take as many photos as you’d like, allowing you to capture memories and share experiences with others in ways that were never before possible.
These days, you can purchase a really good-quality, point-and-shoot digital camera that’s chock full of features for just a few hundred dollars. These cameras allow you to shoot amazing images, in a wide range of situations. Just a few years ago, this capability was only possible using the most expensive and advanced professional-level equipment. With the right skills and editing tools, you can take eye-catching photos using any digital camera.
In fact, even cell phones and Smartphones, like the iPhone 4, are now equipped with good-quality digital cameras, allowing you to snap photos just about anywhere and immediately share them with friends and family using the wireless web.
You can transfer the digital photos you take to your computer to be viewed, organized, edited, enhanced, printed, shared, and archived. However, until recently, to accomplish each of these tasks required you to utilize multiple and totally separate software packages on your computer. Keeping track of your digital photos and editing them were confusing and time-consuming processes—but not anymore!
Today, Apple has made taking, managing, and sharing pictures a fun and easy process. Just about all the functionality you need to view, organize, edit, enhance, print, share, and archive all your digital images is offered in a single program, called iPhoto, and it comes bundled with every iMac and MacBook.
Although creativity is still useful for taking visually impressive and nicely composed photos, thanks to software like iPhoto ’11, you can edit and enhance your images after they’re shot to make them look even better. Plus, you can fix any mistakes you might have made while shooting.
By the time you’re done reading Using iPhoto ’11, you’ll know everything needed to vastly improve all your digital photos. You will be even prouder to share your photos with others and equally excited to look back on them in the future as you reminisce about your most cherished memories captured in photos.

TELL ME MORE Media 1.1—Why digital photography is so much better than traditional, film-based photography for amateurs and hobbyists
Access this audio recording through your registered Web Edition at http://www.quepublishing.com.
The Main Functions of iPhoto ’11
As you’re about to discover (if you haven’t already), iPhoto ’11 is one of the most robust applications available when it comes to viewing, organizing, editing, enhancing, printing, sharing, and archiving all your digital images, as well as for creating photo projects. Although most other applications for amateur photographers are designed to handle just one or two of these tasks, iPhoto ’11 easily handles just about everything related to digital picture taking, except actually snapping the photos...and it manages these tasks extremely well.
Let’s take a closer look at the primary uses of iPhoto ’11. Regardless of your photography skill level, you’ll find that this application is powerful, yet intuitive to use, especially when you compare it to other photo management and editing applications currently on the market.
![]() Chapter 5, “Taking Professional-Quality Photos,” and Chapter 6, “Overcoming Common Mistakes and Mishaps,” focus on how to take better photos using any digital camera and teach shooting techniques used by the pros. When you combine these skills with the editing and photo enhancement capabilities of iPhoto ’11, you’ll quickly discover a dramatic improvement in the overall quality of the photos you take.
Chapter 5, “Taking Professional-Quality Photos,” and Chapter 6, “Overcoming Common Mistakes and Mishaps,” focus on how to take better photos using any digital camera and teach shooting techniques used by the pros. When you combine these skills with the editing and photo enhancement capabilities of iPhoto ’11, you’ll quickly discover a dramatic improvement in the overall quality of the photos you take.
After shooting your pictures using any digital camera, you can easily transfer them from your camera to iPhoto ’11. Note that Chapter 3, “Loading Your Digital Images into iPhoto ’11,” focuses on the various ways you can transfer your digital images from your camera to your computer and load (import) them into iPhoto ’11, whereas this chapter offers an overview of what you can do with your images after they’ve been transferred.
Viewing Your Images
Chances are, your digital camera has a small LCD screen that you can use to preview the photos you shoot. To view your images in crisp detail, transfer them to your Mac and then view them using iPhoto ’11 (or the Preview application that also comes bundled with every Mac).
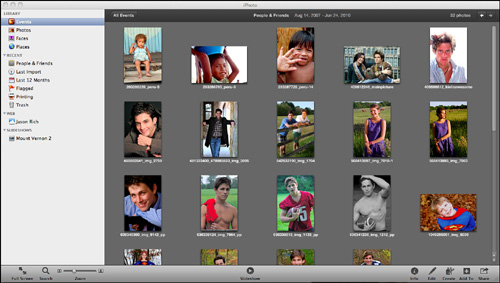
iPhoto ’11 offers multiple ways to view your images. You can preview many images at once on your screen by displaying thumbnails of your photos stored within Events or Albums, for example. Figure 1.1 shows thumbnails of multiple photos saved in one particular Event within iPhoto ’11.
Figure 1.1. You can view thumbnails of all images stored within an iPhoto ’11 Event.
![]() To learn more about Events, Albums, and other ways to organize your digital photos, be sure to read Chapter 4, “Organizing Your Photos.”
To learn more about Events, Albums, and other ways to organize your digital photos, be sure to read Chapter 4, “Organizing Your Photos.”
It’s possible to adjust the size of these thumbnails. If you choose a smaller size, you can display more image thumbnails at once on the screen. However, when you choose larger-size thumbnails, you see more detail in your images. You can control the size of the thumbnails being displayed on the iPhoto ’11 screen by using the Zoom slider that’s located in the lower-left corner of the main screen. Move the slider to the left to shrink the size of the viewable thumbnails or move it to the right to enlarge the thumbnail size displayed on the screen.
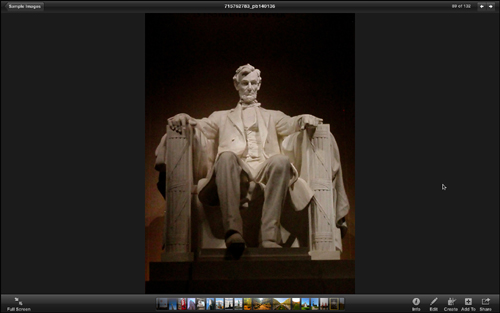
In addition to viewing thumbnails, you can view one image at a time that’s enlarged on iPhoto ’11’s main screen or while in full-screen mode. Simply double-click on any of the thumbnails. From the normal viewing mode (shown in Figure 1.2), you can switch to full-screen mode (shown in Figure 1.3) to see your image even larger on the screen. To do this, click on the Full Screen icon located in the lower-left corner of the main iPhoto screen.
Figure 1.2. View one image at a time in iPhoto ’11’s normal viewing mode.
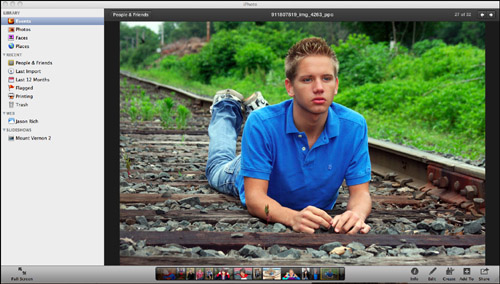
Figure 1.3. View one image at a time in iPhoto ’11’s new full-screen mode to see it even larger.
To return to the thumbnail view and see all the photos in an Event or Album, for example, click on the left-facing arrow icon, which displays the Event or Album name (Sample Images, in this case). It is located in the upper-left corner of the image display area.
It’s also possible to view groups of images together as an animated slideshow on your Mac’s screen or quickly create an online photo gallery or slideshow featuring groups of images that can be uploaded and published to an online-based service, such as Flickr, MobileMe, or Facebook.
![]() You learn how to create extremely impressive and professional-quality slideshows that feature your images in Chapter 15, “Creating and Sharing Slideshows.” Chapter 14, “Emailing or Publishing Your Photos Online,” and Chapter 16, “Using Apple’s MobileMe with iPhoto ’11,” explain how to create online-based photo galleries using the various online services.
You learn how to create extremely impressive and professional-quality slideshows that feature your images in Chapter 15, “Creating and Sharing Slideshows.” Chapter 14, “Emailing or Publishing Your Photos Online,” and Chapter 16, “Using Apple’s MobileMe with iPhoto ’11,” explain how to create online-based photo galleries using the various online services.
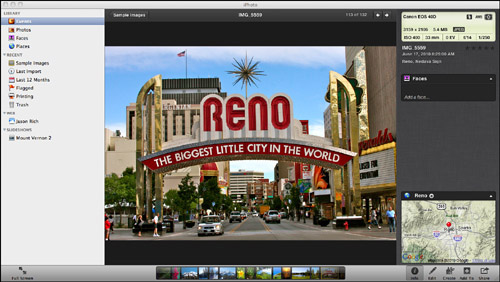
In iPhoto, when you view an image, you can display just the photo, or you can display detailed information pertaining to that photo. For example, you can open a single image within iPhoto ’11 and then click on the Info icon located in the lower-right corner of the screen (see Figure 1.4). This feature allows you to view information about the camera and lens used to shoot that particular image; plus, it shows details about the camera’s settings, size of the image file, file format the image is saved in, along with other pertinent data that iPhoto tracks in regard to each and every image you shoot.
Figure 1.4. Clicking on the Info icon when viewing a photo allows you to view a lot of detailed information about that particular image.
Note
If you’re interested in the technical aspects of photography, the data provided within the Info section that pertains to each of your images will be useful and highly relevant. For the average hobbyist, however, some of the technical details provided in this window will be of little interest or relevance, so ignore it.
Organizing All Your Digital Photos
Because many high-capacity camera memory cards can hold literally thousands of images each and you can always replace a full memory card with an empty one while you’re shooting, as a photographer, you are not limited to how many photos you can take at any given time. Thus, within a few days of shooting with a digital camera, you could take several hundred photos. Over a period of several months, you could wind up with thousands of images. After a few years, it’s common to acquire a collection of tens of thousands of images. As you can imagine, keeping them all organized can turn into quite a chore. Fortunately, iPhoto ’11 is up to the task.
Organizing Images by Filename
When your digital camera shoots a new photo, it automatically assigns a generic but sequential filename to it, such as IMG_1234.jpg. Keeping track of a few dozen images is easy, even if they all have similar filenames, such as IMG_1234.jpg, IMG_1235.jpg, and IMG_1236.jpg. However, finding a single photo you took last year at your office Christmas party could pose a challenge if you have thousands of similarly named photos that aren’t well organized, and these generic and numeric-based filenames in no way describe the photo’s content.
Using iPhoto ’11, you can keep the default filename given to each image or easily change it to something more descriptive, such as Close Up of Erica.jpg or Statue of Liberty – NYC.jpg. However, this can be a time-consuming process. Instead, you might want to change the filenames of just your favorite images to make locating them later a bit easier. How to do this is explained in Chapter 3.
Organizing Photos Within Events or Albums
To make the photo organization process on your computer much easier, iPhoto ’11 offers a handful of features that automatically separate your photos into individual Events. If you don’t like the Events iPhoto creates, you can create additional Events or Albums (which is explained shortly) on your own and manually sort your own images. You can then create a custom name for each Event.
To keep your images well organized, create separate Events every time you shoot new photos, and name your Events based on what types of photos are stored within them, such as “Winter 2011 Disney World Vacation” or “Visit to the Zoo.” Whenever you create a new Event or Album, iPhoto ’11 automatically tracks the dates each photo within it was shot.
Tip
You can save time by gathering together groups of related photos and storing each group in its own Event. This way, you don’t need to change each image’s filename to something descriptive because you know what types of photos are stored in each Event based on the descriptive title you’ve given to that Event.
Within each Event or Album, you can go through and manually customize the filename for each image and assign keywords, tags, or a full description to each image to help you identify and find it later. We’ll focus more on keywords and tags, and how they’re used to organize your photos, in a bit.
Tip
You can organize how Events are displayed on the screen based on their Name, Date, Rating, or Keyword, or you can manually position them in whatever order you choose. To adjust the arrangement of Events, click on Events in the Source List, access the View pull-down menu from the top of the iPhoto ’11 screen, and select the Sort Events command. Events can be rearranged anytime using this command.
iPhoto’s Face-Recognition Feature Identifies Who’s in Your Photos
Organizing dozens, hundreds, or thousands of individual images using separate Events and Albums is one approach. However, it’s not the only way to organize your photos using iPhoto ’11. The software also uses proprietary technology to perform automatic face recognition of your photos and then separates and categorizes each of them based on who appears within each image.
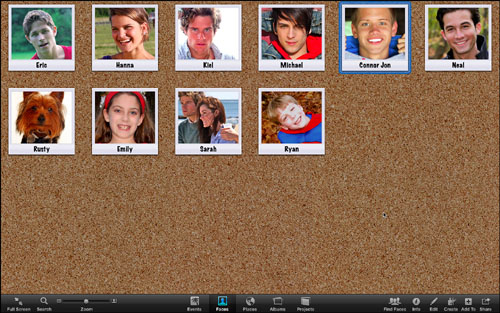
After you “teach” iPhoto ’11 who each person is in your photos just once, it remembers those faces and later groups all new photos together using iPhoto ’11’s advanced face-recognition functionality (see Figure 1.5).
Figure 1.5. iPhoto ’11 automatically sorts your photos and allows you to easily find specific images based on who appears within them.
![]() Faces requires an initial setup to use. How to do this is explained in Chapter 4, “Organizing Your Photos.” After this feature is set up, it works automatically in the background. In the future, when you click the Faces option within iPhoto, you’ll see groups of your photos sorted and displayed based on who appears within them.
Faces requires an initial setup to use. How to do this is explained in Chapter 4, “Organizing Your Photos.” After this feature is set up, it works automatically in the background. In the future, when you click the Faces option within iPhoto, you’ll see groups of your photos sorted and displayed based on who appears within them.
iPhoto ’11 allows you to organize and sort your digital photos by filename, date, keyword, description, or Event or Album in which they are placed. There are still several additional ways to organize your photos using this software, however.

SHOW ME Media 1.2—A preview of iPhoto ’11’s Faces face-recognition capabilities
Access this video file through your registered Web Edition at http://www.quepublishing.com.
Flagging, Tagging, and Rating Your Images
You can pick and choose your favorite photos and flag them for easy reference later (a feature discussed in Chapter 4), or you can rate your images and choose your absolute favorites (using a one- to five-star rating system). This feature is useful if you’ve just returned from your vacation and have several hundred new photos. As you review your images, you might really like 10 of them, which you decide to print or share with friends via email. You can give those 10 favorite photos a five-star rating or flag them for easy reference.
Tip
When viewing an image, you can rate it by accessing the Photos pull-down menu at the top of the iPhoto ’11 screen and then selecting the My Rating option. You can also click on the Info command icon located in the lower-right corner of the screen and then click on your desired Star Rating toward the top of the Photo Information window that appears on the right side of the iPhoto ’11 screen. A third way to rate a photo is to press the Command key + the number zero through five when viewing an image or when an image is highlighted in thumbnail mode.
Rating an Image, Tagging It, and Adding a Description
For each image you take that’s stored in iPhoto ’11, you can give it a personal rating, tag the image (with the names of the people in it), or add a text-based description. Here’s how:
- From within iPhoto ’11, choose the image you want to rate. Open and view that single image on the screen.
- To rate the image, access the Photos pull-down menu and select My Rating.
- Click on the number of stars you want to rate that image (between one and five, with five stars being your absolute favorite).
- To add a description of the photo, click on the Info command icon located in the lower-right corner of the screen. A new Information window appears on the right side of the main iPhoto screen. Move toward the top of this window. Beneath the image’s date, click on the Add a Description option. You can now type in a text-based description of that photo, which can include full sentences, keywords, or search phrases that will help you identify that photo later.
- To tag the photo with the names of the people featured within it, keep the Info screen open, but using the mouse (or touchpad), move the cursor to the main image viewing area of the iPhoto ’11 screen and place the cursor over each subject’s face. A white box appears. Click the mouse, and a Name field appears below the box. Type in the name of the person whose face is surrounded by the white box. Repeat this step for each person in the photo. Tagging a photo makes it easier for iPhoto’s Faces feature to identify who is in your pictures. Each time you shoot someone new, you need to identify that person using this method so iPhoto’s Faces feature can automatically use its face-recognition capabilities to identify him or her in the future.
![]() Photo tagging is covered in greater detail within Chapter 4, “Organizing Your Photos.”
Photo tagging is covered in greater detail within Chapter 4, “Organizing Your Photos.”
Organizing Photos Based on Where They’re Shot (Geographically)
Another cutting-edge way to organize your photos, especially if you vacation or travel extensively, is to use iPhoto 11’s Places feature. Many of the newer digital cameras and cell phones with built-in cameras keep track of exactly where each of your photos is shot geographically.
By combining geo-tagging associated with your pictures with the capabilities of Google Maps and iPhoto ’11’s Places feature (all of which work seamlessly together), you can view on a map exactly where each of your photos was shot and see the maps in a variety of formats.
When the Places feature is set up within iPhoto ’11, a process explained in greater detail in Chapter 4, you are able to organize and sort your photos based on where they were shot.
Tip
If your camera doesn’t offer geo-tagging of photos, which means it keeps track of exactly where geographically each photo is shot using GPS coordinates, you can add this useful feature to any digital camera with an Eye-Fi Geo X2 digital memory card offered by Eye-Fi, Inc. (Price: $69.99 for a 4GB memory card that stores up to 2,000 photos.) For more information about wireless geo-tagging memory cards for any digital camera, visit www.eye.fi.
Searching For and Locating Your Images
iPhoto ’11 allows you to sort, organize, and group together your images in many ways. How you ultimately organize your photos on your computer is entirely up to you. However, iPhoto ’11 makes the process straightforward by automatically dividing your images into Events based on when they were shot as they’re being imported into the iPhoto ’11 software.
![]() Chapter 4 covers how to combine (merge) Event folders, add new Event folders, or delete unwanted folders from within iPhoto ’11.
Chapter 4 covers how to combine (merge) Event folders, add new Event folders, or delete unwanted folders from within iPhoto ’11.
When you’re using iPhoto ’11, you can always locate a particular photo or group of photos you shot by searching based on an image’s filename, keyword, description, date shot, rating, location where it was taken, or person who appears within the photo using the software’s built-in Search feature.
On the main iPhoto ’11 screen, the Search command icon is located in the lower-left corner (see Figure 1.6).
Figure 1.6. Even if you have thousands of photos stored within iPhoto ’11, you can find a single image in seconds by using the powerful Search feature.

To search for a photo, click the Search command icon. When the Search field appears, enter the desired photo’s filename/title, description, date, keyword, or rating and then press Return. The results of your search are displayed in the form of photo thumbnails within the main viewing area of the iPhoto screen.
Another way to search for photos is to click on the Photos, Faces, or Places controls located on the left side of iPhoto’s main screen. When you click on Faces, for example, a corkboard screen appears with thumbnails of each person for which you have photos stored within iPhoto (refer to Figure 1.5). You can then look at all photos of that particular person.
Editing Your Photos to Achieve Professional-Looking Results
Even if you’re a professional photographer with the very best, state-of-the-art digital camera equipment, not every single one of your shots will turn out perfectly. When shooting, all photographers face many challenges, such as poor lighting, too much light, shadows, glare, the inability to hold the camera steady, or a fast-moving subject.
Many of the most basic point-and-shoot digital cameras are capable of helping you overcome common shooting obstacles, but the results are not always perfect. That’s when photo editing comes in handy. Using basic photo editing techniques, after a photo is shot and transferred to your Mac, you can quickly edit it using a variety of tools built into iPhoto ’11.
For example, using iPhoto’s powerful editing tools, you can rotate or crop images, automatically adjust the colorization and lighting within a photo with a single click of the mouse, fix red-eye, straighten a crooked image, or retouch images to remove unwanted elements (such as a blemish on someone’s face or something distracting from the photo’s background).
![]() How to use each of these editing features and a discussion of when and why you’d use them are the focus of Chapter 7, “Using iPhoto 11’s Simple Photo Editing Features.”
How to use each of these editing features and a discussion of when and why you’d use them are the focus of Chapter 7, “Using iPhoto 11’s Simple Photo Editing Features.”
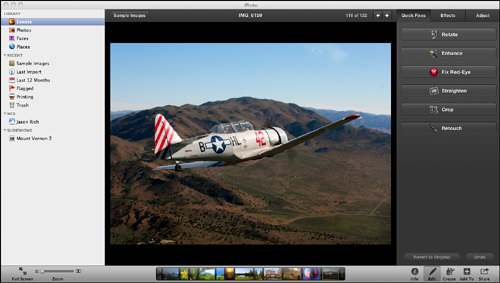
All these easy photo editing options can be found within the Quick Fixes window, which appears when you click the Edit command icon in the lower-right corner of the main iPhoto ’11 screen (see Figure 1.7).
Figure 1.7. One-click photo editing is easy with iPhoto ’11. You can quickly but dramatically improve the quality of an image plus fix common mistakes or mishaps that occurred when shooting.
Tip
Before you share or showcase your images, it’s a good idea to edit them to ensure that they look their absolute best. Even a few simple edits can dramatically improve the overall look and composition of any photo.
Using the features and functions found in the Quick Fixes window of iPhoto ’11, you can literally transform an image within seconds and vastly improve its overall appearance and quality.
After you become familiar with the Quick Fixes editing capabilities of iPhoto ’11, you can experiment with the more advanced and powerful editing features, which give you maximum control over many aspects of your photos’ appearance. You can find the advanced photo editing tools within iPhoto ’11 by clicking on the Edit command icon and then clicking on the Adjustments tab located at the top of the window that appears.
![]() Using a series of sliders, you can manually adjust an image’s exposure, contrast, saturation, definition, shadows, temperature, and tint. Plus, you can “de-noise” an image. How to use each of these more advanced editing techniques is explained, in detail, in Chapter 9, “Advanced Photo Editing with iPhoto ’11.” As you’ll discover, the result of using these tools on your images can be dramatic, allowing you to transform a basic image into a photograph that’s worth displaying or sharing.
Using a series of sliders, you can manually adjust an image’s exposure, contrast, saturation, definition, shadows, temperature, and tint. Plus, you can “de-noise” an image. How to use each of these more advanced editing techniques is explained, in detail, in Chapter 9, “Advanced Photo Editing with iPhoto ’11.” As you’ll discover, the result of using these tools on your images can be dramatic, allowing you to transform a basic image into a photograph that’s worth displaying or sharing.
Tip
Although you can use the Quick Fixes editing features to improve the quality of an image in seconds, plan on spending at least several minutes fine-tuning your images when you utilize the more advanced editing features offered within the Adjustments window.
SHOW ME Media 1.3—A preview of iPhoto ’11’s Quick Fixes features for editing digital photos
Access this video file through your registered Web Edition at http://www.quepublishing.com.
Enhancing Your Images to Make Them Stand Out
Typically, photographers choose to edit their digital images to make them look better or to fix a problem within the images. However, iPhoto ’11 allows you to go beyond just fixing problems. By clicking on the Edit command icon and then on the Effects tab, you can quickly add a wide range of visual effects to each of your images to either improve them visually or give them more of an artistic appearance. Using the Effects features built into iPhoto ’11, which are vastly improved over previous versions of the iPhoto software, you can significantly alter the appearance of a photo.
![]() You learn how to add special effects to your photos in Chapter 8, “Adding Effects to Your Images.” For example, with a few clicks of the mouse, you can transform a color image into black and white or dramatically boost the colors of an image to make it more vibrant.
You learn how to add special effects to your photos in Chapter 8, “Adding Effects to Your Images.” For example, with a few clicks of the mouse, you can transform a color image into black and white or dramatically boost the colors of an image to make it more vibrant.
Note
When you see the “before” and “after” pictures in Chapters 7, 8, and 9, you’ll see why editing and enhancing your photos before sharing, printing, or archiving them is a good idea, especially if you’re looking to achieve professional-quality results and want people to say “Wow!” when they look at your photos.
Printing Your Digital Photos in Many Different Sizes
Aside from viewing your digital photos on a computer’s screen, you can print images using any photo printer in a wide range of standard or nonstandard sizes. You can also use the printing features within iPhoto ’11 to add borders, digital mattes, and captions to your photos just before you print them.
Tip
Depending on the photo printer, type of photo paper, and ink you use, the prints you can create at home will be as professional looking as the prints you can have made using a traditional photo lab. However, when you print your photos at home using a photo printer, you can have the print, which will be suitable for framing or inclusion within a photo album or scrapbook, in your hands within minutes.
Using a photo printer and iPhoto ’11, you can choose to create prints in almost any size, from wallet-size photos to standard 4" × 6" or 5" × 7" prints. Creating 8" × 10" or 8.5" × 11" prints is just as easy. If you happen to have a wide-carriage photo printer, you can also create poster-size images (up to 13" × 19"). A good-quality photo printer can be purchased for under $200.
In addition to using iPhoto ’11 with a good-quality photo printer, from a company such as Kodak, HP, Canon, or Epson, you’ll want to use high-quality (four- or five-star rated) photo paper and choose between glossy, semi-gloss, matte, or luster paper finish.
![]() Learn more about choosing the best photo printer, photo paper, and ink and why this is important. These topics are covered in Chapter 11, “Printing Photos Using Your Own Home Photo Printer.”
Learn more about choosing the best photo printer, photo paper, and ink and why this is important. These topics are covered in Chapter 11, “Printing Photos Using Your Own Home Photo Printer.”
If you don’t want to invest in a full-color photo printer but still want professional-looking prints from within iPhoto ’11, you can order prints in specific sizes from a professional photo lab and have those prints shipped directly to your door within a few business days.
Apple has teamed up with professional photo lab services to offer the capability to conveniently order prints of your images via the Web, with a few clicks of the mouse, and without ever having to leave iPhoto ’11. (An Internet connection is required, however.)
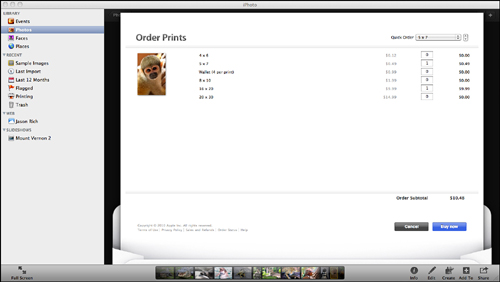
To order prints from a professional photo lab using iPhoto ’11, choose the images from which you want prints created, click on the Share command icon located in the lower-right corner of the screen, and then choose the Order Prints option.
From the Order Prints screen that appears (see Figure 1.8), choose the size of the prints you want created. The prices you’ll pay are reasonable, compared to one-hour photo labs across America; however, you are also responsible for shipping and handling charges associated with your order.
Figure 1.8. Order professional prints created from your images directly from within iPhoto ’11. There’s no need to export your images into another program.
Tip
You can order prints from any photo lab by exporting the images from which you want prints made; storing them on a CD, DVD, or thumb drive; and then taking them to a one-hour or professional photo lab in your area. You can also export your images to .JPG format and order prints from other photo labs online, but to do this, you need to exit iPhoto ’11 and use Safari to access a specific online photo service, such as Shutterfly.com, Snapfish.com, CVSPhoto.com, KodakGallery.com, SmugMug.com, or MPix.com.
![]() There are a handful of things to consider before having your photos professionally printed at a lab. Chapter 12, “Creating Prints Using a Professional Photo Lab,” focuses on using a professional lab or a local one-hour photo service to create prints from your digital images.
There are a handful of things to consider before having your photos professionally printed at a lab. Chapter 12, “Creating Prints Using a Professional Photo Lab,” focuses on using a professional lab or a local one-hour photo service to create prints from your digital images.
Sharing Your Photos with Friends, Family, and Coworkers with Ease
Creating prints is just one way of sharing your digital photos with your family, friends, and coworkers. Again, without leaving iPhoto ’11, you can share one or more images electronically via email or by uploading your photos to a free Flickr.com account, to a MobileMe gallery (annual membership required), or to Facebook.
Sharing photos electronically via email or by posting or publishing them on an online service is a fun way to share your photos with one person, a small group of people, or even the general public.
![]() Chapters 14, 15, 16, and 17 focus on various ways of sharing your favorite photos with others from within iPhoto ’11.
Chapters 14, 15, 16, and 17 focus on various ways of sharing your favorite photos with others from within iPhoto ’11.
Securely Archiving Your Images
Your digital photos will contain cherished memories and become important keepsakes that you’ll want to enjoy for many years to come. Although digital photos are electronic files that can’t fade or tear, like traditional prints, the hard drive they’re stored on can crash, get damaged, be stolen, or otherwise fail.
For all these reasons, it is absolutely essential that you create and maintain secure backups of your digital photos. Many backup and archiving options are available to you. For example, from within iPhoto ’11, you can burn your images to some form of external storage, such as CD or DVD, back them up to an external hard drive (either manually or automatically using the Mac’s Time Machine software), or you can use a remote online backup service.
Caution
Some online photo services and social networking sites, including Facebook, automatically shrink the resolution and file size of your digital images when they’re uploaded. Although this is fine for viewing purposes, it is not suitable for creating a reliable online-based archive or backup of your photos. If you use an online-based photo service to store and maintain backup copies of your images, make sure they remain in their original, high-resolution format.
![]() You learn about the various photo backup and archiving solutions available to you in Chapter 18, “Burning Photos to CD or DVD from iPhoto ’11,” and Chapter 19, “Photo Backup Solutions.”
You learn about the various photo backup and archiving solutions available to you in Chapter 18, “Burning Photos to CD or DVD from iPhoto ’11,” and Chapter 19, “Photo Backup Solutions.”
Be sure that you invest the time necessary to create and maintain at least one reliable backup of your digital images. If your computer crashes (and yes, Macs do crash occasionally), and your hard drive becomes corrupted or needs to be reformatted but you don’t have a backup of your photos, they could be lost forever. Or you might have to pay hundreds, perhaps thousands, of dollars to a data recovery service to retrieve your images from a damaged hard drive.
Tip
To ensure that your digital photos remain safe, consider maintaining a backup copy of them on an external hard drive that’s connected to your Mac. Plus, use an offsite, online-based remote backup service.
Creating Photo Projects Such as Greeting Cards and Photo Books
Sharing your photos by creating prints and distributing and publishing them online are two very viable options. However, iPhoto ’11 also enables you to tap your own creativity and create wonderful and unique photo projects and gifts using professional templates. These products can be created and ordered from within iPhoto ’11 and arrive at your door within a few days. (An Internet connection is required.)
For example, iPhoto ’11 allows you to create extremely impressive printed greeting cards (featuring your photos) suitable for any occasion, which also incorporate your own custom messages. The cards you create will look as professional as anything you’d buy at a greeting card store. However, your photo greeting cards will showcase your own photo(s) and have your own custom message imprinted within them.
Photo Books Can Replace the Need for Traditional Photo Albums and Scrapbooks
iPhoto ’11 has greatly enhanced the functionality for creating amazing-looking photo books. Instead of creating an old-fashioned photo album or scrapbook, you can create fully customized hard-cover or soft-cover photo books, using templates and design tools built into iPhoto ’11.
The photo books you can create using this software will look like books you purchased at a bookstore, except that all your own photos, captions, and design elements will be imprinted within them. Thanks to the latest digital printing technologies, photo books have dropped dramatically in price, and creating professional results has never been easier.
Tip
Although you can create impressive photo books from within iPhoto ’11 and use an Apple-authorized photo book printer to publish your books, an alternative is to download the free BookSmart photo book design software from Blurb.com (www.blurb.com) and use Blurb’s incredibly robust photo book design elements and printing services to create incredible results, even if you have no artistic skills whatsoever. Blurb offers different page templates and photo book designs than what’s built into iPhoto ’11. Blurb’s BookSmart software is, however, compatible with iPhoto ’11, so you can drag and drop photos from iPhoto into the BookSmart software without having to first export your images from iPhoto and then import them into BookSmart.
Note
One of the great features of iPhoto’s photo book creation tools, as well as all the tools available for creating other photo projects, is that you don’t need any artistic abilities whatsoever to create visually stunning results. The templates built into iPhoto ’11 are professionally designed. Although you can customize the templates and use your own creativity and artistic abilities, you don’t have to.
iPhoto ’11 Works Seamlessly with Other Mac Software
If you’re an avid Mac user, you’ll discover that the photos you store and edit within iPhoto ’11 can easily be dragged and dropped, cut and pasted, or exported into a wide range of other Mac applications, including all programs in the Microsoft Office suite and Apple’s iWork suite. You can also drag and drop photos from within iPhoto to the Mac’s Address Book application (that comes bundled with all Macs), as well as into many other third-party software packages.
You can even select your favorite photos stored within iPhoto ’11 and use them for your Mac’s Desktop Wallpaper or Screensaver. This can be done either from within iPhoto ’11 or by using the options available from Mac OS X’s System Preferences.
Tip
After selecting an image to use as your Desktop Wallpaper, from iPhoto 11’s Share pull-down menu, choose the Set Desktop command to instantly display that photo as your Mac’s main Desktop Wallpaper image.
Taking Advantage of as Much or as Little as You Need
Using iPhoto ’11 will help you become acquainted with just about everything you can do with iPhoto when it comes to viewing, organizing, editing, enhancing, printing, sharing, and archiving all your digital images. However, based on your own wants and needs when it comes to digital photography, you might discover that not all the features and functions built into this software are suitable for you.
iPhoto ’11 is designed so you can use whichever features and functions you want yet totally ignore whatever isn’t relevant to your needs. For example, you can use Events to organize all your photos but not utilize the Faces or Places functionality.
When you become better at snapping really good photos using your digital camera (after reading Chapters 5 and 6, for example), and you’ve discovered how to edit them using the features and functions built into iPhoto ’11, chances are you’ll be excited to share your creations with friends, family, and coworkers and want to showcase your images using the many different methods available to you using iPhoto ’11.
Digital photography is a fun and rewarding hobby. It’s a great way to express your creativity and capture important moments in your life (and in the lives of those around you) so you can reminisce later. It’s also a wonderful way to share memories with the people in your life who are important to you.
As you’ll soon discover, iPhoto is a powerful tool you can use to handle just about every task associated with digital photography, without getting bogged down with having to use complex, confusing, or highly technical software.