1. Preparing for Final Cut Pro X
This first chapter focuses on getting organized for editing and thinking about your workflow. A workflow is simply a fancy word for the process you follow to get something done. The better your planning and workflow, the more successful the outcome.
This chapter has two sections: getting your system ready for editing and then getting you ready for editing in Final Cut Pro X.
Getting Your System Ready to Edit
Since specifications change faster than I can update this book, the best place to go to learn the technical requirements for the latest version of Final Cut Pro X is the Apple website, at www.apple.com/finalcutpro/specs/.

Just to amplify what Apple has written, FCP X will use all the memory you have on your system. I recommend you install 8 GB of RAM, if your hardware supports that much. FCP X will use even more than that, but the improvement in speed may not be sufficiently offset by the cost of more RAM.
FCP X supports multiple processors. In fact, if you have a choice, more processors running at a slower speed will yield better performance than fewer processors running faster. (Weird, but true.)
Note: New Feature—GPU-acceleration
New with version 10.0.1, Apple harnessed the power of the graphics processing unit (GPU) to accelerate exports, in addition to supporting real-time playback. If you own a Mac Pro and are creating lots of projects that you need to export and post quickly, investing in a fast GPU is a good idea.
FCP X requires a minimum of Mac OS X 10.6.8 (and the new, full-screen editing option requires upgrading to Lion). You do not need to upgrade to Lion to run FCP X, though as Lion matures, upgrading your FCP X system will be a good idea.
The big issue with video editing is media storage. Over the course of your editing career, you will spend far more money buying storage hardware than computer gear. Far more.
So, I want to spend a little time, right at the beginning, making sure your system is ready to edit video problem-free.
It Isn’t the Amount of the Storage; It’s the Speed
Video editing requires two things: vast storage and fast data transfers between the computer and the hard disk.
The storage part we pretty much understand. The more gigabytes (GB) or terabytes (TB) your hard disk holds, the better. A terabyte is just a ridiculously vast amount of storage—a trillion times bigger than a single byte. (I find it truly depressing that my media seems to fill a terabyte of storage in virtually no time at all.)
Table 1.1 illustrates a few common video formats. The middle column shows how much storage one hour of media will require. The right column indicates the sustained speed (the data transfer rate) required for continuous, smooth playback of a single stream of media.
Table 1.1 Hard Disk Storage and Data Rate Requirements*
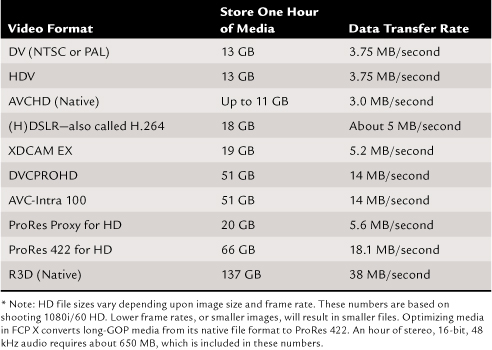
Table 1.1 is helpful for two reasons. First, it provides the ability to estimate how much storage your project is going to require. Second, it illustrates that different video formats require different speeds from your hard disk.
Planning Your Storage
The reason these storage sizes are so important is that for many video formats, FCP X gives you the option to “optimize” your media. In general, this is a good thing, because it provides better performance and improved image quality for effects. However, optimizing your long-GOP media means that Final Cut Pro will convert it (a process called transcoding) from its native format (the format shot by the camera) to ProRes 422. This transcoding process means that your storage requirements will increase.
Note: But Doesn’t Transcoding Take Time?
Yes, but you won’t notice. One of the real advantages to FCP X is that all this transcoding, rendering, importing, and file handling happens in the background. While you are busy working on your project, FCP is busy behind the scenes processing media.
For example, one hour of AVCHD media will take about 11 GB to store, plus another 66 GB when it is transcoded into ProRes 422. This transcoding is not bad; in fact, I recommend it. However, it does mean your hard disks will fill up more quickly than you might expect.
Another option in FCP X is to copy your media into a central storage location that Final Cut Pro tracks. For new editors, this is an excellent idea, because you don’t need to worry about keeping track of all your media.
However, this also increases your storage requirements.
Again, in the example, an hour of AVCHD stored on your hard disk takes 11 GB to store. First, FCP X copies it to the Final Cut Events folder. This takes another 11 GB. Then, FCP X transcodes it into ProRes 422. This takes another 66 GB. So, when FCP X is done, your media files have been backed up and transcoded, while your file storage has jumped from 11 GB to 88 GB. One of the benefits of this system, though, is that you now have three copies of your media. So, if something gets accidently deleted, you have backups you can use to restore the missing file.
A little later in this chapter, I’ll explain a system that you can use for storing and naming media—either from videotape or from media cards.
In any case, however, media takes a lot of storage space!
Adding More Storage
Although it is technically possible to edit video using only one drive (your boot, or start-up, drive), it is not a wise idea to do so. This is because your boot drive has many, many, many calls on its attentions: the operating system, Final Cut Pro, any background applications, all background processes, and then—dead last in priority—playing media.
The problem with this is that unless media plays smoothly, second after second and minute after minute, the rest of the editing system is useless.
By adding a second drive, specifically for media storage, not only do you provide a lot more storage for your media but you significantly improve the performance of your system by allowing your boot disk to concentrate on serving the needs of the operating system and Final Cut Pro X, while the second drive concentrates on storing and playing all media.
I use the phrase second drive, and most of the time, this drive will be external to your computer. However, for Mac Pro systems, a second drive can be an internal drive.
An internal drive on a Mac Pro will be faster than an external single drive connected via USB or FireWire 400. Recent FireWire 800 drives will be about as fast as an internal single Mac Pro drive.
Internal drives are cheaper than external drives. However, if something goes wrong with an internal drive, you lose access to your computer while you get the drive fixed. I recommend using external drives for your storage, even for Mac Pros.
Adding a second drive to your system is a wise investment and, with the prices of hard drives falling daily, not that expensive, either.
Why Not Use the Network?
Well, with the initial release of Final Cut Pro X, you couldn’t use the network. But the 10.0.1 update fixed that. This new upgrade added support for Xsan, Apple’s file-sharing system. These network features should work with any network file server provided the data transfer rate is fast enough from the server to the local computer to support media file transfers and provided the server supports user permissions and record locking, which OS X Server does.
Shared media on a server has always been supported by FCP X.
Note: How Fast Does My Network Need to Be?
Pretty darn fast. Apple recommends networks connected via Fibre Channel. At a minimum, you need Gigabit Ethernet. It all depends upon the video format you are using and how many users are on the network. The higher the data rate required by your media—see Table 1.1—the faster your network needs to be to support it.
With the new release, now Projects and Events can also be stored on a server. Media can be accessed by multiple users at the same time; however, Project and Event folders can be accessed by only one person at a time. In other words, multiple editors can now share the same Project; however, only one editor can be in that Project at the same time. FCP X provides a simple menu choice allowing editors to move Events and Projects into, or out of, the app as necessary.
For non-network setups, a second drive will still be necessary.
To RAID or Not to RAID?
RAIDs (Redundant Array of Inexpensive Drives/Devices/Disks—there’s a lot of debate on which is the correct word for the letter D) are the fastest, largest, and best storage systems for editing video. They are also the most expensive.
A RAID combines the speed and storage of multiple hard drives into a unit that connects via a single cable to your computer. There are many types of RAIDs, the most common of which are illustrated in Table 1.2.
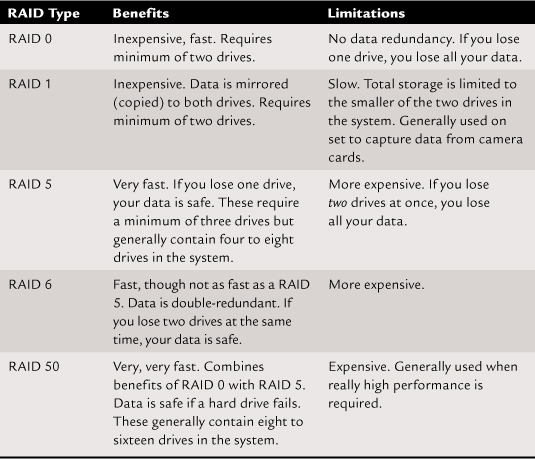
My recommendation is that if you are going to invest in a RAID, buy a RAID 5. They are worth the money and the peace of mind.
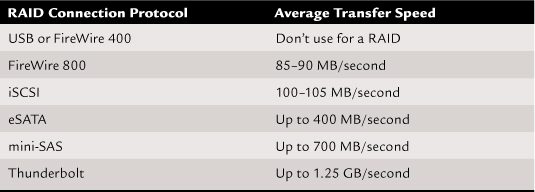
How you connect your RAID to your computer, just like connecting a hard drive, has a significant impact on the speed you’ll get from the system. Table 1.3 illustrates this. My recommendation is to use the fastest connection protocol your hardware supports.
Table 1.3 Connecting Hard Drives to Mac Computers
I recommend you connect three drives to your system: one for the operating system, one for Final Cut Pro’s media files, and one as your source media backup drive.
When it comes to your projects, buying more storage is a whole lot cheaper than going back to reshoot.
Why Use an Editing Workflow?

Well, the short answer is that a workflow keeps you organized and minimizes distractions. More importantly, as you turn to video editing to make a living, having a consistent, efficient workflow makes the difference between earning a living and losing your shirt.
As editors, all we have to sell is our time and our creativity. The more efficient we are with our time, the more projects we can tackle and the more money we can make. Or putting it another way, wasting time costs us money.
A workflow answers this key question: What should I be doing right now to be as efficient as possible? In thinking about this, I created a 12-step workflow for Final Cut Pro X that divides into two big sections: creating the story and polishing the story.
When you’re creating your story, the first thing you need to do is get organized and plan what you want to do. Then, gather your media into one spot, build your story in the Timeline, organize your story, and trim it.
Once you’ve completed the story part, you fine-tune it. You add transitions, add text and effects, polish the audio (audio repair and mixing), and adjust the color (color correction and grading). Then you export or share the finished project. At the end, and most importantly, you need to archive the project, because you don’t want to have it cluttering up your system forever. So, you have to figure out a way to store it for the long term.
Let’s take a closer look at these 12 steps, because this whole book is organized around this concept.
Step 1: Plan Twice, Cut Once
The first step is to plan. When I tell this to new editors, their faces fall, because the very first thing they want to do is get in and start cutting. Wrong. You have to think about the story you want to tell first.
You need to know your story and how to interpret it for your audience. Then, again, who is your audience? What do they expect? Who needs to see and approve your edits? What media or other files do you need? What footage will be shot? What footage do you need to buy? What footage do you need to create? What’s your budget? What are your exact deliverables? What’s your deadline? How much storage do you need? Do you need to buy any special gear or software? Who provides final approvals?
Take a deep breath at the beginning, and think through your whole process. Planning makes your life a whole lot easier, because you’ll discover it’s much simpler to solve a problem by avoiding it than trying to dig yourself out of that unexpected hole you just fell into.
This current chapter covers the initial planning process.
Step 2: Get Organized
The second step is to get organized. Figure out where you are going to store media. What are you going to name files and folders? Make sure you have enough storage. Copy the camera files from any card or external device to a locally attached hard drive or RAID. And remember, be sure to create backups.
In Final Cut Pro X, media, Event, render, and Project files can be stored either on a local hard disk, a RAID, or on a network server.
Personally, I’m of the “old school” and organize my files and folders in the Finder before starting editing. It helps me to think through the process. However, by default, Final Cut Pro X is designed to automatically organize your files for you by copying media from wherever it is stored in your system into the Event folder for editing.
Chapters 2 and 3 focus on getting organized.
Step 3: Import (and Track) Every Byte
The third step is to gather your media so you can edit it. Import your media directly from your camera, from a camera folder on your hard drive, or from an attached media device such as a card reader or a camera. Although you need to capture media stored on videotape directly from the camera in real time, for tapeless media you have more choices. My strong recommendation is that you copy tapeless media to a folder on your hard drive before you import. Then, import from that folder.
Final Cut Pro X does not support video capture from tape using timecode to determine the Start and End of a clip (the In and the Out). It only supports video streamed in real time from tape. Basically, you push the play button on your tape deck, and Final Cut Pro captures whatever audio and video flows in.
After you’ve imported your media, you need to label it so you can keep track of it. To do this, you’ll add ratings, keywords, and metadata. Properly filing your clips at the beginning makes them much easier to find later.
Chapter 4 discusses importing and managing media. Chapter 5 shows you how to use ratings, keywords, and metadata to track your media.
Step 4: Build Your Story
The fourth step is to build your story. When you plan, every show is perfect. Then, reality hits.
Your first pass through an edit should not be to make it perfect. Just get the pieces roughed in (which is why it is called a rough cut) so you can see what’s there, see what’s missing, and start to figure out where you need to go.
Building a story means previewing your clips, deciding which shot you want to use, selecting the portion of the shot you want to use, editing it to the Timeline, and then repeating over and over and over until your story is complete. Don’t be too fussy at this point. The goal is to quickly create an edit of your story and then refine it until you either get it perfect or run out of time. And don’t worry—you’ll always run out of time. That’s why being efficient is so important.
When you’re looking at video of a past family event, you generally don’t really want to edit it because each frame brings back too many memories. You look and say, “Wow, I remember that day” or “Oh, look how small they used to be!”
But for the rest of us who don’t know your family and don’t have that backstory, watching home movies is about the most mind-numbing thing I can imagine. Oftentimes, our family events don’t contain compelling content. Editing removes the dull parts so the audience gets interested in the characters and the story.
Chapter 6 illustrates how to edit your clips into a rough cut, and Chapter 9 amplifies this with specific techniques for audio.
Step 5: Organize Your Story
Once you have your story built, then you organize it. Where does your story actually begin? You’ll want to shuffle the clips. Delete the clips you don’t need. Add clips. Keep polishing the material until you get your story the way you want. The initial process of editing is the process of refining your story by making sure you have the right clips in the right order.
Chapter 7 shows how to select, organize, and delete clips in the Timeline; how to work with placeholders and gaps; how to use markers and To-Dos; and how to find things; plus an extended discussion of the new Roles feature.
Step 6: Trim Your Story
Trimming is the process of adjusting where two clips touch and ultimately makes the difference between an amateur movie and a professional one.
Trimming adjusts where two clips touch to smooth the transition between two clips. You want one shot to flow so seamlessly into the next shot so that they don’t even look edited. Sometimes I’ll spend a half hour making the perfect edit between two shots. It can look so good and flow so smoothly that no one notices all the hard work that was put into it.
Chapter 8 walks through all the trimming techniques in FCP X.
Step 7: Add Transitions
Once you have these first six steps done, your story is complete. The next six steps allow you to polish the story, principally by adding effects.
The seventh step is to add transitions. There are three types of transitions: cuts, dissolves, and wipes. You use cuts the most, dissolves second most, and wipes only when you’re forced, because wipes are most cool when they’re rarely used. Also, don’t spend time adding transitions until you have the order of your shots pretty much figured out.
Because you and I both know what’s going to happen.
You’re going to add this really cool transition. And you’re going to spend five or ten minutes tweaking it and making it exactly right. Then, you realize the first shot is not necessary. You delete the first shot. You’ve just wasted ten minutes putting that transition in. These are ten minutes you really can’t afford to waste.
Add transitions only after your shots are pretty much in the order you want.
Chapter 10 presents the different transition options in Final Cut Pro.
Step 8: Add Text and Other Effects
Effects will soak up every available minute of your time for any project, because you can tweak them forever. So, I recommend you start adding effects only after your story is complete, because there’s nothing worse than having your story half-edited, with great effects, and running out of time to edit the rest.
Just like there are three types of transitions, there are also three broad categories of effects. These are text effects, built-in effects, and clip effects. This book will discuss all of them.
Starting with Chapter 11, you’ll see a lot more about effects and learn how to incorporate them into your projects.
Step 9: Polish the Audio
Now, it’s not really called audio polish. Instead, editors call it audio editing and mixing, but I’m trying to stay with this polish analogy we’ve got going on here. When the story is complete and your effects are done, that’s the time to finish your audio.
Don’t get too hung up adjusting audio until you have all your shots in the right order and trimmed. The process of polishing your audio is doing things such as adding sound effects, adding music, adding filters, and setting audio levels.
The general rule of thumb is that you do your final audio mix after all of your editing is done, after all of your trimming is done, and after most of your effects are done. In other words, when the picture is locked.
Final Cut Pro can create both stereo and 5.1 surround audio mixes, which gives you plenty of room to make your project sound great.
Chapters 9 turns up the volume on audio.
Step 10: Color Correct and Grade
The tenth step is to create that final “look” for your project. When everything else is done, you create the final look for your project by adjusting the color of your clips. Now, this final color step has two parts. First is correcting for color problems. Overexposure, underexposure, when the camera is not white balanced...that kind of thing. And the second is to create a color grade or color look. Final Cut Pro X can do both.
In high-end productions, the audio mix and color grading both occur at the same time, using two different teams, and then both are integrated back into the final project for output. Final Cut Pro allows you to do both in the same application.
Chapter 16 highlights how to do color correction.
Step 11: Share Your Project
The second-to-last step is to export, what Apple calls sharing. To create your finished project, you share it.
Sharing is fast and easy and works with existing presets. Export creates a master file of your project, which you can then compress later. If you’re in a hurry to get something up to the Web, sharing is the best option. It’s faster and easier. Use exporting to create a high-quality master file or to save a still frame from your project.
Just as a note, Final Cut Pro X does not support outputting to tape, just outputting to a file. To output to tape, you would need to use hardware and software from companies such as AJA, Blackmagic Design, or Matrox.
Chapter 17 shows what you need to know about sharing or exporting your final project.
Step 12: Archive Your Project
The last step on any project is to archive it.
Archiving is the process of collecting all your assets and preserving them for the long term. Final Cut Pro X makes the process of collecting assets for final archiving easy. How you decide to archive them is up to you, though my current recommendation is LTO-5 tape.
LTO tape requires buying more gear, but it’s a lot more secure than long-term storage on a hard disk.
The whole reason behind creating a workflow is that it helps you be both creative and efficient, by focusing on the task you need to do right now. It helps you minimize spinning your wheels and wasting time.
This book is organized around these 12 steps. When you’re organized with a workflow, you can focus on the art and craft of storytelling, while Final Cut Pro X watches over the technical side of editing your video.
Summary
Time spent thinking about your project and getting organized is never wasted—even if you take only a few minutes to organize your thoughts.
But I also know you are anxious to get started. So, here’s the deal. The next chapter provides a quick guide to show you how to use Final Cut Pro X in the editing process. Then, the next four chapters go into far more detail so you can understand the why behind the process.
If you can’t wait to start, read Chapter 2 and then jump to Chapter 6. If you want to get your questions answered and really understand what Final Cut Pro is doing, start reading Chapter 3.
Or, you can just continue reading the whole book—there’s a lot to learn, regardless of which choice you make.
In any case, our planning is over—let’s get to work.