13. Mail
In This Chapter
 Mail is the iPad’s email app. You must be connected to the Internet (Wi-Fi or cellular signal) to send or receive mail. This chapter shows you how to:
• Set up email accounts
• Read mail
• Write, format, and send mail
• Change mail settings
Setting Up Email Accounts
To get your messages flowing into Mail, you must set up your email account settings so that Mail knows where to find your mailboxes on the Internet. If you’re using a dedicated email program like Microsoft Outlook or Apple Mail on your computer, you can copy your account settings to your iPad via iTunes. Otherwise, you can set up your accounts directly on your iPad.
If you use a Web-based email account such as Gmail, Yahoo, or Hotmail, you don’t really have to use Mail. You can open Safari, the iPad’s Web browser, and then log in to and use your account normally. Some bigger services, such as Google, have their own free mail apps in the App Store (see Chapter 5).
To sync mail accounts with iTunes on your computer
1. Connect your iPad to your computer via USB cable or Wi-Fi Sync.
2. In iTunes, click your iPad in the iTunes sidebar (on the left).
3. Click the Info tab and then set Sync Mail Accounts options.
Select only the accounts that you want to use on your iPad.
4. When you’re done, click Apply or Sync.
Your account settings—but not your computer-based messages—are copied to your iPad, where you can now check for mail.
To set up mail accounts on your iPad
1. Tap Settings > Mail, Contacts, Calendars > Add Account ![]() .
.

![]() The Add Account screen lists the most popular Web-based mail providers, as well as Microsoft Exchange (for work or school servers).
The Add Account screen lists the most popular Web-based mail providers, as well as Microsoft Exchange (for work or school servers).
2. Tap the icon for your mail provider, or tap Other if your provider isn’t listed.
3. Type your name, email address, password, and a brief description (Personal Gmail, for example).
If you tapped Other, see the Other Mail Accounts sidebar.
4. When you’re done, tap Save.
5. Repeat steps 1–4 if you have more than one account.
6. Open Mail to retrieve your messages ![]() .
.

![]() The Mailboxes screen in Mail shows your inboxes and accounts. If this screen isn’t visible, flick left to right.
The Mailboxes screen in Mail shows your inboxes and accounts. If this screen isn’t visible, flick left to right.
If you have more than one account, Mail shows a unified inbox, where you can see all your new messages for every account by tapping All Inboxes. You can still tap each inbox individually or tap an account name to see other mailboxes (Sent, Trash, Drafts, and so on).
To delete an unwanted account, tap Settings > Mail, Contacts, Calendars; tap the name of the target account in the Accounts section; and then tap Delete Account.
If you don’t see your mail provider listed in the Add Account screen ![]() , tap Other > Add Mail Account to set up a POP or IMAP mail account manually. Use the account settings provided by your ISP (Internet service provider), account administrator, or employer. These settings include your email address, your password, and the addresses of your provider’s incoming and outgoing mail servers (which look like mail.servername.com and smtp.servername.com, respectively).
, tap Other > Add Mail Account to set up a POP or IMAP mail account manually. Use the account settings provided by your ISP (Internet service provider), account administrator, or employer. These settings include your email address, your password, and the addresses of your provider’s incoming and outgoing mail servers (which look like mail.servername.com and smtp.servername.com, respectively).
Using Mail
Mail shows your mailboxes and accounts in a vertical list. Each message in the list shows the sender’s name, a time stamp, the email’s subject, and a two-line preview of the message.
In landscape (wide) view ![]() , the list appears automatically. In portrait (tall) view, flick right or left to show or hide the list. Tap the list items to navigate among your mailboxes. To return to the previous mailbox, tap the arrow button in the top-left corner of the list.
, the list appears automatically. In portrait (tall) view, flick right or left to show or hide the list. Tap the list items to navigate among your mailboxes. To return to the previous mailbox, tap the arrow button in the top-left corner of the list.
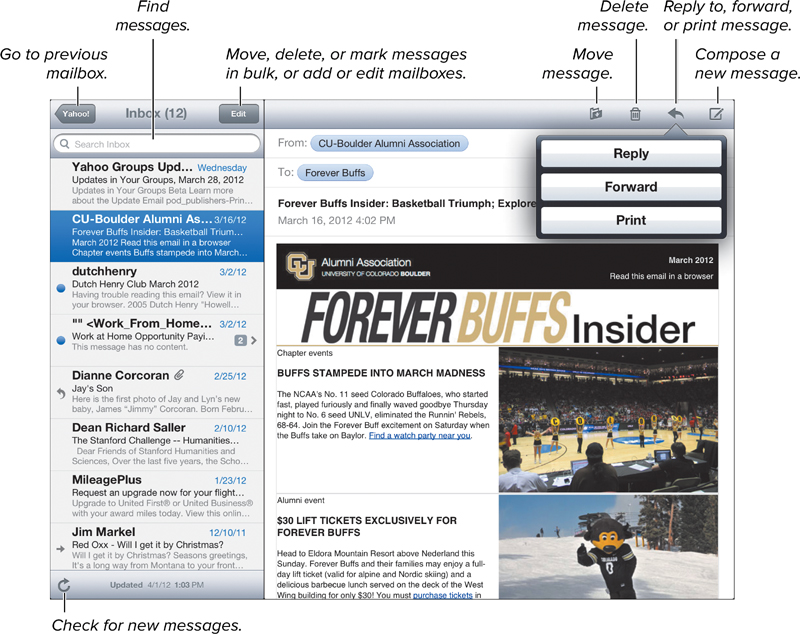
![]() Mail controls.
Mail controls.
In portrait view, ![]() and
and ![]() also appear at the top of the screen; tap these icons to view the previous or next message.
also appear at the top of the screen; tap these icons to view the previous or next message.
Here are some tips for using the mailbox list:
• Flick up or down to scroll the list.
• To find mail containing specific keywords, tap the Search field. You can search the To, From, and Subject fields and the body text of messages. Mail searches the downloaded messages in the current mailbox.
• A ![]() next to a message means you haven’t read it. A
next to a message means you haven’t read it. A ![]() means you’ve sent a reply. A
means you’ve sent a reply. A ![]() means you’ve forwarded it.
means you’ve forwarded it.
• A numbered gray icon ![]() on the right side of a message preview refers to the number of messages in that thread—a set of messages grouped because they all have the same Subject line.
on the right side of a message preview refers to the number of messages in that thread—a set of messages grouped because they all have the same Subject line.
• Tap a message in the list to open it, complete with headers (From, To, Subject, and more), text, and attachments.
• Flick a message title in the list to delete it.
Some providers, notably Gmail, turn the Delete button into an Archive button. A “deleted” message is actually moved to All Mail instead of Trash. If you prefer to delete to the trash, tap Settings > Mail, Contacts, Calendars; tap your account; and then turn off Archive Messages.
Reading Mail
You can read mail, open attachments, and use certain information in messages with other apps.
To read mail
1. Open Mail.
If you’re connected to the Internet, Mail checks all your email accounts and downloads any new messages.
2. In the Mailboxes list, navigate to the desired mailbox and then tap a message preview.
The message fills the screen (or most of it, in horizontal view ![]() ).
).
![]() Message controls.
Message controls.
3. Read the message.
If the message is long, flick to scroll it. To zip to the top of the message, tap the status bar at the top of the screen. Double-tap or pinch to zoom text and images.
4. When you’re done reading the message, you can open another one by tapping it in the list or by tapping the ![]() and
and ![]() buttons.
buttons.
To mark multiple messages at the same time, tap Edit in the Mailboxes list, tap the target messages to select them, and then tap Mark at the bottom of the list.
Viewing attached files
If an email message comes with files attached, Mail can display them. Mail supports
• Common photo and graphics formats (JPEG, PNG, GIF, and TIFF)
• Some audio formats (MP3, AAC, WAV, and AIFF)
• Some video formats (M4V, MP4, and MOV)
• PDF, RTF (Rich Text Format), and plain-text (.txt) files
• Web pages (.html and .htm files)
• vCard (.vcf) files, which you can add to Contacts (see Chapter 8)
• Microsoft Office files (Word, Excel, and PowerPoint)
• Apple iWork files (Pages, Numbers, and Keynote)
Photo attachments usually appear open and visible in the message. Other attachments typically appear as icons at the bottom of the message ![]() . Tap an attachment’s icon to preview it.
. Tap an attachment’s icon to preview it.
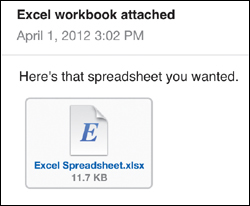
![]() Tap an attachment’s icon to open it in the iPad’s Quick Look previewer. In Quick Look, you can tap
Tap an attachment’s icon to open it in the iPad’s Quick Look previewer. In Quick Look, you can tap ![]() to open the attachment in a compatible app or print it.
to open the attachment in a compatible app or print it.
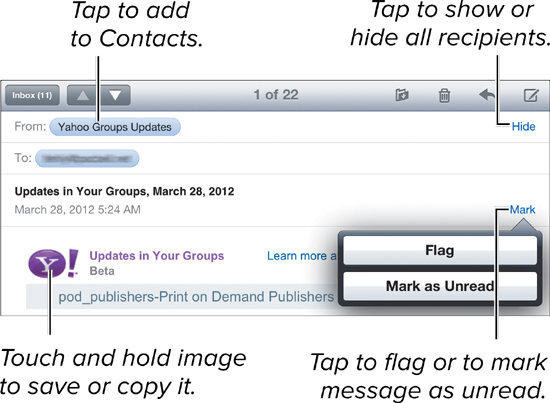
Using links and detected data
Mail recognizes dates, phone numbers, postal addresses, Web addresses, and certain other types of information in messages. If you see a bit of text underlined in blue, touch and hold that link to open a pop-up menu ![]() . Depending on the type of information the link represents, you can display a location in Maps, add info to Contacts, create an event in Calendar, open a Web page in Safari, copy text to the Clipboard, and more. Mail even recognizes phrases like dinner tomorrow.
. Depending on the type of information the link represents, you can display a location in Maps, add info to Contacts, create an event in Calendar, open a Web page in Safari, copy text to the Clipboard, and more. Mail even recognizes phrases like dinner tomorrow.
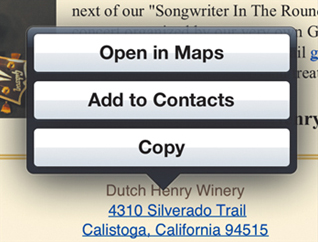
![]() Touch and hold a blue link in a message to see a pop-up menu of options.
Touch and hold a blue link in a message to see a pop-up menu of options.
Writing and Sending Mail
You can use Mail to send a message to anyone who has an email address.
To write and send a message
1. To start from scratch, tap ![]() at the top of the screen.
at the top of the screen.
or
To reply to (or forward) a message, tap ![]() at the top of the screen and then tap Reply, Reply All, or Forward.
at the top of the screen and then tap Reply, Reply All, or Forward.
Either way, Mail creates a new message ![]() .
.

![]() You can add message recipients from your Contacts list or type their email addresses manually.
You can add message recipients from your Contacts list or type their email addresses manually.
If you reply, files or photos attached to the original message aren’t sent back. To include attachments, forward instead of reply.
2. To add a recipient, tap the To field at the top of the message and then type the recipient’s email address.
If the recipient is in your Contacts list or if you’ve written to the person before, Mail autosuggests addresses as you type (which you can tap or ignore).
or
Tap ![]() to pop open your Contacts list and then tap the recipient’s name.
to pop open your Contacts list and then tap the recipient’s name.
3. If you want to send copies of the message to other people, tap the Cc (carbon copy) or Bcc (blind carbon copy) field and then fill it out as you did the To field.
or
Drag addresses between the fields.
Bcc recipients aren’t disclosed to the message’s other recipients. It’s common to use Bcc when you’re addressing many recipients or recipients who don’t necessarily know one another (members of a mailing list, for example).
4. If you have multiple mail accounts, tap the From field and then choose the account you want to send from.
5. Tap the Subject line and then type whatever this message is about.
If you’re replying to or forwarding a message, you can edit the existing subject.
6. Tap the message body area and then type your main text.
7. Format the message, if you want.
To add character formatting, select the text in question; tap ![]() in the pop-up menu; and then tap BIU to apply the bold, italic, or underline style. To increase or decrease the indentation (if you’re quoting a section from a previous message), tap Quote Level.
in the pop-up menu; and then tap BIU to apply the bold, italic, or underline style. To increase or decrease the indentation (if you’re quoting a section from a previous message), tap Quote Level.
8. When you’re done, tap Send in the top-right corner of the message, or tap Cancel to delete the message or save it as a draft for later.
To send a photo or video, open Photos or Videos, select the photo(s) or video(s), and then tap ![]() or Share. You can also copy and paste photos and videos into a message. To send contact information, open Contacts, select a contact, and then tap Share Contact in the contact’s Info screen.
or Share. You can also copy and paste photos and videos into a message. To send contact information, open Contacts, select a contact, and then tap Share Contact in the contact’s Info screen.
Changing Mail Settings
Mail comes with standard settings for the text size, default account, and more. If you don’t like what you see, tap Settings > Mail, Contacts, Calendars and then change any of the following settings in the Mail section ![]() :
:

![]() You can change Mail’s default settings here.
You can change Mail’s default settings here.
Show. Set the number of recent messages to show in a mailbox. To download additional messages, scroll to the bottom of the mailbox list and then tap the link.
Preview. Show more or fewer preview lines for each message in the list. These lines let you scan a list of messages in a mailbox and get an idea of what each message is about.
Minimum Font Size. Make message text larger or smaller for more comfortable reading.
Show To/Cc Label. Choose whether To and Cc labels appear in the preview list.
Ask Before Deleting. Choose whether you must confirm that you want to delete a message.
Load Remote Images. Choose whether remote images—images located on a server rather than embedded in the message—are displayed in messages. Spammers and advertisers tend to use remote images to reduce their bandwidth costs and find out whether you open their messages.
Organize By Thread. Choose whether messages with the same Subject line are grouped in the preview list. (Threaded messages are the ones with the ![]() icons.)
icons.)
Always Bcc Myself. Choose whether you get a copy of every message you send.
Increase Quote Level. Choose whether Mail indents sections of the original message when you reply.
Signature. Add an optional personalized tag to the bottom of each outgoing message. Typically, a signature is your name, title, contact info, or—if you must—a favorite quote or legal disclaimer.
Default Account. If you have multiple mail accounts, designate one as the default when you send a message from another app. When you send a photo from Photos or tap the email address of a business in Maps, for example, the message is sent from the default account. Note that you can still tap the From field to switch to a different account on a case-by-case basis.