Hour 18. Creating a Trial and Handling In-App Purchases
What You’ll Learn This Hour:
• Why having a trial mode is important for paid apps
• How to create a time-limited trial
• How to create a feature-limited trial
• How to handle in-app purchases
We have seen lots of functionality available from Windows 8. We can create free apps, but we also can create apps that make income from ads. We discuss how to use the Ad SDK during Hour 24, “Making Money with Windows Store Apps.” During this hour, we look at the other options, including paid apps and in-app purchases.
We discuss creating a time trial app that will not function after a certain number of days after it is installed. We look at the better trial mode model, in which we can disable certain features in trial mode. We also explore what it takes to have an app offer in-app purchases that provide functionality or content when a user purchases individual products or features.
Understanding the Value of Trial Modes
Microsoft does not force developers to use trial modes. Of course, we can have free apps, but even if we have paid apps, we can just publish them to the store without any sort of trial. This is allowed, but it isn’t ideal. Consumers want to know what they are getting before they click the Buy button. If they can’t try the app before they buy it, they will most likely not buy it. In fact, research done in 2011 in the Windows Phone Marketplace determined that apps with a trial mode had 70 times more downloads than apps without a trial. The research also showed that about 10 percent of those downloads were converted into sales. So just having a trial mode can bring in about seven times more sales. That’s a big number. If we sell 10,000 apps without a trial, we could have sold 70,000 with trials. Fortunately, creating a trial mode is not difficult, as we show in this hour.
Creating a Time-Limited Trial Mode App
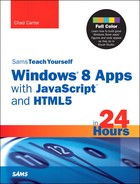
Creating a time-limited trial mode app is especially easy because it requires only that we select a value from a drop-down list when we submit the app to the Windows Store. (See Figure 18.1.)
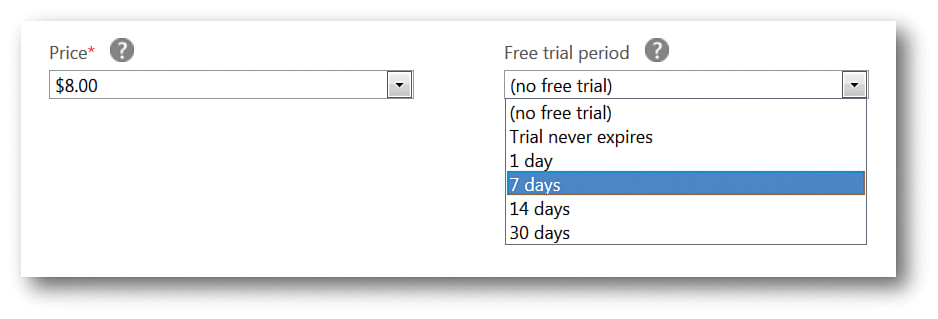
Figure 18.1. When submitting the app to the Windows Store, we can set a time trial mode with no code requirements.
Windows handles all the hard work if we go this route. This option is certainly better than offering no trial, but a featured-limited trial mode is better. The next section explores how it works.
If we simply wanted to handle an out-of-the-box time trial, we would be done. We have absolutely no code to write; we simply select the value from the drop-down list. We then let users know how may days they have before the trial mode will end and state that, after that period, they will no longer be able to use the app.
When the trial mode does end, Windows does not allow the app to launch unless the user buys the app. Microsoft handles all the licensing information and determines whether a user has purchased the app. The app is licensed to the user, which means that if the user goes to another machine, he can download the app to that machine free. Machine limits are in effect, so, for example, an entire college dormitory can’t use a single Microsoft account to purchase apps for every one of them. However, it is perfectly acceptable for a regular user to have the app installed on multiple devices at the same time.
Checking the License Information
Let’s see how to write code to determine how much time is left in the trial mode. Even if you have no interest in creating time trial applications, be sure to read this section—the rest of the hour builds on the knowledge here.
Try It Yourself: Checking the License Information Through Code
1. Inside the newly created TimeTrialExample project, we add the following HTML markup to the default.html page:
<div id="purchaseFlyout" data-win-control="WinJS.UI.Flyout">
<div>You only have <span data-win-bind="innerText:
STYWin.daysRemaining STYWin.daysRemainingConverter"></span>
days remaining in your trial.</div>
<div>Once the trial is over you will no longer be able to run the app.</div>
<div>As long as the app is installed, any data you created will be preserved
should you choose to purchase the app. If the app is uninstalled, all
data will be lost.</div>
<div>Would you like to buy the app now? It is only
<span data-win-bind="innerText: STYWin.price"></span>.</div>
<button id="btnBuy">Go to Windows Store</button>
</div>
2. We have created a WinJS.UI.Flyout control that contains several lines of text, along with a Go to Windows Store button. We have also done some data binding for the number of days remaining in the trial and the prices of the app.
3. We can add the following ready function to the bottom of the default.js file:
WinJS.Utilities.ready(function () {
var currentApp = Windows.ApplicationModel.Store.CurrentAppSimulator;
//var currentProduct = Windows.ApplicationModel.Store.CurrentApp;
var licenseInformation = currentApp.licenseInformation;
var isTrial = licenseInformation.isTrial;
var price;
currentApp.loadListingInformationAsync().then(function (listing) {
price = listing.formattedPrice;
});
var daysRemainingConverter = WinJS.Binding.converter(function (date) {
var singleDay = 1000 * 60 * 60 * 24;
var expiringDate = date.getTime();
var dateNow = Date.now();
var diff = (expiringDate - dateNow);
var daysLeft = Math.round(diff / singleDay);
return daysLeft.toString();
});
WinJS.Namespace.define("STYWin", {
daysRemaining: licenseInformation.expirationDate,
daysRemainingConverter: daysRemainingConverter,
isTrial: isTrial,
price: price,
currentApp: currentApp
});
});
4. We declare a variable called currentApp. Because we are working on this app and it hasn’t been deployed to the store, we can’t use the normal Windows.ApplicationModel.Store.CurrentApp object that we would use in production. Instead, we need to use the Windows.ApplicationModel.Store.CurrentAppSimulator object. Declaring this currentApp variable enables us to change the code in one place.
Next, we get the license information of the current app. The licensing information contains the expiration date, details on whether the app is active (has a valid license) and whether it is in trial mode, and a list of product licenses used for in-app purchases (we discuss this later in the hour in the section, “Allowing In-App Purchases”).
The LicenseInformation class also has the licensechanged event, which we can tie into to know whether the license has changed. Knowing that the trial period has expired can be beneficial. Windows won’t shut the app down, and although we could, we probably shouldn’t, either. A better approach might be to call setInterval and display a nag message every so often to ask the user to buy. If the user decides not to buy the app, upon exiting, he or she will not be able to run the app again until after purchasing a license through the Windows Store.
After getting license information, we assign the isTrial value of the license information to our own variable. Then we call loadListingInformationAsync to obtain the listing information of the app. Besides containing the formattedPrice, which we obtain, it contains the currentMarket (such as en-us), the description, the name, and the productListings. The productListings gets information about the features and products that can be bought through in-app purchases.
After setting the price, we declare the daysRemainingConverter function, which we use to convert the date passed in through data binding. Finally, we create a namespace where we expose the expiration date, converter function, isTrial, price, and currentApp.
5. We can replace the setPromise call inside the onactivated event handler to the following:
args.setPromise(WinJS.UI.processAll().then(function () {
WinJS.Binding.processAll();
if (STYWin.isTrial) {
var purchaseFlyout = document.getElementById("purchaseFlyout").winControl;
var btnBuy = document.getElementById("btnBuy");
btnBuy.addEventListener("click", function () {
//Do Buy function
STYWin.currentApp.requestAppPurchaseAsync(true).then(
function (receipt) {
},
function (err) {
});
}, false);
purchaseFlyout.show(document.querySelector("body"));
}
}));
6. After we instantiate the WinJS controls with the WinJS.UI.processAll function, we bind the data using WinJS.Binding.processAll in the promise. Then we check to see whether the game is in trial mode. If it is, we grab a reference to the flyout control and hook up the btnBuy click event. We then display the flyout. When the btnBuy button is clicked, we make a call out to the Windows Store API’s requestAppPurchaseAsync function. This function takes in a Boolean where we can specify that we want an XML document back that contains receipt information from the Windows Store. We don’t do anything if it succeeds or fails; we are only bringing up the reminder screen at launch anyway.
7. When we run the app, the information in the flyout tells us that the app costs $1.00 and won’t expire for many days.
8. If we click the Go to Windows Store button, we see a Win32 form with a drop-down list (see Figure 18.2). Clicking Cancel simulates the user clicking Cancel, or we can select a value from the drop-down list. The default of S_OK simulates the user buying the app when we click the Continue button. The other options simulate the error conditions that could occur: E_INVALIDARG, E_FAIL, and E_OUTOFMEMORY.
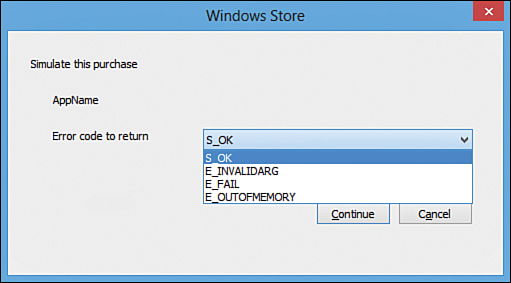
Figure 18.2. The Windows Store API provides a simulation for us to test apps in trial mode and simulate the purchasing process.
Working with WindowsStoreProxy.xml
To actually test different options available, we need to set the test information in the WindowsStoreProxy.xml file. By setting data in this file, we can specify whether the app is running in trial mode or whether it should simulate a fully functioning app. We can specify when the app expires and several other elements we will see along the way.
In the previous example, we saw that the user had many days until expiration. If we wanted to change that, we would do it in the WindowsStoreProxy.xml file. So the question becomes, “Where is this magical file?” It isn’t included in our solution. Instead, it exists where the app was deployed: <installation_folder>MicrosoftWindows StoreApiData. The full path for the file on my machine follows:
C:UsersChadAppDataLocalPackagesTimeTrialExample_qwnwt6twhqbv0LocalStateMicrosoftWindows StoreApiDataWindowsStoreProxy.xml
It is much better to have a single app with trial functionality than two separate apps where one is fully featured and the other is limited in functionality. If there is any customization or settings in an app, they would need to be set again if the user actually purchased the full-featured app. A single app with a feature-limited trial mode is the better approach.
Inside the file, we see data similar to the following:
<?xml version="1.0" encoding="utf-16" ?>
<CurrentApp>
<ListingInformation>
<App>
<AppId>00000000-0000-0000-0000-000000000000</AppId>
<LinkUri>
http://store.windows.microsoft.com/app/00000000-0000-0000-0000-000000000000
</LinkUri>
<CurrentMarket>en-US</CurrentMarket>
<AgeRating>3</AgeRating>
<MarketData xml:lang="en-us">
<Name>AppName</Name>
<Description>AppDescription</Description>
<Price>1.00</Price>
<CurrencySymbol>$</CurrencySymbol>
</MarketData>
</App>
<Product ProductId="1" LicenseDuration="0">
<MarketData xml:lang="en-us">
<Name>Product1Name</Name>
<Price>1.00</Price>
<CurrencySymbol>$</CurrencySymbol>
</MarketData>
</Product>
</ListingInformation>
<LicenseInformation>
<App>
<IsActive>true</IsActive>
<IsTrial>true</IsTrial>
</App>
<Product ProductId="1">
<IsActive>true</IsActive>
</Product>
</LicenseInformation>
</CurrentApp>
Figure 18.2 showed AppName in the Windows Store dialog box; it pulled that from this file. Let’s change the name to TimeTrialExample. Let’s also change the price from 1.00 to the real minimum price of 1.49. The only price that matters for our example is the first price under AppMarketData, but we can also change the one under ProductMarketData. The App element contains everything about the app; the Product element contains information about a particular product id or feature id our app might have for in-app purchases. Finally, let’s add the following element to the LicenseInformationApp tree. It should be a sibling of the IsActive and IsTrial elements:
<ExpirationDate>2012-08-18T05:00:00.00Z</ExpirationDate>
Set the actual date to a couple days in the future. Now if we rerun the TimeTrialExample, we see that the data in the flyout is the data from this file. Also, any time we actually simulate buying the app, the data is just stored in memory. This file is not modified, so when the app launches, it reads in this file and sets its initial settings based on this file. When we run the app, we see a result similar to Figure 18.3.
Figure 18.3. The Windows Store API exposes information about the app that we can access at runtime. This displays the number of days before the trial ends, as well as the price of the app.
If we want to test the site outside trial mode when it is launched, we can change the LicenseInformationAppIsTrial to false instead of true. For this example, we want to leave it at true because we want to continually test in trial mode.
Creating a Feature-Limited Trial Mode Example
Instead of using a time trial, we can opt for a feature-limited trial. Checking the isTrial property determines whether we are in trial mode and enables us to act on the code appropriately. Perhaps we want to display a flyout that the action the user just tried is locked in trial mode. Perhaps we just want to hide or disable a button or display a div. We can do any of those by simply checking isTrial Boolean and handling the logic accordingly. When we have a feature-limited trial, we must be sure to address expectations in the feature page of the store so that consumers know what to expect before they download our app.
Apps with trials are downloaded many more times and, as a result, have a greater number of sales than apps that do not offer free trials.
To test this, copy the FingerPainting app from Hour 16, “Using Contracts and Extensions.” During that hour, we set up the print contract and settings extension. We also hooked into the File Open Picker to allow the user to use a background image instead of a blank artboard.
Using the Webcam
Here we quickly add the capability for the user to use a camera directly from the app and take a picture that will become the background image of the artboard. The app already supports this: The user can find a background image and, instead of picking Files from the drop-down list, can select Camera. Because the user initiates the web camera, our app does not need permission to use it. However, for this feature, we are letting the user tap a button on the app bar that directly calls up the camera. We thus need to request the webcam capability under the Capabilities tab of the app package manifest file.
Now we can create a new JavaScript file under the js folder, called camera.js. Inside this file, we can add the following code:
"use strict";
(function () {
WinJS.Namespace.define("STYWin.Camera", {
takePicture: takePicture
});
function takePicture() {
if (STYWin.Utilities.asyncFlag) {
return;
}
var canvas = STYWin.ArtBoard.canvas;
var dialog = new Windows.Media.Capture.CameraCaptureUI();
var aspectRatio = { width: canvas.width, height: canvas.height };
dialog.photoSettings.croppedAspectRatio = aspectRatio;
dialog.captureFileAsync(Windows.Media.Capture.CameraCaptureUIMode.photo)
.then(STYWin.ArtBoard.setBackgroundImage, STYWin.Utilities.asyncError);
}
})();
To begin, we declare the STYWin.Camera namespace and expose the takePicture function. The takePicture function first checks the asyncFlag and exits if it is true. This is to make sure that any work being done asynchronously when files are being read doesn’t get trampled on if another request for another file (or in this case the webcam) is initiated. Assuming that the system isn’t already trying to open a file, we instantiate the Windows.Media.Capture.CameraCaptureUI object. This enables us to communicate with the webcam and, ultimately, capture a photo from it. We have obtained the canvas dimensions and are setting the aspect ratio based on those dimensions. If the camera can support the aspect ratio, it uses it. Then we call captureFileAsync and tell it that we want to capture a photo (versus video or photoOrVideo). After the user snaps a picture, we simply call the setBackgroundImage function that we call if a user selects a file from the file system. We already did the work of reading the file from disk and applying the pixels to the canvas, so we were able to get the camera working with very little code.
We need to hook up the app bar command to the takePicture function. Let’s add the following code to the appbar.js file in the init function:
document.getElementById("cmdTakePicture")
.addEventListener("click", STYWin.Camera.takePicture, false);
To see this work, we need to add a reference to camera.js in the default.html file. We can add the following line right after we reference the filepicker.js:
<script src="/js/camera.js"></script>
If we run the app, we should be able to select the “take picture” command from the app bar. Because this is the first time the app has run and we have declared the webcam capability, we are greeted with the screen in Figure 18.4.
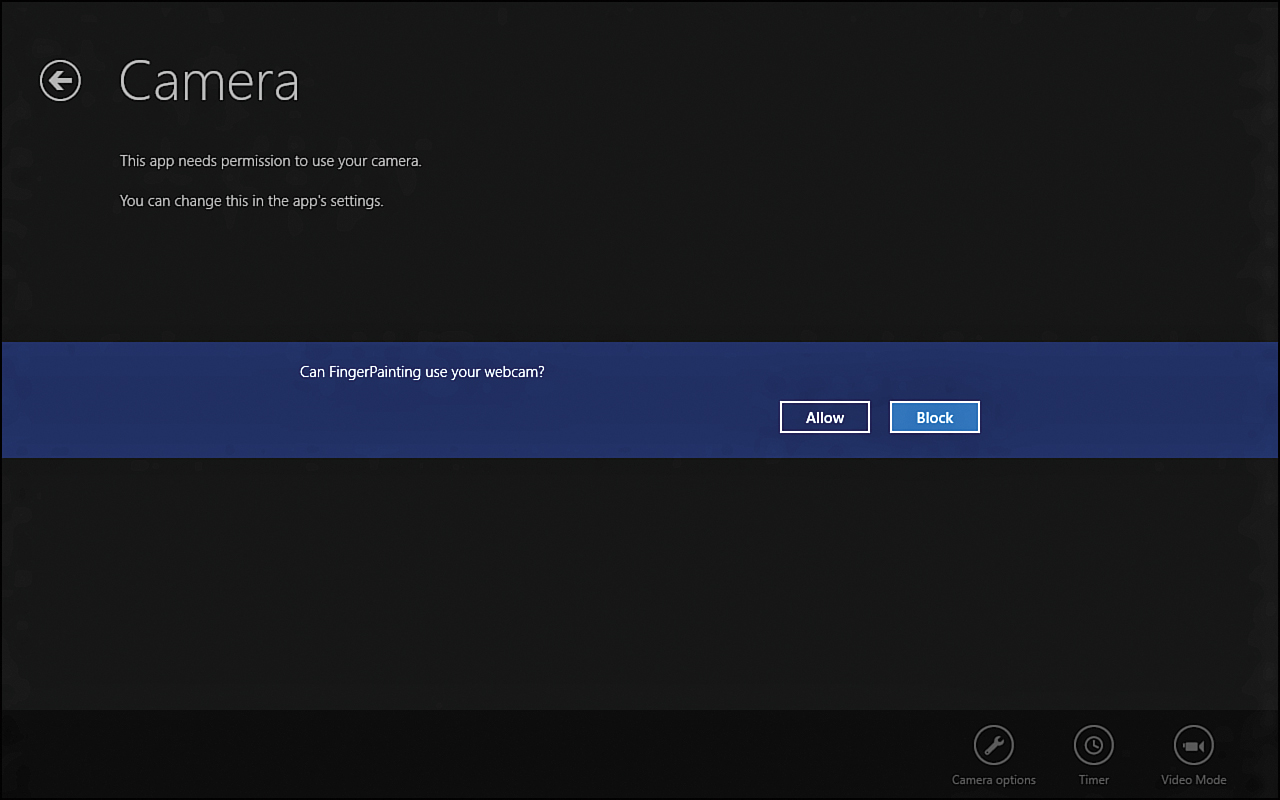
Figure 18.4. The webcam capability requires the user to allow or block the functionality the first time the app accesses the webcam.
Locking Down Functionality
Now that we have added more functionality to the FingerPainting app, let’s wrap it with some code that checks to see if we are in trial mode. If we are, we want to provide the user with the option to purchase the app. If we aren’t in trial mode, we want to proceed with the request.
Let’s add a new file to the js folder, called trialmanager.js. We open the default.js from the TimeTrialExample we created earlier this hour and copy the WinJS.Utilities.ready function into the Clipboard. Then we can paste it into the FingerPainting app’s trialManager.js file. At the top of the trialManager.js, we add the "use strict"; mode. Then we change this from the WinJS.Utilities.ready function to a self-executing anonymous function. We also change the namespace to STYWin.TrialManager.
Let’s add the following flyout control to default.html immediately before the closing body tag:
<div id="purchaseFlyout" data-win-control="WinJS.UI.Flyout">
<div>This feature is only available in the full version of the app.</div>
<div>Would you like to buy the app now? It is only
<span data-win-bind="innerText: STYWin.TrialManager.price"></span>.</div>
<button id="btnBuy">Go to Windows Store</button>
</div>
While we are in the default.html file, we can add a reference to the newly created trialmanager.js file. We can add the following reference above the appbar.js reference:
<script src="/js/trialmanager.js"></script>
Inside default.js, we need to add the following line to bind the data right before the STYWin.AppBar.init in the promise chain in the activated event handler:
WinJS.Binding.processAll();
We need to add the following function inside trialmanager.js:
function buyApp(callback) {
if (STYWin.TrialManager.isTrial) {
var purchaseFlyout = document.getElementById("purchaseFlyout").winControl;
var btnBuy = document.getElementById("btnBuy");
btnBuy.onclick = function () {
//Do Buy function
currentApp.requestAppPurchaseAsync(true).then(
function (receipt) {
licenseInformation = currentApp.licenseInformation;
STYWin.TrialManager.isTrial = licenseInformation.isTrial;
//call the original function
//the user was trying to do before they had access
//to all the capabilities
callback();
},
function (err) {
//ruh roh
});
};
purchaseFlyout.show(document.querySelector("body"));
}
}
This is similar to what we did in the last example, but this time on a successful buy, we want to complete the task the user was trying to do in the first place. To accomplish this, we have the calling code pass in a callback function to the buyApp function that should be called after the app is bought.
We need to expose the buyApp function in the STYWin.TrialManager namespace.
We add the following code inside the image condition in artboardartboard.js in the setBackgroundImage function:
function setBackgroundImage(image) {
if (image) {
if (STYWin.TrialManager.isTrial) {
STYWin.TrialManager.buyApp(function() { setBackgroundImage(image); });
return;
}
...
We put the feature check in the main setBackgroundImage function. This means that we let the user select a picture and actually take a photo from the webcam, but right before we set the background to the image, we ask if the user wants to buy the app if it is in trial mode. Arguably, this could be a bad experience for the user because the user can’t actually use the image without buying the app. On the flip side, this could lead to more conversions to sales because the user did some work and wants to see what he or she just did.
For this example, we are putting the feature check in the main setBackgroundImage so we can show a best practice of completing the task the user was trying to do before being prompted to buy the app. In the earlier setBackgroundImage function, we pass to the buyApp function a callback function that executes the same function we are in: setBackgroundImage. So if we are in trial mode, we call buyApp. When it finishes, it calls this function again to complete the task. We also make sure we don’t execute the rest of the function the first time through if we are in trial mode by returning out of the function.
If we run the app and select the webcam or the Load button, we can take a photo or select an image, but as soon as we are done, we see the flyout. Clicking the button brings up the Windows Store Win32 simulator. If we select S_OK from the drop-down list of the Windows Store simulator, then the image created/selected is displayed on the background.
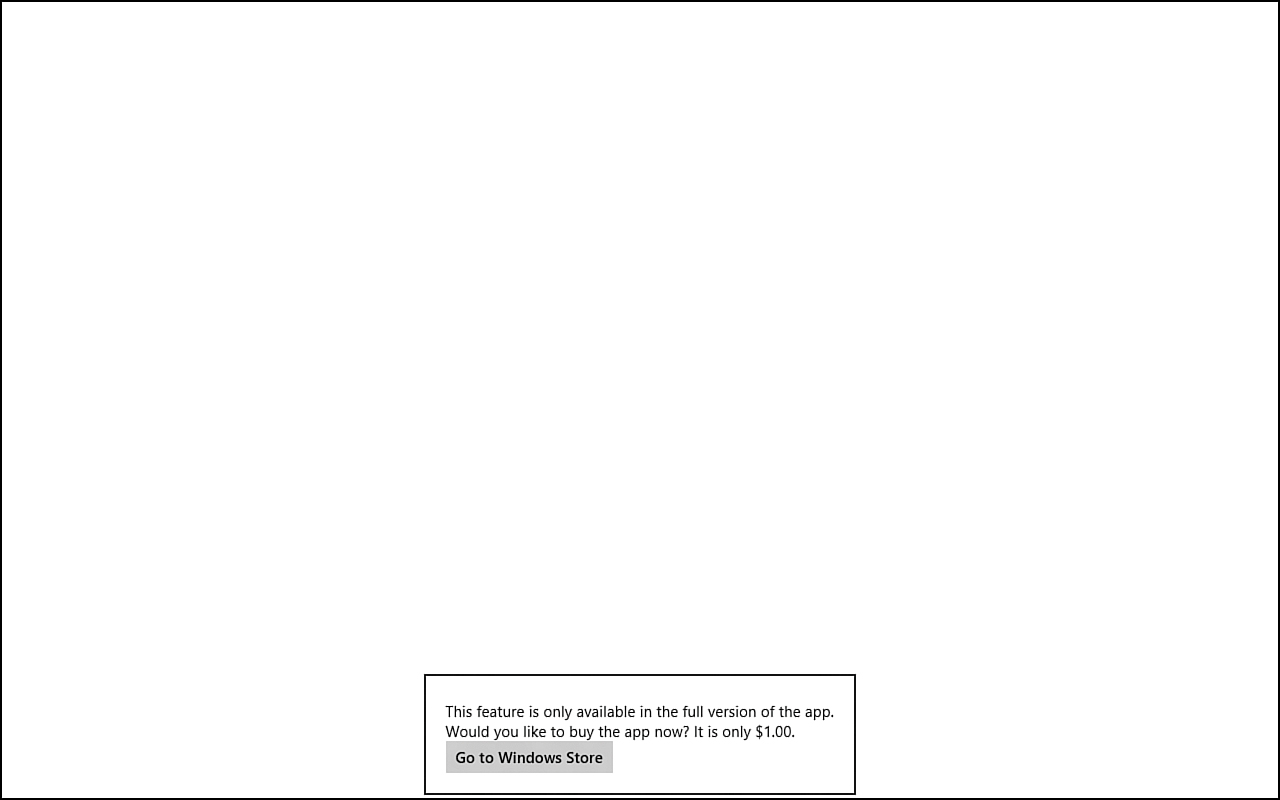
Figure 18.5. We can protect certain features of the app so that they are available for only fully paid apps and are not available in trial mode.
Allowing In-App Purchases
Besides time trials and feature-limited trials, we have the capability to allow in-app purchases. We can actually have these micro-transactions in an app that also must be purchased to in order to be used. It might be a hard sell, but certain apps do well with this model. Of course, in-app purchases can be used with a free app as well, which is common.
To show how we handle in-app purchases, let’s continue working with the FingerPainting app. Here we add the capability to set the brush color, but we require an in-app purchase for additional colors.
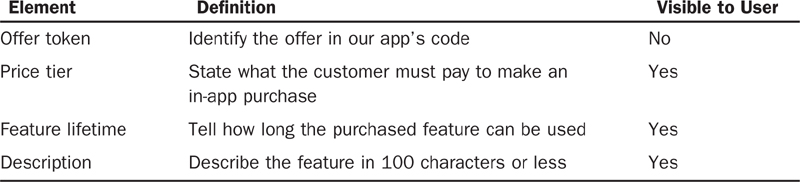
Before we start adding features that will be offered through in-app purchases, we need to create a description of each in-app offer in every language. We do not discuss globalization and localization in the book, but offering the app in as many languages as possible is important. The in-app offers have the following information we need to provide:
When we submit the app to the Windows Store, we need to provide information such as the name, description, price, and countries in which we sell our app. In addition, if our app has in-app purchases, we need to state up front what those purchases are. This is done via the Advanced Features page when we submit the app.
Using these same descriptions, we need to modify the WindowsStoreProxy.xml file to match so that we are testing against how we will be selling it. Let’s define our offer, with the offer token being addColors. The price tier here is $1.49. The feature lifetime is forever, and the description is Add Colors to your arsenal!
To begin, let’s create the fully functioning code and then set it up to be available only as an in-app purchase. We add the following markup to default.html after we set up the brushSizeMenu WinJS menu control:
<div id="pickColorFlyout" data-win-control="WinJS.UI.Flyout"
aria-label="{Pick Color Flyout}" >
<div id="palette">
<div id ="selectedColor" style="top: 2px; left: 2px; width: 40px;
height: 40px; background-color: #000000;"
aria-labelledby="listLabel"></div>
<div style="width: 40px; height: 17px"><p id="listLabel">Color</p></div>
<!-- Top row colors -->
<div id="#000000" class="color" style="top: -70px; left: 60px;
background-color:#000000"></div>
<div id="#808080" class="color" style="top: -102px; left: 94px;
background-color:#808080"></div>
<div id="#8b0000" class="color" style="top: -134px; left: 128px;
background-color:#8b0000"></div>
<div id="#ff0000" class="color" style="top: -166px; left: 162px;
background-color:#ff0000"></div>
<div id="#ffa500" class="color" style="top: -198px; left: 196px;
background-color:#ffa500"></div>
<div id="#ffff00" class="color" style="top: -230px; left: 230px;
background-color:#ffff00"></div>
<div id="#008000" class="color" style="top: -262px; left: 264px;
background-color:#008000"></div>
<div id="#0000ff" class="color" style="top: -294px; left: 298px;
background-color:#0000ff"></div>
<!-- Bottom row colors -->
<div id="#ffffff" class="color" style="top: -292px; left: 60px;
background-color:#ffffff"></div>
<div id="#c0c0c0" class="color" style="top: -324px; left: 94px;
background-color:#c0c0c0"></div>
<div id="#955a5a" class="color" style="top: -356px; left: 128px;
background-color:#955a5a"></div>
<div id="#ffc0cb" class="color" style="top: -388px; left: 162px;
background-color:#ffc0cb"></div>
<div id="#ffd700" class="color" style="top: -420px; left: 196px;
background-color:#ffd700"></div>
<div id="#adff2f" class="color" style="top: -452px; left: 230px;
background-color:#adff2f"></div>
<div id="#00dd00" class="color" style="top: -484px; left: 264px;
background-color:#00dd00"></div>
<div id="#ff00ff" class="color" style="top: -516px; left: 298px;
background-color:#ff00ff"></div>
</div>
</div>
We have simply set up two columns of colors, along with the selected color on the left. Ideally, this should have been styled with a CSS grid, but so many third-party color pickers are available that it can easily be replaced. The main point to note is that the selectedColor exists.
Add the following CSS to pagesartboardartboard.css:
#palette {
border: 1px solid gray;
height: 70px;
width: 330px;
padding: 2px;
}
.color {
position: relative;
border: 1px solid gray;
height: 30px;
width: 30px;
}
Now we can hook up the app bar command button to display the color picker by adding the following code in the init function in pages/artboard/artboard.js:
document.getElementById("cmdPickColor")
.addEventListener("click", STYWin.ColorPicker.pickColor, false);
We need to create a new JavaScript file under the js folder, called colorpicker.js. Let’s add the following code to the file:
"use strict";
(function () {
function pickColor() {
//activate the images
var element = document.getElementById("palette");
var divs = element.getElementsByClassName("color");
for (var idx = 0; idx < divs.length; idx++) {
divs[idx].addEventListener("click", colorSelected, false);
}
//display the flyout
var flyOut = document.getElementById("pickColorFlyout").winControl;
flyOut.show(cmdPickColor, "bottom");
}
var selectedColor = "#000000";
function setColor(color) {
var canvas = document.getElementById("artboard");
var ctx = canvas.getContext("2d");
selectedColor = color;
var element = document.getElementById("selectedColor");
element.style.backgroundColor = selectedColor;
ctx.strokeStyle = selectedColor;
//need to style the appbar icon ...
var cmdPickColor = document.getElementById("cmdPickColor");
cmdPickColor.children[0].style.backgroundColor = selectedColor;
}
function getColor() {
return selectedColor;
}
function colorSelected(evt) {
evt.preventDefault();
setColor(evt.srcElement.id);
document.getElementById("pickColorFlyout").winControl.hide();
STYWin.AppBar.hide();
}
WinJS.Namespace.define("STYWin.ColorPicker", {
pickColor: pickColor
});
})();
The STYWin.ColorPicker namespace exposes the pickColor function, which displays the flyout we created in HTML. It associates the colorSelected event handler to the click event of each div with the color class. The colorSelected event handler calls setColor, passing in the id of the color div, which is the HTML color value. It then hides the flyout and the app bar.
The setColor function does what the name implies and sets the strokeStyle of the 2D context of the canvas to the selected color. It also sets the background color of the colorSelected div (in the flyout) to the selected color so that when it is displayed again, it has the appropriate color. Finally, it applies the selected color to the background of the app bar command button.
Let’s add a reference of the JavaScript file to the default.html after the trialmanager.js reference:
<script src="/js/colorpicker.js"></script>
When we run the app, we now have color picking functionality in place. As in Figure 18.6, we can select the color we want and draw with the currently selected color.
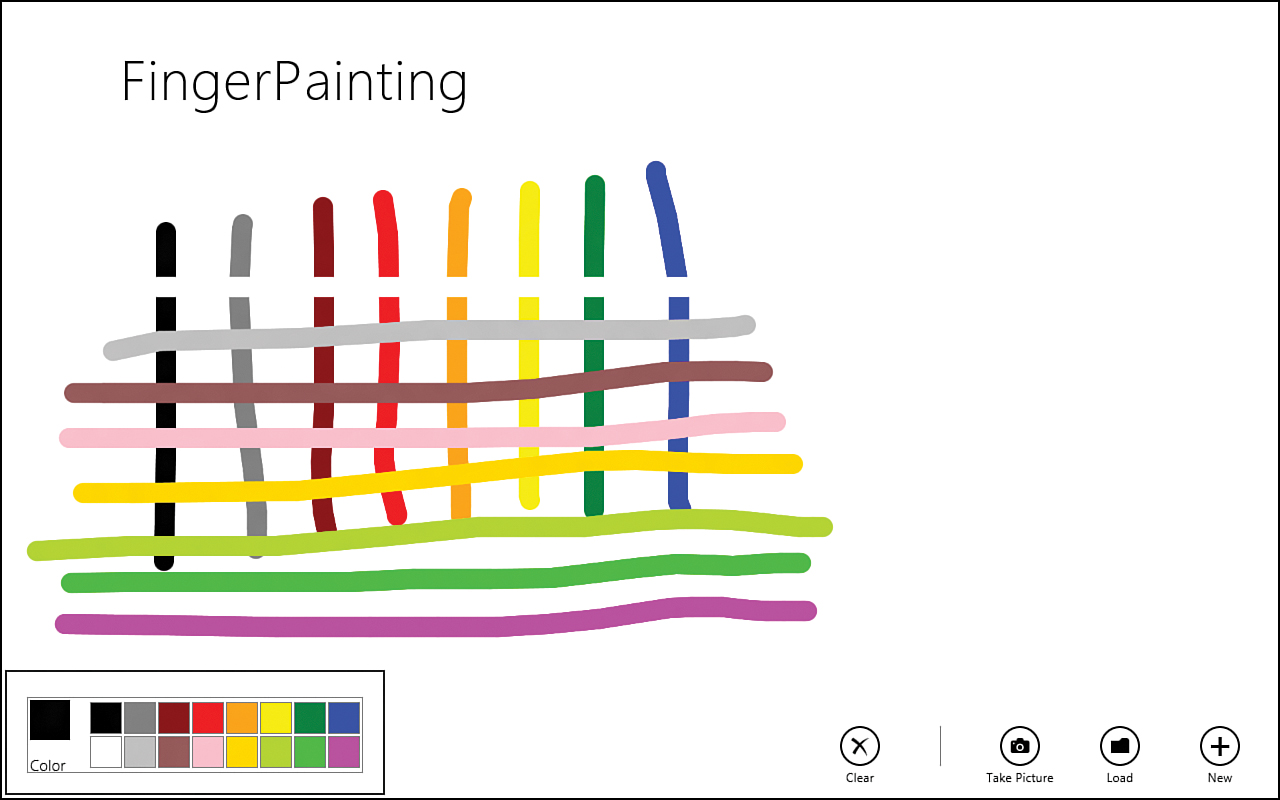
Figure 18.6. FingerPainting enables the user to select different colors and draw with each color.
Implementing In-App Purchases
Now that we have added the functionality, let’s set up the code to make using the additional colors an in-app purchase. Let’s modify the WindowsStoreProxy.xml. To make it easy to find, we change the Package Name to FingerPainting, under the Packaging tab in the app package manifest file. Now we can redeploy our app and then browse to the <installation_folder>LocalStateMicrosoftWindows StoreApiData folder. The installation folder on this machine is located at C:UsersChadAppDataLocalPackagesFingerPainting_qwnwt6twhqbv0. In the MicrosoftWindows StoreApiData folder, we open WindowsStoreProxy.xml and replace it with the following contents:
<?xml version="1.0" encoding="utf-16" ?>
<CurrentApp>
<ListingInformation>
<App>
<AppId>00000000-0000-0000-0000-000000000000</AppId>
<LinkUri>
http://store.windows.microsoft.com/app/00000000-0000-0000-0000-000000000000
</LinkUri>
<CurrentMarket>en-US</CurrentMarket>
<AgeRating>3</AgeRating>
<MarketData xml:lang="en-us">
<Name>FingerPainting</Name>
<Description>FingerPainting lets you paint with your
fingers! (and mouse and stylus)</Description>
<Price>1.49</Price>
<CurrencySymbol>$</CurrencySymbol>
</MarketData>
</App>
<Product ProductId="addColors" LicenseDuration="0">
<MarketData xml:lang="en-us">
<Name>Color Pack</Name>
<Price>0.49</Price>
<CurrencySymbol>$</CurrencySymbol>
</MarketData>
</Product>
</ListingInformation>
<LicenseInformation>
<App>
<IsActive>true</IsActive>
<IsTrial>false</IsTrial>
</App>
<Product ProductId="addColors">
<IsActive>false</IsActive>
</Product>
</LicenseInformation>
</CurrentApp>
We have added a new feature/product with the id of addColors. We have it marked as not active. In ProductMarketData, we have set the price to 0.49 and set the name to Color Pack. Also, for in-app purchases to work with the Windows Store simulator, we need to make sure the app does is not in trial mode. This is why IsTrial has been set to false: In-app purchases are not allowed if the app is in trial mode.
Let’s add the following variable to the trialmanager.js file right after we declare the prices variable:
var price;
var addColorPrice;
Now we add the buyAddColor function after the buyApp function:
function buyAddColor(callback) {
if (!STYWin.TrialManager.isAddColorPurchased) {
var purchaseFlyout = document
.getElementById("purchaseAddColorFlyout").winControl;
var btnBuy = document.getElementById("btnBuyColors");
btnBuy.onclick = function () {
//Do Buy function
currentApp.requestProductPurchaseAsync(addColorsId, true).done(
function (receipt) {
licenseInformation = currentApp.licenseInformation;
STYWin.TrialManager.isAddColorPurchased = licenseInformation
.productLicenses.lookup(addColorsId).isActive;
//call the original function
//the user was trying to do before they had access
//to all the capabilities
callback();
},
function () {
//ruh roh
});
};
purchaseFlyout.show(document.querySelector("body"));
}
}
The buyApp and buyAddColor functions are similar. The main difference is that, instead of calling requestAppPurchaseAsync, we call requestProductPurchaseAsync and pass in the addColorsId, which contains the id. Also, instead of setting the isTrial property, we set the isAddColorPurchased property. We find it by looking up the license by the addColorsId value. Let’s add addColorsId to the top of the trialmanager.js file:
var addColorsId = "addColors";
This is the id we set in the XML file and also the id we are using for the Add Colors feature. We need to expose the variables and functions through the STYWin.TrialManager namespace:
WinJS.Namespace.define("STYWin.TrialManager", {
daysRemaining: licenseInformation.expirationDate,
daysRemainingConverter: daysRemainingConverter,
isTrial: isTrial,
price: price,
currentApp: currentApp,
buyApp: buyApp,
isAddColorPurchased: licenseInformation
.productLicenses.lookup(addColorsId).isActive,
buyAddColor: buyAddColor,
addColorPrice: addColorPrice
});
We need to set the price of the addColorsId product. We can add the following code in bold:
currentApp.loadListingInformationAsync().then(function (listing) {
price = listing.formattedPrice;
addColorPrice = listing.productListings.lookup(addColorsId).formattedPrice;
});
With the code just added, we need to make sure that, if we are loading the WindowsStoreProxy.xml file, we have updated the XML file to include the product id of addColors. Otherwise, we will get a JavaScript error because it couldn’t find the product information.
Let’s add the flyout control to the default.html page:
<div id="purchaseAddColorFlyout" data-win-control="WinJS.UI.Flyout">
<div>The colors on the bottom row can be purchased for
<span data-win-bind="innerText: STYWin.TrialManager.addColorPrice"></span>.
</div>
<div>Would you like to purchase the colors now?</div>
<button id="btnBuyColors">Go to Windows Store</button>
</div>
Now we actually update the colorpicker.js code to test whether the user has purchased the feature. We can replace the colorSelected function with the following code:
var restrictedColors = [
"#ffffff", "#c0c0c0", "#955a5a", "#ffc0cb",
"#ffd700", "#adff2f", "#00dd00", "#ff00ff"
];
function colorSelected(evt) {
evt.preventDefault();
if (!STYWin.TrialManager.isAddColorPurchased &&
restrictedColors.indexOf(evt.srcElement.id) >= 0) {
STYWin.TrialManager.buyAddColor(function () { colorSelected(evt); });
return;
}
setColor(evt.srcElement.id);
document.getElementById("pickColorFlyout").winControl.hide();
STYWin.AppBar.hide();
}
We are storing all the restricted colors (the colors on the second row) in an array. Then inside the colorSelected event handler, we check to see if the feature was purchased by checking isAddColorPurchased. It if wasn’t purchased and the color selected is in the restricted array, we call the buyAddColor function we created previously. We pass in a callback function so that if the user decides to purchase the additional colors, we simply call the method we are in again so that the chosen color is selected.
When we run the app and click on a restricted color, we see the results in Figure 18.7.
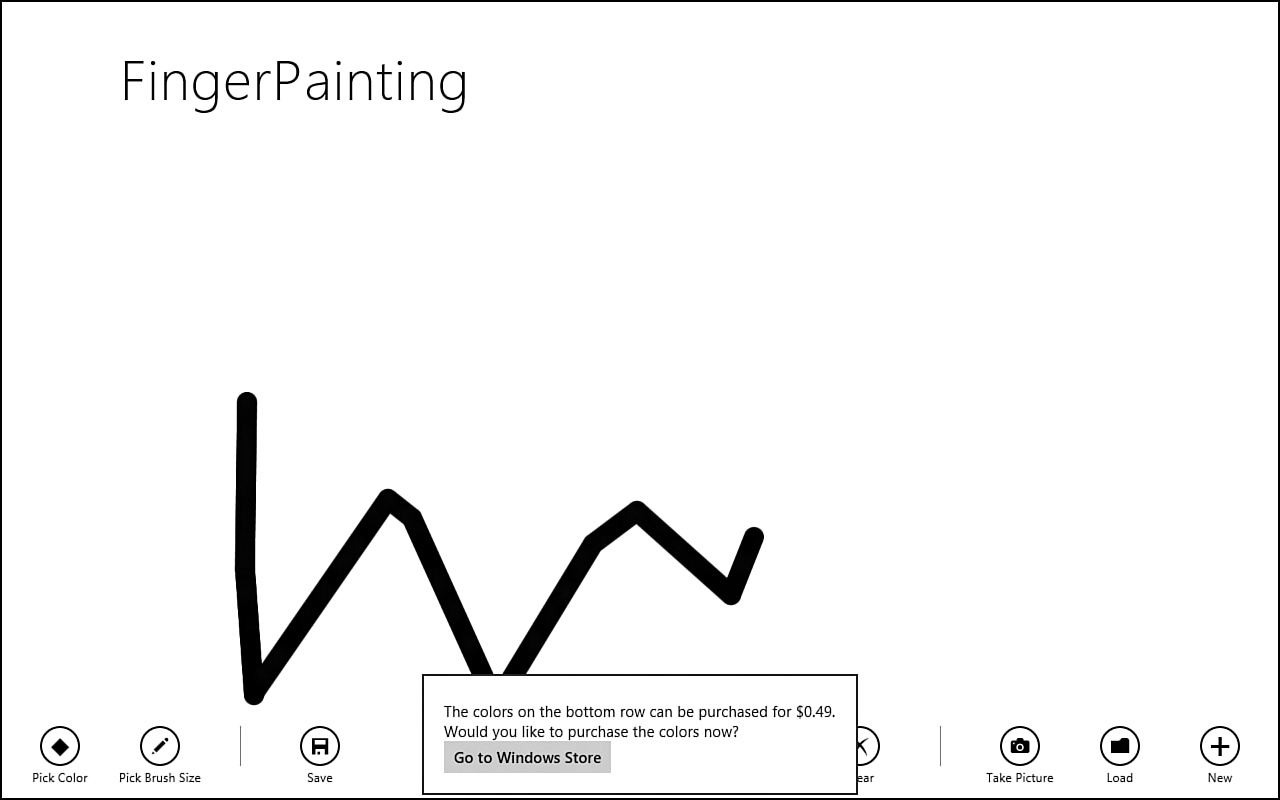
Figure 18.7. The in-app purchase for adding colors is kicked off when a color on the bottom row is selected.
We have successfully created code to handle in-app purchases. Although we didn’t use it in this app, hooking into the licensechanged event can make a lot of sense. In some scenarios, reloading the licensing logic and flags when the event occurred would be better. As expected, we could write similar code to this, to tie into the licensechanged event:
licenseInformation.addEventListener("licensechanged", reloadLicense);
The code has no error handling. The user should be notified if the purchase was unsuccessful. In addition, the call to the callback method upon success should be wrapped with a check to make sure that STYWin.TrialManager.isAddColorPurchased is actually true. If it isn’t, the callback shouldn’t be called; the error-handling function should be called instead.
Subscriptions are just in-app purchases that have an expiration date set. Products can have either an explicit expiration date or a license duration.
Finally, before an app is submitted to the store, the code must be modified to use CurrentApp instead of CurrentAppSimulator.
Further Exploration
We didn’t have room to show how subscriptions work, but they are similar to in-app purchases. In fact, we use in-app purchases to pull off a subscription. We can set the License Duration (in days) for the product/feature, which would cause the license to expire after a certain number of days of purchase. Alternatively, we can set the Expiration Date to have the product/feature automatically expire on a particular date. If the subscription model is needed, take some time to test the scenarios.
Microsoft has documentation for both trial apps and in-apps purchases. Information on creating trial based apps can be found at http://msdn.microsoft.com/en-us/library/windows/apps/hh694065.
Information on creating apps with in-app purchases can be found at http://msdn.microsoft.com/en-us/library/windows/apps/hh694067.
The only Windows SDK sample of interest for this hour is the trial app and in-app purchase sample.
Summary
We covered how to do time trials with no code. We explored how to use time trials with code that reminds the user how many days are left. We also discussed feature-limited trials, looked at in-app purchases, and even talked about the subscription model. To submit free apps, we simply set a price of $0 and set the time trial value to “trial never expires”. We also have the capability to make money using ads, which we talk about during Hour 24. Several of these options are not mutually exclusive. For example, an app can have a feature- or time-limited trial and also include in-app purchases or subscriptions. The great thing about the Windows Store is that we have a choice in how to sell our apps. We will learn more about that during Hour 22, “Understanding the Windows Store.”
This was the last hour in which we cover new features. The next three hours put what we learned into practice by creating three full apps. We finish the app we have been modifying the most, FingerPainting, during Hour 20, “Making the Finger-Painting App.” We also create an RSS Aggregator app, similar to the RSS Reader example we created, and also create a game. During the final three hours, we explore how to pass certification, put apps in the Windows Store, and ultimately make money selling them. Congratulations on making it through the bulk of the functionality! We still have some work ahead, but it is smooth sailing now.
Q&A
Q. What is the most successful type of app: free with ads, no trial, time-limited trial, feature-limited trial, or in-app purchases?
A. Based on data from mobile devices, apps with in-app purchases are far more successful than any other type of app.
Q. What does the Age Rating refer to?
A. When an app is submitted to the Windows Store, the developer must select a value from a drop-down list concerning the age rating, to specify the appropriateness of the app’s content. Can it be viewed by 3-year-olds? Or only 16 and older? Or somewhere in the middle? Select the appropriate Age Rating based on the answer.
Q. Does the Windows Store API support subscriptions?
A. Yes, subscriptions are just in-app purchases that have an expiration date set. Products can have either an explicit expiration date or a license duration.
Workshop
Quiz
1. Where does the CurrentAppSimulator obtain the Windows Store licensing Information?
2. Having a trial mode in an app can make a huge impact on sales. True or false?
3. When selecting a time-based trial mode, developers have no visibility into how long the user has before the license expires. True or false?
4. If the app wants to use the attached camera to take photos, what capability must be set?
Answers
1. By default, the CurrentAppSimulator grabs the licensing information from the WindowsStorePolicy.xml file. However, XML files can be loaded dynamically to test different scenarios.
2. True. Apps with trials are downloaded many more times and, as a result, have a greater number of sales than apps that do not offer free trials.
3. False. When we use time-based trials, code does not need to be written, but code can be written to take advantage of information such as the expiration date of the trial mode of the app.
4. The webcam capability must be set if the app wants to use the attached camera to take photos.
Activities
1. In places where the comment simply reads //ruh roh, add some error checking. The user might like to know that the sale wasn’t successful.
2. Add logic to allow the app to handle in-app purchases and a trial mode. This means that users need to be aware that they can’t purchase in-app items without first purchasing the app itself.
3. Add a third row of colors, and make that another product/feature id that sells for $1.49.