
Hour 16. Using Contracts and Extensions
What You’ll Learn This Hour:
• Identifying the differences between a contract and an extension
• Using the File Open Picker contract
• Using the Print extension
• Making use of the Settings extension
• Implementing the Contact Picker extension
• Using the Search contract
• Understanding how the remaining contracts and extensions work
Windows 8 exposes extensions we can tie into. The API also has contracts that we can expose and consume to integrate with other apps. Using extensions can really help an app feel integrated into Windows and work well with other apps that exist today—and those that are yet to be created.
Hour 5, “Understanding Microsoft Design Style Principles,” discussed the principle of winning as one. Although it includes other items discussed during that hour, it also includes contracts and extensions. During this hour, we cover how we can win as one by using contracts and extensions.
Understanding Contracts and Extensions
Extensions are agreements between our app and Windows. Extensions enable us to extend standard Windows features. There are more extensions than contracts for us to tie into. Extensions really help an app to feel integrated into Windows, and it is important to take advantage of the extensions available.
Contracts are agreements between apps. The apps do not know about other apps that are installed or will be installed on the machine. Apps cannot assume that other apps are installed and cannot talk directly to other apps. Instead, apps expose and consume contracts. Two types of contracts exist: a source contract and a target contract. These sharing contracts have different sets of requirements. An app might want to support both contracts for the same item. Windows provides all the glue needed to make apps work together, so long as they expose these contracts.
Using the File Open Picker Contract
We discussed the file open picker contract during Hour 14, “Using the App Bar and Pickers.” Here we implement the File Open Picker Contract in the FingerPainting app we started during Hour 15, “Handling Our App Life Cycle Events.” This code is not actually implementing the File Open Picker contract; it is simply consuming it. We discuss how an app can implement the contract later this hour.
Let’s open the FingerPainting app in Visual Studio. Inside artboard.js, we can add the following code after the declaration of our variables:
WinJS.Namespace.define("STYWin.ArtBoard", {
canvas: canvas,
clearArtBoard: clearArtBoard,
setBackgroundImage: setBackgroundImage
});
We are exposing the canvas variables, as well as both the clearArtBoard function and the not-yet-created setBackgroundImage function. Let’s assign the exposed canvas property to the canvas variable when it is assigned in the ready function:
canvas = document.getElementById("artboard");
STYWin.ArtBoard.canvas = canvas;
Before we create the setBackgroundImage function, let’s add the file open picker to the project. We need to create a new JavaScript file inside the js folder named filepicker.js. Listing 16.1 shows the code we need to add to filepicker.js.
"use strict";
(function () {
WinJS.Namespace.define("STYWin.FilePicker", {
selectFile: selectFile
});
function canShowPicker() {
var retVal = true;
var vm = Windows.UI.ViewManagement;
// Verify that we are currently not snapped,
// or that we can unsnap to open the picker
var currentState = vm.ApplicationView.value;
if (currentState === vm.ApplicationViewState.snapped &&
!Windows.UI.ViewManagement.ApplicationView.tryUnsnap()) {
// Fail silently if we can't unsnap
retVal = false;
}
return retVal;
}
function selectFile() {
if (STYWin.Utilities.asyncFlag) {
return;
}
if (!canShowPicker())
return;
var pickers = Windows.Storage.Pickers;
var fileOpenPicker = new pickers.FileOpenPicker();
fileOpenPicker.commitButtonText = "Set Background";
fileOpenPicker.suggestedStartLocation =
pickers.PickerLocationId.picturesLibrary;
fileOpenPicker.viewMode = pickers.PickerViewMode.thumbnail;
fileOpenPicker.fileTypeFilter.replaceAll([".jpg",".bmp",".gif",".png"]);
fileOpenPicker.pickSingleFileAsync().then(function (file) {
if (file) {
STYWin.ArtBoard.setBackgroundImage(file);
}
}, STYWin.Utilities.asyncError);
}
})();
The core of filepicker.js is identical to what we created during Hour 14. However, we have added a check for an asyncFlag, which we discuss shortly. We also added an error handler function, asyncError, for pickSingleFileAsync promise. In addition, we changed the call to displayFile to STYWin.ArtBoard.setBackgroundImage. The actual logic is what we can expect for the file open picker. We are specifying a single file and stating that we want to see the images in thumbnail view.
Now we can actually create the setBackgroundImage function inside the artboard.js file. Listing 16.2 shows the function.
Listing 16.2. setBackgroundImage
function setBackgroundImage(image) {
if (image) {
var loadStream = null;
var imageProperties = null;
image.openAsync(Windows.Storage.FileAccessMode.read).then(
function (stream) {
// prevent future calls to this API until
// we are done with the first call
STYWin.Utilities.asyncFlag = true;
loadStream = stream;
return image.properties.getImagePropertiesAsync();
}
).done(
function (imageProperties) {
var url = URL.createObjectURL(image, { oneTimeOnly: true });
var imageObj = new Image(canvas.width, canvas.height);
imageObj.onload = function () {
STYWin.ArtBoard.clearArtBoard();
var width = imageProperties.width;
var height = imageProperties.height;
var top = 0, left = 0;
//determine if we need to resize according to width or height
var w = imageProperties.width / canvas.width;
var h = imageProperties.height / canvas.height;
if (w >= h) {
width = canvas.width;
var ratio = width / imageProperties.width;
height *= ratio;
//vertically center the image
top = Math.abs(canvas.height - height) / 2 | 0;
}
else {
height = canvas.height;
var ratio = height / imageProperties.height;
width *= ratio;
//horizontally center the image
left = Math.abs(canvas.width - width) / 2 | 0;
}
ctx.drawImage(imageObj, left, top, width, height);
};
imageObj.src = url;
// reset asyncFlag, can call loadAsync() once again
STYWin.Utilities.asyncFlag = false;
// input stream is IClosable interface; requires explicit close
loadStream.close();
},
function (e) {
STYWin.Messages.displayError("Load failed.");
// we still want to reset asyncFlag if an error occurs
STYWin.Utilities.asyncFlag = false;
// if the error occurred after the stream was opened,
//close the stream
if (loadStream) {
loadStream.close();
}
}
);
}
}
In the file picker example, we simply loaded the file from disk and set the blob URL to the src attribute of the img element. However, for the FingerPainting app, we need to load the image onto the canvas. To do this, we need to know the width and height of the image we are loading. After we open the image file passed in using openAsync in read mode, we set an asyncFlag to true, store the stream, and get the image properties. In the promise, we call the createObjectURL with the oneTimeOnly property to create the blob URL.
We then set the onload event handler to an anonymous function that clears the artboard, obtains the width and height of the image, and then scales the image as needed to get it to fit on the canvas. It also centers the image if it doesn’t fill up the entire canvas. Finally, the image load event handler draws the image on the canvas in the right position.
After declaring the load event handler, the src attribute is set to the blob URL. This kicks off the load event. It then resets the asyncFlag, which makes sure we don’t call open multiple times while work is being done. Finally, we close the stream. If an error occurs, we display an error and also reset the asyncFlag so that we can try to load another file later, if we want. We also must make sure that the stream is closed if it was opened.
The code in Listing 16.2 worked with an asyncFlag in STYWin.Utilities and called a displayError function in STYWin.Messages. Let’s create those functions now. We can create two new JavaScript files in the js folder, one named utilities.js and the other named messages.js.
Inside the newly created utilities.js file, let’s add the following code:
"use strict";
(function () {
WinJS.Namespace.define("STYWin.Utilities", {
asyncFlag: asyncFlag,
asyncError: asyncError
});
var asyncFlag = false;
function asyncError(e) {
STYWin.Messages.displayError("Async error: " + e.toString());
}
})();
We are simply exposing the asyncFlag we used, along with the asyncError handler we passed to the file open picker. We now have a utilities object stubbed out in case we need to use it in the future. The message.js file should contain the following code:
"use strict";
(function () {
WinJS.Namespace.define("STYWin.Messages", {
displayError: displayError,
displayStatus: displayStatus,
});
function showMessage(message, state) {
if (state && state.toLowerCase() === "error") {
var msg = new Windows.UI.Popups.MessageDialog(message, state);
msg.showAsync();
}
else {
console.log(message);
}
}
function displayStatus(message) {
showMessage(message);
}
function displayError(message) {
showMessage(message, "Error");
}
})();
Nothing new is being done here: We are simply displaying a message dialog if an error was passed in; otherwise, we just log the message to the console window (in Visual Studio). We need to add a reference to both of these JavaScript files in the default.html file. We might end up needing to use the messages inside the Utilities object, so let’s add them in the following order before the appbar.js reference:
<script src="/js/messages.js"></script>
<script src="/js/utilities.js"></script>
Now we can hook up the file open picker code to the AppBar control. Inside appbar.js, we can add an init function and expose it in the namespace:
function init() {
document.getElementById("cmdLoad")
.addEventListener("click", STYWin.FilePicker.selectFile, false);
}
WinJS.Namespace.define("STYWin.AppBar", {
hide: hideAppBar,
init: init
});
In artboard.js, we also have an init function that adds the brush command click event handlers to the app bar. We have split these out because we want our app to have a front page that lists the recent images we have created. When that page is displayed, the app bar should still allow a user to load an image (which is why the load icon is in the global section of the app bar), but the user shouldn’t be able to see the options to select a brush size. This init function simply assigns the selectFile function as the click event handler for the Load button on the app bar. The app should call the init function we just created. We can add this to default.js. The code to be added appears in bold:
args.setPromise(WinJS.UI.processAll().then(function () {
if (nav.location) {
nav.history.current.initialPlaceholder = true;
return nav.navigate(nav.location, nav.state);
} else {
return nav.navigate(Application.navigator.home);
}
}).then(function () {
STYWin.AppBar.init();
}));
When the app is run, we can actually load an image by clicking the Load icon on the app bar. Figure 6.1 shows the final result of a loaded image, with some drawing on top of it. The base image was downloaded from http://visualstudiowallpapers.com/post/25145983097/embrace-the-case.

Figure 16.1. The image loaded from the file open picker contract is now the background that has been doodled on.
Using the Print Extension
Windows provides the print extension so that apps can tie into the Devices charm to print. Apps do not need a Print button because printing is done through charms. Adding printing capabilities to an app is really straightforward.
In the FingerPainting app, we can add a JavaScript file called print.js to the js folder. The contents of print.js are as follows:
"use strict";
(function () {
WinJS.Namespace.define("STYWin.Print", {
registerForPrintContract: registerForPrintContract,
unregisterForPrintContract: unregisterForPrintContract
});
var printManager = Windows.Graphics.Printing.PrintManager.getForCurrentView();
function registerForPrintContract() {
printManager.addEventListener(
"printtaskrequested", onPrintTaskRequested);
}
function unregisterForPrintContract() {
printManager.removeEventListener(
"printtaskrequested", onPrintTaskRequested);
}
function onPrintTaskRequested(printEvent) {
printEvent.request.createPrintTask("FingerPainting", function (args) {
args.setSource(MSApp.getHtmlPrintDocumentSource(document));
});
}
})();
The namespace we created, STYWin.Print, is exposing the register and unregister event handlers. We get the PrintManager object associated with the current window with the call to getForCurrentView. Inside the onPrintTaskRequested event handler, we create a print task. This indicates that the app has content to print. It takes the title that will be displayed in the Devices charm as well as the handler to the code to actually print the document. The MSApp.getHtmlPrintDocumentSource function is a helper function that returns the source content for the content to be printed.
In artboard.js, we can add the following statement at the end of the ready function:
STYWin.Print.registerForPrintContract();
We can also add the unregister call to the unload function of the artboard page:
STYWin.Print.unregisterForPrintContract();
We add this because we will be adding the main page that displays recent images created. That page won’t be printed, so we don’t want anything to display in the Devices charm. If we run the app, we can see that the app has notified Windows that it can print. Figure 16.2 shows the results.

Figure 16.2. FingerPainting has registered for the print contract.
The window.print function could be used, but using the print contract is a best practice. The window.print function simply prints exactly what is on the screen. Some apps might handle it fine, but in others, what is on the screen doesn’t translate well to print.
The print contract also exposes the options we can modify, such as the page range to print, the orientation, and the color mode. If we try to print currently, it defaults to portrait mode and chops off the image. Instead, let’s default the options to use landscape. Inside the print.js file, in the onPrintTaskRequested function, we store the return value from the createPrintTask in a variable called printTask. We can add the following code to the end of the onPrintTaskRequested function:
printTask.options.orientation =
Windows.Graphics.Printing.PrintOrientation.landscape;
Using the Settings Extension
To demonstrate how to use the Settings extension, we to continue to update the FingerPainting app. We have a brushSize stored in sessionState if the app is suspended and resumed, but if the app is launched fresh, we set it straight to a brush size of 5. We want our users to be able to specify the default brush size when they launch the app fresh. Settings are modified by the Settings charm (Win+I) for each app. We add two commands for information and the general settings where the brush size will be set.
Try It Yourself: Implementing About and General Settings Flyouts
1. To start, we need to create a new folder in our solution called settingflyouts. This should be a sibling to the pages folder. We will put all setting flyouts in this folder.
2. Inside the settingflyouts folder, we need to create two more folders: about and general. The Solutions Explorer should look like Figure 16.3.
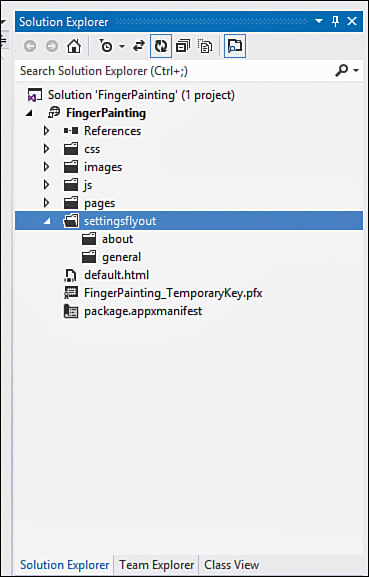
Figure 16.3. The solution structure after adding folders to hold the setting flyouts.
3. We right-click the about folder and create a new PageControl called about.html.
4. We right-click the general folder and create a new PageControl called general.html.
5. These don’t have to be structured this way; there is nothing special about the grouping. As with our pages folder, we are just trying to keep things organized.
6. Now we open jssessionstate.js and change the assignment of SessionState.brushSize to the following:
SessionState.brushSize = STYWin.Settings.brushSize;
7. Instead of just setting it to 5, we pull the information from the not-yet-created STYWin.Settings namespace.
8. Let’s create the namespace now. Under the js folder, we create a new file called settings.js.
9. The jssettings.js file contains the following code:
"use strict";
(function () {
var Settings = {};
Settings.brushSize = 5;
WinJS.Namespace.define("STYWin.Settings", Settings);
})();
10. Let’s replace the contents of the body element in settingflyoutabout.html with the following:
<div data-win-control="WinJS.UI.SettingsFlyout" aria-label="App Settings Flyout"
data-win-options="{ settingsCommandId: 'about', width: 'wide' }">
<div class="win-ui-light win-header"
style="background-color: white; border-bottom: 1px solid black;">
<button type="button" onclick="WinJS.UI.SettingsFlyout.show()"
class="win-backbutton">
</button>
<div class="win-label">About</div>
</div>
<div class="win-content">
<div class="win-settings-section">
<div>This is the about section of the FingerPainting app.</div>
<div>This could be an iframe that points to web content that provides
up to date information.</div>
</div>
</div>
</div>
11. We are actually using the WinJS SettingsFlyout control. The options we pass to it include the settingsCommandId, which uniquely identifies each flyout command. We set up the header to show the Back button and, if it is pressed, to basically hide this flyout and show the main SettingsFlyout. The label, About, is the header label that shows up beside the Back button. The actual content is what we display in the settings pane. In this case, we are using some temporary text to simulate an about page.
12. In the jssettings.js file, after defining the namespace, we can add the following code:
WinJS.Application.onsettings = function (e) {
e.detail.applicationcommands = {
"general":
{ title: "General", href: "/settingflyouts/general/general.html" },
"about":
{ title: "About", href: "/settingflyouts/about/about.html" }
};
WinJS.UI.SettingsFlyout.populateSettings(e);
};
13. The code could have been put in default.js, but this way, all the settings logic is stored together. We see the about id that is being assigned in the onsettings event handler is the same as the about settingsCommandId that is being set in the data-win-options in the about.html file. We already created the general application command and pointed it to the general.html file we created. We will modify that file shortly.
14. It is important for the setting.js reference to be placed before default.js so that the populateSettings function is called before the call to app.start occurs. In our case, because SessionState also relies on this, it is important for it to be before SessionState as well. Place a reference to settings.js immediately following the reference to utilities.js in default.html:
<script src="/js/settings.js"></script>
15. At this time, we have fully set up what is needed for the About setting to be displayed. If we run the app now and bring up the Settings charm by swiping from the right, or hovering our mouse cursor over there, or pressing Win+I on the keyboard, we will see the General and About settings. Clicking General does not do anything because we haven’t set up general.html to actually be a SettingsFlyout control. Selecting About makes visible the about text we created. The header has a white background with a black border on the bottom, just as we styled it. See Figure 16.4.
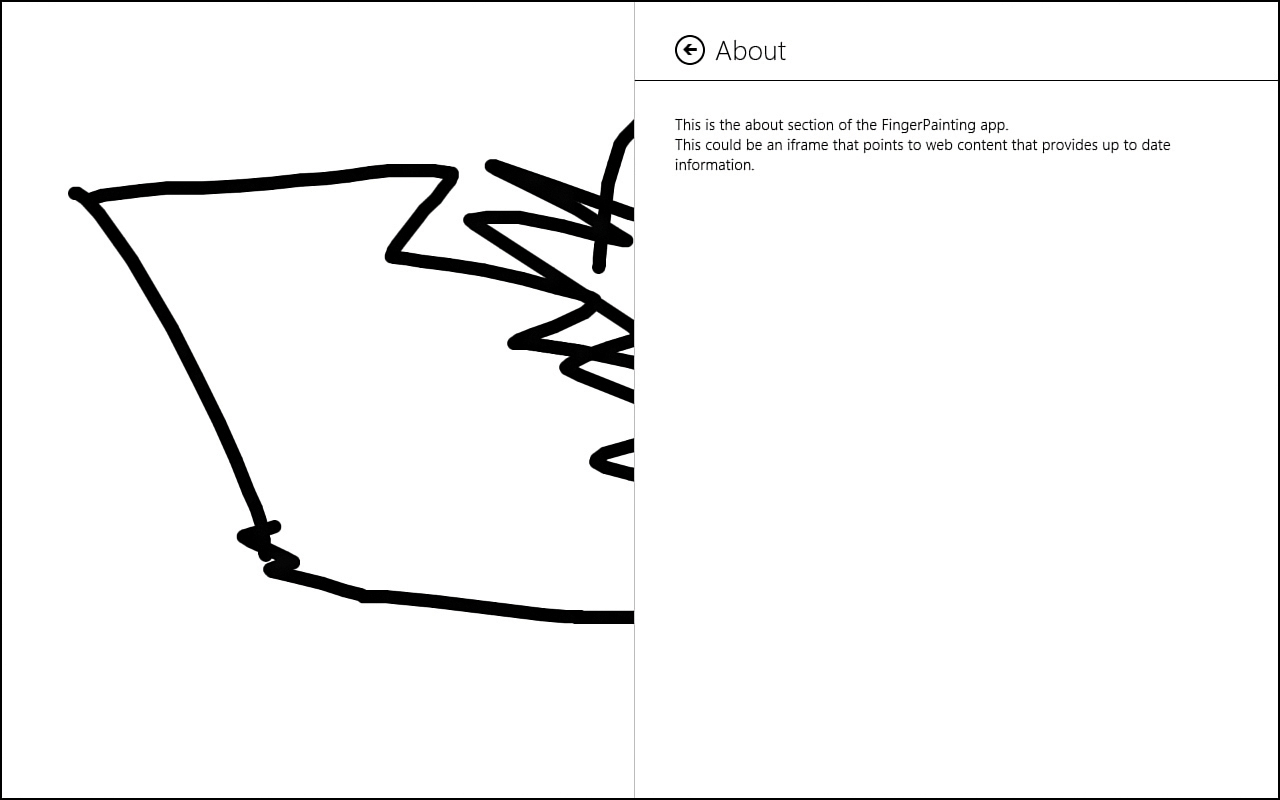
Figure 16.4. The FingerPainting app now includes a settings flyout for an About page.
16. Let’s create a way for the user to modify the brush size through the general settings flyout. We replace the contents of the body element in settingflyoutsgeneral.html with the following code:
<div data-win-control="WinJS.UI.SettingsFlyout" aria-label="App Settings Flyout"
data-win-options="{ settingsCommandId:'general',
onafterhide: STYWin.Settings.saveSettings }">
<div class="win-ui-light win-header"
style="background-color: white; border-bottom: 1px solid black;">
<button type="button" onclick="WinJS.UI.SettingsFlyout.show()"
class="win-backbutton"></button>
<div class="win-label">General</div>
</div>
<div class="win-content">
<div class="win-settings-section">
<label>Select the default brush size: </label>
<select id="ddlBrushSize">
<option value="5">Brush Size: 5</option>
<option value="10">Brush Size: 10</option>
<option value="15">Brush Size: 15</option>
<option value="20">Brush Size: 20</option>
<option value="30">Brush Size: 30</option>
<option value="50">Brush Size: 50</option>
</select>
</div>
</div>
</div>
17. Just as with the about settings, we have created a SettingsFlyout control. We have set the command id to general, which matches what we set in the Settings.js file. We also set the onafterhide event to a function we will create called STYWin.Settings.saveSettings. This is how we will actually save the settings to the local storage after the user has closed the settings flyout. The header is styled the same way, and the label is set to General. Instead of having text as we did for the about flyout, we create a drop-down list box for the user to select the default brush size.
18. Now we can hook up our JavaScript in the settingflyoutsgeneral.js file by adding the following code to the ready function:
var ddlBrushSize = document.getElementById("ddlBrushSize");
ddlBrushSize.value = STYWin.Settings.brushSize;
ddlBrushSize.onchange = function (evt) {
STYWin.Settings.brushSize = evt.target.value;
}
19. We grab a handle to the drop-down list and then set the value to the current brushSize stored in the settings. This automatically selects the right item in the list. Then when the selection changes, we make sure we set the brushSize to the value of the item selected.
20. Finally, we can finish building out the STYWin.Settings object by adding the following code before defining the namespace in the jssettings.js file:
var appData = Windows.Storage.ApplicationData.current;
var roamingSettings = appData.roamingSettings;
if (roamingSettings.values["brushSize"]) {
//override app default with settings default
Settings.brushSize = roamingSettings.values["brushSize"];
}
Settings.saveSettings = WinJS.Utilities.markSupportedForProcessing(
function () {
roamingSettings.values["brushSize"] = STYWin.Settings.brushSize;
});
21. We are taking the brushSize we created a few steps ago and now are reading it in from the user’s roaming settings if it is present. We then expose a saveSettings function (which is marked as supported for processing, for security reasons), which stores the brushSize value in the roaming settings.
Figure 16.5 shows the results of the General settings flyout.
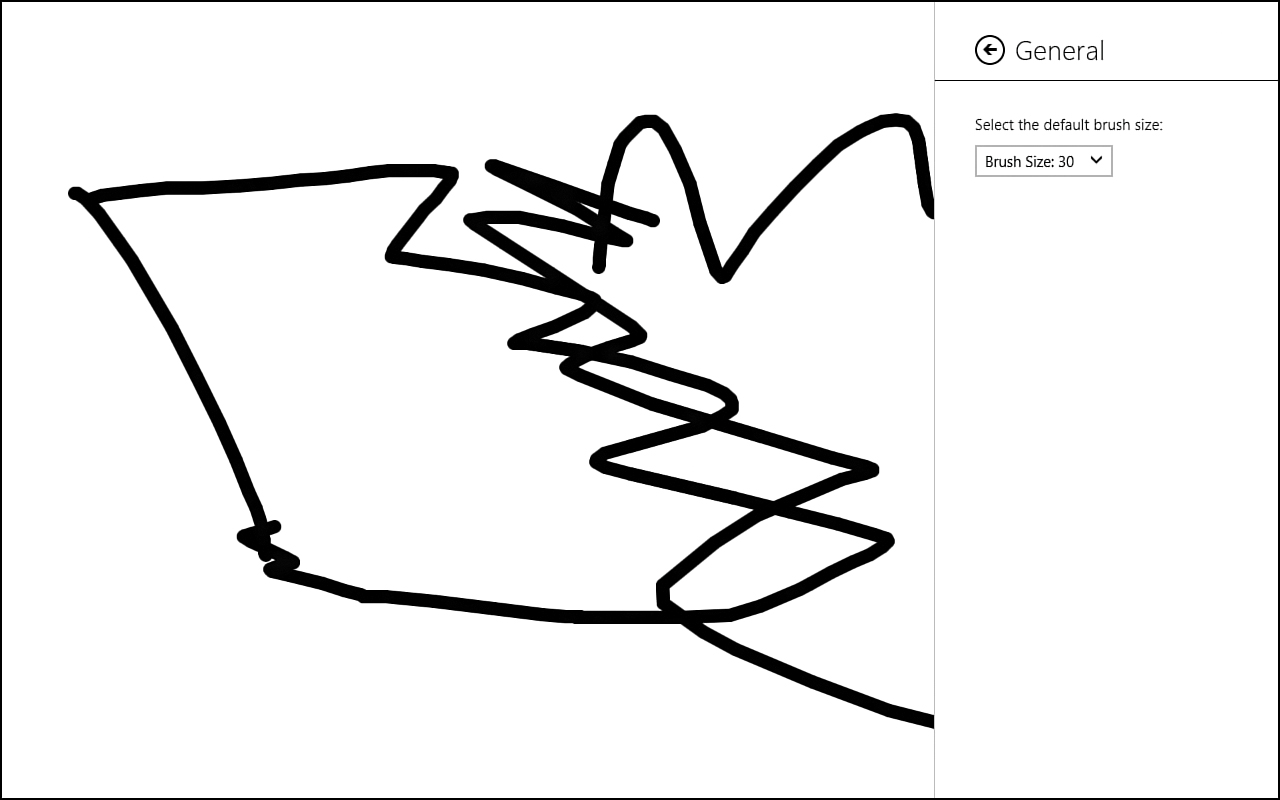
Figure 16.5. The FingerPainting app now includes a settings flyout for a General page.
When running the app, we can select the General settings. When the app first loads, it gets the default brush size of 5, but this can be set to any other size. When we close the app and launch the app again, the new value appears in the General settings flyout. If this was a fresh launch, the brush size is used when we start painting. If we change the size and then suspend and terminate the app and launch it again, the brush size from the session state is used, which is what we want. Not much work was needed to actually tie into the Windows setting extension and to get it to work with the existing code.
Implementing the Contact Picker Extension
Sometimes an app needs to have the user select from a contact list. During these times, the app can consume the Contact Picker Extension. However, apps can also be a contact source. This section looks at how to both retrieve contact information and provide a list of contacts for other apps.
We create two projects in this section. One is the contact selector. The other is the app that provides the contacts. (This was already created during Hour 13, “Working with Fullscreen, Filled, Snapped, and Portrait Views.”)
Let’s create a new Blank App project called ContactPickerExample. We can open the default.html and replace the body content with the following markup:
<button id="btnGetContact">Get Contacts</button>
<ul id="output"></ul>
We can add the WinJS.Utilities.ready function at the end of default.js:
WinJS.Utilities.ready(function () {
});
Inside the ready function, we can add the following code:
var btnGetContact = document.getElementById("btnGetContact");
btnGetContact.addEventListener("click", getContact, false);
function getContact() {
// Verify that we are unsnapped or can unsnap to open the picker
var viewState = Windows.UI.ViewManagement.ApplicationView.value;
if (viewState === Windows.UI.ViewManagement.ApplicationViewState.snapped &&
!Windows.UI.ViewManagement.ApplicationView.tryUnsnap()) {
// Fail silently if we can't unsnap
return;
};
// Create the picker
var picker = new Windows.ApplicationModel.Contacts.ContactPicker();
picker.commitButtonText = "Select";
// Open the picker for the user to select contacts
picker.pickMultipleContactsAsync().done(function (contacts) {
if (contacts.length > 0) {
var ouput = document.getElementById("output");
var li;
contacts.forEach(function (contact) {
li = document.createElement("li");
li.innerText = contact.name;
output.appendChild(li);
});
} else {
// The picker was dismissed without selecting any contacts
console.log("No contacts were selected");
}
});
}
After hooking up the event handler for the button and making sure we aren’t in snapped mode, we instantiate a new ContactPicker object. This is similar to how we worked with the File Open Picker. We set the text of the Commit button to Select. Then we call pickMultipleContactsAsync. A pickSingleContactAsync function also is available. When we get the list of contacts, we loop through and add them to a list to be displayed onscreen. If no contacts are returned, we print a message to the console in Visual Studio. We can run the app and see that we can select contacts from the People app that comes with Windows.
Now we create an app that provides contacts. To get started, we first copy the ListViewExample project from Hour 13 (in the ListViewWithSemanticZoomExample folder).
After we open the copy, we need to first modify the application package manifest file. We need to declare that the app is going to be a Contact Picker. We do this by going to the Declarations tab and selecting Contact Picker from the Available Declarations drop-down listbox. We can click the Add button to place the declaration in the Supported Declarations list. We can save and close the manifest file.
Next, inside default.js, we need to modify the activation condition. Because this is a Contact Picker, it can be launched that way in addition to being launched normally. We can modify the args.detail.kind condition in the onactivated event handler to this:
if (args.detail.kind === activation.ActivationKind.launch ||
args.detail.kind === activation.ActivationKind.contactPicker) {
Then inside the condition we can add the following code:
if (args.detail.kind === activation.ActivationKind.contactPicker) {
STYWin.Utility.contactPickerUI = args.detail.contactPickerUI;
}
If we launched from a Contact Picker, we need to keep track of the contactPickerUI passed in. Inside the ready function, we need to declare the variable:
var contactPickerUI;
We also need to expose it in our namespace:
WinJS.Namespace.define("STYWin.Utility", {
contactPickerUI: contactPickerUI,
formatCurrency: WinJS.Binding.converter(function (num) {
Inside the initLayout function, immediately after we declare the listView variable, we add the following condition:
var listView = document.getElementById("simpleListView").winControl;
if (STYWin.Utility.contactPickerUI) {
listView.addEventListener("iteminvoked", addContact, false);
}
When we launched the app, we set the contactPickerUI if it was launched as a Contact Picker. If not, the contactPickerUI won’t be set. Assuming that we are in the correct mode, when an item is clicked, we call the addContact function. Let’s add that function:
function addContact(evt) {
var contactToAdd = evt.detail.itemPromise._value.data;
var contact = new Windows.ApplicationModel.Contacts.Contact();
contact.name = contactToAdd.name;
var result = STYWin.Utility.contactPickerUI
.addContact(contactToAdd.name, contact);
}
When a contact is invoked, we grab the contact data. We instantiate a new Contact object and set the name of the object to the name of the contact passed into this event handler. We then call the addContact on the contactPickerUI. We are using the name as the id because our data didn’t have an id and all users in our list have unique names. For a real app, we would provide much more information and have a unique identifier. We aren’t doing anything with the result from the contactPickerUI.addContact function, but it does return a Windows.ApplicationModel.Contacts.Provider.AddContactResult value. The possible values for the AddContactResult are added, alreadyAdded, and unavailable. We are ignoring any of the results for this little demo. The app is deployed by running it and then closing it, by choosing Deploy Solution from the Build menu, or by right-clicking the solution in the Solution Explorer.
After the ListViewExample (our contact provider) is deployed, we can run the ContactPickerExample app we created a moment ago. Now when we run it, we can pick the ListViewExample from the drop-down list at the top of the screen. Figure 16.6 shows the results.
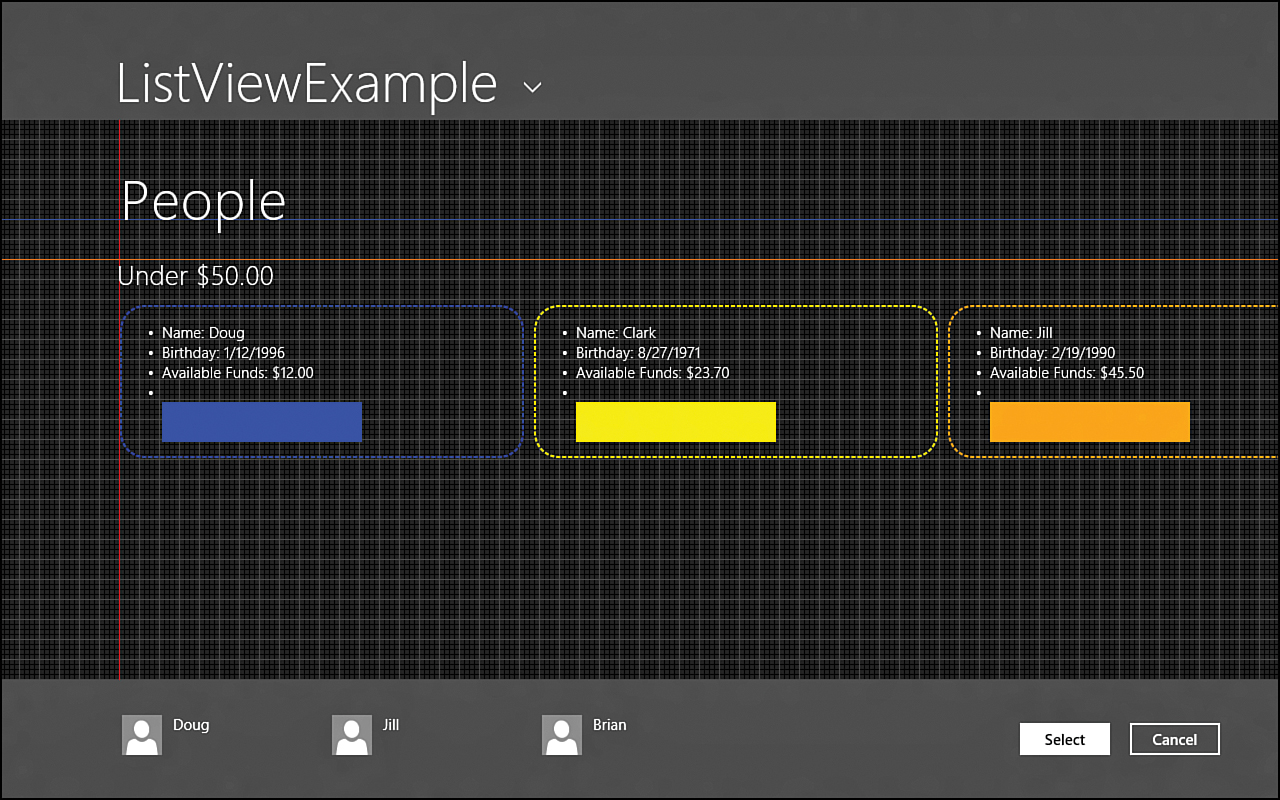
Figure 16.6. Apps expose custom contact information.
Implementing the Search Contract
The goal with the search contract is to make an app searchable from anywhere within Windows 8. The Search charm enables users to go to a single location to search for anything.
The search box is scoped to the main app on the screen. The main app provides the query suggestions on the screen. This provides the autocomplete for terms for which the app has search results. All the installed Windows Store apps that have implemented the search contract are listed and can be selected from the Search charm. So even if our app isn’t the main app open, the user can select it from the list to search the app. Besides the query suggestions, the app can provide result suggestions when it is the main app on the screen. These result suggestions show a direct match or a strong match that takes the user directly to some content. It must include a thumbnail and title.
Let’s update the RSSReader app we made during Hour 12, to make it implement the search extension. When we have the project copied over and opened, we can create a new folder called search under the pages folder. We can then right-click the newly created search folder and add a new item. In the Visual Studio Add New Item dialog box, in Figure 16.7, we select Search Target Contract. We leave the name to the default searchResults.html.

Figure 16.7. Visual Studio provides a Search Target Contract template that we can add to sites to implement the search extension.
The template provides a lot of functionality for us automatically. It handles displaying search results and filtering the results. However, it does require modification to work with the real data in a way that makes sense for apps. Still, it is a great starting point and should be used. When we added the contract template, it automatically modified the app manifest file to declare that we are using Search.
Let’s modify the searchsearchResults.js file. To begin, we have only a single group (the single Windows Blog feed), so we can remove the two filter push calls in the _generateFilters function shown here:
this.filters.push({ results: null, text: "Group 1", predicate: function (item) ...
this.filters.push({ results: null, text: "Group 2+", predicate: function (item) ...
Next, we can modify what data we are actually searching. For the RSSReader app, we removed the subtitle and changed the description to content. So we can replace the first return in the _searchData function with the following return:
return (item.title.indexOf(queryText) >= 0 ||
item.content.indexOf(queryText) >= 0);
We simply removed the subtitle check and changed description to content. Inside searchResults.html, we also need to make similar changes in the data we are binding. In the itemtemplate, we need to remove the img element and the item-subtitle h4 element. We need to change the description property to shortContent because we are showing just a few lines of text in the list of search results.
While we are here, we can change the CSS reference to use ui-light instead of ui-dark. We also need to reference the searchResults.js file. We can add the following line above the reference to default.js inside of default.html:
<script src="/pages/search/searchResults.js"></script>
If we run the app now, we can bring up the Search charm and enter something like HTML or App or Windows and get results from the RSS feed. We can’t click on any of the results because we didn’t implement it. If we open the searchResults.js file, we can see the _itemInvoked function. If we add the following code under the comment TODO: Navigate to the item that was invoked, we can select the items:
var index = Data.items.indexOf(item.data, 0);
nav.navigate("/pages/split/split.html", {
group: item.data.group, selectedIndex: index
});
The Split App project, which is what we started with when we created this RSSReader app, enables passing in an index so that the correct item is displayed. We are simply passing in the item group (which is always the same) and the index of the item the person selected. We determine the index by searching the data items with the item the user selected.
To finish this example, we just need to add one more piece back in the split.js file. If we select an item that isn’t on the first page, the list view doesn’t scroll down to the selected index. The index is selected correctly in the previous code, but it isn’t visible to the user. To fix that, we need to add the following code in the ready function after the // Set up the ListView comment and before we call this.updateVisibility:
if (this._itemSelectionIndex >= 0) {
msSetImmediate(function () {
listView.ensureVisible(options.selectedIndex);
});
}
We are checking to see if an index was passed in the options. If so, we make sure the index is visible. We wrap it in the msSetImmediate function to have the function called when the current or pending task is completed. We want it called as soon as possible so that the index is actually set before the list view is rendered. Figure 16.8 illustrates searching the RSSReader app.
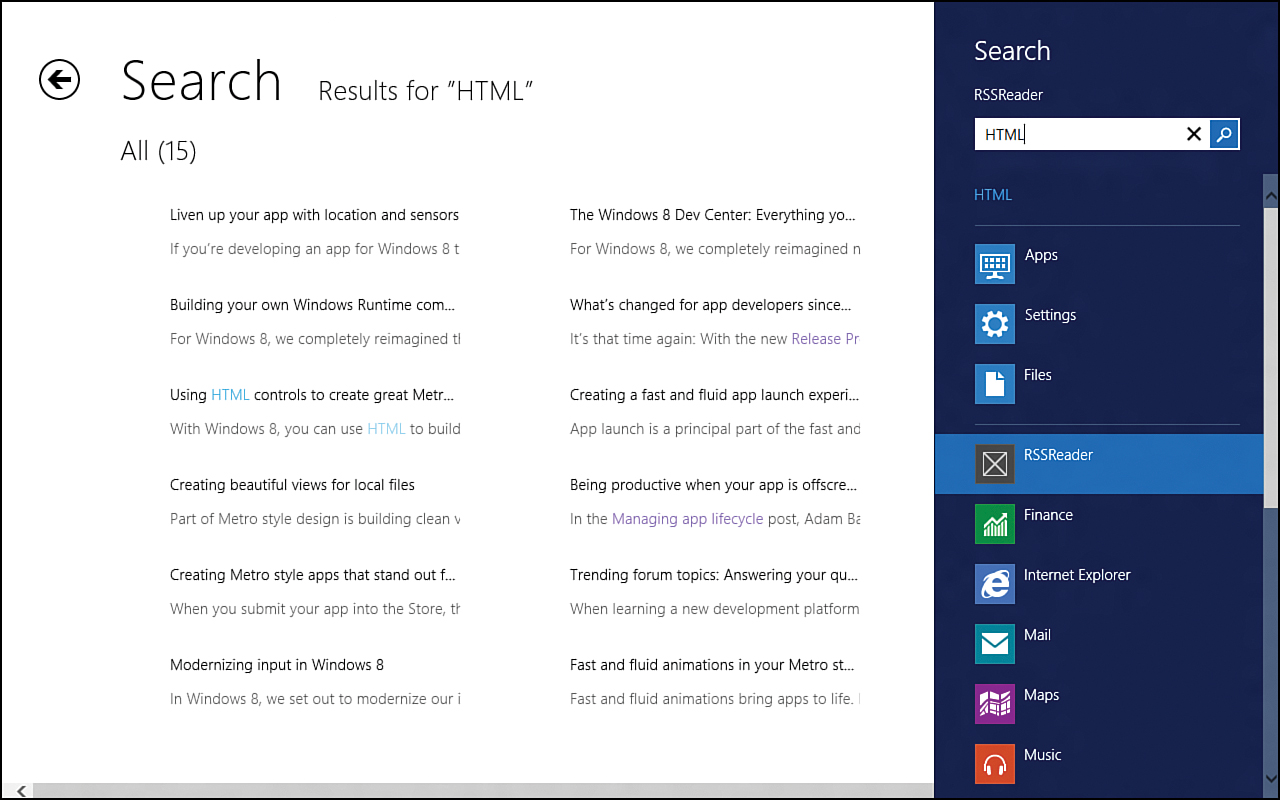
Figure 16.8. The Search extension allows apps to be searched from the Windows Search charm.
The code has a bug, though. As long as our app is running, we can do a search just fine. But if we close our app, bring up the Search charm, type in the search, and select our RSSReader app from the list, the app launches and then terminates. So the question becomes, “How exactly do we debug this problem?” Fortunately, Visual Studio provides a mechanism to do just that. Under the debug menu, we can select RSSReader Properties. On the Debugging configuration, we can see that Launch Application is set to Yes. We want to change that to No, as in Figure 16.9.
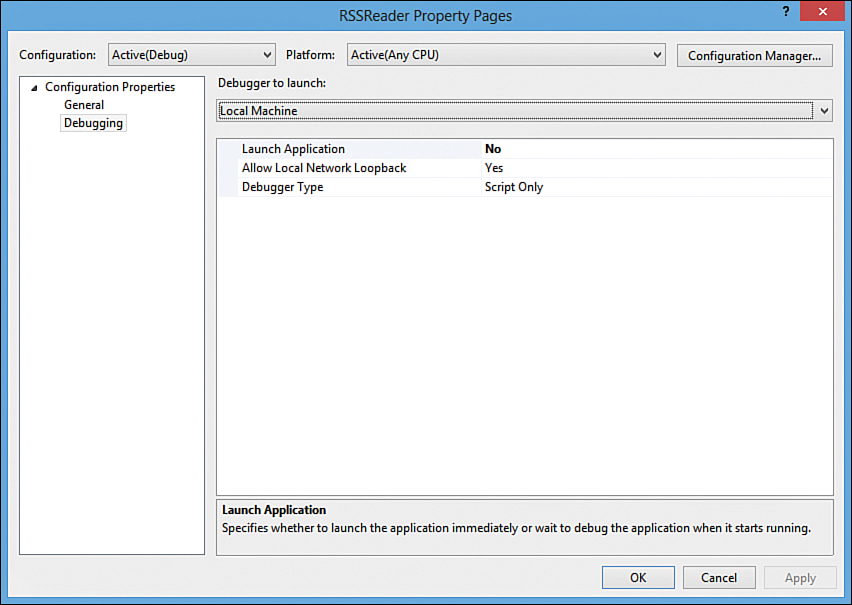
Figure 16.9. Visual Studio can attach to a process when it is launched by other means.
This allows to “run” the app in Visual Studio and then launch the app outside of Visual Studio. Visual Studio thus waits for the app to be executed and then attaches itself to the correct process so that it can be debugged. This is very handy, indeed.
With Visual Studio waiting to attach to the process, when we do the search in the Windows Search charm and then select the RSSReader app from the list, the code breaks in the _searchData function in searchResults.js. It tries to call createFiltered on Data.items, but Data.items doesn’t have that function. This is because the RSS data hasn’t been loaded yet. We need to make sure that we have data to search that can be filtered.
To fix this, we need to modify the _handleQuery function, which calls the _searchData function. The _handleQuery function assumes that data is immediately present. Because we are loading data from the web, we need it to wait on the data and display a progress bar if no data is loaded. We need to call the same logic twice (if the data is already loaded and if the data isn’t already in memory), so we want to create an additional function that will be called by _handleQuery. Let’s replace the _handleQuery function with the following two functions:
_populateResults: function (inst, element) {
document.querySelector('.fetchingresults').style.display = "block";
document.querySelector('.resultsmessage').style.display = "none";
document.querySelector('.filterarea').style.display = "none";
var originalResults = inst._searchData(inst._lastSearch);
if (originalResults.length === 0) {
document.querySelector('.resultsmessage').style.display = "block";
} else {
document.querySelector('.filterarea').style.display = "block";
}
document.querySelector('.fetchingresults').style.display = "none";
inst._populateFilterBar(element, originalResults);
inst._applyFilter(inst._filters[0], originalResults);
},
// This function executes each step required to perform a search.
_handleQuery: function (element, args) {
//var originalResults;
this._lastSearch = args.queryText;
WinJS.Namespace.define("searchResults",
{
markText: WinJS.Binding.converter(this._markText.bind(this))
});
this._initializeLayout(element.querySelector(".resultslist")
.winControl, Windows.UI.ViewManagement.ApplicationView.value);
this._generateFilters();
if (Data.items.length === undefined) {
var self = this;
Data.refreshFeeds().then(function () {
self._populateResults(self, element);
});
} else {
this._populateResults(this, element);
}
},
In the _handleQuery function, we are checking to see if the items are actually present. If they aren’t, then length will be undefined instead of having a value. If there is data, then the original code is called and all is well. If there is no data, then we make the asynchronous call to our refreshFeeds function we created in an earlier hour. In the promise we call the function we created named _populateResults. Since this is inside a promise we need to store the this reference and pass it in. If the data is already present, we call the same _populateResults function passing in this. The first part of the _handleQuery function remains unaltered with the template code that handles filtering the data and highlighting the searched values.
The _populateResults function we created is taking the code that was being called inside of _handleQuery and does the same logic. The only difference is that we have added a .fetchingresults class that we are tracking. When the function is called, we display the fetchingresults div, which just contains a progress bar that we will see shortly. Then we hide both the actual list of items (.filterarea') and the no results found message (.resultsmessage). So when the data is already present, the progress bar may not even be displayed and either the nothing found message or the actual list of items found will be displayed. On the other hand, if this is being launched from the charms menu, then the progress bar will be displayed and then it will hide and either the nothing found message or the actual list of items found will be displayed.
The markup we need to add for the progress bar to the searchResults.html is as follows:
<div class="fetchingresults">
<label class="win-type-xx-large">
<progress class="win-ring win-large"></progress>
Fetching ...
</label>
</div>
The previous markup can be placed at the very beginning of the Main content section. The following CSS rule needs to be added to the searchResults.css file to position the progress bar in the same place as the resultsmessage is positioned:
.searchResults section[role=main] .fetchingresults {
margin-left: 120px;
margin-top: 193px;
}
We are simply setting the rule to the exact same values as the following rule:
.searchResults section[role=main] .resultsmessage
Finally, we need to add the following initialization states of the resultsmessage and filterarea to not be displayed when the page is first loaded. The code needs to be added to the very beginning of the ready function:
document.querySelector('.resultsmessage').style.display = "none";
document.querySelector('.filterarea').style.display = "none";
Now, when we run the code we see the results we expect. We can change the debugging mode back so Visual Studio will actually launch the code.
Unfortunately, we don’t have the space to walkthrough setting up the query suggestions or the result suggestions. More information can be found in the “Further Exploration” section at the end of the hour.
Understanding the Share Contract
Sharing allows users to share content from one app to another app. If our app is going to share with another app, our app needs to register with the DataTransfer Manager. Assuming a user shares something from our app through the Share charm, our app will receive an event and the app will need to populate the DataPackage. Once that is done we return the data to the Share Broker. The Share Broker will display a filtered list of target apps and quick links the user can select to share the data. The target app selected will be activated by the share broker. The target app will process the DataPackage contents the way it likes and then tell the Share Broker it is done. The target UI is then removed and the user is back to the main app.
DataPackages can contain plain text, formatted text, URI information, HTML, images, files and even custom data formats (assuming other apps know how to use it). We are out of room to show how this works, but we will see an example during Hour 20, “Making the FingerPainting App.” We will make the FingerPainting app be both a target and a source for an Image DataPackage.
Glancing at the Remaining Contracts and Extensions
There are more contracts than what we have seen so far. We are going to spend just a moment to list the different contracts available and explain how they can be used. The “Further Exploration” section at the end of this hour will provide links for more information on these contracts and extensions.
Understanding the Protocol Activation Extension
The Protocol Activation Extension will allow our app to be activated when a particular protocol is used, assuming a user chooses our app as the default handler for the protocol scheme. In order to handle the protocol activation extension, we need to add the extension point in the application package manifest file. Under the Declarations tab, we can select Protocol from the Available Declarations drop-down list. Finally, we can hit Add to add it to the Supported Declarations list. If we support a protocol, it is important that we provide the user with the functionality she expects. For example, if our app use the mailto: protocol, then it would be expected to actually open up an email and populate the mail information appropriately.
Once our app has declared that it will utilize a protocol, then any app or website can use the protocol. This means that any site can invoke a Windows Store app that is installed on the machine and has registered for the extension. Of course, the caller could have malicious intent, so it is important to not perform permanent actions based on the parameters. For example, the app should never update the user’s account information when the app is activated from this protocol.
Using the Account Picture Provider Extension
The Account Picture Provider extension allows apps to get and set the user’s account pictures. This can be invoked programmatically, but it is mainly used when the user goes to set the account picture through the operating system. Any apps that have declared this contract are listed as an app that can change the account picture. The account picture provider extension actually uses the protocol activation extension. The following code checks whether the activation is a protocol and sees if it is specifically the ms-accountpictureprovider protocol:
if (args.detail.kind ===
Windows.ApplicationModel.Activation.ActivationKind.protocol) {
// Check if the protocol matches the "ms-accountpictureprovider" scheme
if (args.detail.uri.schemeName === "ms-accountpictureprovider") {
Understanding the File Activation Extension
Similar to the protocol activation extension, we can create an app that is launched based off a particular file type. So if a file with a particular extension was launched, Windows would activate the app associated to the file type and pass the filename to the app in the launch event. There is no need to use this extension to just use files. We have seen how we can read and write files to local storage without needing to declare this extension. This is only to handle a particular file type when the user launches the file type. As with the protocol activation extension, if our app registered for a file extension, it is important that the app actually act on the file in a way that the user expects. For example, if we registered for a .png file extension, the app would be expected to immediately display the image file to the user. The declaration needed in the package manifest is the File Type Associations declaration. We could use the following condition to check whether the app was activated by this extension:
if (args.detail.kind === Windows.ApplicationModel.Activation.ActivationKind.file){
Glancing at the Camera Settings Extension
The camera settings extension is made for the hardware vendors. If a hardware vendor provides extra functionality for their camera, they can create an app that would let the user utilize that camera app instead of the default one. This could be beneficial when the camera provided by the hardware vendor has more options than the default app exposes.
Using the App to App Picking Contract
Similarly to how we created the Contact Picking contract, we can create a contract for a particular type of data. Other apps can then bring up our picker screen so that the user can select the desired data. This could be beneficial if our app provided extra value to a common file type or had its own file format that other apps wanted to utilize. Perhaps the app organizes the data in a particular way that makes having its own picker beneficial. If there is no added value, a File Open Picker can be used instead.
An example of an app providing value is one that lists music files in a way that isn’t handled by default. For example, an app might display music by artist or album title, regardless of how the music files are actually organized in the file system. In this case, the app could register for the File Open Picker contract and provide the UI that would show up in the File Open Picker center portion of the screen (inside the letterbox).
If an app has an interesting save location, such as a cloud service file storage app, it could register for the File Save Picker so that users can save the files to the proprietary cloud storage. Of course, if the app acts as a save location by participating in the File Save Picker, it should also participate in the File Open Picker so that the user can easily retrieve the files to be used in other apps.
Understanding the Cached File Updater Contract
Besides participating in the File Open Picker and File Save Picker contracts, apps can provide real-time updates for files by participating in the Cached File Updater contract. Assuming that a cloud storage app was being created, it would be beneficial for the files to be local as well and to change locally to automatically update the cloud version. Likewise, if the cloud version was updated, the app would bring down the updated version. If an app provides real-time updates for files using the Cached File Updater contract, it needs to participate in the File Save Picker and File Open Picker contracts.
Using the Game Explorer Extension
If the app we are creating is a game, we can register with Windows as a game. This requires creating a Game Definition File (GDF) and including it as a binary resource in our app. Then we must declare the resource in the package manifest file. We will see how to do this during Hour 21, “Making the Simon Game.” Using this extension allows Windows to limit access to the game when family safety features have been enabled on the system.
Exposing the Play To Contract
The Play To contract allows apps to enable users to easily stream multimedia from the computer to other devices on the network. If the application is a picture viewer app, a music player, or a video player, we can declare the Play To contract in the app package manifest file to enable the user to select the Devices charm and have the media play to the selected device.
Looking at the AutoPlay Extension
The AutoPlay extension allows our app to be an option the user can select when connecting a nonvolume device to a computer. This includes devices such as a camera, a USB thumb drive, a DVD player, SD cards, and media players. When users want to share files between two machines by using Proximity (tapping the devices), AutoPlay can also be used as an option to share the files.
Using the Background Task Extension
Background tasks allow apps to run in the background for small work items that require no user interaction. They are allowed to run even when the app is suspended. They are associated to the lock screen and should run only because they provide relevant information to the user. Hour 17, “Using Live Tiles, Secondary Tiles, Notifications, and Toasts,” covers notifications in more detail.
Using the SSL/Certificates Extension
The last extension is the SSL/Certificates extension, which enables us to install a digital certificate with an app. Digital certificates authenticate a user over SSL. They facilitate authenticating a web server to a user and authenticating a user to a web server. Not many apps require this sort of extension, but it is extremely beneficial for the apps that do have this requirement.
Further Exploration
Many contracts and extension were just described, but we didn’t actually dig into how they need to be implemented. This section lists many links to Microsoft documentation that provides more information on each contract and extension:
How to print alternate content that is not displayed: http://msdn.microsoft.com/en-us/library/windows/apps/hh761455
Tutorial on how to add custom settings to the print window: http://msdn.microsoft.com/en-us/library/windows/apps/hh761450
Guidelines for developing print-capable Windows Store apps: http://msdn.microsoft.com/en-us/library/windows/apps/hh868178
More information on search contracts: http://msdn.microsoft.com/en-us/library/windows/apps/br225058
How to create a Protocol Activation Extension: http://msdn.microsoft.com/en-us/library/windows/apps/hh452686
Guidelines and checklist for file types and protocols: http://msdn.microsoft.com/en-us/library/windows/apps/hh700321
How to handle file activation: http://msdn.microsoft.com/en-us/library/windows/apps/hh452684
Streaming media to devices using Play To: http://msdn.microsoft.com/en-us/library/windows/apps/hh465176
Autolaunching with AutoPlay: http://msdn.microsoft.com/en-us/library/windows/apps/hh452731
Quickstart: How to register an app for AutoPlay: http://msdn.microsoft.com/en-us/library/windows/apps/hh452728
Introduction to background tasks: www.microsoft.com/download/details.aspx?id=27411
Ways to work with certificates: http://msdn.microsoft.com/en-us/library/windows/apps/hh465044
In addition to the documentation, Microsoft has the following Windows SDK samples that show how the code needs to be written to utilize the contracts and extensions:
• Association launching sample
• Contact Picker app sample
• Credential picker sample
• CryptoWinRT sample
• Lock screen personalization sample
• Lock screen apps sample
• Media Play To sample
• PlayToReceiver sample
• Print sample
• Search app contract sample
• Sharing content source app sample
• Sharing content target app sample
• SMS message send, receive, and SIM management sample
• SMS background task sample
• Windows 8 device app for camera sample
• Windows 8 banking app with strong authentication sample
Summary
We discussed a lot of contracts and extensions this hour—in fact, we discussed all of them! We looked in detail at the Print extension, Settings extension, Contract Picker extensions, and Search contract. We modified the FingerPainting app and added functionality with the Print extension and the Settings extension. We also consumed the File Open Picker contract to load in a background image.
We looked at the share contract and discuss it more detail during Hour 20. We also covered the rest of the contracts and extensions that we have access to, including the Protocol Activation extension, Account Picture Provider extension, File Activation extension, and Camera Settings extension. We also discussed the App to App Picking contract and how it works with the File Open Picker and File Save Picker and the Cached File Updater contracts. We wrapped up the hour by exploring the Game Explorer extension, the Play To contract, the Background Task extension, and the SSL/Certificates extension.
Q&A
Q. Can my Windows Store app communicate with a desktop app?
A. No. Windows Store apps are contained in a sandboxed environment and can’t talk directly to desktop apps. Windows Store apps cannot assume that any app is installed on the desktop.
Q. If the primary purpose of my app is to provide search and to show extensive suggestions, how would I go about doing that with the search contract?
A. Although the search contract should be used, if the app’s purpose is really just for searching, the search box should be prominently displayed in the app to signify to the user the importance of the search function.
Q. When I run my app through Visual Studio, nothing happens—no splash screen or anything. What is wrong?
A. Chances are, the app was being debugged in regard to contracts. Check the project properties and, under the debugging section, confirm that Launch Application is set to Yes.
Workshop
Quiz
1. When having the user open a file through File Open Picker, do we need to add the File Open Picker declaration to our app package manifest file?
2. To search the Internet with our app, we need to implement the search contract. True or false?
3. Which extension do we use to associate an app with a particular file extension?
4. When implementing a Share contract, the app must support both the target and the source contracts. True or false?
Answers
1. No. When using the File Open Picker contract or the File Save Picker contract in our apps, we do not need to add the declaration to the app. The declarations need to be added only if we are creating our own File Picker that other apps can use to allow the user to select files.
2. False. The Internet capability, which is selected by default, is what we need to connect to the Internet. The Search contract is to allow our app to be searchable from the Windows Search charm.
3. To have our app activated when the user launches a particular file, we need to implement the File Activation extension.
4. False. An app can choose to implement both the source and target search contract, but if one is implemented, the other is not required to be. It might make sense for an app to only produce content or only consume content; for other apps, it may make sense to both consumer and produce content.
Activities
1. Currently, the FingerPainting app only clears the background to the color white. Add a setting that allows the user to specify what the background color should be when a blank artboard is created.
2. Complete the Microsoft Quickstart “Integrating with File Picker Contracts,” at http://msdn.microsoft.com/en-us/library/windows/apps/hh465192.
3. Modify the ListViewExample to provide search suggestions.