
6. JavaFX Integration
In this chapter, we’ll explore how to use JavaFX within a NetBeans Platform application. We’ll first create a basic one-window NetBeans Platform application with JavaFX content. This will show you the minimum steps required to add JavaFX to your NetBeans Platform application.
Next, we’ll port a JavaFX program from Chapter 4. We’ll show you how to structure a multi-window NetBeans Platform application that follows the guidelines discussed in Chapter 5, taking advantage of the same NetBeans Platform features. This includes modularizing your application, using service providers, creating modules with public packages, and relying on Lookups and change events to keep your application loosely coupled. The discussion of this example assumes you have read Chapter 5.
We’ll also show you communication strategies you can use to keep your JavaFX UI code isolated and separate from your Swing UI code.
What You Will Learn
• Integrate JavaFX into a NetBeans Platform application.
• Add JavaFX content to a Swing UI.
• Structure JavaFX with FXML and controller class in the context of a NetBeans Platform application.
• Use Lookup to discover service providers and share objects between modules.
• Communicate between a TopComponent Swing window and its embedded JavaFX scene graph.
6.1 JavaFX and the NetBeans Platform
Let’s begin by porting an example program from Chapter 3, project MyRectangleCSSApp in the book’s download bundle. This single-window JavaFX application is described in “Creating a JavaFX FXML Application” on page 93, “CSS Files” on page 98, and “Animation” on page 100. Figure 6.1 shows the application running during a transition that rotates the rectangle and text elements. Recall that this program uses FXML to describe the scene graph and associated controller class to specify event handlers and any additional configuration. The main program invokes the FXML Loader to instantiate the elements in the scene graph and the controller class.
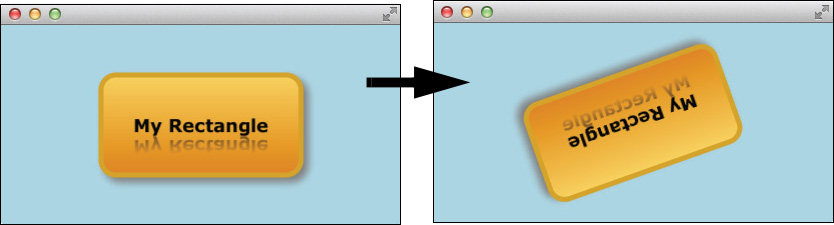
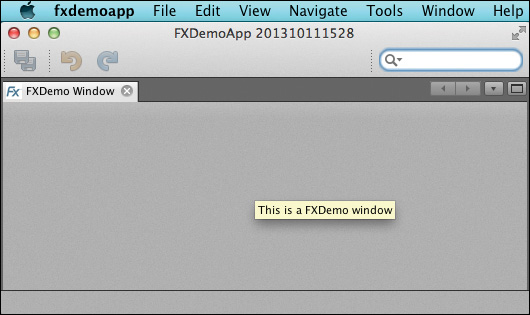
Figure 6.2 shows this program running as a NetBeans Platform application with the rectangle and text elements during rotation. Although similar, the NetBeans Platform application has a top-level menu and toolbar, a fully floating/docking resizable window, and the ability to open and close the FXDemo window via the Window menu.

Here are the general steps to build a NetBeans Platform application with JavaFX content.
1. Create a NetBeans Platform Application project.
2. Create a new module in the application.
3. Add a window (TopComponent) to the module.
4. Add JavaFX content to the TopComponent using Swing component JFXPanel.
There is flexibility with the final step. You can, for example, add JavaFX elements directly to the JFXPanel in the TopComponent class. Alternatively, you can use FXML with an FXML controller class. The FXML approach has several advantages.
• You can use Scene Builder and FXML to build and edit your scene graph.
• FXML (with or without Scene Builder) helps you better visualize your scene graph. FXML also makes it easier to edit scene graph elements, since you don’t have to configure them with Java APIs.
• The JavaFX code is separate and isolated from the TopComponent Swing code. Since you are integrating two different GUI APIs in a single application, your code will be much easier to read and maintain with FXML.
• If you already have an FXML document and controller class, it is straightforward to port this code to a NetBeans module.
For these reasons, we will use the FXML approach.
Java 8 and JavaFX 8 Enhancements
Beginning with Java 8, JavaFX is fully integrated into the JDK and the JavaFX runtime libraries are included in the standard Java classpath. This means you don’t have to do anything special to access JavaFX classes in NetBeans Platform applications. Prior to Java 8, however, you had to perform these additional steps.
1. Create a library wrapper for the JavaFX runtime JAR file, jfxrt.jar, and add it to your NetBeans Platform project. A library wrapper is a NetBeans module with all of the JAR file’s packages declared public.
2. Declare a dependency on the wrapped library module with any module that contains JavaFX.
We show how to create and add a library wrapper to a NetBeans Platform project in Chapter 12 (see “Prepare to Use the Validation Library” on page 578). The JavaFX runtime is part of the JDK in Java 7 and can be found in subdirectory jre/lib. Note that these steps are only necessary if you’re running Java 7 or earlier.
Let’s begin our JavaFX integration by creating a NetBeans Platform application.
Create a NetBeans Platform Application
Follow these steps to create your NetBeans Platform application project with the NetBeans IDE.
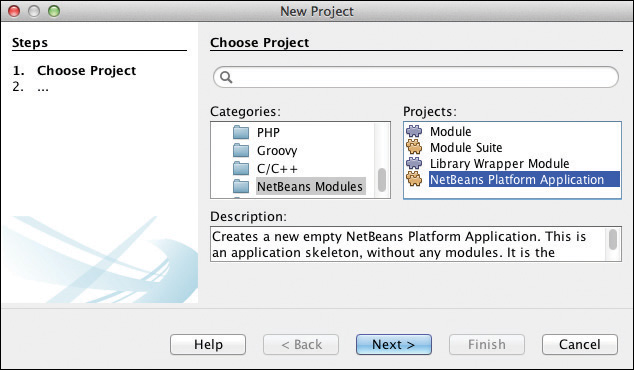
1. From the NetBeans IDE top-level menu bar, select File | New Project. The NetBeans New Project wizard pops up the Choose Project dialog.
2. Under Categories select NetBeans Modules and under Projects select NetBeans Platform Application, as shown in Figure 6.3. Select Next.
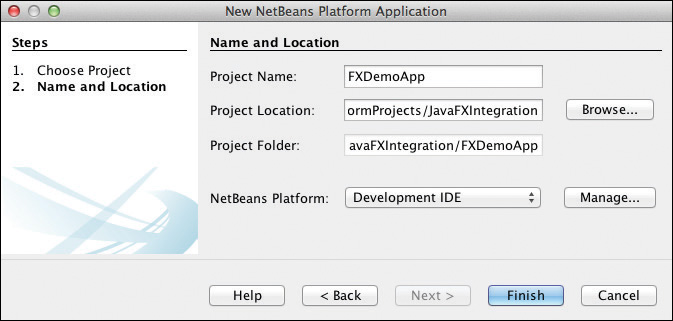
3. NetBeans displays the Name and Location dialog. Provide the Project Name FXDemoApp and click Browse to select a Project Location directory. Accept the defaults for the remaining fields, as shown in Figure 6.4. Click Finish.
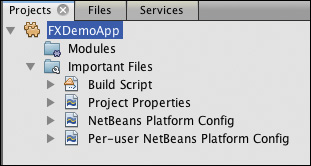
NetBeans creates a basic NetBeans Platform application with no user modules added. Figure 6.5 shows the Projects view for the newly created FXDemoApp application.
Create a NetBeans Module
You’ll now create a module for the application’s window.
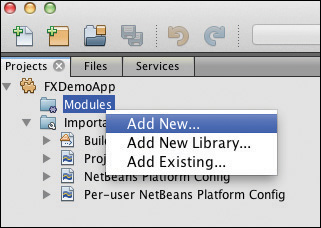
1. Right click on the Modules node in project FXDemoApp and choose Add New... as shown in Figure 6.6. NetBeans begins the New Module Project wizard.
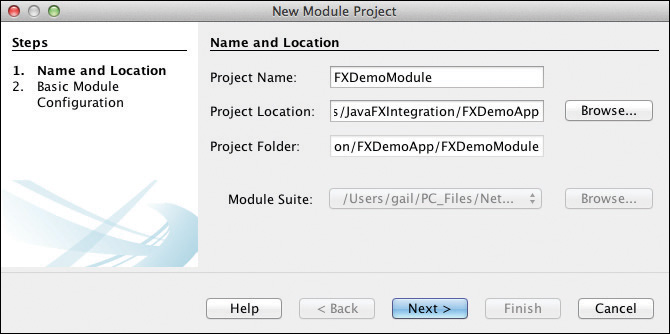
2. NetBeans displays the Name and Location dialog. Specify FXDemoModule for the Project Name. Accept the defaults for Project Location and Project Folder and click Next, as shown in Figure 6.7.
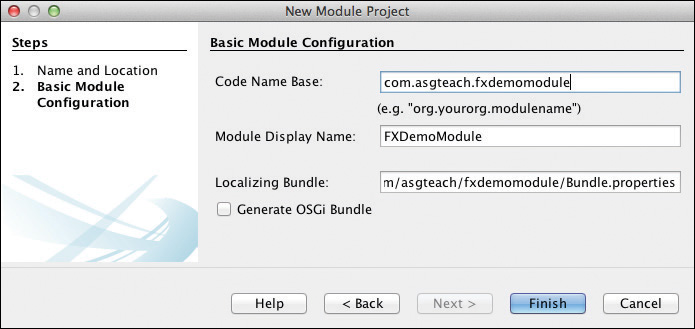
3. NetBeans displays the Basic Module Configuration dialog. Specify com.asgteach.fxdemomodule for the Code Name Base. Accept the defaults for the Module Display Name (FXDemoModule) and Localizing Bundle (com/asgteach/fxdemomodule/Bundle.properties) and leave Generate OSGi Bundle unchecked, as shown in Figure 6.8. Click Finish.
NetBeans creates project FXDemoModule for your newly created module.
Add a Window to the Module
Our FXDemoApp application has a single window. To add a TopComponent to the module, follow these steps.
1. Expand the FXDemoModule project and Source Packages nodes. Right click on package name com.asgteach.fxdemomodule and select New | Other from the context menu (or select New | Window if the choice is available and skip the next step).
2. NetBeans displays the Choose File Type dialog. Select Module Development under Categories and Window under File Type. Click Next.
3. NetBeans displays the Basic Settings dialog. For Window Position, select editor from the drop down control and check the box Open on Application Start. Position editor creates a large window for your application. Leave the other checkboxes unchecked. Click Next.
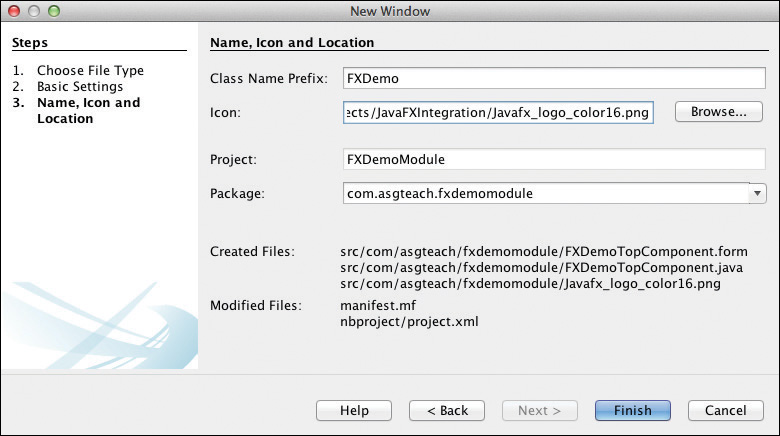
4. NetBeans displays the Name, Icon, and Location dialog. Provide FXDemo for the Class Name Prefix. Editor windows display icons on their tab (if you provide one). For Icon, optionally provide a suitable 16 x 16 GIF or PNG graphic, as shown in Figure 6.9. (You can use file javafx_logo_color16.png found in the download bundle for this book.) Click Finish.
NetBeans creates file FXDemoTopComponent.java and brings it up in the Swing Form Designer. Click Source to bring up the Java Editor in the IDE.
Although you haven’t added any JavaFX content to the window yet, you can run the application. Select project FXDemoApp, right click, and select Run in the context menu. The NetBeans Platform application runs with a single (blank) editor-style window, as shown in Figure 6.10.
Add JavaFX Content to the TopComponent
The JFXPanel Swing component lets you add JavaFX content to a TopComponent. We’ll use the JavaFX code from project MyRectangleCSSApp to configure our TopComponent.
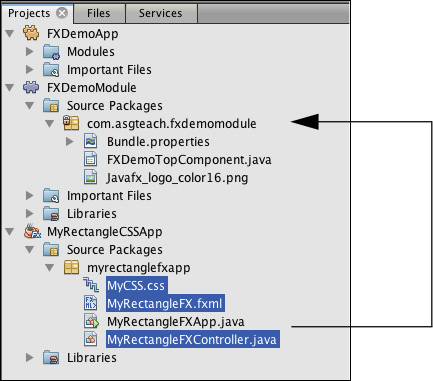
1. Open project MyRectangleCSSApp from Chapter 3. Expand the project and the Source Packages nodes. Select files MyCSS.css, MyRectangleFX.fxml, and MyRectangleFXController.java, as shown in Figure 6.11. Copy these three files to package com.asgteach.fxdemomodule under the Source Packages node in project FXDemoModule.
2. Make changes to the FXML and controller class to account for the different package name. Listing 6.1 shows the changes (in bold) to MyRectangleFXController.java. Listing 6.2 shows the changes to MyRectangleFX.fxml. You don’t need to edit the <stylesheets> element since the reference to MyCSS.css is unchanged.
Listing 6.1 MyRectangleFXController.java
package com.asgteach.fxdemomodule;
. . . import statements omitted . . .
public class MyRectangleFXController implements Initializable {
. . . unchanged code omitted . . .
}
Listing 6.2 MyRectangleFX.fxml
<StackPane id="StackPane" fx:id="stackpane"
xmlns:fx="http://javafx.com/fxml"
fx:controller="com.asgteach.fxdemomodule.MyRectangleFXController">
<stylesheets>
<URL value="@MyCSS.css" />
</stylesheets>
<children>
. . . unchanged code omitted . . .
</children>
</StackPane>
3. Add the following code to the TopComponent, file FXDemoTopComponent.java, as shown in Listing 6.3. This code creates the JFXPanel and adds the scene and FXML-defined scene graph to the JFXPanel component. The added code is in bold.
Listing 6.3 FXDemoTopComponent.java
. . . topcomponent annotations and import statements omitted . . .
public final class FXDemoTopComponent extends TopComponent {
private static JFXPanel fxPanel;
public FXDemoTopComponent() {
initComponents();
setName(Bundle.CTL_FXDemoTopComponent());
setToolTipText(Bundle.HINT_FXDemoTopComponent());
setLayout(new BorderLayout());
init();
}
private void init() {
fxPanel = new JFXPanel();
add(fxPanel, BorderLayout.CENTER);
Platform.setImplicitExit(false);
Platform.runLater(() -> createScene());
}
private void createScene() {
try {
Parent root = FXMLLoader.load(getClass().getResource(
"MyRectangleFX.fxml"));
Scene scene = new Scene(root, Color.LIGHTBLUE);
fxPanel.setScene(scene);
} catch (IOException ex) {
Exceptions.printStackTrace(ex);
}
}
. . . unchanged code omitted . . .
}
Creating JavaFX content in a NetBeans Platform TopComponent requires several actions as shown in Listing 6.3 and further described here.
• Create a Swing BorderLayout component and add it to the TopComponent’s layout. BorderLayout will keep the resizing behavior consistent with a top-level JavaFX Stage (window frame).
Adding JavaFX Content Tip
If you forget the setLayout(new BorderLayout()) statement, you won’t see any JavaFX content in your NetBeans Platform window.
• Instantiate the JFXPanel component and add it to the TopComponent’s layout with Border.CENTER. This keeps the JavaFX content centered in the window.
• When the first JFXPanel object is created, it implicitly initializes the JavaFX runtime (the JavaFX Application Thread). When the final JFXPanel is destroyed, the JavaFX runtime exits. With Platform.setExplicitExit(false), the JavaFX Application Thread does not exit after the last JavaFX content window closes. This setting is necessary to close and then re-open JavaFX-enabled windows.
• Wrap the code that creates the JavaFX content in a runnable (or use a lambda expression) and invoke it with Platform.runLater(). TopComponent code executes on the Swing EDT, whereas JavaFX code that creates and manipulates the scene graph must execute on the JavaFX Application Thread.1
1. As noted in Chapter 3, there is experimental support in JDK 8 for making the EDT and JavaFX Application Thread (FXT) the same thread. Currently, this is not the default behavior. To run with a single EDT-FXT thread, supply runtime VM option -Djavafx.embed.singleThread=true. Since this feature is experimental, we show you how to use JavaFX and Swing in the default configuration (two separate threads).
• The code in createScene() is analogous to the code in a JavaFX application’s start() method (for example, as shown in Listing 3.2 on page 95). In both methods, you invoke the FXML Loader to load the scene graph and create and set the root for the scene. The start() method sets the Stage’s scene, whereas createScene() sets the scene in the JFXPanel component.
With these modifications, FXDemoApp is ready to run. Note that the animation initiated by a mouse click inside the rectangle works exactly the same as the JavaFX-only application. Also note that we made no modifications (other than changing the package name) to either the FXML or the controller class!
The Magic of JFXPanel
The JFXPanel component is a Swing JComponent specifically implemented to embed JavaFX content in a Swing application. JFXPanel starts up the JavaFX runtime for you. It also transparently forwards all input (mouse, key) and focus events to the JavaFX runtime. This transparent handling of user input allows the FXDemoApp application to run with minimal changes from the ported JavaFX program.
The JFXPanel component allows both Swing and JavaFX to run concurrently. You therefore must pay attention to code that manipulates Swing components from the JavaFX environment and code that manipulates the JavaFX scene graph from the Swing environment. To manipulate the Swing UI from JavaFX, you wrap the code in a Runnable and use SwingUtilities.invokeLater() (lambdas help reduce boilerplate code here).
SwingUtilities.invokeLater(() -> {
// Change Swing UI
});
Conversely, to manipulate the JavaFX UI from Swing, wrap the code in a Runnable and call Platform.runLater().
Platform.runLater(() -> {
// Change JavaFX UI
});
The communication requirements, however, can be more involved. In the next section we’ll examine the strategies to communicate between Swing and JavaFX from an architectural point of view and in the context of a NetBeans Platform application.
SwingNode
SwingNode is the counterpart to JFXPanel and lets you install Swing content into a JavaFX scene graph. When you use SwingNode you’ll have to pay attention to EDT / JavaFX Application Thread issues. Since SwingNode is part of JavaFX, you instantiate and manipulate it just like any other JavaFX node. However, when you install Swing content, you must execute on the EDT.
Let’s show you how to use SwingNode with a Swing JButton component in our demo application, FXDemoApp. Listing 6.4 shows the modified FXML file with SwingNode added to the StackPane. We set the fx:id attribute to access the SwingNode in the controller class, and the translateY property places the SwingNode above the Text.
Listing 6.4 MyRectangleFX.fxml—Add SwingNode
<StackPane id="StackPane" fx:id="stackpane"
xmlns:fx="http://javafx.com/fxml"
fx:controller="com.asgteach.fxdemomodule.MyRectangleFXController">
<stylesheets>
<URL value="@MyCSS.css" />
</stylesheets>
<children>
. . . unchanged code omitted . . .
<SwingNode fx:id="swingNode" translateY="-30" />
</children>
</StackPane>
Listing 6.5 shows you how to install Swing content into SwingNode with SwingUtilities.invokeLater(). We add a Swing ActionListener to the clickButton JButton component. The event handler is invoked on the EDT. However, because we manipulate the JavaFX scene graph in the handler, we must then use Platform.runLater().
Listing 6.5 MyRectangleFXController.java—Using SwingNode
public class MyRectangleFXController implements Initializable {
@FXML
private Rectangle rectangle;
@FXML
private StackPane stackpane;
@FXML
private SwingNode swingNode;
private RotateTransition rt;
private JButton clickButton;
@Override
public void initialize(URL url, ResourceBundle rb) {
. . . unchanged code omitted
createAndSetSwingContent(swingNode);
}
private void createAndSetSwingContent(final SwingNode swingNode) {
SwingUtilities.invokeLater(() -> {
swingNode.setContent(clickButton = new JButton("Click me!"));
clickButton.addActionListener((ActionEvent e) -> {
Platform.runLater(() -> rt.play());
});
});
}
}
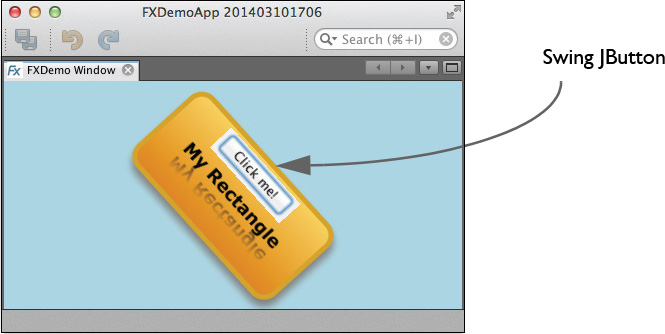
Figure 6.12 shows the rotating Rectangle, Text, and SwingNode, activated when the user clicks the Swing JButton.2
2. SwingNode is a great way to add custom Swing components to the JavaFX scene graph. However, we recommend keeping the JavaFX and Swing elements as isolated as possible. See the section on “Communication Strategies” on this page for a discussion.
6.2 Communication Strategies
Depending on your NetBeans Platform application, there will be various requirements for communication between the TopComponent (which is tightly integrated into the NetBeans Platform framework and window system) and the JavaFX scene graph and controller code. The simplest application requires no communication at all between the TopComponent and JavaFX code. In this case, the JFXPanel transparently forwards all input and focus events to the scene graph. The NetBeans Platform window with JavaFX content behaves like a stand-alone JavaFX program. This is the situation with the FXDemoApp program and its FXDemoTopComponent. As shown in Listing 6.3 on page 258, the TopComponent invokes the FXML Loader and builds the scene graph, and like a wind-up toy, lets the JavaFX code just “run.”
However, to take advantage of the NetBeans Platform APIs, you’ll need a more flexible structure. Any manipulation of the scene graph by the TopComponent should be controlled, deliberate, and well-documented. Public methods (that you write) in the JavaFX controller class provide this access. The TopComponent thus needs access to the controller instance.
Similarly, to maintain its isolation, the controller class should not invoke any methods in its TopComponent class. Instead, any communication from the JavaFX environment is implemented with property change events generated by the JavaFX controller. As we’ve seen from Chapter 2 (see “Event Handlers and Loose Coupling” on page 59), event handlers provide a powerful mechanism for communicating state change and maintaining loose coupling. We want the JavaFX code to be as independent as possible from its TopComponent.
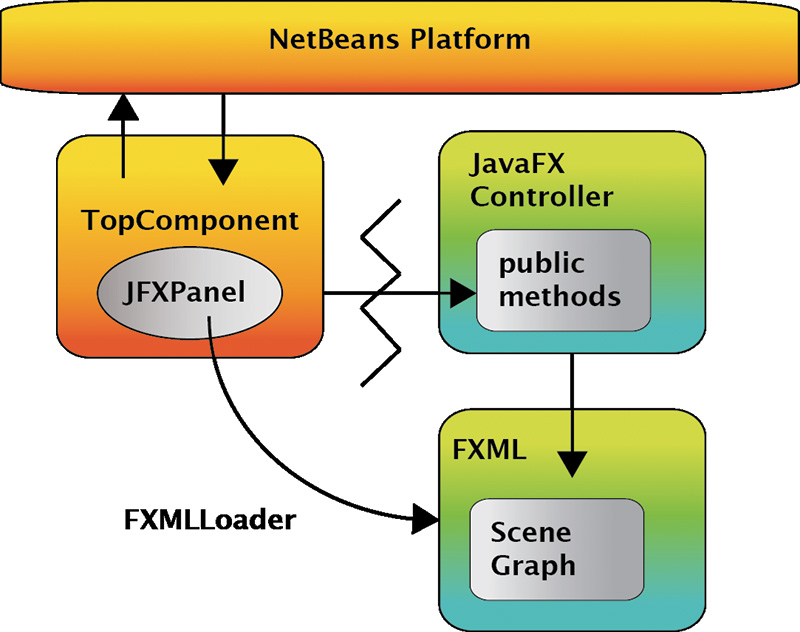
Thus, the overriding goal is that the JavaFX scene graph and its controller should be encapsulated, as illustrated in Figure 6.13. The TopComponent communicates directly with the NetBeans Platform framework and is managed by the NetBeans Platform window system. The TopComponent invokes the FXML Loader and builds the scene graph. The FXML Loader instantiates the controller class. Any further manipulation of the scene graph goes through the controller’s public methods.
We can characterize a TopComponent with JavaFX content and its communication requirements as follows.
• Self-contained events—All events that occur in the JavaFX scene graph are self contained and no communication with the TopComponent is required. In the FXDemoApp application, for example, the user generates mouse click events, which initiates a rotation transition. Since the handler is in the controller class, no further communication is required.
• One-way communication—The TopComponent must initiate a change in the JavaFX scene graph (perhaps due to a user-selected top-level menu item). Any action that affects the JavaFX scene graph must occur on the JavaFX Application Thread. Thus, the TopComponent must call Platform.runLater() to invoke the controller method.
If the controller method returns a value or reference, the TopComponent should wait for the controller method to complete. The Concurrent Library’s CountDownLatch provides a safe and straightforward way to do this.
• Two-way communication—In addition to having the TopComponent manipulate the JavaFX scene graph, the JavaFX environment must communicate state change back to the TopComponent. In this situation, PropertyChange events fired to interested listeners provide a workable approach that keeps the JavaFX environment isolated from its TopComponent.
Note that we are not saying you should never access the NetBeans Platform APIs from JavaFX controller code. As you will see in our example application, the powerful Global Lookup can be accessed directly from JavaFX code.
Accessing the JavaFX Controller Instance
To access public methods in the JavaFX controller class, the TopComponent must access the controller instance. Listing 6.6 shows how to do this. Here, we separately instantiate the FXMLLoader so that we can access the associated controller with FXMLLoader method getController(). This approach lets you build the JavaFX scene graph in TopComponents that require access to the JavaFX controller instance.
Listing 6.6 Build the JavaFX Scene Graph with Controller Access
public final class MyFXTopComponent extends TopComponent {
private static JFXPanel fxPanel;
private MyFXController controller;
public PersonFXEditorTopComponent() {
initComponents();
setName(Bundle.CTL_PersonFXEditorTopComponent());
setToolTipText(Bundle.HINT_PersonFXEditorTopComponent());
setLayout(new BorderLayout());
init();
}
private void init() {
fxPanel = new JFXPanel();
add(fxPanel, BorderLayout.CENTER);
Platform.setImplicitExit(false);
Platform.runLater(() -> createScene());
}
private void createScene() {
try {
URL location = getClass().getResource("MyFX.fxml");
FXMLLoader fxmlLoader = new FXMLLoader();
fxmlLoader.setLocation(location);
fxmlLoader.setBuilderFactory(new JavaFXBuilderFactory());
Parent root = (Parent) fxmlLoader.load(location.openStream());
Scene scene = new Scene(root);
fxPanel.setScene(scene);
controller = (MyFXController) fxmlLoader.getController();
} catch (IOException ex) {
Exceptions.printStackTrace(ex);
}
}
. . . other TopComponent code omitted . . .
}
The next section uses these communication strategies to port a different JavaFX application to the NetBeans Platform.
6.3 Integrating with the NetBeans Platform
Let’s now convert a JavaFX program that is a more typical desktop application to the NetBeans Platform. We’ll port project PersonFXMLAppEnhancedUI, the JavaFX version of the Swing application we converted to the NetBeans Platform in Chapter 5. (Project PersonFXMLAppEnhancedUI is described in detail in Chapter 4. See “JavaFX Applications” on page 153.) As we build this application, we’ll use the same NetBeans Platform features you’ve seen previously. This includes breaking up an application into modules, creating windows with TopComponents, using Global Lookup and Service Providers, and having event listeners that respond to changes in data and user selection events.
Figure 6.14 shows the FamilyTreeFXApp project running as a JavaFX NetBeans Platform application with two windows. The left window (PersonFXViewer) displays Person objects using a JavaFX TreeView control. When the user selects a Person in the TreeView control, the selected Person object is displayed in the right window (the PersonFXEditor window). The user saves edits by clicking the Update button. Selecting the top item clears the controls in the PersonFXEditor window.

Here are the general steps to build this application. Note that we leverage the same NetBeans Platform features used in project FamilyTreeApp described in Chapter 5.
• Create a NetBeans Platform application called FamilyTreeFXApp.
• Create module FamilyTreeFXModel (for the Person class and FamilyTreeManager interface) and configure this module with public packages so that other modules can declare a dependency on this module.
• Create module FamiyTreeManagerFXImpl, set a dependency on module FamilyTreeFXModel, and implement FamilyTreeManager as a service provider.
• Create module PersonFXViewer for the left window. Set a dependency on the FamilyTreeFXModel module. Build a TopComponent and configure the window to hold a JavaFX TreeView control to display Person elements stored in the FamilyTreeManager. Use FXML and a controller class.
Module PersonFXViewer accesses the FamilyTreeManager service provider through the Global Lookup. The JavaFX controller code listens for changes to the FamilyTreeManager so that the Person items in the JavaFX TreeView control will be current with the FamilyTreeManager’s data store.
The JavaFX TreeView control’s selection listener uses InstanceContent to publish selection changes through the TopComponent’s Lookup. This makes the selection accessible to the PersonFXEditor module.
• Create module PersonFXEditor for the right window. Set a dependency on the FamilyTreeFXModel module. Build a TopComponent and configure the window to display a form (using JavaFX controls) to edit Person items and an Update button to save changes to the FamilyTreeManager. Use FXML and a controller class.
Module PersonFXEditor accesses the FamilyTreeManager service provider through the Global Lookup.
The PersonFXEditor’s TopComponent implements a LookupListener that responds to changes in the PersonFXViewerTopComponent’s Lookup. The listener invokes a JavaFX controller method to react to selection changes and update the JavaFX Person form.
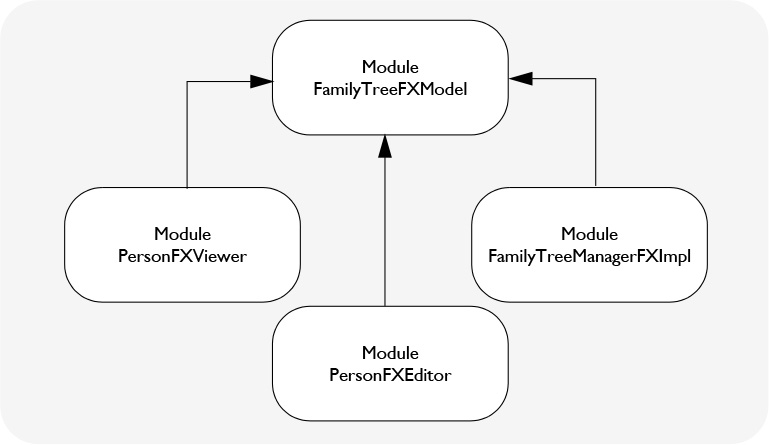
Figure 6.15 shows the four modules and their dependencies for the FamilyTreeFXApp project. (The JavaFX version has the same module structure as the Swing / NetBeans Platform version shown in Figure 5.10 on page 209.)
These steps are analogous to the steps we followed to create the Swing version of this NetBeans Platform application. As we proceed through these steps, we’ll concentrate on the JavaFX code and the communication required between NetBeans Platform APIs and JavaFX code. You will see that structuring the JavaFX code with FXML makes this communication clearer than using only JavaFX API code.
Create a NetBeans Platform Application
Here are the steps to create the FamilyTreeFXApp NetBeans Platform application.
1. From the NetBeans IDE top-level menu bar, select File | New Project. The NetBeans New Project wizard pops up the Choose Project dialog.
2. Under Categories select NetBeans Modules and under Projects select NetBeans Platform Application. Select Next.
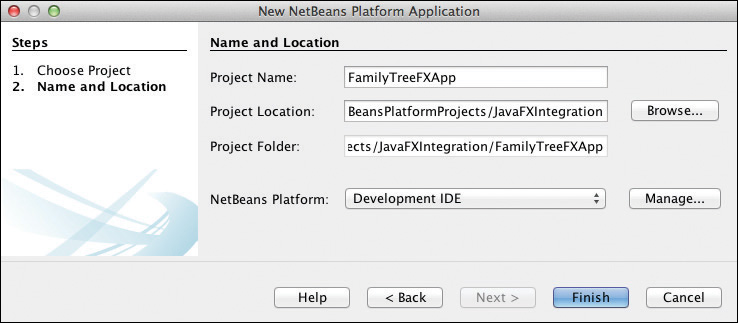
3. NetBeans now displays the Name and Location dialog. Provide the Project Name FamilyTreeFXApp and click Browse to select a Project Location directory. Accept the defaults for the remaining fields and click Finish, as shown in Figure 6.16.
NetBeans creates a NetBeans Platform application project with modules that include a menu bar, toolbar, and empty window system. Figure 6.17 shows project FamilyTreeFXApp in the Projects view with no user-created modules (the Modules node is empty). The metadata associated with the application appears under node Important Files.

Create NetBeans Platform Modules
Next, create a new NetBeans module for the FamilyTreeManager interface and Person class, as follows.
1. Right click on the Modules node in project FamilyTreeFXApp and choose Add New... . NetBeans begins the New Module Project wizard.
2. NetBeans displays the Name and Location dialog. Specify FamilyTreeFXModel for the Project Name. Accept the defaults for Project Location and Project Folder and click Next.
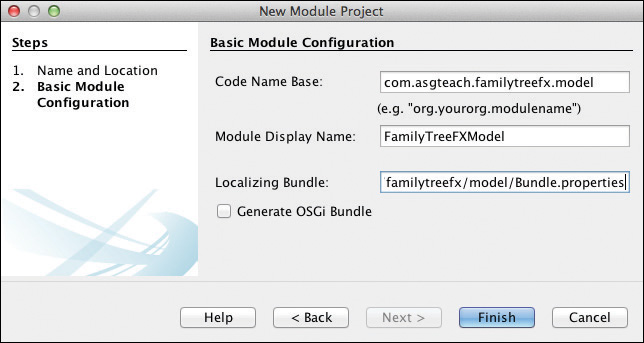
3. NetBeans displays the Basic Module Configuration dialog. Specify com.asgteach.familytreefx.model for the Code Name Base. Accept the defaults for the Module Display Name (FamilyTreeFXModel) and Localizing Bundle (com/asgteach/familytreefx/model/Bundle.properties) and leave Generate OSGi Bundle unchecked, as shown in Figure 6.18. Click Finish.
The FamilyTreeFXApp application now contains one user-added module called FamilyTreeFXModel. Repeat the above steps and add three more modules: FamilyTreeManagerFXImpl, PersonFXViewer, and PersonFXEditor, as follows.
1. New Module FamilyTreeManagerFXImpl, code name base com.asgteach.familytree.managerfx.impl, and display name FamilyTreeManagerFXImpl.
2. New Module PersonFXViewer, code name base com.asgteach.familytree.personfxviewer, and display name PersonFXViewer.
3. New Module PersonFXEditor, code name base com.asgteach.familytree.personfxeditor, and display name PersonFXEditor.
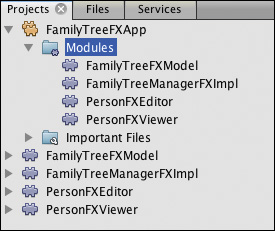
Figure 6.19 shows the Projects view for application FamilyTreeFXApp with its four modules. You also see new projects for each module. Recall that when you work with these module projects, you select the project name outside the FamilyTreeFXApp project, not the module name under the Modules node.
Configure a Module with Public Packages
Now let’s add code and configure module FamilyTreeFXModel.
1. Begin by copying files Person.java and FamilyTreeManager.java from project PersonFXMLAppEnhancedUI to package com.asgteach.familytreefx.model under Source Packages (use Refactor Copy). Class Person.java is unchanged (see Listing 4.8 on page 142).
2. Modify FamilyTreeManager.java and make it an interface, as shown in Listing 6.7.
Listing 6.7 FamilyTreeManager Interface
package com.asgteach.familytreefx.model;
import java.util.List;
import javafx.beans.InvalidationListener;
import javafx.collections.MapChangeListener;
public interface FamilyTreeManager {
public void addListener(
MapChangeListener<? super Long, ? super Person> ml);
public void removeListener(
MapChangeListener<? super Long, ? super Person> ml);
public void addListener(InvalidationListener il);
public void removeListener(InvalidationListener il);
public void addPerson(Person p);
public void updatePerson(Person p);
public void deletePerson(Person p);
public List<Person> getAllPeople();
}
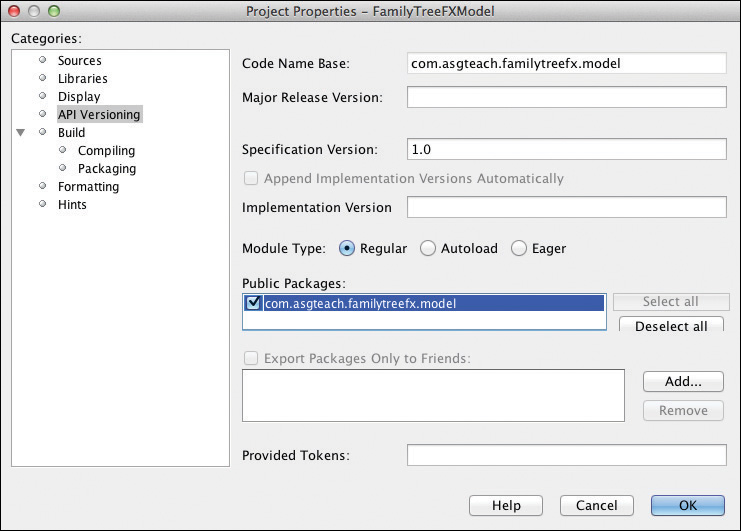
3. Since we want other modules to access the code in this module, we declare package com.asgteach.familytreefx.model public. In the Projects view, select project FamilyTreeFXModel, right click, and select Properties from the context menu.
4. Under Categories, select API Versioning.
5. Under Public Packages, select the checkbox to specify that package com.asgteach.familytreefx.model is Public, as shown in Figure 6.20. Accept the default for Specification Version 1.0. Click OK.
Register a Service Provider
The FamilyTreeManagerFXImpl module contains the code that implements interface FamilyTreeManager. Furthermore, it registers itself as a Service Provider for service FamilyTreeManager. You register a service provider with annotation @ServiceProvider.
Declare Module Dependencies
You must declare a dependency on module FamilyTreeFXModel to access classes Person and FamilyTreeManager. A dependency on the Lookup API module is also necessary to use annotation @ServiceProvider. Follow these steps to declare the module dependencies.
1. In project FamilyTreeManagerFXImpl, right click node Libraries and select Add Module Dependency . . . . NetBeans displays the Add Module Dependency dialog.
2. In the list of modules, select both FamilyTreeFXModel and Lookup API as shown in Figure 6.21. Click OK.
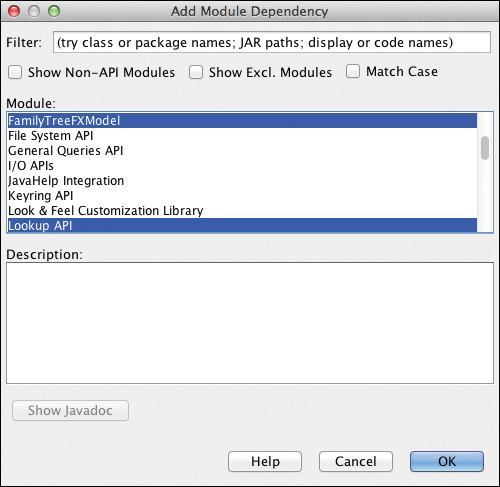
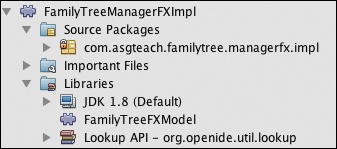
3. NetBeans adds both FamilyTreeFXModel and Lookup API to FamilyTreeManagerFXImpl’s list of dependencies. When you expand the Libraries node, you’ll see these modules listed, as shown in Figure 6.22.
Create Implementation Class
Now add the implementation class for interface FamilyTreeManager, as follows.
1. In project FamilyTreeManagerFXImpl, expand node Source Packages.
2. Select package com.asgteach.familytree.managerfx.impl, right click, and select New then Java Class from the context menu.
3. In the New Java Class dialog, provide FamilyTreeManagerFXImpl for Class Name and click Finish. You’ll now see file FamilyTreeManagerFXImpl.java under the selected package name and the file opens in the Java editor.
4. Edit the Java class so that it implements FamilyTreeManager. Fix imports (right click and select Fix Imports from the context menu).
5. Let NetBeans generate override method stubs for all of the abstract methods in interface FamilyTreeManager.
6. Copy the method bodies as well as class variable observableMap from the FamilyTreeManager class in project PersonFXMLAppEnhancedUI (see Listing 4.12 on page 149). Do not include either the constructor or the getInstance() method.
7. Add annotation @ServiceProvider to class FamilyTreeManagerFXImpl. Listing 6.8 shows the code for the entire class.
Listing 6.8 Class FamilyTreeManagerFXImpl.java
package com.asgteach.familytree.managerfx.impl;
import com.asgteach.familytreefx.model.FamilyTreeManager;
import com.asgteach.familytreefx.model.Person;
import java.util.ArrayList;
import java.util.List;
import javafx.beans.InvalidationListener;
import javafx.collections.FXCollections;
import javafx.collections.MapChangeListener;
import javafx.collections.ObservableMap;
import org.openide.util.lookup.ServiceProvider;
@ServiceProvider(service = FamilyTreeManager.class)
public class FamilyTreeManagerFXImpl implements FamilyTreeManager {
private final ObservableMap<Long, Person> observableMap =
FXCollections.observableHashMap();
@Override
public void addListener(MapChangeListener<? super Long,
? super Person> ml) {
observableMap.addListener(ml);
}
@Override
public void removeListener(MapChangeListener<? super Long,
? super Person> ml) {
observableMap.removeListener(ml);
}
@Override
public void addListener(InvalidationListener il) {
observableMap.addListener(il);
}
@Override
public void removeListener(InvalidationListener il) {
observableMap.removeListener(il);
}
@Override
public void addPerson(Person p) {
Person person = new Person(p);
observableMap.put(person.getId(), person);
}
@Override
public void updatePerson(Person p) {
Person person = new Person(p);
observableMap.put(person.getId(), person);
}
@Override
public void deletePerson(Person p) {
observableMap.remove(p.getId());
}
@Override
public List<Person> getAllPeople() {
List<Person> copyList = new ArrayList<>();
observableMap.values().stream().forEach((p) ->
copyList.add(new Person(p)));
return copyList;
}
}
Annotation @ServiceProvider puts an instance of this class into the application’s Global Lookup so that other modules can find and use it. This automatically provides a singleton object for our application. Modules PersonFXViewer and PersonFXEditor will find and use this service provider to interact with the FamilyTreeManager.
Configure a Window with JavaFX for Selection
Application FamilyTreeFXApp (see Figure 6.14 on page 266) has two windows. The left window provides a list of Person objects, which we implement in the PersonFXViewer module. As described earlier, when a user selects a Person in the PersonFXViewer window, the selected Person is displayed in the PersonFXEditor window, the right window.
As indicated in Figure 6.15 on page 267, module PersonFXViewer must declare a dependency on module FamilyTreeFXModel. Follow the steps in “Declare Module Dependencies” on page 271. Set a dependency on the FamilyTreeFXModel module.
We’ll now add a window (TopComponent) to module PersonFXViewer with the following steps.
1. Expand project PersonFXViewer and Source Packages. Right click on package name com.asgteach.familytree.personfxviwer and select New | Other from the context menu (or select New | Window if the choice is available and skip the next step).
2. NetBeans displays the Choose File Type dialog. Select Module Development under Categories and Window under File Type. Click Next.
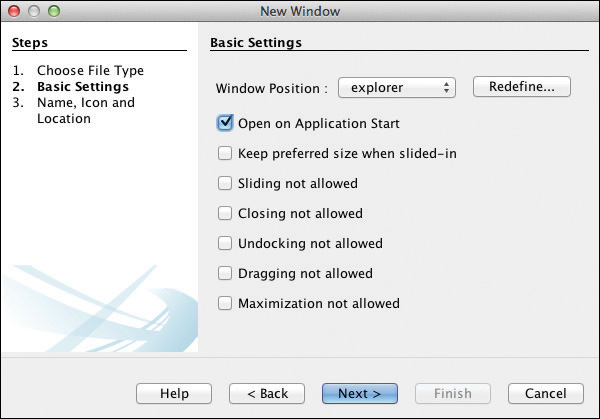
3. NetBeans displays the Basic Settings dialog. For Window Position, select explorer from the drop down control and check the box Open on Application Start. The explorer position makes the window appear on the left side of the application window frame.
4. Leave the other checkboxes unchecked and click Next as shown in Figure 6.23.
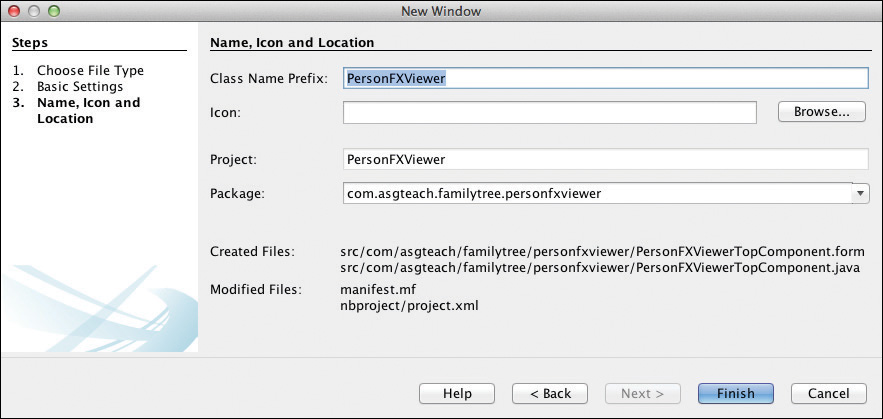
5. NetBeans displays the Name, Icon and Location dialog. Provide PersonFXViewer for the Class Name Prefix. Leave the Icon blank and accept the defaults for the rest, as shown in Figure 6.24. Click Finish.
NetBeans creates PersonFXViewerTopComponent.java and brings the class up in the Design View. Click Source to switch to the Java editor.
Add FXML and Controller Code
As a starting point, copy the FXML document and Controller class from project PersonFXMLAppEnhancedUI with the following steps. Note that after you copy these files, you’ll retain the code for the JavaFX TreeView control (the left window) and you’ll strip out the code for the Person editor (the right window). When you configure the PersonFXEditor module on page 283, you’ll use these same files but strip out the code for the JavaFX TreeView control and retain the code for the Person editor.
1. In project PersonFXMLAppEnhancedUI, expand the Source Packages node and copy file PersonFXML.fxml to project PersonFXViewer | Source Packages under package com.asgteach.familytree.personfxviewer.
2. Rename the FXML file to PersonFXViewer.fxml.
3. Copy file PersonFXMLController.java to the same package in project PersonFXViewer.
4. Rename (refactor) the file to PersonFXViewerController.java.
5. Make sure the class name is PersonFXViewerController and its package name is correct, as shown in Listing 6.9. Fix imports so that the import statements for FamilyTreeManager and Person are correct. We’ll make additional changes after configuring the FXML file.
Listing 6.9 PersonFXViewerController.java
package com.asgteach.familytree.personfxviewer;
import com.asgteach.familytreefx.model.FamilyTreeManager;
import com.asgteach.familytreefx.model.Person;
. . . other import statements omitted . . .
public class PersonFXViewerController implements Initializable {
. . . code omitted . . .
}
Configure the FXML
Using either Scene Builder or the NetBeans FXML editor, remove the FXML declarations that refer to the Person form editor controls in the right window. Edit the controller class attribute so that it refers to PersonFXViewerController. Listing 6.10 shows the updated FXML. Note that the top-level AnchorPane contains a single control, the TreeView, which is anchored as described by its FXML attributes.
Listing 6.10 PersonFXViewer.fxml
<?xml version="1.0" encoding="UTF-8"?>
<?import java.lang.*?>
<?import java.util.*?>
<?import javafx.scene.*?>
<?import javafx.scene.control.*?>
<?import javafx.scene.layout.*?>
<AnchorPane id="AnchorPane" xmlns:fx="http://javafx.com/fxml"
fx:controller=
"com.asgteach.familytree.personfxviewer.PersonFXViewerController">
<children>
<TreeView fx:id="personTreeView" AnchorPane.bottomAnchor="25.0"
AnchorPane.leftAnchor="14.0"
AnchorPane.rightAnchor="14.0"
AnchorPane.topAnchor="14.0" />
</children>
</AnchorPane>
Configure the JavaFX Controller
In the NetBeans Platform version of this application, the Controller class has the following responsibilities.
• Obtain an instance of FamilyTreeManager from the Global Lookup to display Person objects in the TreeView control.
• Implement a listener to respond to changes in the FamilyTreeManager’s map of Person objects.
• Implement a TreeSelectionListener and publish the current selection in the TopComponent’s Lookup.
Listing 6.11 shows the JavaFX controller’s class variables and the initialize(), buildData(), and buildTreeView() methods where we populate the TreeView control with Person objects from the FamilyTreeManager and other variables.
We instantiate an InstanceContent object, which will contain the selected Person. The TopComponent publishes the contents of InstanceContent in its Lookup as described in “Lookup as an Object Repository” on page 225. We keep track of the selected Person with class variable selectedPerson.
The Global Lookup returns an instance of the FamilyTreeManager, which we assign to class variable ftm.
Listing 6.11 PersonFXViewerController.java—Class Variables and initialize()
public class PersonFXViewerController implements Initializable {
@FXML
private TreeView<Person> personTreeView;
private static final Logger logger =
Logger.getLogger(PersonFXViewerController.class.getName());
private FamilyTreeManager ftm = null;
private final InstanceContent instanceContent = new InstanceContent();
private Person selectedPerson = null;
@Override
public void initialize(URL url, ResourceBundle rb) {
// Change level to Level.INFO to reduce console messages
logger.setLevel(Level.FINE);
Handler handler = new ConsoleHandler();
handler.setLevel(Level.FINE);
logger.addHandler(handler);
try {
FileHandler fileHandler = new FileHandler();
// records sent to file javaN.log in user's home directory
fileHandler.setLevel(Level.FINE);
logger.addHandler(fileHandler);
logger.log(Level.FINE, "Created File Handler");
} catch (IOException | SecurityException ex) {
logger.log(Level.SEVERE, "Couldn't create FileHandler", ex);
}
ftm = Lookup.getDefault().lookup(FamilyTreeManager.class);
if (ftm == null) {
logger.log(Level.SEVERE, "Cannot get FamilyTreeManager object");
LifecycleManager.getDefault().exit();
}
buildData();
ftm.addListener(familyTreeListener);
// Create a root node and populate the TreeView control
TreeItem<Person> rootNode =
new TreeItem<>(new Person("People", "", Person.Gender.UNKNOWN));
buildTreeView(rootNode);
// Configure the TreeView control
personTreeView.setRoot(rootNode);
personTreeView.getRoot().setExpanded(true);
personTreeView.getSelectionModel().selectedItemProperty()
.addListener(treeSelectionListener);
}
private void buildData() {
ftm.addPerson(new Person("Homer", "Simpson", Person.Gender.MALE));
ftm.addPerson(new Person("Marge", "Simpson", Person.Gender.FEMALE));
ftm.addPerson(new Person("Bart", "Simpson", Person.Gender.MALE));
ftm.addPerson(new Person("Lisa", "Simpson", Person.Gender.FEMALE));
ftm.addPerson(new Person("Maggie", "Simpson", Person.Gender.FEMALE));
logger.log(Level.FINE, ftm.getAllPeople().toString());
}
private void buildTreeView(TreeItem<Person> root) {
// listen for changes to the familytreemanager's map
ftm.addListener(familyTreeListener);
// Populate the TreeView control
ftm.getAllPeople().stream().forEach((p) -> {
root.getChildren().add(new TreeItem<>(p));
});
}
. . . code omitted . . .
}
Listing 6.12 shows the MapChangeListener that responds to changes in the FamilyTreeManager’s map of Person objects. This code is unchanged from the JavaFX-only version of the application.
Listing 6.12 MapChangeListener
// MapChangeListener when underlying FamilyTreeManager changes
private final MapChangeListener<Long, Person> familyTreeListener =
(change) -> {
if (change.getValueAdded() != null) {
logger.log(Level.FINE, "changed value = {0}",
change.getValueAdded());
// Find the treeitem that this matches and replace it
for (TreeItem<Person> node :
personTreeView.getRoot().getChildren()) {
if (change.getKey().equals(node.getValue().getId())) {
// an update returns the new value in getValueAdded()
node.setValue(change.getValueAdded());
return;
}
}
}
};
Listing 6.13 shows the TreeSelectionListener, which updates class variable instanceContent depending on the TreeView control’s selected item. The previously selected Person (stored in class variable selectedPerson) is removed from the InstanceContent if the user selects the top root node. Otherwise, the newly selected Person is saved to class variable selectedPerson and replaces whatever was previously in InstanceContent.
The public method getInstanceContent() returns class variable instanceContent. This method is invoked from the TopComponent’s constructor to associate this InstanceContent object with the TopComponent’s Lookup, publishing it within the running NetBeans Platform application.
Listing 6.13 TreeSelectionListener and InstanceContent
// TreeView selected item event handler
private final ChangeListener<TreeItem<Person>> treeSelectionListener =
(ov, oldValue, newValue) -> {
TreeItem<Person> treeItem = newValue;
logger.log(Level.FINE, "selected item = {0}", treeItem);
if (treeItem == null || treeItem.equals(personTreeView.getRoot())) {
instanceContent.remove(selectedPerson);
return;
}
// set selectedPerson to the selected treeItem value
selectedPerson = new Person(treeItem.getValue());
logger.log(Level.FINE, "selected person = {0}", selectedPerson);
instanceContent.set(Collections.singleton(selectedPerson), null);
};
// called from TopComponent constructor
public InstanceContent getInstanceContent() {
return instanceContent;
}
Configure the TopComponent
Let’s now turn our attention to the TopComponent. The constructor builds the JavaFX scene graph and obtains a reference to the JavaFX controller class. After building the scene graph, the TopComponent associates the controller’s InstanceContent object with the TopComponent’s Lookup. Because the TopComponent invokes a controller method in the constructor (here, the controller method getInstanceContent()), it must wait for completion of the createScene() method, which builds the scene graph and instantiates the controller. We use the Concurrency Library CountDownLatch for the wait. Furthermore, the TopComponent associateLookup() method must be invoked on the Swing EDT.3 Listing 6.14 shows this code.
3. Invoking controller method getInstanceContent() on the EDT is safe, since it does not access or modify the JavaFX scene graph.
Listing 6.14 PersonFXViewerTopComponent
package com.asgteach.familytree.personfxviewer;
. . . import statements and TopComponent annotations omitted . . .
public final class PersonFXViewerTopComponent extends TopComponent {
private static JFXPanel fxPanel;
private PersonFXViewerController controller;
private static final Logger logger = Logger.getLogger(
PersonFXViewerTopComponent.class.getName());
public PersonFXViewerTopComponent() {
initComponents();
setName(Bundle.CTL_PersonFXViewerTopComponent());
setToolTipText(Bundle.HINT_PersonFXViewerTopComponent());
setLayout(new BorderLayout());
init();
}
private void init() {
fxPanel = new JFXPanel();
add(fxPanel, BorderLayout.CENTER);
Platform.setImplicitExit(false);
// we need to wait for createScene() to finish
final CountDownLatch latch = new CountDownLatch(1);
Platform.runLater(() -> {
try {
createScene();
} finally {
latch.countDown();
}
});
try {
latch.await(); // wait for createScene() to finish
// get the InstanceContent from the controller
associateLookup(new AbstractLookup(
controller.getInstanceContent()));
} catch (InterruptedException ex) {
logger.log(Level.SEVERE, "JavaFX initialization interrupted");
LifecycleManager.getDefault().exit();
}
}
private void createScene() {
try {
URL location = getClass().getResource("PersonFXViewer.fxml");
FXMLLoader fxmlLoader = new FXMLLoader();
fxmlLoader.setLocation(location);
fxmlLoader.setBuilderFactory(new JavaFXBuilderFactory());
Parent root = (Parent) fxmlLoader.load(location.openStream());
Scene scene = new Scene(root);
fxPanel.setScene(scene);
controller = (PersonFXViewerController) fxmlLoader.getController();
} catch (IOException ex) {
Exceptions.printStackTrace(ex);
}
}
. . . code omitted . . .
}
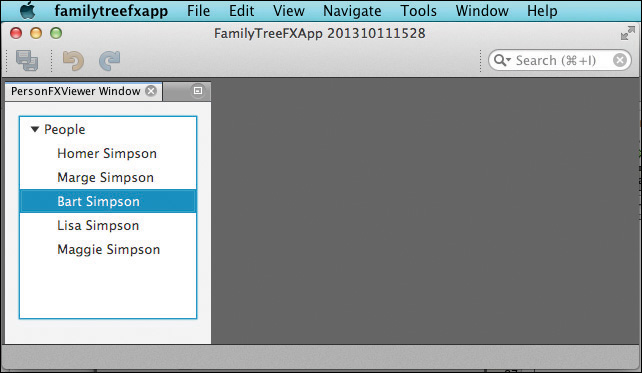
At this point, you can now run the FamilyTreeFXApp application. The PersonFXViewer window appears, as shown in Figure 6.25, and selection changes are logged.
Configure a Window with JavaFX for Form Editing
Module PersonFXEditor implements the right window in the FamilyTreeFXApp application. You configure this module in a similar way to the PersonFXViewer module, as follows.
1. Set a dependency on module FamilyTreeFXModel so that module PersonFXEditor can access classes Person and FamilyTreeManager.
2. Add a window (TopComponent) to module PersonFXEditor. In the Basics Setting dialog, select editor from the window position drop down control and select the checkbox Open on Application Start. In the Name and Location dialog, provide PersonFXEditor for the Class Name Prefix. For Icon, optionally provide a 16 x 16 GIF or PNG graphic. (You can use file personIcon.png found in the download bundle for this book.) Click Finish to complete the New Window wizard, which creates file PersonFXEditorTopComponent.java.
3. From project PersonFXMLAppEnhancedUI, copy files PersonFXML.fxml and PersonFXMLController.java to project PersonFXEditor | Source Packages under package com.asgteach.familytree.personfxeditor.
4. Rename the FXML file to PersonFXEditor.fxml.
5. Rename the controller class to PersonFXEditorController.java.
6. Edit the controller class so that its class name is PersonFXEditorController and its package name is correct, as shown in Listing 6.15. Fix imports so that the import statements for FamilyTreeManager and Person are correct. We’ll make additional changes to this controller class after configuring the FXML file.
Listing 6.15 PersonFXEditorController.java
package com.asgteach.familytree.personfxeditor;
import com.asgteach.familytreefx.model.FamilyTreeManager;
import com.asgteach.familytreefx.model.Person;
. . . other import statements omitted . . .
public class PersonFXEditorController implements Initializable {
. . . code omitted . . .
}
Configure the FXML
Edit the FXML file and remove the FXML declarations that describe the TreeView control in the left window. Edit the controller class attribute so that it refers to PersonFXEditorController, as shown in Listing 6.16.
Listing 6.16 PersonFXEditor.fxml
<?xml version="1.0" encoding="UTF-8"?>
<?import java.lang.*?>
<?import java.util.*?>
<?import javafx.scene.*?>
<?import javafx.scene.control.*?>
<?import javafx.scene.layout.*?>
<AnchorPane id="AnchorPane"
style="-fx-background-color: linear-gradient(aliceblue, lightblue);"
xmlns:fx="http://javafx.com/fxml"
fx:controller=
"com.asgteach.familytree.personfxeditor.PersonFXEditorController">
<children>
. . . fxml for Person Editor form unchanged from
project PersonFXMLAppEnhancedUI
(See Listing 4.17 on page 159) . . .
</children>
</AnchorPane>
Configure the JavaFX Controller
The JavaFX controller class for module PersonFXEditor has the following responsibilities.
• Obtain an instance of FamilyTreeManager from the Global Lookup to update the edited Person object.
• Implement event handlers to process user input from the text field controls, the radio buttons, and the text area control. This code is unchanged from the JavaFX-only version.
• Implement the Update Button event handler, which invokes the FamilyTreeManager updatePerson() method. This is also unchanged.
• Replace the TreeSelectionListener with public method doUpdate(), which displays its Person argument in the Person editor form (or clears the form when no Person is available). The TopComponent invokes this method in its LookupListener event handler.
Listing 6.17 shows the updated controller code with the modified code shown in bold.
Listing 6.17 PersonFXEditorController.java
public class PersonFXEditorController implements Initializable {
. . . unchanged code omitted . . .
private FamilyTreeManager ftm = null;
private Person thePerson = null;
private ObjectBinding<Person.Gender> genderBinding;
private boolean changeOK = false;
private BooleanProperty enableUpdateProperty;
. . . unchanged code omitted . . .
// This is invoked from the LookupListener in the TopComponent
public void doUpdate(Collection<? extends Person> people) {
enableUpdateProperty.set(false);
changeOK = false;
if (people.isEmpty()) {
logger.log(Level.FINE, "No selection");
clearForm();
return;
}
thePerson = people.iterator().next();
logger.log(Level.FINE, "{0} selected", thePerson);
configureEditPanelBindings(thePerson);
// set the gender from Person, then configure the genderBinding
if (thePerson.getGender().equals(Person.Gender.MALE)) {
maleRadioButton.setSelected(true);
} else if (thePerson.getGender().equals(Person.Gender.FEMALE)) {
femaleRadioButton.setSelected(true);
} else {
unknownRadioButton.setSelected(true);
}
thePerson.genderProperty().bind(genderBinding);
changeOK = true;
}
@Override
public void initialize(URL url, ResourceBundle rb) {
. . . unchanged code omitted . . .
ftm = Lookup.getDefault().lookup(FamilyTreeManager.class);
if (ftm == null) {
logger.log(Level.SEVERE, "Cannot get FamilyTreeManager object");
LifecycleManager.getDefault().exit();
}
. . . unchanged code omitted . . .
}
}
Configure the TopComponent
Listing 6.18 shows the TopComponent code, which has two main responsibilities. One, it builds the JavaFX scene graph, saving the controller reference in a class variable. Two, it implements a LookupListener and adds it to the Lookup.Result<Person> lookupResult class variable. The lookupResult variable stores the Lookup that contains Person objects from the Global Selection Lookup. The listener is invoked when the Lookup.Result changes. See “Configure TopComponent Life Cycle Methods” on page 230 for a detailed explanation of how the LookupListener reacts to selection changes in the PersonFXViewer window.
The LookupListener invokes the checkLookup() method. Here, we must make sure we’re executing on the JavaFX Application Thread. If not, we use Platform.runLater() to invoke the JavaFX controller method doUpdate() with the Lookup results. The doUpdate() method updates the Person editor form in the JavaFX scene graph.4
4. Since we invoke the checkLookup() method both in the LookupListener and in the TopComponent life cycle method componentOpened(), we make sure that we always call the JavaFX controller method doUpdate() on the JavaFX Application Thread.
Listing 6.18 PersonFXEditorTopComponent.java
public final class PersonFXEditorTopComponent extends TopComponent {
private static JFXPanel fxPanel;
private Lookup.Result<Person> lookupResult = null;
private PersonFXEditorController controller;
private static final Logger logger =
Logger.getLogger(PersonFXEditorTopComponent.class.getName());
public PersonFXEditorTopComponent() {
initComponents();
setName(Bundle.CTL_PersonFXEditorTopComponent());
setToolTipText(Bundle.HINT_PersonFXEditorTopComponent());
setLayout(new BorderLayout());
init();
}
private void init() {
fxPanel = new JFXPanel();
add(fxPanel, BorderLayout.CENTER);
Platform.setImplicitExit(false);
Platform.runLater(() -> createScene());
}
private void createScene() {
try {
URL location = getClass().getResource("PersonFXEditor.fxml");
FXMLLoader fxmlLoader = new FXMLLoader();
fxmlLoader.setLocation(location);
fxmlLoader.setBuilderFactory(new JavaFXBuilderFactory());
Parent root = (Parent) fxmlLoader.load(location.openStream());
Scene scene = new Scene(root);
fxPanel.setScene(scene);
controller = (PersonFXEditorController) fxmlLoader.getController();
} catch (IOException ex) {
Exceptions.printStackTrace(ex);
}
}
// LookupListener to detect changes in Global Selection Lookup
LookupListener lookupListener = (LookupEvent le) -> checkLookup();
private void checkLookup() {
TopComponent tc = TopComponent.getRegistry().getActivated();
if (tc != null && tc.equals(this)) {
logger.log(Level.INFO, "PersonFXEditorTopComponent has focus.");
return;
}
Collection<? extends Person> allPeople = lookupResult.allInstances();
if (Platform.isFxApplicationThread()) {
System.out.println("Already in JavaFX Application Thread");
controller.doUpdate(allPeople);
} else {
System.out.println("NOT in JavaFX Application Thread");
Platform.runLater(() -> controller.doUpdate(allPeople));
}
}
@Override
public void componentOpened() {
// Listen for Person objects in the Global Selection Lookup
lookupResult = Utilities.actionsGlobalContext()
.lookupResult (Person.class);
lookupResult.addLookupListener(lookupListener);
checkLookup();
}
@Override
public void componentClosed() {
lookupResult.removeLookupListener(lookupListener);
}
. . . code omitted . . .
}
Figure 6.26 shows the FamilyTreeFXApp NetBeans Platform application running with both windows detached.
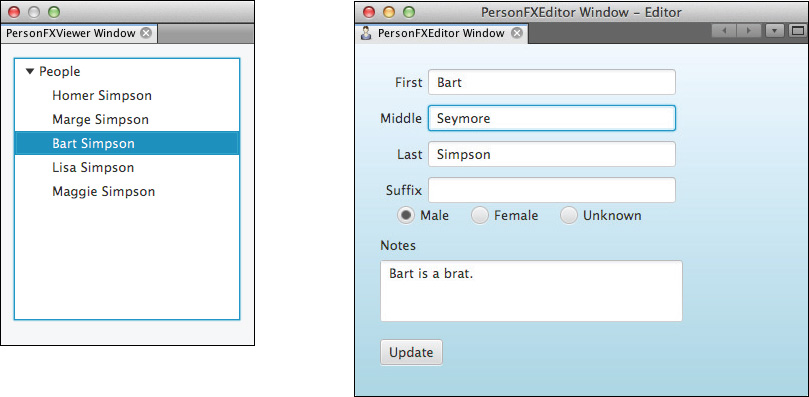
As you select different Person items in the TreeView control, the Person details appear in the PersonFXEditor form. Also, if you close the PersonFXEditor window and then select different items in the TreeView, the currently selected Person appears in the PersonFXEditor when you re-open it. (This use case is handled in the PersonFXEditorTopComponent componentOpened() method.) Furthermore, you can close both windows and then re-open them. The call to Platform.setImplicitExit(false) makes sure that the JavaFX runtime does not exit.
The FamilyTreeFXApp application not only shows how to build a NetBeans Platform application with JavaFX content, but it leverages the important NetBeans Platform features of modularity and Lookup to achieve the architectural advantages we describe in Chapter 5.
6.4 Key Point Summary
In the previous chapter, you learned how to build a well-designed, loosely-coupled NetBeans Platform application that is modular and uses the Lookup API for discovering service providers and inter-module communication. In this chapter, we use the same features (modules and Lookup) to build a NetBeans Platform application with JavaFX content. Here, we concentrate on the issues of JavaFX integration. In particular, we discuss the interaction between the Swing EDT and JavaFX Application threads, the mechanics of embedding JavaFX within the JFXPanel component, and the communication strategies between the Swing TopComponent code and the JavaFX scene graph.
Here are the key points in this chapter.
• You embed JavaFX content into a NetBeans Platform application by adding a scene graph to the Swing JFXPanel component.
• You place JavaFX content in a TopComponent (window).
• It is straightforward to copy an FXML document and controller class into a NetBeans module with a TopComponent with only minor modifications.
• The TopComponent constructor instantiates the JFXPanel component and then invokes the FXML Loader to build the scene graph.
• The JFXPanel implicitly initializes the JavaFX runtime.
• Use Platform.setExplicitExit(false) to prevent the JavaFX runtime from exiting when the last window with JavaFX content closes.
• The TopComponent wraps the code that creates the JavaFX content in a Runnable and invokes it with Platform.runLater().
• Code that accesses or manipulates the JavaFX scene graph must execute on the JavaFX Application Thread.
• The TopComponent code that creates the JavaFX scene graph is analogous to the code in a JavaFX application’s start() method.
• The JFXPanel transparently forwards all input and focus events to the JavaFX runtime.
• SwingNode is a JavaFX control that lets you install Swing content into a JavaFX scene graph.
• Communication strategies between a TopComponent and embedded JavaFX scene graph content can be characterized as self contained, one way, one way with waiting, and two way.
• Provide public methods in the JavaFX controller class when the TopComponent must access or modify the JavaFX scene graph.
• Use the Concurrency Library CountDownLatch when the TopComponent must wait for a JavaFX controller method to complete.
• JavaFX-enabled windows that provide selection events put selected items in a Lookup container (InstanceContent) that the TopComponent then publishes.
• JavaFX-enabled NetBeans Platform applications use service providers, listeners, and listener events to provide a modular and loosely-coupled design. This is the same approach you use with NetBeans Platform applications with just Swing-based windows.