
19. Compiling Your Completed Work
After you’ve sweat blood and tears over your writing project, you are finally ready to produce a completed work. Before you can hold a printed thesis in your hand, submit a manuscript to your publisher, or upload an e-book to Amazon, however, you first need to compile all your separate project documents into a cohesive whole.
As fascinated as many new Scrivener users are about features such as project templates, they are terrified about tackling the Compile settings. This chapter attempts to break the process down into chunks and build up to a complete understanding, much the way Scrivener itself works.
Understanding the Compile Process
When you learned how to set up an external folder in Chapter 18, “Taking Scrivener Out and About,” your project files remained the same, but you instructed Scrivener to export them into something new that could be used by other applications. In essence, the compile process is more of the same. Your project remains unchanged, but you instruct Scrivener to gather all of the files you select into a format that can be used in another way. For many types of projects, final editing and formatting are done in a word processor or screenplay application, so you can fine-tune the compiled document before printing or submitting the file. For others, you can print a hard copy directly from Scrivener.
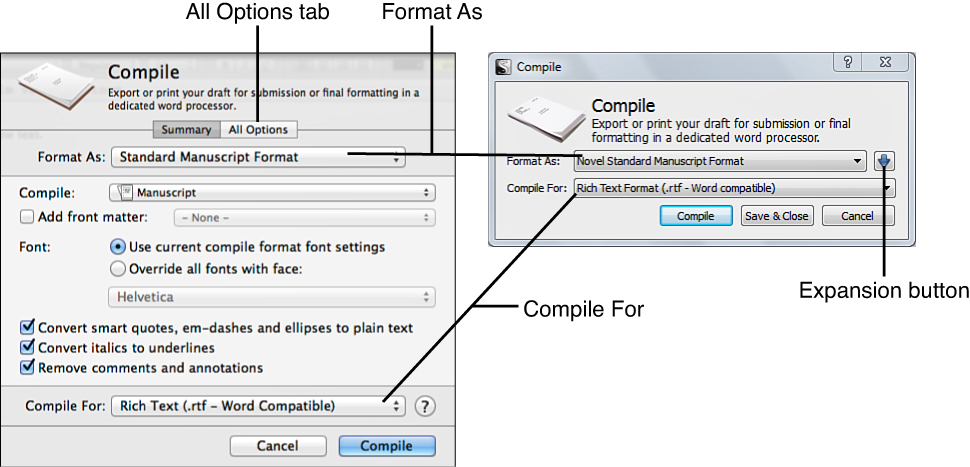
To begin the compile process, choose File, Compile from the menu. You can also press Option-Cmd-E on the Mac or Ctrl+Shift+E in Windows. The first time you open the Compile dialog box, shown in Figure 19.1, it opens in a summary tab on the Mac or a condensed set of options in Windows. Once you have set all the compile options for your project, as you learn throughout this chapter, this Summary view is a good way to quickly recompile your project.
At its most basic level, you compile a project following these steps:
1. Choose a compile format from the Format As drop-down menu.
2. Select an output format from the Compile For drop-down menu.
3. Click the Compile button.
This is only the beginning of your compile options, but that’s a good place to start.
Choosing a Compile Format
The first decision you need to make is the format you require for your finished project. This is known as the compile format. The options available in the Format As drop-down menu depend upon which version of Scrivener you are using and the project template you chose for your project. Some types of projects may offer one or more variations, such as Non-Fiction Manuscript Format and Non-Fiction (with Subheads). The following lists the most common options for both platforms:
![]() Note
Note
The Format As drop-down menu list is a bit different for the Mac and Windows platforms, so some formats appear only on one platform or the other, and the menu options may be in a different order.
• Original: This format is the standard setting. It preserves your Draft folder without any additional formatting, making it a good place to start if you want to create your own custom Compile settings from scratch. On the Mac, this option appears at the top of the menu if you created your project from the Blank project template, but moves down the menu if you used a different template.
• E-Book: This option prepares to compile the project as an e-book, with containers treated as chapters and documents as scenes or sections. See Chapter 20, “Creating E-Books,” for more information about e-book projects.
• Enumerated Outline: This format lists the titles of each document and a number to indicate its order in your project hierarchy. Subfolders and subdocuments are indented to indicate the structure of the project.
• Non-Fiction Manuscript Format: This format is good for academic and other nonfiction work. It treats folders and top-level file groups as chapters. Top-level files are titled, while those below the top level are untitled.
• Paperback Novel: This format is designed for creating a PDF file to submit to a print-on-demand (POD) service, such as CreateSpace. This preset is only available on the Mac.
• Plain Text Screenplay (Celtx, Movie Magic): This screenplay format is intended to produce a plain text file that is compatible with screenplay applications such as Celtx and Movie Magic. This preset is only available on the Mac.
• Proof Copy: This format creates a double-spaced draft copy of your project so you can edit it or distribute it to co-workers for feedback. It adds a disclaimer after each chapter title and in the header that reads Not for Distribution. This format treats folders as chapters, and everything else includes the title of the item. This preset is only available on the Mac.
• Script or Screenplay: This screenplay format is intended to produce a file that is compatible with Final Draft version 8 or higher using the FDX format. This preset is only available on the Mac.
• Standard Manuscript Format: This format prepares your project for submission of a manuscript. It double-spaces your text, converts the font to Courier 12-point, and adds page numbers and scene separators.
• Synopses and Titles: This format is similar to the Enumerated Outline format, but synopses are added to each item. This format does not include hierarchical numbering. In Windows, the Outliner preset is similar to the Mac’s Synopses and Titles preset.
• Synopsis Outline: This format is a good choice if you are writing a novel and trying to get a feel for how the scenes within each chapter flow or if you are writing an academic or nonfiction work and want to see how your supporting sections flow in order within a major heading. This option indents items to indicate their position within the project hierarchy. Files below the top level do not include their titles. This preset is only available on the Mac.
• Custom: This format contains your current Compile settings.
Selecting an Output Format
Once you select a compile format, you need to choose an output format. Whereas the compile format specifies the type of product to compile, the output format specifies how that product is distributed. If you want a printed hard copy of your project, choose Print. If you want to disseminate or submit your project electronically or fine-tune it in another application, choose an appropriate file format.
 Caution
Do not let the terminology confuse you. Select your compile format from the Format As drop-down menu. Select your output format from the Compile For drop-down menu.
As with the compile formats, your output format options depend upon your Scrivener version, but most of the following options are available on both platforms:
• Print: This option compiles your project and sends it to your printer. It does not save the compiled project in a file.
![]() Tip
Tip
On the Mac, choose this format to quickly preview your compiled document with the current settings, then click the PDF button in the Print dialog box and select Open PDF in Preview to see how your document appears with the current Compile settings.
• PDF: This format saves the compiled project as a Portable Document Format (PDF). This format cannot be edited, but it is accessible from almost any computer platform or device. In Windows, choose this format if you want to quickly preview your compiled document with the current Compile settings.
• Rich Text (.rtf—Word Compatible): This format preserves images, formatted lists, comments, footnotes, and tables in the compiled file. This is the best option if you plan to open the file in Word or another word processor because it is widely compatible and preserves your project’s formatting integrity.
• Rich Text with Attachments (.rtfd): This option is only available on the Mac. You should only select this option if you need to open the compiled document in an Apple-proprietary application such as Pages or TextEdit. It is not compatible with other word processors or on other computer platforms.
![]() Tip
Tip
If you use Pages, save in either Rich Text with Attachments or Microsoft Word (.docx) format. If you use headers, page breaks, or footnotes, you lose some formatting options, but you can edit the document in Pages to reformat it. Alternatively, save in Rich Text (.rtf—Word Compatible), open the file in another word processor, and then resave it as a Word .doc file. You can then open that file in Pages. If you are looking for a free word processor to use as the go-between, try OpenOffice.
• Microsoft Word 97-2004 (.doc): This format preserves the same settings as the Rich Text (.rtf—Word Compatible) option, but with the .doc extension. When you compile to this format on a Mac, you are prompted to install improved converters, which are capable of retaining most of your formatting.
Caution
If you do not install the improved converters on the Mac platform, Scrivener uses Apple’s Microsoft Word converters, which lose formatting such as bullets, footnotes, and comments.
• Microsoft Word (.docx): This is the current XML-based Word format. As with its predecessor, you are prompted to install improved converters to preserve your formatting. In Windows, this format is only available if you have Word 2007 or higher installed and have enabled the Use Microsoft Word or Open Office for Doc and Docx Conversions option in the Import/Export tab of the Options window.
![]() Tip
Tip
If you need to save your document in .doc or .docx format in order to submit your work electronically to a professor or editor, another approach is to compile your project into a Rich Text (.rtf) file in order to retain your formatting, then open the file in Word and save as a .doc or .docx file. I prefer this approach because it avoids formatting issues between Scrivener and Word since the document does not have to go through a conversion process. Many publishers now accept .doc/.docx submissions and use this format during the revision process.
• OpenOffice (.odt): This option saves the file in the native OpenOffice format. As with .doc and .docx, you are prompted to install the improved converters. If you encounter problems, use the Rich Text (.rtf) format, instead.
• Plain Text (.txt): This format removes all of your formatting, but creates a plain text file that can be accessed from almost any application on almost any platform or device.
• Final Draft 8 (.fdx): This option is used to transfer scripts to Final Draft. It saves synopses as scene summaries on the Mac and preserves scene titles and custom script element formatting.
• Final Draft 5-7 Converter (.fcf): This option is only available on the Mac and is intended to save a file that is compatible with earlier versions of Final Draft. You may lose formatting with this choice, as this format only supports basic screenplay formatting.
• ePub eBook (.epub): This format creates an ePub file that is compatible with a wide range of e-readers.
![]() Tip
Tip
If you save an e-book in ePub format, you can convert it to other formats using Calibre, a free, multiplatform e-book management application. Visit http://www.calibre-ebook.com for more information.
• Kindle eBook (.mobi): This option requires Amazon KindleGen. It generates an e-book for reading on Amazon Kindle devices and apps.
• iBooks Author Chapters (.docx): Use this format to save each section of your book as an individual .docx file, which can then be imported into iBooks Author to convert to .iba format. This format is only available on the Mac.
• Web Page (.html): This format creates a single HTML file to publish on a website.
• eXtensible Web Page (.xhtml): This option is only available in Windows. It is similar to the HTML option, but takes advantage of XHTML code.
• Web Archive (.webarchive): This option is similar to HTML, but it saves the project into Apple’s .webarchive format, with images bundled into a single file. This option is only available on the Mac, and can only be opened by Apple’s Safari browser and some other Mac OS X apps.
• PostScript (.ps): This format is only available in Windows. It creates a single file in a format commonly used in design and publishing apps.
• MultiMarkdown (.md): Use this option or one of the other MultiMarkdown files to export a plain text MultiMarkdown file or a file formatted with MultiMarkdown support.
![]() Note
Note
MultiMarkdown is a plain text markup language that allows you to separate the content and structure of your document from the formatting of the document. Coverage of MultiMarkdown is beyond the scope of this book, but you can find information about it on the Literature & Latte forum (http://www.literatureandlatte.com/forum) and Fletcher Penney’s MultiMarkdown website (http://www.fletcherpenney.net/multimarkdown/).
![]() Tip
Tip
This list of output formats may be intimidating, so let’s cut to the chase with some best practices. If you want to print your compilation directly from Scrivener, choose Print. If you want to access the file from a word processor other than Pages, choose Rich Text (.rtf) format. If you are using Pages, output in Rich Text with Attachments (.rtfd) or Microsoft Word (.docx) format.
If you are a screenwriter or playwright using Final Draft, output in the Final Draft format that is compatible with your application. If you use Movie Magic Screenwriter or Celtx, save as plain text (.txt). If you use Montage, save in either Rich Text or plain text.
![]() Note
Note
If you are compiling an e-book, see Chapter 20 for details on formatting and compiling your project for the best results.
Compiling the Project Using Compile Presets
If you want to compile based solely on these basic criteria and presets, you can generally get good results. You give up control over fonts, chapter numbering, front matter, headers and footers, and other formatting options, but you will get an idea of what Scrivener can do without any further intervention.
In Windows, to complete the compile process, simply click the Compile button in the condensed Compile dialog box after choosing your compile and output options. In the Save As dialog box, enter a filename, choose where you want to save the file, and click Save.
On the Mac, to complete the compile process based only on the summary options:
1. Open the Compile dialog box, if it is not already open (File, Compile or Option-Cmd-E).
2. Select the compile format from the Format As drop-down menu.
3. Select the output format from the Compile As drop-down menu.
4. Choose a compile group from the Compile drop-down menu. You can choose to compile any of the following, as you can see from the example in Figure 19.2:
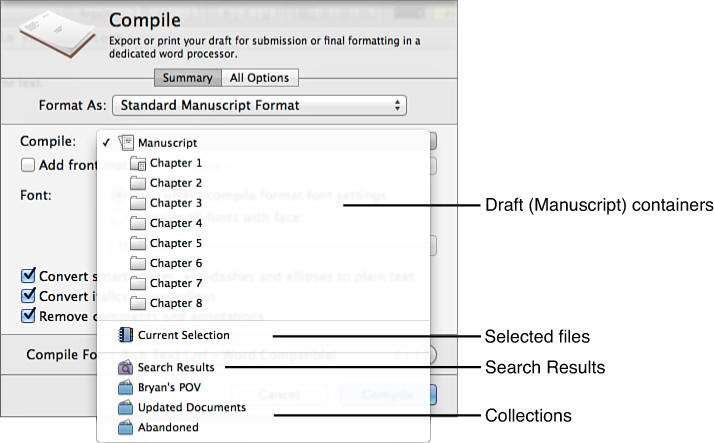
Figure 19.2 On the Mac, choose which items to compile from the Summary tab of the Compile dialog box.
• Your entire Draft folder
• Individual containers within the Draft folder
• Selected files in the Binder
• A collection or search results
5. You can opt to Add Front Matter by clicking the check box and then selecting a document from the drop-down menu.
6. In relevant formats, choose whether to use the current compile format font settings or to override any font settings and replace it with a font selected from the drop-down menu. This option is not available for plain text, scriptwriting, or e-book formats.
7. Select or deselect the options to Convert Smart Quotes, Em-Dashes, and Ellipses to Plain Text, Convert Italics to Underlines, and Remove Comments and Annotations.
8. Click Compile.
9. In the Export dialog box, enter a filename, choose where you want to save the file, and click Export. If you selected the Print option from the Compile For drop-down menu, the Print dialog box opens instead of the Export dialog box.
Using the Compile Window
Of course, while the compile process can be as simple as making a couple selections from drop-down menus and clicking a button, this is just the tip of the iceberg. There are many other settings and options that you can use to determine which items are included and the formatting of your compiled project. Once you select your Compile settings, they are saved with your project.
![]() Note
Note
Compile settings are also saved with project templates. If you want to apply a preformatted compile preset or a custom preset to projects based on a particular template, follow the instructions in this chapter to configure the Compile settings before saving the project template. For more information about project templates, refer to Chapter 14, “Creating and Using Project Templates.”
On the Mac, click the All Options tab in the Compile dialog box. In Windows, click the Expansion button to the right of the Format As drop-down menu, as shown in Figure 19.1. The options available in the Compilation Options list on the left, as shown in Figures 19.3 and 19.4, depend on the output format you selected. The right pane contains the settings for the selected option tab.
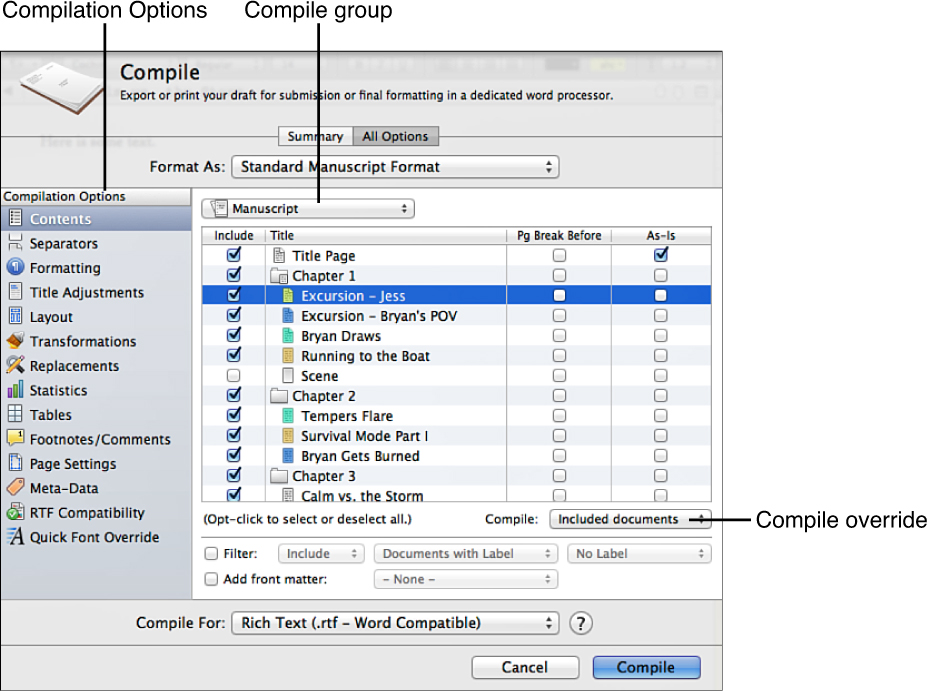
Figure 19.3 The All Options tab in the Compile dialog box on the Mac displays a list of compilation options and settings.
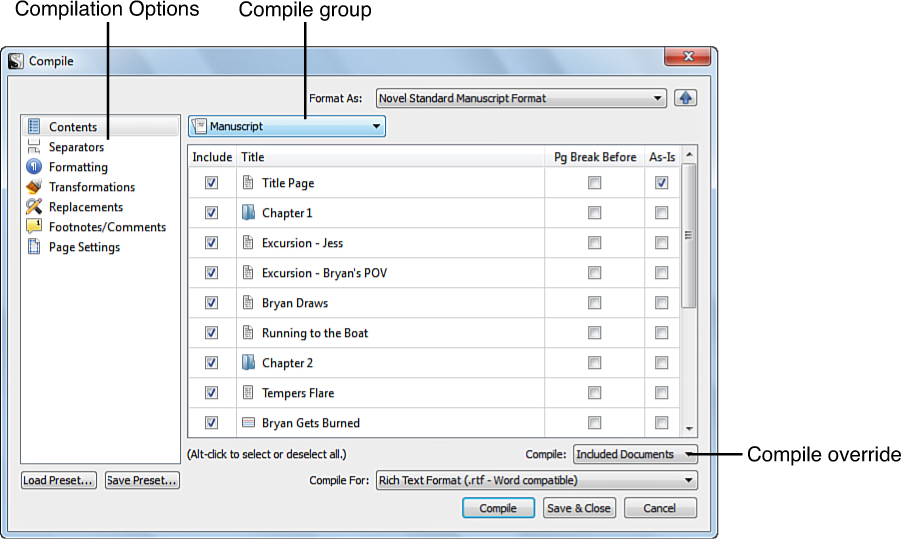
Figure 19.4 The expanded Compile dialog box in Windows allows you to customize your Compile settings.
![]() Note
Note
This chapter is not intended to be a comprehensive guide to all of the options in the Compile dialog box. To learn more about some of the advanced or less-common options, turn to some of the resources listed in the Introduction. I also blog about some of these features on my website at http://www.jenniferkettell.com.
Choosing the Contents to Compile
The Contents tab in the Compile dialog box, shown in Figures 19.3 and 19.4, displays the entire contents of your Draft folder by default. The compile group drop-down menu allows you to select from containers within the Draft folder, the current Binder selection (Mac only), the search results, or a collection. The Contents pane displays all of the files and folders in the compile group.
If you select only a portion of the Draft folder on the Mac, another menu appears to the right of the compile group field, as shown in Figure 19.5. The Compile Group Options drop-down contains the following two options, each of which can be independently enabled or disabled:
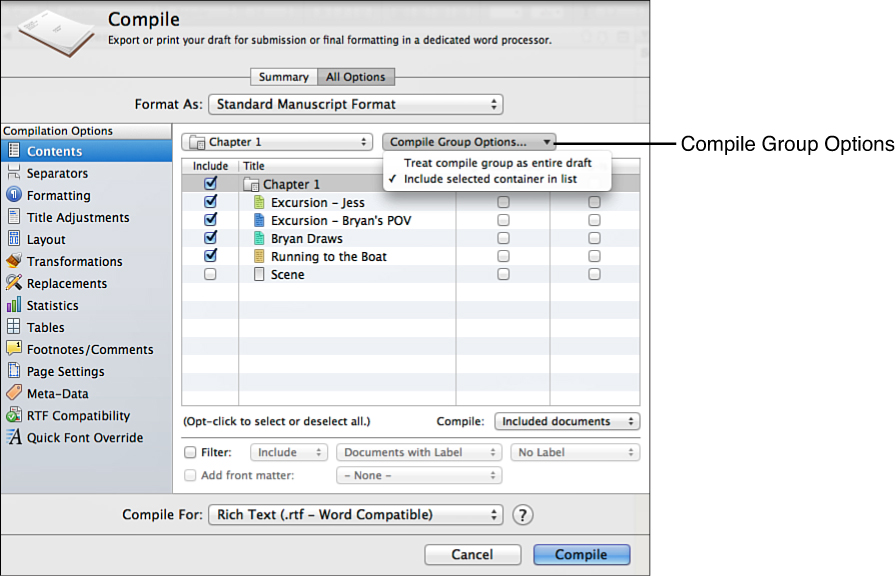
Figure 19.5 Select how to treat a selected subgroup of the Draft folder from the Compile Group Options drop-down menu.
• Treat Compile Group as Entire Draft: When this option is selected, the compile group is treated as if it were the entire project. Think of the compile group container as a designated Draft folder, with its subdocuments following in the project hierarchy. Chapter numbers begin at 1, and any other level-related compile formatting is assigned accordingly.
• Include Selected Container in List: This is the default option. When it is selected, the selected container is included in the compile group. If you disable this option, the compile group only includes the items beneath the selected container. If this option is selected by itself, the hierarchy of the project remains unchanged. If you select this option in conjunction with the Treat Compile Group as Entire Draft option, however, all of the items in the compile group shift up by a level, as items that were at Level 2 in the hierarchy are then considered to be Level 1 in the compile group.
The levels of the hierarchy are important in formatting the compiled output, as is explained in the “Formatting the Compilation” section later in this chapter.
Selecting Items in the Compile Group
The Include check box is linked to the Include in Compile option in the Inspector. To change these options, select or deselect items from the Contents pane by clicking the Include check box to the left of each item. To select or deselect all of the items in the pane, Option-click (Alt-click in Windows) the Include check box. As an example, if you want to compile only the first three chapters of your novel to submit a book proposal, choose your Draft (Manuscript) folder as the compile group, then select the first three chapters and deselect the remaining chapters.
Caution
If you select a container in the Contents pane, the items within the container are not included unless you select them, as well.
To the right of the item title are two additional check boxes:
• Pg Break Before: This option links to the Page Break Before option in the Inspector, and it inserts a page break before the checked document. Use this option primarily for title pages, a glossary, or a table of contents—documents that generally appear only once in a project.
![]() Note
Note
For chapter and section breaks, use the Separators tab in the Compile dialog box instead of the Page Break Before option.
• As-Is: This option is linked to the Compile As-Is option in the Inspector, and it instructs the Formatting pane of the Compile dialog box to ignore this document.
By default, items that are selected in the Include column are included in the compile. The Compile Override drop-down menu in the lower-right corner of the dialog box can alter these settings as follows:
• Included Documents: This is the default behavior and includes only selected documents in the compilation.
• Excluded Documents: This reverses the default behavior and includes only those documents that are not selected in the compilation. This option is helpful if you have added notes or other materials within the Draft folder that you do not want included in the default compile. This option allows you to compile those items separately.
• All: This ignores the Include in Draft selection and compiles all of the items in the compile group.
![]() Tip
Tip
A professor using Scrivener to generate course materials is an example of a good time to use the compile override options. Select your handouts and assignment sheets to Include in Compile in the Inspector when creating the items. Do not set your lecture notes with the Include in Compile option. Print the course materials for your students using the default Included Documents option. Then return to the Compile dialog box and select the Excluded Documents compile override to print just your lecture notes or the All compile override to print a complete set of course materials and lecture notes for yourself.
Filtering the Contents of a Compile Group (Mac Only)
On the Mac, you can filter the compile group to select files that match specific criteria. Using the professor’s course material example, you can limit the compilation to files about a specific topic. For a novel, you can limit the compilation to files relating to a specific subplot, as shown in Figure 19.6.
Caution
Filters require preplanning in the main Scrivener interface. If you plan to filter by label or status, you must create and assign label or status values to achieve the desired results. If you want to filter by a collection, you must create the collection prior to opening the Compile dialog box. Likewise, if you want to filter by a selection of items in the Binder, search results, or a collection, you need to preselect those items before opening the Compile dialog box.
1. Select the Filter check box.
2. In the first Filter drop-down menu, choose to Include or Exclude the filtered documents.
3. In the second drop-down menu, select the criteria for the filter from the following options:
• Documents with Label: This is the default setting. Documents containing the label you select in the third drop-down menu are included or excluded from the compilation (based on your selection in step 2).
• Documents with Status: Documents containing the status you select in the third drop-down menu are included or excluded from the compilation.
• Documents in Collection: Documents within the collection you select in the third drop-down menu are included or excluded from the compilation.
![]() Note
Note
Filtering a compile group by collection is different from selecting a collection as the compile group itself. When you select a collection as a compile group, text items in the collection from outside the Draft folder are included in the compile, and the compile group is a flat list without any hierarchy of documents. When you filter by a collection, however, only items in the collection that are also in the selected compile group are included or excluded by the filter. Also, the filtered documents retain their order in the hierarchy of the compile group.
• Current Selection: Documents that you select in the Binder, search results, or a collection prior to opening the Compile dialog box are included or excluded from the compilation.
4. Select a value from the third drop-down menu. The items on the menu vary depending on your selection in step 3. If you choose Current Selection in step 3, the third drop-down menu disappears.
Adding Front Matter (Mac Only)
Front matter items are documents such as the title page, author bio, and acknowledgments that may appear at the beginning of a book. You may require different front matter elements in different situations. If you self-publish, for example, you may want to include a static table of contents with page numbers in the PDF you send to a Print on Demand service, but a table of contents composed of links for the e-book file you load onto Amazon. Or you might want to include a set of review questions for copies of your work that you send to your critique group or beta readers, but a synopsis and title page for the copy you submit to an editor.
Some of the Scrivener for Mac project templates, such as the Novel template, include a Front Matter folder with subfolders and items for different publishing scenarios. You can customize these documents or create your own.
![]() Note
Note
If your project does not include a Front Matter folder, you can create one. The folder does not need to be titled Front Matter, but this does help you remember its purpose as you work on your project and ensures that the folder appears at the top of the list when selecting from the Front Matter drop-down menu.
![]() Tip
Tip
You can only select one option from the Front Matter drop-down list, so if you need to add multiple documents, group them in a subfolder in your Front Matter folder prior to opening the Compile dialog box.
The Add Front Matter option on the Contents tab of the Compile dialog box lets you select these items from outside your Draft folder. You can then create presets for different types of compilations that automatically call up the proper front matter materials for each situation.
![]() Note
Note
Learn about how to create compile presets later in this chapter.
Caution
The Front Matter feature is disabled if you select a subgroup of the Draft folder as the compile group and disable the Treat Compile Group as Entire Draft compile group option. It is also disabled if your compile group is based on the current selection of documents.
To add front matter to your compilation:
1. Select the Add Front Matter check box.
2. In the Front Matter drop-down menu, shown in Figure 19.7, select the subfolder appropriate for the desired output format. The documents within the folder are added at the top of the items listed in the Contents pane.
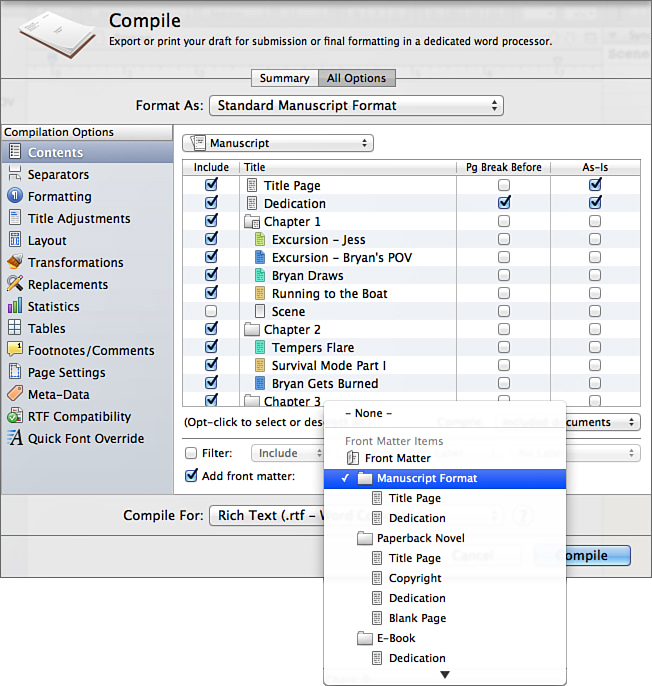
Figure 19.7 Adding front matter from a non-Draft folder makes it easy to customize your compilations for multiple formats.
3. Choose the Page Break Before and As-Is settings for each document that has been added to the Contents pane.
Formatting Separators Between Documents
Your project is composed of multiple files and folders. The Separators tab, shown in Figure 19.8, instructs Scrivener on how to transition between these items as it creates the compiled file. Separators automatically insert spaces, page breaks, or symbols between the items based on the options you select in this tab.
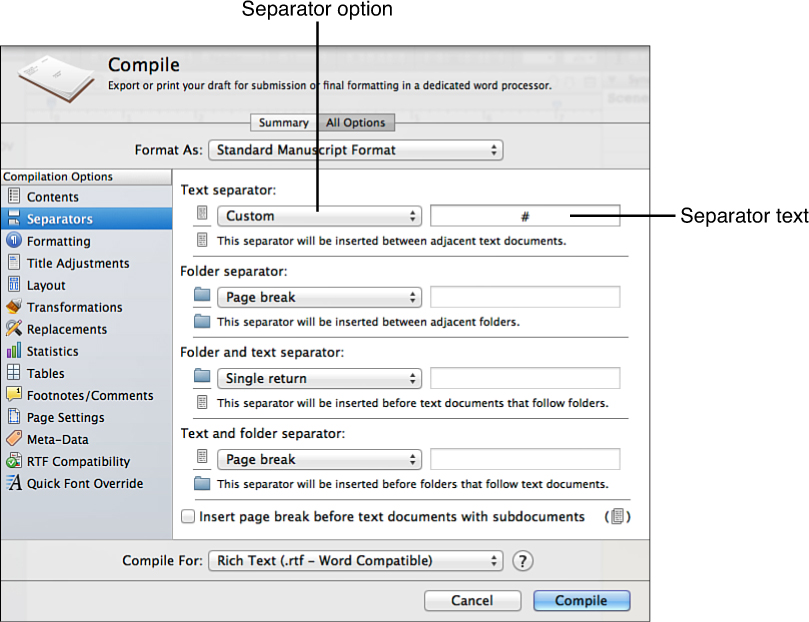
Figure 19.8 The Separators tab controls the transition between files and folders in the compile group.
![]() Note
Note
If you select the Page Break Before option in the Contents tab, it overrides the separators options for that item.
To understand the transition between items, think of a manuscript project. The manuscript is divided into parts, chapters, and scenes. The Draft folder contains subfolders for each part, and each part contains subfolders for each chapter. Those chapters, in turn, contain files for each scene.
![]() Note
Note
File groups are treated as files. This means that the transition between a file group parent and a child text file is governed by the Text Separator option.
There are four types of transitions between items:
• Text Separator: This option specifies the transition between two text files. In the previous example, the text separator specifies the type of separator used between scenes in the manuscript. Scenes are commonly separated by one or more pound symbols (#) or an empty line.
• Folder Separator: This option specifies the transition between two folders, such as a Part folder followed by a Chapter subfolder. These items are generally separated by a page break.
• Folder and Text Separator: This option specifies the transition between a folder and a text file (or file group). In the manuscript example, this determines the separator used between the chapter folder and the first scene in the chapter. These items are usually separated by a single return so as to make the transition invisible to the reader or an empty line to separate the chapter heading from the first line of the first scene in the chapter.
• Text and Folder Separator: This option specifies the transition between a text file and a folder, such as the last scene in a chapter and the beginning of a new chapter or part. This is generally done with a page break.
To set the separators, for each of the four types of transitions, select a separator option from the following:
• Single Return: Inserts a single return between items, making a seamless transition from one item to the next.
• Empty Line: Adds two returns between items, leaving an empty line between the items.
• Page Break: Inserts a page break between items.
• Custom: Inserts the characters or symbols you enter in the separator text box between items. This option automatically centers the custom characters and adds a single return before and after the characters so they appear on their own line.
![]() Tip
Tip
File groups are treated as files. This means that the transition between a file group parent and a child text file is governed by the Text Separator option. Scrivener for the Mac contains an additional option at the bottom of the Separators tab. Select Insert Page Break Before Text Documents with Subdocuments if you want Scrivener to insert a page break before all file groups. You can use this to approximate the same effect as choosing a page break for the folder separator and text and folder separator if you use file groups instead of folders in your project.
Formatting the Compilation
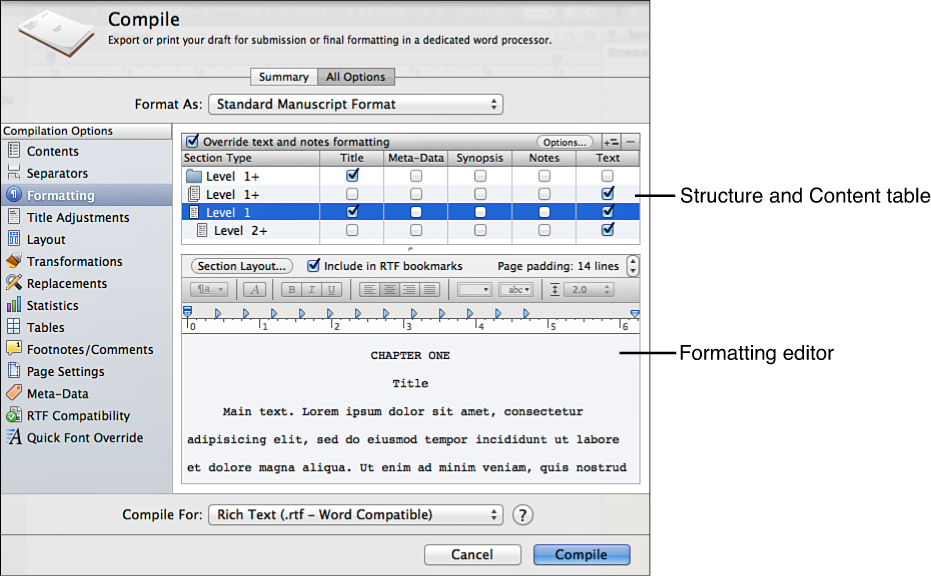
The Formatting tab of the Compile dialog box, shown in Figure 19.9, contains settings for the structure and appearance of your compiled document. This tab is divided into two sections: the Structure and Content table and the Formatting editor.
The Formatting tab tends to cause the most confusion for Scrivener users. As with the rest of the compile process, taking this concept in parts helps lay the foundation so you can understand the whole process.
Understanding Level Hierarchy
The Structure and Content table uses the Binder structure to group items into a hierarchy and assign attributes to each level. Level 1 files and folders are at the top of the hierarchy. Level 2 files and folders are contained within Level 1 items. Level 3 files and folders are contained within Level 2 items, and so on.
For example, a novel may have parts (Level 1), chapters within those parts (Level 2), and scenes within each chapter (Level 3). A different novel may only have chapters (Level 1) and scenes (Level 2).
Interestingly, the best way to understand the level hierarchy is with a complex example rather than a simple one. Figure 19.10 shows the structure of this Scrivener Absolute Beginner’s Guide, which has multiple levels.
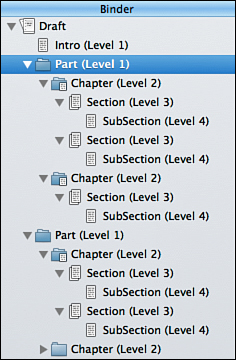
Each level in a project hierarchy can contain a mix of folders, files, and file groups. In the example in Figure 19.10, the Introduction file is at the same level as the Part folders. Although their level is the same, the Structure and Content table allows you to set different options for each type of item at each level so that you can apply different formatting to them. The Introduction and the Part folders, for example, can be formatted differently while remaining at the same hierarchical level.
Establishing the Structure and Content Table
In the Structure and Content table, each Level item affects items at that level or below it, signified by the plus (+) sign following the level number. Thus, a Level 1+ folder specifies how all folders at the top level or below are formatted. To add a level to the structure:
1. Select the row with the type of item you want to add to the Structure and Content table. If you want to add another level of folders, for example, select the Level 1+ folder. If you want to add another level of text documents, select the Level 1+ text document.
2. Click the Add Another Formatting Level button.
Figure 19.11 shows the Structure and Content table for the hierarchy established in Figure 19.10.
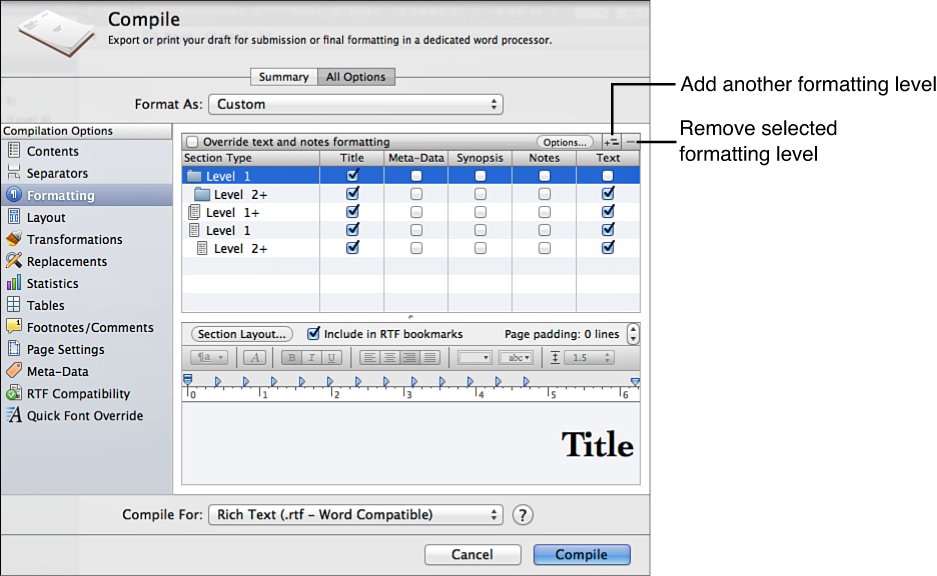
Figure 19.11 The Structure and Content table displays the level settings for the items in a project.
When you add a formatting level, the lowest level for each item type is followed by the plus (+) sign to indicate it is the lowest level of the formatting hierarchy and its formatting affects all items of that type below that level. A Level 1 text document only affects text documents at Level 1, whereas a Level 2+ text document affects text documents at Level 2 or lower, and so on.
The way to determine whether you need to add a level to the table or if it can be accommodated by a higher-level catchall is to think about how you want each level of your compilation formatted. This book, for example, has parts, chapters, sections, and subsections. Let’s say you want the following layout for these items:
• Introduction, in a Level 1 file in the Binder, formatted with the Introduction title in a 24-point font, and the text in a 12-point font
• Parts, in Level 1 folders, formatted with just the part number and title on their own page in a 36-point font, right-justified
• Chapters, in Level 2 folders with text, formatted with the title in a 24-point font and text introducing the purpose of the chapter in a 14-point font
• Sections, in Level 3 file groups, formatted with the section heading in an 18-point font and text explaining a major concept in an 11-point font
• Subsections, in Level 4 files, formatted with the subsection heading in a 14-point font and text explaining a minor concept in an 11-point font
Although both Parts and Chapters appear in folders, the formatting is different for each, so you need two distinct levels of folders. The Introduction and Subsections are both files and both contain a heading and text, but the formatting of those components is different. There are three levels separating those two items in your hierarchy; however, because there are no text documents at those interim levels, you can create a Level 1 file to format the Introduction and a Level 2+ file to accommodate any other files at a lower hierarchy (of which there are only the Level 4 documents). There is only one level of file groups, so you can set the Level 1+ file group item knowing it only applies to the file groups you have at Level 3 in your hierarchy.
![]() Tip
Tip
It may help to sketch out the hierarchy of your project on a sheet of paper or type it into a non-Draft document. For each item type at each level, list the formatting as demonstrated above. Add notes for how you want chapter or section headings to appear and which items should display the title of the scene or section; this will help you later in this chapter.
If your document is complex, such as this example, there are often multiple ways to configure the Structure and Content table to get the results you want. Don’t let this table confuse you unnecessarily. If you create an overly complex Structure and Content table and realize you can get the same result in a simplified manner, select the level you want to delete, then click the Remove Selected Formatting Level button.
![]() Tip
Tip
To provide a much simpler example, if you have a manuscript with only folders for each chapter and text documents for each scene within a chapter, you only need to set a Level 1+ folder and a Level 1+ file.
Selecting Content for Structure Levels
Once you have laid out the structure of the compilation, you are ready to select the content for each level. The Structure and Content table contains the following five elements from which to select:
• Title: Displays the title of the item
![]() Note
Note
Chapter numbering is handled in the Section Layout, explained below.
• Meta-Data: Displays the meta-data for the item—the created and modified dates for the item, the label and status values, assigned keywords, and custom meta-data
• Synopsis: Adds the synopsis for the item
• Notes: Adds the Document Notes from the Inspector
• Text: Includes the text of the item
The meta-data, synopsis, and notes elements allow you to structure a compiled outline or add this information to a draft of your project. If you are compiling a manuscript, nonfiction work, or another type of completed project, you most likely want to focus on the title and text elements.
In a typical manuscript, your chapters are formatted with a Level 1+ folder. If the chapters have titles, select the title element. Scenes are formatted with Level 1+ files with the text element selected.
Remember that folders can contain text. If you want to begin each chapter with a quotation, for example, type it in the chapter folder in the Editor before entering the Compile dialog box, and then select both the title and text elements in the Structure and Content table. The quotation appears below the title of the chapter in your compiled manuscript.
Formatting Content Elements
The final step in configuring the Formatting tab is to specify the formatting for each level in the Structure and Content table. The Formatting editor beneath the Structure and Content table allows you to change the appearance for each level of content. In Windows, this area is a preview pane.
As shown in Figure 19.12, the Formatting editor shows how the format of the selected elements appears in the compilation. If you selected the title element for a level, for example, a title element appears in the Formatting editor.
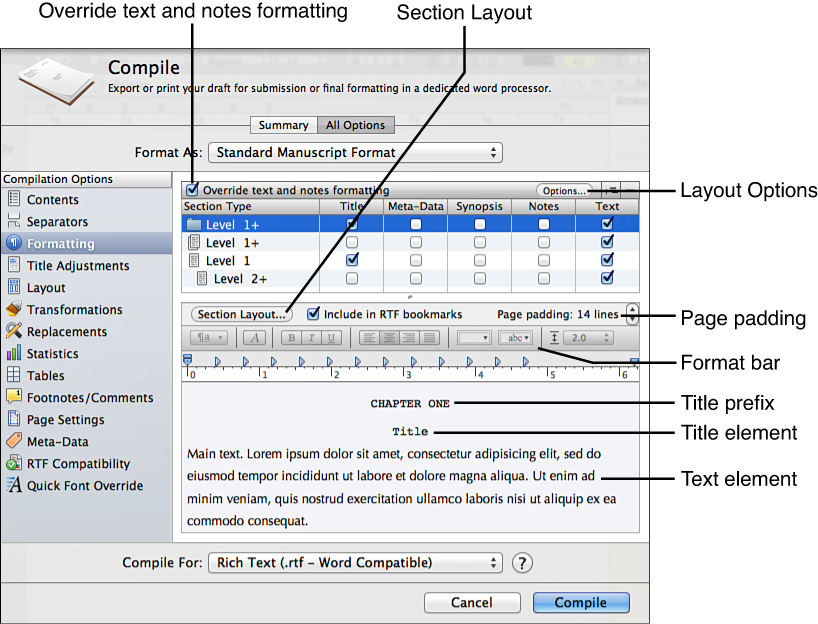
Figure 19.12 The Formatting editor controls the appearance of the content elements of your compilation.
The Format bar in the Formatting editor is similar to the Format bar and Ruler in the Editor. On the Mac, to change the appearance of each content element, click inside the element in the Formatting editor and then use the Format bar to modify it. There is no need to select the entire element because you are modifying the traits of the entire element, not a portion of it.
In Windows, click the Modify button to open the Formatting dialog box and modify elements, as shown in Figure 19.13. When you are finished, click OK to return to the Compile dialog box.

If you want to override the formatting of the text or notes elements, you must first select the Override Text and Notes Formatting check box at the top of the Structure and Content table.
![]() Note
Note
If you need a logical explanation of the need to override the text and notes formatting, consider that the other content elements are unformatted meta-data, including the title. Thus, the Formatting editor is adding formatting to elements that previously had none. The text and notes elements, however, were formatted in the Editor and Inspector, so you must make a conscious decision to override those settings.
If you were writing in 14-point Trebuchet MS in the Editor, you can change the font in your compilation to 12-point Times New Roman or Courier for submitting a completed manuscript to an editor. To do this, take the following steps:
1. Click the Override Text and Notes Formatting check box.
2. Select the relevant row in the Structure and Content table.
3. Click in the Text or Notes element of the Formatting editor. In Windows, you must click the Modify button first to open the Formatting editor.
4. Click the Font button on the Format bar to open the Fonts dialog box.
5. Select the new font and font size; then close the dialog box.
![]() Tip
Tip
In Windows, if you click the Override Text and Notes Formatting check box before you click the Modify button, you can format all of the elements in the Formatting dialog box at the same time instead of making repeated visits to this dialog box. To change the font, click on the Font button in the Format bar to open the Select Font dialog box.
![]() Note
Note
If you selected As-Is for an item in the Contents tab or Compile As-Is in the Inspector, the item retains the settings from the Editor rather than modifications made in the Formatting editor.
Numbering Chapters with the Section Layout
The title prefix is configured differently from the other content elements. Several compile presets, including the Standard Manuscript Format, are preconfigured to include a title prefix and automatically number each chapter or part. You can also add this element manually.
The Section Layout button controls the content of headings, such as a chapter heading. It also controls how the first page of a section is composed following a page break. Click the Section Layout button to open the Section Layout dialog box, shown in Figure 19.14.
The Section Layout dialog box contains three tabs on the Mac and two tabs in Windows:
• Title Prefix and Suffix: This tab lets you add text before or after the title element.
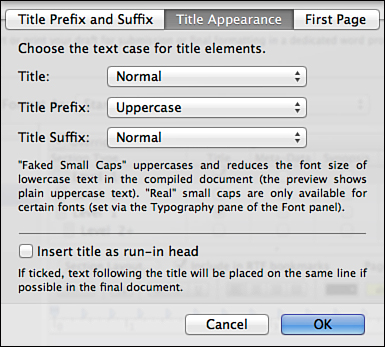
• Title Appearance: This tab is labeled Case in Windows. It controls the format of the title element (see Figure 19.15). On the Mac, you can change the appearance of the title element, the title prefix, and the title suffix to uppercase, lowercase, normal (title) case, or faked small caps. In Windows, you can change the appearance to uppercase and normal (title) case.
![]() Note
Note
Faked Small Caps changes the title to uppercase but then decreases the font size of the letters other than the initial capitals to make the title appear to be in small caps. Alternatively, you can choose a legitimate small caps font.
• First Page: This tab does not appear in Windows. At the beginning of a chapter or section, you can set a certain number of words of the text to appear in uppercase as a stylistic choice (see Figure 19.16).
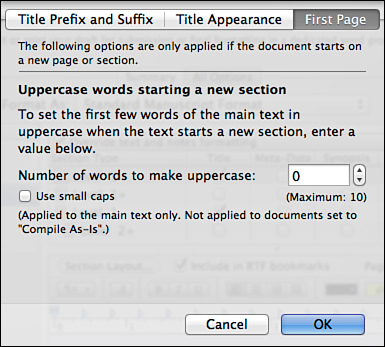
Figure 19.16 The First Page tab controls the appearance of the first few words of a document beginning on a new page or section of the compilation.
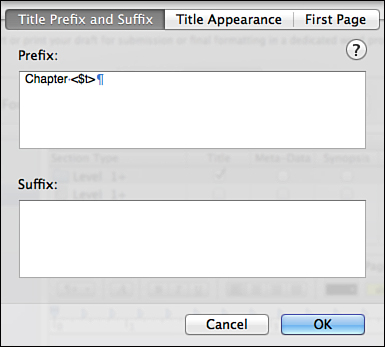
The key to setting the title prefix lies in the Title Prefix and Suffix tab. To add a numbered heading along with the title element:
1. Select the Title element in the Structure and Content table for the appropriate level.
2. Click the Section Layout button. In Windows, click Modify to open the Formatting dialog box; then click Section Layout.
3. In the Prefix pane, enter the word Chapter followed by one of the following placeholders:
• <$t> to spell out the chapter numbers in title case (One, Two, etc.)
• <$W> to spell out chapter numbers in uppercase (ONE, TWO, etc.)
• <$n> to use Arabic numbers (1, 2, etc.)
4. Choose from the following options:
• To add the title element to the same line as the title prefix, enter a colon (:) or a dash (—) immediately following the chapter element, followed by a space, such as Chapter <$t>: . The resulting chapter and title in the compiled document look like this: Chapter One: An Island Getaway.
• To position the title element beneath the title prefix, enter the title prefix followed by a return.
5. Change the settings on the Title Appearance and First Page tabs, if necessary.
6. Click OK to close the dialog box.
If you want to add just the title prefix without including the title element, deselect the Title element in the Structure and Content table.
![]() Tip
Tip
The <$t>, <$W>, and <$n> codes are placeholder tags. If you need to number parts as well as chapters, use <$R> as a placeholder for uppercase Roman numerals to number the parts. Use this placeholder in the Section Layout for the level in your Structure and Content table that correlates with the parts of your project. To discover more placeholder tags, choose Help, Placeholder Tags from the menu on the Mac. In Windows, visit https://scrivener.tenderapp.com/help/kb/windows/placeholder-tags-list.
If you use the title prefix in the Section Layout dialog box, be sure you do not use chapter headings elsewhere in your project. If you see two chapter headings in your compiled document or chapter headings at the beginning of a scene, check these possibilities:
• You titled your folders Chapter 1, Chapter 2, etc., and selected the title element along with adding a prefix or suffix in the Section Layout.
• You entered text in your folders or files in the Editor reading Chapter 1, Chapter 2, etc.
• You have a title prefix or suffix assigned to the scene level in your hierarchy. Select each level of your project in the Structure and Content table in turn and then use the Section Layout to remove extraneous prefixes or suffixes.
Excluding Documents from the Section Layout
Certain sections of your project should not be included in the auto-numbering of chapters or parts. Front matter should be excluded, for example, as should the Introduction, Prologue, or Epilogue of the document, if you have any of these items. To exclude one or more of these items:
1. Click the Title Adjustments tab in the Compile dialog box.
2. In the Title Adjustments pane, shown in Figure 19.17, select the Do Not Add Title Prefix to Front Matter Documents and Do Not Add Title Suffix to Front Matter Documents options if your compile contents include front matter.
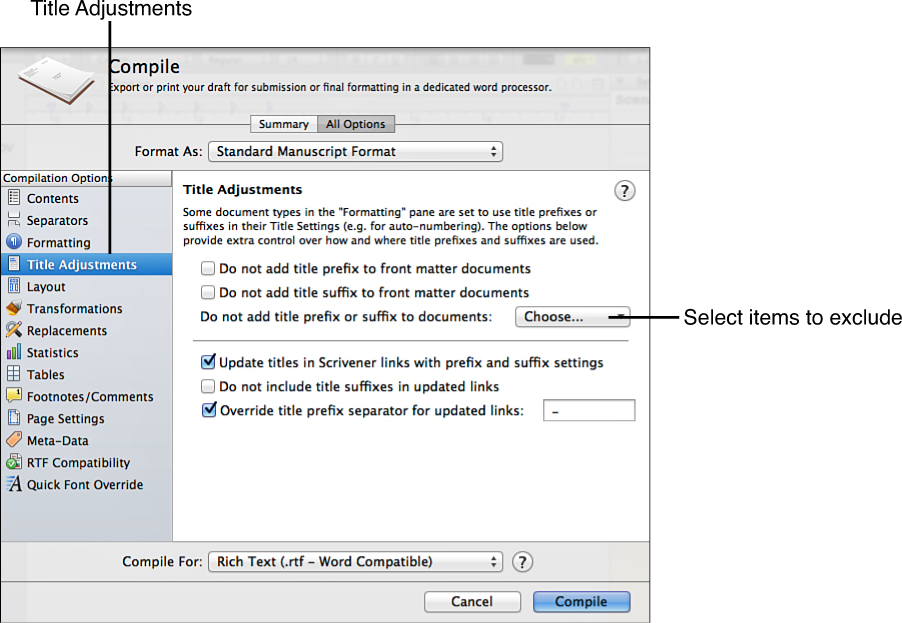
Figure 19.17 Exclude items from auto-numbering in the Title Adjustments tab of the Compile dialog box.
![]() Note
Note
You are not required to use the auto-numbering options! You can title your items Chapter 1, Chapter 2, and so on, and use the title element instead of the Section Layout prefix. If your project has an Introduction, Prologue, or Epilogue, you may prefer to use this option to avoid mistakenly numbering these chapters.
3. Click the Choose drop-down menu to select an item to exclude it from the prefix and suffix settings.
4. Repeat step 3 to select additional items to exclude.
Changing Layout Options
The Options button in the Structure and Content table opens the Layout Options dialog box (Figure 19.18), which allows you to set certain formatting options for the entire project, as follows:
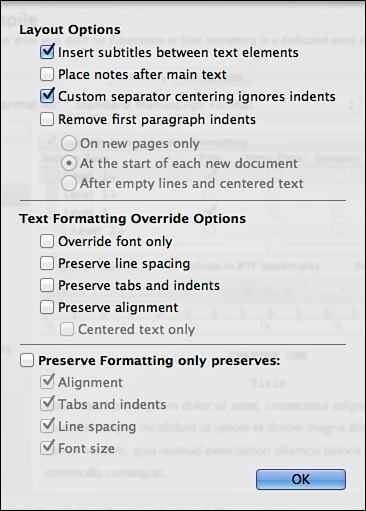
• Insert Subtitles Between Text Elements: When you select synopsis or notes elements in the Structure and Content table, you can opt to insert a subtitle to set them apart from the text of the item.
• Place Notes after Main Text: By default, document notes appear above the text of the item when the notes element is selected. Check this option if you want to place notes below the item text.
• Custom Separator Centering Ignores Indents (Mac Only): This option is selected by default and causes custom character separators to be centered on the page. If you prefer the separator to use the document indent settings, deselect this option.
• Remove First Paragraph Indents (Mac Only): This option overrides the first-line paragraph indent settings for the first paragraph following a header or section break.
• Text Formatting Override Options (Mac Only): This option ignores selected formatting you’ve done in the formatting. To select this option, you must select the Override Text and Notes Formatting check box.
• Preserve Formatting Only Preserves (Mac Only): If you selected Format, Formatting, Preserve Formatting from the menu for any portions of your project while using the Editor, these settings set limits on which formatting options are affected.
Adding Page Padding
Common manuscript submission format dictates that new chapters begin a third of the way down a new page. Some teachers also require similar formatting for essays and research papers. To set page padding, click the toggle to the right of the Page Padding option at the top of the Formatting editor. In Windows, click Modify to open the Formatting dialog box; then enter the number of lines of padding or use the up and down arrows to adjust the number.
If you are printing your manuscript or paper in 12-point font, page padding of 14–16 lines is usually appropriate.
Making Adjustments to Your Compilation
Congratulations! The hardest part of configuring your compilation settings is over. The rest of the options involve tweaking elements of the compilation to produce exactly the finished product you want.
The Layout tab (Mac only), shown in Figure 19.19, contains options that are probably familiar to you if you’ve used a word processor. The specific options available depend on the output format you selected in the Compile For drop-down menu. Select Use Hyphenation to automatically hyphenate long words at the end of a line instead of putting the entire word on the next line. Select Avoid Widows and Orphans to avoid leaving a single line of a paragraph alone at the top or bottom of a page.
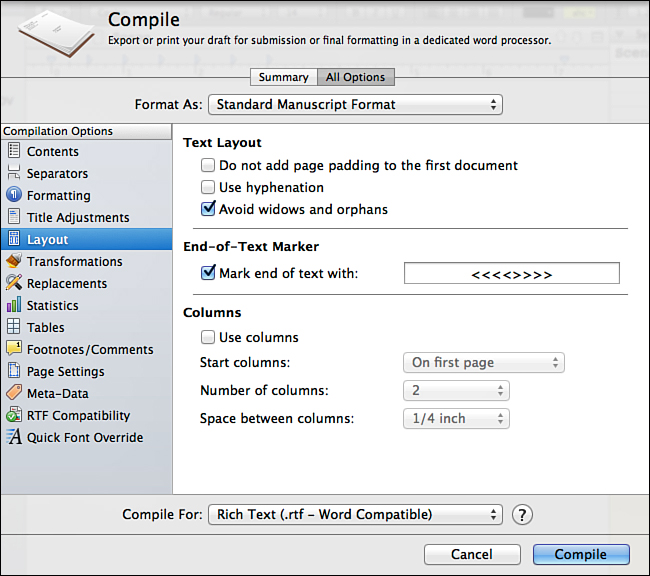
If you added page padding in the Formatting tab, select Do Not Add Page Padding to the First Document in order to format this page differently from the rest of your compilation. The first page of a manuscript is generally a title page, and page padding interferes with the formatting of this page.
Laying Out Your Text in Columns
If you are compiling your project into Rich Text (.rtf) or PDF format using the Proofing option, you can lay out your text in columns. To do this:
1. Click on the Layout tab.
2. Select the Use Columns check box.
3. In the Start Columns drop-down, select from the following options:
• On First Page: Starts the columnar layout from the beginning of your compilation
• After First Document: Starts the columnar layout after the first document in the compile contents to allow for an introduction or similar document
• After Front Matter: Starts the columnar layout after all of the front matter items have been laid out
4. In the Number of Columns drop-down menu, select how many columns the page should be divided into.
5. In the Space Between Columns drop-down menu, suggest how much space should be left between columns to make the compilation more readable.
![]() Note
Note
Laying out your text in columns does not change how the draft of your project appears onscreen. You will not see the compilation in columns until you compile the project and export the file to another application.
Adding an End-of-Text Marker
An end-of-text marker is commonly used at the end of magazine articles or books to signify the end. In a book, this can be a symbol or series of characters, including the words The End.
To add an end-of-text marker to your compilation, click Mark End of Text With and enter the characters you want in the text box. On the Mac, this option appears in the Layout tab. In Windows, this option appears in the Transformations tab.
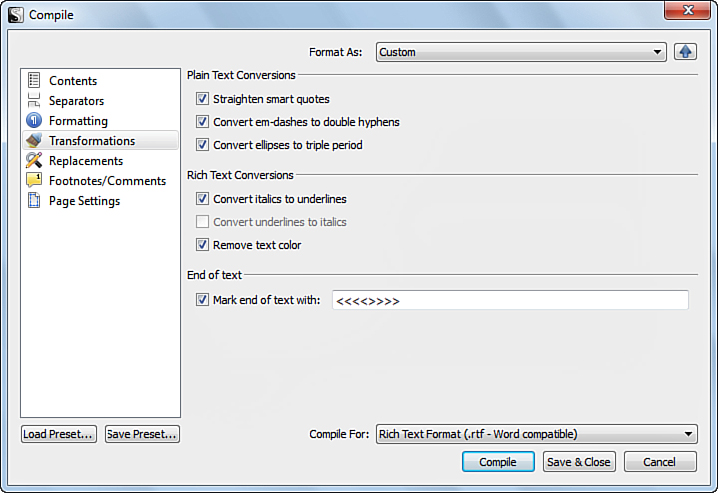
Converting Special Characters
The Transformations tab, shown in Figure 19.20, converts special characters such as smart quotes to straight quotes. It also converts formatting such as italics to underlining. These conversions can improve compatibility with plain text and rich text editors.
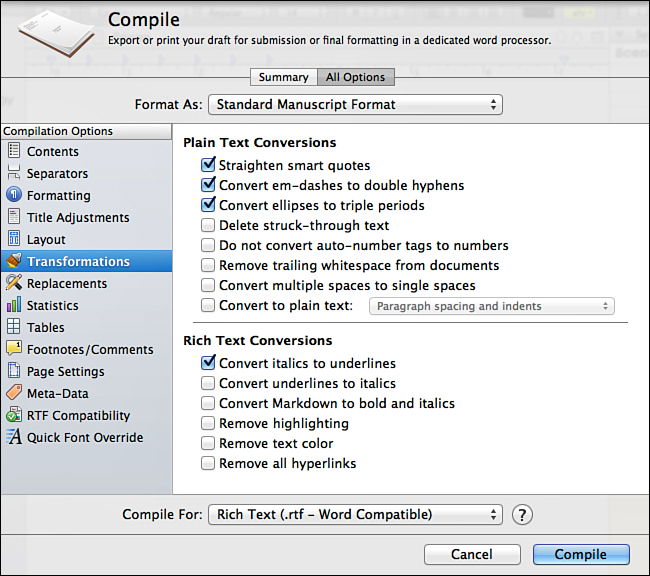
Figure 19.20 The Transformations tab enables you to convert formatted elements to comparable rich text and plain text elements.
![]() Note
Note
The options in the Transformations tab vary by output format.
The options to Straighten Smart Quotes, Convert Em-Dashes to Double Hyphens, and Convert Ellipses to Triple Periods are very straightforward. On the Mac, you can also choose from the following Plain Text Conversions:
• Delete Struck-Through Text: If you used Revision mode when editing your project, deleted text uses strike-through formatting so the text is not permanently removed. Select this option to delete struck-through text before compiling.
• Do Not Convert Auto-Number Tags to Numbers: This option disables any placeholder tags that automatically number elements of your project, such as chapter numbers. Other placeholder tags continue to function as normal.
• Remove Trailing Whitespace from Documents: This option removes extra spaces at the end of a line.
• Convert Multiple Spaces to Single Spaces: This option replaces two spaces after a period with a single space. If you learned how to type in the good ol’ days, you may have learned to put two spaces between sentences. With the advent of proportional fonts, this is no longer standard practice, but Scrivener can clean up your old habit.
• Convert to Plain Text: This option replaces indents and paragraph spacing with actual spaces and carriage returns. If you select this option, select the conversions you want from the following drop-down menu choices:
• Paragraph Spacing: Inserts carriage returns between paragraphs to approximate the space left by automatic paragraph spacing.
• Paragraph Spacing and Indents: Inserts spaces to replace indents and carriage returns between paragraphs.
• All Whitespace: Inserts spaces and carriage returns to preserve all whitespace, such as alignment, hanging indents, block quotes, and right-indents. This mode does not preserve full justification.
• All Whitespace (Add a One-Inch Margin): Inserts 10 spaces to the left of every line in addition to all of the conversions in the All Whitespace mode.
In addition to converting italics to underlines and vice versa, the following options are intended for Rich Text Conversions:
• Convert Markdown to Bold and Italics: Converts Markdown strong emphasis formatting to bold and emphasis formatting to italic.
• Remove Highlighting: Removes highlighter colors from your text before compiling.
• Remove Text Color: Removes all color from text. Although text continues to appear black onscreen for display purposes, the text does not have any color assigned. This option is available on both the Mac and in Windows.
• Remove All Hyperlinks: Removes all hyperlinks from the text and displays them as flat text. This is useful if you are outputting to Print as well as certain file formats.
The Transformations tab in Windows, shown in Figure 19.21, contains fewer options, but they are among the most common conversions.
Replacing Words and Phrases
The Replacements tab, shown in Figure 19.22, can be used to replace abbreviations or other substitutions before compiling. In your project, for example, you may type CDC to save time, but you can set the Replacements options to replace it with Centers for Disease Control. The project itself remains unchanged; this replacement only appears in the compiled file.
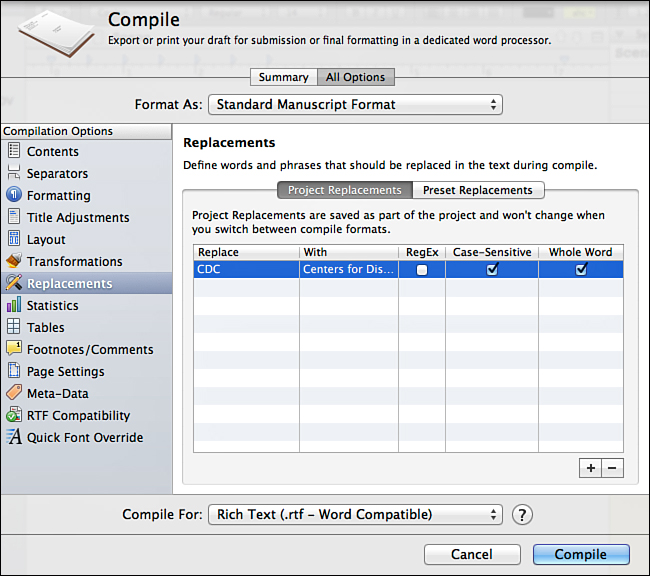
Figure 19.22 The Replacements tab performs find-and-replace processes before compiling without changing the underlying project.
There are two types of replacements: project replacements and preset replacements. Project replacements are stored with the project and are applied to any compile preset you use to compile the project. Preset replacements are stored with the compile preset settings for the project and are only applied when you use that compile preset with the project.
The Replacements table has four columns in Windows. The Mac version has five columns, with the addition of a RegEx column to indicate the substitution is using Regular Expressions to perform the replacement. The four columns both platforms have in common are as follows:
• Replace: This is the text you have entered into your project.
• With: This is the text you want to substitute into the compiled document.
• Case-Sensitive: This selection specifies that the Replace column must match exactly in order to be replaced.
• Whole Word: This selection specifies that the Replace column must stand alone rather than be part of another word. Par will not match parlor, for example, if this is selected.
Formatting Footnotes and Comments
If you have footnotes or comments in your project, the Footnotes/Comments tab determines how they are handled when you compile. The Mac version of the Footnotes/Comments tab is shown in Figure 19.23 and the Windows version in Figure 19.24.
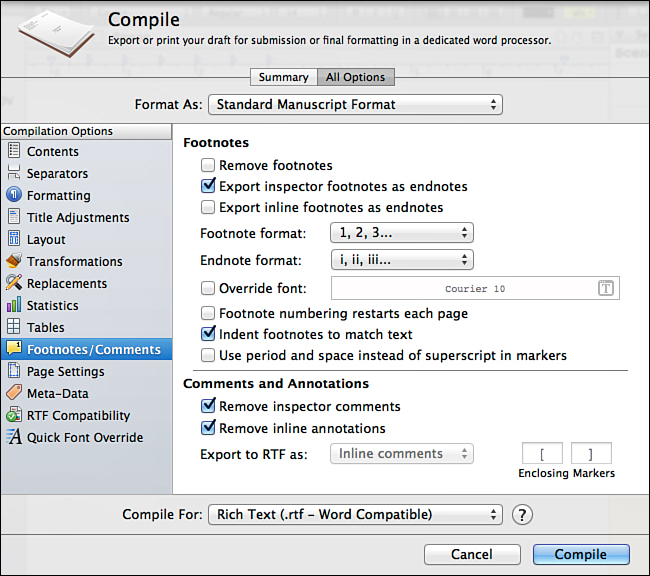
Figure 19.24 The Windows Footnotes/Comments tab has a different appearance but performs much the same actions as the Mac platform.
If you select Rich Text (.rtf) as your output format, you can handle inline comments and footnotes and linked comments and footnotes each in a different manner. For example, you can retain inline footnotes as footnotes but export Inspector footnotes as endnotes. You can also embed inline annotations into your output but strip Inspector comments.
![]() Note
Note
Footnotes are covered in Chapter 22, “Using Scrivener for Nonfiction Writing.” Comments are covered in Chapter 10, “Editing Your Manuscript.”
Removing Notations
Some applications stumble over footnotes, comments, and annotations when you attempt to open output files. In other cases, the output format itself does not support footnotes, so Scrivener attempts to convert them to endnotes, occasionally with poor results. If you encounter problems, remove the notations, as follows:
• To remove footnotes, select the Remove Footnotes check box in the Footnotes/Comments tab.
• To remove Inspector comments, select Remove Inspector Comments.
• To remove inline annotations, select Remove Inline Annotations.
![]() Tip
Tip
When you remove notations in the Compile dialog box, the original notations remain untouched in your project. The formatting you select here only applies to the compilation output.
Converting Notations
When you encounter problems with a word processor app struggling with footnotes, sometimes converting them to endnotes alleviates the problem. To convert footnotes, choose from the following options:
• Export Inspector Footnotes as Endnotes (Mac Only): Exports Inspector (linked) footnotes
• Export Inline Footnotes as Endnotes (Mac Only): Exports inline (embedded) footnotes
• Export to RTF As (Windows Only): Exports to either footnotes, endnotes, or comments
This process is similar for comments and annotations. If you select Rich Text (.rtf—Word Compatible) or Microsoft Word as the output format, you can open the compiled file in Word and see your comments in the margin notes. To convert comments and annotations into margin notes:
1. Deselect the Remove Inspector Comments and Remove Inline Annotations check boxes, as needed. You can decide to export only comments or only annotations, as well.
2. In the Export to RTF As drop-down menu, select Margin Comments.
If your word processor does not accept your margin comments, convert to inline comments, instead. Take the following steps:
1. Return to the Footnotes/Comments tab.
2. Deselect the Remove Inspector Comments and/or Remove Inline Annotations check boxes, if necessary.
3. In the Export to RTF As drop-down menu, select Inline Comments.
4. In the Enclosing Markers field, select an opening and closing marker.
Controlling Page Settings
If you are using Print, PDF, Rich Text, Microsoft Word, or Open Office as your output format, you can use the Page Settings tab to control margins and paper size in the output file. If you set Print, PDF, Rich Text (.rtf—Word Compatible), or Microsoft Word as the output format, you can also customize headers and footers in the output file.
On the Mac, select Use Project Page Setup Settings (Figure 19.25) if you want to use your project to determine the paper size and margins of your output file. View these settings in your project by choosing File, Page Setup from the menu. If you want to set different page settings, you must disable this option first.
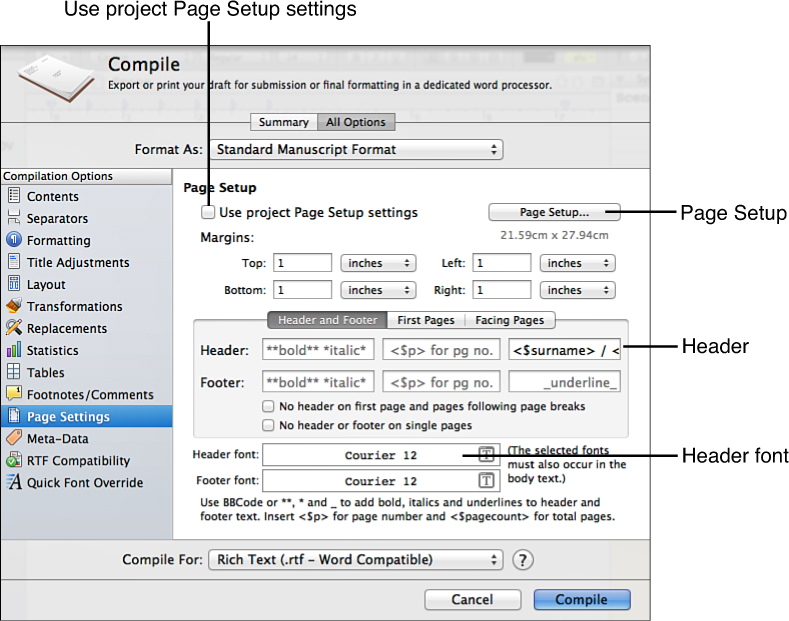
Figure 19.25 The Page Settings tab is used to specify margins, headers, and footers for your output file.
Setting Margins
To set the margins for the output file:
1. Click the Page Setup button to select the paper size and orientation of the paper from the Page Setup dialog box on the Mac. In Windows, click the Paper Size and Orientation drop-down menus to make these selections, as shown in Figure 19.26.
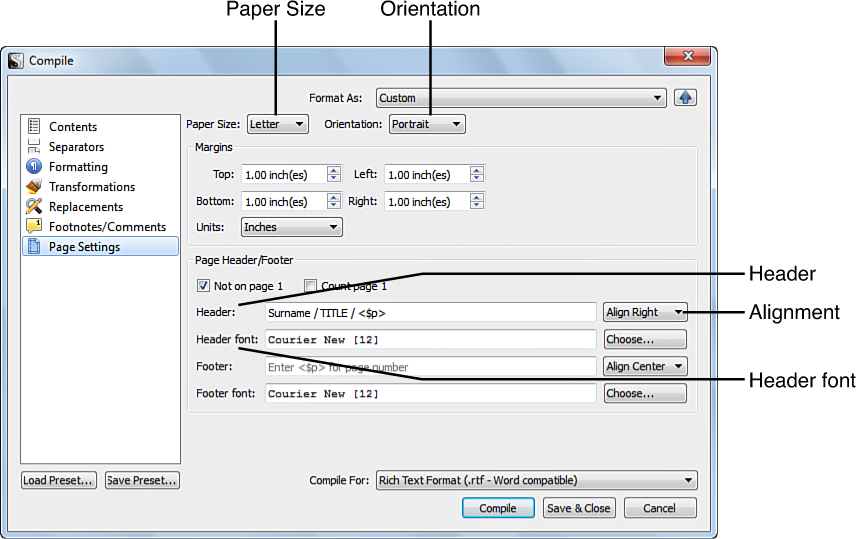
Figure 19.26 The Page Settings tab in Windows allows you to select the paper size and orientation directly from the options.
2. Enter the width of the Top, Bottom, Left, and Right margins. You can measure the width in centimeters, inches, or points. On the Mac, each unit of measure is selected separately. In Windows, choose the Units setting for all of the margins at once.
Adding Headers and Footers
Headers and footers contain identifying information about the document. You can add page numbers, the project title, and your name to a document header to prepare a manuscript or academic paper for submission to an editor or professor.
![]() Note
Note
Headers and footers are available if you choose one of the following output formats: Print, PDF, Rich Text (.rtf—Word Compatible), or Microsoft Word. If you’re on a Mac and enable the improved converters, headers and footers are also available for OpenOffice (.odt) format.
The Header and Footer settings, shown in Figures 19.25 and 19.26 previously, are different for the Mac and Windows.
On the Mac, the header and footer are each divided into three sections: left-aligned, centered, and right-aligned text. You can enter header elements in any or all of these sections. Select the font by clicking the Header font (or Footer font) text box to open the Fonts dialog box.
In Windows, enter the header in the Header text box, then choose one alignment for the entire header. To select the font for the header, click the Choose button to the right of the Header font option.
![]() Tip
Tip
Most manuscript headers are formatted as right-aligned and contain the following information: Surname/TITLE/Page Number. Most academic headers are formatted as right-aligned and contain only the author’s surname and the page number.
Just as you used placeholder tags in the Section Layout of the Formatting tab to automatically number chapters, you can use placeholder tags to insert variable information into headers and footers. The placeholder tag for page numbers is <$p>. Thus, in Windows, the header for an academic paper would be formatted as the following: Kettell <$p>, with the Alignment drop-down menu set for Align Right.
On the Mac, you can also use placeholder tags for the author’s surname (<$surname>) and the project title (<$projecttitle>). Thus, to create a manuscript header on the Mac, click in the right-aligned column of the Header field and enter the following: <$surname>/<$PROJECTTITLE>/<$p>.
On the Mac, the project title and surname placeholders acquire their information from the Project Properties tab of the Meta-Data Settings dialog box in the project. To access this information, choose Project, Meta-Data Settings, Project Properties from the menu. You must exit the Compile dialog box first.
![]() Tip
Tip
Before exiting the Compile dialog box, save your settings. To do this on the Mac, press the Option key. The Compile button changes to a Save button. In Windows, press the Save & Close button.
Using a Different First Page Header/Footer
The first page of a manuscript or academic paper usually contains title and contact information, so you generally want your header and footer to begin after the first page. In Windows, you can select the Not on Page 1 check box to remove the header and footer from the first page of the compilation. If you still want the page numbering to begin with page 1 on the first page of the document, even though it no longer displays a header, select the Count Page 1 check box.
On the Mac, you can either remove the header (or footer) or create a replacement. To create a different first page header on the Mac:
1. On the Page Settings tab, click the First Pages tab above the Header and Footer section.
2. On the First Pages tab, shown in Figure 19.27, select the Different First Page Header/Footer check box.
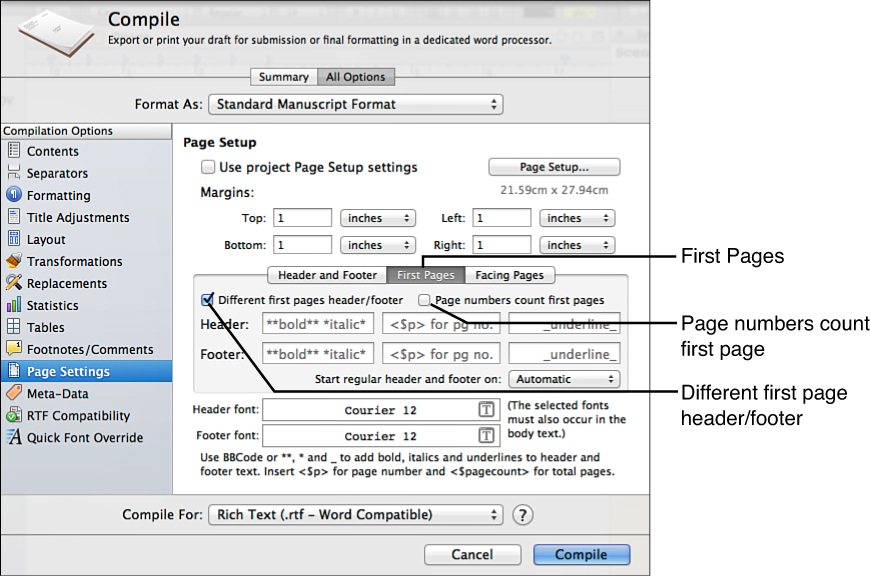
Figure 19.27 Use the First Pages tab to create a different header or footer for the first page of the compilation.
3. Enter a different header or footer in the Header or Footer fields. Leave these fields blank if you want to remove the header or footer from the first page. The gray text that appears in the box does not affect the settings; it is merely there to guide you.
4. If you want to begin numbering the pages of the document beginning with the first page, even if it does not contain a header, select the Page Numbers Count First Pages check box.
Adjusting Word Count on the Title Page (Mac Only)
Some project templates, such as the Novel template, include a title page in the front matter. This title page contains a placeholder tag for the word count. If you want to change the way this word count is calculated in your compiled manuscript, click the Statistics tab, shown in Figure 19.28.
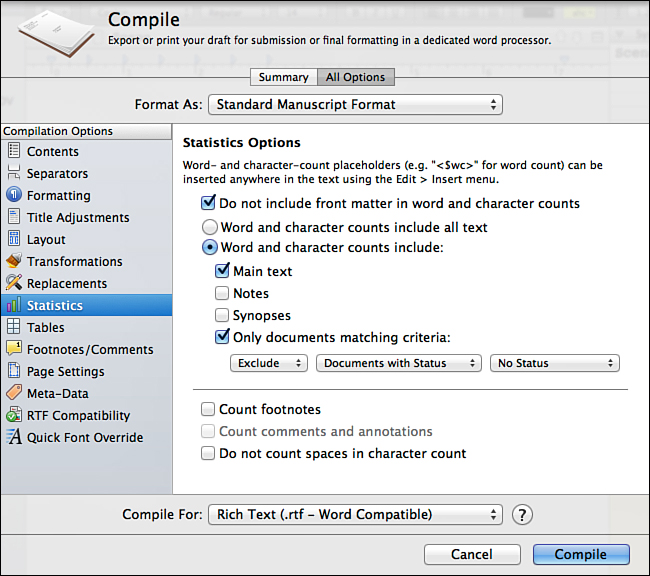
The Statistics Options allow you to opt whether or not to include front matter or content elements in the calculation of the word count. You can also opt to include footnotes and other notations.
Saving Compile Settings
Scrivener saves your settings when you compile so that you can recompile your project at another time. If you click Cancel to exit the Compile dialog box before you have compiled, however, your updated settings are lost. If you’re on a Mac and want to save your Compile settings without compiling the project, hold down the Option key. The Cancel and Compile buttons change to Reset and Save options. The Reset button reverts to the default settings if you have never compiled the project before or to the last saved settings if you previously compiled. The Save button saves your current settings and closes the Compile dialog box. In Windows, click the Save & Close button to save your Compile settings without compiling the project.
Creating Compile Presets
After all of the effort you put into creating a Structure and Content table and setting all of the other options for your project, wouldn’t you like to be able to reuse those settings at another time or maybe even in your next project? Create a compile format preset, and your settings get added to the Format As drop-down menu along with all the preloaded presets.
In Windows, save a compile preset by clicking the Save Preset button below the Compilation Options pane in the Compile dialog box and then enter a name for the new preset in the Save Compile Settings dialog box.
On the Mac, do the following to save a compile preset:
1. Select Manage Compile Format Presets from the Format As drop-down menu.
2. In the Manage Compile Format Presets dialog box, shown in Figure 19.29, choose one of the following options:
• Global Presets: Saves the preset in the Application Support folder to make it available to all projects
• Project Presets: Saves the preset in the current project so it is only available to that project
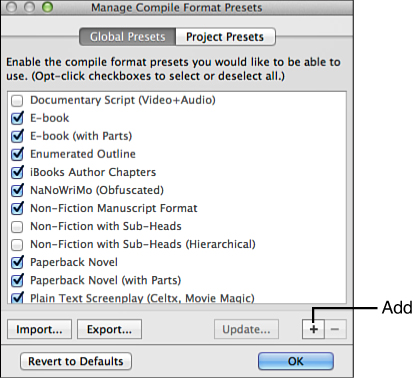
Figure 19.29 Add, remove, select, and deselect compile presets in the Manage Compile Format Presets dialog box.
4. Give the preset a name in the Enter a Name for This Compile Format dialog box, and then click OK.
5. Click OK to exit the Manage Compile Format Presets dialog box.
You can see your new preset in the Format As drop-down menu.
Deleting Compile Presets
If you no longer need an old or outdated preset and want to delete it, take the following steps on the Mac:
1. Open the Compile dialog box, if it is not already open.
2. Click the Format As drop-down and select Manage Compile Format Presets from the menu.
3. In the Manage Compile Format Presets dialog box, click the preset you want to delete. You cannot delete built-in presets.
4. Click the Delete (−) button.
5. Click OK in the warning that pops up about the deletion.
6. Click OK to return to the Compile dialog box.
In Windows, do the following to delete a compile preset:
1. In the Compile dialog box, click Load Preset.
2. Select the preset in the Load Compile Settings dialog box. You cannot delete built-in presets.
3. Click Delete.
4. Click OK to return to the Compile dialog box.
Compiling Your Project
After you’ve tweaked, poked, and prodded your Compile settings, it’s finally time to compile your project. To compile:
1. Double-check that the compile format (Format As), output format (Compile For), compile group, and other settings are as you want.
2. Click Compile.
3. In the Export dialog box (Save As in Windows), choose a filename and location, and then click Export (Save in Windows).
If you selected the Print output format, the Print dialog box opens in step 3. Click Print.
Once you’ve exported your compilation, always check it in an appropriate application to ensure you didn’t lose any formatting unexpectedly.
Congratulations! You are now a Compile Master.