
16. Sharing QuickBooks Data with Your Accountant
One feature that truly sets QuickBooks apart from other business accounting software is the ease and flexibility of sharing a copy of the data between the business owner and the accounting professional. This chapter shares useful details for both the business owner and the accountant.
Overview
Accounting professionals can work more profitably with their client’s files by partnering the Accountant’s Copy functionality with the robust Client Data Review feature. The Client Data Review feature is available in QuickBooks Accountant 2014 and QuickBooks Enterprise Solutions Accountant 14.0.
→ For more information, refer to Appendix A, “Client Data Review.”
Benefits for the Business Owner
As a business owner, you will want to have your accounting professional review your data. After all, you are using this data to make important management decisions. Additionally, you need to provide your data to your accountant for preparation of your federal and state tax returns.
So what might be some of the benefits of sharing your QuickBooks business data with your accountant? Benefits include the following:
• You can share an Accountant’s Copy of your data, which allows your accountant to review and provide timely feedback without interrupting your daily workflow.
• You have less stress because you do not need to prepare multiple reports for your accountant to review.
• You can delegate critical tasks to your accountant, such as reconciling a bank account. (Use the Accountant’s Copy file-sharing method.)
• Your accountant can use your data to compile the information needed for your tax returns.
• You can choose from multiple sharing methods and select one that is right for your business.
• Periodic review of your data by your accountant can save precious time at year’s end and provide more accurate financials during the year.
Benefits for the Accountant
Periodically reviewing your client’s data has become more important in recent years, as strict accounting guidelines tighten further. Often your clients are even unaware of these changes.
As an accountant, you can benefit from access to your client’s data by doing the following:
• Review your client’s data at your office at a time convenient for you or your staff.
• Complete key reviewing tasks while enabling your clients to continue their day-to-day transactions. (Use the Accountant’s Copy file-sharing method.)
• Use the many accountant-specific tools to facilitate this review offered in the QuickBooks Accountant or QuickBooks Enterprise Solutions Accountant including the Client Data Review feature.
• Complete critical tasks for your client, such as reconciling a bank account, making your services more valued by the client. (Use the Accountant’s Copy file-sharing method.)
• Provide your clients with more frequent and timely analysis of their data.
This chapter is a guide for how both the business owner and the accountant can share QuickBooks data.
QuickBooks File Types
QuickBooks offers much flexibility in how a business owner or accountant can share a common QuickBooks data file. This chapter discusses details of all the choices offered in facilitating this sharing.
Table 16.1 lists the common QuickBooks file types used for sharing data. Knowing these file types is important as you make decisions on the best method for your business or your clients’ data sharing needs.
Table 16.1. QuickBooks File Types

Choosing a Method to Share Data
QuickBooks offers flexibility in how data is shared between a business owner and the accountant. Different methods can be used at different times during the year, depending on the nature of the changes to be made.
Options available might also be determined by the edition of QuickBooks you use and whether your data is in an older version of QuickBooks. The enhancements made in recent years for sharing your data with your accountant make it a perfect time to upgrade to the newest release.
To compare different QuickBooks products, go to http://quickbooks.intuit.com/product/accounting-software/quickbooks-comparison-chart.jsp and click Desktop Products.
You might even choose to use multiple data sharing methods during the course of a year, after you know the advantages and limitations associated with each type.
Before choosing an option, review the details of each file type (shown earlier in Table 16.1 and in the sections that follow).
.QBW: Regular Working Copy of the Data
Each client file is originally created in the .QBW file type. Here is a list of some of the advantages and limitations of sharing this type of data file:
• The accountant cannot take the file to his office, work in the file, and later merge changes into the business owner’s file unless the client agrees not to work in the file while the accountant has possession of it.
• Send General Journal Entries—if both the client and accountant are using QuickBooks 2014, the accountant can electronically transfer journal entries to clients. The transactions are attached to an email and imported by clicking on the attachment. Additionally, such journal transactions are not subject to the Dividing Date restrictions found in the Accountant’s Copy file-sharing method.
• The accountant has access to all transaction activities.
• The accountant can access this file at the business owner’s office or with a remote Internet-assisted program. QuickBooks partners with Remote Access by WebEx, but there are several others in the market, including LogMeIn or GoToMeeting.
• The file can often be too large to send as an attachment in an email.
To open a working copy of the data from the menu bar, select File, Open or Restore Company and select the Open a Company File option.
.QBB: QuickBooks Backup File
This file type remains as it has for years—it’s the best choice for securing a data backup of your work. If needed, this file can be restored to a .QBW file. Here is a list of some of the advantages and limitations of sharing this type of data file:
• The file cannot be opened first without being restored.
• When restored, the file extension becomes a .QBW (see the pros and cons listed earlier).
• Changes made to a restored version of this file type cannot be merged later into the original data file.
To restore a backup file from the menu bar, select File, Open or Restore Company and select the Restore a Backup Copy option.
.QBM: QuickBooks Portable Company File
The .QBM file type has been offered for the past few years; however, it does not replace the usefulness of the QuickBooks .QBB file type. Here is a list of some of the advantages and limitations of sharing this type of data file:
• The compressed file size makes a .QBM a perfect choice for attaching to an email or moving from one computer location to another.
• The file type does not replace a .QBB backup because it lacks some of the needed transaction logs.
• The file cannot be opened until it is restored.
• When restored, the file extension becomes a .QBW (see the pros and cons listed earlier).
• Changes made to a restored version of this file type cannot be merged later into the original data file.
To restore a portable company file from the menu bar, select File, Open or Restore Company and select the Restore a Portable File option.
.QBX: Accountant’s Copy (Export File)
As a business owner, if you choose to share your data with your accountant using the Accountant’s Copy functionality, you will send the .QBX file type to your accounting professional. Here is a list of some of the advantages and limitations of sharing this type of data file:
• This file type is created by the business owner and enables your accountant to review and make needed changes to your data while you continue recording your day-to-day transactions in the file at your office.
• Any changes or additions your accountant makes can be imported (merged) into your company’s data file.
• The accountant’s work is protected by a required Dividing Date, preventing the business owner from making changes to transactions dated on or before the Dividing Date.
• The compressed file size makes it a perfect choice for attaching to an email or moving from one computer location to another.
• The file type does not replace a .QBB backup because it lacks some of the needed transaction logs.
• The file cannot be opened; it must be converted to a .QBA file type.
Using QuickBooks Accountant software, from the menu bar, select File, Accountant’s Copy and selects the Open & Convert Transfer File option.
.QBA: Accountant’s Copy (Working File)
Only the accountant will work with the .QBA file. Listed here are some of the advantages and limitations of sharing this type of data file:
• This file type is a converted .QBX file and is created by the accountant from within the QuickBooks Accountant or QuickBooks Enterprise Solutions Accountant.
• The .QBA file type is the file the accountant will make changes to. It will be converted to a .QBY file for the client to import.
• The file can be saved to the accountant’s computer and be opened and closed as needed while the accountant reviews the file.
.QBY: Accountant’s Copy (Import File)
The business owner receives the .QBY file from the accountant, and it includes any accounting changes made to the original .QBX file. Here is a list of some of the advantages and limitations of sharing this type of data file:
• This file type is created by the accountant using QuickBooks Accountant or QuickBooks Enterprise Solutions Accountant software.
• The file includes the changes made by the accountant to the original .QBX file the business owner provided the accountant.
• The file cannot be opened; it must be imported into the data file that originally created the Accountant’s Copy data file.
QuickBooks offers your business many options in how you want to share your data with your accountant. Select a solution that works for you and your accountant.
Send General Journal Entries
With QuickBooks Accountant 2014, you have flexibility in choosing what method of file sharing works best for you and your client. When considering a method, your client needs to continue the daily accounting tasks while allowing you to review the data and create journal entries.
With the Send Journal Entry feature, your clients send you either a copy of their working file (.QBW), a backup (.QBB), or a portable company file (.QBM). Your clients can continue to work in their files while you review their copy at your office. This avoids the restrictions imposed when sharing an Accountant’s Copy file.
See the section titled “Send General Journal Entries” later in this chapter for more details.
Data Sharing for the Business Owner
Few business owners with whom I have worked over the years have a college degree in accounting. That situation is exactly what makes QuickBooks so appealing to a growing business—you don’t need to be an accountant to use it. However, you will need an accountant to review your financials, perhaps at tax time or when you need a statement of your business’s financial condition to give to a bank when requesting a business loan.
QuickBooks provides several methods of sharing data with your accountant. Refer to Table 16.1 for details on the QuickBooks file types the business owner can choose.
Reviewing Your QuickBooks Data
No matter what method you choose to share your data file with your accountant, one of the most important things you can do is review your data for accuracy, especially in the areas of Accounts Payable and Accounts Receivable—areas that you will know better than your accountant.
To begin, pick a chapter of this book that covers the area of QuickBooks you need to review. You might want to start with Chapter 15, “Reviewing Your Data.” This chapter shows you quick and easy data checks you can do before your accountant formally reviews your data. Performing this quick review can also help you identify any potential errors for which you will need your accountant’s guidance when correcting.
Creating an Accountant’s Copy of Your Data
The Accountant’s Copy method of sharing your data is the most efficient because it enables your accountant to work in the data file from her office without interrupting your day-to-day work pattern.
You must consider the following before making the choice to use the Accountant’s Copy file-sharing type:
Caution
Only the Admin or new External Accountant user can create an Accountant’s Copy or import the .QBY Accountant’s Copy import file that contains the changes the accountant made to your data.
• If you choose to create an Accountant’s Copy, you need to determine how to get the Accountant’s Copy data file to your accountant. QuickBooks offers these options:
• Send an encrypted copy of your data to your accountant via Intuit’s secure Accountant’s Copy File Transfer Service.
• Attach the saved file to an email.
• Copy it to a storage device such as a USB drive or CD.
• Use an online file sharing service like YouSendIt or Dropbox.
• You also will be required to set a dividing date, as shown in Figure 16.1. The dividing date is a specific date in the past, which determines the restrictions you and your accountant will have when adding or editing transactions.
Figure 16.1. Setting a dividing date is required when creating an Accountant’s Copy.
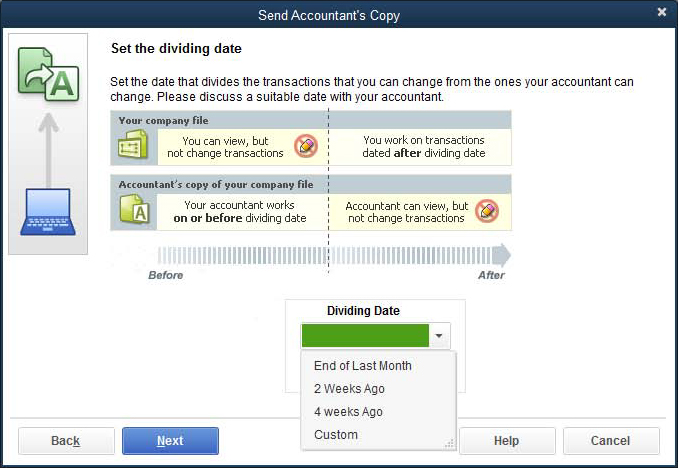
The following list briefly identifies the date restrictions with a dividing date in place when you share an Accountant’s Copy of your data with your accountant. For example, if you choose a sample dividing date of 12/31/16, the following restrictions exist:
• On or Before the Dividing Date—You (the business owner) cannot add, delete, or modify transactions. The accountant can add, delete, or modify transactions.
• After the Dividing Date—You (the business owner) can add, delete, or modify transactions. The accountant can add transactions, but cannot delete or modify them.
For more information, see “What the Business Owner Can and Cannot Do” later in this chapter for any restrictions that affect you, the business owner.
The business owner has the following options for delivering the QuickBooks data file to the accountant:
• Send to Accountant—Send an encrypted copy of your data to your accountant via Intuit’s Accountant’s Copy File Transfer Service (free for the business owner). Included for the accountant who subscribes to the QuickBooks ProAdvisor program.
• Save File—Attach the file to an email or copy to USB or other portable medium.
Method 1: Using the Send File Method Via the Web
Offered with QuickBooks Pro, Premier, and Enterprise is the option to use a secure, Intuit-hosted site to encrypt and transfer data to your accountant without needing to create a file and attach it to an email.
Note
Before you send the Accountant’s Copy to your accountant using the Accountant’s Copy File Transfer service, be aware of these limitations.
• Your company file must be under 200 MB.
• A dial-up connection may be too slow to send your file over the Internet.
To send data to your accountant with the secure encrypted file service, follow these steps:
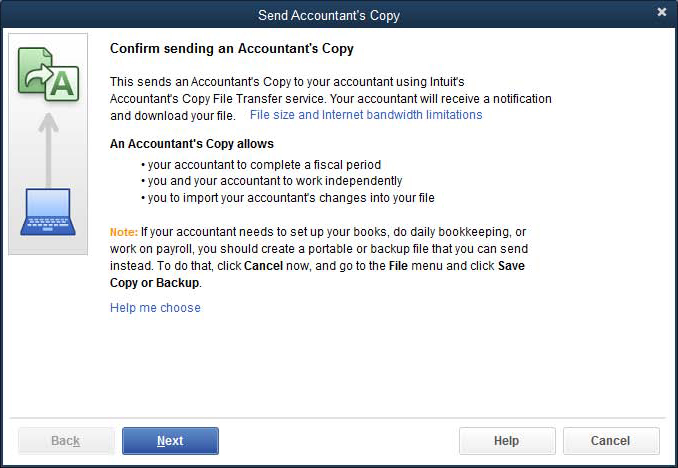
1. From the menu bar, select File, Accountant’s Copy, Client Activities, Send to Accountant. The Confirm Sending an Accountant’s Copy dialog box displays, shown in Figure 16.2. This message details the service and what types of shared work are and are not recommended with this type of file.
Figure 16.2. Confirming that the Accountant’s Copy is the appropriate choice for the shared work you and your accountant will be doing.
2. Click Next. The Set the Dividing Date dialog box displays.
3. From the Dividing Date drop-down list, choose one of the date options shown in Figure 16.1, or choose Custom to select your own specific dividing date.
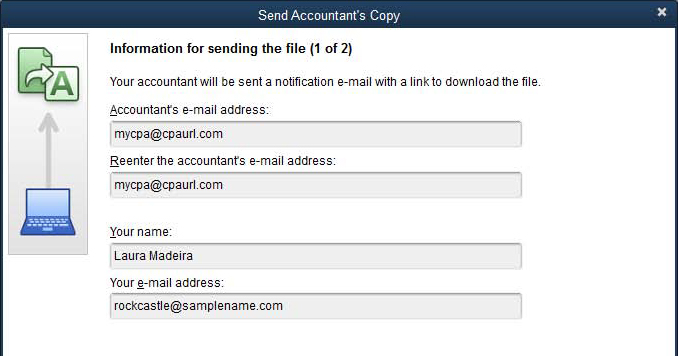
4. Click Next. The Information for Sending the File (1 of 2) dialog box displays, as shown in Figure 16.3. Type the email address to notify your accountant, and include your name and return email. Your accountant will receive an email notification that your data file is ready to download. The download is available only for 14 days.
Figure 16.3. Identify the email address where your accountant should be notified, as well as your own name and email address.
5. Click Next. The Information for Sending the File (2 of 2) dialog box displays, as shown in Figure 16.4.
Figure 16.4. Set a strong password and add an optional note for your accountant.
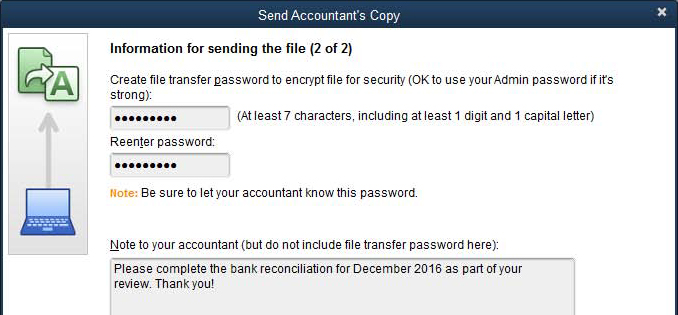
6. Enter a strong password that is at least seven characters long and contains at least one capital letter and one digit. (Optional) Type a note to your accountant, but do not include the password in the communication.
7. Click Send.
8. Click OK to the message that QuickBooks has to close all windows to create the Accountant’s Copy. Note: QuickBooks also provides an information message only (no action to be taken) that the transfer might take a few minutes, so don’t worry if QuickBooks seems unresponsive.
9. Click OK on the QuickBooks Information dialog box that displays, which indicates the file was uploaded to the Intuit Accountant’s Copy File Transfer server successfully.
The QuickBooks title bar identifies your file as having Accountant’s Changes Pending, as shown in Figure 16.5. This title bar change indicates you have successfully created a file for your accountant to review, edit, modify, and later return the changes to you without interrupting your work.
Figure 16.5. Your QuickBooks title bar will indicate whether you have accountant’s changes pending.

Method 2: Using the Save File Method
Another method is to create the file, save it to your computer, and then email it or provide the file to your accountant on a USB device. To create an Accountant’s Copy file of your data that your accountant can review and modify while you continue to do your daily transactions, follow these steps:
1. Close all your active QuickBooks windows. From the menu bar, select File, Accountant’s Copy, Client Activities, Save File.
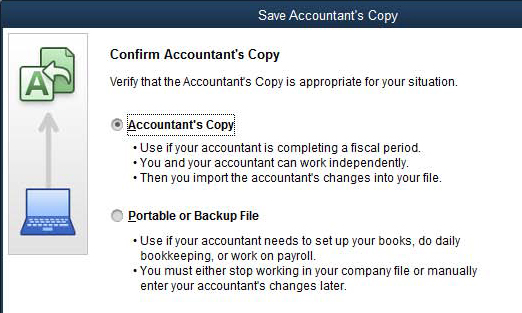
2. Choose the Accountant’s Copy option, as shown in Figure 16.6. (The other option includes the Portable or Backup File. These methods will not allow the accountant to export any changes made or you to import the changes.)
Figure 16.6. Saving a file as an Accountant’s Copy creates a file that your accountant can work in and later merge the changes with your file.
3. Click Next. The Set the Dividing Date dialog box opens.
4. From the Dividing Date drop-down list, select one of the date options as previously shown in Figure 16.1, or choose Custom to select your own specific dividing date. For more information on the importance of this date, see “What the Business Owner Can and Cannot Do,” p. xxx.
5. Click Next. QuickBooks opens the Save Accountant’s Copy dialog box, where you can browse your computer for the location where you want to save the Accountant’s Copy export file (.QBX file).
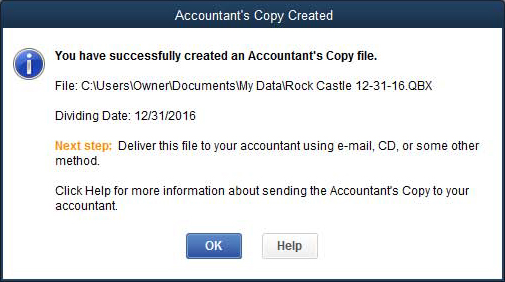
6. Click the Save button. QuickBooks provides the message shown in Figure 16.7, indicating that you successfully created an Accountant’s Copy and telling you where the file was saved, as well as other useful information.
Figure 16.7. QuickBooks provides information about where the file was saved.
7. Click OK. As previously shown in Figure 16.5, the QuickBooks title bar now identifies your file as having Accountant’s Changes Pending.
8. Send this .QBX file to your accountant as an email attachment, or copy it to a removable data storage device.
What the Business Owner Can and Cannot Do
With the useful features of Accountant’s Copy, your accountant can be assured the information in the file she is working in will not change for dates prior to the dividing date.
The following list details what you can and cannot do with your data file while an Accountant’s Changes are pending:
• Transactions—You can add, edit, and modify transactions with a date after the dividing date.
• Accounts—You can add a new chart of accounts list item.
• Subaccounts—You cannot add a subaccount to an existing account.
• Editing, merging, or inactivating accounts—You cannot edit, merge, or inactivate a chart of accounts item (your accountant can).
• Editing lists (other than the chart of accounts)—You can add, edit, and inactivate your list items. If you and your accountant make changes to the same item, the accountant’s changes will override your changes.
• Deleting lists—You cannot delete or merge list items (your accountant can).
• Reconciling the bank account—In the .QBW file with pending Accountant’s Copy, if the statement date and all transactions involved into the reconciliation are after the dividing date and the accountant didn’t reconcile this account in the Accountant’s Copy, reconciliation work remains in the .QBW file after the import. Bank reconciliations for dates on or before the dividing date are removed when you incorporate your accountant’s changes file.
Importing Your Accountant’s Changes
When you make an Accountant’s Copy from your data file, QuickBooks creates a file for you to give to your accountant. Your accountant then works in this file, adding and editing transactions, and even reconciling your bank account. When the accountant finishes with the review, she exports the changes for you, which generates a .QBY file, also referred to as an Accountant’s Copy Import File.
Your accountant has two options for sending you the file with her changes:
• Send Changes to Client—This method allows the business owner to incorporate the changes from a menu in QuickBooks. There is no charge to the business owner for this service and only a nominal fee for the accounting professional (included free for the accountant with a subscription to the QuickBooks ProAdvisor program).
• Create Change File—This method can be attached to an email or stored on a removable device. There is no fee for the business owner or the accountant when using this method.
Encourage your accountant to use the Send Changes to Client method—of the two methods, it is the easiest for the business owner.
Method 1: Importing Changes from the Web
You can tell if your accountant used this method if you receive an email from Intuit, providing instructions for incorporating the changes your accountant made to your file. This method does not require attachments to emails or files on flash drives, making it the simplest method to use.
To import changes from the Web, follow these steps:
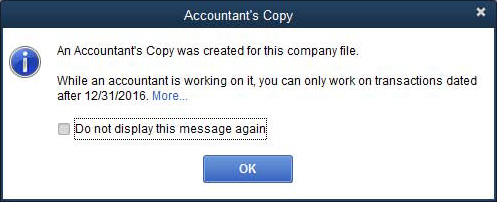
1. With your QuickBooks data file open, verify that the title bar indicates that the accountant’s changes are pending (refer to Figure 16.5). You might also see the message shown in Figure 16.8 when you open your data file.
Figure 16.8. Message when you open the data file indicating that your accountant’s changes are pending.
2. From menu bar, select File, Accountant’s Copy, Client Activities, Import Accountant’s Changes from Web. The Incorporate Accountant’s Changes dialog box opens, enabling you to view the details of the changes to be imported (see Figure 16.9).
Figure 16.9. View the accountant’s changes and notes before they are incorporated into your data.
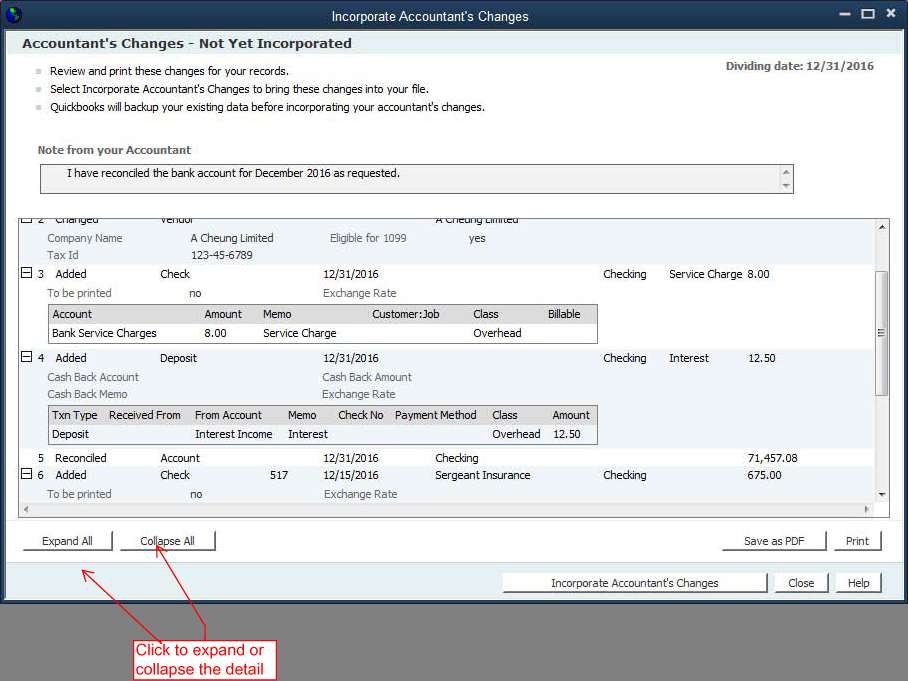
3. Click the plus sign (+) in front of a transaction to see more details about that specific transaction, or click Expand All to see the details of all the transactions.
4. Click Save as PDF or Print to save the details for your future reference.
5. Click the Incorporate Accountant’s Changes button when you have finished reviewing the changes.
6. The Accountant Import dialog box opens, instructing you to close any open QuickBooks windows. Click OK.
7. The Save Backup Copy dialog box opens, indicating that you must first make a backup of your data before the import. In the Save In drop-down menu select a location to save the backup file and in the File Name field, type a name if you don’t want to accept the default name provided.
8. If a message displays about backing up your data to the same location as your data, read the message and select Change Location or Use This Location.
9. Click OK to close the message that informs you where the backup was stored. QuickBooks displays a progress indicator while it is incorporating the changes. When QuickBooks finishes the Accountant’s Changes Incorporated dialog box displays.
10. Click OK in the QuickBooks Information dialog box, which informs you about the PDF file of the changes that QuickBooks created and stored in the same location as your company file.
11. Click OK to close the message that your accountant has been notified that you have imported the changes.
12. Click Print or Save as PDF to store a copy of the changes in addition to the PDF automatically created in step 11.
13. Click Close to close the Incorporate Accountant’s Changes dialog box.
The changes made by your accountant are now incorporated into your file.
Method 2: Importing Changes from the Transfer File
Use this method if the accountant provided you with a file with an extension of .QBY. She might have provided it to you via an email attachment or brought it by your office on a flash drive or other removable device.
To import changes from the transfer file, follow these steps:
1. With your QuickBooks data file open, verify that the title bar indicates that the accountant’s changes are pending (refer to Figure 16.5). If the Accountant’s Copy message displays, click OK to close.
2. Click File, Accountant’s Copy, Client Activities, Import Accountant’s Changes.
3. Browse to the location where you stored the .QBY Accountant’s Copy (import file) your accountant sent you.
4. Select the file and click Open. The Incorporate Accountant’s Changes dialog box opens, enabling you to view the details of the changes to be imported (refer to Figure 16.9).
5. Click the plus sign (+) in front of a transaction to see more details about that specific transaction, or click Expand All to see the details of all the transactions.
6. Click Print or Save as PDF to save the details for your future reference.
7. Click the Incorporate Accountant’s Changes button when you have finished reviewing the changes.
8. The Accountant Import dialog box opens, instructing you to close any open QuickBooks windows. Click OK.
9. The Save Backup Copy dialog box opens, indicating that you must first make a backup of your data before the import. In the Save In drop-down menu, select a location to save the backup file, and in the File Name field, type a name if you don’t want to accept the default name provided. Click Save.
10. Click OK to close the message that informs you where the backup was stored. QuickBooks displays a progressive message that it is incorporating the changes. When QuickBooks finishes the Accountant’s Changes Incorporated dialog box displays.
11. Click OK to the QuickBooks Information dialog box about the PDF file of the changes that was created and stored in the same location as your company file.
12. Click Close after viewing the Accountant’s Changes—Incorporated dialog box. (Optional) Click Print or Save as PDF to store a copy of the changes in addition to the PDF automatically created in step 11.
13. Click Close to close the Incorporate Accountant’s Changes dialog box.
Set a Closing Date
When the accountant’s changes are imported, the dividing date and all the restrictions associated with it are removed. The accountant can include with his changes a closing date that transfers to your file so you do not inadvertently add, delete, or modify transactions prior to the closing date. If a closing date was set, you will see the details in the Incorporate Accountant’s Changes report you view prior to importing the changes.
If your accountant did not send back a closing date and password, I recommend that you set a closing date the same as the dividing date to protect the accountant’s work.
To set a closing date for your file, follow these steps:
1. Log in as the Admin user and from the menu bar, select Company, Set Closing Date.
2. The Preferences dialog box displays. Click the Set Date/Password button. The Set Closing Date and Password dialog box displays.
3. Select a closing date, typically the same date used for the dividing date.
4. (Optional) Select the Exclude Estimates, Sales Orders, and Purchase Orders from Closing Data Restrictions checkbox shown in Figure 16.10.
Figure 16.10. Setting a closing date will help protect the work done by the accountant.
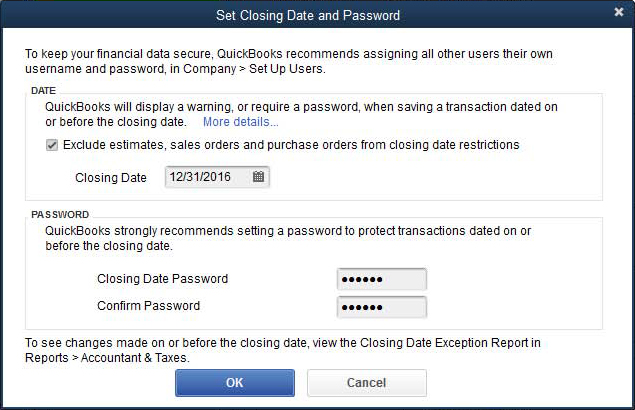
5. Enter an optional password (recommended).
6. Click OK to accept the closing date and optional closing date password.
Setting Employee Security
To be certain the Closing Date control is managed properly, review all users for their specific rights for changing transactions prior to a closing date.
1. From the menu bar, select Company, Set Up Users and Passwords, Set Up Users. This is the menu path for QuickBooks Pro, Premier, or Accountant; QuickBooks Enterprise Solutions has more robust security setting options discussed in detail in Chapter 1, “User Security in QuickBooks Enterprise,” p. xx.
2. To view existing security by user, from the User List dialog box opened in the previous step, select the user with your cursor and click the View User button.
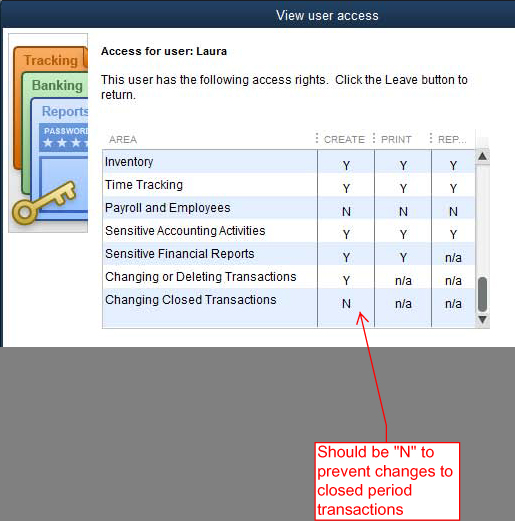
3. The View User Access dialog box opens, as shown in Figure 16.11. Any user who should not have rights to change closed period transactions should have an “N” appearing in the last menu option in the Create column.
Figure 16.11. You can easily view the user’s access rights from one summary window.
4. After reviewing the access for each employee, if you need to edit this setting for an employee, click Leave to close the View User Access dialog box.
5. You are returned to the User List dialog box. With your cursor, select the employee and click Edit User.
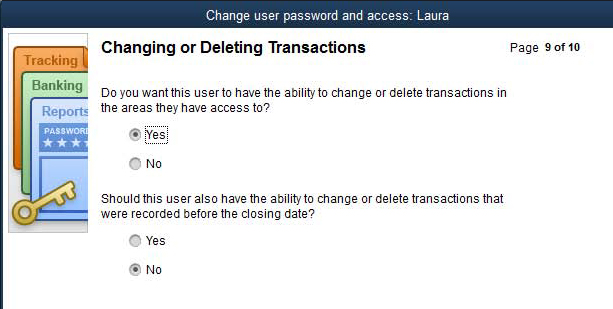
6. The Access for User dialog box opens. Choose the Selected Areas option and click Continue through the screens until you reach page 9 of 10, as shown in Figure 16.12. Click Next (page 10 of 10) to see a summary of the employee’s security settings or click Finish to return to the User List dialog box.
Figure 16.12. On the second option, click No to prevent the user from changing transactions in closed periods.
7. Click Close.
Canceling an Accountant’s Copy
It is possible for you to cancel an accountant’s copy of your data if necessary. Be sure to discuss this action with your accountant before you make this change. The following are some reasons you might need to cancel the accountant’s changes:
• Your accountant has delayed the review of your file.
• You have found corrections you would like to make prior to the dividing date.
• You cannot modify nonposting documents (purchase orders, sales orders, and estimates) dated prior to the dividing date.
• Your accountant needs to work in your file without any transaction restrictions and makes an appointment to come to your office to work or perform the work remotely via the Internet.
Before canceling or removing restrictions on your data file, discuss this option with your accountant. After the Accountant’s Copy is canceled, your accountant’s changes file cannot be imported into your data file.
To remove the restrictions placed on your file by an Accountant’s Copy, select File, Accountant’s Copy, Client Activities, Remove Restrictions from the menu bar. The Remove Restrictions dialog box displays, warning you that your accountant will no longer be able to import changes back into your file, as shown in Figure 16.13.
Figure 16.13. The Remove Restrictions warning displays when canceling an Accountant’s Copy file.
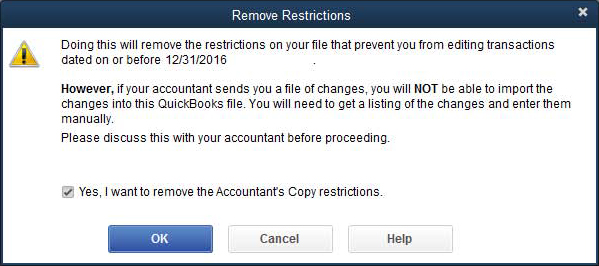
After you remove the restriction from the file, no more data restrictions are imposed by the dividing date, and the top bar of your data file no longer displays the Accountant’s Changes Pending message.
Data Sharing for the Accountant
Earlier, Table 16.1 listed the types of QuickBooks files that business owners and accountants have the options of working with. This section discusses the options from the perspective of the accountant.
As the accountant, you will want to review the variety of file types and the pros and cons of using each file type for sharing data with your client.
→ For more information, see “QuickBooks File Types,” p. xxx.
File Manager 2014
QuickBooks File Manager 2014 (see Figure 16.14) is automatically installed with your QuickBooks Accountant 2014 and Enterprise Accountant 14.0 software. With File Manager accounting professionals can:
Figure 16.14. File Manager, included with QuickBooks Accountant, manages multiple client files, stores clients’ passwords, and can upgrade client files in batch.

• Build a client list that creates a virtual view of your hard drive where your client files are stored. Files can be stored on a server, on a local hard drive, or both!
• Create user-definable client groups such as Annual Review Clients, Monthly Review Clients, or Payroll Clients to name just a few suggestions for grouping your client files.
• Save your client file passwords in one place, and QuickBooks File Manager will open the clients’ files without requiring input of the password.
• View important information about your clients’ without opening them, information includes:
• Upgrade client files in batch to the newest release, a real time saver!
• Open your client files from within File Manager and the correct year’s version of QuickBooks opens automatically (must have that version installed).
• Backup and restore your File Manager settings, useful when you buy a new computer or want to share one employee File Manager settings with another.
There are multiple ways to launch QuickBooks File Manager:
• Click the QuickBooks File Manager desktop icon.
• From the Accountant Center in your Accountant version of QuickBooks.
• From the menu bar, selecting Accountant, QuickBooks File Manager.
• Click the Start button in Windows, and then select Programs, QuickBooks, and File Manager.
Using File Manager takes the guesswork out of working with your client’s file. It is easy to use and included with your Accountant version software.
Creating an External Accountant User Type
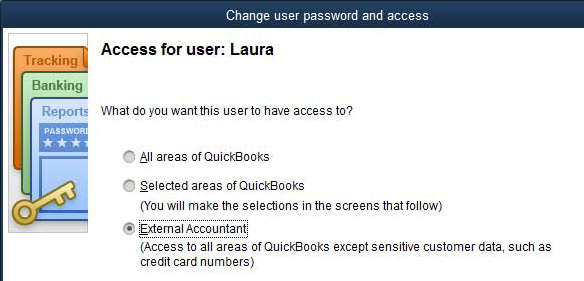
When you work in a client’s file, request that the client create a username specific for you and assign that username the External Accountant type, as shown in Figure 16.15. Benefits and controls available when working in a client’s file as the External Accountant user type include the following:
• The capability to separate the changes you make in the data file from the changes your client makes.
• The option to use the Client Data Review feature efficiently. For more information, see “Client Data Review,” p. xxx.
• Access to all areas of QuickBooks, except creating new users, changing a user’s access privileges or viewing sensitive customer credit card numbers.
Figure 16.15. Ask your client to create an External Accountant user type for you as the company accountant.
To create this unique type of user, you must be logged in to the data file as the Admin user, and you or the client must create the new user before the client creates the Accountant’s Copy file for your use.
You will then use this new login when you begin working with the client’s data file.
Preparing Your Client for Data Exchange
As an accounting professional, you probably will be able to choose the method you and your client use to share the data. However, you might not be able to control the condition in which you receive the file. I am speaking specifically of accounting accuracy. Some accounting professionals don’t worry much about this until they receive the data file; others might want their client to take certain steps to ensure the accuracy of the data before beginning the review. Encourage your clients to review specific chapters in this book to help better prepare their file for your review, making your review time more profitable!
Ask your clients to review the following in their files before sharing the data with you:
• Accuracy of bank balances
• The open customer invoices in Accounts Receivable
• The unpaid vendor bills in Accounts Payable
Other critical numbers to review are usually easier to reconcile by asking for documents from banks, such as a bank loan payoff statement or comparing the business financials with filed payroll returns.
After your client has reviewed the information and provided the documents you requested, you are ready to choose a method for sharing the data with your client.
Receiving an Accountant’s Copy File
After reviewing the advantages or limitations of each file type in the section titled “QuickBooks File Types,” you can see that the most effective method is the QuickBooks Accountant’s Copy file feature. Using this file type, your clients can continue their day-to-day accounting tasks, and from the convenience of your office you can review and make needed changes to their data, later importing these changes into the files they have been using.
Discuss the following with your clients before they prepare an Accountant’s Copy of their QuickBooks data:
• The Dividing Date selected. As their accounting professional, communicate what date this should be.
• How current are the bank reconciliations in the data file? In the Accountant’s Copy, your bank reconciliation work is returned to the client only for statement dates on or before the dividing date. Additionally, the client can only mark as cleared items dated after the Dividing Date.
• Verify that the user settings in the data file include restrictions for editing or modifying transactions prior to the closing date. This step is optional, but when you are working in the Accountant’s Copy file, you can send back the closing date with your changes.
Tip
If you are using QuickBooks Premier Accountant 2014 or QuickBooks Enterprise Solutions Accountant 14.0, you can convert your clients’ QuickBooks 2013 or 2014 Accountant’s Copy files (.QBX file extension); work with them in your Premier Accountant 2014 or Enterprise Solutions Accountant 14.0; and return them to your clients to import back into their QuickBooks 2013 or 2014 versions! This feature is available only with the Accountant’s Copy file-sharing feature and does not apply to other file types.
QuickBooks Premier can open a Pro or Premier industry-specific edition, and when the files are returned to the clients, they will be able to work again with the files in their product edition.
QuickBooks Enterprise Solutions can open an Accountant’s Copy File from a Pro, Premier, or Enterprise file and return the file back to the client for use in a Pro, Premier, or Enterprise product.
• Instruct clients not to cancel or remove restrictions on the Accountant’s Changes Pending file without first consulting you.
• Discuss the options for sending this file to you. Owners have these options:
• Send you an encrypted copy of their data via Intuit’s secure Accountant’s Copy File Transfer Service, a free service to your client. Accounting professionals pay a nominal fee annually for an unlimited number of uses of the service (free if you are a QuickBooks ProAdvisor). Be sure your client knows the email address where you would like to be notified.
• Attach the saved file to an email.
• Copy it to a storage device, such as a USB drive or CD.
Method 1: Receiving Accountant’s Copy from Client via Web
If your client chooses the Intuit’s Accountant’s Copy File Transfer secure server to get the data to you, you are notified at the email address the client provides in the transfer process, and you are directed to a secure site to download your client’s file. This service offers your client simplicity in getting the data to you while aiding in the encrypted security of the transfer of sensitive data over the Internet. Downloading the client’s file is only available for 14 days, so don’t delay!
After downloading the file, follow the instructions in the next section for opening and converting the Transfer File (.QBX file extension) to an Accountant’s Copy file (.QBA file extension).
Method 2: Receiving Accountant’s Copy from Client via File
Have your client follow the steps to create and send you the Accountant’s Copy file of the data as outlined in the section “Create an Accountant’s Copy of Your Data.”
To work with your client’s Accountant’s Copy (.QBX) file type your client sent you or that you downloaded, follow these steps:
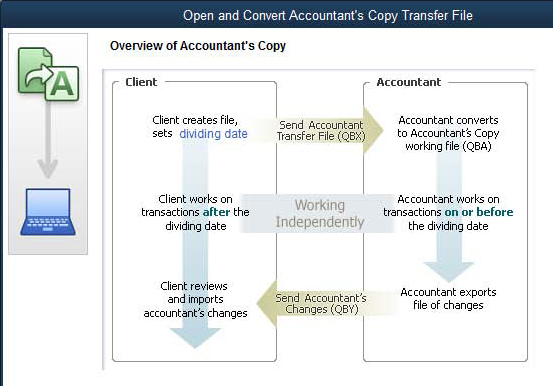
1. From the menu bar, select File, Accountant’s Copy, Open & Convert Transfer File. The Open and Convert Accountant’s Copy Transfer File dialog box displays, as shown in Figure 16.16. This summary provides you with an overview of the workflow when using an Accountant’s Copy of your client’s data.
Figure 16.16. Overview of the Accountant’s Copy workflow when working with your client’s data.
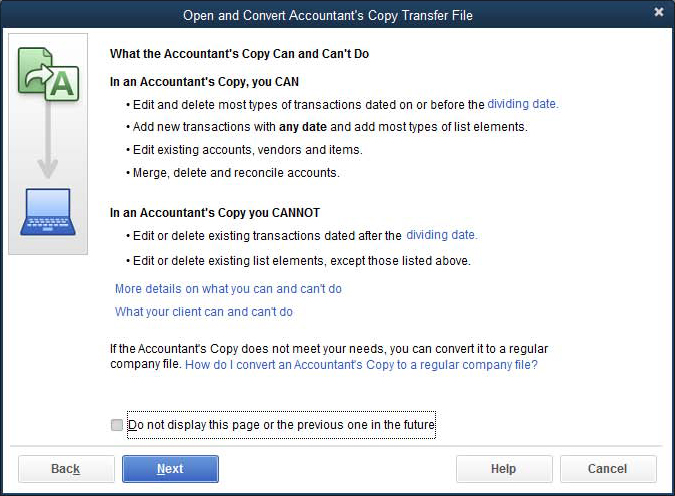
2. Click Next. The Open Accountant’s Copy Transfer File dialog box displays. This provides details on what tasks you can and cannot do when working with an Accountant’s Copy. See Figure 16.17. Click Next.
Figure 16.17. Review a summary of the tasks you can and cannot do when working with an Accountant’s Copy file.
3. Browse to the location where you stored your client’s QuickBooks transfer file. Select the file and click Open. If displayed, click OK to the message that you have chosen an Accountant’s Copy transfer file.
4. In the Save Accountant’s Copy dialog box, select a location and name for the new file. I usually put the accounting period being reviewed in the name, such as <Company Name_YE_12_31_XX.QBA>. Click Save and QuickBooks shows a message that the conversion is taking place.
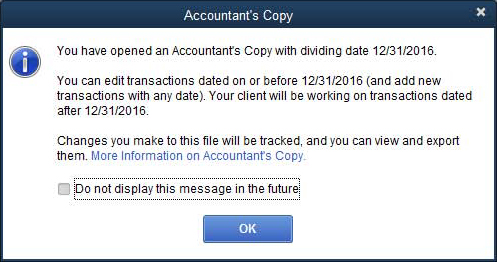
5. If you have not previously disabled this warning, you will see the message that indicates you are opening an Accountant’s Copy, and it shows you the dividing date that was chosen by your client, as shown in Figure 16.18. Click OK to close.
Figure 16.18. Notification that you are opening an Accountant’s Copy file, providing details of the selected dividing date.
6. Your QuickBooks Accountant title bar will show that you are working with an Accountant’s Copy and what the dividing date for that file is (see Figure 16.19).
Figure 16.19. You can be certain you are working in the correct file by looking at the title bar of your Accountant’s Copy .QBA file.

As the company’s accounting professional, you can now review, add, and edit the data file and be secure that your clients cannot modify the balances prior to the dividing date that was set—all while the clients continue their day-to-day accounting tasks.
What the Accountant Can Do
Recent releases of the QuickBooks software have greatly improved the capabilities you have with an Accountant’s Copy of your client’s data.
The restrictions invoked by the dividing date set by your client affect your ability to add or edit transactions. If these restrictions prevent you from completing your tasks, you can convert the Accountant’s Copy to a working QuickBooks data file (.QBW file extension). However, your changes cannot be imported into your client’s file.
→ For more information, see “Converting the Accountant’s Copy to a Regular Company File,” p. xxx.
The Accountant’s Copy provides a unique feature that will help you determine whether your changes will be sent back to the client’s file. Any field that is colored beige will transfer back to your client. If the field is white, you might be able to modify it for your own purposes, but the change will not be sent back to your client.
For example, if part of your correction to your client’s file was to modify an existing list item, only the fields identified in Figure 16.20 would be sent back to your client’s data file. All other fields can be modified for your purposes, but would not transfer back to your client’s file. If you and your client make changes to details on the same item, your changes will override the client’s when the changes are imported.
Figure 16.20. When adding or modifying details in the Accountant’s Copy, any fields shaded beige (nonwhite) will be sent back to your client’s file.

The following sections describe more specifically what you, the accountant, can do (with noted limitations) while working in the Accountant’s Copy of your client’s file.
Accounting Activities
Recent versions of QuickBooks enhance the accounting activities you can do with the client’s data when sharing an Accountant’s Copy file type:
• Reconcile the bank statements for dates prior to the Dividing Date—You can create and edit transactions necessary to perform the bank reconciliation. Additionally, your changes to a reconciled item will also be sent back to the client.
Your client can reconcile the bank account when the statement date and all cleared transactions are dated after the selected dividing date. However, if you also reconcile this account, the client’s bank reconciliation work will be rolled back to the transactions cleared status as of the time the Accountant’s Copy was created.
• Set 1099 account mappings—You can assign the proper chart of account to the Federal Form 1099-MISC Income box.
• Reconcile the bank statements for dates after the Dividing Date—You can do this if it helps your review. However, these reconciliations will not be sent back to the client’s data. Any transactions added will be sent back to the client.
• Set tax-line mappings—Used to assign the tax form line to a chart of accounts. Use this feature if you are integrating the QuickBooks data with Intuit’s tax preparation software ProSeries or Lacerte.
QuickBooks Lists
Also enhanced with recent QuickBooks releases is your ability to manage your client’s list items when performing data corrections:
• Chart of Accounts—No restrictions, including the capability to merge charts of account list items. For more information, see “Merging Duplicated Accounts,” p. xxx.
• List Items—In general you can add, edit, delete, and inactivate list items you create in the Accountant’s Copy.
• Items List—For lists with items dated before the dividing date, you can edit the Item Name/Number, Subitem, Expense Account, Tax Code, and Income Account and also make the item inactive. Note: If you and your client both make changes to the same item, the accountant’s changes will override that of the client when the changes are imported.
• Customer, Other Names List—Add a new Name, edit the Name field, or make the name inactive.
• Vendor—Add a new vendor or edit the Vendor Name, Tax ID, and identify vendor as an eligible to receive a 1099-MISC Income form at year-end. Additionally, you can assign up to three general ledger accounts on the Account Prefill tab. Your changes will override the same information in the client’s file when imported.
• Employee List—Add a new employee or edit the Name and Social Security fields only.
• Class List, Fixed Asset Item—The capability to merge class list items. Additionally, you can add a new list item or edit the Name, assign Subclass of field, or make the class inactive.
• Sales Tax Code—Add a new sales tax code or edit the Name, Tax Agency, and make the item inactive. New sales tax items can be created, but the tax rate assigned will not transfer to the client’s file.
Transactions
Generally, you can add any transaction type before or after the dividing date with the following limitations on editing, voiding, or deleting:
• Bills and checks—Add these types of transactions with dates before or after the dividing date. Edit, void, or delete is limited to those dated before the dividing date.
• Vendor credits—Add these types of transactions with dates before or after the dividing date. Edit, void, or delete is limited to those dated before the dividing date.
• Item receipts—Add or delete, but you will be unable to edit or void before and after the dividing date.
• Bill payments by credit card—Add or delete, but you will not be able to edit or void before and after the dividing date.
• Inventory quantity/value adjustments—Add or delete, but you will not be able to edit or void before and after the dividing date.
• Customer payments—Add or delete, but you will not be able to edit or void before and after the dividing date.
What the Accountant Cannot Do
Here is what you, the accountant, cannot do while working in the Accountant’s Copy of your client’s file:
• Add or modify payroll transactions.
• Add or modify nonposting transactions, such as estimates, sales orders, or purchase orders.
• Add or modify transfers of funds between accounts. Although you cannot use the transfer transaction, you can create the same effect on the accounts with a journal entry or deposit transaction.
• Add or modify the build assembly transaction.
• Add or modify the sales tax payment transaction.
Although you cannot make changes to these types of transactions in your client’s file with an Accountant’s Copy file type, you can conveniently make these changes in the client’s file using remote access via tools such as Webex, LogMeIn, GoToMyPC, or others.
Note
If you are working with a client’s Accountant’s Copy file created from a QuickBooks 2013 version, you can open the file with your QuickBooks Accountant 2014 and return the data to the client in the original QuickBooks 2013 version.
Returning the Accountant’s Copy Change File to the Client
One of the most important features of using the Accountant’s Copy to share your clients’ data is that when your changes are complete, you can send back updated files for your clients to import into their files.
Set a Closing Date
When your clients import the changes you have made to the Accountant’s Copy of their files, the dividing date restrictions are removed. If you do not want a client to add or edit transactions prior to the dividing date, make sure you also set a closing date prior to exporting the data for the client.
To set a closing date while working in the Accountant’s Copy of your client’s data, follow these steps:
1. Log in to the client’s Accountant’s Copy file. From the menu bar, select Company, Set Closing Date.
2. The Company Preference dialog box displays. Click the Set Date/Password button. The Set Closing Date and Password dialog box displays.
3. Enter an optional password and a closing date—typically the same date that was used for the dividing date.
4. Click OK to accept the closing date and optional closing date password.
Note
If you do not set a closing date as part of your changes, when the client incorporates the changes file, a message will display asking if the client wants to set a closing date.
The closing date will transfer back to the client’s file, and the client will not be asked to set the closing date. The fact that a closing date was set is included in the information the client previews before incorporating the accountant’s changes.
If you want your client to have the ability to modify your changes, you might not need to set a closing date for the file.
Review the details of setting a closing date and reviewing each employee’s access rights to changing transactions prior to the closing date.
→ For more information, see “Setting Employee Security,” p. xxx.
Method 1: Send Changes to Client via Web
The Send Changes method is the simplest for your client to use to import. This service is included with a QuickBooks ProAdvisor membership or is available for a nominal annual fee. No fee is charged to the client to accept this file from you.
To return the corrected file to your client after you make all your changes, follow these steps:
Note
If you have already exported these changes for the client, a message will display informing you that if your client has already imported the previously exported changes file, the client will not be able to import these changes. Click OK if you still want to export the changes.
1. From the menu bar, select File, Accountant’s Copy, View/Export Changes for Client. The View/Export Changes for Client dialog box displays as shown in Figure 16.21.
Figure 16.21. The View/Export Changes for Client dialog box, where you can review your changes and include a note for your client.
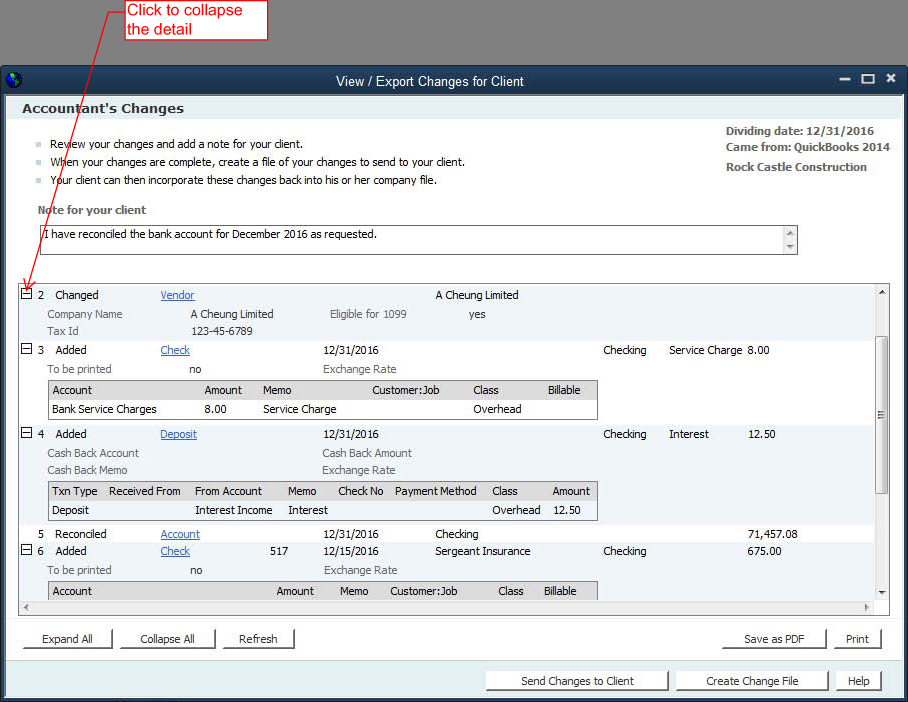
2. Review your changes and add an optional note for your client.
3. If you need to make additional changes or edit the changes you have made to the file, click the X in the top-right corner.
4. If your changes are complete, click Send Changes to Client.
5. Enter your client’s email address, your name, and your email address.
6. Click Send.
Intuit will send you an email notifying you that the file was uploaded to the Intuit Accountant’s Copy File Transfer secure server. Your client will also receive an email notification that the file is available for downloading for 30 days. Encourage your client to follow the instructions in the email to easily incorporate your changes into the data file.
Method 2: Send Changes to Client via File
You might also choose to send the Changes File to the client via a file you can attach to an email or store on a flash drive or other storage device. This method requires more effort on the part of your customers. They must access the file, save it to their computer, and then import the changes into QuickBooks. Consider using the first method of sending the file via the Web, which does not require as many steps.
To create the Changes File (.QBY extension) to give to your client, follow these steps:
1. From the menu bar, select File, Accountant’s Copy, View/Export Changes for Client. The View/Export Changes for Client dialog box displays (refer to Figure 16.21).
2. Review your changes and optionally add a note for your client.
3. If you need to make additional changes or edit the changes you have made to the file, click the X in the top-right corner.
4. If your changes are complete, click Create Change File. The Save Accountant Changes File to dialog box displays.
5. Browse to the location where you want to save the file and optionally edit the filename to be saved. QuickBooks creates a file with .QBY extension.
6. If you have already exported these changes for the client, you will see the message informing you that if your client has already imported the previously exported changes file, the client will not be able to import these changes. Click OK if you still want to export the changes.
7. Click Save. A message displays, letting you know the file was successfully created.
8. Click OK to close the message. QuickBooks returns you to the .QBA file.
To complete the process, simply give this newly created .QBY (Accountant’s Copy import file) back to the client. You can copy it to a removable storage device or attach it to an email.
Instruct your client to follow the steps listed in the section, “Method 2: Importing Changes from the Transfer File,” p. xxx. Your client will be able to review your changes in detail before accepting or incorporating the changes into her file.
QuickBooks Remote Access for Accountants
If, as the accountant, you would like to take more control over the import of your changes into your client’s file as well as setting the closing date, you might want to consider using a remote access program to log in to your client’s file through the Internet.
QuickBooks partners with WebEx to bring you a solution that makes it easy to work remotely in your file or your clients’ files. You can use this option if you need to make data changes that are not allowed in an Accountant’s Copy—for example, making changes to payroll transactions. You can also use this tool to perform the import of your changes into your client’s data file.
I find working in the remote environment a perfect choice for simplifying the entire process for clients. For more information, select Accountant, Remote Access from the menu bar in QuickBooks Accountant or QuickBooks Enterprise Accountant.
What to Request from the Client When the Import Is Complete
Clients can import your changes with simple, easy-to-follow instructions if you used the Send Changes to Client method. However, you might want to request a few items from the client after the import to be sure the process was completed successfully:
• Trial Balance—You should review the Trial Balance report as of the dividing date to compare with the same information from your copy of the client’s file. From the menu bar, select Reports, Accountant, Trial Balance. Request that clients prepare the report in accrual or cash basis. They may have one or the other as the default setup in their file.
• Closing Date—If you want to verify that the closing date was incorporated with your changes, instruct your client to select Company, Set Closing Date from the menu bar. Doing so opens the Company Preference tab for Accounting Preferences. Have your client verify the closing date (or any date at all). Refer to Figure 16.10.
• User Security Rights—Verify with your client the access rights each employee has for changing transactions dated prior to the closing date. Instruct your client to select Company, Set Up Users and Passwords, Set Up Users from the menu bar. In the User List dialog box that opens, select the employee and the View User tab on the right. A “Y” in the Changing Closed Transactions permission allows that user to add or edit transactions dated prior to the closing date. If a closing date password was set, the user will have to type that password first. A creative password that I have used is “call laura,” prompting the client to call me first before making the change!
Converting the Accountant’s Copy to a Regular Company File
What can you do if, after beginning to work in the Accountant’s Copy, you determine some of the changes that need to be made cannot be accommodated with this file type? You can convert the client’s Accountant’s Copy (.QBX) file type to a regular QuickBooks (.QBW) file type following these steps.
From the menu bar, select File, Accountant’s Copy, Convert Accountant’s Copy to Company File/QBW. A message displays, recommending that you contact your client to discuss this change.
You have to make the following decisions:
• Have the client manually repeat your changes in the client’s file.
• If the client is going to use your file, the client must stop working in the file she has.
QuickBooks 2014 offers accountants more flexibility than in prior versions in how you choose to share and work in your client’s data. These improvements help make the workflow for you and your client more efficient, making your accounting business more profitable.
Other Methods of Sharing Data
With QuickBooks Accountant 2014, you have flexibility in choosing what method of file sharing works best for you and your client. When considering a method, your client needs to continue daily accounting tasks while allowing you to review the data and create journal entries.
Note
To use the Send General Journal Entries method, the business owner must be using a Windows version of QuickBooks 2014, and the accountant must be using QuickBooks Accountant 2014 or QuickBooks Enterprise Accountant 14.0.
Send General Journal Entries
The Send General Journal Entries is available in QuickBooks 2014 and allows your accountant to share changes to your data easily with an email attachment.
The best practice when using this new feature would be to have the business owner send the accountant either a copy of the working file (.QBW), a backup (.QBB), or a portable company file (.QBM). Business owners can continue to work in their files while that accountant reviews the copy at his office. This avoids the restrictions imposed when sharing an Accountant’s Copy file.
The accountant’s journal entries are emailed directly from QuickBooks, with no messy file transfers to worry about. Clients simply click the attachment to import the entries automatically into their file.
The best part about this new feature is that there are no new “tools” to learn for the accountant or your client. For the accountant, just follow these simple steps:
1. For the accounting professional, open or restore the file you have received from the client.
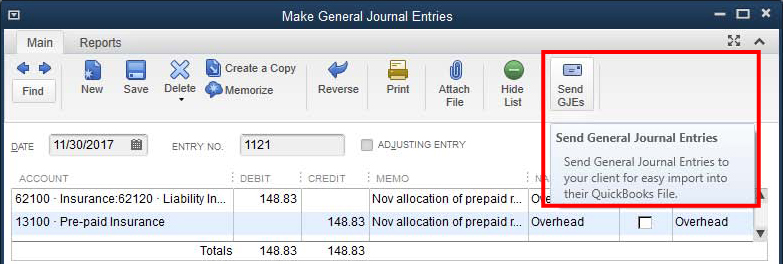
2. From the menu bar, select Company, Make General Journal Entries. Create the Journal Entry as you normally would. Click Save on the Main tab of the ribbon toolbar.
3. From the displayed Make General Journal Entries transaction, on the Main tab of the ribbon toolbar, click Send GJEs icon. See Figure 16.22.
Figure 16.22. Click the Send GJEs icon to send to your client.
4. The Send General Journal Entries dialog box displays. Select a single journal entry or multiple journal entries. If needed, use the Dates or From and To fields to filter the displayed journal entries. See Figure 16.23.
Figure 16.23. Select a single journal entry or multiple entries.
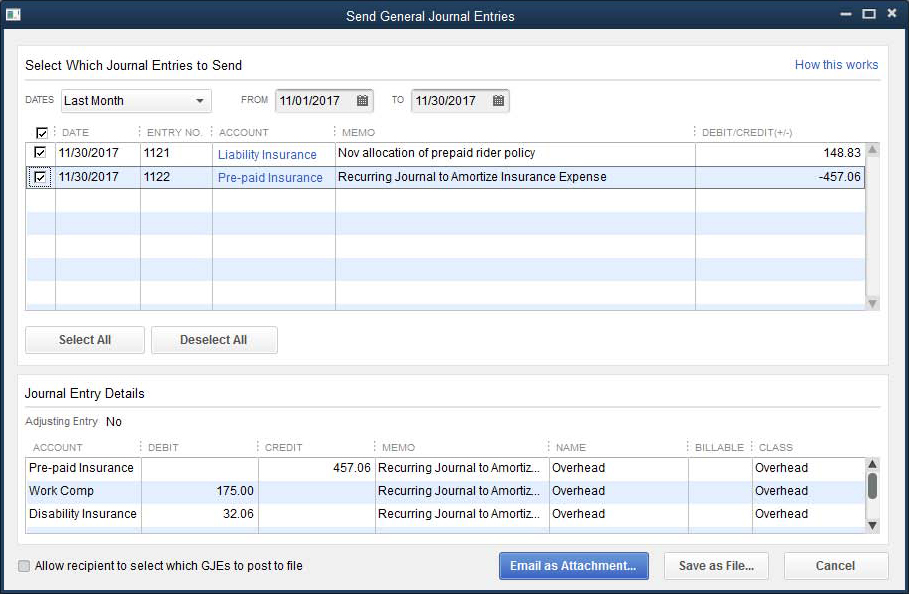
5. Place a check in the box in front of each journal entry you want to send to the client. (Optional) Click Select All or Deselect All.
6. Click the Email as Attachment button. QuickBooks utilizes the email program specified within your QuickBooks preferences. In the example in Figure 16.24, an Outlook email is created with instructions for your client. The journal entries are attached automatically.
Figure 16.24. Click the attachment to add to the currently open QuickBooks file.
QuickBooks creates a ready-made email communication complete with instructions and attaches the journal entry or entries. You do not need to browse to find and attach the entries.
The business owner receives the email and clicks the attachment to add to the business owner’s file.
Recommend this method to your accountant, if the accountant has been sending a list of journal entries for you to enter manually.
Caution
Care should be taken not to click more than once on the attachment. QuickBooks allows the import of the attachment more than once, misstating the financials from what the accountant provided. If this should happen to you, prepare a report that shows the duplication and click one of the duplicated entries. From the Edit menu, select Void.
If a new general ledger account (chart of account), vendor, customer, or other list item is included in the journal entry, this new list item will be created in the business owner’s file automatically.
If you have more than one QuickBooks company file, it works best to have that company file open before clicking the attachment. If you have the wrong file open, QuickBooks provides a warning message but will not prevent you from incorporating the changes into the wrong file.
Batch Enter Transactions
The improved batch transaction entry feature offers accounting professionals a way to streamline data entry tasks. This feature is also useful for business owners that do batch entry of transactions when using QuickBooks Enterprise. This feature is included only with QuickBooks Accountant 2014, and all versions of QuickBooks Enterprise 14.0.
Use Batch Enter Transactions for adding the following to a QuickBooks data file:
• Checks
• Deposits
• Credit Card Charges or Credits
• Vendor Bills and Bill Credits
• Customer Invoices and Credit Memos
Typically, accounting professionals offer services helping clients enter data into QuickBooks. With the Batch Enter Transactions feature you can do the following:
• Enter transactions in batches on a screen designed for power data entry.
• Paste 1,000+ transactions from Excel and save all at once.
• Enter after-the-fact transactions easily into a customizable data entry grid.
• Configure the batch entry screen, including specifying data fields and column order.
Accounting professionals, follow these steps to use this helpful feature:
1. From the menu bar, select Accountant, Batch Enter Transactions. A dialog box of the same name displays. For all other Enterprise users, you can access the same feature from the menu bar by selecting, Company, Batch Enter Transactions.
2. From the Transaction Type drop-down menu, select Checks, Deposits, Credit Card Charges & Credits, Bills & Bill Credits or Invoices & Credit Memos. I’ll demonstrate entering checks, but the procedure is similar for other permitted transaction types.
Tip
If your transactions are in Excel, customize the columns of the Batch Enter Transactions dialog box to match those of your Excel spreadsheet. You can then copy the transaction data from Excel and paste it into the Batch Entry screen in QuickBooks.
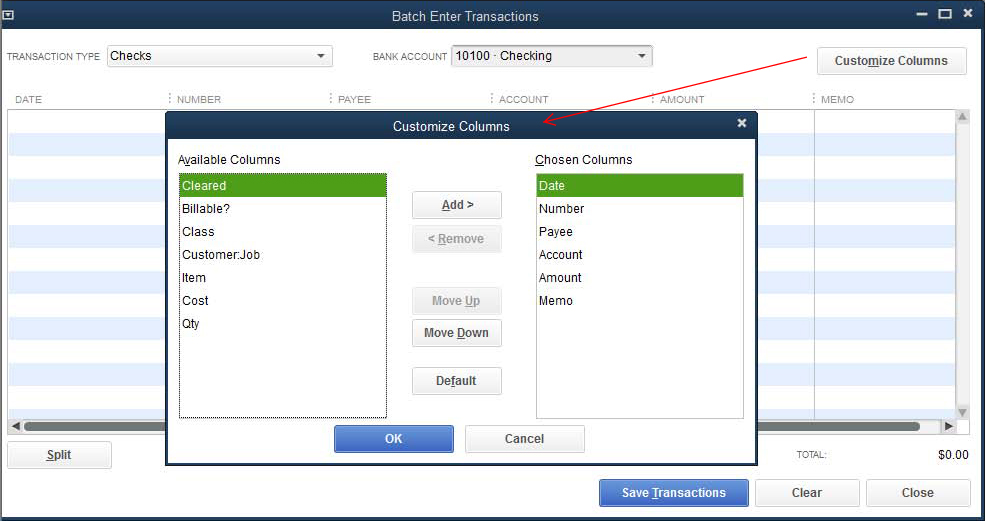
3. Select the appropriate Bank Account or Credit Card account.
4. Click the Customize Columns button as shown in Figure 16.25. You can add or remove data fields and rearrange the order of the fields. This is particularly useful if you are using Excel’s copy and paste functionality.
Figure 16.25. Customize the columns to aid in data entry or to match the Excel worksheet you are copying from.
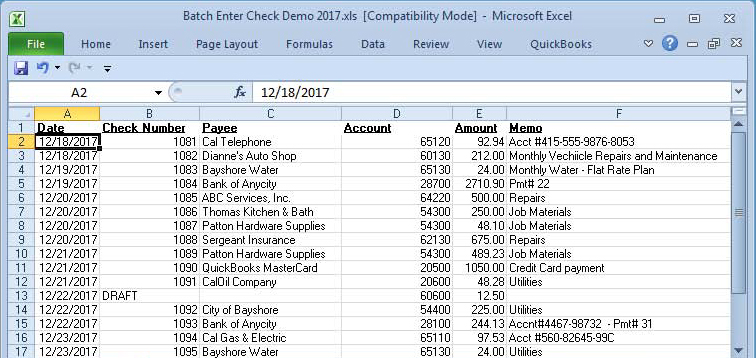
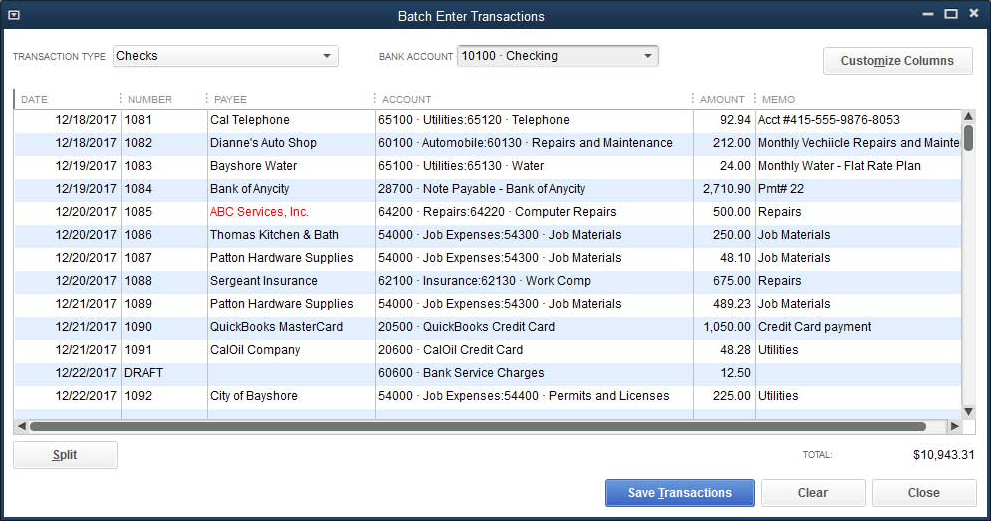
5. Add transactions to the Batch Enter Transactions dialog box by manually entering them or from an Excel worksheet (see Figure 16.26) using the Windows copy and paste functionality.
Figure 16.26. Copy and paste transactions from Excel to add to the Batch Enter Transactions dialog box.
Note
If you are copying data from Excel, and the list item does not exist in the QuickBooks file, the item text will be red in color. Simply click through the field and you will be given the opportunity to add the list item to QuickBooks.
Figure 16.27. When adding data from an Excel spreadsheet, fields with values not recognized in QuickBooks will be shown in red type.
This feature supports transaction entry using the Expense tab details (as shown in these figures) and also supports the Item tab details. However, you can use only one or the other in the same Batch Enter Transactions session.
In effect, this feature allows accounting professionals to automate the process of entering large amounts of data into a client’s QuickBooks data file. Access to this in QuickBooks Enterprise provides companies with the option of entering data in batch from an Excel spreadsheet.
Client and Accountant Collaboration
How often as a business owner do you contact your accountant by email or phone to ask a question about specific transactions? Or as an accounting professional you review your client’s data and find yourself making a list of questions about transactions?
New for QuickBooks 2014, is the QuickBooks Client Collaborator. This new feature helps the business owner and the accounting professional efficiently ask transaction specific questions and track each other’s replies.
Collaboration is initiated by the accountant using QuickBooks Accountant 2014 PLUS or QuickBooks Enterprise Accountant 14.0 software. Business owners wanting to collaborate with their accountant using this feature must be using any Windows desktop version of QuickBooks including Pro, Premier or Enterprise.
Features of the QuickBooks Client Collaborator include:
• Creating a list of questions associated with specific transactions
• Automated notification to the business owner of the transaction question(s)
• Business owner replies or asks additional questions directly inside their QuickBooks file
• Automated notification to the accountant of the business owner replies
• Accountant reviews the transaction conversation replies from the business owner and marks them closed
Specifically, Client Collaborator is a timesaving solution helping the accountant and business owner converse about specific transactions without leaving the QuickBooks file. Accounting professionals can begin using the feature from any file type from the client including, backup, portable company, accountant’s copy, or working copy.
Client Collaborator is a connected service, and the Transaction Conversation List is stored in the “cloud”. Access to the Transaction Conversation List is launched from within the QuickBooks. The accountant and business owner can both collaborate while working in two different copies of the same file. The transaction conversation is not stored with the actual data file, but will continue as a conversation list for reviews from future copies of the client’s file.
Access to Client Collaborator
For the accounting professional, Client Collaborator is included with a subscription to QuickBooks Accountant 2014 PLUS software, or QuickBooks Enterprise Accountant 14.0 software. Business owners using QuickBooks Pro or Premier 2014 and QuickBooks Enterprise 14.0 can collaborate with their accountant for no additional fee.
For accounting professionals, there are two methods for subscribing to the QuickBooks Accountant 2014 PLUS software:
• QuickBooks ProAdvisors with a current, paid membership will receive the QuickBooks Accountant 2014 PLUS subscription automatically.
• Accountants can purchase the QuickBooks Accountant 2014 PLUS software, paying in monthly installments or as a yearly fee.
Accountants using QuickBooks Enterprise Accountant 14.0, as part of their ProAdvisor membership, will automatically have access to the Client Collaborator.
How the Accountant Gets Started
The collaboration experience is initiated by the accountant and accepted by the business owner in just a few easy, automated steps.
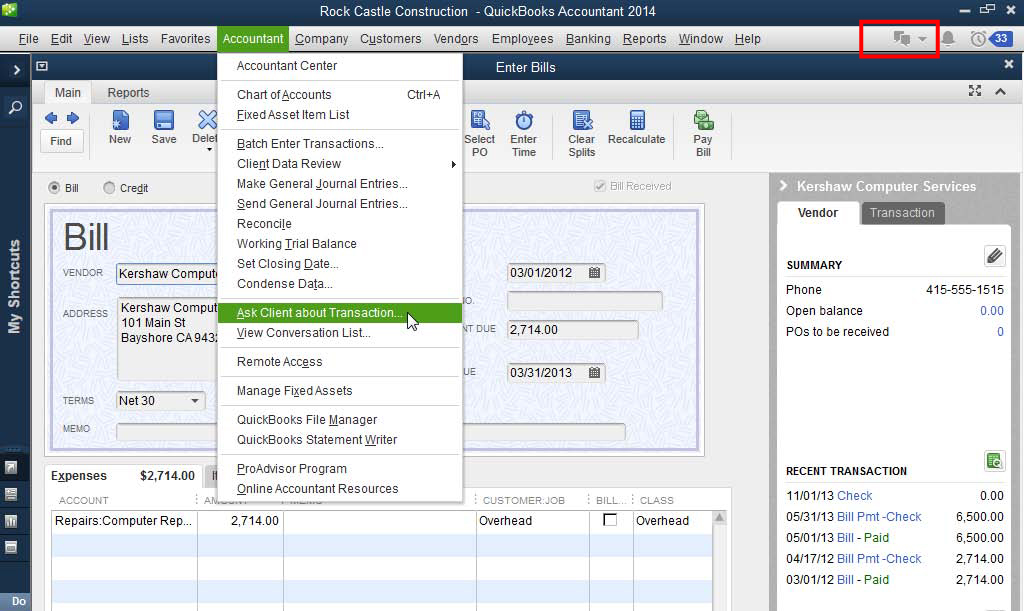
1. To begin collaborating, open a transaction in the business owner’s file. From the menu bar, select Accountant, Ask Client About Transaction.
Figure 16.28. Accountant begins conversation with a transaction displayed.
2. The “Sign in to Your Intuit Account” window displays. Enter your Email or User ID and Password.
3. Click Sign In. If you have used this email with other Intuit connected services, you may be prompted to select your company file (not your client’s file).
4. Client Collaborator prompts you to enter your client’s email address. This email address will receive automated notifications generated by the Client Collaborator.
5. Click Send, and an automated email notification is sent to the email address specified here. Click Close to the “Your invitation....” message.
6. Once the client has accepted the accountant’s invitation, Client Collaborator generates an email notification to the accountant using the accountant’s email address as specified by the client. The accountant clicks the “Sign in to <company name>” provided in the email.
Figure 16.29. QuickBooks Client Collaborator automates notices to both accountant and business owner

7. A web browser opens to Client Collaborator and the accountant will sign into their Intuit Account (not shown). After a successful sign in, the accountant will receive a “You Are Now Connected With Your Client” message.
Collaboration can begin in both the copy of the business owner’s file at the accountant’s office and the file the business owner is using at their place of business.
These one-time collaboration steps are now complete. While this section discusses both the accountant and client actions, in real life you will only have to complete one or the other and all notifications are automated.
How the Business Owner Gets Started
After the accountant has initiated a request for collaboration the business owner follows these few steps, all completed conveniently in their own copy of the file.
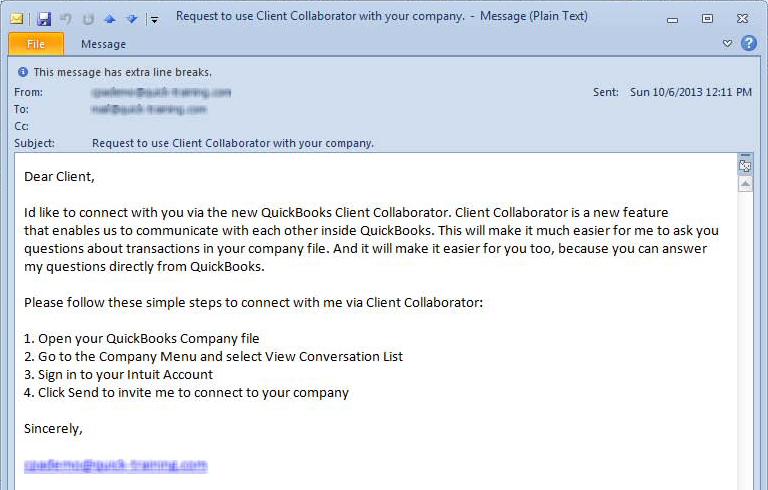
1. The business owner receives an automated email from the accountant with instructions, inviting them to join the Transaction Conversation.
Figure 16.30. All communications are automated, saving time for accountant and business owner
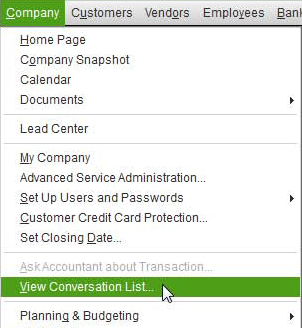
2. From the menu bar, select Company, View Conversation List as detailed in the email received. You are then prompted for your Intuit Account Email or User ID and Password.
Figure 16.31. All communications are accessed directly in the QuickBooks file.
3. The Client Collaborator window displays. Enter the accountant’s email address for future communications using Client Collaborator.
4. Click Send and Client Collaborator automatically sends a notification to the accountant allowing them to collaborate with you.
So simple! Business owners get started quickly and from the convenience of their own file. For the accounting professional, no need to ask for a new copy of the client’s file, the collaboration is all stored in the “cloud”.
And, with all of the communication between accountant and client automated, it is just smart to work with Client Collaborator!
Accountant and Client Converse via Client Collaborator
The accounting professional initiates the request for collaboration. When the initial invitation by the accountant is accepted by the business owner, full collaboration can then take place.
Accountant Asks Questions
The accounting professional will follow these steps to begin collaborating:
1. The accountant opens a copy of the business owner’s file for review at the accountant’s office. The file copy can be a backup copy (.QBB), portable company file (.QBM), accountant’s copy (.QBA) or even a working copy of the file (.QBW).
2. With a transaction displayed, from the menu bar, select Accountant, Ask Client About Transaction. Beginning with maintenance release R3, you can also access this option from the icon drop-down menu on the far right of the menu bar.
→ For more information, refer to “Installing a QuickBooks Maintenance Release” pg. xxx in Chapter 17.
3. You will be prompted to sign in to your Intuit Account.
Note
Client Collaborator will stay signed in as long as users are actively adding questions or making comments to the list. After a period of 30 minutes of inactivity, the accountant will be required to sign in again.
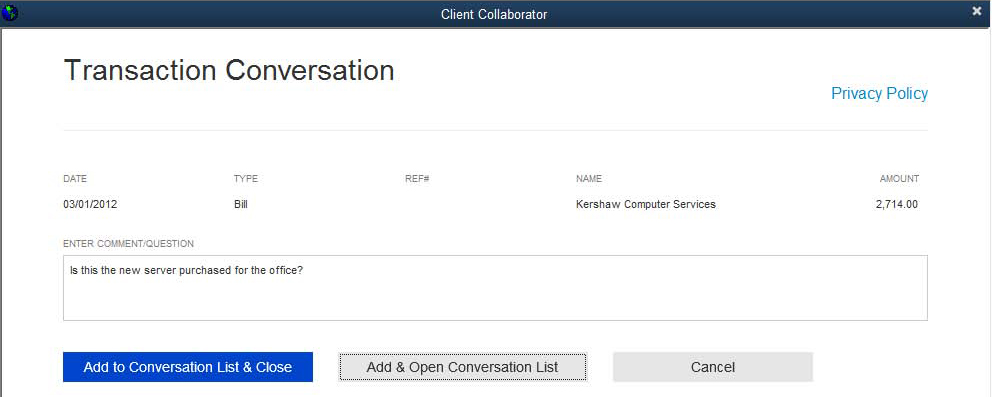
4. The Transaction Conversation window shows the details of the displayed transaction added to the collaborator. Type a comment or question in the space provided. Click Add to Conversation List & Close or Add & Open Conversation List.
5. To view the Conversation List, from the menu bar select, Accountant, View Conversation List.
Figure 16.32. Accountants ask questions about specific transactions.
6. Click the Notify Client, and a single email will advise the client that there is a Conversation List to review. The details of the questions and the transactions are not included in the automated email.
7. Optionally, click Close next to a transaction conversation to remove it from the list that the client will see. Only the accountant can mark a transaction conversation as closed.
The accountant now waits for an automated notification that the client has provided replies to the accountant’s comments or questions. No phone calls, no emails to keep track of!
Figure 16.33. The list of questions can be reviewed.

Business Owner Responds to Accountant’s Questions
Not only does the accountant work more efficiently, but so does the business owner. No interrupting emails or phone calls addressing questions about transactions. Let QuickBooks Client Collaborator do the work!
1. The business owner receives an automated email notification that the accountant has questions.
2. The business owner launches the Client Collaborator from their file by selecting from the menu bar, Company, View Conversation List.
3. The business owner is prompted to sign into their Intuit Account with their User ID and Password.
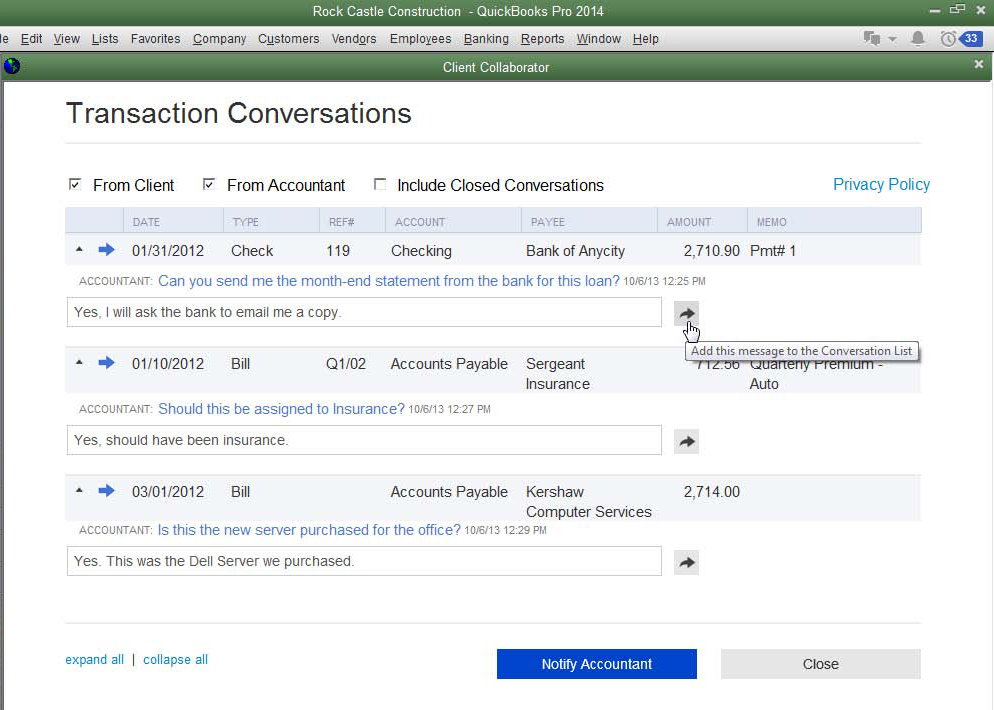
4. The most recent updated Transaction Conversation List is displayed thanks to it being stored “in the cloud” and not with the file. The business owner adds comments or additional questions and clicks the “Add this message to the Conversation List”.
Figure 16.34. The business owner replies to the transaction questions directly in their QuickBooks file.
5. When the business owner has completed their replies or comments, click the Notify Accountant. The accountant will receive one email instructing them to access the Conversation List from the copy of the client’s file they have at their office. The email notification does not include any of the specifics about the transaction conversation.
6. The collaboration comes full circle now, when the accountant receives an automated email notice that there are replies and or comments from the business owner.
The accountant will now use whatever method they have in place to make these changes to the business owner’s file. Client Collaborator is simply solving the need for discussion about specific transactions.