
Lesson 5. Quick Fixes and Effects
Lesson Files
Desktop > APTS iPhoto Book Files > APTS iPhoto Library > Mediterranean Vacation
Time
This lesson takes approximately 50 minutes to complete.
Goals
Understand nondestructive editing
Trim away unwanted parts of a photo
Enhance photos with one click
Straighten tilted photos
Remove red-eye
Erase objects from a photo
Rotate photos
Use effects
Although iPhoto encompasses several methods for making photos look better, in this lesson you’ll start by using a few Quick Fixes to address the most common photo problems. In many cases, the Quick Fixes might be all you need to improve your photos. Then, for more creative results, you’ll experiment with different iPhoto effects to create stylized looks.
Understanding Nondestructive Editing
When you alter a photo by changing its brightness or intensifying its color, iPhoto does not permanently change the original photo. Although the photo appears changed in your library, behind the scenes, iPhoto has actually modified a copy of your photo. As a result, you can easily return to the original at any time.
More importantly, you can later remove all of the changes because iPhoto remembers them. This ability to return to your original photo is called nondestructive editing because the edits you make in iPhoto are never permanently applied to a photo. With nondestructive editing, you can try out various edits and effects with no worries that successive edits will degrade your photo’s quality.
Cropping Photos
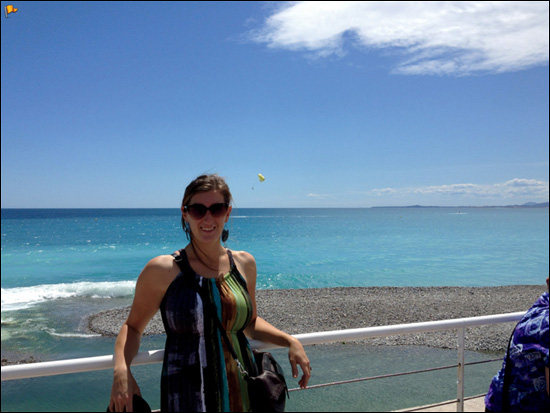
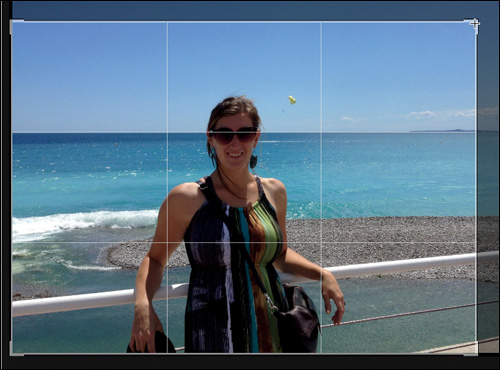
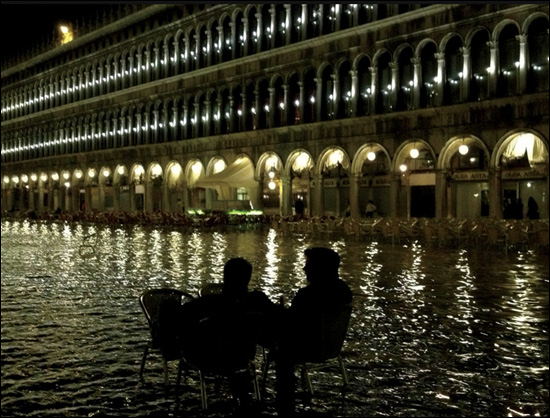
Quite possibly the most common edit made to photos is a crop. Cropping allows you to trim the side, top, or bottom of a photo to cut out nonessential objects and help keep viewers focused on the main subject. The shot of the woman at the sunny Mediterranean seashore from Lesson 3 has this problem. Someone is standing mostly out of frame to the right of the picture and is distracting attention from our subject. Let’s remove the bystander.
1. In the Source list, select the Flagged album, and then double-click the woman standing in front of the blue Mediterranean Sea.
2. Click the Edit button to open the Edit pane.

3. In the Edit pane, click the Crop button. The Crop controls appear, and a crop rectangle is placed around the edge of the photo.
How often do you wait around for someone to get out of your picture before you snap it? Often that person never moves, so you lose patience and just take the photo. That’s what happened here, but luckily you can crop out the intruder.
4. Hover the mouse pointer in the upper-right corner of the picture until it changes to a crosshair.

5. Drag the corner of the rectangle down and to the left until the unwanted photo intruder is outside the crop rectangle.
6. Click Done to close the Crop controls. The newly cropped photo is displayed for your viewing pleasure.
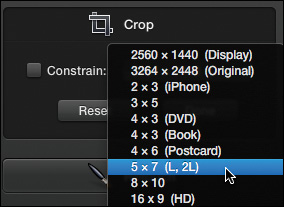
Nothing is inherently wrong with freely dragging the crop handles as you did if you only intend to view these photos on your computer. However, if you want to print your photo, you should force the crop outline to conform to the common dimensions used for printed picture frames, postcards, or iPhone screens. For instance, if you wanted to print this photo as a letterpress card using Apple Print Services, the aspect ratio needs to be 5 x 7 inches.
7. Click the Crop button to open the controls again.
Here is a good example of nondestructive editing. Even though you cropped the photo, when you return to the Crop controls, the original photo is displayed. The crop did not permanently cut out the unwanted portion of the photo.
8. From the Constrain pop-up menu, choose 5 x 7 (L, 2L).
9. Click Done to close the Crop controls.
The new crop is now constrained to the 5 x 7 aspect ratio.
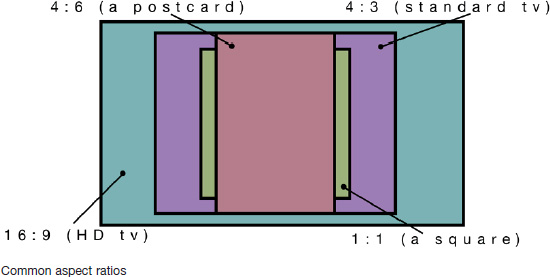
![]() What Is an Aspect Ratio?
What Is an Aspect Ratio?
Using the Rule of Thirds
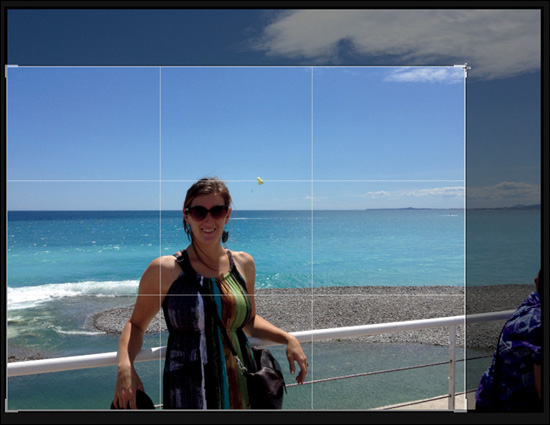
Cropping can improve photos by removing unwanted areas, but also by reframing them, which can create a more interesting, visually balanced composition—specifically by using the simple rule of thirds.
This rule was developed as a theory in painting and has since been extended to photography. Imagine two evenly spaced horizontal lines and two evenly spaced vertical lines (similar to a tic-tac-toe grid) over your photo. Then try to place important elements at the grid intersections or along the grid lines. Conveniently, you don’t have to imagine these lines, because the iPhoto rule-of-thirds grid helps you crop and reframe your photos.
1. Click the Crop button.
Although you removed the unwanted person to the right of the photo, you still have a lot of space above the main subject. The subject is also placed squarely in the center.
2. Hover the mouse pointer in the upper-right corner of the picture until it changes to a crosshair.
3. Drag the corner of the crop rectangle down and to the left until the woman’s eyes match up with the horizontal line.
4. Position the mouse pointer in the center of the crop rectangle, and drag the crop rectangle until the vertical line is over the woman.
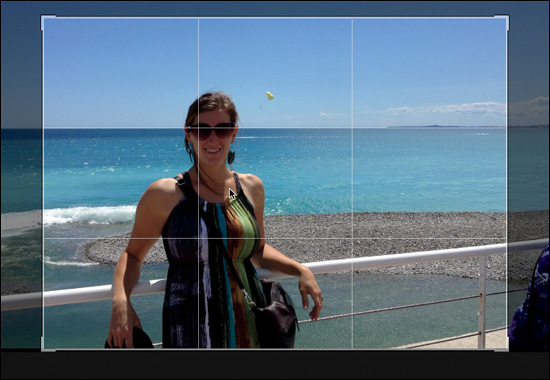
5. Click Done to close the Crop controls.
This was a decent picture to begin with, but your cropping has significantly enhanced it. The woman is standing against a perfectly serene Mediterranean sea without a soul around, so you can now rate it four stars and remove the flag.
6. Press Command-4 to rate this picture with four stars.
7. Choose Photos > Unflag Photo to remove the flag.
Unflagging the photo removes it from the Flagged album. Cropping can come in handy when you first start taking pictures. It can transform an average photo into a great one just by following the rule of thirds. But the more photos you take, the more skillfully you’ll frame your shots when taking them, possibly bypassing the need for later cropping. Keep the rule of thirds in mind when taking pictures. Cropping isn’t necessarily bad, but if you can frame your pictures well at the time you take them, you can spend less time correcting them in iPhoto.
Enhancing Photos with One Click
The Quick Fix Enhance button offers a magical one-click way to improve many photos. Without knowing anything about photo correction, you can automatically repair exposure, saturation, shadows, white balance, and much more with just a click of a button.
1. Select the photo of the Greek hillside town.

This is already a pretty nice picture, but clicking the Enhance button improves almost every image.
2. Click the Edit button to open the Edit pane.
3. Click the Enhance button.
Everything seems to pop a lot more with this enhancement. Let’s compare the results with the original photo.
4. Press the Shift key to view the original photo, and then release the Shift key to see the enhanced version.

You can now rate this improved photo with five stars and remove the flag.
5. Press Command-5 to rate this picture with five stars.
6. Choose Photos > Unflag Photo to remove the flag.
The image is noticeably improved. The blue sky looks deeper, the shadows look darker, and the whites are brighter—like it went through the washing machine with great detergent!
Removing Red-Eye
You’ve probably seen red-eye more than a few times in your photos. When a camera’s flash directly reflects from the back of the eye, it causes a red color to fill the pupil. Fortunately, red-eye is very easy to remove using iPhoto.
1. Select the photo of the woman coming up the stairs at sunset.
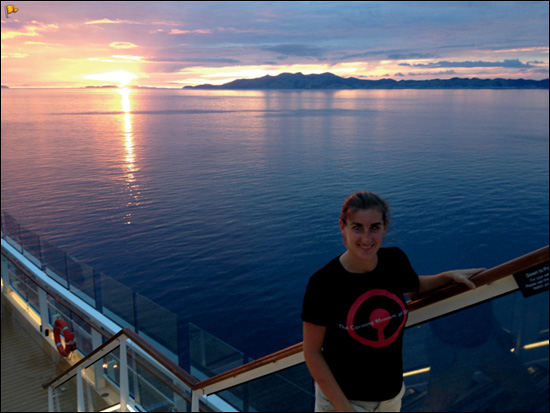
2. Click the Edit button to open the Edit pane.
3. Click the Fix Red-Eye button. The red eyes are removed.
Fix Red-Eye works automatically by detecting the red eyes in the photo and removing the red. In rare situations, the automatic detection is unable to correct automatically and you must manually select the red pupils.
In this photo, the automatic detection worked flawlessly, but for practice, let’s also try the manual method.
4. Click the Undo button to remove the red-eye fix. Then deselect the “Auto-fix red-eye” checkbox.

To more precisely select the eyes, you will want to zoom in on the photo.
5. Position the mouse pointer over the woman’s face and press Z.
Doing so zooms in to the specific location of the mouse pointer. The photo is magnified 100 percent, or to its “actual size.”
The next step is to adjust the pointer’s size to match the subject’s pupil size.
6. In the red-eye controls, drag the Size slider until the circular pointer is approximately the same size as the red pupils.
7. Click directly over each pupil to remove the red-eye.
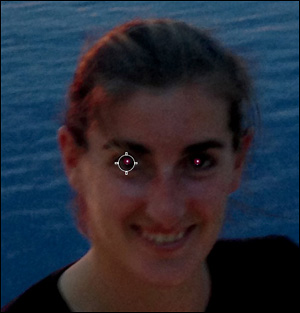
8. In the Fix Red-Eye controls, click Done.
9. Close the small Navigation window that appears.
10. Press Z again to see the entire photo in the viewing area.
11. Press Command-5 to rate this as a five-star photo.
12. Choose Photos > Unflag Photo to remove the flag for the photo.
The red-eye is removed without a trace. If it’s not, undo your work and try again, increasing the zoom level of the photo to make sure that the pointer exactly matches the pupil size and your placement is accurate. More often than not, the auto-fix setting will work; but when it doesn’t, you have manual skills to resolve the problem.
Straightening Photos
Most cameras do not come with controls to ensure that you’re holding them level. So, it’s up to you to either carry a level with you on vacation, or fix tilted photos after the fact using the iPhoto Straighten tool.
The Straighten tool is used to subtly tilt the photo in one-degree or smaller increments.
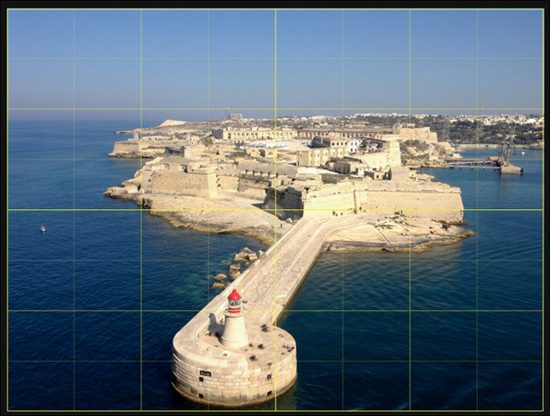
1. From the flagged album, double-click the photo of the lighthouse jutting into the sea.
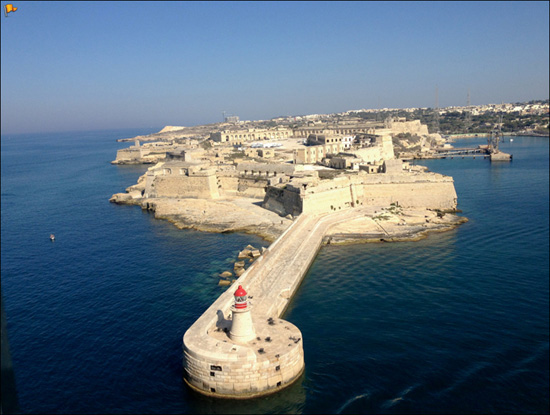
It’s a good photo, but the skewed horizon makes the tilt of the photo that much more obvious.
2. Click the Edit button to open the Edit pane.
An alignment grid appears over the photo.
4. Drag the Straighten slider to the right until the horizon line matches one of the horizontal guidelines.
5. Click Done.
6. Press Command-3 to rate this picture with three stars.
7. Choose Photos > Unflag Photo to remove the flag.
When straightening photos, try looking for the horizon or a vertical pole in the photo. With one of these as a reference line, you can use the guidelines to create a photo that is perfectly level horizontally and vertically.
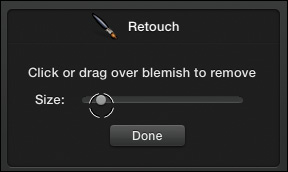
Retouching Photos
You can use the iPhoto Retouch tool to cover minor photo problems, such as skin blemishes, dust spots, and other undesired marks. It works by copying an area from one part of the photo and using it to “paint” over another part. The Retouch tool then blends the source colors to match the destination colors.
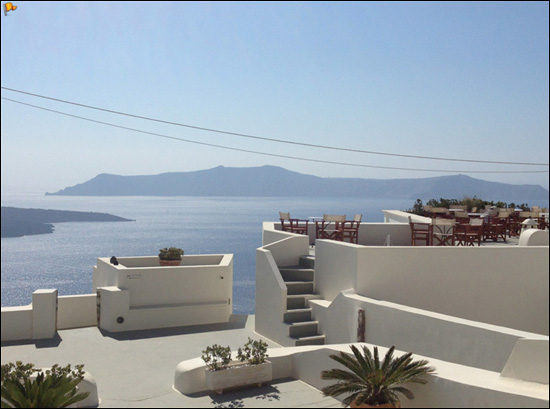
1. In the thumbnail browser, select the last remaining photo of the white patio with the telephone lines.
The wires ruin this perfectly good picture.
2. Open the Editing pane, and click Retouch.
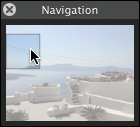
3. To see the wires more closely, press Z to zoom in.
You now see the wires closer, but you also need to pan the photo so you can follow the wires across the screen. You can do so in the Navigation window, which conveniently appeared when you zoom in. You can drag the square in the Navigation window to view different parts of the zoomed image.
4. In the Navigation window, drag the small square all the way to the left, placing it over the start of the wire centered in the screen.
5. In the Retouch controls, drag the Size slider to create a circular brush size slightly larger than the wire thickness.
You want to set the brush size just large enough to cover the area but not much larger.
Tip
You can also place the circular pointer over the area of the photo you want to retouch, and press the Left Bracket ([) and Right Bracket (]) keys to resize the brush.
6. Position the brush over one of the wires on the left side of the screen and then drag right over the wire to remove it.
Short drags over small areas work better than longer drags across the entire area. Don’t try to remove the wires in one stroke.
7. Return to the left edge of the photo, and do the same to eliminate the second wire.
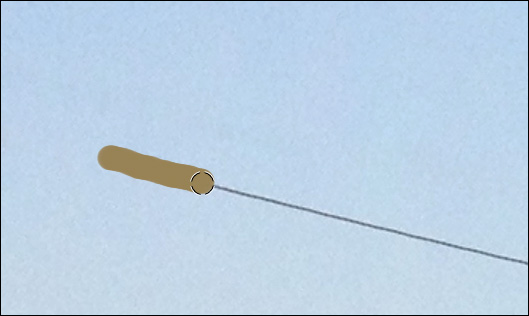
8. When you reach the right edge of the image, reposition the square in the Navigation window and continue removing both wires completely.
9. If you make a mistake, click the Undo button in the Edit pane to remove the last stroke.
Tip
You can remove all the Quick Fixes applied to a photo and return to your original photo by clicking the “Revert to Original” button.
iPhoto automatically selects the source area that works best for matching the area you want to retouch. To clearly see your progress, remember to compare the photo to the original.
Tip
If you want to override the automatic source selection in iPhoto, Option-click a source area on the photo. When you next drag over an area you want to remove, iPhoto will copy from the selected source area.
10. To compare the original photo to your edited version, press the Shift key repeatedly to toggle between the two versions of the photo.

When you hold down the Shift key, you are viewing the original photo without any fixes. Release the Shift key and you are viewing the edited version.
You aren’t limited to applying just one Quick Fix to a photo. To really perfect this photo, let’s also apply the Enhance Quick Fix.
11. Click the Enhance button to apply this additional fix.
Very nice! You’ve applied both the Enhance and Retouch fixes to this one photo and it looks great!
12. Rate this photo with five stars, and choose Photos > Unflag Photo.
The Retouch tool is very reliable on small areas and areas like the wires that have a relatively flat monotone color background. However, removing an entire person standing in front of a city scene is not really possible with this tool.
Rotating Photos
Most digital cameras now sense if they are held horizontally (landscape) or vertically (portrait). They embed that information into the photo so that iPhoto can automatically correct the image orientation. However, if you’ve scanned photos in a scanner, or you use a camera without an orientation sensor, the iPhoto Rotate tool allows you to rotate a photo in 90-degree increments.
1. In the Source list, click Events, and then double-click the Mediterranean Vacation event.
2. Double-click the third photo in the thumbnail browser (the sideways Venice canal), and click the Edit button to open the Edit pane.
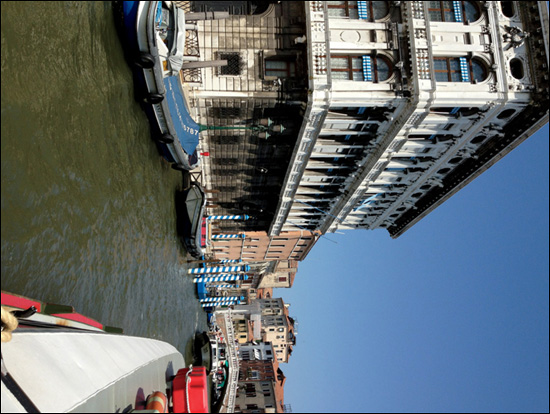
The Quick Fixes in the Edit pane contain a Rotate button to rotate photos like this.
3. At the top of the Edit pane, click the Rotate button.
The Rotate button points in the rotation direction, so the photo rotates correctly. As handy as this button is, using the Edit pane every time you wanted to rotate a photo would be cumbersome. But you don’t have to.
4. Click the Edit button to close the Edit pane, and click the Mediterranean Vacation button in the upper left to return to the event.
The last photo in the event is also rotated, but instead of using the Edit pane, you can use the pop-up menu you previously used when rating this photo.
5. Place the mouse pointer over the last photo in the Event, and click the disclosure triangle to open the pop-up menu.
However, the pop-up menu’s Rotate button points in the opposite direction we need to rotate.
6. Press the Option key to change the direction of the rotation arrow, and then click the Rotate button.
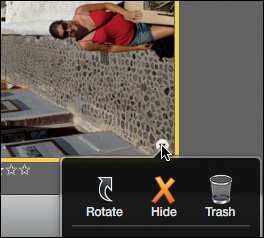
The image rotates clockwise, in the direction that the Rotate arrow now points.
The two remaining photos need to be rotated in the same direction. So this time you’ll perform the rotation on both photos at once.
7. Scroll up until you see the upside-down ice cream store, and click to select it.

8. Scroll up again until you locate the vacationing couple standing upside down in front of the upside-down Venice canal.
9. Command-click the happy couple photo.
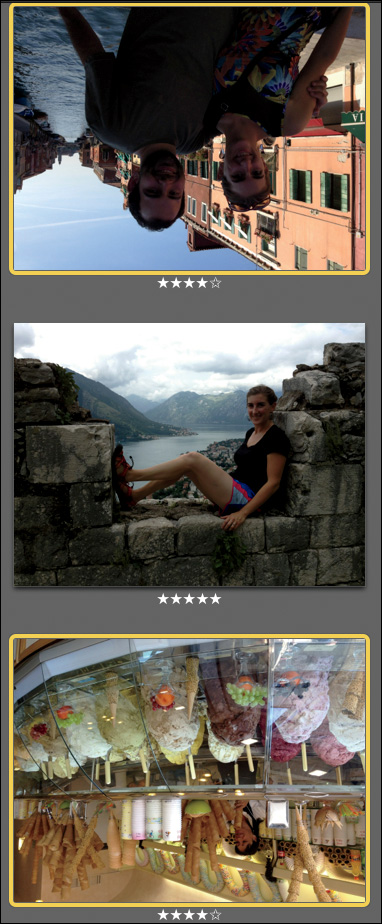
10. From the Photos menu, choose Rotate Clockwise twice to get the photos rotated upright.
You rotated these photos using a number of methods. It ultimately doesn’t matter how you rotate photos. You can rotate a photo as many times as you want using any method you choose.
Using Effects
Quick Fixes address many common problems and improve the quality of your photos. The middle tab in the Edit pane, called Effects, is used for a different reason. Effects target more artistic endeavors, such as creating a mood and stylizing a photo for dramatic impact.
1. Double-click the Mediterranean Vacation event to open it, if necessary.
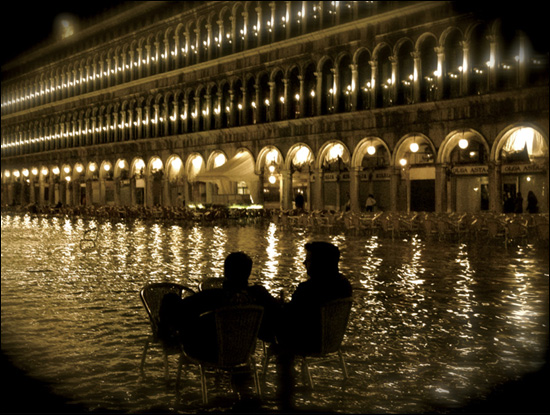
2. Drag the scroll bar to the right of the iPhoto window and scroll to the top of the view. Select the first photo at the top, the flooded square at night.
This photo is very interesting, but not your typical picture of Venice. You can enhance the dark drama of an already stylized photo by giving it the look of an old photograph.
3. Click the Edit button, and then at the top of the Edit pane, click the Effects tab.
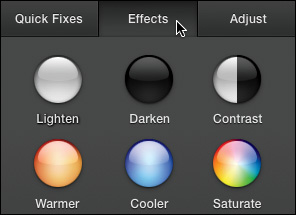
The Effects pane includes two areas of circular and square effect buttons.
The six circular buttons at the top act more like Quick Fixes than effects because they alter brightness, contrast, and color.
The nine square buttons, which display the selected photo with the effect applied, are creative effects.
4. In the Effects pane, click the Antique button to apply an older, faded look with a subtle sepia tint.
Each time you click the button it increases the intensity of the effect. A number at the bottom of the effect button displays the number of times you have intensified the effect.
Tip
Option-click the thumbnail, or click the arrow to the left of the number at the bottom of the thumbnail, to reduce the effect level. You can reduce it until the number on the thumbnail disappears, indicating that the effect has been removed completely.
5. Click the Antique button two more times to increase the effect amount.
You can also click other effect buttons to apply multiple effects to a photo.
6. Click the Vignette button to add a vignette effect.
7. Click the Edge Blur button three times to blur the edges of the vignette.
You’ve added three effects to this photo to give it an old-time appearance. You can also compare your results with the original photo.
8. Press the Shift key to view the original photo, and then release the Shift key to view the edited photo.
Tip
To remove the effects, you can click the None button in the lower-right corner, or click “Revert to Original.”
9. Rate this photo with five stars.
The top six circular effect buttons operate in a similar way but are less dramatic in their application. Let’s look at one to help you understand how they work.
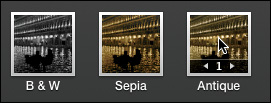
10. Return to the Mediterranean Vacation event, and select the second photo on the top row, the large building on the Venetian canal.
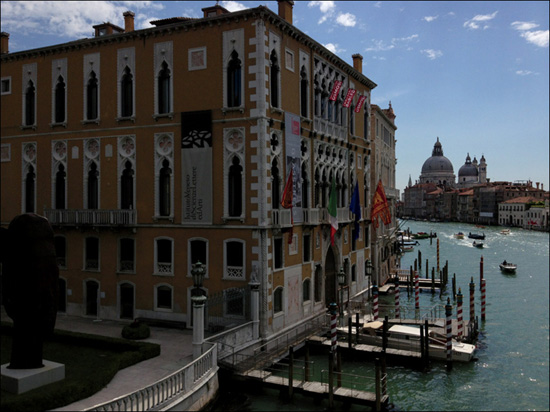
This photo is a bit dark and drab for a lively, vibrant place like Venice. You can click a few effect buttons to brighten it up.
11. In the Edit pane, open the Effects tab, and click the Lighten button seven times. With each click, you increase the level of brightness in the photo.
12. Click the Contrast button four times.
Contrast simultaneously darkens the shadows and brightens the highlights. Each time you click Contrast, the shadows become darker and the highlights grow brighter. Finally, let’s warm up the photo.
13. Click the Warmer button four times.
Now the photo has a lot more pop and warmth. Let’s compare it to the original.
14. Press and release the Shift key to compare the original photo and the edited photo.
15. Rate this photo with five stars. (We’re being liberal with our stars here.)
16. Click the Edit button to close the Edit pane, and see all the photos in the event.
Effects are useful not only when you want to explore your creative options, but also when you need more repairing prowess than the Enhance button provides. Starting your photo fixing with the Enhance button is easiest, and if that isn’t sufficient, move over to the Effects pane and try your hand there. You’ll gain a bit more control in fixing the color and brightness of your photos, as well as a chance to explore your artistic side.
Lesson Review
1. What is nondestructive editing?
2. Describe one way to rotate a photo.
3. What is the rule of thirds?
4. After you’ve edited a photo, how can you compare the edited version with the original photo?
5. When applying effects, how can you increase the amount of the effect applied to the photo?
Answers
1. The ability to return to your original photo after performing edits
2. To rotate a photo, do one of the following:
In the lower-right corner of each photo, choose Rotate from the pop-up menu.
Choose Photos > Rotate Clockwise, or Photos > Rotate Counter Clockwise.
Press Command-R to rotate clockwise, or press Command-Option-R to rotate counterclockwise.
In the Quick Fixes pane, click the Rotate button.
3. The rule of thirds suggests that you visualize a photo divided by two evenly spaced horizontal lines and two evenly spaced vertical lines. Then try to place important elements at the grid intersections or along the grid lines to create a more balanced picture.
4. Press the Shift key to see the original photo, and then release the Shift key to see the edited version.
5. Each click of the effect thumbnail increases the amount of the effect applied.