Sometimes, with all the options, interface functionality, and project setup information, it can be easy to forget that what we’re supposed to be doing here is cutting video, audio, and graphic content together.
In some ways, editing video and audio is a strange process. Since the days of the film editor with a razor blade and bins full of film clips, the very object of editing has been to discard and to create: destruction and construction. Raw material must be evaluated and sorted, then the chosen pieces, minus the parts that have been cut away, are put together to create a finished product.
For those readers who are new to editing video using a computer, it is a bit like using a word processor to write a letter or a report. Attempting to choose the right words carefully, you write a sentence, then you review it. As you reconsider the phrasing, you decide to add a word in one, which that makes the entire sentence longer; in another instance you decide to replace one word with another, and at yet another point in the sentence you decide to discard a word completely.
The same methods can be employed with video and audio. The largest difference is that a writer has all the words in a known language at his or her disposal, whereas a video editor has the video shots and audio clips he or she has been given. The shots are viewed, assembled in a preliminary sequence, and then rearranged and removed, replaced and revised.
This chapter covers the slicing, dicing, arranging, and rearranging that are actually video editing.
If we carry the word processor analogy a bit further, in English, text is read from left to right. In Premiere Pro, you will notice the video and audio are played from left to right when represented on a timeline. Inserting a word into a sentence pushes the existing words to the right. Inserting video into an existing sequence can be done in the same way, pushing existing footage to the right. Each track in the Timeline window is like a line of text. The major departure from the printed page is there is no right margin, and Premiere Pro reads all the lines at once.
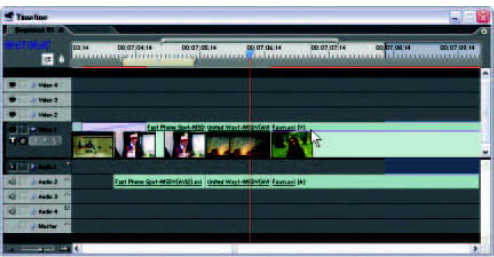
The work area for our assembly of the program is the Timeline window. The Timeline window contains tracks, which are the organization system for your content on the timeline, creating something a bit like a graph of your program over time. You have multiple tracks of video and audio (99 of each should you need them) that each flow from left to right over time.
The Timeline window.
Targeting Tracks
With all these different tracks, performing operations on your timeline can get confusing. As we start to address functions in the timeline, the concept of targeting tracks should probably be our first stop.
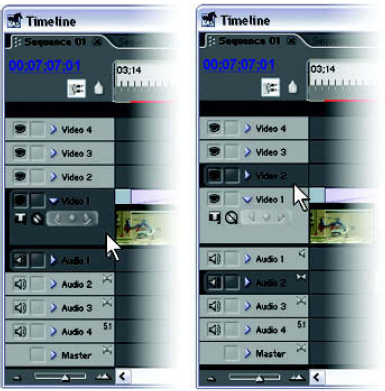
Two examples of targeted tracks. On the left, Video Track 1 and Audio Track 1 are targeted. On the right, Video Track 2 and Audio Track 2 are targeted.
When a track is targeted, it means that particular track is chosen for certain operations (more on what these operations are a bit later). To target a track, click in the track header area at the far left of the Sequence window, in the space where the name of the track is located. The space will darken as the track is selected. You can unselect a selected track by clicking in the track header area again.
Insert and Overlay Editing
The second important concept is the idea that when you place a clip in the timeline, there are two basic ways to apply it to your sequence: insert and overlay.
Insert goes with our word processor metaphor, as you might expect. When you insert a word into a sentence, the words that come after it must move over to allow it some space, creating a longer sentence. The same thing holds true for your timeline. Inserting a shot will make all the clips on the track, or on the entire timeline, move over to allow space.
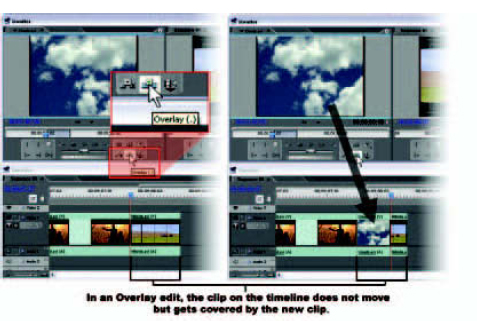
Overlay is more like selecting a certain word, or group of words, and typing something in to replace it. The text you selected doesn’t move down; it is replaced, or overwritten. Overlay editing differs from insert editing because it doesn’t move anything down; it just drops the new clip on top of whatever is currently occupying that space, overlaying or “overwriting” it, effectively eliminating the material that was originally in that position.
There are several ways to insert or overlay edit a clip into your sequence. You can preview a clip in the Source window and use the Insert or the Overlay button to place the clip in your sequence, with the in point at the position of the current time indicator (CTI), into the target track(s) on the timeline.
The alternative is to drag the clip from the Source window (or directly from the Project window) to the position in the sequence where you would like it. The track in the timeline on which you intend to place the clip can be considered your destination track. By simply dragging the clip to the destination track in the timeline, you will perform an overlay edit. This is the default behavior.
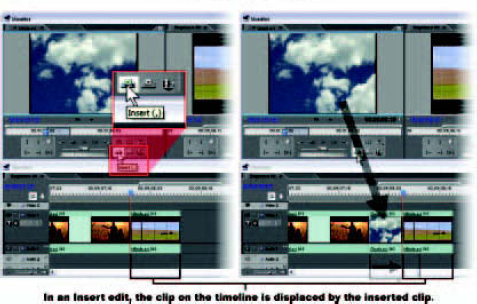
An insert edit and an overlay edit from the source window. Note that the new clip will go to the CTI position in the targeted track(s).
There are two ways to insert a clip, both involving modifier keys. You can insert on the timeline, creating a gap in all the tracks in your timeline, or you can choose simply to shift the destination track(s).
1 To insert a clip and shift all tracks, drag the clip holding down the Control key (Ctrl).
2 If you want to shift only the destination track(s), hold down Ctrl+Alt while dragging your clip.
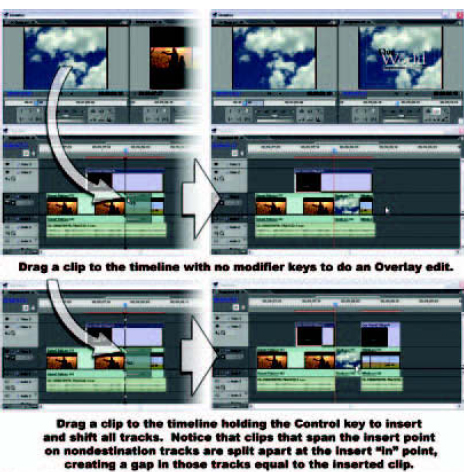
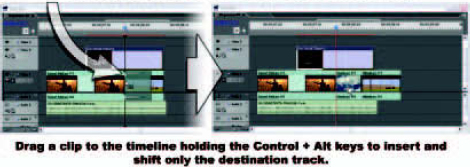
The modifier keys for shifting target track(s) and all tracks will also work with the Insert button in the Source view.
Note: Shifting only the destination track(s) can cause unintended consequences later in the timeline. Video, audio, and graphic material residing on several tracks and properly positioned in relation to each other will not move together. When doing an insert into a complex program, I usually find that the clean-up work necessary to take care of split clips (and any other consequences of inserting and shifting all tracks) is still much easier than tracking down and correcting all the possible errors down the timeline caused by shifting only destination tracks.
Modifying In and Out Points on the Source Clip
To alter the in and out points of your raw clip, you can double-click on the raw clip in the timeline, and the raw clip will open in the Source view to mark or change an in and out points. Or you can trim the clip on the timeline.
To set in and out points in the Source view, take these steps:
1 Double click (or drag) a clip into the Source view.
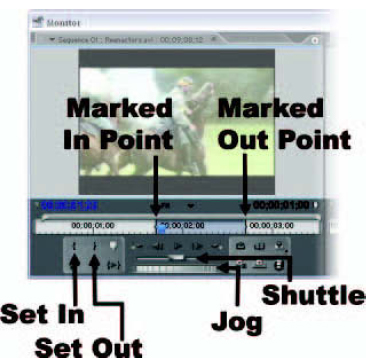
2 Using the shuttle or jog controls below the Source Monitor, or the JKL keys, position the clip at your desired in point.
3 Click the Set In Point button in the source window, or simply press the I key.
4 Using the shuttle or jog controls below the Source Monitor, or the JKL keys, position the clip at your desired out point.
5 Click the Set Out Point button in the Source window, or simply press the O key.
Trimming Clips in the Sequence
To trim a clip after you’ve placed it in your sequence, do the following:
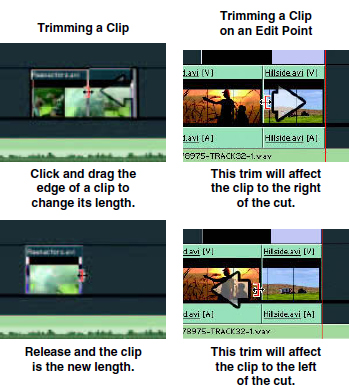
1 Click on the Selection tool and move the cursor to the edge of a clip you want to trim. You will see the cursor change to the Trim tool.
2 The Trim tool will show a bracket facing the edge of the clip it will trim. If you are working near a cut, you may have to adjust the positioning slightly to ensure you are trimming the correct clip.
3 To trim the audio or video portion of a clip only, while not affecting the trims of the other part, hold the Alt key while trimming the video or audio part of the clip.
Three-Point Editing
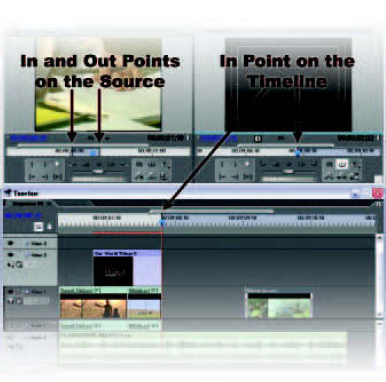
Three-point editing is a technique for which only three of the four possible edit points are specified (the four edit points include an in point and an out point on the source and an in point and an out point on the timeline). Three-point edits are one of the most common operations in editing. You can do three-point editing with Premiere Pro by selecting an in point and/or an out point on your source clip and doing the following:
1 Position the CTI in the Timeline window at the point where you wish to start the new shot. Press the I key or select the In Point button in the Program view.
2 Or you can position the CTI in the Timeline window at the point where you wish to end the new shot. Press the O key or select the Out Point button in the Sequence Monitor.
You can perform steps 1 and 2 if you only have one point selected on your source clip.
3 Click the Insert or the Overlay button in the Source Monitor to complete the edit.
Note: By setting the in and out points for both the source and the sequence, you will have what is called a four-point edit. Unless the time lengths defined by each set of ins and outs are identical, traditionally, the source clip would be sped up or slowed down to fill the gap properly. This is sometimes referred to as a fit-to-fill edit.
Premiere Pro will sense when the source and record settings are of different lengths and present you with options for how you would like to complete the edit.
An example of a three-point edit. There is a source in point, a source out point, and a record or timeline in point. If the timeline had a specified out point, it would be considered a four-point edit.
The Tool Palette
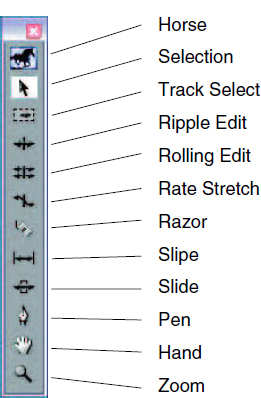
The tools in the Tool palette are the “bread and butter” functions of video editing.
• The Horse: He doesn’t do anything. You could right-click on him to choose whether to display the palette horizontally or vertically, but otherwise he (or she) is for decoration only.
• Selection tool: This is the tool you will be using most often. You can choose, select, and drag items in the various windows in Premiere Pro. This is the tool you will use to interact with buttons and controls throughout the interface.
• Track Select tool: This tool is designed to enable you to select everything from the point of selection forward in a track and slide it down. The relationship between the clips that are selected doesn’t change. By using this tool with the Shift key, you can select everything from a point forward in all tracks.
• Ripple Edit tool: We’ll address ripple editing on page 82.
• Rolling Edit tool: We’ll address rolling edits on page 82.
• Rate Stretch tool: Use this tool to stretch or compress the duration of a clip on the timeline. This tool can be used as a sort of manual fit-to-fill tool if you have a clip trimmed on the timeline and you need to adjust it to fill a gap.
• Razor tool: Oddly enough, this tool cuts things. If you need to separate a clip into two parts while it’s on the timeline, you can cut it into multiple parts using the Razor tool. Many editors will capture a very long piece of footage and cut it up on the timeline. By using this tool with the Shift key, you can create a cut in one place through the clips on all tracks.
• Slip tool: We’ll discuss slip editing on page 80.
• Slide tool: We’ll discuss slide editing on page 80.
• Pen tool: This tool is used on the timeline to adjust volume and opacity. We’ll discuss the Pen tool on page 98.
• Hand tool: This tool is used primarily for sliding views in windows, for instance, to drag the sequence display to the right or left to view a different portion of the program.
• Zoom tool: You guessed it. This tool “zooms” you in and out to do more detailed work or to get a wider overview in windows, such as the Timeline window and the Effect Controls window.
The Premiere Pro Tool palette.
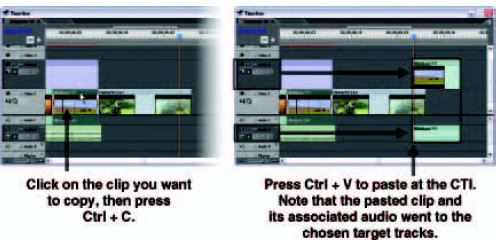
Cutting and copying of clips can be done by selecting a clip, right-clicking, and selecting Copy or Cut from the context menu. Or you can select the clip and type Ctrl + C to copy the clip, or Ctrl + X to cut it. To paste, position the CTI on the timeline and make sure to target the track(s) where you want the new clip to go. Then, use the Edit ![]() Paste command or Ctrl + V to paste the clip into the targeted track at the CTI.
Paste command or Ctrl + V to paste the clip into the targeted track at the CTI.
Excluding and Locking Tracks
If you are working with several layers of video and graphics or many tracks of audio, you will have occasions when you don’t need to see all the layers at once to do the task at hand. In these cases, you can improve Premiere Pro’s performance and reduce the visual or audible clutter for yourself by disabling, or excluding, one or several tracks.
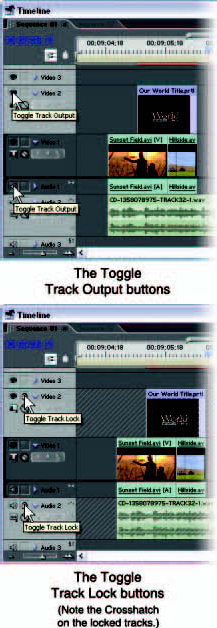
To exclude a track, click on the Toggle Track Output button on the far left side of the Timeline window. For video tracks, this would be the symbol that looks like an eye; for audio tracks, the button resembles a small speaker. In each case, the symbol will disappear when a track is disabled.
After a portion of your project has been edited, you may want to lock an entire track to preserve your work against accidental changes.
To lock a track, click in the square space next to the eye or speaker symbol in the track header at the far left of the Timeline window. This is the Toggle Track Lock button. When a track is locked, the clips should all have a crosshatch pattern across them, and you will see a padlock icon visible on the toggle button.
Linked and Unlinked Clips
When you bring a clip that has audio and video components to the timeline, the two parts of the clip will appear on the appropriate tracks. However, the two parts of the clip will respond to modification together. Trimming or dragging either clip will result in identical results for both clips. The two components are said to be linked.
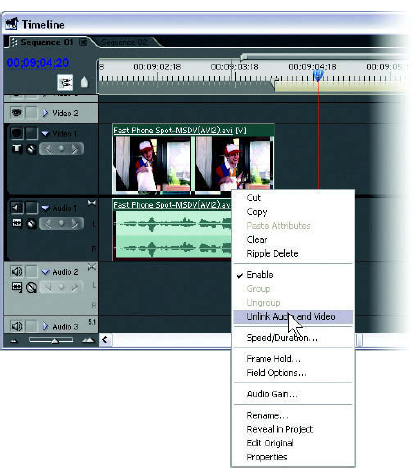
If you need to separate the audio from the video to work with each component on its own, you need to unlink them. There are two ways to unlink a clip:
• Select the clip. From the pulldown, go to Clip ![]() Unlink Audio and Video.
Unlink Audio and Video.
• Or right-click the clip and select Unlink Audio and Video from the context menu.
Right-click on the clips and choose Unlink Audio and Video to unlink the audio and video portions of a clip.
After unlinking a clip, click off the clip in a blank area of the timeline and click back to one portion of the clip to deselect the pair and make a change to the audio or video individually.
Even after the clips have been unlinked, Premiere Pro will still remember that they belong together and will tell you if they are out of sync and, if you relink them, how many frames the offset is.
To relink two clips that have been previously unlinked, follow these steps:
1 Select the first part of the clip, either video or audio.
2 Shift-select the second clip.
3 From the pulldown menu, select Clip ![]() Link Audio and Video.
Link Audio and Video.
4 Or you can right-click on either clip and select Link Audio and Video.
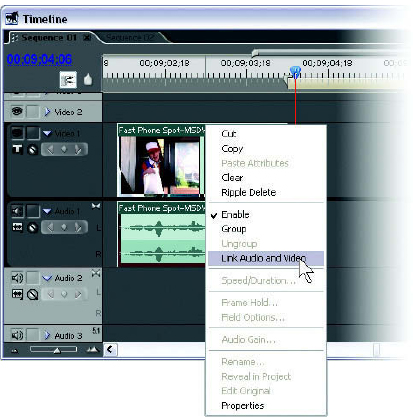
Right-click on the clip and choose Link Audio and Video to link an audio and a video clip.
You may also want to link clips that weren’t previously linked. This can be handy when you’ve aligned some footage to specific audio and you now want to keep the relationship between the two clips constant. To link the two clips, follow the relinking procedure just described.
Note: You can’t link two audio clips or two video clips together. Neither can you link more than one audio clip to one video clip or multiple video clips to one audio clip.
Bringing Video and Audio Clips Back into Sync
When you have an audio and a video clip out of synchronization, Premiere Pro will give you the number of frames (or more extensive seconds, minutes, etc.), provided the two clips are linked. The offset will appear to the left of the clip name with a + or - to indicate the direction of offset. Resync the clips by right-clicking on the offset number and choosing one of the following:
Move into Sync: This option will move the part of the clip you clicked to a position where it syncs with the other portion (right-click on the video clip’s offset and it will move to the audio clip’s position, or click on the audio to move to the position of the video clip).
Note: When you select Move into Sync, if there is a clip occupying the position needed by the synchronizing clip, the synchronizing clip will overlay the clip that’s in its way.
Slip into Sync: This option will not move the clip but will change the trim points so that the audio and video are synchronized, even though they may have different in and out points.
You can also slide the clip into sync manually by holding down the Alt key and dragging the part of the clip you want to move.
Moving Edits in the Sequence
The fine (and even not-so-fine) adjustments of editing can be made in the Sequence window. Most of the work in the Sequence window can be done by using the Selection tool to drag clips and by using the Slip and Slide tools to adjust cut points.
To move a clip in the sequence with the mouse, click and drag it along the timeline. It’s important to note that the default behavior for the clip you’re moving is to overlay. If you should cause utter destruction when this slips your mind (as it does mine occasionally), make sure to undo using Ctrl + Z, because simply moving the clip back will leave a gap. (See page 66 for further information on insert and overlay.)

You can also edit clips in the timeline by using the Slip and Slide tools in the Tool palette.
The difference between the Slip and Slide tools is essentially the difference between shifting the in and out trim points on the source clip with the Slip tool and changing the in and out points on the timeline with the Slide tool.
When you click and drag a clip after selecting either the Slip or the Slide tool, you will notice that the display in the monitor changes. The Program view will show you four images: the last frame of the previous clip, the first and last frames of the selected clip, and the first frame of the next clip—basically, the two edits that involve your selected clip. These frames have two different arrangements, depending on which tool you’re using. The images that are changing with the adjustment are always the largest ones.
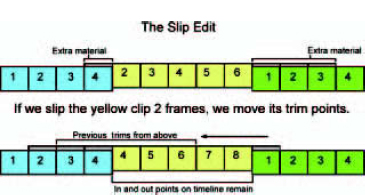
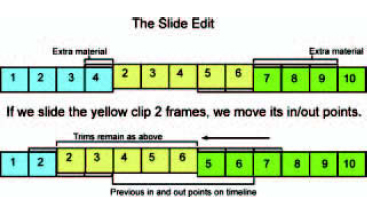
This concept is more difficult to grasp through words than it is by seeing it for yourself. I’d encourage you to experiment with Slip and Slide to become more familiar with the techniques.
When using the Slip tool, you will notice that the first and last frames of your selected clip are the largest pictures and that they are changing while the preceding clip’s last frame and succeeding clip’s first frame, which do not change, show as smaller frames above. This is because you are affecting which part of the clip we see, not where it is positioned on the timeline.
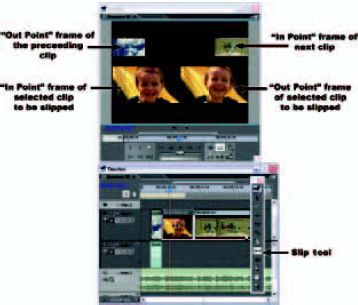
The Slip tool with its specialized monitor.
The Slide tool will cause the frame sizes to be reversed. Because you are changing the preceding out point and the succeeding in point, those frames are now largest, and the selected clip’s first and last frames are smaller and do not change. This is because you are now moving the clip on the timeline, affecting the clips around your selected clip, not changing which part of the clip is seen.
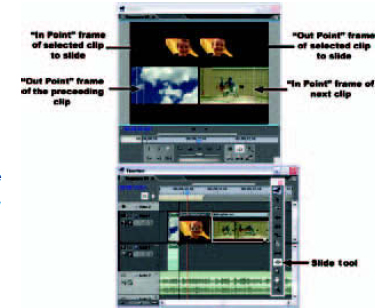
The Slide tool with its specialized monitor.
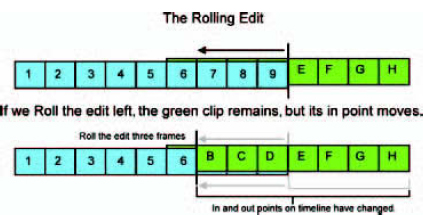
Unlike the Slip and Slide tools, which are designed to move clips, the Ripple and Rolling Edit tools are designed to move edit points.
Note: You must have some extra material available beyond the trim points of your clips for the Ripple and Rolling Edit tools to be fully functional.
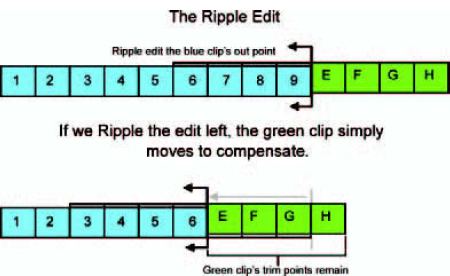
The Ripple Edit tool will actually move an edit point by affecting the clip you are adjusting and by moving the entire timeline after that point to fill the gap or allow extra space, based on your adjustment. This ultimately lengthens or shortens your entire edited sequence.
The Rolling Edit tool will move an edit point in time, trimming one clip while expanding the adjacent clip, ultimately keeping the edited sequence exactly the same length through this method of give and take.
The Trim Window
There are times when an edit needs fine adjustments. It can be much easier to fine-tune an edit if you can see the frames you are cutting on and can try some variations. This is where the Trim window comes in handy.
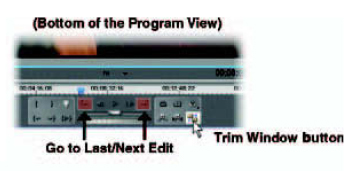
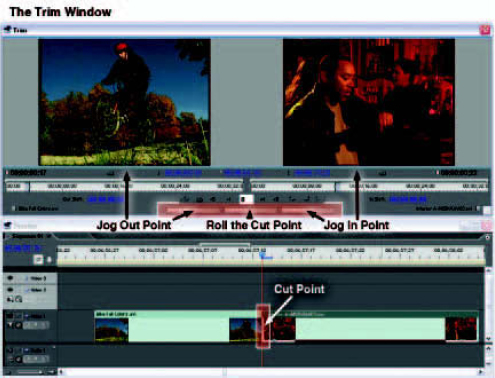
To use the Trim window, position the CTI directly on an edit point. This can be done by using the Page Up and Page Down keys, or by using the Next Edit and Last Edit buttons in the Monitor window. Once you are positioned on an edit, click on the Trim button, or press Ctrl + T. The Trim window will open with two panes, like the Monitor window, and it may open directly over the Monitor window. The Trim window does not replace your Monitor window, which you can view either by dragging the Trim window to a different position or by simply closing it when you’re done.
Once the window is open, you will notice three thumbwheels in the bottom center of the window. The one on the left jogs the out point of the clip before the cut, the wheel in the center rolls the edit, and the wheel on the right jogs the in point of the clip that comes after the cut. These functions can also be accomplished by clicking and dragging in each monitor pane. When you click and drag on the border in between the monitors, you can roll the edit.
Split Edits
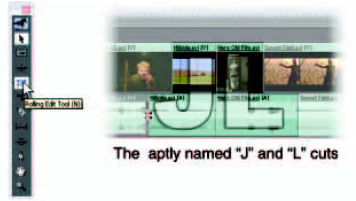
Split edits are when the audio and video parts of a clip have different in and out points. Many times, when editors are cutting a dramatic performance, perhaps a conversation taking place between two actors, there are times when the picture needs to cut at a different point than the sound. Perhaps Actor #1 says something shocking and we want to see the look on Actor #2’s face before he responds verbally, but also before Actor #1 has delivered his entire line, even though we need to hear all of it. In this case, we cut picture first to catch the visible reaction, then cut sound as Actor #1 finishes talking and Actor #2 starts to respond.
This is called a split edit. The popular forms of this are the J cut, where the audio in point is ahead of the video in point, and the L cut, where the audio out point trails the video out point. The letter nicknames for the edits come from visualizing the “shape” of the edit—and our industry’s ever-increasing need for additional technical jargon.
Although you can set different in and out points for video and audio in the Source view before moving the clip to the timeline, the most effective way to do this is when the clips are already “rough cut” together on the timeline.
To be able to perform a split edit, it’s important that you have extra trim material available outside of the clips’ current in and out points.
1 Select the Rolling Edit tool.
2 Use the tool on either the video or audio track, holding down the Alt key.
3 The track you adjust will be independent of its companion track. However, if you attempt to roll edit or simply trim that clip later, without using the Alt key, the in or out points will move proportionately to each other.
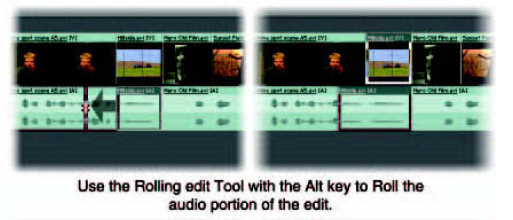
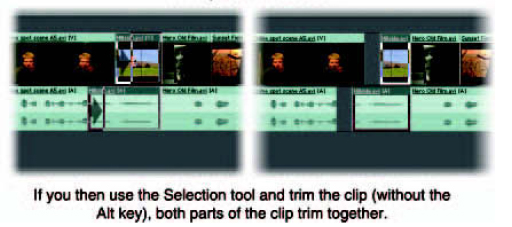
You can trim the audio and video portions of a clip separately by using the trim method, described earlier, with the Alt key.
Selecting Multiple Items on the Timeline
Use one of the following methods to select multiple items on the timeline:
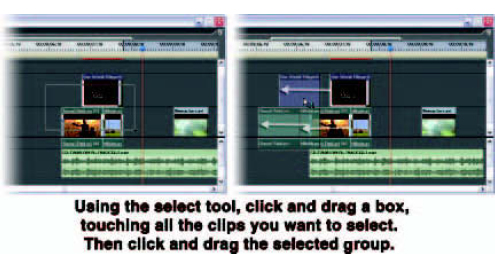
• Select the first clip and Shift-click on the additional clips.
• Or click and drag a marquee box over the group of clips you’d like to select.
Creating New Sequences
The Timeline window contains your edited sequences. Each sequence is a self-contained edit “timeline” in itself. Multiple sequences are useful for creating multiple versions of your program or subtimelines, where each segment of your program can be worked on separately and multiple sequences assembled in an additional master sequence.
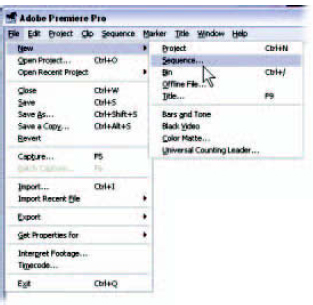
You can create a new, empty sequence document by selecting File ![]() New
New ![]() Sequence.
Sequence.
There may be times when you edit a program, and then you decide that you would like to try an alternate version of your edited sequence, but you don’t want to destroy what you’ve done. You can do this by creating a duplicate of your sequence and making the changes to the duplicate, while keeping your original sequence intact.
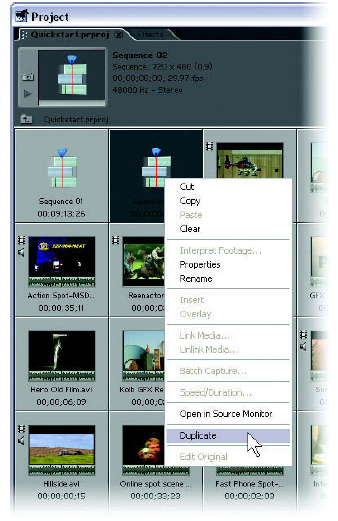
Right-click on the sequence you want to duplicate and select Duplicate from the context menu.
Here’s how to make a duplicate of an existing sequence to create an alternate version of your program:
1 In the Project window, find the sequence you want to duplicate.
2 Right-click on the sequence and select Duplicate from the context menu.
3 You will create a new sequence called <original name> copy.
4 If you wish, right-click on the new sequence and give it a new name.
Slow and Fast Motion
You can adjust the speed of a clip in Premiere Pro. To put a clip into slow-motion or fast-motion, you can do any one of the following:
• Click on the clip, go to the Clip ![]() Speed Duration pulldown menu, and type a percentage in the dialogue.
Speed Duration pulldown menu, and type a percentage in the dialogue.
Specify a new duration in the dialogue.
• Right-click on the clip in the timeline and select Speed/Duration from the context menu and type a new percentage.
Specify a new duration.
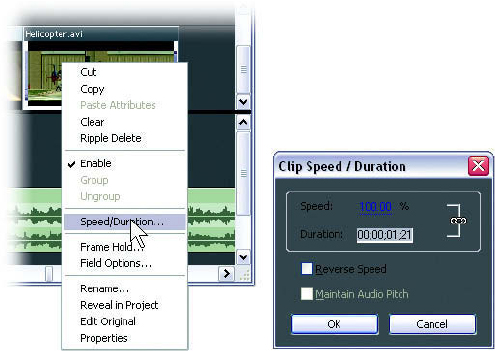
Right-click on your clip and select Speed/Duration from the context menu.
• Use the Rate Stretch tool to alter the speed of a clip on the timeline. When you drag the tool on the outer edge of a clip, the Rate Stretch tool will lengthen or shorten the clip by time-expanding or compressing the material. This tool works similarly to trimming, except you are time-expanding or compressing the content, not adding or subtracting material.
Note: If you want a clip to run backward, click the Reverse Speed checkbox and enter a percentage or duration.
Speeding up a video clip will also speed its associated audio, making human speech begin to sound like a squeaky toy for dogs. Or, when the clip is slowed down enough, your 4-year-old daughter could do James Earl Jones voiceovers. The Maintain Audio Pitch checkbox is to prevent the audio from changing pitch in proportion to the speed. The audio speeds up, but the pitch remains constant.
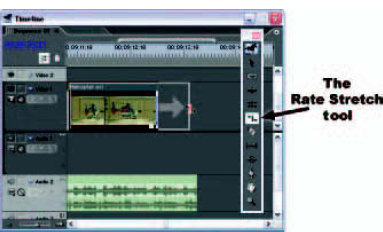
Use the Rate Stretch tool in the same manner as the Trim tool to change a clip’s speed.
Rendering
As fast and efficient as Adobe Premiere Pro is, you will reach a point when you will have to render at least a portion, if not most or even all, of your edited timeline.
Premiere Pro will display a red line above the areas where full frame rate can’t be achieved on your system. Each system’s power is different, but typically, complex sections, where there may be multiple layers of video and audio with effects and filters, need to be preprocessed or rendered to create a preview clip. The preview clip takes the place of the multiple clips and filters when you playback (without affecting the timeline) and eliminates any frame dropping you might experience in preview when you master out to tape. These rendered preview files are stored on your hard drive. When you render an area, the red line turns green. Any additional changes in that area may need rendering again.
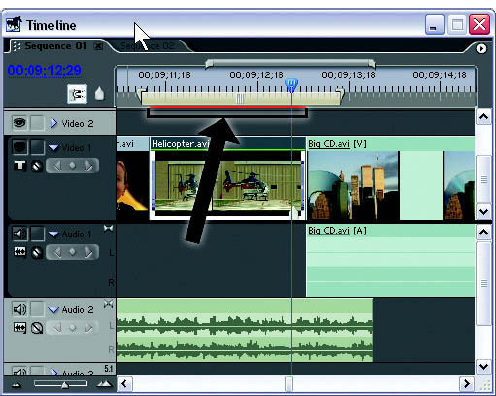
The arrow shows the red line indicating that this area of the timeline will not play at full frame rate.
To set the area of the timeline you would like to render, use the Work Area bar. If the bar extends beyond the edges of your current timeline view, the easiest way to bring it into view is to double-click in the lower, darker area of the timeline ruler. This will bring the Work Area bar to the active Sequence window or the length of the sequence, whichever is shorter. To extend the Work Area bar to the correct length, you can drag the edges in much the same way as you can trim a clip on the timeline. The Work Area bar position can be moved by dragging on the textured area in the center of the bar, which many of us call the tread. You can also move the Work Area bar by hovering over any section of it and holding the Alt key; the cursor will turn into a hand, and you can drag the Work Area bar to a new position.
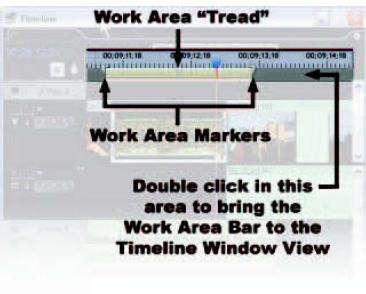
When the Work Area bar is the correct length and in the desired position, you can select Sequence ![]() Render Preview from the pulldown menu or simply press Enter. The part of the timeline bracketed by the Work Area bar will render. If you want to preview the timeline and save the rendering for later, simply press the spacebar.
Render Preview from the pulldown menu or simply press Enter. The part of the timeline bracketed by the Work Area bar will render. If you want to preview the timeline and save the rendering for later, simply press the spacebar.
Freeze Frame
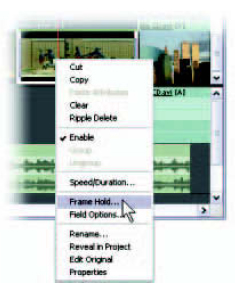
To create a freeze frame so that an entire clip plays back frozen on one frame, do this:
1 Right-click on the clip you want to freeze in the timeline window.
2 Select Frame Hold in the context menu.
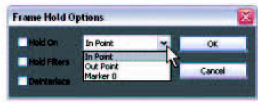
3 Click in the Frame Hold Options box and select whether you want the clip frozen at the In point, the Out point, or at Marker 0 (zero).
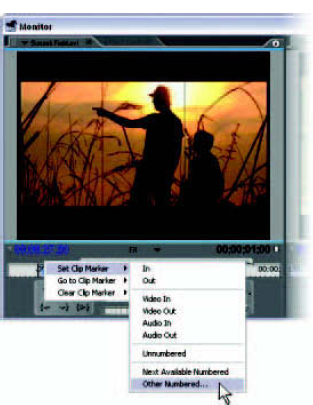
To place a Marker 0 on the clip, start with the clip in the Source window, position the cursor at the frame you wish to freeze, right-click in the Source window timeline, and select Set Clip Marker ![]() Next Available Numbered. If there are already other markers on the clip, you must reset Marker 0, because that is the only marker available for creating freeze frames.
Next Available Numbered. If there are already other markers on the clip, you must reset Marker 0, because that is the only marker available for creating freeze frames.
Note: The way I like to do this is to go directly to Set Clip Marker ![]() Other Numbered. This will bring up a dialogue that will tell you the next numbered marker available. If it isn’t zero, you can simply type in 0 to override the previous setting and move Marker 0 to your current position.
Other Numbered. This will bring up a dialogue that will tell you the next numbered marker available. If it isn’t zero, you can simply type in 0 to override the previous setting and move Marker 0 to your current position.
Also in the Frame Hold Options dialogue, the box marked “Hold Filters” should be checked if you have any filters changing settings over time that you want to freeze with the video.
The box marked Deinterlace should be checked if you have content with very fast action that shows saw-toothed edges on moving objects or excessive flickering when you freeze the frame.
