
5
The Hasselblad V System Cameras and Components
THE HASSELBLAD 500 SERIES CAMERAS
All Hasselblad cameras in the 500 series are identical in the interchangeability of their components and in the use and operation of lenses and magazines (see Figure 5-1). All are completely mechanical, battery-independent, single-lens reflex cameras in which the mirror returns to the viewing position when the film is advanced. The cameras do not have shutters. A rear curtain protects the film from light before and after an exposure is made.
The 500C and 500EL cameras made prior to 1970 are identical to the 500CM and 500ELM models but do not have interchangeable focusing screens. To verify whether your 500 camera has interchangeable focusing screens, remove the viewfinder and check whether the camera has the two focusing screen retaining clips.
Hasselblad Classic
The Classic is basically a 500CM but without a removable winding crank. The Classic camera was sold with an 80mm Planar lens engraved with the letter C. The optical and mechanical design of this lens, however, is identical to that of the CF type except that the Classic does not have the F setting and the interlock between the aperture and the shutter speed ring. The lens can be used on focal plane shutter cameras (except model 202FA), making the exposure with the shutter in the lens.
Hasselblad 501C
This camera model has the 500 Classic design but is equipped with the Acute Matte focusing screen.
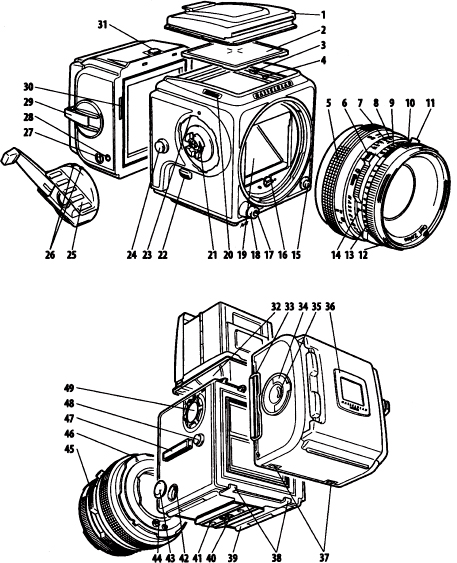
Figure 5-1 500/501/503 components.
1. Focusing hood
2. Focusing screen
3. Screen retaining clip
4. Flash ready signal*
5. Focusing ring and scale
6. Shutter speed and aperture interlock button
7. Central lens index
8. Depth-of-field scale
9. Aperture ring and scale
10. Shutter speed selector ring
11. PC flash terminal
12. Lens accessory mount
13. Exposure value scale
14. Exposure value index
15. Lens lock and release button
16. Drive shaft
17. Cable release socket
18. Shutter release button
19. Mirror
20. Nameplate
21. Winding crank bayonet*
22. Prerelease button
23. Winder bayonet mount*
24. Strap lug
25. Winding crank
26. Winding crank index*
27. Frame counter
28. Magazine status indicator
29. Film winding crank
30. Magazine driving gear
31. Magazine catch
32. Focusing hood magnifier
33. Magazine slide
34. Film insert key
35. Film consumption indicator
36. Film tab holder
37. Magazine support slots
38. Magazine supports
39. Camera support
40. Tripod socket
41. Quick coupling plate
42. Dedicated flash connection*
43. Connection cover*
44. Lens coupling shaft
45. Manual stop down control
46. Lens location index
47. Accessory rail
48. Strap lug
49. Film speed selector*
*Not on 500/501 models
Hasselblad 501CM
The current 501CM is the 501C but with an Acute Matte focusing screen with microprism and split-image rangefinder. The 501CM also has the gliding mirror system (GMS), which shows the entire image on the focusing screen with all lenses and all accessories. The 500 and 501 models do not have a dedicated flash system.
Hasselblad 503CX
The 503CX camera comes with the Acute Matte focusing screen and is equipped with the automatic dedicated flash system.
Hasselblad 503CXi and 503CW
The 503CXi and the current 503CW cameras have a new winding crank design. This lets you attach an accessory motor winder, which is also designed for convenient carrying and handheld camera operation. The winder has two infrared sensors for wireless camera operation and includes a remote release that works up to 33 feet (10 meters). Both cameras have the dedicated flash system, and the 503CW model also has the gliding mirror system.
Camera Finishes
The 501CM and 503CW cameras are available in the ruby red, cobalt blue, forest green, and sun yellow finishes. The use and operation of these models are identical to those in the chrome or black finish.
THE MOTOR-DRIVEN EL CAMERA MODELS
Hasselblad 500ELX
The 500ELX has the automatic dedicated flash system and a gliding mirror arrangement that shows the full viewfinder image with all lenses and accessories. Like those of the earlier EL and ELM models, the 500ELX motor is powered by rechargeable NiCad batteries.
Hasselblad 553ELX
The 553ELX motor, like the motor in all future models, is powered by five standard AA batteries instead of the NiCads. The camera is supplied with the Acute Matte focusing screen.
Hasselblad 555ELD
The current 555ELD has a new heavy-duty motor powered by five AA batteries and a gliding mirror system with a mirror suspension similar to that in the Hasselblad space cameras. The 555ELD camera also has the release mechanism that was part of the space cameras for years.
This camera is ideal for photography with film or for electronic recording via a digital camera back. The rear of the 555ELD has integrated connectors to interface with some digital backs, eliminating cable connections between camera and magazine. The camera also has separate release ports in the front for film photography and digital work. An accessory IR release unit can be attached to the front of the camera for wireless remote operation up to 33 feet (10 meters). It is powered by the camera batteries. The remote control works only on the 555ELD. It cannot be used on earlier EL models.
THE HASSELBLAD 200 SERIES CAMERA MODELS
All camera models in the 200 series have electronically controlled focal plane shutters, the gliding mirror system with an instant return mirror, the Acute Matte focusing screen, the dedicated flash system, and a built-in self-timer. Flash sync with the focal plane shutter is up to 1/90 second. You can make double or multiple exposures without removing the film magazine.
The winding crank is removable for operation with a motor winder specifically made for these camera models. The cameras can be used with all non-shutter lenses (FE,TCC, and F) as well as the CF, CFi, and CFE types with shutter. With the latter, exposures can be made with the shutter in the lens or the focal plane shutter (except the 202FA, where the focal plane shutter must be used). Using the lens shutter, you can make flash pictures at shutter speeds up to 1/500 second.
The camera models with built-in metering systems have the electronic Databus connection in the bayonet lens mount to transfer the data from FE, CFE, and TCC lenses into the camera. If you're using lenses that do not have the electronic coupling, you must manually stop down the lens aperture for the meter reading. The cameras with built-in metering systems also have the same electronic connection at the rear of the camera body to transfer the data from E, ECC, or TCC film magazines into the camera's metering system. You can use A-type film magazines. The film sensitivity is then programmed manually into the camera body's metering system.
All cameras need a 6V battery for timing the focal plane shutter speed and for operating the metering system. The rest of the camera operation is mechanical. All cameras (except the 202FA) can be operated without a battery if the shutter in CF, CFE, or CFi lenses is used to make the exposure.
Hasselblad 205
The original model was the 205TCC, with TCC film magazines that have an adjustment that automatically changes the exposure for shorter or longer film developing times. The purpose was to change the contrast on the negative, based on Ansel Adams's principles.
The camera designation was changed to 205FCC, with a change in the dedicated flash operation. The letter F designates that the camera has a focal plane shutter. All 205 cameras have a built-in spot meter with automatic bracketing that can be programmed in 1/4 f stop values. The shutter speed ranges from 90 seconds to 1/2000 second (from 34 minutes to 1/2000 second in Manual mode). The shutter speeds are set electronically to an accuracy of 1/12 f stop increment but can also be set manually to 1/2 f stop values. The built-in self-timer can be programmed for delays from 2 to 60 seconds.
Hasselblad 203FE
The 203FE camera is identical to the 205FCC but has a center metering system (not a spot meter) and automatic bracketing in 1/3 f stop increments.
Hasselblad 202FA
The 202FA model (discontinued) has the features of the 203FE but no automatic bracketing and a shutter speed range up to 1/1000 second only. There is no manual shutter speed setting. With CF, CFi, and CFE shutter lenses, the exposure must be made with the focal plane shutter, limiting flash exposures to 1/90 second or slower. CB lenses cannot be used.
Hasselblad 201F
Like the other 200 models, the 201F (discontinued) has the same camera and shutter design, with speeds up to 1/1000 second adjustable in 1/2 f stop increments but no metering system. The self-timer can be programmed for either a 2-second or a 10-second delay.
THE HASSELBLAD 2000/2003 CAMERA MODELS
The original Hasselblad focal plane shutter models (discontinued) offer electronically controlled shutter speeds from 1 second to 1/2000 second, with a focal plane curtain made from very thin titanium, which can easily become damaged when the magazine is off the camera. Extreme care is necessary.
To prevent accidental damage to the shutter, the later 2000 FCM/FCW and 2003 models include a safeguard device that retracts the shutter curtain when the film magazine is removed. On the 2000FCW and the 2003 models, a motor winder, specifically made for these cameras, can be attached. These two models can also be used without a battery if the shutter in a lens is used to make the exposure. Double or multiple exposures can be made on all models without removing the magazine. The mirror can be made to return instantly after the exposure when the film is advanced, or it can be locked up permanently.
THE HASSELBLAD SUPERWIDE CAMERAS
The Biogon 38mm f 4.5 lens with a 90-degree diagonal angle of view when used for the 21/4 square is the heart of all Superwides, from the earliest models to the latest 905SWC. The lens has shutter speeds and flash synchronization up to 1/500 second.
The Biogon, permanently mounted on a short camera body without reflex viewing, is an optically true wide-angle design, which provides a distortion-free image with superb corner quality at close and far distances even with the lens aperture wide open. The Biogon focuses down to 12 inches (0.3 meters), making the Superwide an excellent camera for copying or other critical close-up work where a distortion-free image of the highest quality is desired or necessary. The rear of the camera is identical to those of the other Hasselblad models, so the same film magazines can be used. Older camera models, however, do not accept the Polaroid film magazine.
An optical viewfinder attaches to the top of the camera. Because the lens has great depth of field—for example, from 26 inches (66 cm) to infinity at f/22—you can usually achieve sufficiently accurate focusing by visually estimating the distance. However, you can view and focus the image on a focusing screen by removing the film magazine and attaching in its place the focusing screen adapter. This accessory is now equipped with the Acute Matte focusing screen. With this accessory attached, the Superwide is like a large-format, wide-angle camera from a viewing and focusing point of view.
Hasselblad Supreme Wide Angle
The original camera came equipped with a Biogon lens that operated like lenses on large-format cameras, with film advance and shutter cocking being two separate operations.
Hasselblad Superwide C
The next version of this camera model was equipped with a Biogon lens of the typical C lens design. Film advance and shutter cocking became one operation. A spirit level was built into the top of the camera body, with a prism attached to the viewfinder. This arrangement makes it possible to see the level setting from the viewing position.
Hasselblad Superwide SWC/M
The position of the viewfinder and the tripod coupling are changed slightly to allow the use of the Hasselblad instant film magazine. Newer SWC/M camera models also have a Biogon with the CF lens barrel design and are supplied with the new 903 model viewfinder.
Hasselblad 903SWC
The spirit level is no longer on the camera body but instead is on the top of the removable viewfinder and is visible in the viewfinder, together with the image area covered on the film. You can therefore see the position of the spirit level while you compose the image, and this allows you to do critical work, handheld if desired. The viewfinder also has a magnifier at the bottom that allows you to see the distance setting on the lens in the viewfinder. This new viewfinder can be attached to older camera models, but the distance setting is visible in the finder only with cameras that have the CF lens design.
Hasselblad 905SWC
The current 905 model is like the 903SWC but has a newly designed Biogon lens with reduced improvime. This can produce images with better color saturation, especially when you are photographing against bright background areas.
THE HASSELBLAD FLEXBODY AND ARCBODY CAMERAS
The Hasselblad V system also includes the FlexBody and the ArcBody models. In spite of their value in making the Hasselblad system even more versatile by providing swing and tilt control, the two cameras are no longer manufactured.
COMPONENT INTERCHANGEABILITY IN THE V SYSTEM
Many features and operations are identical on all Hasselblad V system cameras. The rear of the camera body is designed so that film magazines can be switched from one camera to another at the end or the middle of a roll of film. All the models, except the Superwide models made before 1980, also can be combined with the Hasselblad instant film (Polaroid) magazine. The magazine interchangeability is also included in the FlexBody and ArcBody and even in the original 1000F and 1600F models. The very early magazines with serial numbers below 20000, however, are usable only on 1000F and 1600F cameras.
All cameras can be used with the tripod coupling, but older camera models require that you add the Hasselblad quick coupling plate to the camera for use with the latest tripod coupling.
The lens mount was changed in 1957, so lenses from the original 1000F/1600F focal plane shutter models cannot be used on newer cameras and vice versa. However, all V system cameras made since 1957, except the ArcBody, have the same lens mount. All V system lenses fit on all cameras (except the ArcBody), but there are some restrictions regarding the use of shutter lenses on focal plane shutter cameras.
HASSELBLAD SHUTTER LENSES
Hasselblad lenses with shutters are indicated with a C (C, CF, CB, CFi, and CFE). The letter F in the designation indicates that those lenses, which also have an F setting on the shutter speed ring, can be used on focal plane shutter cameras as well.
C Lenses
The original Carl Zeiss C lenses were distinguished by their unique lens barrel design, with interlocked aperture and shutter speed rings, automatic depth-of-field scales, M and X flash synchronization (sync), and the built-in self-timer (see Figure 5-2). They should not be used on focal plane shutter cameras. The C lenses were discontinued in 1981. Although such lenses can still be cleaned and lubricated, many spare parts are no longer available, and more extensive service is therefore no longer possible.
CF Lenses
In 1982, all C lenses (including the 38mm Biogon on the Superwide) were replaced by the CF line. These models have a completely redesigned lens barrel and a new shutter, as well as new features to improve their operation. Some seldom-used features were omitted, including the self-timer.
Aperture and shutter speed rings are no longer interlocked but can be locked together easily when desired. The manual stop down control is more convenient, and the M sync setting has been eliminated. Figure 5-2 shows how to distinguish between C lenses and the CF and similar types.
CFi Lenses
The CFi lenses are optically identical to the CF types. The changes are in the lens mount. The front bayonet mount is made from a solid black acrylic material that is almost indestructible, and the rear bayonet ring is made from a single piece of specially treated metal. Focusing is extremely smooth, and the flash connector is equipped with a cable locking device. The CFi lenses also have a newly designed mainspring made from Nivarox, which is expected to perform reliably three times longer than the other types. The interior behind the lens elements has been opened up to reduce possible light reflections on the interior surface.
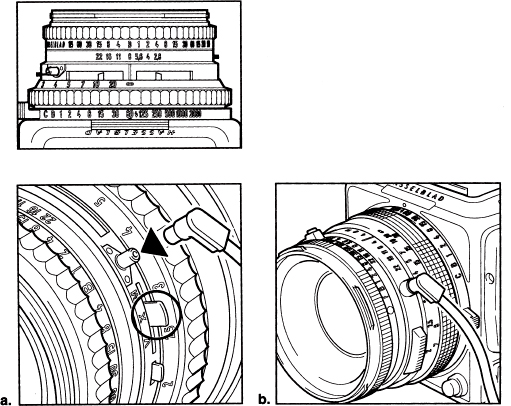
Figure 5-2 C lenses (a) can be distinguished from CF, CFi, CB, and CFE types (b) mainly by the VXM lever on the left side. This control is only on C types.
CFE Lenses
Lenses designated CFE are identical to CFi types but also have the electronic connections for the light-metering system in the 200 camera models.
CB Lenses
In the limited line of CB lenses, now discontinued, Carl Zeiss eliminated some features and functions that many photographers do not need, such as the F setting on the shutter speed ring. CB lenses can be used on focal plane shutter cameras (except the 202FA), but the exposure must be made with the shutter in the lens. Some lens designs (the 60mm, for example) are identical to that of the CFi type. Others are new and different but produce an image sharpness that is completely up to Hasselblad standards.
LENSES WITHOUT SHUTTERS
Hasselblad decided to produce focal plane shutter cameras in 1977, mainly to allow the use of larger-aperture lenses. Adding a shutter to a lens made it difficult, if not impossible, to increase the maximum lens aperture, at least at that time. The Carl Zeiss F lenses were originally designed for the 2000 camera models, which did not have a built-in metering system; the lenses therefore did not include an electronic coupling to the camera body. The F lenses became TCC types with electronic Databus connections when the 205TCC camera was introduced. The lenses changed later, in name only, to the FE types. CFE lenses are shutter lenses with electronic Databus connections. They can be used on all V system cameras (except the Superwides).
THE V SYSTEM COMPONENTS
Removing and Attaching Lenses
Removing the Lens All cameras in the V system since 1957 have identical bayonet lens mounts. To take the lens off, press the lens lock lever, turn the lens about 35 degrees counterclockwise (preferably by holding the lens on a nonmovable part), and lift it out (see Figure 5-3). Lenses with or without shutters can be removed and attached only when the shutter is cocked and the camera is ready to be released but is not prereleased.
If the shutter in the lens is not cocked, turning the winding crank or knob on all models with manual film advance solves the problem but also advances the film. You can avoid this by removing the magazine before turning the crank. Use the same procedure with a camera in the prereleased mode, but press the camera release after the magazine is removed and turn the crank or knob before reattaching the magazine. On 200 and 2000 series cameras, simply turn the winding crank while pressing the center chrome button, as for double exposures.

Figure 5-3 Before removing a lens, first check that the winding crank has been turned. 2. Press the lens lock button. 3. Turn the lens counterclockwise as seen from the front.
When EL models are prereleased, the operating control is probably set to SR or AS; if it is, remove the magazine, set the operating lever to 0, and press the release to bring the camera into the normal position.
Attaching the Lens To attach a lens to any camera body, it is not necessary, nor is it recommended, to press the lens lock lever. Instead, simply place the lens into the mount and turn it clockwise until you hear a definite click, which indicates a complete and secure combination of body and lens (see Figures 5-4 and 5-5). Lenses can be attached only if the shutter in the lens is cocked and the ridge on the camera's connecting shaft points to the dot. If neither is the case, reset the camera or the lens as if removing the lens.
The Hasselblad shutter lenses are designed to be stored with the shutter in the cocked position. They are designed for this type of operation. There are no parts in the lens that wear out because of the shutter being left in the cocked position.
The suggestions for attaching and removing lenses apply to all camera models and all lenses, including the types with the electronic coupling. These suggestions for mounting and removing lenses also apply to bellows, tele-converters, and extension tubes with or without electronic coupling.
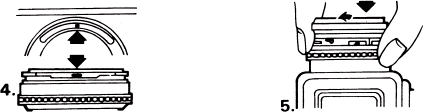
Figure 5-4 4. To attach a lens, insert the lens in the bayonet mount so that the marking on the lens mount is aligned with the mark on the camera. 5. Rotate the lens clockwise until it clicks into place.
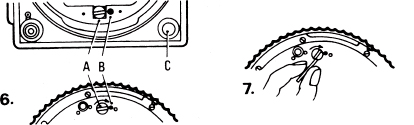
Figure 5-5 6. Lenses can be attached only if the slot or ridge on the coupling shaft (A) is lined up with the dots (B) on the camera body and lens. If the camera slot is not lined up, turn the winding knob, or, on the EL models, change from the prereleased to the normal position. 7. If the slot in the lens is not lined up, insert a coin in the slot and make one full turn clockwise.
In addition, you must remember to remove the components from the camera in the proper sequence. Always remove the lens first from the converter, tube, or bellows; then remove the accessory from the camera body. You can remove lens and accessory together from the camera, but never remove a lens from the accessory without the components being attached to the camera. There is nothing to prevent the shaft from turning and uncocking the shutter during the process, and that might jam the lens and accessory together.
Removing and Attaching Film Magazines
The instructions for attaching and removing film magazines apply to all Hasselblad rollfilm and 70mm magazines with or without electronic contacts.
Removing the Film Magazine Hasselblad film magazines can be removed from all camera bodies, whether they are loaded with film and whether the film has been advanced. They can be removed, however, only when the darkslide is inserted completely. The purpose of the darkslide is to keep the film magazine completely light ight when it is removed from the camera. A darkslide in the magazine also prevents accidental releasing of the camera. As long as a darkslide is in the magazine, the camera release cannot be pressed. To remove a magazine, push the magazine lock on top of the magazine to the right (see Figure 5-6).
Attaching the Film Magazine Before a magazine is attached to the camera, determine whether the camera is in the ready position. If it is, attach the magazine by hooking the two lower support catches onto the camera body and pivoting the upper part of the magazine toward the camera body until it locks into position; remove the darkslide, and the camera is ready for the next shot.
Magazines with or without film can be attached to a camera whether or not the film has been advanced. You can check the latter by looking at the round window on the frame counter side. If it is white, the film has been advanced; if it is red, the film has not been advanced. You can check whether there is film in the magazine by looking at the film consumption window on the other side of the magazine. If it is all or partially red, it contains film. If it is all chrome, it is empty.
If you attach a magazine with film advanced (the signal is white) to a body that is not in the ready position, you will waste a frame, because the necessary shutter cocking will advance the film again. To avoid wasting a frame, lift the magazine off again and then turn the winding crank; or, on the focal plane shutter models, turn the winding crank while pressing the slotted disc.

Figure 5-6 The camera/magazine connection 1. A gear (A) on the magazine connects to the winding mechanism (B) of the camera. The opening (C) is for the pin (D) that comes out of the camera when the darkslide is out and the release is pressed. The 2000FCM and 2003 models also have a shutter retraction control (G). 2. When the darkslide is inserted, a piece of white metal (B) covers half the opening so that the pin cannot penetrate and the release cannot be pressed. The magazine lock button (A) can be pressed only when the darkslide is fully inserted. 3. The handle of the magazine slide (A) is moved to one side to clear the film insert. 4. It is best to insert the magazine slide with the handle toward the camera front. E, ECC, and TCC magazines and camera models with a built-in metering system also have the four electronic connectors.
If the film has not been advanced (the signal in the magazine is red), attach the magazine to a camera body that also has not been cocked. Turn the winding crank, and then remove the darkslide; the camera is ready for the next shot.
There is one exception to this case. When you are making double exposures, the second exposure is made without the film having been advanced (that is, the magazine with a red signal is attached to a camera body) with a shutter cocked.
Figure 5-7 shows how to remove a magazine and attach a new one.
Operating the Instant Film Magazine
With instant film (Polaroid) magazines, you can turn the camera's winding crank without affecting the film. The current instant film magazine can be used on all newer camera models;the older, discontinued type 80 can be used only on 500Cs and 500ELs. Neither type can be used on Superwide cameras made before 1980.

Figure 5-7 1. To remove a magazine, insert the darkslide. Press the magazine lock (C) on top of the magazine to the right, move the top of the magazine away from the camera, and lift the magazine off the two lower support catches. 2. When attaching a magazine with the darkslide inserted, hook the bottom of the magazine onto the lower two support catches of the camera body (B). Pivot the top of the magazine toward the camera latches (A) while pressing the magazine lock (C) to the right. Remove the darkslide.
Attaching and Removing Viewfinders
Until the introduction of the 205TCC in 1991, all viewfinders were interchangeable among all SLR models, including the 1000F and 1600F. On the 205 cameras and subsequent models with built-in metering systems, the viewfinder display panel prevents a “regular” viewfinder from being pushed forward completely.
The 205TCC was introduced with viewfinders that have the necessary cut-out for the display panel in the front. These new viewfinders can be used equally well on all the other camera models. This means that all the viewfinder types made since 1990 have the front cut-out and are usable on all camera models in the V system as well as on the focusing screen adapters made for the Superwides, the FlexBody, and the ArcBody. If you have older types, you must switch to the newer type when adding or switching to a camera model with a built-in metering system. The older types cannot be modified.
All viewfinders, old or new, are mounted and removed from a camera in the same fashion. After detaching the film magazine, slide the viewfinder toward the rear (see Figure 5-8). Slide in the new viewfinder from the rear, and replace the magazine.
Changing Focusing Screens
On all Hasselblad V system camera models made since 1970, you can remove the focusing screen after removing the film magazine and the viewfinder. To remove a screen, push the two retaining clips in the camera body toward the sides (see Figure 5-9). The clips are pushed back automatically when the viewfinder is inserted. To avoid finger marks, hold the screens by the edges.

Figure 5-8 Changing a viewfinder Viewfinders can be removed only with the film magazine detached. 8. Slide the finder toward the rear and off the camera. 9. Slide in the new viewfinder from the rear, making certain that it is properly placed in the guiding grooves.

Figure 5-9 Changing a focusing screen 1. After removing the film magazine and viewfinder, push both screen retainers (A) into the camera body, and turn the camera upside down. The screen will drop out easily (if it does not, push gently from inside the camera body). 2. Drop the new screen into the square opening, with the finished side up. 3. Make certain that the screen rests on all four supports (A). The screen retaining clips will close automatically when the viewfinder is attached to the camera.
Because the focusing screens and the opening in the camera are square, the screens can be inserted vertically or horizontally. A screen with a split-image rangefinder can be placed so that the dividing line is either horizontal or vertical. The screen must, however, be inserted the right way up. The finished side, which has a metal frame over the screen, must face up.
Changing the Winding Cranks or Knobs
On all camera models with removable winding cranks, the crank (or knob) is best removed and attached with the camera in the cocked position when the winding mechanism does not rotate (see Figures 5-10 and 5-11).
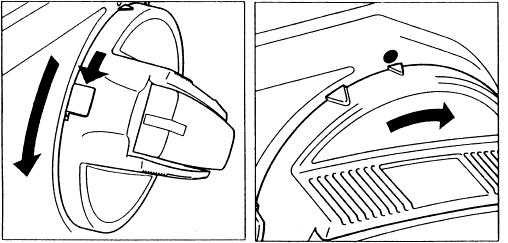
Figure 5-10 Changing winding cranks on newer models To remove the winding crank, push the locking lever downward while turning the crank counterclockwise (left). To attach the crank or motor winder, place the winder or motor with the small black triangle opposite the dot on the camera, and turn it clockwise until it locks into position (right).

Figure 5-11 Changing the winding crank or knob on older cameras 4. The dot (or the large triangular mark) on the crank or knob is usually opposite the red triangle on the camera body. 5. To change the knob or crank, put the camera in the ready position and push the locking device on the knob or crank away from the camera body. On the newer cranks, press the center button while turning the knob or crank counterclockwise. 6. Attach the knob or crank by pressing it against the camera body, with its engraved circle (or the small triangular mark) opposite the triangular index on the camera body. 7. Turn it clockwise, and it will lock into position as soon as the red dot and the triangle match.
The Auxiliary Shutter
The purpose of the auxiliary shutter at the rear of lens shutter SLR cameras is to protect the film from light before and after an exposure is made. When the release is pressed, the top baffle plate flips up and the bottom plate flips down; they stay in this position until the pressure is taken off the release. Although the baffle plates cannot be damaged easily, care is nevertheless recommended. Check their proper operation occasionally by making certain that they open and close completely, as described in the section Checking the Camera Functions later in this chapter.
The Focal Plane Shutter
In the focal plane shutter cameras, the shutter curtain controls the exposure time and protects the film from light before and after the exposure. When the shutter in a lens is used to make the exposure (with the focal plane shutter set to C), the focal plane curtain works like the auxiliary shutter. It opens when you press the release, and it closes when you remove your finger from the release.
CHECKING THE CAMERA FUNCTIONS
Because all Hasselblad cameras can be operated without the film magazine attached to the camera body, you can easily check the camera and lens functions. With the magazine removed and the camera pointing toward a bright area, look through the camera body/lens combination from the rear to see what is happening when the release is pressed.
Make certain that the two rear baffle plates are completely out of the light path when the release is pressed and that they close completely and tightly when the button is released. Set the aperture ring at a small aperture, and check whether the diaphragm closes down to the preset aperture and whether the diaphragm has the familiar shape indicating that all blades are opening properly. With focal plane shutter cameras set to C, make certain that the curtain fully opens when you press the release and that it closes when you remove your finger from the release. You can also check whether the long shutter speeds (1 second, 1/2 second, 1/4 second) in the lens or focal plane shutter are approximately correct.
You can check the proper timing of the auxiliary or the focal plane shutter in relation to the shutter in the lens. The rear curtains or the focal plane shutter must be fully open when the lens shutter opens and closes. After attaching a flash unit to the camera or lens, you can also check the flash synchronization. You must see the flash firing while the lens or focal plane shutter is fully open.
If anything does not function as it should, it is usually an indication that the camera and/or lens should be cleaned and lubricated.
Bottom Plate and Tripod Socket
Although the newer camera models have a more solid and more professional-looking bottom plate, the tripod coupling plate design has been maintained, and all camera models can therefore be used with the tripod coupling. Older models, however, may need the quick coupling plate for mounting the camera on the latest tripod coupling models.
Tripod couplings have been modified and improved over the years; the later models come with a built-in spirit level. The tripod coupling introduced in 2002 has two spirit levels that are helpful for perfect vertical or horizontal alignment of the camera and has the locking controls in a somewhat different position for most convenient mounting and detaching of H1 camera models. This latest type should be used with these new cameras.
Over the years the size of the tripod screw also has been changed and in some cases may have to be changed before you can attach a camera or accessory. Check with the Hasselblad agent or service department.