9
Operating the 200 Cameras
The features, the component interchangeability, and the basic operations of the Hasselblad 200 camera models are described in Chapters 5 and 6. The text here concentrates on the operation of the special features, especially the built-in exposure and flash metering system (see Figure 9-1).
SHUTTER OPERATION
All camera models in the 200 series have electronically controlled focal plane shutters, with the shutter curtain made from a robust, rubberized silk textile material that is not easily damaged except with a sharp object or the corner of a film magazine. Care is recommended when you attach magazines. Protect the curtain when the camera is stored without a magazine attached.
Batteries
The basic camera operations are mechanical, but the shutter speeds are controlled electronically via the power from a 6V PX28 battery stored in a battery compartment on the left side (as seen from the rear) of the camera. Lithium types are highly recommended.
In the 202, 203, and 205 models, the battery also powers the metering system, so its life span depends mainly on the use of the meter and the display light. At normal temperatures, a battery should last for more than 4000 metering cycles of 15 seconds each. This is reduced to about 1000 cycles at very low temperatures. To save the battery power, the electronic circuit turns off automatically after about 15 seconds. A battery symbol appears on the viewfinder display when the battery needs to be replaced.
To insert or change a battery, pull out the battery compartment. Insert the battery with the minus (-) and plus (+) ends positioned as engraved on the compartment. Push the compartment completely into the camera body.
It is advisable to remove and insert the battery compartment when the camera is in the ready state, with the shutter cocked and the mirror down. To be certain that this is the case, before inserting a battery turn the winding crank with the center disc pressed. Whenever you remove the battery compartment, all values programmed into the electronic circuit change to the standard values mentioned under Programming later in this chapter. When the shutter speed ring in 203 or 205 cameras is set to C, you can make an exposure without a battery in the camera if you use the shutter in the lens to make the exposure.
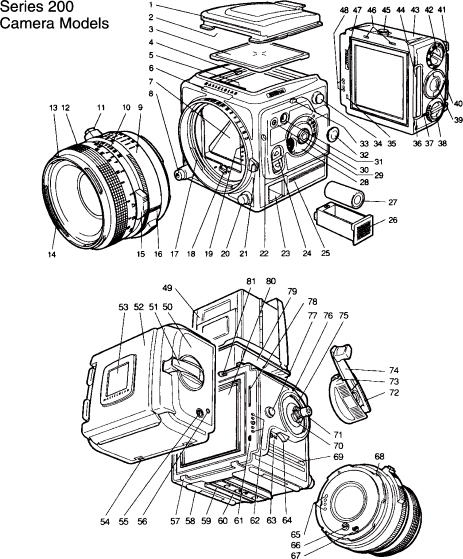
Figure 9-1 Main components and operating controls of cameras with a built-in metering system.
1. Focusing hood cover
2. Cut-out in viewfinder for finder display
3. Focusing screen
4. Focusing screen catch
5. Liquid crystal display
6. Illumination window
7. Mirror
8. Shutter release
16. System mark
17. Lens mount
18. Drive shaft
19. Electronic connections
20. Lens lock
21. Shutter speed ring (not on 202 model)
22. Self-timer indicator
23. Battery compartment
24. Adjustment controls
25. Grip cushion
26. Battery case
27. Battery
28. Mode selector dial
29. PC socket
30. AE lock
31. Dedicated flash connection
32. Flash socket cover
33. Display illumination button
34. Strap lug
58. Camera support
59. Quick coupling slide
60. Tripod thread
61. Magazine indicator trigger
62. Electronic connections
63. Self-timer symbol
64. Prerelease/self-timer control
65. Electronic connections
66. Drive shaft
67. Drive shaft catch
68. Lens bayonet
69. Grip cushion
70. Winder coupling
71. Double-exposure control
72. Winding crank hub
73. Crank catch
74. Winding crank
75. Winder bayonet mount
76. Winding crank index
77. Strap lug
78. Magazine driving gear
80. Shutter curtain
PRERELEASING AND USE OF THE SELF-TIMER
You lock the mirror up by pressing the release under the winding crank one time toward the rear (see Figures 9-2 and 6–16). Pressing the prerelease a second time starts the self-timer, with the self-timer exposures made with the mirror locked up.
The desired self-timer delay (from 2 to 60 seconds) is programmed into the camera. When the self-timer is in operation, the self-timer symbol appears on the display, and a red light flashes at the front of the camera, where it is visible to the people being photographed.
At the beginning, the light flashes twice per second. But when only 3 seconds of the delay time remains, it increases to four times per second and changes to a continuous light during the last ½ second. In this way, you know precisely when the camera will go off. You can interrupt the self-timer function at any time by pressing the prerelease lever again or by turning the crank with the center disc pressed, as for a double exposure. The self-timer function is inoperative when the shutter speed ring is set in position B or C.
As with all V camera models, the mirror moves up when the camera is prereleased, and the image disappears from the focusing screen. If you want to see the image again before making the exposure, simply turn the crank with the center disc pressed, as for a multiple exposure.
MANUAL FILM ADVANCE
You recock the shutter and advance the film by turning the winding crank with the handle folded out or in. You can also recock the shutter without advancing the film by pressing the program disc in the center of the crank when you start turning the crank. The magazine signal remains red. This is the procedure for making double and multiple exposures.
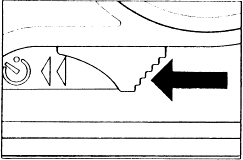
Figure 9-2 The prerelease control The lever underneath the winding crank prereleases the camera when pushed once toward the rear. It starts the self-timer when pushed a second time. The self-timer exposure can be stopped with a third push on the lever. On the 201 camera, the self-timer delay is set for a 10-second delay with a second push and with an additional push, a 2-second delay.
The easiest way to operate the crank without advancing the film is to press the program disc with your right index finger. Then start turning the crank with your right thumb. The disc needs to be pressed only when you start turning the crank, not for the complete turn.
MOTOR OPERATION
All 200 series camera models can be operated with a motor winder specifically made for these cameras. If only one picture is desired, you press the release for only a moment. When you keep the release pressed, sequences of images are recorded at the rate of 1.3 images per second until you remove your finger from the release or the roll of film is finished.
The motor is powered by five AA cells—alkaline or rechargeable. A set of fully charged batteries should provide about 3000 exposures at normal temperatures, or 1000 exposures with the rechargeable type.
The motor is held to the camera by means of a solid stainless steel coupling. It is shaped to serve as a second support for handheld photography, but you should never use the motor winder for carrying the camera. The motor winder is not designed for remote camera operation, and you must remove it from the camera to produce double exposures.
The electrical contacts on the camera and motor must be kept clean. A soft cloth can be used for cleaning. Do not use abrasives.
OPERATION OF FILM MAGAZINES
All cameras in the 200 series can be used with all Hasselblad film magazines. With E, ECC, and TCC magazines, the ISO film sensitivity set on the magazine is electronically transferred to the camera body. When you switch from one magazine to another having a different ISO setting, the change is made automatically when you change the magazine.
With A-type magazines or the instant film magazine, you manually program the ISO film sensitivity into the camera's electronic circuit by using the camera's Programming (Pr) mode. When you change from one A magazine to another A type having a different film sensitivity, you must manually program the new ISO value into the camera. This is not the case when you change from an E, ECC, or TCC magazine to an A type or vice versa. With the E, ECC, or TCC magazine on the camera, the electronic circuit is automatically set for the ISO set on the magazine, overriding any ISO value programmed into the camera. When you change to the A or instant film magazine, the electronic circuit automatically changes to the ISO value programmed into the camera. This design eliminates mistakes and simplifies the use of the camera, something that is especially helpful when you work with an instant film magazine. When the instant film or A-type film magazine is on the camera, a magazine symbol appears in the viewfinder, reminding you to program the film sensitivity into the camera.
SETTING THE SHUTTER SPEED
The 202, 203, and 205 cameras have a shutter speed ring that can be set manually to shutter speeds from 1 second to 1/2000 second (1/1000 second on discontinued 201 and 202 models), either at the engraved speeds or between them for ½ stops. The C setting beyond the 1-second engraving is used when exposures are made with the shutter in a lens. When you do so, you must keep the release pressed until the shutter in the lens closes, something you need to remember when using the longer speeds from ⅛ second to 1 second. The B setting is for longer time exposures. These cameras, however, offer better ways for doing this electronically, as discussed later in the chapter.
You can turn the shutter speed ring to C and B only after pressing the lens lock button. You must also press the lens lock button to move the shutter speed ring back to the normal speed range.
Setting the Speed Electronically
Although the shutter speeds can be set manually, that is not likely the approach for photography with 200 cameras, except for the discontinued 201. Instead, you should let the camera set the shutter speed electronically. This not only eliminates a time-consuming manual operation but also sets the shutter speed to a more precise accuracy of 1/12 f stop increment.
Long Exposure Times
The electronic shutter speed range is up to 90 seconds (see Figure 9-3). This is the recommended approach for long exposures because it does not require that you keep the release pressed manually.

Figure 9-3 The long exposure mode The long exposure mode is indicated on the viewfinder display by L. E. Exposure time here is 1 minute 30 seconds, or 90 seconds. The shutter speed ring was set at 1/90 second.
On the 203 and 205 cameras, you can have electronically controlled exposure times up to 34 minutes, but only in the manual (M) exposure mode. Set the mode selector to M, and press both the + and the - adjustment buttons simultaneously (see Figure 9-4). The electronic circuit changes into the long exposure mode (LE), which is indicated on the viewfinder display. In the LE mode, every manually set shutter speed is reversed; ½ second becomes 2 seconds,1/30 second will be 30 seconds, and 1/2000 second will be 2000 seconds, which is almost 34 minutes. To go back to the normal shutter speed range, press both adjustment buttons again simultaneously.
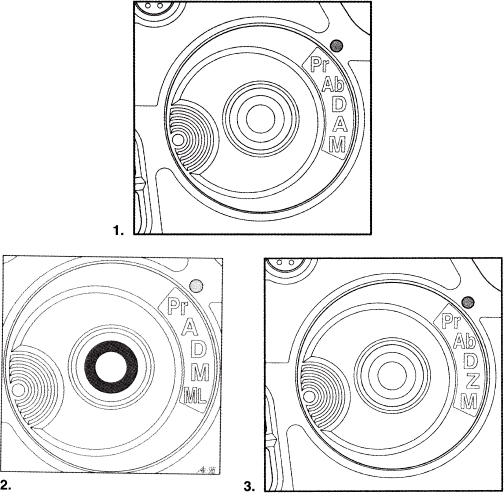
Figure 9-4 The exposure mode selector The 202,203, and 205 cameras can be distinguished by the mode selector: 203 model (1), 202 model (2), 205 model (3). The original 205TCC had A instead of Ab (no automatic bracketing), and the Pr and A settings were reversed, with A on top. The engravings mean the following: Pr = Programming, A = Automatic mode, Ab = Automatic mode with automatic bracketing, D = Differential mode, Z = Zone mode, M = Manual mode, and ML = Manual mode with locked shutter speed. The AE lock is in the center of the mode selector on all cameras.
OPERATION OF FE, CFE, AND TCC LENSES
The FE, CFE, and earlier TCC lenses without a shutter can be identified by the set of four Databus contact pins in the bayonet plate at the rear of the lens; these contact pins are used for electronic data transmission between the lens and the camera body. The contact surfaces of these pins are sensitive to contamination and should not be touched with your fingers. Attach the protective cover on the lens after removing the lens from the camera, and never set the lens on the unprotected bayonet plate.
Before you take a meter reading, decide on the lens aperture that you want to use, and set the lens manually to the desired value, either at one of the engraved figures or between two figures for ½ stops. The set value is now transferred into the camera body. You can take the meter reading either with the lens aperture fully open (for maximum screen brightness) or with the aperture manually closed down (as you might do for evaluating the image at the set aperture). The shutter speed, which sets itself automatically in all modes except M (Manual), adjusts automatically when you change the lens aperture setting.
Operation of CFE Shutter Lenses
CFE shutter lenses are used on all 200 cameras, with the lens shutter set to F if the focal plane shutter is used for the exposure. On all models except the 202, the exposure can also be made with the shutter in the lens, in which case the shutter is operated like a CF type. The aperture need not be closed down manually for the meter reading in either case. The shutter speed ring on the camera is set to C. In 202 model cameras, shutter lenses must be used with the focal plane shutter.
Operation of Other Shutter Lenses
All shutter lenses except CB types are set to F when the exposure is made with the focal plane shutter. The lens shutter is inoperative, and the viewfinder image returns instantly after the exposure. When the shutter in the lens is used with the focal plane shutter set to C, the finder image does not return until the film is advanced manually or by the motor winder. CB lenses cannot be used on the 202FA. On other 200 models the exposure with CB lenses must be made with the lens shutter.
When the focal plane shutter is used for the exposure, the shutter speeds are automatically set and are indicated in the viewfinder no matter what type of lens is used. When the shutter in the lens is used for the exposure, the shutter speed that provides correct exposure at the set aperture is also indicated on the display, together with the letters SET, reminding you that you must set this shutter speed manually on the lens.
C lenses should not be considered for use on any focal plane shutter camera.
Manually Closing Down the Aperture
With shutter lenses (except the CFE type), you must manually close down the lens aperture when you are taking the exposure meter reading, whether you use the lens or the camera shutter for the exposure. To eliminate having to close the aperture for every picture, you can simply leave the lens in the closed down position if the darker focusing image is not objectionable. The need to close down the aperture manually must nevertheless be considered the main disadvantage of using such lenses on 200 cameras.
You must also manually close down the aperture when you use accessories without the electronic connection, such as the old extension tubes or old teleconverters, with any lens—even the FE, CFE, and TCC types.
Setting the Shutter Speed on the 202FA Camera
The 202FA camera does not have the manual shutter speed ring at the front of the camera. The electronic circuit in the camera always sets the shutter speed even in the Manual mode.
Selecting the Shutter Type
In addition to the need to close down the lens aperture with some shutter lenses, your choice of shutter is likely decided by the type of photography you are doing. For flash photography, especially outdoors, the lens shutter gives you the possibility of shooting flash at all shutter speeds up to 1/500
second, an option that is extremely helpful on sunny days. You may also want to consider using the smooth-operating lens shutter when camera vibration is a possibility—for example, when you are using a lightweight tripod or working with long shutter speeds or long telephoto lenses.
THE METERING SYSTEM
The 202 and 203 camera models have a center area metering system, with the exposure based on the light reflected from a large center area. The 205 models have a spot meter, in which 100% of the meter reading is based on a center area that is approximately 1% of the total image area (Figure 9-5).
The light is always measured through the lens. The measuring angle therefore depends on the focal length of the lens on the camera and is about 4½ degrees with the spot meter and the standard 80mm lens. It becomes a 1-degree spot meter when the reading is made through a 350mm focal length lens. Regardless of the lens, all cameras show the metered area on the Acute Matte focusing screen.
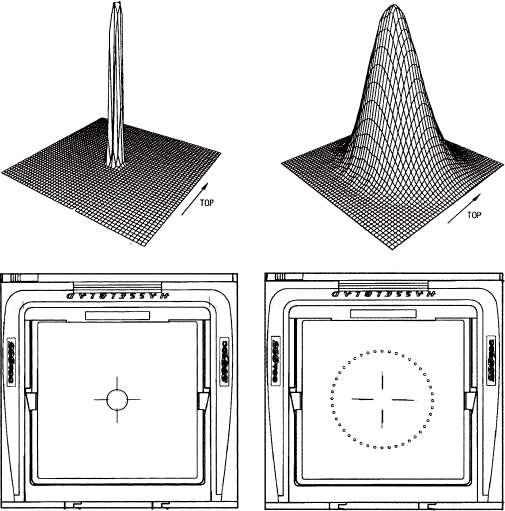
Figure 9-5 The metering area The 205 (left) has a precise spot meter that measures only a small center area. In the 202 and 203 models (right), approximately 75% of the light is measured within a 28mm center area and is also indicated on the screen. The measured areas are indicated on the focusing screens (bottom).
The entire metering system is within the camera body on all cameras (Figure 9-6). This design eliminates electronic contacts between camera and finder and allows you to use all the newer viewfinders that have display cutouts and are used on the other cameras in the V system. Chapter 12 Achieving Perfect Exposures, discusses the suggested selection and use of various metering systems.
Turning On the Metering System
You can turn on the camera's metering system by pressing the AE lock on the side of the camera (Figure 9-7), by pressing the front release halfway, or by pressing the prerelease control, but you can do so only if the darkslide is removed.
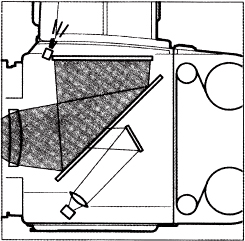
Figure 9-6 The metering system The metering cell is at the bottom of the camera and is completely protected from extraneous light.
The system and the display will turn on only when the shutter is cocked. Therefore, if the display does not come on, turn the winding crank. To save the battery, the metering system turns off automatically after about 15 seconds.
Using the AE Lock to Turn On the System
If you use the AE lock to turn on the system, any light value stored in the camera from the preceding shot is erased, and metering starts from scratch. This is the logical approach when you start taking pictures in new surroundings with a different light situation. Starting with the AE lock is also recommended when you are using shutter lenses in either mode because it eliminates possible mistakes if the lens settings should have been changed for some reason.
Using the Front Release or Prerelease to Turn On the System
When you turn on the system using the front release or the prerelease and with the mode selector set to D or Z, the light value from the preceding reading is maintained. The camera is still set to provide the same exposure as for the preceding shot. This is the ideal approach when you are continuing to take pictures in the same lighting situation. It eliminates the need to take a new reading for every shot.
With lenses having the electronic connection, you can change the aperture for the new picture, and the shutter speed automatically adjusts itself. With electronically coupled lenses, you can also change lenses and use the new lens at any aperture without the need to take a new meter reading. You can use this approach with shutter lenses if the lens settings have not been changed manually. Keep in mind that this applies only in the D and Z settings, a good reason to consider either one of these modes for your photography.
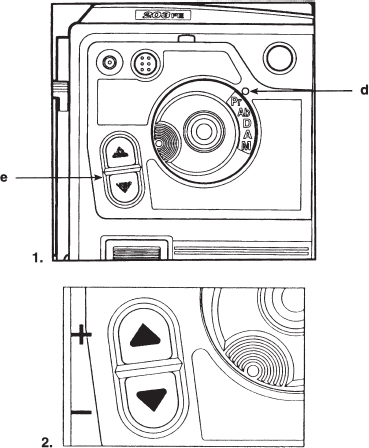
Figure 9-7 The operating controls The 200 cameras have a mode selector with engravings that differ according to model. 1. The desired mode is set opposite the index (d). In the center of the selector is the AE lock button, which is used to activate the metering system or to lock the shutter speed or light value. 2. The two adjustment buttons (e) are used to increase values (top button) or decrease them (bottom button).
In the A or Ab setting, the system always starts from scratch, even when turned on with the front release, unless a light value in the preceding reading was locked with the AE control. If the AE lock has been kept depressed for more than 16 seconds, the camera can be activated only by means of the release button or the prerelease lever.
Prereleasing the camera in any of the operating modes always locks and stores the exposure value that is present at the moment that the mirror was lifted, but the adjustment buttons can still be used to adjust that value.

Figure 9-8 Illuminating the display The view-finder display is illuminated by daylight coming through the window below the Hasselblad engraving at the front of the camera. In dim light, you can illuminate the display by pressing the button above the flash connectors. It turns off automatically after about 15 seconds.
THE VIEWFINDER DISPLAY
The viewfinder display comes on only when the shutter is cocked. With the darkslide inserted, it comes on when you press the AE lock. The exposure indications depend on the camera model, the lens type, and the setting of the mode selector. Figure 9-9 shows the viewfinder display information.
The shutter speed is always visible on the right side. If a small “s” appears following the figures, the shutter speed is in seconds. For example, 4s means 4 seconds. If there is no s, it means a fraction, such as ¼ second. With the shutter set to C, the letters SET also appear, indicating that you must set the indicated shutter speed on the lens. This was not the case with the original TCC model. With FE, CFE, or TCC lenses on the camera, you can see the preset lens aperture on the left by pressing the release halfway.
The setting of the mode selector dial is always shown with the same letters as on the selector dial, with the exception of Ab, which is indicated only as A. When you are using the 202, 203, and 205FCC models in the A or Ab mode, the letter L comes on when the AE lock or the front release is pressed, the finder display can be illuminated (see Figure 9-8).
Warning Signals
An incorrect camera setting that you should be aware of appears on the display as some kind of warning. The most important ones are illustrated in Figure 9-10.
A few other points are worth mentioning. You know when the shutter speed ring is set at B because the display does not come on nor does it stay on. You know when the ring is set to C as the display on newer cameras will say SET, indicating that the shutter speeds need to be set manually. The exposure in all newer 200 cameras is made at the speed determined by the metering system regardless of the setting of the shutter speed ring. On the original 205TCC cameras, the shutter speed flickers if the calculated value is longer than the value set on the shutter speed ring. To avoid this, leave the shutter speed ring at 1 second.

Figure 9-9 Viewfinder display information Various kinds of information appear on the viewfinder display.
PROGRAMMING
The Pr setting on the mode selector is not a metering function but rather is used to program certain values into the electronic circuit of the camera. Three values can be programmed into any 200 camera model (see Figure 9-12):

Figure 9-10 Warning signals in finder display The major warning signals that appear on the display are as follows:
a. Flashing red triangle indicates an improper camera setting.
b. Low battery power.
c. Shutter speed should be longer than is possible on camera.
d. Shutter speed should be shorter than is possible on camera.
e. Light value is below meter range.
f. Light value is above meter range.
g. Flash was too bright for correct exposure (displayed in dedicated flash mode only).
h. Flash was too low for correct exposure (displayed in dedicated flash mode only).
i. Measured area falls below zone 0.
j. Measured subject area falls above zone 10.
k. Measured area is beyond set contrast range.
• The ISO film sensitivity (works only with film magazines that do not have the electronic coupling)
• The self-timer delay
• A reduction (or increase) in the flash exposure of the dedicated flash system
On camera models that have automatic bracketing, you can program the Ab value, meaning the difference in exposure between the first and subsequent pictures. On the 205 models, you can also program a desired contrast range, and on the 203, a desired reference value.
Programming the Functions
To program any value into any camera model, you set the mode selector to PR and then repeatedly press the AE lock until the function that you want to program appears on the display. You set or change the programming values by pressing the plus or minus adjusting buttons. For example, pressing the + button changes the self-timer's delay from 10 to 12 to 14 seconds. Depressing the—adjustment control reduces the flash value from 0 to –⅓, –⅔, or –1 stop. Flash and automatic bracketing values are shown as fractions (Figure 9-11).
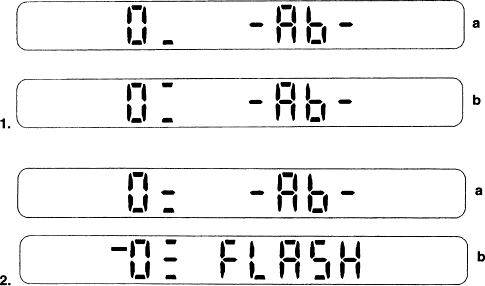
Figure 9-11 Fractional indications on viewfinder display 1. On the 202 and 203 models, fractional indications on the display are in ⅓ stop increments: ⅓ (a), ⅔ (b). 2. On the 205 camera, the indications are in ¼ stop increments: 2/4 or ½ (a), ¾ (b).
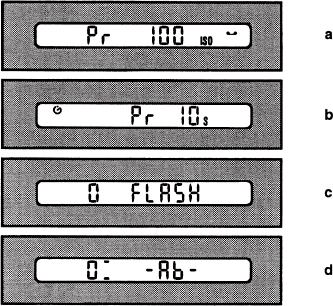
Figure 9-12 The programming display The major programmed values as they appear on the display are the film sensitivity (a), the self-timer delay (b), the flash adjustment (c), and the bracketing value (d).
After programming the desired values, set the mode selector to the exposure mode that you want to use. Should you forget to do so, the picture will be made in the automatic mode and will probably still be usable.
The programmed values can be changed at any time. All programmed values remain stored in the camera as long as the camera's battery is in good condition. When you remove the battery, all programmed functions return to the normal (default) values: 10 seconds for the self-timer; 100 ISO for the film sensitivity; 0 for the flash, the bracketing, and the reference values; and –9 to +9 for the contrast range.
THE METERING OPERATION
Before using the built-in metering system, you must decide and set the desired metering mode and set the desired lens aperture, no matter what type of lens or which shutter you use. With lenses that do not have the electronic connection, you must also manually close the aperture to the preset value for the meter reading.
Exposure Modes
Different exposure modes (Figure 9-4) do not change the metering area but give you different choices for evaluating and measuring the subject and for setting the lens for the correct exposure based on your desired approach. The selected exposure mode is set opposite the index and the change is shown on the display (Figure 9-14). The dial is designed to stay in a set position.
Automatic Exposure Mode
In the A or Ab mode, you take one picture, with the shutter speed determined automatically. With a motor winder attached, the camera keeps taking pictures until you take your finger off the release or until you run out of film. This is the procedure for sequence photography and for automatic bracketing with the control set to Ab, where the camera takes pictures at different exposures as programmed into the camera.
When you set the camera in the A or Ab mode, the meter always starts with a new reading of the new subject unless you locked the previous setting using the AE lock.
When the camera is moved to brighter or darker subject areas in the A or Ab mode, the shutter speed adjusts itself automatically and continuously, giving you the point-and-shoot approach when there is no time to take more careful meter readings. It works well with cameras, such as the 203, that have center area metering. I do not suggest using the automatic mode on the 205 camera because the small spot metering area may point at a subject area that provides completely wrong readings.
Although the shutter speed is set automatically, I suggest having a quick look at the shutter speed indicated in the viewfinder just so that you know what it is. This is especially recommended in handheld work, where you need to make certain that the shutter speed is short enough to eliminate or reduce problems of camera motion.
If you do not want the shutter speed to adjust itself to a new subject area, you can lock it by pressing the AE lock. This is automatically done in the D and Z modes.
Automatic Bracketing Mode
With the motor winder attached and the 203 or 205FCC camera set to PR, program the desired bracketing value—the difference in exposure between images—into the camera by using the adjustment buttons (see Figure 9-13). The numeral 0 changes to horizontal fraction lines, showing ⅓ f stops on the 203 and ¼ f stops on the 205. The maximum value is 1 stop. Set the mode control to AB.
If you want only three images, remove your finger from the release after the third take.
Differential and Zone Modes
The D mode and the Z mode work the same way. The difference is only in the viewfinder display. With the lens aperture preset, you point the metering area at a desired part of the subject and turn on the metering system using the AE lock. The shutter speed sets itself and also locks itself instantly. Figure 9-15 shows the finder display in the D mode; Figure 9-16 does the same for the Z setting.
This automatic locking is the real benefit and beauty of working in the Z or D mode. In both modes; the display shows the set shutter speed on the right. The display shows a 0 on the right in D, and zone 5 in Z, indicating in either case that the set shutter speed is correct for the measured area.
I recommend either of these two modes for most subjects and applications, except perhaps flash. They offer a wonderful, logical, fast, and convenient method of taking accurate meter readings no matter what the subject or the lighting might be. You know what subject area you are measuring, and the instant automatic locking of the shutter speed provides speed and convenience.
A good metering approach is to point the metering area at a part of the subject that has the average brightness (18% reflectance), use the AE lock to turn on the meter and set the shutter speed, and then recompose the image and take the picture. You can change the aperture if you like, and the shutter speed will adjust automatically. If you want to bracket exposures, do so by using the adjustment controls. If you want to take additional pictures in the same location without a change in exposure, use the front release to turn on the metering system.
If you move the camera in the D or Z mode into brighter or darker subject areas, the shutter speed does not change (because it is locked), but the 0 on the left then shows the difference in brightness between the first and second area; for example, +1 means that the new area is 1 stop brighter. In the Z mode, zone 5 changes to a higher or lower zone number. These differences are indicated in ⅓ f stop values on the 202 and 203, and in ¼ values on the 205.

Figure 9-13 Programming the Ab value In the automatic bracketing (Ab) mode (1), the Ab values are shown as ⅓ (a), ⅔ (b), and 1 f stop (c) on the 203 camera (2). They are programmed into the camera by pressing the + adjustment control with the mode selector set to PR (3). The values are ¼ stops on the 205.
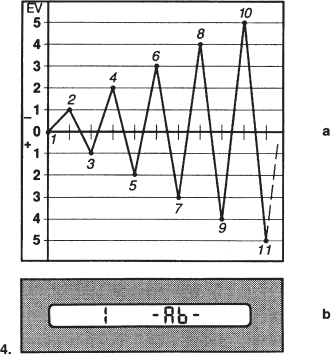
Figure 9-13 Programming the AB value (continued) With the automatic bracketing function programmed for 1 stop (4b) the first exposure is now made at the set exposure value, the second image is made at 1 EV lower (1 stop brighter), the third at 1 EV higher (1 stop darker), the fourth 2 stops brighter, the fifth 2 stops darker, and so on (4a).
Manual Exposure Mode
Although the M mode works beautifully, I see little advantage in using this setting because the D or Z setting works the same way but without having to adjust the shutter speed manually. The main advantage of the M mode is in letting you preselect the shutter speed, an option that can be desirable in flash work.
In the M mode, you can preset the aperture and then turn the shutter speed ring until the display shows 0. You can also preset the shutter speed and then change the aperture until you see 0 on the display.
The ML Exposure Mode on the 202 Camera
The mode selector on the 202 camera has an ML setting, which is the Manual mode just described but with the possibility of locking the shutter speed. This is an ideal setting for using the camera in the shutter priority mode, an approach that can work beautifully in flash location photography.
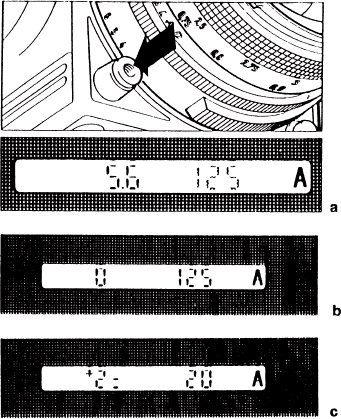
Figure 9-14 Display of shutter speed and aperture In the A, D, and Z modes, the display shows the selected mode, the shutter speed, and a 0 (zero) indicating the correct exposure for that area (b). The aperture is visible when you press the release halfway (a). You can change shutter speed by pressing an adjustment button. The display then shows the new shutter speed and the deviation (c), or the new zone.

Figure 9-15 Display in D mode In the D mode, the display shows 0 and the calculated shutter speed (a). When you move the camera to brighter or darker areas, the shutter speed does not change. The 0 changes to a deviation figure, indicating how much brighter or darker the new area is; in this case, the difference is –1½ (on the 205 model). Exposure and shutter speed are changed by using the adjustment buttons (c), and the deviation figure changes accordingly (b).
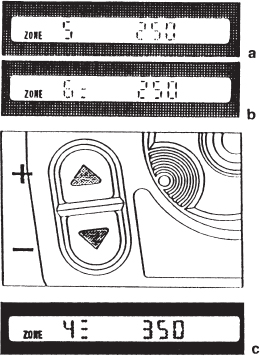
Figure 9-16 Display in Z mode In the Zone mode, the display shows zone 5 and the selected shutter speed (a). When the metering spot is moved to other areas, the shutter speed does not change, but the display shows the new zone:6½ (b). You can change the shutter speed and zone at any time using the adjustment buttons (c).
THE ZONE SYSTEM THEORY
The Zone mode, in combination with the precise spot meter in the 205 camera, is the ideal metering system for black and white photographers working with Ansel Adams's zone system. There is no need to make calculations nor to transfer exposure figures into zone values. The zone value for any measured area appears on the viewfinder display. You can change it at any time using the adjustment buttons.
An important aspect of Adams's zone system theory is the concept of adjusting exposure and film development so that all the resulting black and white negatives can be printed on standard-grade paper no matter what the contrast range of the scene might have been. In principle, low-contrast scenes are given less exposure but longer development time, whereas a subject that has a high contrast is exposed longer and developed for a shorter time. Adams referred to these adjustments as expansion (increasing contrast) and contraction (lowering contrast), and he defined the adjustments more accurately with the so-called N– (for contraction) and N+ (for expansion). For details, consult Adams's or other zone system books.
The Zone System Compensation Dial
The ECC (TCC) film magazines have a dial to program these compensations, from –4 to +3, directly into the camera. The exposure is changed automatically based on these adjustments. To eliminate mistakes the contrast dial functions only in the Zone mode. The adjustment does not show on the viewfinder display, so check the setting on the magazine.
Keeping Track of the Contrast Range
When working with the 205 in the D mode, you can program into the camera a desired maximum contrast range. The normal value programmed into the camera is –9 to +9 f stops, a range that is probably greater than anything you need in your photography. You can program a narrower range into the camera—for example, from –2 EV to +3 EV—by pressing the minus adjustment button until you see the desired minus value. To set the + value, do the same with the + adjustment button. If the programmed values are exceeded during subject evaluation, the DIFF display flickers.
The Reference Mode in the 203
With the 203 set to the Manual mode, it is possible to program a reference value into the camera that will warn you when the light or the subject brightness changes beyond a desirable level. To take advantage of the reference mode, you must turn on the meter using the front release, not the AE lock button.
ELECTRONIC FLASH
All 200 series cameras have a dedicated flash system that measures the light from a 40mm center area of the film plane. The dedicated flash is operated in the same way as with the other Hasselblad cameras. All cameras can also be used in the nondedicated fashion with any portable or studio flash units. With the camera's focal plane shutter, flash can be used at shutter speeds up to 1/90 second. If the shutter is set at shorter speeds, the flash does not fire, the exposure is made automatically at 1/90 second, or you receive a warning, depending on the camera model. With the shutter in a lens, all shutter speeds up to 1/500 second can be used.
The Flash Connections
For dedicated flash with the focal plane shutter, the six-pin cable from the flash unit or dedicated flash accessory is connected to the six-pin socket on the side of the camera. No other connection is necessary. When you are using nondedicated units with the focal plane shutter, the sync cable goes into the PC socket next to it. When dedicated or nondedicated units are used with the shutter in a lens, the sync cable goes into the PC socket on the lens. For dedicated use, the six-pin cable must also be connected to the camera body.
Flash and Exposure Modes
Any type of flash can be used in all the exposure modes (A,Ab, D, Z, and M). I do not suggest using the A or Ab mode for flash work in dark indoors because the camera will set itself for a undesirably long shutter speed. In the D, Z, and M modes you can photograph at any desired shutter speed, perhaps at 1/30 second to pick up more of the existing light. You can also consider using the M mode for location flash photography because it lets you preset the shutter speed at a specific value, 1/90 second or longer.

Figure 9-17 Flash exposure adjustments The desired flash exposure is programmed into the camera at the Pr setting (a) and indicated on the viewfinder display. A 0 means that the flash exposure is normal and equal to the existing light (b). The display in (c) indicates a flash exposure reduction of 2⅔ f stops on the 202 or 203 camera.
Chapter 17,Flash Photography with Hasselblad Cameras, has more details on outdoor flash photography and the technique of combining flash and existing light.
Flash Exposure
On all 200 series cameras, the desired exposure for the flash is adjustable within a wide range and is completely independent of the lens settings (see Figure 9-17). On the 201 model, you make the adjustment using the ISO dial on the side of the camera, as on the 500 models. On cameras with built-in metering systems, the desired value for the flash exposure is electronically programmed into the camera. Press the AE lock repeatedly until FLASH appears on the display. The values + or - are then programmed with the adjustment buttons. Recommended adjustments are mentioned in Chapter 17.
Flash with the Original 205TCC Camera
On the 205FCC and the 202 and 203 cameras, the exposure is always made at the shutter speed indicated on the viewfinder display, even when dedicated flash is used, not so on the original 205TCC model. When this camera is used in dedicated flash fashion, the camera uses the shutter speed that is set physically on the shutter speed ring, not the speed set by the camera's microprocessor and shown on the viewfinder display. The simplest way to overcome this problem is to use the Manual Exposure mode and set the shutter speed manually at a figure not higher than 1/90 second.
When the camera is set to C for use with the lens shutter, the shutter speed and the letters SET do not appear on the display.