
10
Selection and Use of V System Film Magazines
V SYSTEM MAGAZINES
All Hasselblad rollfilm magazines in the V system are of the same design and are used in the same way. Each magazine consists of three parts: the shell, the darkslide, and the insert that holds the spools. Magazine shells have serial numbers on the plate that attaches to the camera; film inserts have a three-digit number engraved between the two film spools. These three numbers should correspond to the last three digits on the magazine shell. For example, if the magazine number is VC482232, the insert with the number 232 belongs to it.
This matching system ensures the best possible film flatness. Hasselblad V system film magazines have small rollers going across the top and bottom of the opening on the magazine shell and larger rollers on the insert. The interaction and alignment between these rollers in the magazine shell and insert are adjusted in the factory on every magazine (Figure 10-5). Matched numbers ensure the best possible performance. If inserts are switched, the magazine still works, but spacing between images may not be as even and the film may not be as flat. If you work with more than one magazine, check the numbers once in a while.
HASSELBLAD ROLLFILM MAGAZINES
Magazine Type
All the latest Hasselblad rollfilm magazines have a darkslide holder for storing the darkslide while pictures are taken (Figure 10-1). The magazines are otherwise identical to older types. The darkslide holder should not be added to older magazines.
Magazines come in three types: the E type, the ECC type, and the A type.

Figure 10-1 Hasselblad rollfilm magazines 1 and 4. All newer magazines have a dark slide holder at the rear. 2. E magazines have an ISO adjustment dial at the top. 3. It can be set for ISO 12 to 6400. 4. ECC magazines have the ISO dial on top and a contrast adjustment control at the bottom. 5. The adjustments are from -4 to +3 based on Ansel Adams's recommendations.
E-Type Magazines The E types have an ISO dial and electronic contacts to transfer the ISO sensitivity to the 200 cameras that have a built-in exposure meter.
ECC Magazines The ECC magazines (formerly called TCC) are for use mainly in combination with the spot meter in the 205 camera and also have the ISO dial and electronic contacts. In addition, they have a dial for programming image contrast adjustments based on Ansel Adams's zone system theory.
E and ECC magazines are used like any other magazine on cameras that don't have a metering system.
A-Type Magazines A-type magazines do not have adjustment controls and are mainly for use with cameras that don't have a metering system. A-type magazines can also be used on cameras that have a metering system; in that case the ISO film sensitivity must be programmed into the camera.

Figure 10-2 The rollfilm magazine components.
1. Darkslide
2. Film load indicator
3. Film holder key
4. Darkslide holder
5. Film tab holder
6. Film winding crank
7. Frame counter
8. Film advance indicator
9. Take-up spool
10. Take-up knob
11. Film clamp
12. Film insert number
13. Spool clamp bar
14. Supply spool
15. Film load index
Magazines for 120 Rollfilm
All magazine types are available as “12” versions—A12, E12, E12CC—made for 12 images in the 2¼-in. (6 × 6cm) size on 120 rollfilm. Some magazine types are also available in the “16” version—A16, E16—made for 16 images in the 6 × 4.5cm format on 120 rollfilm.
The 16 magazines are supplied with a transparent mask to show the rectangular area on the focusing screen. The checked screens can be used instead of these masks because the lines engraved on the screen also correspond to the 16 format.
Magazines That Are No Longer Available
The film magazine 16S, made for the Superslide format, is no longer made because 35mm projectors cause vignetting in projection.
The magazine A12V produced 12 images in the vertical format without the need for turning the camera. The same results can be obtained today with standard 12 or 24 magazines by placing a mask at the rear of some camera bodies.
For a short time, Hasselblad also made a magazine producing 24 × 56mm panoramic images on 35mm film. Today, the XPan camera provides a better solution for panoramic photography.
All rollfilm magazines made before 1969 were of the nonautomatic type. They can be distinguished by a chrome winding key on the side (possibly covered by a nonfoldable accessory crank) instead of the foldable crank and a round cover at the rear engraved with film speeds and types. The cover can be opened to let you see the paper backing of the 120 rollfilm. This is necessary because the beginning of the film must be moved through the magazine until #1 is visible through this window.
Magazines for 220 Rollfilm
Some film magazine types are also made for 220 rollfilm and are known as “24” because they produce 24 images in the 2¼-in. (6 × 6cm) format on 220 rollfilm, or as “32” when made for the 6 × 4.5cm format (now discontinued). The 220 rollfilm has the same dimensions as the 120, and both types are supplied on identical spools. Instead of paper backing along the entire roll of film, the 220 type has only short paper leaders and trailers at the beginning and end of the roll to protect the film when it is loaded and unloaded. Twice as much film can be put on the same size roll and into the same size magazine, giving twice as many images on one roll of film; that is the main advantage of 220 rollfilm. Using 220 film reduces the number of film or magazine changes, but the choice of film is greatly reduced, and 220 film is available only in professional camera outlets.
The 220 rollfilm magazines differ from the 120 types in the gear mechanism, the springs on the pressure plate, and the roller adjustment. The 220 film is only about half as thick as the combined thickness of film and paper on the 120 type, and therefore the rollers and the pressure plates must be adjusted differently.
Using 120 Film in 220 Magazines Because the rollers and the pressure plates in 120 and 220 film magazines are adjusted to produce best image sharpness on the film only for which they are made, it is highly recommended that you use each magazine with the film only for which it is made. In an emergency, the following options exist:
• The 120 rollfilm can be used in a 24 magazine type. The spacing, however, becomes wide toward the end of the roll, so you end up with only about 11 images.
• The 220 film can be used in an old, nonautomatic magazine after the magazine is made light tight by closing the opening at the rear. Image spacing and the number of images, however, are questionable.
• The 220 film cannot be used in an automatic magazine.
USING MAGAZINES
Care of Magazines
Before you drop the loaded holder into the magazine, look inside the shell to ascertain that there are no leftover pieces of paper from a previous roll. Before you place the film on the holder, always completely remove the paper that is used to tape the beginning of a roll. Never leave any loose paper on a roll of film. It can easily come off and possibly lodge itself in the film gate.
Remove any dust and dirt particles in the magazine because they can easily scratch the film. Keep the openings of the connecting gear and pin free from any dust that may enter the magazine's winding mechanism.
Film Identification
When using different types of film, you want to know what type is in which magazine. As an easy way to keep track, simply place the top from the film box underneath the black cover disc. Earlier magazines had a dial that could be set for the film sensitivity, but current models do not.
Operating Signals
Whenever the insert, with or without film, is removed from the magazine shell, the frame counter jumps back, and the operating signal in the magazine becomes black. The spring-loaded device that keeps the film tight on the loaded spool also activates the film consumption indicator on the roll holder lock. With a full roll, the indicator shows all white. As the film is used, more and more red shows in the circular window (Figure 10-3).
Film Inserts
The film inserts made since 1985 are somewhat different from the earlier types. They have a single, solid stainless steel spool-holder arm on a spring mechanism, instead of separate arms for feed and take-up spools. The magazines with new inserts start at number 3250869 for magazine A12 and at 3524656 for magazine A24. The latest inserts (made since 2001) also have a second starting index, which you use when loading the somewhat thicker Ilford films. Place the arrow opposite this new index before the insert with Ilford film goes into the magazine.
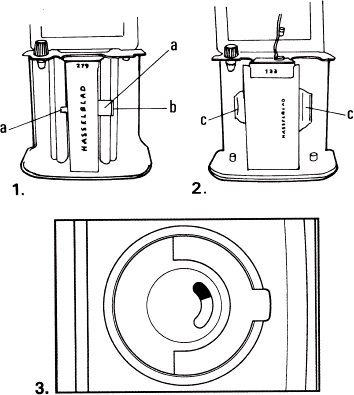
Figure 10-3 The film holder—film insert The new film inserts (1) have in the center portion a spring-loaded device (a) that keeps the film tight on both the feed and the take-up spools. The roller (b) on the feed side rests against the film to actuate the film consumption signal. Two chrome strips (c) served the same purpose on the older film inserts (2). A film consumption signal (3) that is partially red and chrome indicates that a partially exposed roll of film is in the magazine.
Loading the Magazine
All rollfilm magazines are loaded in identical fashion. The paper protects the film from daylight, but it is best to avoid exposing it to direct sunlight whenever possible.
The film magazines can be loaded while attached to the camera or off the camera; in the latter case the darkslide must be in the magazine. It is easiest to load the magazine when it is attached to the camera without the darkslide inserted.
Film loading is described step by step in the instruction manual. Let me repeat here the most important points to keep in mind, also illustrated in Figure 10-4.
1. The take-up side on the insert is easily distinguished by the knurled knob.
2. Make certain the film comes off the spool so that the black side is outermost; the emulsion faces the lens. The film needs to curl the opposite way from the way it is wound on the spool.
3. Make certain the film rides under the side guide, not over it. I find it easiest to press my thumb against the paper next to the guide to keep it under the guide. It eliminates the need for using the insert lock.
4. For proper spacing, the black arrow on the paper must be placed opposite the red triangle (the Ilford index for Ilford films on the latest magazines). Most films have only one arrow going across the paper backing. Some 220 films, however, have a black dotted line followed by an unbroken black arrow a few inches later. Advance the film to the line with an arrow.

Figure 10-4 Important film loading steps for the automatic magazines 3. The take-up spool is identified by the knurled knob. Place the film on the other side. 4. Make certain the film unwinds the opposite way from the way it is wound on the spool, with the black side outermost, and that it is placed underneath the side guide. 5. Attach it in the same way on the take-up spool. 6. Use the knurled knob on the take-up spool to move the film until the black arrow on the film is opposite the triangular index.

Figure 10-5 Film flatness A. The Hasselblad film magazines have small rollers (b) in the shell, which are factory aligned to be at the exact distance and perfectly parallel to the large rollers (a) in the film insert. This interaction ensures maximum film flatness and is the reason every film insert must be matched to the shell. B. Magazines on other medium-format cameras do not have these rollers, possibly making the film buckle just ahead of the take-up roller.
5. Before placing the insert into the magazine, ascertain once more that the edge of the film is underneath the side guide.
6. Make certain to turn the magazine's winding crank until it stops before you start to take pictures; otherwise, you will lose the first two or three pictures and the spacing will be uneven. The film winding crank brings the number 1 automatically into the film counter window. At this point, the crank is locked and cannot be turned again until after the first exposure. Thereafter, the film winding crank is unlocked but should not be touched until the end of the film.
Unloading the Film
After the last picture on a roll has been taken, the camera's winding crank or knob can be turned as usual, so you really do not know that you have reached the end of the roll until you try to take the next picture. I have found that the turning of the crank feels a little different and the sound of the moving film is a little different when moving to the last frame (from 11 to 12 on a 120 magazine). You can become accustomed to the difference and recognize when the film is moved to the last frame without checking the frame counter.
At the end of a roll of film, turn the film winding crank again to pull the paper trailer through the magazine and around the exposed roll of film so that it can be removed in daylight. You know when the paper has gone through: It becomes easier to turn the crank.
It is advisable to wind the paper through immediately at the end of the film, even if the magazine is not to be reloaded immediately. You may forget that you did not advance the film to the end, and pulling out the insert at that point ruins at least the last two shots.
Spacing
With the film properly loaded, all Hasselblad magazines should space images pretty evenly from the first to the last picture so that the space between images never exceeds about 6 mm and is always wide enough to make a cut. If spacing is not correct, consult the Hasselblad service center.
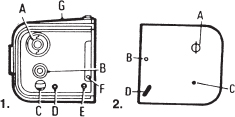
Figure 10-6 Film magazine 70 1. On the side of the magazine are the film transport key (A); the film counter setting button (B); the film counter (C); the signal indicating whether the magazine is loaded (white), not loaded, or at the end of film (red) (D); the operating signal (E); the film plane mark (F); and a panel for notes (G). 2. Without a cassette holder, the inside of the magazine can be seen with the film winding shaft (A); the slotted pin (B), which locks the cassette holder to the magazine; the pin (C) connecting to the exposure counter; and the feeler lever (D), which connects to the film load indicator. The camera can operate only when the lever is pushed down by the film or manually.
FILM MAGAZINE 70
Film magazine 70 (see Figure 10-6) is made for 70mm film loaded into cassettes, with one cassette providing about 70 images in the 2¼ square format. Magazine 70 has one operating signal near the film plane indicator, and this signal shows whether the film has been advanced. A second one near the exposure counter shows whether the magazine is loaded with film. A camera equipped with film magazine 70 operates only with film in the magazine or when the feeler lever is taped in the down position. (This should be done only for demonstration purposes.) If there is no film in the magazine, the release is locked.
You advance the film to 1 using a foldable winding key. The magazine has an exposure counter numbered from 1 to 73 and another—an engraved circle with a knurled center knob—above the counter window. This summarizing counter can easily be seen from a distance. Each engraved dot on the circle corresponds to 10 images.
Both counters return to the original position—to 0 or to the red line— when the cassette holder is removed. You can manually reset both counters by turning the center knurled disc with your thumb. The counters are helpful when you are removing a partially exposed film. For instance, if you want to remove and develop a film with 23 images, wind the exposed film completely inside the take-up cassette by turning the film winding crank three full turns. Remove the cassette holder and cut the film. Remove the exposed film from the cassette in a darkroom. Reload the magazine in the usual fashion, and wind the film to 1. Now reset the exposure counters manually to the number of images that have been removed, adding 4 for the probable amount of film that has been lost in cutting. If 23 exposures have been made, set the counters to 27. Film loading is shown in Figure 10-7.

Figure 10-7 Loading the 70mm magazine The cassette holder is removed from the magazine shell in the same way as the rollfilm holders in other magazines. Open the cassette holding arms (1A). Place the feed cassette (2B) on the side of the magazine without the winding pin, making sure that it unwinds in the correct direction. Close the cassette holding arm. Guide the film around the sprocket wheel (2D), over the pressure plate, and under the film clamp (3A). Attach the take-up cassette (2A) to the other side of the magazine. If the film runs smoothly, close the holding arm. Place the cassette holder in the magazine. Turn the film winding key until it stops (the counter should show 1).
The 70mm Film
The 70mm film comes either unperforated or perforated in various ways. The Hasselblad magazine 70 requires the type 2 perforated type. Some film is available in daylight loading cassettes. Other emulsions are purchased in bulk for loading your own cassettes in a darkroom, a process that is like loading a 35mm cassette.
Although 70mm film offers the benefits of a large number of exposures per roll, 70mm film is available only in very few emulsions and frequently on special order only. Also, be sure to use a laboratory that is equipped to process the 15-foot lengths without cutting.
OTHER FILM MAGAZINES
Magazine 70/100–200
This magazine, which may be available by special order, has the same dimensions as magazine 70 but is designed for use of 70mm film on spools, not cassettes. Depending on the film thickness, this magazine provides up to 200 exposures but requires darkroom loading.
Magazine 70/500
This large film magazine, which could provide up to 500 exposures on 70mm film, was available for a number of years before 1980.
Sheet Film Holder and Adapter
The sheet film adapter has been discontinued, mainly because sheet film in the proper size is no longer available. It was necessary to use 4 × 5 sheet film cut to the proper size in a darkroom.
The Hasselblad Data-Recording System
The data-recording magazines that are in use in the American space program can record up to 32 characters directly on the edge of the film when used on a motor-driven camera model. Obtain further details from the Hasselblad distributor.
USE AND APPLICATION OF THE INSTANT FILM MAGAZINES
The instant film magazine allows you to see the image that will be recorded on the film before you shoot, thereby giving you the opportunity to make changes in the camera or lighting setup. The instant film magazines encourage experimentation, eliminate guesswork, save on film and laboratory costs, and serve as a great teaching tool.
Instant film can also show things you cannot see on the focusing screen, such as the result of camera-made double exposures, the lighting ratio between flash and ambient light, and the effect of multiple strobe use. It also lets you see the amount of blur when you zoom, when you move the camera, or when you photograph moving subjects at slow shutter speeds.
Checking Exposure
Checking exposure is especially valuable when you are working under unusual lighting situations or are combining different light sources. It is also useful in photomicrography or high-magnification photography.
The exposure latitude of instant film is not as wide as with regular negative or transparency films, and lens settings are more critical. This is actually an advantage because it means that a good instant film exposure is probably a perfect exposure on the other films.
Keep in mind that a good exposure on instant film means a correct exposure for transparencies that need to be exposed for the lighted areas. The results are correct for negative materials when the instant print shows some details in the shade.
Instant Film Magazines for Hasselblad Cameras
The current magazine is made for the professional films in the 100 and 600 series, which are the preferred emulsions in professional photography. The magazine can be used on all current Hasselblad models and also in combination with the 45-degree prism finders, but not in combination with the PM 90 and PME 90 viewfinders.
The discontinued magazine 80 was made for the amateur films Polacolor 88 and black and white 87. This magazine cannot be used on focal plane shutter or Superwide camera models.
The Purpose of the Glass Plate
The Hasselblad instant film magazines have glass plates in front of the film to move the image to the exact film plane distance (see Figure 10-8). With the Hasselblad instant film magazines protruding at the top of the camera, the camera's magazine hooks prevent the film plane from being at the same position as on other film magazines. It is slightly farther back. The glass plate restores the image distance.
Because the glass plate is right in front of the film plane, dirt and dust particles will show up in the image. This is not a serious problem on test shots, but it will be if the magazine is used with negative/positive film. For this reason, keep it clean. Being glass, it can be cleaned like lens surfaces.
The Polaroid magazines attach to Hasselblad camera bodies like the other film magazines and are removed in the same way, with the darkslide inserted (see Figure 10-9).

Figure 10-8 The purpose of the glass plate The design of the instant film pack makes it impossible to bring the film plane at the same distance as in other Hasselblad magazines. The image formed by the lens falls at x, slightly in front of the instant film plane (y). The glass plate lengthens the distance and moves the image from x to y so that it is formed exactly where the film is and where it produces the sharpest possible image.

Figure 10-9 Using the instant film magazine To attach and remove the instant magazine, press the catch (D). To load the magazine, open the lid by releasing the clamp (A). With the film toward the glass plate, push the file pack at an angle completely under the flange (B) on the hinged end of the magazine; push it down so that it snaps into place. Close the lid, making certain that all the white tabs are free. Pull the black safety cover all the way out of the camera. The film pack is ready for the first picture.

Figure 10-10 Using the instant film pack After exposure, grasp the center of the white tab (E), and pull it all the way out at a moderate and constant speed without stopping. Developing time starts now. The film magazine is ready for the next exposure. The darkslide can be stored in the holder (F). The developer spreader should be cleaned frequently with a moist cloth. To remove it, lift the two rear arms (H) diagonally upward at the same time. Press the arms down simultaneously when you replace the spreader.
Adjusting for the Different Film Sensitivities
In most cases, the negative or transparency film used for the final image will have a different exposure index than the instant film used for the test. You can match the two by changing either the aperture or the shutter speed or by using a neutral density filter.
If you use a neutral density filter, you can make the test shot and the final image at the same aperture and shutter speed, with both pictures having identical depth of field. Use the neutral density filter for the test shot if the instant film has a higher ISO value, and use it for the final picture when the negative or transparency film has a higher ISO value. If one of the films has twice the ISO of the other (50 versus 100 ISO, or a 3 DIN value difference), use a filter with a 0.3 density. If one of the films has an ISO value three times as high (100 versus 800 ISO, or a 9 DIN value difference), use a filter with a 0.9 density for the faster film.
Using the Instant Film Magazine on Cameras with a Built-In Metering System
The Hasselblad instant film magazines do not have the electronic connections to transfer the ISO sensitivity into the camera body. You must program the film sensitivity of the instant film into the camera's microcomputer using the Pr setting on the mode selector.
When E-, ECC-, or TCC-type magazines are used for the final film, it is not necessary to make any adjustment in the ISO when you switch magazines. The metering system switches automatically from the ISO value programmed into the camera for the instant film to the ISO value set on the film magazine for the negative or transparency film. If the magazine for the final film is an A type without the electronic connections, the ISO value must be reprogrammed with every change of magazine.
Care of the Instant Film and Magazine
When you handle film packs, do not press against the center of the pack because this may damage the film. Hold the film pack by its edges.
The caustic jelly that may be in the film pack should be wiped off your skin immediately and washed off as soon as possible. Keep the discarded materials out of the reach of children and animals and out of contact with clothing and furniture. Clean the rollers of the developer spreader in the magazine, preferably after every film pack. Do not touch the face of the instant print immediately after separation. Let it dry and come to a hard gloss.