6
Operating V System Cameras
THE BASIC CAMERA OPERATION
On all Hasselblad V system cameras without a built-in motor or a motor drive accessory, the film is advanced and the shutter recocked by a full turn of the winding crank or knob. On the motor-driven EL models set to the normal 0 operating position, or on any of the other 500, 200, and 2000 camera models equipped with a motor winder, the film is advanced and the shutter recocked automatically after the picture has been taken.
The Operating Signals
Hasselblad camera bodies interlock with the lenses and magazines so that they can be released only when all the settings are correct. The bodies or magazines have signals that show whether there is film in the camera, how many frames have been exposed, and whether the film has been advanced (see Figure 6-1). The frame counter is coupled to the transport mechanism in the magazine and works with or without film. It therefore cannot be used to determine whether the magazine is loaded with film.
SETTING APERTURE AND SHUTTER SPEEDS
CFi and CFE Lenses
On CF, CFi, and CFE shutter lenses, the aperture and the shutter speed ring rotate separately. You set and change the aperture, the shutter speed, or the EV value by turning either ring. To interlock the two rings, you press the cross coupling button on the aperture ring.
The shutter speed ring stops at B and does not automatically move into the F position, which is used when the focal plane shutter is used to make the exposure. To move the ring to F or out of F, you must press the locking button, which is green on CF lenses and orange on the CFi and CFE types. The aperture can be set at the engraved figures or between for 1/2 stop settings. The shutter speed ring must be set at the engraved figures.

Figure 6-1 The operating signals 1. The film counter in the magazine (1) shows how far the film has been advanced. The operating signal in the magazine (2) is white when the film has been advanced, red when the film has not been advanced. Older cameras also had a signal in the camera body (3), which showed white when the shutter was cocked, red when uncocked. 2. In the old nonautomatic magazine, you see the paper backing of the film when the film indicator window is opened. 3. When an automatic magazine (A) is newly loaded, the film consumption indicator is all chrome (1); when there is no film in the magazine or the roll of film is at the end, the indicator is all red (B). A partially exposed film is indicated by an intermediate red/chrome position (C).
CB Lenses
The operation of the CB lenses is identical to the CFi types except that the CB lenses do not have the F setting. They can be used on focal plane shutter cameras (except the 202FA) if the shutter in the lens is used for the exposure.
Figure 6-2 shows the lens controls on the CFi, CFE, and CB lenses.
CF Lenses
Some of the operating controls, such as the manual stop down, the interlock, and the F position lock, are slightly different on the CF lenses but are operated in exactly the same fashion. CF lenses do not have the locking arrangements on the flash socket, which is one of the distinguishing marks between CF lenses and CFI, CB, and CFE types. Figure 6-3 shows the operation of CB and CF type lenses.
FE, TCC, and F Non-shutter Lenses
FE and TCC lenses have the electronic coupling for the metering system; the F lenses do not. Operating aperture and shutter speed controls are identical. The shutter speed ring, which is part of the camera body, can be set at any of the engraved shutter speeds or halfway between them. For example, between 500 and 1000, the shutter speed is 1/750 second. The shortest flash sync speed of 1/90 second is indicated by X. You set the aperture by turning the ring at the rear of the lens at the engraved figures or between for 1/2 stop settings. On discontinued 2000/2003 cameras, you can couple the aperture and the shutter speed ring by pressing the cross coupling button on the aperture ring. Figure 6-4 shows operating controls on nonshutter lenses.

Figure 6-2 CFi, CFE, and CB lens controls.
1. External and internal bayonet mount
2. Shutter speed ring
3. Warning mark
4. Shutter speed scale
5. Manual stop down control
6. Flash terminal with lock
7. Focusing ring
8. Lens bayonet plate
9. EV scale
10. Aperture/shutter speed interlock
11. Aperture ring and scale
12. Depth-of-field scale
13. Index
14. Infrared focusing index
15. Distance scale
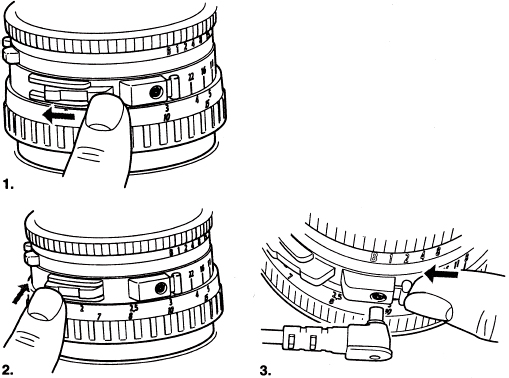
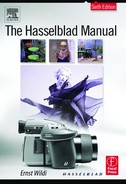
Figure 6-3 Operating CF/CB lens controls 1. To close the aperture down manually, slide the knob in the direction of the arrow until it clicks into position. 2. To return the aperture to the fully open position, press the lower part of the control. 3. To attach a flash cord, press the locking button. When the button is released, the cord will be locked in the flash socket. To remove the cord, press the lock button again.

Figure 6-4 FE,TCC, and F lens controls.
1. Flash outlet in camera body for focal plane shutter
2. Aperture scale
3. Shutter speed ring and scale on camera (not on 202FA)
4. Bayonet mount for lens shade
5. EV scale
6. Depth-of-field indicator
7. Distance scale
8. Focusing ring
9. Lock for bayonet lens mount
10. Index for EV scale
11. Manual stop down control
12. Inside bayonet mount for filters
13. Grip ring for attaching and removing lenses
14. Index for aperture
15. Index for shutter speed
16. Shutter speed lock (only on 2000/2003 cameras)
17. Button for cross coupling of aperture and shutter speed (does not work on 200 series cameras)
18. Grip for aperture and EV setting
Operating C Lenses
On old C-type shutter lenses shown in Figure 6-5, the aperture and shutter speed rings are interlocked. Rotating the knurled ring in front of the shutter speed engravings changes shutter speed and aperture. You can set the aperture and shutter speed rings separately after pressing the cross coupling lever toward the camera body with your right hand. C lenses can be set at the engraved apertures or halfway between. Shutter speeds can be set only at the engraved figures.
The Self-Timer in C lenses
With the self-timer in C lenses, the exposure is made approximately eight seconds after the release is pressed. You make self-timer exposures by setting the flash synchronization lever to V. You cannot move the lever without releasing its lock, something that requires two hands. This difficulty is deliberate.
The rear curtain of the SLR models must be open eight seconds after the release is pressed, so the release lock on the camera or cable release must be used. The flash synchronization lever automatically jumps back to X after each exposure, so it must be reset to V if another self-timer exposure is made. The self-timer position V is synchronized for electronic flash.

1. Synchronizing lever
2. Flash outlet
3. Aperture scale
4. Shutter speed scale
5. Bayonet mount for lens shade
6. EV scale
7. Shutter speed ring
8. Aperture and shutter speed interlock
9. Depth-of-field indicator
10. Distance scale 11. Focusing mount
12. Lock for sync lever
13. Lock on camera for bayonet lens mount
14. Index for EV scale
15. Manual stop down control
16. Inside bayonet mount for filters
17. Index for aperture and shutter speed
Using Long Shutter Speeds
When shutter lenses are set to shutter speeds 1, 2, and 4 (corresponding to 1-second, 1/2-second, and 1/4-second shutter speeds), you must keep the camera release pressed until you hear the sound of the shutter closing; otherwise, the rear curtain closes when you remove your finger from the release and before the exposure cycle is finished. You need to take the same precaution on the focal plane shutter camera models when the exposure is made with the shutter in the lens.
Time Exposures
On 200 series cameras, electronically controlled long exposures up to 90 seconds can be made with the focal plane shutter in any exposure mode. For even longer exposures—up to 34 minutes—you can use the focal plane shutter in the Manual Exposure mode.
The longest adjustable speed in all V system shutter lenses is 1 second. For longer speeds, you set the shutter in the lens to B, where it stays open as long as the release on the camera or the cable release is pressed. Cameras or lenses set at B are still flash synchronized.
The old C lenses have green figures (4 to 125) on the left side of B, simply indicating how long the exposure time must be at the engraved aperture setting. To obtain shutter speeds longer than 1 second, you set the shutter speed ring at B and the desired aperture opposite B and the index. Press the release for the indicated number of seconds.
DISTANCE SETTING
You can make the distance setting on any lens by focusing on the main subject, or you can base it on the desired depth of field. All lenses in the V system (except the old C types) have large rubberized focusing rings that are far away from the camera body, so they can easily be reached and operated. On the latest CFi, CFE, and CB lenses, focusing is also exceptionally smooth even in cold weather.
Quick Focusing Handles
The focusing ring on some older C lenses was close to the camera body and not exceptionally easy to turn. To simplify the process,Hasselblad made quick focusing handles that attached over the focusing ring. Because the large, rubberized focusing rings on the new lenses allow easy, fast, and convenient focusing, such focusing handles are no longer made.
Focusing Apochromatic Lenses
The focusing ring on apochromatic lenses does not stop at the infinity mark but can be turned a few millimeters beyond this point. This is because the fluorite elements in these lenses are more sensitive to changes in temperature than glass elements, and distance settings may vary depending on the temperature. You should always focus on the image shown on the focusing screen; don't guess the distance or simply set the scale at infinity for anything that is far away.
RELEASING THE CAMERA
Hasselblad V system cameras can be released when the shutter is cocked, the darkslide is removed, and the frame counter in the magazine shows a number (not a black area). The release cycle in V system SLR cameras is shown in Figure 6-6.
Camera steadiness is determined by the way you operate the release. Push it slowly and gradually, so that you hardly know when it goes off. The releases have some free play to avoid accidental exposure at the slightest touch of the release. For smoothest operation, move the release to the halfway position so that only a slight additional pressure makes the shutter click. On the 200 series cameras with built-in metering systems, pressing the release halfway also turns on the metering system.
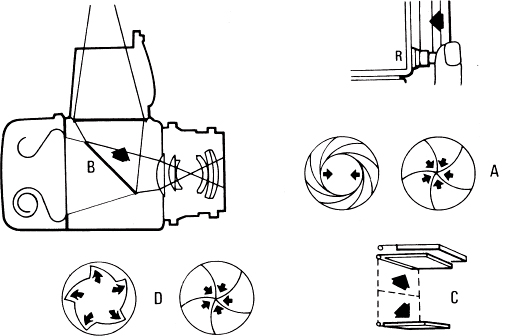
Figure 6-6 The release cycle on all V system SLR camera models when the shutter in the lens is used When the camera release is pressed, the lens shutter closes and the diaphragm stops down to the preset aperture (A), the mirror moves up (B), and the auxiliary shutter or focal plane shutter opens (C). The lens shutter opens and closes at the set shutter speed, or, in the B setting, the shutter closes when the finger is removed from the release (D). Depending on the camera model or the set operating mode on some models, the mirror returns either instantly after the exposure or when the film is advanced.
Release Lock in Older 500 Cameras
The 500 series camera models used to have a small lever around the release button shown in Figure 6-7; it could be set to either 0 or T. When set to T, the release button stayed in even when you removed your finger. The release lock had to be used in combination with the self-timer in C lenses. It could also be used for time exposures, but that was not a recommended procedure because it was likely to produce camera motion. For time exposures, it is necessary to prerelease the camera and use a cable release. The release lock had no effect when you used a cable release. The film winding crank could not be turned when the release lock was set to T. Because the lock serves no practical purpose with today's lenses, it has been eliminated, except on the Superwide cameras.
Figure 6-7 The release lock 1. Set to T; the release lock in earlier 500 models keeps the auxiliary shutter open until the lever is moved back to 0. 2. EL models have a release lock on the side of the battery compartment with the operating position 0 in the center, a release lock L to prevent accidental releasing at the top, and a lock T for time exposures at the bottom. 3. Superwide cameras still have the release lock next to the release.
The Release on EL Camera Models
The release button is a separate item that is inserted in either one of the two openings at the front of EL cameras. On the 555ELD, the release button must be inserted in the lower opening for photography with film, or in the upper opening for digital recording. On the other EL models, it makes no difference which opening is used. You can use one opening for the small release button and the second for any of the accessory FK release cords. Some EL models come equipped with the large square release button that the astronauts use. It is removable, and when it is removed, the camera has the same two release openings.
The EL is released by electrical contact, not by mechanical means, even though the camera operation is mechanical. All EL models can also be released through the side socket at the rear of the camera using an SK release cord. EL cameras have a release lock in the form of a lever on the battery compartment, shown in Figure 6-7. Set to L, the camera cannot be released, an arrangement that prevents accidental exposures. A zero (0) in the center is the operating position. T can be used for time exposures. With the lens set to B, the shutter opens when the lever is moved to the lower T position and closes when moved back to 0. This procedure, however, is likely to create camera motion and therefore is not recommended. Use the release cables for this purpose after prereleasing the camera.
The Release Cycle on Focal Plane Shutter Cameras
When the lens shutter is used, the release cycle is identical to that of the other cameras except that the focal plane shutter (instead of the auxiliary shutter) opens and closes. On all the 200 series cameras, the mirror returns instantly after the exposure is made. When the focal plane shutter is used, the release cycle is as follows:
1. The diaphragm stops down.
2. The mirror moves up.
3. The focal plane shutter opens and closes to make the exposure.
4. The lens diaphragm opens, and the mirror moves down.
Operating the 201F Camera
The 201F focal plane shutter camera without metering system shown in Figure 6-8 has a shutter speed range from 1 second to 1/1000 second. You can lock the shutter speed setting by pushing forward the locking knob above the battery compartment. This is recommended when the focal plane shutter is set to C for use of the shutter in the lens.
The built-in self-timer can be programmed for a 2-second or a 10-second delay. For a 10-second delay, push the Mirror Lock-Up control once (after the mirror is locked up); for a 2-second delay, press twice. The 201F also has the ASA dial on the side for use with dedicated flash. It is set and used like the control on the 500 models.
To check the condition of the battery, turn the shutter speed ring to bring the battery symbol opposite the index as shown in Figure 6-9. If the battery is in good condition, the ready light of the dedicated flash system in the viewfinder lights up. If the ready light is already lit, the light intensity increases if the battery is in good condition.

Figure 6-8 The discontinued 201 camera is distinguished mainly by the ASA dial for dedicated flash. Above the battery compartment is the lock for the shutter speed ring.

Figure 6-9 201 Battery check The condition of the 201 battery is checked by placing the battery symbol on the shutter speed ring opposite the index.
Special Operating Controls on 2000/2003 Camera Models
The 2000/2003 cameras basically operate like the newer focal plane shutter models but have a few unique operating controls. The mirror motion is adjustable so that the mirror returns instantly or returns when the film is advanced or remains locked in the upper position (a permanent mirror lock up) (see Figure 6-10). On the 2000FCW and 2003FCW models, you must remove the winding crank or motor to change the mirror program disc.
You can lock the shutter speed setting by moving the lever above the battery compartment from O to L, a recommended procedure when the shutter is used in the C setting (see Figure 6-11). A shutter speed multiplier accessory, used in place of the battery compartment, was available and multiplied the set shutter speed by 60 (a 1-second setting becomes 60 seconds).
On the 2000FCM and the 2000FCW and 2003FCW models, the focal plane shutter automatically retracts when a film magazine is removed. When you reattach the magazine to such a camera and remove the darkslide, you will expose the film because the shutter is open. The proper procedure is as follows: Either recock the shutter before you attach the magazine, or attach the magazine;but before removing the darkslide, turn the winding crank with the center disc pressed as for double exposures. Now remove the darkslide. With a motor winder shown in Figure 6-12 on the camera, the shutter is automatically recocked when the film magazine is reattached. You can disconnect the shutter safeguard feature by pushing the lever on the rear of the camera body to the side.
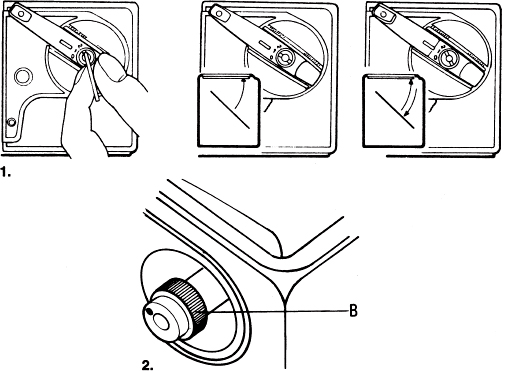
Figure 6-10 Mirror motion on 2000/2003 cameras 1. You change the mirror motion by turning the slotted disc with a coin. Turn the disc to 1 if the mirror is to return when the shutter is recocked, to 2 for instant return operation, or to 0 if the mirror is to be permanently locked up. 2. To change the mirror motion on 2003FCW models, remove the crank or motor, pull out the ring (B), and turn the shaft to 1, 2, or 3.

Figure 6-11 Shutter speed lock on 2000/2003 models You lock the shutter speed ring by pushing the locking lever above the battery compartment downward so that the indicator points toward L. The battery compartment on all focal plane shutter cameras is identical and can be removed easily using the fingernails. Remove and insert the battery compartment only with the camera in the ready position, with the shutter cocked and the mirror down.
PRERELEASING THE CAMERA
Before you can make an exposure on any V system SLR model using the shutter in the lens, the lens shutter must close completely, the aperture must close to the preset opening, the mirror must move out of the way, and the auxiliary or focal plane shutter must open. The required operations cause a slight delay so that the picture is taken approximately 1/25 second after the release is pressed. If you want to avoid this delay in sports or action photography, you can set the camera in a prerelease mode (see Figure 6-13). The shutter now opens and closes instantly, and the picture is taken without any delay, just as on a rangefinder or twin lens reflex camera.

Figure 6-12 Motor winder for 2000/2003 cameras To attach the motor winder, align the triangular mark on the winder with the index on the camera. Turn clockwise until it stops. To detach the motor winder, pull the tab (A) away from the camera, and turn the winder counterclockwise. The winder can be attached only if the dots (B) on the winder and shaft are aligned. Turn the shaft, if necessary.
Prereleasing can also reduce the danger of camera-created vibrations when the camera is mounted on a tripod or stand. Any moving element inside a camera, such as a mirror or shutter, can cause camera vibration. Such camera motion is not eliminated with a cable release but can be lessened by reducing the number of moving elements within the camera at the moment the exposure is made. This is exactly what prereleasing the camera does, eliminating the mirror motion and reducing the camera functions to the shutter operation.
Because Hasselblad cameras can be prereleased easily, my recommendation is to prerelease whenever you work with a mounted camera. Camera-produced motions need be considered only with a mounted camera. In handheld work, the body seems to absorb such motion.

Figure 6-13 Prereleasing cameras The 500 series cameras (1) and all focal-plane shutter models (2) are prereleased by pressing the lever below the winding crank or knob upward (on 500 models) or toward the rear (on 200 models). You prerelease EL cameras by setting the selector dial to S (3) or to SR (4). When set to S, the camera returns to its normal viewing position after the exposure. When set to SR, the camera remains in the prereleased mode.
Because prereleasing does not reduce the danger of vibration from the shutter operation, it is worthwhile mentioning that a lens shutter is extremely smooth because the shutter blades move in all directions around the optical axis. With a focal plane curtain moving sideways (or up and down), the danger for vibrations is somewhat greater. If you have a choice, use the lens shutter, especially with longer shutter speeds and longer lenses.
Prereleasing the 500 Series Cameras
The prerelease control is below the winding knob and is pushed upward (see Figure 6-13). As the mirror lifts up, the image on the focusing screen disappears. If, for some reason, you need to see the image before making the exposure, turn the winding knob or crank with the magazine removed from the camera. In this way, the film is not advanced. The prerelease cycle is shown in Figure 6-14.
Prereleasing the Focal Plane Shutter Models
The prerelease button is below the winding crank (see Figures 6-13 and 6-16), but you prerelease the camera by pushing the control toward the rear of the camera instead of upward. When the lens shutter is used for the exposure, prereleasing performs the same function as it does on 500 camera models. When the exposure is made with the focal plane shutter, prereleasing lifts up only the mirror and closes the lens aperture to the preset opening. If you want to see the image on the focusing screen again after the camera is prereleased, simply turn the crank with the center button pressed, as for a double exposure. The prerelease cycle is shown in Figure 6-15.

Figure 6-14 Prereleasing the 500 series and EL models Prereleasing (A) causes the lens shutter to close (B), the lens diaphragm to stop down to the present aperture (C), the mirror to lift up (D), and the auxiliary shutter to open (E). When the release is pressed (F), only the lens shutter opens and closes (G) to make the exposure.
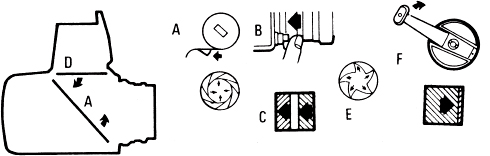
Figure 6-15 Prereleasing the 200 and 2000 focal plane shutter cameras When the lens shutter is used, the prerelease cycle is identical to that of the 500 and EL models, except that the focal plane shutter replaces the auxiliary shutter. When the focal plane shutter is used with non-shutter lenses, prereleasing lifts only the mirror and closes the diaphragm to the preset aperture (A). When the camera release is pressed (B), the focal plane shutter opens and closes to make the exposure (C), the mirror then flips down, and the diaphragm opens fully (E). An image at full brightness is therefore visible on the focusing screen immediately after the exposure has been made (on 2000/2003 cameras only with the mirror set at 2). You advance the film and cock the shutter by turning the crank (F).
Prereleasing the EL Models
You prerelease EL cameras (Figure 6-13) by setting the operating knob to S, at which point the lens shutter closes, the aperture presets itself, the mirror rises, and the rear curtains open. The exposure is made when the release is pressed. After the exposure, the control moves back to 0, with the camera returning to the normal position—the lens open and the mirror down for viewing.

Figure 6-16 Prerelease function 1. On 200 series cameras, pressing the prerelease one time prereleases the camera, and pressing it a second time starts the self-timer (except on 201 models), with the self-timer delay time programmed into the camera. You can stop the self-timer by pressing the prerelease a third time. 2. Self-timer operation is indicated by a red light at the front of the camera. On 201 models, pressing the prerelease control a second time starts the self-timer for a 10-second delay, and pressing it twice, for a 2-second delay.
When the camera is set to SR, the knob remains at SR, leaving the camera in the prereleased mode. Use the SR position when all the images are to be made in the prereleased mode and you don't need to see the image between exposures. The SR position also provides the fastest sequence operation: about 12 pictures in 9 seconds.
PRODUCING DOUBLE OR MULTIPLE EXPOSURES
All Hasselblad V system cameras are ideal for producing double or multiple exposures. With the magazine interchangeability, the two images need not be made right after each other. You can remove the magazine after the first exposure, work with another magazine, and then later reattach the first one to superimpose the second image. The second exposure need not even be made in the same camera. The magazine with the first exposure can be attached to any other Hasselblad V system camera model.
To produce a double exposure on Superwide and 500 model cameras, you must remove the film magazine after the first exposure so that the film is not advanced when you recock the shutter with the winding crank. After turning the crank, reattach the magazine and make the second exposure. See Figure 6-18.
Removing the magazine is not necessary on 200 and 2000 camera models. After the first exposure, turn the winding crank with the center disc pressed, thereby cocking the shutter without advancing the film. See Figure 6-17.

Figure 6-17 Producing double exposures on 200 and 2000 camera models Make the first exposure as usual. Press the mirror program disc with your index finger (1) while you start turning the winding crank. This operation ensures that the gear (2a) that connects to the film transport in the magazine (2b) will not turn and therefore will not advance the film.
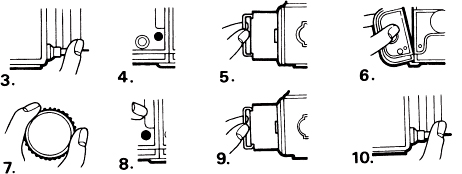
Figure 6-18 Producing double exposures in Superwide and 500 camera models Make the first exposure as usual (3); the operating signal in the magazine will then be red (4). Insert the darkslide (5), and lift the magazine away from the camera (6). You need only tilt it away from the camera body to disconnect the gear. Turn the camera winding crank (7). Reattach the magazine (8). Remove the darkslide (9), and make the second exposure (10). Set the 503 motor winder to M for multiple exposures.
Most double exposures have two images recorded on the same film area, which results in one overexposed image. Exposure for each image must be reduced, the amount depending somewhat on the type of image. A good suggestion is to reduce the exposure for each by 11/2 EV values. Or, if you want to have one of the two images more dominant, reduce the exposure by 1 EV value for one and 2 EV values for the other. Test exposures are advised. In some double exposures, the second image may be recorded in a dark, unexposed area of the first, in which case an exposure reduction may not be necessary.

Figure 6-19 Producing a double exposure on EL models Release the camera for the first exposure, but keep your finger on the release so that the film does not advance. With the release pressed, move the time lever to the L position (11), which locks the mechanism. Insert the darkslide, and remove the magazine (12) from the camera. Move the time lever back to 0 (13); this starts the transport cycle and recocks the shutter. Replace the magazine and make the second exposure.

Figure 6-20 The CW motor winder.
1. Mode selector dial
2. Release button
3. Mode selector
4. Front IR sensor
5. Camera release lever
6. Winder coupling
7. Bayonet mount
8. Winder retaining slot
9. Camera interface plate
10. Battery holder
11. Battery holder catch
12. Upper strap lug
13. Winder catch
14. Remote cord connector
15. Strap mounting screws
16. Rear IR sensor
17. Lower strap lug
OPERATION OF THE 503CW WINDER
The CW motor winder (see Figure 6-20) is held to the camera not only by the winding shaft but also by the carrying strap lug and can be used as a grip for convenient handheld photography. The camera/winder combination handles like a motor-driven 35mm camera. The winder transports the film at about 1.3 frames per second. The motor is powered by six 1.5V AA Alkaline or rechargeable NiCad battery types. Alkaline batteries should provide at least 3000 exposures in normal conditions.
Attaching the 503 Winders
After removing the winding crank, lens, and carrying strap, place the winder over the winding mechanism with the strap lug in the winder's mounting plate. Rotate it clockwise until it clicks into position (see Figure 6-21). After the motor is attached, you may hear a faint sound indicating that the motor senses the camera status. It will also wind an uncocked camera automatically. With film in the camera, you will lose a frame. To avoid this, make certain that the shutter is cocked before you attach the motor winder.
Removing the Motor Winder
Remove the lens. Holding the winder firmly, press the detaching lever and keep it pressed while turning the winder counterclockwise. Keep in mind that the lens must be removed for attaching and detaching the winder.
Motor Operation
The motor winder can be used for single exposures (S) at any shutter speed. At shutter speeds of 1/8 second and longer, you must keep the release button pressed until you hear the lens shutter closing. In sequence photography (C), the shutter speed must be 1/8 second or shorter (1/15 second or shorter in cold temperatures).
You can make multiple exposures without removing the motor winder from the camera. Set the mode selector to M. The motor makes the exposure but does not advance the film. Insert the darkslide, remove the magazine, and switch the mode selector from M to S (or C), an action that recocks the shutter. Then reattach the film magazine and remove the darkslide. To prevent accidental exposures, set the mode selector to L (lock) when not in use. See Figure 6-22.
If the motor does not operate the camera, check whether a darkslide might be inserted and whether the frame counter in the film magazine may indicate that you are at the end of the film. Also check that the mode selector is not set to L or RC, and, of course, check the condition of the batteries and be sure that they have been inserted properly.
Remote Operation
A camera equipped with a motor winder can be remote-released by using a 10-foot (3m) accessory release cable or by using the supplied wireless infrared remote control. The remote release is connected to the socket in the motor winder. The winder can be operated in the S, C, or M mode.

Figure 6-21 503CW motor operation 2. After opening the battery compartment by moving the lever clockwise, insert the six batteries as shown in the battery holder. 3. After removing the lens, attach the motor over the winding mechanism, with the strap lug in the motor's mounting plate. 4. Turn the motor clockwise. 5. To remove the motor, press the detaching lever and turn the winder counterclockwise.

Figure 6-22 The winder operating controls The release and mode selector have these settings: RC (remote), L (lock), S (single pictures), C (sequences), and M (multiple exposures).

Figure 6-23 The IR remote release. 1. Release button 2. IR windows 3. Mode selector 4. Battery compartment
With the mode selector set to RC, the compact IR remote release (see Figure 6-23) can operate the camera from up to 33 feet (10 meters) from almost anywhere because the motor winder has IR sensors at the front and rear.
The remote control uses one CR2 battery. The mode selector should be set back to L or to S, C, or M as soon as the remote release is no longer used. This saves battery power.
Before using the IR remote, you must code it to the specific motor winder on the camera. Set the mode selector to RC, aiming the IR windows in the remote control at one of the IR sensors in the motor and pressing for three or four seconds both the release in the remote control and the release in the motor at the same time. If you want to operate more than one camera from one release, code each motor with the remote release in the same fashion.