11
V System Viewfinders and Focusing Screens
Viewfinders are interchangeable on all the more recent V system Hasselblad camera models, and focusing screens are interchangeable on all models made since 1970. This versatility allows convenient image evaluation and focusing with all lenses and accessories and with the camera handheld or on a tripod.
FOCUSING SCREENS
The Acute Matte Focusing Screen
All Hasselblad cameras made since 1998 are supplied with an Acute Matte screen, and the very latest 500 models have a version with a split-image rangefinder and a microprism. The Acute Matte design consists of an acrylic focusing screen with a fine Fresnel pattern and microlenses (see Figure 11-1). Combined with a protective glass plate mounted in a metal frame, this design provides remarkably high brightness over the entire surface.
Although screen brightness is helpful for composing and evaluating the image, brightness alone does not help in achieving precise focusing. The latter needs a high resolution in the focusing image. The Acute Matte screen beautifully combines the two necessary characteristics, providing the photographer with a superb focusing screen for any type of photography in any lighting conditions. If your camera is equipped with the old groundglass screen, consider the Acute Matte very seriously, even if it means changing to a newer camera model.
The Acute Matte is also the only screen that ensures correct exposures with the latest meter prism viewfinders. Although the plain Acute Matte type seems to help most photographers in achieving accurate focusing, some prefer focusing with a split-image rangefinder or a microprism. This is a personal choice that you can make only after trying the different options.
The 200 camera models have Acute Matte screens with the metering area engraved: the 6mm spot meter area in the 205 or the 28mm center area in the 202 and 203 models (see Figure 11-2). There is also an Acute Matte screen that shows the 12mm spot metering area of the PME 90 and PME 45 meter prism viewfinders.

Figure 11-1 The Acute Matte screen The superb image brightness and contrast of the Acute Matte focusing screen (left) are achieved with a fine Fresnel pattern (A) and a focusing screen plate composed of microscopic lenses (B). The lenses direct much more light toward the eye than an ordinary focusing screen (right), which diffuses the light in all directions.
Focusing with Split-Image Rangefinder
The Acute Matte screens with split-image rangefinder can be inserted into the camera with the dividing line running horizontally or vertically. The image can be focused either in the clear rangefinder center circle or in the surrounding screen area. In the rangefinder area, the subject is in focus when a straight line crossing the rangefinder area appears unbroken across the dividing center line (see Figure 11-3). This is easy to see even by photographers who have a focusing problem.
Keep in mind that the image in the rangefinder area always looks sharp. You must focus on a straight line crossing the split area. Rangefinder focusing also requires that the rangefinder area be aimed at the main subject, a requirement that may be inconvenient when you must work fast.
Split-image rangefinder focusing has limitations with regard to lenses. When the aperture of the lens is smaller than f/4 or f/5.6, one side of the split-image rangefinder field blacks out. You can no longer use the rangefinder for focusing. This is not a serious limitation because the lens aperture is normally wide open and the limitations appear only when you focus with the aperture manually closed down or with small aperture lenses, perhaps telephotos.
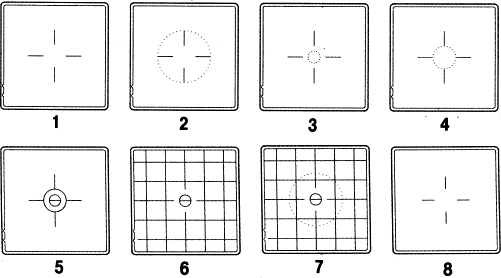
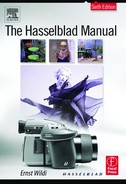
Figure 11-2 Different focusing screens In addition to the standard Acute Matte focusing screen (1) are the screens with the 202/203 center metering area (2), the 205 spot metering area (3), and a screen showing the metering area of the PME 90 and PME 45 meter prism finder (4). There is a screen with a microprism/split-image rangefinder area, which is the screen supplied in the latest 500 camera models (5), and two screens that combine a split-image rangefinder with grid lines (6) and that show the 202/203 metering area (7). The plain glass screen (8) has been discontinued.

Figure 11-3 Rangefinder focusing Accurate focusing with the split-image rangefinder screen is obtained when a straight line of the subject crossing the split is not broken (A) but continuous (B). The screen can be placed in the camera so that the split is horizontal (C) or vertical (D).
Split-image rangefinder focusing with any lens requires that your eye be in the optical axis. If one field is blacked out, move your eye slightly up or down or sideways.
Focusing with Microprisms
The microprism center area consists of many tiny prisms that split lines if the lens is not focused at the proper distance. The image jumps readily and rapidly into place. Screens with microprism areas had definite advantages with the old focusing screens. The value is somewhat reduced with the Acute Matte types, which offer a sharp image over the entire screen area.
Focusing Screens with Grid Lines
The focusing screens that have equally spaced horizontal and vertical grid lines are helpful when the lines of a subject must be perfectly horizontal or vertical within the image area. The most typical application is in photographing buildings, whether it involves professional architectural photography or souvenir pictures of the beautiful buildings that we encounter during our travels. Other applications come up in product photography and in any type of copying.
The engraved lines on these focusing screens are spaced so that the two vertical and the two horizontal outside lines correspond to the 6 × 4.5cm film format and the 8 × 10 paper ratio and can therefore also be used as cropping guides instead of masks (see Figure 11-4).
Other Focusing Screens
Over the years, other screens have been available for Hasselblad. These screens should not be used in combination with meter prism viewfinders. The exposures will not be correct.
The clear glass screen, now discontinued, is a plain glass screen with a Fresnel lens and a reference cross in the center. This screen is recommended only for focusing on very fine detail, as in photomicroscopy, and for use by people who know how to focus the image in a microscope.
The original groundglass screen should no longer be used because today you have the opportunity to enjoy the brightness and sharpness of the Acute Matte screen, which makes composing and focusing faster and more precise.
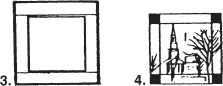
Figure 11-4 Focusing screen masks 3. The film magazines and the camera masks for the 6 × 4.5cm and panoramic image format are supplied with a transparent mask that is placed over the focusing screen to show the rectangular image area covered on the film. Such a mask is also helpful when you photograph in the square but plan to change some or all of the images later into rectangles corresponding to the 8 × 10 paper proportions. 4. Darkening the corners of the mask with black lacquer or any other method can further assist in composing in the rectangular format. The focusing screens with grid lines can also be used for this purpose because the outer lines correspond to the 8 × 10 image proportions.
The fine line focusing screen was the old groundglass screen, but with the Fresnel lines more closely spaced so that they were less obvious.
The Optofibre screen was made up of nearly 100 million light conductors, yielding a brighter image compared with the standard screen.
The Bright Matte screen provided a brighter image over the entire screen surface, with a microcutting that made the Fresnel circles invisible.
Cleaning Focusing Screens
Never use lens cleaning fluids, other chemicals, or water on any focusing screen. Instead, clean it with a soft cloth, if necessary by breathing on it. Never dry it with hot air. Handle the acrylic screens carefully, because they can easily become scratched.
VIEWFINDERS
The interchangeable Hasselblad viewfinders magnify the image on the screen for accurate focusing and shield the screen from extraneous light for convenient image evaluation even in bright sunlight. They are attached to the camera as shown in Figure 11-5.
Each viewfinder has its own advantage, so select the type that appears to be most satisfactory for your type of photography and for the way you operate the camera with the lenses and accessories that you usually use. All finders are beautifully suited for handheld photography.
When you are working from a tripod set at eye level, a prism finder is a necessity to eliminate the need for standing on a chair.
Viewfinders to Improve Camera Steadiness
The danger of camera motion is reduced when two forces work against each other. With a handheld camera, the two forces are the hands pressing the camera in one direction and the photographer's head, with the eye pressed against the viewfinder, pushing the opposite way. A firm contact between eye and viewfinder is necessary. The rubber eyepieces on the Hasselblad finders (except the standard hood) encourage this firm contact.
You can wear eyeglasses for viewing with the latest Hasselblad accessory finders (because of their high eyepoint), but the firm contact is somewhat lost because it is difficult to press a finder eyepiece as firmly toward eyeglasses as you can toward your eye and forehead. Eyeglasses also leave an open space on the sides where light can enter, creating a disturbing flare and making the image on the screen appear darker than it actually is. On older finders (without the high eyepoint), eyeglasses also prevent you from placing your eye close enough to the eyepiece to see the entire screen area.
Figure 11-5 Attaching viewfinders To mount any viewfinder on the camera, remove the film magazine, and then slide the finder into the grooves and completely forward as far as it goes.
Some finders that have the older eyepiece can be changed to the newer type. Check with the Hasselblad service center. The standard focusing hood on the camera cannot be used in any practical way with eyeglasses.
Whether to work with or without eyeglasses must be your decision. Because I do much handheld photography, my personal choice is to view without glasses. I keep my reading glasses—which I need for reading the numbers on the cameras and lenses, especially in low light—hanging on a chain around my neck so that I can simply drop them for viewing and focusing.
Viewfinders for Exposure Measurements
Equipping the camera with a meter prism viewfinder adds a built-in light-metering system to any V system Hasselblad camera. The light is measured through the lens (TTL) and through filters, extension tubes, and bellows, and you can recognize the measured area while composing the image on the focusing screen. For these reasons, the meter prism finders offer an excellent solution for light metering that is more accurate, more convenient, and faster than the regular handheld metering approach. Chapter 12,Achieving Perfect Exposures, discusses the use and operation of the metering system in these finders.
Viewfinders for Accurate Focusing
A viewfinder must provide you with an absolutely sharp image of the focusing screen. This happens only if your eyes are able to focus for the distance at which you see the focusing screen in the viewfinder, just as you can read a newspaper only if your eyes can focus at the reading distance.
Table 11-1 Viewfinders and Focusing Hoods and Their Diopter Values
| Viewfinder type | Built-in diopter adjustment | Potential diopter range with correction lenses or eyepleces | Magnification |
| Standard focusing hood | –4 to +3 | 4.5× | |
| PME 90 | –2 to +0.5 | –4 to +3 | 2× |
| PM 90 | –4 to +3 | 2× | |
| PM 45 and PME 45 | –2 to +1 | –4.5 to +3.5 | 2.5× |
| Magnifying hood (discontinued) | –2.5 to +3.5 | 3× | |
| View magnifier | –3 to +4.5 | 2× | |
| Magnifying hood 4 × 4 DPS | –2.5 to +0.5 | 5.5× | |
| Magnifying hood 4 × 4 DPS | –1.5 to +1.5 with | 5.5× | |
| standard focusing | |||
| screen adapter | |||
| Some older prism finders | –4 to +3 | ||
| Magnifying Hood | Correction lens | ||
| HMZ | mounting kit | 3.3× | |
| available | |||
| Rmfx finder | Correction lens | 3.3× | |
| mounting kit | |||
| available |
Note: The correction mounting kits do not include the correction lenses which must be obtained from an optical store.
Make a test with your camera and finder. Point the camera at a subject with fine detail, turn the focusing ring, and see whether you can easily see the details, whether you can really see when the lens is focused accurately. Focus a few times to see whether you always end up at exactly the same setting on the focusing ring. Make the test with different lenses if you have them, especially with wide angles, and also at lower light levels, where focusing always becomes a problem. If you plan to wear your glasses for viewing, make this test with the glasses on; otherwise, do not wear them. If your glasses are bifocals, make the test through the part of the glasses that you plan to use, which is likely the upper, long-distance part.
MATCHING THE VIEWFINDER TO YOUR EYESIGHT
If the focusing test does not provide the desired image sharpness for focusing, your eyes cannot adjust to the viewing distance of the finder. Except for the HM 2 and Rmfx finders, all newer Hasselblad viewfinders can be matched to your eyesight, as shown in Table 11-1.
The built-in correction ranges seem to be sufficient for most photographers. If not, consider changing the eyepiece or magnifying lens, if available. Unfortunately, there is no simple way of determining what diopter correction you need except to try the various correction pieces or lenses.

Figure 11-6 Opening and closing the focusing hood 1. You open the new focusing hood by placing your finger underneath the plastic tab (A) and lifting the hood upward (1a, 1b). 2. To bring the magnifying lens into viewing position, slide the tab (B) in the direction of the arrow. 3. To fold the new focusing hood, pinch the sides at the hinge (a) and press down the cover. 4. To close the older focusing hood, flip down the top plate and fold down the sides and rear panel. The front panel locks when folded down.
Adjusting the Built-In Diopter Correction
Because the eyepiece must provide a sharp image of the focusing screen and not necessarily of the subject, it is best to make the adjustment without a lens on the camera so that you see nothing but the focusing screen. Turn the diopter correction ring until the lines on the screen are absolutely sharp. After the first adjustment, remove your eye from the finder for a few seconds and look at a distant subject to relax your eye. Look at the focusing screen a second time to see whether the image is still sharp with the relaxed eye.
You can make this adjustment with the lens on the camera as long as you ascertain that you adjust the eyepiece for the screen, not for the image. (The image sharpness depends on the focus setting on the lens.)
Diopter Correction Lenses for the Standard Focusing Hood
The standard focusing hoods made for all SLR Hasselblad models since 1986 can be equipped with diopter correction lenses ranging from +3 to –4. These accessory lenses, mounted in a square frame like the one that is in the hood, are not added to the existing magnifier but instead are inserted in place of the present lens (see Figure 11-7). The standard viewfinders made up to 1985 offer no practical diopter correction method, so I can only suggest considering the new version or a prism finder.

Figure 11-7 Changing the magnifying lens on the standard focusing hood To change the magnifying lens, remove the hood from the camera and open it. Hold the plate with the lens at an angle, pull it downward, and remove it through the bottom. To insert the new plate, reverse the process.
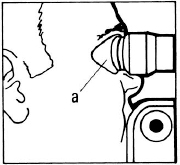
Figure 11-8 Viewing with prism viewfinders Prism viewfinders provide a magnified, upright, and laterally correct image. The rubber eyecup, which can be mounted for left or right eye viewing, provides additional shielding against extraneous light and is recommended when you are viewing without eyeglasses. For viewing with eyeglasses, either cut off the flap or use the rubber eyecup supplied with the finder.
Adjustment of Older Finders
On older Hasselblad prism viewfinders, the eyepiece adjustment was made by adding diopter correction lenses to the existing eyepiece or by changing the entire eyepiece. The correction lenses or eyepieces may or may not be available any longer. Check with the Hasselblad distributor.
VIEWFINDER MAGNIFICATION
The magnification of the various Hasselblad viewfinders varies and is indicated for most finders in Table 11-1.
Although the magnification varies, the image in all finders is sufficiently magnified for precise focusing on the Acute Matte screen. Your choice of finder is therefore best determined by the viewing convenience for your approach to photography. A higher magnification naturally enlarges the viewfinder display of a metering system, making the figures and symbols easier to read.

Figure 11-9 The PM 90 viewfinder The PM 90, like the PME 90, lies flat over the camera body and film magazine and therefore cannot be used with the Hasselblad instant film magazine or magazine 70. All other film magazines, including the E types, can be used.
The Hasselblad View Magnifier
In spite of the high magnification of the Hasselblad viewfinders, some photographers feel the need or desire for an even more precise approach, at least when working with a tripod. The view magnifier serves their needs. Attached over the regular viewfinder eyepiece (see Figure 11-12), the magnifier adds 2× to the magnification of the center portion of the focusing screen image. The center portion is thus magnified 5× with the PM 45 finders.
After focusing, you can move the magnifier's hinged eyepiece out of the way so that you can see the entire focusing screen to evaluate the composition. The needed switching between focusing and viewing makes the use of the magnifier practical only when you are working from a tripod. However, you can leave the view magnifier attached to the eyepiece, moving it into the magnified focusing position only when needed and when time permits.
The view magnifier comes in two versions: one for the PM 90 and some earlier 45-degree finders, and the other made for the PM 45, PME 45, and PME 90 finders and is attached as shown in fig 11-12.
AREA COVERAGE ON THE FOCUSING SCREEN
The focusing screen on Hasselblad V system cameras shows about 98% (horizontally and vertically) of the image recorded on the film. This reduction was originally done purposely to match more closely the area of a projected transparency (which is cut off by the slide mount). Some viewfinders cause an additional slight cut-off, and the 200 camera models have an additional 1mm cut-off at the bottom caused by the camera body. The differences need not be considered except by the photographer who plans to exhibit images complete with their actual frames.

Figure 11-10 Eyepiece correction in PM and PME finders 1. To set the diopter correction built into the PME finders, pull out the eyepiece lock. Then turn the eyepiece to the proper setting and push the lock lever back into the finder. 2. To change the eyepiece in the finder, remove the eyecup, release the diopter lock, and rotate the diopter all the way to the right. 3. With a pointed tool, remove the red “C” lock ring and remove the diopter. 4. Insert the corrective diopter eyepiece and the red “C” lock ring. 5. Reinstall the rubber eyecup, rotate the eyepiece to the correct setting, and lock it by inserting the locking lever into finder.
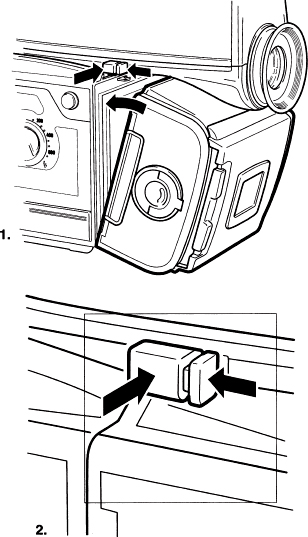
Figure 11-11 Attaching and removing a film magazine with PM 90 or PME 90 on the camera 1. You attach or remove a film magazine by pressing the magazine catch slide. 2. The catch slide can be pressed only if the locking lever is pushed forward simultaneously. This double lock arrangement prevents the magazine from falling off if the lever should be pressed accidentally.
Vignetting
When you use long focal length lenses, extension tubes, or bellows on older cameras without a gliding mirror system, you may note vignetting along the upper edge of the viewfinder image. The vignetting starts with focal lengths greater than 100 mm but becomes objectionable only with lenses 180 mm and longer and when you use longer extension tubes with any lens.
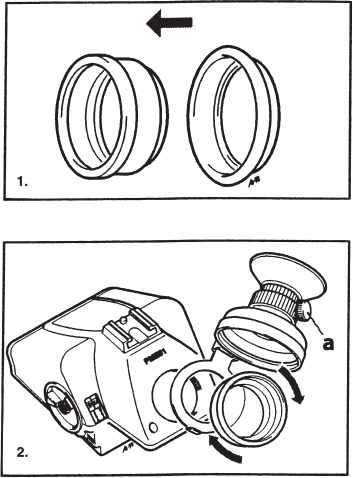
Figure 11-12 Attaching the view magnifier 1. Remove the eyepiece and rubber eyecup by unscrewing them counterclockwise. Remove the original eyecup, and slide the supplied eyecup over the threaded end of the eyepiece as far as it will go. 2. Fold out the hinged ring of the magnifier and place it over the opening of the finder. Screw the eyepiece back by turning it clockwise. You can rotate the magnifier to the most suitable position by loosening the eyepiece a little.
This image cut-off, caused by the mirror, happens only on the focusing screen, not on the film, and you must therefore allow for it. Move the camera slightly upward to see what is in the cut-off area to make certain that it does not include anything that should be in the image. If you work extensively with longer lenses or close-up accessories, consider switching to a newer camera model with the gliding mirror system. All Hasselblad cameras with a gliding mirror system show the entire image that is recorded on the film with any lens or accessory.
SELECTING A VIEWFINDER
Selecting a viewfinder is a personal choice based on your type of photography, but you may also want to consider a meter prism viewfinder simply because it adds a metering system to the camera.
The Standard Focusing Hood
The standard focusing hood (Figure 11-5) has definite and unique advantages compared with any other type of viewfinder. It provides the highest magnification and, because it is foldable, keeps the camera lightweight and compact. By not using the magnifying lens, you can also view the image from a distance and with both eyes open. With the standard hood, you can view the image on the focusing screen from many camera angles, from waist level, from low angles or ground level, and from high levels by holding the camera upside down above your head.
The standard hood is not suitable for viewing with eyeglasses, so you should change the magnifying lens to one that provides a sharp image of the focusing screen without eyeglasses. Also, the hood is not very comfortable when pressed against the eye, as it should be for handheld work. A magnifying hood with a rubber eyecup is a better choice because it allows you to view the image from above. With both the standard finder and the magnifying hood, the image is right side up but reversed sideways. You can get accustomed to this, at least with stationary subjects. You are likely to move the camera in the wrong direction when following moving subjects.
The standard viewfinder and the magnifying hood can be used with all film magazines, including those for instant film.
Magnifying Hoods
A magnifying hood adds almost no weight but makes the camera bulkier because it is not foldable. On the other hand, with its soft rubber eyecup the magnifying hood keeps out extraneous light and provides comfortable viewing when the camera is pressed against the eye.
In place of the magnifying hood with built-in diopter correction that has been available for many years, Hasselblad has the HM2 model, a simplified and less expensive version. HM2 does not have built-in diopter correction but has two settings: one when it is used on cameras, and the other when it is used in combination with a focusing screen adapter.
Magnifying Hood 4x4 DPS
The designation 4x4 refers to the 40mm area coverage. This magnifying hood is optimized for use with digital backs with CCD sizes smaller than 40mm. The magnifying hood enlarges this area 5.5×.
Viewing from the Top
Viewing from the top lets you photograph from almost any camera angle and holding the camera in many different ways, and it is especially helpful in low-angle photography (see Figure 11-13). When viewing without the magnifier, you can take pictures without anyone being aware of your photography because the camera need not be in front of your eyes. Viewing from the top is also convenient when the camera is mounted vertically on a copy stand or microscope.
On the other hand, a focusing or magnifying hood is not practical with a tripod-mounted camera at eye level.
90-degree Eye-Level Viewing
The 90-degree viewfinders in Figure 11-9 may have a special appeal to 35mm photographers who are accustomed to this type of viewing and focusing. Viewing and focusing are practical and convenient, whether the camera is held in the normal fashion or turned sideways for shooting verticals, and this is why such finders are on all 35mm cameras and on the Hasselblad H1. A 90-degree finder is necessary when you are photographing handheld verticals with magazine 16 on any Hasselblad V system camera. All prism finders show an image that is right side up and unreversed. These viewfinders also have a shoe on top for attaching a small flash unit or other accessory. The PM 90 finders cannot be used with the instant film or the 70mm film magazines.
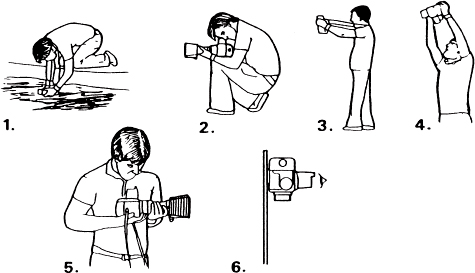
Figure 11-13 Viewing from the top has great advantages when you are photographing, for example, from low angles (1), from the knee (2), straight down (3), from over the head (4), sideways (5), or from a vertically mounted camera (6).
Reflex Viewfinder RMfx
The RMfx contains a mirror instead of a prism, and the viewing angle is 10 degrees from the vertical. This finder is designed for use with the focusing screen adapter on the Superwide cameras, the FlexBody, and the ArcBody, and it offers the wonderful advantage of providing a 3.3× magnified image that is right side up. With other viewfinders attached to the focusing screen adapter, the image is upside down.
45-degree Eye-Level Viewing
The prism viewfinders with 45-degree viewing are a good compromise between the standard hood and the 90-degree eye-level finders. You can hold the camera steadily, with your hands pressing the camera diagonally upward toward your slightly tilted head. Held in this fashion, the lens is only about two inches lower than with a 90-degree prism finder. Viewing can be considered eye-level whether you work handheld or from a tripod. These finders can be used with all film magazines, including the instant film types.
Discontinued Hasselblad Viewfinders
Reflex Viewfinder RM 2 The RM 2, originally called HC 3/70, is for 90-degree viewing from behind the camera. It has a viewing tube long enough to go to the rear of the 70mm film magazine. The eyepiece is adjustable from –5 to +5 diopters and can be locked in the set position. It can be used with instant film magazines.
HC-4 Viewfinder The HC-4 viewfinder for 90-degree eye-level viewing is designed like the RM 2 but with a shorter tube for use with rollfilm magazines only.
HC-1 Prism Viewfinder The HC-1 was the original 90-degree finder, going back to the 1960s. It has not been made for many years.
PME 5 and PM 51 These two 45-degree prism finders with built-in exposure meter are almost identical for use on all camera models.
PM 3 and PME 3 The PME 3 (with exposure meter) and the PM 3 (without) are identical to the PM 5 and PME 51 but do not have the cut-out front for use on cameras with a built-in metering system. The meter is adjusted for the Acute Matte screen.
PME/VFC 6 Prism Viewfinder This finder looks like the PM 3, but the meter was adjusted for the old groundglass screens. It needs an adjustment of about one stop when used with the Acute Matte screen. Test exposures are advised with some lenses and teleconverters. Using one of the newer meter prism finders with the newer cameras is recommended.
NC-2 Prism Finder This original 45-degree prism finder was introduced in 1963 as NC-2. It could not be used in combination with an instant film magazine. The finder was modified in 1981 to the NC2-100 to be usable with the instant film magazine.
Meter Prism Finder This is the original meter prism finder, introduced in 1971 with a CDS cell. The meter indications are made with a movable needle. This finder has delicate moving parts and should be replaced with a newer, more modern meter finder.
Frame and Sports Viewfinders The frame and sports viewfinders made by Hasselblad were mounted either on the side or the top of a camera or on top of some lenses. They have been discontinued because they serve little purpose on a modern camera.
Cleaning Viewfinders
Clean the eyepiece lenses and the lens in the standard and magnifying hood in the same way you clean any lens. Be certain to blow or brush away all dust particles before wiping with lens tissue. Wipe the lens gently with the tissue, but only if necessary. The same approach can be used on the bottom prism surface, but do it carefully because it is a large glass surface that can be damaged easily.
The bottom surface of older prism finders was covered by a plastic sheet, which should never be cleaned with cleaning fluids or any other chemicals. Protect the bottom surface of the prism finder with the cover when it is off the camera.