
13
Controls for Exposure and Creating Images
EXPOSURE CONTROLS
The amount of light that reaches the film or digital sensor—and therefore the exposure—is determined by the aperture and the shutter speed. The maximum aperture of a lens is frequently referred to as the “speed” of the lens, and large aperture lenses are known as “fast” lenses. The aperture is determined by the size of the diaphragm opening, with a low number, such as f 2.8, indicating a larger opening. You reduce the amount of light reaching the image plane by setting the aperture to a higher number, such as f/11. A change in aperture from one setting to the next either doubles or halves the amount of light reaching the image plane.
Because aperture and shutter speed together determine the total amount of light that reaches the image plane, the same exposure can be obtained with many different combinations of aperture and shutter speed. Because aperture numbers double or halve the amount of light, it is easy to adjust the shutter speed to compensate for a change in aperture.
EXPOSURE AND DISTANCE SETTING
When the focusing ring on lenses without internal focusing is turned toward the closer distances, the amount of light reaching the image plane may be reduced. The amount is negligible for all practical purposes within the normal focusing range of a lens because it almost never exceeds ½ f stop. The loss is compensated for when exposure is determined with a metering system in the camera. On many newer lenses, you focus optically by moving some of the lens components rather than physically moving the entire lens. This focusing arrangement, known as internal focusing, or rear or front focusing on the H camera lenses, does not require an increase in exposure.

Figure 13-1 Exposure values 1. A lower EV number indicates a smaller amount of light or a darker subject. 2. If the EV is 17 with 400 ISO (27 DIN) film, it will be 15 for a film with ISO 100 (21 DIN). 3. Most professional exposure meters have an EV scale. 4. For every EV value you have a choice of various aperture and shutter speed combinations, such as f/2.8 and 1/60 second or f/16 and ½ second. Both give the same exposure because they have the same EV value.
Exposure Values
Exposure values (EVs) are easy-to-remember, single numbers that indicate how much light exists in a certain location or is reflected from a subject for a specific film sensitivity. A camera or lens set to a specific EV number produces the same exposure no matter what the aperture and shutter speed combination might be (see Figure 13-1).
On V system cameras that do not have a metering system, you can set the lens for the desired EV number and then interlock the aperture and shutter speed ring and set them interlocked to any one of the possible aperture/shutter speed combinations or take pictures at different combinations. They all produce the same exposure (see Figures 13-2, 13-3, and 13-4). If you change the aperture in the interlocked mode, the shutter speed changes auto-matically and vice versa. You can take two or more images with different depths of field, or at different shutter speeds, almost instantly and be assured that they all will be equally exposed.
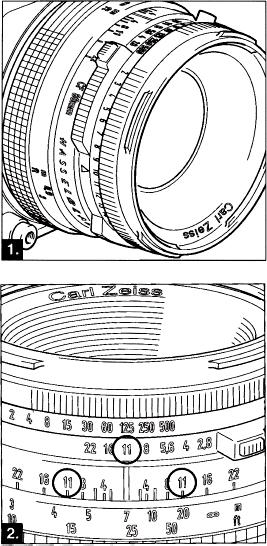
Figure 13-2 Aperture and shutter speed settings Once the EV value is set on any V system lens (1), you can see all the possible aperture and shutter speed combinations as well as the depth of field on the lens (2).
CONTROLS FOR CREATING IMAGES
Aperture for Depth of Field
When a camera lens is focused at a specific distance, only the subject at the focused distance is recorded critically sharp in the image. Sharpness gradually falls off for subjects in front of and beyond the set distance. On the photographic print or transparency, however, some degree of blur is acceptable because it still appears sharp to our eyes. This range of acceptable sharpness is called depth of field (see Figure 13-6).
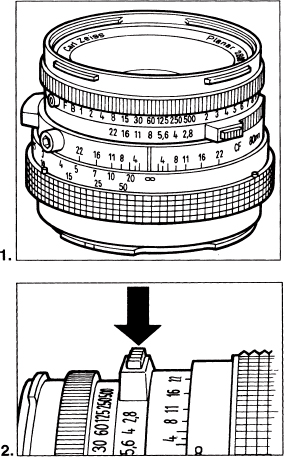
Figure 13-3 Aperture/shutter speed lock On CF, CFE, CB, and CFi lenses, you set shutter speed and EV values by turning the shutter speed ring. You set the aperture by turning the aperture ring (1). You interlock aperture and shutter speed rings by pressing the interlock button (2).
At normal distances, about one-third of the total depth of field is in front, and two-thirds is behind the set distance. At close distances, the range is more equally divided between the areas in front of and behind the set distance. The amount of depth of field is determined by the lens aperture. Depth of field increases as the aperture is closed down, as clearly shown by the depth-of-field scales on the lenses (see Figures 13-5 and 13-7).
Depth of Field and the Focal Length of the Lens
“Wide-angle lenses have more depth of field than telephotos” is a common statement in the photographic field. The statement is correct, but only if the different focal length lenses are used from the same distance. In such a case, the wide-angle lens has more depth of field but also covers a much larger area than the standard or telephoto lens. The three lenses create three completely different images (see Figure 13-8). If you use different focal length lenses to cover the same size area by taking the pictures from different distances, the depth of field is exactly the same with every lens. It can be changed only by opening or closing the aperture (see Figures 13-9 and 13-11).
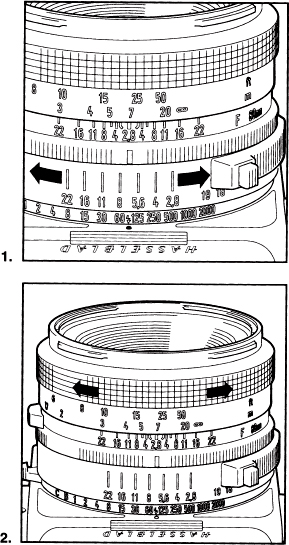
Figure 13-4 Aperture/shutter speed lock on lenses without shutters On FE, TCC, and F lenses, the shutter speed is set on the camera (except on 202FA). The aperture is set using the rear ring, which has grip sections (1). The focusing ring is at the front (2).
Medium-Format Depth of Field
If you move to the medium format from 35 mm, be aware that the depth of field in the medium format is shallower than in 35 mm. The explanation is usually based on the longer focal length of the lens that is necessary in the medium format for equal area coverage—for example, 80 mm vs 50 mm for standard area coverage. The more correct explanation, however, is in the different magnification for the same area coverage. For example, covering an area 56mm wide with a Hasselblad camera means a 1× (life-size) magnification, whereas it is only 0.6× in 35 mm. A higher magnification has less depth of field at the same aperture.
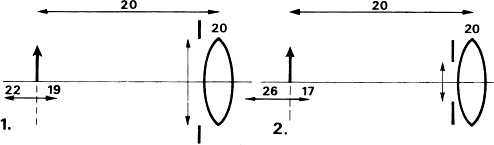
Figure 13-5 Depth of field at different apertures 1. With the lens focused on the subject at 20 feet (or meters) and the aperture wide open, the depth of field may extend from 19 to 22 feet, with one-third in front and two-thirds behind the focused distance. 2. With the lens closed down, the depth of field increases, for instance to a range from 17 to 26 feet, still with one-third in front and two-thirds behind the focused distance.
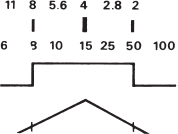
Figure 13-6 Sharpness within the depth-of-field range Depth of field is not a range of critical sharpness (in the example, from 8 to 50 feet) with an abrupt falloff to blur. Instead, it is a gradual decrease in sharpness on both sides of the set distance (15 feet in the example) even within the depth-of-field range.

Figure 13-7 Depth-of-field scales 1. The depth of field is the distance range (on the focusing ring between the aperture figures on the left and right) that corresponds to the aperture (here, f/11) on the lens. 2. The same scales, here set for f/8, are on FE,TCC, and F lenses.
Depth-of-Field Scales and Charts
The figures on depth-of-field scales and charts are calculated based on the acceptable blur known as the “circle of confusion.” They are not in any way related to the lens design or the type or quality of a lens.
When you evaluate your negatives or transparencies under a magnifying glass with an 8× or 10× magnification, which I recommend for evaluating medium-format images, you will undoubtedly notice a considerable difference of sharpness even within the depth-of-field range. Although the subject at the focused distance is critically sharp, subjects toward the end of the depth-of-field range look outright blurred in such an image evaluation (see Figure 13-6). This may bring you to the conclusion that your lens does not produce enough depth of field.
Don't blame the lens. You can blame the incredibly sharp films that we have today that make these differences in sharpness more obvious, and you can also blame the age of the depth-of-field scales and tables. They were calculated years ago when films were not very sharp. Although the scales are still usable for general work, you may want to adjust for critical work, either by not using the entire range or by closing the aperture one or two stops more than necessary for the desired depth-of-field range. Whenever a specific subject is to be critically sharp, focus the lens on that subject. Don't rely on depth of field.

Figure 13-8 Depth of field with different lenses When different focal length lenses are used from the same distance (here, 8 feet), the wide-angle lens (c) has more depth of field (46 feet) than the standard lens (a), with 6 feet, or the telephoto lens (b), with 1.5 feet.

Figure 13-9 Depth of field and area coverage To cover the same size area, the wide-angle lens (b) must be used from a closer distance than the standard lens (a). With the telephoto lens (c), you must move farther away. In this situation, all three lenses have the same depth of field (6 feet) at the same aperture.
Seeing Depth of Field on the Focusing Screen
The focusing screen on a 35mm or medium-format camera is wonderful for evaluating the image and for critical focusing, but not for seeing depth of field. The focusing screen, even on a medium-format camera, is small compared with the size of the final photographic print or the projected transparency. There is no way you can determine from the screen image where the sharpness range starts to fall beyond the acceptable level. The problem is increased when you evaluate the image with the lens aperture closed down.
The Hasselblad focusing screens are ideal for focusing, for composing, and for showing what is really sharp and how much blur you have in background and foreground areas. For determining depth of field, use the scales on the lenses after determining the min and max distances (see Figure 13-13).
Hyperfocal Distance
Hyperfocal distance is often referred to as the distance setting that produces the maximum depth of field at a specific aperture. Although this is correct, I suggest looking at it as the distance setting that produces depth of field to infinity at the set aperture. Because lenses have depth-of-field scales, there is no need for hyperfocal distance charts. Simply set the distance ring so that the infinity mark is opposite the corresponding aperture on the depth-of-field scale on the right. The hyperfocal distance, if you want to know it, is the distance opposite the index (see Figure 13-14). You will also find that the depth of field extends on the other side to half the hyperfocal distance—for example, to 8 feet (2.6 meters) if the hyperfocal distance is 16 feet (5.2 meters).

Figure 13-10 Setting lens for depth of field To set the lens for depth of field, focus the lens (manually or automatically on the H camera) at the farthest subject you want to be sharp. Read the distance on the focusing scale (here, 30 feet) (A), and then focus at the closest subject that you want to be sharp and read the distance (8 feet) (B). Set the lens so that the two distances are within the depth-of-field indicators (C), 14 feet in this case.
Figure 13-11 Depth-of-field theory When you are photographing an area of a specific size, depth of field is determined only by the aperture and the area coverage (magnification).
Manual Diaphragm Stop Down
On single-lens reflex cameras, the diaphragm is normally wide open to provide the brightest view of the focusing screen. This setting also shows the image as it will be recorded by the lens at the maximum aperture. The manual diaphragm stop down on all Hasselblad lenses and on the H camera allows you to see how the image is recorded at different apertures (see Figures 13-12 and 13-13).
When you operate the stop down mechanism, the lens diaphragm closes to the preset aperture. The focusing screen becomes darker; you can now see the image as it will be recorded in the camera at the set aperture, or you can see how the image changes as you open or close the aperture. You can take the picture with the aperture manually closed down, or you can reopen the aperture before you take the picture.
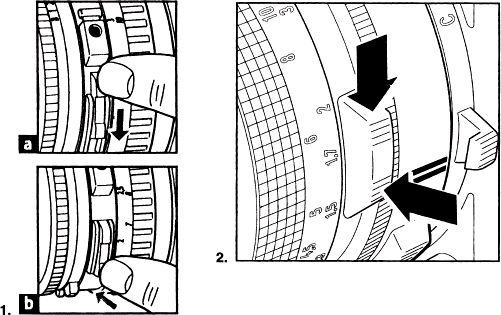
Figure 13-12 Manual aperture stop down 1. You can close down the aperture on the latest V system lenses to any preset aperture by pushing the stop down lever downward (a). It remains in the stopped down position until you move the stop down lever back to the original position by pressing the bottom part of the lever (b). 2. The stop down control on the CF lenses looks somewhat different but is operated in the same way. You manually close down the aperture on all H system lenses by clicking the stop down lever at the front of the camera.
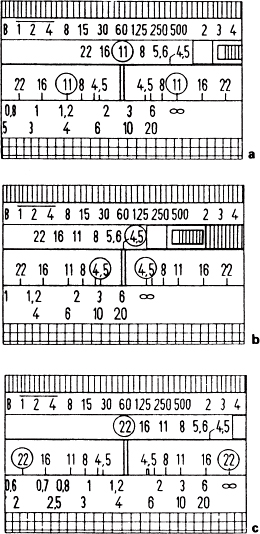
Figure 13-13 Hyperfocal distance A lens is set to the hyperfocal distance when the infinity mark is placed opposite the set aperture on the depth-of-field scale, at f/11 (a), f/4.5 (b), and f/22 (c). The depth of field then extends from infinity down to half the distance that is opposite the index (to 10 feet at f/4.5, to 2 feet at f/22, and to 4 feet at f/11).

Figure 13-14 Controls on C lenses 1. The manual stop down control is on the right side. The aperture returns to the wide open position when you recock the shutter or move the aperture ring to the maximum aperture. 2. The depth of field is indicated by two red pointers that move when the aperture setting is changed.
Photographing Groups
There are different opinions on whether the people in a group picture should be arranged in a straight or a curved line so that they will all be sharp from side to side, especially when wide-angle lenses are used. The photographers who insist on a curved arrangement justify their explanation with the fact that in a straight arrangement, the people on the outside are farther away from the center of the lens than those in the center and will therefore be out of focus. If the group is arranged in a curved line, everybody from center to the edges can be at the same distance (see Figure 13-15).
This is not, however, the way lenses are designed nor how they record a subject. Every lens is designed to record a sharp image on the flat image plane from a flat subject in front of the lens, whether the subject is a building, a flat document, or a group of people. If this were not the case, the walls of a building and a document would also have to be curved to ensure sharpness from left to right. If you prefer a curved arrangement for artistic reasons or for better flash illumination, feel free to use it, but be aware that the lens aperture needs to be closed down more because you need more depth of field.

Figure 13-15 Photographing groups When people are arranged in a straight line, the people at the edges are farther away (here, 14 feet) than the people in the center (9 feet) when measured from the center of the lens. Arranged in a curve, they all can be at the same 9-foot distance. Lenses, however, are designed to produce a sharp image from a flat, not a curved, subject plane. If the group of people is arranged in a curved line for other reasons, the lens aperture must be closed down because you need more depth of field, from 6 feet to 9 feet in this example.
Background Sharpness
The lens aperture determines the degree of blur in subjects in front of and beyond the depth-of-field range—how sharp or how blurred backgrounds appear in the photograph. Because backgrounds are a dominant part of many pictures, you should set the aperture for depth of field and to evaluate the image at different apertures and to check the degree of sharpness or blur in the background. Blur in the background is enhanced not only at larger apertures but also with longer focal length lenses. If you want to keep backgrounds reasonably sharp, use a shorter focal length; if you want to blur backgrounds more, change to a telephoto.
CREATIVE USE OF THE LENS APERTURE
Before you press the release, you must decide whether everything from foreground to background should be sharp or whether one or both should be blurred, and if so how much.
With your eyes you see everything sharp because our eyes focus constantly and instantly. If you desire to present the scene or subject as seen with your eyes, try to have sharpness from foreground to background. A maximum range of sharpness is usually called for with subjects that we are accustomed to see sharp, such as buildings, room interiors, product displays, and food illustrations. Generally, subjects with sharp, straight lines, such as fences and rock formations, look better sharp, especially when they are in the foreground.
On the other hand, limiting the range of sharpness lets us create images that look different from the way we see the world and create images as only the camera can do. By narrowing the plane of focus, you create a strong attention-getting element, forcing the audience to look at that part of your image. The lens aperture is a powerful tool for creating effective, different-looking images.
SELECTION OF SHUTTER SPEED
The shutter speed may be predetermined for exposure or for allowing hand-held camera operation. With moving subjects, the shutter speed must be chosen from the image-creating point of view because it determines how the subject is recorded in the camera. You must decide whether the motion is to be frozen, recorded with a slight blur, or completely blurred.
A moving subject recorded at a high shutter speed appears to be standing still, producing interesting and sometimes strange pictures. The shutter speed necessary to stop action depends on the speed of the moving subject, the size of the subject as recorded in the camera, and its direction of movement in relation to the image plane (see Figure 13-16). To stop continuous motions, such as skiing; diving; motorcycle, car, and horse races; or roller-coasters, 1/800 or 1/2000 second is frequently necessary, especially with longer focal length lenses.
You can also stop motion at slower shutter speeds by photographing at the peak of the action. It works beautifully with all sports or actions that are not continuous but have a beginning and an end or are repeated. There is a peak of action on many amusement park rides, in jumping on a trampoline, in ballet dancing, and in other stage and circus performances (see Figure 13-17).
Blurred Motion Effects
The photographic approach of blurring subjects with a slow shutter speed is not limited to sports actions. Interesting and fascinating images can be created with anything that moves: water in any form, reflections on water, clouds moving in the sky, smoke, rain, trees, flowers or grass blown by the wind, traffic at night, amusement park rides. Because we cannot see blurred motion with our eyes, slow shutter speeds allow us to create images that are different from our way of seeing—undoubtedly a main reason blurred motion effects are fascinating and attract attention.
Because the desired effect in the image is usually based on personal taste, it is difficult to give recommended shutter speeds. For moving trees, grass, and reflections, shutter speeds around 1 second can be used as a starting point. For moving water and waves, ⅛ to 1 second can produce good results, but you can also go to speeds of several seconds for a different effect.
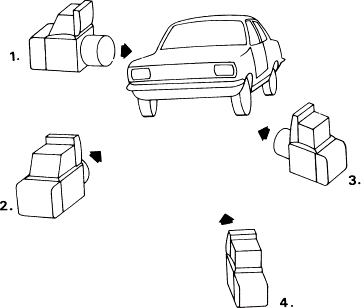
Figure 13-16 Shooting direction Using the same shutter speed, blur is greatest when the subject is moving at right angles to the camera view (1). A subject moving at the same speed straight (2) or at an angle (3) toward the camera view is less blurred. There will be less blur even at the same shutter speed when the subject is photographed from a greater distance (4).

Figure 13-17 Photographing the peak of the action Blur in moving subjects is reduced when the shutter is released when the subject is momentarily still, as at the end of a swing or at the top of the bounce from a trampoline. Another method is to follow the moving subject with the camera and make the exposure while the camera moves.
Following Moving Subjects
Another approach that works beautifully with moving subjects is to follow the subject with the camera and snap the shutter while the camera moves. If you move the camera at the same speed as the subject, only the background is blurred. You can also move the camera slower or faster than the subject, creating a blur in the background and in the subject. With many subjects, some elements are moving in different directions at different speeds—for instance, the spokes of a wheel, the legs of a bicycle rider or a horse, the wings of a bird, and the arms of a ballet dancer or ice skater—thereby creating different amounts of blur within the image. The feeling of motion is enhanced when you photograph the moving subject against a contrasting background that has dark and bright and different-colored areas that create noticeable streaks. Spectators and trees are good examples.
Many photographers find it best to follow a moving subject with a hand-held camera, especially when the subject changes speed or direction, as birds or ice hockey players might. If the subject moves along a straight line, such as a racing car or an athlete in a 100-meter sprint, a tripod-mounted camera is more likely to produce successful results.