
16
Understanding Light and Filters
USING FILTERS
There are five basic reasons for using filters: to obtain correct color rendition in color photography or correct gray tones in black and white work, to enhance color images or change gray tones in black and white, to create special effects and moods, to reduce the amount of light reaching the film, and to protect the lens.
Filters as Lens Protection
Lenses are expensive components in any camera system, and they are easily damaged and usually expensive to repair. It is a good practice to protect the front element with an optically plain piece of glass such as an ultraviolet (UV) or haze filter. Filters protect the lens from dust, dirt, and possible damage without changing the colors or gray tones to any noticeable degree.
Because these filters are used all the time and therefore become a semipermanent part of the lens, they must be of the very highest quality. Equip each lens with its own filter. It is too time-consuming to switch filters every time lenses are changed. For color photography, it is best to use identical filters made by the same company to avoid possible differences in color rendition. A lens shade offers further protection for the lens and also prevents snow or raindrops from falling on the lens element.
Haze and UV Filters
Haze and UV filters absorb UV rays without changing colors to a noticeable degree and can be helpful when you are photographing in places that have large amounts of UV light, such as at high altitudes. Most modern lenses, however, have some lens elements that are made from glass that absorbs UV rays to a greater extent than a UV filter. In a way, such lenses have a built-in UV filter. Consequently, haze and UV filters have little value for improving pictures, for reducing haze penetration, and for improving distant shots. Polarizing filters should be considered for this purpose.
| Density | Percentage of light transmission | Increase in exposure in f stops |
| 0.3 | 50 | 1 |
| 0.6 | 25 | 2 |
| 0.9 | 12 | 3 |
| 1.2 | 6 | 4 |
| 1.5 | 3 | 5 |
| 1.8 | 1.5 | 6 |
Neutral Density Filters
Neutral density filters, also called gray filters, are made from neutral gray colored glass and are used in black and white and color photography to reduce the amount of light reaching the image plane without changing the tonal rendition. You may want to use these filters outdoors so that you can photograph at a larger aperture to reduce depth of field or photograph at a long shutter speed to blur moving subjects such as water. You can also use these filters to compensate for different film sensitivities when using the instant film back for test shots.
Neutral density filters come in various densities, requiring the exposure increases shown in Table 16-1. The filters can be combined, with the exposure increases added up.
Filters for Black and White Photography
In black and white photography, the various colors are recorded in a range of gray tones from white to black. Filters can be used for purposely darkening or lightening certain colors to emphasize, suppress, separate, increase, or reduce the image contrast. You can lighten or darken any color. To lighten a color, use a filter of the same color or at least from the same side of the color wheel (see Figure 16-1). To darken a color, select the color directly across the wheel or at least from the opposite side. A yellow filter darkens colors from blue-green to violet. Green filters lighten green and darken purple and red; they can be used to lighten shaded green areas under trees.
In black and white photography, a yellow filter produces some improvement in distant shots, but orange and red filters and polarizing filters are more effective. Complete or almost complete haze penetration can be obtained with a red filter, combined with infrared film, but other colors are also changed—for instance, green appears as white.
THE COLOR QUALITY OF LIGHT
Color transparency films are manufactured for a specific color or light source, and correct color rendition can be obtained only if the color of the light matches that for which the film is balanced. The color quality of light, known as color temperature, is usually expressed in Kelvin (K) and sometimes in decamired (DM) values. Kelvin and decamired values arc directly related by the following formula:

Figure 16-1 Filters in black and white photography 1. The color wheel with the colors red (R), yellow (Y), green (G), cyan (C), blue (B), and magenta (M) is a convenient tool for determining how various colors are reproduced in black and white through different filters. A yellow filter (Y) transmits yellow and absorbs blue. 2. Photographed through a red filter (R), green gives a light image on the negative (N) and a dark image on the print (P); red is reproduced darker on the negative, lighter on the print. The situation is reversed when a green filter (G) is used.
Table 16-2 Color Temperatures of a Few Typical Light Sources
| DM | Kelvin | Type of light |
| 8 | 12500 | Shade with clear blue sky |
| 16 | 6250 | Overcast day |
| 18 | 5600 | Sunlight at noon |
| 31 | 3200 | Tungsten lamps |
| 34 | 2900 | 100–200W household lamps |
| 54 | 1850 | Candlelight |
![]()
Daylight color films used in medium-format photography are matched to a 5600K (18DM) value. Tungsten films are matched for a 3200K (31DM) color temperature. Table 16-2 shows color temperatures for certain light sources.
Light Balance and Conversion Filters
Light balance and conversion filters are used in color photography to match the color quality of the illumination to that of the film or purposely to obtain a warmer or cooler color rendition in the images.
The filters with a warming effect—the 81 series light balance and 85 conversion type or the decamired red (R, CR) types—are used when the light is too blue. The filters with a cooling effect—the 82 series light balance and 80 conversion filters or the decamired blue (B, CB) types—are used when the light is too red.
Years ago I used 81A or 81B (CR 1.5 or CR 3) light balance filters for outdoor pictures taken on overcast, foggy, or rainy days or in shaded areas to eliminate or reduce the bluish cast. I have not found this need with the color films that we have today. You may still want to consider these filters, perhaps for portraits in the shade. Fill flash, however, can produce better results. There are also cases when you don't want to match colors. Early morning and late afternoon scenics are usually exceptionally beautiful because of the warm color of the early morning or late afternoon sunlight. Don't destroy the effect with a cooling filter.
Table 16-3 shows filter values for various situations.
Color-Compensating Filters
Color-compensating (CC) filters—available in six colors (yellow, magenta, cyan, red, green, and blue) and in different densities from about 0.05 to 0.50—are used for changes in the overall color balance or for fine color corrections. These filters are most readily available in gelatin form.
Table 16-3 Filter Values for Various Situations
| Purpose | Decamired filter | Wratten filter |
| To get a warmer rendition with electronic flash | R1.5 | 81A |
| To use Tungsten color film in daylight | R13.5 | 85B |
| To use daylight film with 3200K light | B13.5 | 80A |
| To use Tungsten film with household lamps | B3 | 82C |
Fluorescent and Vapor Lights
Unlike sunlight or the light from incandescent sources, the light from a fluorescent tube is not evenly distributed through the spectrum, so the results with color film can be unpredictable (except with special color matching tubes). Film and fluorescent tube manufacturers publish charts showing which color-compensating filters produce the most satisfactory results. Special filters for fluorescent lights are also available for use with daylight and Tungsten-type color film.
The Decamired Filter System
In the Wratten filter system, there is no direct relationship between the color temperature of the light and the filter value. The necessary filter can therefore be determined only by a color temperature meter or from a chart. In the decamired system, the light and filter values are directly related to each other. The required filter must have a DM value equal to the difference in the decamired values of the film and the light source. For example, if a DM 31 film is used with DM 28 light, you need a 3DM value filter—CR 3 (red) in this case because the light is bluer. The filters within each color can be combined to obtain different correction values, such as CR 9, by combining a CR 6 and a CR 3. Hasselblad used to have available decamired filters in blue and red with values from DM 1.5 to DM 6 for the most-used V system lenses. Because most photographers are more familiar with the Wratten system, these filters are no longer made.
EXPOSURE INCREASE
A filter absorbs light. With UV, haze, and some light balance and color-compensating types, the light loss is small and need not be considered. With darker filters, lens settings must be adjusted when the meter reading is made with a handheld meter. When the meter reading is made through the lens, as in the Hasselblad H and 200 cameras, or with a meter prism viewfinder on any other camera model, the light is also measured through the filter, and the light loss is automatically adjusted in the meter reading.
The necessary exposure increases may be indicated either in filter factors or in actual aperture values. The two are not the same. When the increase is indicated in aperture values, you must increase exposure by the indicated value—for example, two f stops if the value is 2. If indicated in filter factors, you convert the factors into the aperture values shown in Table 16-4.
Table 16-4 Filter Factors and f Stops/EV Values
![]()
HASSELBLAD FILTERS
All lenses in the Hasselblad H system take standard-size filters made by filter manufacturers. Hasselblad does not make filters for this camera system.
Because filters are also quite readily available for the various lenses in the V system, Hasselblad reduced its own line to the UV, (Haze), and polarizing types. Other types, especially for black and white photography, used to be available. These filters carried all the necessary information engraved on the rim. For example, a filter engraved 60 2 X YG—1 has a size of 60mm, a color of yellow-green, and a filter factor of 2, requiring an exposure increase of 1 EV value. Filter colors are designated as follows:Y = yellow;YG = yellow-green; G = green; O = orange; and R = red. Some color-compensating filters also carried the equivalent Kodak filter designation.
POLARIZING FILTERS
Light that reaches our eyes or the camera lens directly is unpolarized, which means light waves vibrate in all directions perpendicular to the light path. If such light reaches glass, water, or many other reflecting surfaces at an angle, it becomes polarized, with the light waves vibrating in one direction only (see Figures 16-2 and 16-3).

Figure 16-2 Natural and polarized light Natural, unpolarized light vibrates in all directions (A). As it passes through a polarizing filter (B), the light becomes polarized—vibrates in one direction only. If this polarized light meets another polarizing filter that has its axis of polarization in the same direction as the first (C), the light passes through. A polarizing filter with its axis of polarization at right angles to the first (D) absorbs the light, and we have what is known as cross-polarization.
Polarized light in nature is usually light reflected from water, leaves, rocks, trees, windows, or virtually any other shiny surface except bare metal (see Figure 16-3). Reducing reflections gives many surfaces a deeper, more saturated color. Reflections, of course, can also be natural, as on porcelain or silver, or they can make more beautiful pictures, as in the reflections on water surfaces; eliminating them can make the water dull and uninteresting. Watch the effect when you use polarizing filters.
Fortunately, the effect of the filter can easily be seen. Turn the filter on the lens while evaluating the image on the focusing screen, or turn the filter held in front of your eyes while looking at the subject or scene and see what happens. The difference may be dramatic. A polarizing filter need not be turned for maximum effect. You can use it at whatever setting produces the desired results.
Because the light coming from the sky has been polarized by passing through the thin layers of the atmosphere, a polarizing filter can make a sky dramatically darker, but only when you are photographing at a 90-degree angle to the direction of a line drawn from the sun to the camera—in other words, with sidelight (see Figure 16-4). Polarizing filters can drastically improve distant shots by eliminating the bluish haze, eliminating reflections, and improving color saturation on distant surfaces. This improvement again happens only with sidelight. Polarizing filters work with color and black and white films, and the improvements are alike.

Figure 16-3 Reflected light When natural, unpolarized light (A) is reflected, it may become polarized, vibrating in one direction only (B). In this state, it passes through a polarizing filter with its axis of polarization in line with the light (left) but not through one (D) at right angles (right).
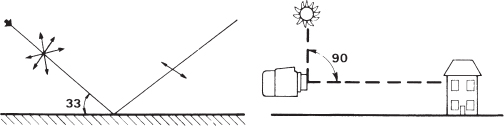
Figure 16-4 Angle for polarization Reflected light is polarized only if it hits a surface at an angle of between 30 and 40 degrees, depending on the material of the reflecting surface (left). Skies are darkened by a polarizing filter only when the pictures are taken at right angles to the sun (right).
Polarizing filters should be mounted on the camera so that they can be rotated easily. The lens shade may have to be removed for this purpose. Because the polarizing effect in the image depends on the angle of reflection, the effect may differ over the image area, especially in wide-angle pictures. Reflections on a window may be eliminated on one side of the window but not on the other; a blue sky may be darker on the left side than on the right. Such differences can be seen in the viewfinder, so evaluate the image carefully when you use polarizing filters.
Polarizing filters require an increase in exposure because the polarizing material has a grayish tint. The required increase is the same no matter how the filter is rotated to the position with either minimum or maximum polarization. Because a polarizing filter reduces or eliminates reflections, polarized images sometimes appear darker than expected but only because the reflections are no longer there.
Figure 16-2 illustrates the difference between natural and polarized light, and Figures 16-3 and 16-4 show the effects of reflection.
Polarizing Filter Types
The original polarizer, known today as the linear type, affects the light measuring or automatic focusing system (or both) in some cameras to the point of giving a wrong reading or distance setting. Whether this happens depends on the design of the metering and focusing system in the camera. The problem has been eliminated with a polarizer known as the circular type, which produces the same results in the picture but does not affect the metering or focusing and can therefore be used on any camera. The camera manufacturer should be able to tell you whether the circular type is necessary on your camera.
The circular type is needed on Hasselblad H cameras because the linear type affects the automatic focusing. Circular types are not needed on the 200 cameras with a metering system nor when you are metering with a meter prism finder. You can use the linear type on these cameras. The Hasselblad polarizers are the linear type.
Using Polarizing Filters over Light Sources
You can polarize light from tungsten lights or electronic flash by placing a polarizing filter over the light source. The polarizing filter on the camera lens then eliminates all reflections, at all angles, from all materials. This procedure is necessary to eliminate reflections on bare metal. It is also a superb approach for copying.
To be most effective, the polarized light must illuminate the picture or document from an angle of between 30 and 40 degrees. You then turn the polarizing filter on the camera by visually examining the image on the focusing screen. Copying with polarized light is described in more detail in Chapter 18.
PARTIAL FILTERING
It may sometimes be desirable to filter only part of a scene, such as darkening a bright sky to bring it closer to the brightness level of the landscape below. This is done with graduated filters, a neutral density type for darkening the sky. Such filters are available in square shapes so that they can be moved in front of the lens in a special filter holder. Graduated color filters can add color to part of a scene, perhaps adding a touch of blue to a white sky.
Be careful in using graduated filters because the effect often does not look real. You also must evaluate the image on the focusing screen at the aperture that will be used for the picture because the dividing line shifts and may become more or less visible when you open and close the diaphragm.
QUALITY OF FILTERS
Filters used with quality lenses for critical photography must be made to the same quality standards as the lenses. This is especially important when they are used extensively and when they are combined with long focal length lenses. Filters for long telelenses must be of the highest quality. A filter that is not perfectly optically flat may have the effect of a very weak lens element, decreasing the image quality and possibly making it impossible to focus the lens at infinity. The quality of filters becomes still more important when filters are combined.
Filters between the Lens
Because the 30mm Distagon fish-eye lens covers a 180-degree diagonal field of view, it is impossible to attach filters to the front without cutting into the diagonal field of view. Filters can be attached to the rear of the front section (see Figure 16-5) and are part of the optical design, meaning that the 30mm Distagon is designed to produce the best sharpness with a filter or clear glass in the lens. Never use the lens without a filter or clear glass. The rear ring of the lens is painted bright red to reduce the possibility of attaching the front section without a glass or filter. The Distagon is supplied with a clear glass and a yellow-orange conversion filter.
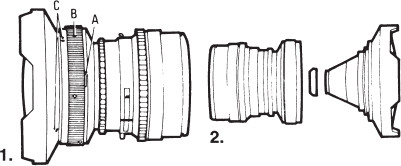
Figure 16-5 To attach or change a filter on the 30mm Distagon, press the release (A), and turn the knurled ring (B) counterclockwise until the two red dots (C) are opposite each other. Lift the front section, and screw the filter to the end of the cone. 2. Assemble the lens by placing the front section in the rear part, with the two red dots opposite each other, and turning the knurled ring clockwise.
Gelatin Filters
Gelatin filters can be used in combination with the Proshade. Older shades were made for the 3-inch size only. The 3-inch or 4-inch sizes can be used in the new shades made since 1991. The larger 4-inch sizes must be used with wide-angle lenses, long telephotos, and the 110mm Planar. The 3-inch size can be used for lenses from 60 to 250mm. The filters should be placed into gelatin filter holders.
SOFT FOCUS EFFECTS
Some images, especially portraits and fashion illustrations, can be more effective with a soft touch, which also suppresses undesirable details and reduces the need for retouching afterward. Only a slight diffusion is necessary for this purpose. A soft focus effect can be produced with special soft focus lenses or with filters placed in front of the regular sharp camera lenses. Using filters makes more sense because they can be used on different lenses, and different filters can produce different degrees of softness.
Soft focus filters, sometimes called diffusion filters, are made by various manufacturers and produce similar, but not identical, results. Select a type in which the degree of softness is independent of the lens aperture—in other words, one that produces the same degree of softness at all apertures. This is important because you want to set the lens aperture for the desired depth of field, not for the degree of softness. Some filters, like soft focus lenses, produce a large degree of softness with the aperture wide open and an almost sharp image when closed down. In addition, make certain to select a filter that produces the softness not by blurring the image but by producing sharp images with diffused outlines created by the highlights bleeding into the shaded areas. Good soft focus images must not give the impression of unsharpness. Our eyes are not accustomed to seeing blurred things. We always expect to see something sharp, whether we look at the actual subject or a photographic image.
The Softar Filters
The Softar filters, available in sizes for the lenses normally used for people photography in the Hasselblad V system, provide a wonderful solution for professional soft focus photography. The degree of softness is the same at all lens apertures, and they produce sharp images with a beautiful, professional softness. Softar #1 gives the minimum softness, Softar #3 the maximum, with #2 falling somewhere in between. For most pictures, especially portraits and fashion shots, the slight softness of #1 or #2 is sufficient.
Soft focus images can be beautiful in the flat lighting of an overcast or foggy day or with the lighting from a soft box in the studio. The effect can be very striking on backlighted subjects or scenes where the diffusion filter creates a sort of halo effect around every highlight in the scene or subject. Because the effect is produced by bleeding the highlights into shaded areas, the bright areas may produce a halo that can look disturbing against a dark background. Avoid or reduce this effect by photographing against a lighter background, photographing from a different angle, changing the lighting setup, or changing to a weaker soft focus filter.
The Softar filters are made from an acrylic material and should never be cleaned with lens cleaning fluids or other chemicals.
The Hasselblad Soft filters in square shapes for use in the Professional Lens Shade produce a very similar effect as the Softars, maintaining image sharpness and producing a softness unaffected by the lens aperture. The different degree of softness is created with different filters, from “light” to “medium” to “heavy,” with the softness degrees similar to Softar #1, #2, and #3. Because most photographers found the Softars more practical, the Soft filters have been discontinued by Hasselblad.
VISIBLE AND INVISIBLE LIGHT
The light that is visible to the human eye has wavelengths from about 400 nm (violet) to about 700 nm (red). Beyond the red is infrared radiation, which is not visible to the eye but can be recorded photographically on special infrared emulsions. At the other end of the spectrum, beyond the violet, is ultraviolet radiation, which is also used in photography. The ultraviolet wavelengths are divided into three bands: long wave (320–400 nm), middle wave (280–320 nm), and short wave (ultraviolet 200–280 nm). Figure 16-6 illustrates the wavelength spectrum.

Figure 16-6 The wavelength spectrum Visible light extends from 400 nm to 700 nm;infrared radiation has wavelengths above this, and ultraviolet has wavelengths below it. Panchromatic emulsions record radiation up to about 730 nm, infrared films up to about 880 nm, and extreme infrared materials beyond 1000 nm. Ultraviolet light, at the other end of the spectrum, is recorded on regular emulsions. Glass transmits radiation down to about 320mm.
Ultraviolet and Fluorescence Photography
In ultraviolet photography, the subject is illuminated with ultraviolet (UV) light and photographed through a filter, such as the Kodak 18A, that absorbs all the visible light. UV photography is used mainly in the scientific field for the examination of altered documents, engravings, tapestries, paintings, sculptures, and so on. Regular films and lenses can be used for photography in the longer wavelength ranges. Special lenses made from quartz elements are necessary when you work in the shorter ranges. Such a lens of 105mm focal length made by Carl Zeiss used to be available for Hasselblad V system SLR cameras.
Fluorescence photography means photographing objects and materials that fluoresce when subjected to UV light, such as a black light (BLB fluorescent tube). The radiation reflected from the subject is visible to the eye and can be photographed on regular films with regular camera lenses. A UV filter is recommended on the lens. The often brilliant and striking colors call for color film. On daylight film, yellows and reds will be more brilliant; tungsten film will accentuate the blues and greens. Although the difference is small, you should base your choice of film on the fluorescing color that is to be emphasized. Exposure can be determined with a handheld or built-in meter, but test exposures are suggested.
Electronic flash is another light source for fluorescence work. A filter that absorbs most of the visible light, such as a Kodak 18A, must be placed over the flash unit.
Infrared Photography
Infrared radiation has important applications in scientific photography and exciting possibilities for the experimenting photographer for producing images with unusual tonal renditions on black and white film. For most photographic purposes, wavelengths from 700 nm to about 900 nm are used.
Almost all light sources used in photography, including daylight, can be used for infrared work. The photography must be done on special infrared films, which unfortunately are not easy to find or do not exist for medium-format cameras. Most infrared black and white photography is done with a red filter on the lens.
Figures 16-7 and 16-8 show how to focus for infrared photography.
Lenses and Focusing
All photographic lenses transmit infrared radiation and are therefore usable. With infrared color films, the lenses are focused normally because the image is created by a combination of infrared and visible light. With infrared black and white film, focus the lens, manually or automatically, as usual based on the image on the focusing screen. Before you take a picture, read the distance setting on the lens, and move this setting opposite the red infrared index, which is engraved on all H system lenses and on all newer lenses in the V system. This adjustment moves the infrared image on the image plane.

Figure 16-7 Focusing in infrared photography Infrared radiation (B) forms an image farther from the lens than the visible light (A). The image on the image plane (F) is therefore out of focus unless you compensate for this by moving the lens forward (C).
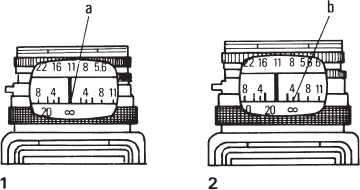
Figure 16-8 Infrared focusing index When you are using a lens with an infrared index, focus the subject visually and read the distance (a) opposite the white index (infinity in this case). Turn the focusing ring so that the distance (infinity) is opposite the red infrared index (b).
The 250mm Sonnar Superachromat is chromatically corrected for infrared radiation up to 1000 nm so that the infrared image is formed at the same plane as normal wavelengths. A focus adjustment is not necessary. The image quality in infrared work and in ordinary black and white photography, especially with red filters, is also improved.