17
Flash Photography with Hasselblad Cameras
ELECTRONIC FLASH PHOTOGRAPHY
Electronic flash units produce a large amount of light from a compact unit that can be attached to the camera or can be part of the camera itself, as on the Hasselblad H camera model. The duration of the flash is short, usually shorter than the shutter speed, and it therefore freezes action and helps to eliminate blurred images due to camera movement. The color temperature of electronic flash matches that of normal daylight, and the two can therefore be combined in color photography. The discussion in this book is limited to location flash photography.
ON-CAMERA FLASH
A flash unit built into the camera or mounted directly on the camera offers the greatest camera mobility in location work. The flat, front lighting is completely satisfactory for candid and news photography and for fill flash work outdoors. The best position for a camera flash is directly above the lens, preferably 6 to 12 inches above the camera lens at least for indoor work. This placement casts the shadows behind and below the people, where they might not be seen, and also eliminates red eye (see Figures 17-1 and 17-2). Red eye is caused when the flash is reflected from the retina at the back of the eye. With the flash well above the camera lens, the light enters the pupil at a slanted angle and does not illuminate the part of the retina that is directly behind the pupil.
Because the flash in outdoor work is usually used as a weak secondary light to fill the shaded areas, a unit right above the lens or built into the camera is completely satisfactory, and red eye is never a problem.

Figure 17-1 Placement of the flash unit A compact flash unit such as the Hasselblad D-Flash 40 is most conveniently mounted on the flash shoe on top of the prism viewfinder. The flash head is right above the camera lens and sufficiently far away to avoid red eye.

Figure 17-2 Red eye 1. Red eye is caused by the flash light being reflected off the blood-filled retina. 2. You can avoid this by placing the flash farther from the camera lens so that the retina is shaded.
Flash Units
The type and size of the required portable flash unit are determined by the amount of light that is needed in your photography and the number of flash pictures that need to be taken. A small, camera-mounted flash with built-in batteries or the unit built into the H camera produces more than sufficient light for fill flash pictures of people outdoors, which are usually made at larger apertures to blur the backgrounds. Such a compact unit is also sufficient for indoor work within about a 15-foot (5-meter) range. Larger flash units are needed to photograph a banquet hall or a factory interior. A larger unit, perhaps with a separate battery pack, is also recommended when a large number of flash pictures need to be made.
The brightness of portable units is indicated in guide numbers, which are based on the film sensitivity. Most companies quote the guide number for 100 ISO (21 DIN) film.
The guide number tells you at what distances the flash must be used for the various lens apertures and therefore can also tell you what the maximum distance is. To obtain the maximum distance, divide the guide number by the maximum aperture of the lens. If the guide number is 42 and the maximum aperture is f/2.8, the distance is 15 feet. Guide numbers are given either in feet or in meters, so you must choose the same units for the conversion. At any distance, the flash exposure is determined by the lens aperture, see Figure 17-3.
FLASH OPERATION
Portable flash units can be made for manual mode, automatic mode, dedicated mode, or a combination of the three. In manual flash, lens apertures must be manually matched to the flash distance and must be changed when the flash is moved closer or farther away. This approach is time-consuming and should be considered only in special situations.
In automatic flash, a sensor built into the flash unit measures the light reflected off the subject and then determines the flash duration that provides correct exposure and turns off the flash at the proper time. Automatic flash eliminates the need for matching aperture to flash distance, but you must still match the aperture setting on the flash unit to the aperture actually set on the lens. After this is done, you can move closer or farther away without any additional adjustments. Automatic flash is a good choice when you are working with the Hasselblad XPan, the 501, and the Superwide camera models as well as all older models in the V system that do not have the dedicated flash option.

Figure 17-3 Flash exposure Because the flash duration is likely shorter than the shutter speed, exposure for flash is determined only by the aperture. Exposure for the flash is the same at any shutter speed within the shutter's synchronization capability.
With all other Hasselblad camera models, dedicated flash is definitely the recommended approach today for all location flash photography, from family snapshots to serious professional candid, portrait, and wedding photography.
DEDICATED FLASH
Dedicated flash is the modern, convenient, reliable form of location flash photography. The flash exposure—the flash duration—is determined by a sensor built into the camera, which measures the light reflected off the image plane (OTF). The flash unit and the camera must be electronically interfaced, something that requires flash units or adapters that are made for a specific camera system.
The Hasselblad H camera is made for dedicated flash at shutter speeds up to 1/800 second. The operation is described in Chapter 4. Hasselblad 503, ELX, and ELD models and all 200 camera models have dedicated flash capability and are used with flash in the same fashion in connection with a flash adapter.
The Hasselblad flash adapter SCA 390 works with flash units based on the SCA 300 system, which is common on European flash units. Some flash manufacturers, such as Quantum and Sunpack, make adapters for use with Hasselblad V system cameras. Consult the Hasselblad distributor for an up-to-date listing. The Hasselblad D-Flash 40 can be used in dedicated fashion on all dedicated flash V system cameras without an adapter.
The sensor in all Hasselblad cameras measures the light reflected off a 40mm center area of the image plane. You can easily visualize the measured area when composing the image on the focusing screen.
The Advantages of Dedicated Flash
Compared with manual or automatic flash, dedicated flash can provide better exposures and more flexibility and allow faster shooting while eliminating mistakes, for the following reasons:
• The sensor measures the light that actually reaches the image plane, which is unquestionably more precise than any other metering mode.
• The metering is done for the selected lens aperture, and you can change the aperture at any time without having to make any further adjustments.
• The metering works with direct or bounced flash, whether the flash is on or off the camera.
• You need not compensate when using filters, teleconverters, or extension tubes.
• With the light measured through the lens (TTL), the area measured by the sensor is matched to the lens that is used for the picture.
• No matter which lens is on the camera, you can visualize the area that is measured by the flash sensor when you compose the image on the focusing screen.
• The ready light is visible in the viewfinder, so you know when you can take a second picture without removing your eye from the finder.
• An exposure signal, also visible in the viewfinder, shows after the picture whether the film received a sufficient amount of light for correct exposure.
• The brightness of the flash can be adjusted independently from the aperture setting, so you can create any desired lighting ratio between the flash and existing light.
Setting the Film Sensitivity
When 503 and ELX or ELD models are used for dedicated flash, the ISO of the film must be set on the flash dial on the side of the camera body. This dial is operative only in dedicated flash operation (see Figure 17-5). This dial is engraved in ASA values only. If you are more familiar with DIN, the conversion chart in Table 17-1 may help. With manual or automatic flash, the film sensitivity must be set on the flash unit regardless of which camera is used.
Setting and Using Flash Units
The Hasselblad D-Flash 40 has all the necessary electronic interface components built into the unit. The D-Flash 40 does not have controls for use with other cameras or for use in other than dedicated fashion.
Other flash units that are used in combination with an adapter with the Hasselblad dedicated flash system in V and H system cameras are set to TTL (see Figure 17-6). The discontinued Hasselblad Pro Flash unit can also be used on Hasselblad V system cameras without an adapter.
Camera–Flash Connections
Connecting flash units to the Hasselblad H cameras is discussed in Chapter 4.
On V system cameras, the six-pin connector on the cable from the adapter is connected to the receptacle on the side of the camera. If the focal plane shutter in 200 cameras is used for the exposure, no other connection is necessary. The 200 cameras can be used for flash in all exposure modes, but the shutter speed must be 1/90 second or longer.
Table 17-1 ISO/DIN Conversion Chart
![]()

Figure 17-4 Flash connections For dedicated operation of V system cameras, the six-pin cable from the flash unit or adapter goes into the six-pin socket on the camera body (b). No other connection is necessary if the focal plane shutter is used for the exposure. When the lens shutter is used, the sync cable must also be connected to the PC socket on the lens (a). When nondedicated flash is used with the focal plane shutter, the sync cable is connected to the PC socket on the camera (c). To insert the dedicated flash cable, rotate the cable to match the grooved parts. Push the plugs straight into the socket, pushing at the flat top on the L-shaped type (d). Grip at the metallic sleeve to disconnect.
If the lens shutter is used on any camera, you must not only connect the six-pin cable to the six-pin socket in the camera but also have a sync cable going from the flash unit or the flash adapter to the sync contact on the lens to synchronize the flash with the shutter in the lens (see Figure 17-4).
If a portable or studio flash unit is used in the automatic or manual mode (nondedicated), you need only connect the sync cable to the sync contact on the camera, if the focal plane shutter is used, or to the sync contact on the lens when the lens shutter is used for the exposure. The old C lenses must be set to X when using electronic flash, see Figure 17-7.
CAMERA OPERATION WITH FLASH
Regardless of how you use the flash, you always set the desired aperture and shutter speed on the lens or camera, keeping in mind that the focal plane flash sync on 200 cameras is up to only 1/90 second. If it is set to a shorter speed, the flash will not fire, a warning will appear in the viewfinder, or the picture will be made automatically at 1/90 second, depending on the Hasselblad camera model.
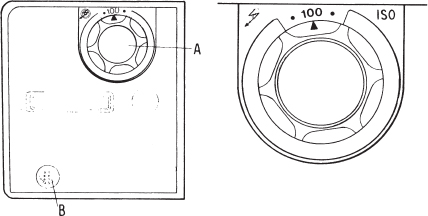
Figure 17-5 ISO setting When dedicated flash is used, the film sensitivity on the 503, 553, and 555 cameras is set by turning the control (A) above the accessory rail until the desired rating is opposite the index. A six-pin connector (B) attaches to the dedicated flash socket on all Hasselblad camera models. The socket is in different locations on different camera models.

Figure 17-6 Flash settings With the ISO set on the camera (a), the flash dial is set to TTL (b). This is not necessary on the Hasselblad D-Flash 40. This unit simply needs to be turned on for either built-in or external battery use (c). The ready light/test button is near the on/off switch (d).
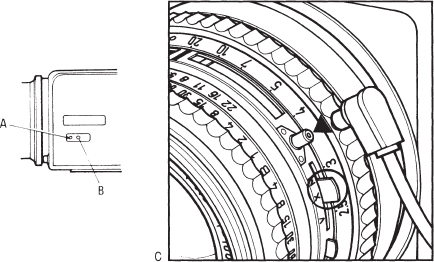
Figure 17-7 Flash with older lenses and cameras Older 500C and 500EL models made before 1976 were equipped with a sync socket (A) on the camera body next to the cable hook opening (B). The sync cable is connected there only when the camera is used without a lens, as in photomicrography. The flash fires when the auxiliary shutter is fully open. C lenses (C) must be set to X for use with electronic flash.
Ready Light and Exposure Signal
In all Hasselblad V system cameras designed for dedicated flash, the flash ready light is visible in the camera's viewfinder as either a green flash symbol (in 200 cameras) or a red light on the left side of the focusing screen (on 500 models). The red light also becomes the exposure signal (see Figure 17-8). When it flickers for about two seconds after the flash fires, it indicates that the film received a sufficient amount of light. If it does not flicker, you must open the aperture, move the flash closer, or change to a faster film. On the 200 model cameras, a flickering signal, LO FLASH, appears on the display immediately after the picture is made, indicating that the flash illumination was insufficient. HI FLASH appears on the display if the light is too strong.
The H camera models can be programmed so that the camera can be released only if a dedicated flash mounted on the hot shoe is fully charged, and this serves the same purpose as a ready light. The H camera also gives a LO FLASH warning if the flash illumination from a dedicated unit is insufficient.

Figure 17-8 Ready light In the 200 camera models with built-in metering system, a green flash symbol on the viewfinder display indicates when the flash is ready to be fired (a). A HI FLASH or LO FLASH warning appears after the picture is made if the flash illumination was excessive or insufficient (b). On the other camera models, the ready light is visible at the edge of the focusing screen (c). It flickers after the exposure if the film received a sufficient amount of light.
USING ELECTRONIC FLASH FOR PHOTOGRAPHING PEOPLE OUTDOORS
Electronic flash is an ideal light source to combine with daylight. Portraits, fashion shots, publicity pictures, and family snapshots are very beautiful when sunlight is used as a backlight or sidelight, with the electronic flash added to lighten the shaded area and bring some light into the faces and eyes of the people being photographed. Such people pictures are very beautiful with the sun used as a backlight or a sidelight placing a highlight on the hair, the shoulders, and perhaps the forehead or cheek (not the nose). Fill flash can also bring some light into the eyes and improve the colors in people pictures taken in the shade or in the soft light of an overcast day. When you photograph in the warm early morning or late afternoon sunlight, place a warming filter over the flash to match the warm sunlight.
Selecting Aperture and Shutter Speed
Because exposure in flash photography is determined only by the lens aperture, any shutter speed within the sync range of the camera provides the same exposure for the flash but not for the surrounding area in the existing light. Location people pictures are a combination of flash and daylight, and they are most effective when the two light sources are combined in a natural-looking fashion with the flash being a secondary light source, not the main light.
Regardless of the type of flash you are using, always start by metering the daylit area that is behind or surrounding the people using the same meter and metering approach that you use for daylight pictures. Based on the meter reading, set the aperture and shutter speed that you feel produces the desired results for the surrounding area. You can make it darker by reducing the shutter speed or make it lighter with a longer speed.
Determining and Changing the Flash Exposure
Regardless of the type and direction of the daylight, the flash exposure must be considered seriously. For a publicity picture, where the main purpose is to see what the people look like, you can use the flash as you do indoors without any reduction. For all other location people pictures, you want to make the flash a secondary light source only for the purpose of lightening the shaded areas or bringing a little light into the eyes. The best flash fill pictures are usually those in which you are not aware that flash was used.
Because you do not want to overflash and because most location pictures are done at larger apertures to blur the background, you do not need a large flash unit for this type of photography. A small portable unit, or the unit built into the Hasselblad H camera, is more than sufficient.
The reduction in the flash illumination that produces the best lighting ratio between the flash and existing light depends somewhat on the type and direction of the existing light. It is best determined by testing your camera and flash unit with the film that you normally use. I have found that a reduction between two and three f stops is most satisfactory. This reduction in the flash exposure can be done beautifully and without changing the exposure for the existing light on all Hasselblad dedicated flash systems. On the Hasselblad V system cameras, you reduce the flash by setting the ISO flash dial on the side of the camera body to a higher value. When this dial is set to ISO 400 with ISO 100 film, it reduces the flash exposure by two stops. Because we did not change the aperture or shutter speed, the exposure for the existing light is the same. Flash exposure is reduced in the same fashion with a flash unit used in the manual or automatic mode. Change the ISO setting on the flash unit.
On Hasselblad H cameras, the reduction up to three f stops is programmed into the camera, as discussed in Chapter 4. On the 200 camera models with built-in meter, the desired flash exposure value is also programmed into the camera body. Set the mode selector to Pr, and press the AE lock in the center of the dial repeatedly until the flash function shows up on the viewfinder display. You can now program into the camera flash exposure values from +1 to -3 by pressing the minus or plus adjustment buttons. The values are set in ⅓ stop increments on the 202 and 203 models and in ¼ stop increments on the 205. Set it to the desired value. It remains programmed into the camera until you change it or the battery is removed.
Flash offers wonderful possibilities in nature photography on overcast days or in shaded areas. Flash adds life, gives the impression of sunlight, produces better colors, allows you to work at smaller apertures, and can reduce the likelihood of blurry pictures due to camera or subject movement. You can also make the flash a front light, a sidelight, or a backlight.

Figure 17-9 Setting the flash exposure On 200 cameras with built-in metering system, the flash exposure is set with the mode selector in the Pr setting. A 0 indicates no reduction in the flash (a). On the 202 and 203 cameras the values are set in ⅓ stop increments, -2/3 in (b). The settings are in ¼ stops on the 205, -2½ in (c).
Determining the Lighting Ratio
The flash fill value, which determines the lighting ratio between the flash and existing light, must be your personal decision. It is best determined with a film test with your equipment, and with the type of film that you intend to use. The latter is very important because films have somewhat different reflectance values. You will probably find that flash values from -1⅓ or -1½ to -2 or -2½ provide natural results with sunlight from the side or back.
ELECTRONIC FLASH IN INDOOR WORK
The approach discussed in Chapter 16 for creating a desired lighting ratio between flash and existing light can also be used indoors if it is desired to make the room part of the picture. This would certainly be the case in a beautiful ballroom, a church, an office, a museum, in beautiful homes, in manufacturing areas. To make the room part of the image, take a meter reading of the part of the room that is behind the people or surrounding the people, as you do outdoors. Try to use the aperture and shutter speed combination based on the meter reading or a value close to it, perhaps one below the value.
Because the amount of existing light is limited in most locations, you may have to use a tripod. Before doing so, however, consider using a film with a higher sensitivity, and do not hesitate to use fairly slow shutter speeds, perhaps 1/30 second. The flash duration is short, reducing the danger of blur due to camera motion, at least in the flashlit subjects, the people.
PRODUCING BETTER FLASH ILLUMINATION
The flash head on built-in and on some portable flash units is small, producing a directional light with sharply outlined shadow lines. You can make the results look more professional by softening the light. To produce a softer light, you must increase the size of the light source. For location work, you can add a small soft box, available in sizes up to about seven inches, to the portable flash unit. Adding such a box reduces the light somewhat, but this loss is more than compensated for by the beautiful results. The portraits no longer have the typical snapshot flash look. The Hasselblad D-40 flash has a larger flash reflector, reducing somewhat the need for a soft box.
Ghost Images
When flash is used with a moving subject in surroundings with sufficient ambient light, we can produce interesting images consisting of a sharp image of the moving subject surrounded by blurred streaks, conveying the feeling of motion. A dancer photographed at 1/15 second, for example, can have just enough blur in the moving arms or legs to indicate the motion while at the same time showing sharp details in the dancer's body. A basketball player photographed at 1/30 second can produce the same results. The shutter speed must be long enough to produce a blur, and the aperture must be set to produce the desired exposure of the existing light.
The Hasselblad H camera can be programmed so that the flash fires either the moment the shutter is fully open or just before it closes. This normal or rear sync option offers more creative possibilities for such images.
IMPROVING YOUR DEDICATED FLASH PICTURES
Although dedicated flash works beautifully and provides consistent exposures in the simplest possible way, there are a few facts you must know and understand to obtain the best possible results.
The sensor in all Hasselblad dedicated flash cameras measures the light reflected off a 40mm center area of the film. The subjects that need to be properly exposed by the flash—the people—must be in that center area, as is usually the case. This is seldom a problem because the measuring area is rather large.
The sensor in the camera, like the sensor in a reflected exposure meter, measures the light reflected from the subject and is adjusted for 18% reflectance. A dedicated (or automatic) flash system produces perfect exposures only when the subject reflects 18% of the light (see Figure 17-10). These variations may cause concern, especially for the wedding photographer, who works with brides dressed in white and grooms dressed in black. Wedding photographers who have been using Hasselblad's dedicated system will admit that variations exist, but they are well within limits for negative films, probably because such pictures are usually a combination of many shades— flowers, flesh tones—rather than only white or black. If desired, you can adjust differences in the reflectance values by using a different ISO setting or programming a different value into the camera. Set the ISO to a lower value for brighter subjects, to a higher value for darker ones. A -2 setting turns the flash off earlier than -1 to compensate for the lower reflectance of darker subjects.

Figure 17-10 Flash tests 1. The flash sensor in the camera is adjusted for 18% reflectance. Bright subjects turn the flash off earlier, creating underexposure; dark subject areas do the opposite. 2. The new Hasselblad rear covers have a center area that reflects the same amount of light as the film does and can be used for checking whether flash illumination is sufficient.
In an OTF dedicated flash system, flash exposures are determined by the amount of light reflected off the film emulsion. There are differences in films, but they are small among transparency films to which the Hasselblad system is optimized. Most negative films reflect somewhat more light, possibly creating a slight underexposure. Because film manufacturers constantly change films, I suggest that you make a test with your film and have it processed and evaluated in your laboratory. You can make compensations in the ISO setting, using a lower ISO, perhaps 80 for ISO 100 film. Set the flash value to +½ or +1/3 to accomplish the same thing with the 200 cameras. The reflectance values are quite different with special films such as instant films, and such films may not be very reliable for dedicated flash exposure tests.
Test Exposures
You may want to check whether there is sufficient light for a dedicated flash exposure before you take pictures and without using instant films. You can do so, but only with film in the camera because it is the film that reflects the light to the sensor. If you do not want to waste a frame for this purpose, you can attach the rear cover that is now supplied with Hasselblad V system cameras (and with the D-Flash 40 unit) to the V system camera in place of the film magazine (see Figure 17-10). These rear covers have a center area with a reflectance value similar to or the same as the film. This rear cover multicontrol is available as an accessory.
Checking Flash Sync
After removing the film magazine from any Hasselblad camera and connecting the flash to the camera, you can look straight through the lens and the shutter to check the flash synchronization (see Figure 17-11). Set the diaphragm and the shutter speed at the values to be checked. Point the camera, with the flash ready signal lit, toward a light wall. Place your eye behind the rear of the camera, and trip the shutter. If you see the flash firing through the fully open shutter, the flash is synchronized. For a complete check, test all shutter speeds (up to 1/90 second for focal plane shutters). This test also shows whether the diaphragm closes down as it should.
Flash Firing Failures
Probably the most annoying happening in photography occurs when flash pictures are made and the flash does not fire. If this happens, check the on/off switch. Check whether the ready light is on. Ensure that focal plane shutter cameras are set at 1/90 second or longer. Check that sync cables are in good order and properly connected. Try another cable. If a contact feels loose, gently squeeze the contact with pliers into an oval shape, thereby making a firmer connection, at least on two sides. If the sync terminal on the lens appears to be loose, have the terminal replaced at a Hasselblad service center. The PC contact on the newer lenses has an improved friction lock to prevent the cable from becoming separated. The PC contacts on the latest lenses include a cable locking device that makes such separation almost impossible (see Figure 17-11).
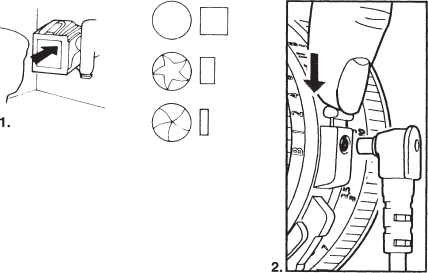
Figure 17-11 Checking flash sync 1. To check flash synchronization, look through the back of the camera while releasing the camera with the flash attached. You should see the flash firing. For a complete check, test at all shutter speeds. 2. The PC contacts on the latest V system lenses include a locking device.
Photographers often attach and remove flash cables from the sync contact by turning the cable back and forth. This is not a recommended procedure, especially on older lenses, because it may loosen the electrical connection. Attach and remove the cable by pushing or pulling it straight up or down. With C lenses, make certain that the flash lever is set to X.
Dedicated Flash with the 205TCC
The original 205TCC (not the FCC model) automatically changes to a “flash mode” when the ready light in dedicated flash appears. Instead of showing the shutter speed calculated by the meter, the display shows the shutter speed physically set on the shutter speed ring, and the exposure is made at the set speed. The automatic metering system no longer works, with the shutter speed changing to the speed set on the shutter speed ring. Use the camera in the Manual (M) mode with the shutter speed preset. This does not happen on the 205FCC or the other focal plane shutter models.
HASSELBLAD FLASH UNITS
The Hasselblad D-Flash 40
The Hasselblad D-Flash 40 flash unit (see Figure 17-12) is compact and lightweight (22 ounces, or 610 grams). This makes it easy to carry yet produces a sufficient amount of light even for most professional applications when you are working with ISO 400 film. It has a guide number of 137 (40 in meters) in the N reflector position, and 110 (33 in meters) in the W position. All electronic components necessary for the dedication to the Hasselblad V system cameras are built into the unit, eliminating the need for accessories. The necessary six-pin flash cable is fixed to the unit, and a separate flash sync cord for use with shutter lenses is supplied. It is not designed for use on the H cameras.
On Hasselblad V system cameras, the D-Flash 40 is most conveniently mounted on the flash shoe on top of a prism viewfinder. This placement brings the flash head high enough above the camera lens for a pleasing light without creating red eye. The power for the flash can come from five AA batteries, five rechargeable AA NiCads, or an external accessory power pack. The choice may be determined from the number of exposures per charge, which is 120 to 1200 from regular AA batteries, 45 to 450 from rechargeable AA types, or 270 to 2250 from the external power pack. The number of flashes always depends on the distance between flash and subject.
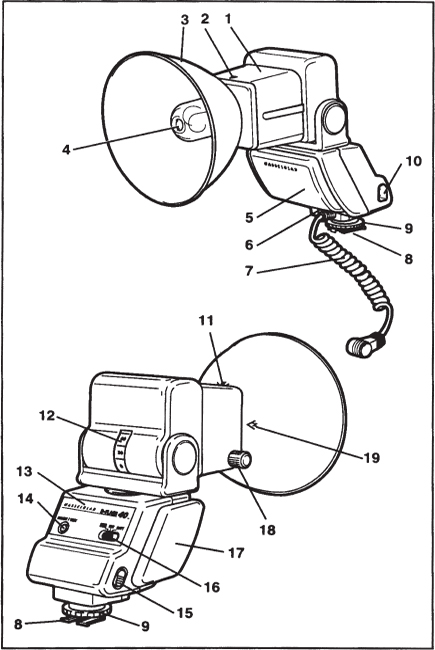
Figure 17-12 The D-Flash 40 operating controls.
1. Tilt and swivel head
2. Index mark
3. Adjustable reflector
4. Flash tube
5. Flash body
6. Sync cord jack
7. Sync cord
8. Flash mounting plate
9. Locking nut
10. External power connection
11. W indication
12. Tilt scale
13. Model designation
14. Ready light and discharge button
15. Battery cassette latch key
16. On/off switch and power selector
17. Battery cassette
18. Reflector locking knob
19. N position
Flash Reflector and Area Coverage
The flash reflector can be moved either to N with a 45-degree illumination angle for lenses 80mm and longer or to W for use with shorter focal length lenses. The reflector can be left in the W position for longer lenses; the light is simply reduced somewhat. The reflector can also be removed completely for bare bulb use.
The Hasselblad Proflash 4505
The Hasselblad Proflash, the forerunner to the D-40 and now discontinued, also has all the necessary electronic components for dedicated use with Hasselblad V system cameras. The Proflash can also be used on Hasselblad or other cameras in the manual or automatic fashion.
Ringlights
Shadowless lighting is obtained when light of equal intensity reaches the subject from all directions. All shadows then cancel each other out. Such lighting can be produced by a ringlight. The Hasselblad ringlight is no longer available. Other companies still make ringlights, but they are seldom used and therefore are not discussed in further detail.

Figure 17-13 Macro unit connected for dedicated operation The power pack (A) with SCA390 adapter (E) at the bottom is connected to a six-pin socket (G) on the camera. The spiral cable (C) attached to the distributor (D) is connected to a socket (J) in the power pack. A straight sync cable (F) goes from the distributor (D) to a multiple coupling (L) attached to the PC contact on the lens. The sync cable (C) interwoven in the spiral cable goes from the multiple connector (L) to the power pack, with the PC end of the cable in the multiple connector. This coupling also works in manual setting, but a simpler connection serves the same purpose.
The Hasselblad Macro Flash
The macro flash unit (discontinued) consists of two small flash units with a guide number 28/92 (meter/feet). The units are connected to a distributor so that the two can fire simultaneously to produce flat front light (almost shadowless in close-up work) or one at a time for directional light from one side, top, or bottom (see Figure 17-13). A special bracket, which mounts in front of the lens with the lens mounting rings from the Proshade, allows mounting the flash heads in either of two ways: on the two arms or one on either arm and the other on top.