Chapter 7. Points and Paths
I remember the first time I tried to use the Pen tool in a computer graphics program. I clicked the tool and dragged across the screen in the way I thought would create a simple curve. Instead, I got a wild series of lines that shot out in different directions. When I tried to change the shape of the curves, things got even worse. I was so startled I immediately closed up the program and didn’t use the Pen tool for a long, long time.
However, I really wanted to use the Pen tool, as I knew it was the best way to create curved shapes. So I forced myself to try the tool again. It took a lot of trial and error but eventually I was able to understand the Pen and Bezier controls. Later on, working with tools such as the Pencil and Eraser made it even easier to work with Bezier curves.
Once I got it, I realized the principles are simple. Even better, if you have used the Pen tool in Adobe Illustrator or Adobe Photoshop, you will find InDesign’s Pen tool almost the same.
I wish someone had written out easy-to-understand, step-by-step instructions on how to use the Pen tool. So think of this chapter as the instructions for the Pen tool that I wish I had had back then.
Pen Points
One of the most important tools in any graphics program is the Pen tool. Fortunately, InDesign has a Pen tool that lets you create much more sophisticated shapes in your layout than can be created with the basic shape tools. (See Chapter 4, “Working with Objects,” for more information on working with the basic shapes.)
Tip
If you are familiar with the Pen tool in Adobe Illustrator or Macromedia FreeHand, you will find it very easy to master the Pen in InDesign.
If you’ve never used a Pen tool in any graphics program, you will understand more if you first become familiar with the elements of paths.
Elements of Paths
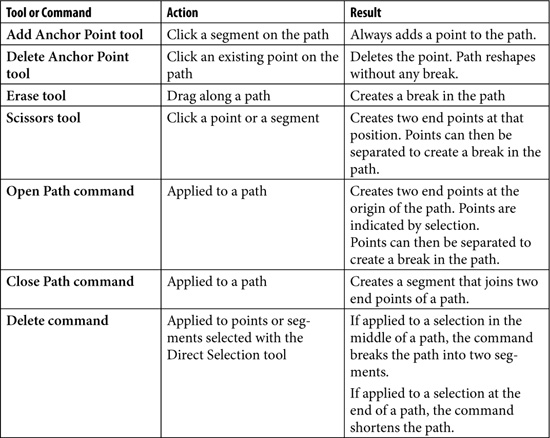
Paths are defined by points and line segments. When you draw with the Pen tool you create the following:
• Anchor points, which define a path at points where the path changes ![]() . These can be plain corner points, smooth curve points, and corner curve points, as explained on the following pages.
. These can be plain corner points, smooth curve points, and corner curve points, as explained on the following pages.
![]() The elements of a path.
The elements of a path.
• Segments, which are the paths that connect anchor points ![]() .
.
• Control handles that extend out from anchor points; their length and direction control the shape of the segment’s curves ![]() .
.
Drawing Lines
Different types of anchor points create different line shapes. Straight lines are formed by creating plain corner points.
- Click the Pen tool in the Tools panel
 .
.
 Click the Pen tool in the Tools panel to create lines.
 - Position the cursor where the path should start. A small X appears next to the Pen, which indicates that you are starting the path
 .
.
 The start icon for the Pen tool.
 - Click. A plain corner point appears as a colored square. The Pen cursor is displayed without any symbol next to it
 .
.
 Click with the Pen tool to create a corner point, shown as a small square.
 - Position the cursor for the next point and click. This creates another plain corner point with a straight line that connects the first point to the second.
- Continue clicking until you have created all the straight-line sides of the object
 .
.
 Straight lines extend between the plain corner points.
To close a path with a straight line:
- Move the Pen over the first point. A small circle appears next to the Pen
 . This indicates that you can close the path.
 The small circle next to the Pen cursor indicates that you will close the path.
 - Click. This closes the path with a plain corner point and allows you to start a new path.
Drawing Curves
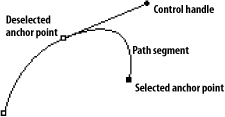
Smooth curve points create curves like the track a roller coaster follows. There are no abrupt changes from one curve to another.
- Drag the Pen tool where you want to start the curve. Handles extend out from the point.
- Release the mouse button.
- Move the cursor to where you want the next part of the curve. Drag to create the curved segment between the two smooth curve points
 .
.
 Drag with the Pen tool to create smooth curves.
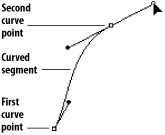
 - Continue to create curved segments by repeating steps 2 and 3
 .
.
 A path with a series of curved segments.
To close a path with a smooth curve:
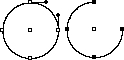
- Move the Pen over the first point. A small circle appears, indicating that you can close the path.
- Drag backwards to close the path
 .
.
 Dragging backwards closes a path with a smooth curve.
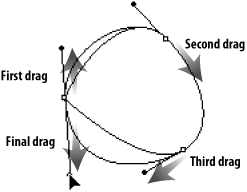
A corner curve point creates curves with an abrupt change in direction. The path of a bouncing ball illustrates a corner curve.
- With the Pen tool active, drag to create an anchor point with control handles.
- Without releasing the mouse button, hold the Opt/Alt key and then drag to pivot the second handle
 .
.
 Hold the Opt/Alt key to pivot the handles, which creates a corner curve.
 - Release the mouse button when the second handle is the correct length and direction.
Changing Curves and Corner Points
If you retract the handle that extends out from a curve point, the next segment becomes a straight line.
- Drag to create a smooth curve point.
- Move the Pen cursor back over the anchor point. A small angle symbol appears next to the cursor.
- Click. The handle retracts back into the anchor point. The point is now a corner point with only one handle
 .
.
 Move the cursor back over a point and click to retract a handle along a curve.
 - Continue the path with either a straight line or a curved line.
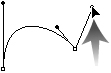
If you create a corner point with no control handles, you can extend a single handle out from that anchor point.
To extend a handle from a point:
- Click to create a corner point with no handles.
- Move the Pen cursor back over the anchor point you just created. A small angle symbol appears next to the cursor.
- Drag to pull a single handle out from the anchor point
 .
.
 Drag with the Pen tool over an existing anchor point to extend a handle out from the point.
 - Continue the path with a curved line.
Modifying Paths
Once you create a path, you can still change its shape and the position of the points. You can also split a path into two separate segments or join two segments together. When you move points, you use the Direct Selection tool.
- Click the Direct Selection tool in the Tools panel
 .
.
 The Direct Selection tool in the Tools panel; use it to move points.
 - Position the tool over the point you want to move.
- Drag the point to the new position.
To select and move multiple points:
- Click the Direct Selection tool in the Tools panel.
- Drag to create a rectangular marquee around the points you want to select
 . The selected points appear solid. The unselected points appear hollow.
 Drag a marquee to select multiple points. The center point does not turn black.
or
Hold the Shift key as you click to select the points.
- Drag the points to the new position.
The Direct Selection tool also lets you change the length and direction of the control handles.
- Click the Direct Selection tool in the Tools panel.
- Click a point on the path. This displays the control handles for that point.
- Position the Direct Selection tool over the end point of the handle.
- Drag the handle to the new position
 .
.
 The Direct Selection tool changes the length and position of a control handle.
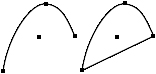
You may want to separate one path into two parts—for instance, to separate two halves of a circle. The Scissors tool makes it easy to split or break a path into segments.
- Select the path.
- Click the Scissors tool in the Tools panel
 .
.
 The Scissors tool in the Tools panel allows you to snip paths in two.
 - Position the cursor where you want to split the path.
- Click to split the path at that point.
Tip
The Scissors tool creates two points, one on top of the other. Use the Direct Selection tool to move one point away from the other
 .
. The Scissors tool splits a path into two points, one on top of the other.
To open paths using a command:
- Select the path.
- Choose Object > Path > Open Path. This opens the path by creating two points, one on top of the other.
To close paths using a command:
- Select the path.
- Choose Object > Path > Close Path. This closes the path by creating a line segment between the end points of the path
 .
.
 The Close Path command joins the two end points of a path.
The path direction comes from the order in which you draw the path. You can change the path direction.
- Use the Direct Selection tool to select the path.
- Choose Object > Path > Reverse Path. This switches the start and end points of the path
 .
.
 The results of applying the Reverse Path command to a path with an arrowhead.
Modifying Points
So what happens if you create the wrong point with the Pen tool? Are you stuck? Does it mean you have to redraw the entire path? Thankfully, no—there are many ways to change the paths made with the Pen tool, as well as paths made with other tools. (See Chapter 4, “Working with Objects,” for more information on working with the basic shapes.)
A simple way to change a path is to add a point. This helps you turn one shape into another.
- Select the path.
- Choose the Add Anchor Point tool in the Tools panel
 .
.
 The Add Anchor Point tool in the Tools panel.
 - Click the path where you want to add the point.

You can delete points from a path without causing a break in the path.
- Select the path.
- Choose the Delete Anchor Point tool in the Tools panel
 .
.
 The Delete Anchor Point tool in the Tools panel.
 - Click to delete the point of the path.

You may also want to create an open path by deleting a segment or the point between two segments.
To delete a segment in a path:
- Use the Direct Selection tool to select the segment that you want to delete.
- Press the Delete key or choose Edit > Clear. This deletes the segment and opens the path
 .
.
 When you select and delete a segment, you keep the points on either side of the segment.
Tip
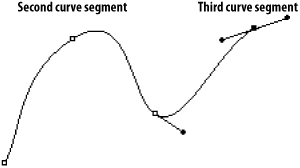
If you select a point with the Direct Selection tool, the two segments on either side of the point can be deleted ![]() .
.

![]() When you select and delete a point, you delete both segments that were attached to the point.
When you select and delete a point, you delete both segments that were attached to the point.
You can also change the control handles around an anchor point. This changes the shape of the segments controlled by that anchor point.
- Select the path.
- Choose the Convert Direction Point tool in the Tools panel
 .
.
 The Convert Direction Point tool in the Tools panel.
 - Use the tool as follows to change the anchor points:
• Press and drag a corner point to create a smooth curve point with two handles
 .
. Drag with the Convert Direction Point tool to change a corner point into a smooth curve point.
• Click a smooth curve point to create a corner point with no handles
 .
. Click with the Convert Direction Point tool to change a smooth curve point into a corner point.
• Drag one of the handles of a smooth curve point to create a corner curve point
 .
. Drag a handle with the Convert Direction Point tool to change a smooth curve point into a corner curve point.
Using the Pencil Tool
Unlike the Pen tool, which uses mathematical principles to draw paths, InDesign’s Pencil tool works more like a traditional Pencil. However, the Pen tool is a little more precise than the Pencil.
Tip
If you are familiar with the Pencil tool in Adobe Illustrator, you will find you already know how to work with InDesign’s Pencil tool.
- Click the Pencil tool in the Tools panel
 .
.
 The Pencil tool in the Tools panel.
A small cross next to the Pencil cursor indicates that you are about to start the path
 .
. The cross next to the Pencil cursor indicates that you are about to start a new path.
 - Press and drag with the Pencil
 .
.
 Press and drag to create a path with the Pencil tool.
 - To close the path, hold the Opt/Alt key. A small circle next to the cursor indicates that the path will be closed
 .
.
 The circle next to the Pencil cursor indicates that the Opt/Alt key will close the path.
 - Release the mouse to create the path.
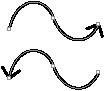
The Pencil tool can also be used to edit existing paths and reshape paths.
To edit paths with the Pencil tool:
- Select the path that you want to reshape.
- Move the Pencil tool near the selected path. The cross next to the cursor disappears. This indicates that you are about to edit the path.
- Drag along the path. When you release the mouse button, the path is reshaped
 .
.
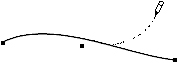 Drag the Pencil tool next to a selected path to reshape the path.
You can change how the Pencil tool responds to the movements of the mouse as you drag. The preferences also control how the Pencil tool edits paths.
To set the preferences for the Pencil tool:
- Double-click the Pencil tool in the Tools panel. This opens the Pencil Tool Preferences dialog box
 .
.
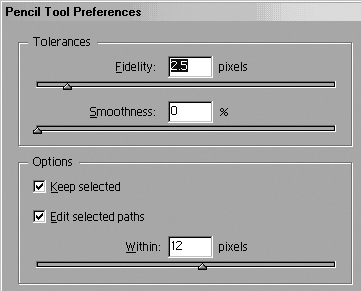 The Pencil Tool Preferences dialog box allows you to control the appearance of the path.
 - Set the amount of Fidelity using the slider or field. The lower the amount of Fidelity, the more the path will follow the motions of the mouse
 .
.
 The Pencil tool Fidelity and Smoothness settings change the appearance of the path.
 - Set the amount of Smoothness using the slider or field. The higher the setting for Smoothness, the more the path will follow curved shapes .
- Check Keep Selected to keep the path selected after you have drawn it. This makes it easier to reshape the path.
- Check Edit Selected Paths to turn on the reshape option.
- If the Edit Selected Paths option is turned on, use the slider or field to set how close the Pencil tool must come, in pixels, to the path you want to reshape.
Using the Smooth Tool
Once you have created a path, you may want to delete extra points so that the path is smoother.
Tip
If you are familiar with Illustrator’s Smooth tool, you will find it easy to use the Smooth tool in InDesign.
To smooth paths with the Smooth tool:
- Select the path that you want to smooth.
- Click the Smooth tool in the Tools panel
 .
.
 The Smooth tool in the Tools panel.
 - Press and drag the Smooth tool along the path.
- Release the mouse. The path is redrawn with fewer points
 .
.
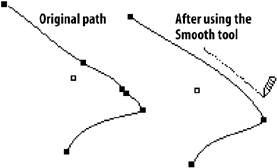 Drag the Smooth tool along a path to remove points and eliminate small bumps and curves.
You can change how the Smooth tool responds to the movements of the mouse as you drag.
To set the preferences for the Smooth tool:
- Double-click the Smooth tool in the Tools panel to open the Smooth Tool Preferences dialog box
 .
.
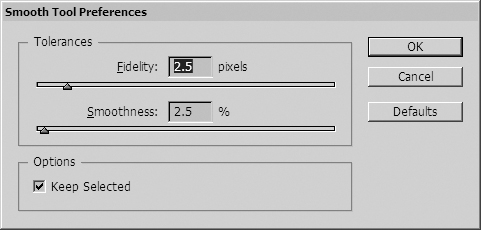 The Smooth Tool Preferences allow you to control how much the Smooth tool affects the appearance of paths.
 - Use the slider or field to set the Fidelity amount. The lower the amount, the more the new path will follow the original path.
- Use the slider or field to set the Smoothness amount. The higher the setting, the more curved the path.
- Check Keep Selected to keep the path selected after you have smoothed it. This makes it easier to increase the smoothness of the path.
Using the Erase Tool
You may want to delete parts of paths. Rather than selecting and deleting individual points, you can use the Erase tool to drag to delete parts of a path.
Tip
If you are familiar with the Erase tool in Adobe Illustrator, you will find it easy to use the Erase tool in InDesign.
To delete paths with the Erase tool:
- Select the path that you want to delete parts of.
- Choose the Erase tool in the Tools panel
 .
.
 The Erase tool in the Tools panel.
 - Press and drag the Erase tool along the path.
- Release the mouse to display the new path
 .
.
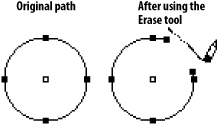 The Erase tool deletes points as you drag it along a path.
Adding or Deleting Points on Paths
The following table compares the different tools and commands as to their effect when adding or deleting points on a path.