
Chapter 14. Automating Your Work
I have a general rule about working with a computer. Anytime I find myself doing the same thing more than ten times in a row, I stop. Most likely there is a command or tool that I can use to automate the process.
That’s what this chapter is about—learning how to automate InDesign so the application does the dull, tedious chores for you. (Sadly, I can’t apply this rule to other parts of my life, such as washing dishes, cleaning the litter box, or folding socks.)
There are many different automation features. You can use Find/Change, Spell Check, Footnotes, and Find Font to quickly change text formatting. Footnotes make it possible to simply choose the command and let InDesign do its stuff.
As amazing as these features are, they are not the ultimate in automation. Chapter 15 shows how text, tables, and object styles are even more powerful automation tools.
Of course, you’re not required to learn any of these automation features. You are perfectly welcome to modify text by hand, one word at a time—especially if you don’t care about doing anything else in your life.
Changing Case
InDesign gives you a command to quickly change text case.
- Select the text you want to change.
- Choose Type > Change Case and then choose one of the following: lowercase, Title Case, Sentence case, or UPPERCASE from the submenu.
Checking Spelling
One of the most popular features of page layout programs is the spelling checker, which searches for misspelled words.
To use the spell check command:
- To check the spelling in a specific text frame or linked frames, click to place an insertion point anywhere within the text.
- Choose Edit > Spelling > Check Spelling. The Check Spelling dialog box appears and displays the first word that needs attention
 .
.
 The Check Spelling dialog box is the command center for a spelling check.
 - Choose one of the Suggested Corrections for the word.
- Click Change. The word is corrected and the next word is displayed.
or
Click Change All to change all instances of the word in the text.
- Click Skip to continue the spelling check without changing that instance of the text.
or
Click Ignore All to continue the spelling check without changing any instance of that word in the text.
- Click Done to stop the spelling check. The dialog box stays open if you want to run more spelling checks.
Once you have opened the Spelling check, you can set which text frames should be searched.
- In the Search list, choose where the spelling check should be performed:
• All Documents checks all open files.
• Document checks the entire active file.
• Story checks all the linked frames of the selected text.
• To End of Story checks from the insertion point.
• Selection checks only the selected text.
- Check the Case Sensitive option to require a match for upper- and lowercase characters.
Of course, the spelling checker wouldn’t be very helpful if it couldn’t make changes to suspect words.
To correct the error displayed:
- Type a correction in the Change To box.
or
Select a word from the Suggested Corrections list
 .
. InDesign gives you a list of suggested corrections for the unknown words found during a spelling check.
 - Click Change to change only that instance of the word in the text.
The Ignore commands only work during a particular session of InDesign. If you use specialized words frequently, you should add them to the dictionary that InDesign uses during a spell check.
To add words to the spelling check dictionary:
• Click Add when the word is displayed during the spelling check.
- Choose Edit > Spelling > Dictionary to open the Dictionary dialog box
 .
.
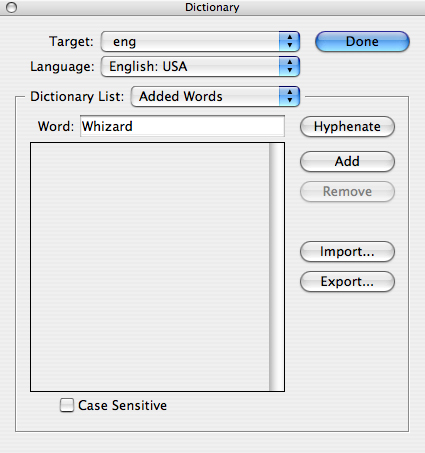 The Dictionary dialog box allows you to add or delete words in the dictionary used during a spelling check.
 - Use the Target list to choose which dictionary you want to add the words to.
- Choose the language from the Language list.
- Choose Added Words, Removed Words, or Ignored Words from the Dictionary List.
- Check the Case Sensitive option to ensure that the case of the word as entered in the dictionary is used during the spelling check.
- Type the word you want to add in the Word field.
or
Select the word you want to remove.
- Click the Add or Remove button.
You may want to send your dictionary list to others. To do this, you can export the list.
To export entries in the spelling check dictionary:
- Click the Export button.
- Name the file and save it.
To import entries into a spelling check dictionary:
- Click the Import button.
- Find the file you wish to import.
InDesign also flags suspect words in the layout or Story Editor the same way it would in the spelling checker.
To use the dynamic spelling:
• Choose Edit > Spelling > Dynamic Spelling. The dynamic spell checker displays unknown words and other spelling errors with wavy underlines ![]() .
.

![]() The wavy underlines indicate which words have been flagged by the dynamic spelling checker.
The wavy underlines indicate which words have been flagged by the dynamic spelling checker.
You can also set InDesign to automatically correct spelling errors as you type. This is called the Autocorrect feature.
To automatically correct spelling errors as you type:
• Choose Edit > Spelling > Autocorrect. A check appears in front of the command to indicate that Autocorrect is turned on.
Tip
The Autocorrection feature only corrects words that are in the Autocorrect preferences or wrongly capitalized words ![]() . It does not automatically correct unknown words or repeated words.
. It does not automatically correct unknown words or repeated words.

![]() An example of how the Autocorrect feature corrects the capital letter and the misspelled word.
An example of how the Autocorrect feature corrects the capital letter and the misspelled word.
Using Find/Change
InDesign has a powerful Find/Change control panel that lets you find and replace text, font characters, or object attributes.
To choose the Find/Change mode:
- Choose Edit > Find/Change. The Find/Change dialog box appears
 .
.
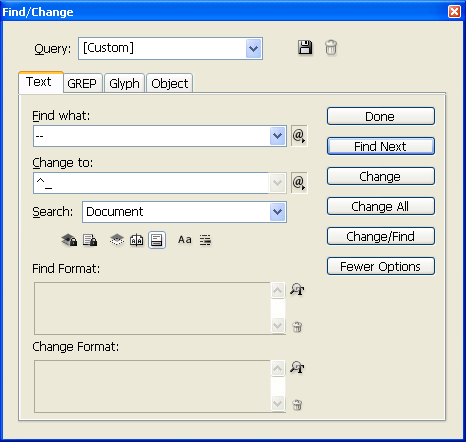
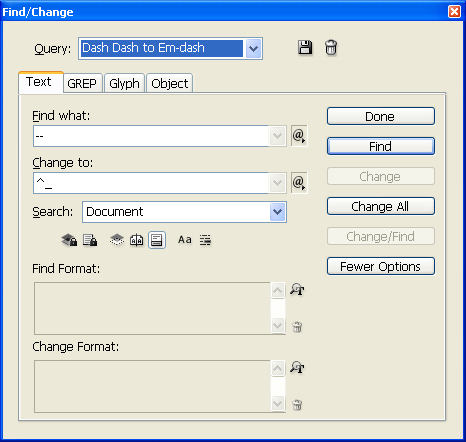 The Find/Change dialog box allows you to set the controls for searching for and replacing text.
 - Click one of the following four Find/Change categories
 :
:
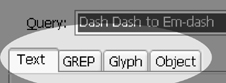 The four categories for Find/Change are Text, GREP, Glyph, and Object.
• Text lets you search and replace strings of text as well as text formatting.
• GREP lets you use codes that search for patterns within text.
• Glyph lets you look for and replace specific glyphs using their Unicode or gid/cid values.
• Object lets you search for and replace objects with certain formatting.
The Find/Change dialog box lets you control which areas of the document are searched.
To set the search areas:
• Click one of the following icons to allow a search in the area ![]() .
.
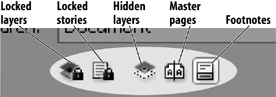
![]() Use the search areas to control which part of the document the Find/Change will look at.
Use the search areas to control which part of the document the Find/Change will look at.
• Locked layers looks on layers that have been locked. This works only for the Find field.
• Locked stories looks inside stories that have been checked out as part of the InCopy workflow. This works only for the Find field.
• Hidden layers looks on layers that have been turned off in the Layers panel.
• Master pages looks on master pages.
• Footnotes looks inside InDesign’s electronic footnotes.
Although all four categories look for and replace different things, the control buttons work the same for all the searches ![]() .
.
![]() The Find/Change buttons control the actions during a search.
The Find/Change buttons control the actions during a search.
To use the Find/Change control buttons:
- Click Find to start the search. Once something has been found, this button changes to Find Next.
- Click Change to make the change without moving to the next instance.
or
Click Change/Find to make the change and move to the next instance.
or
Click Change All to change all the instances in the text.
- Click Find Next to skip to the next occurrence without changing that instance of the found text.
- Click Done if you wish to stop the search without going through the whole document.
Using the Text Find/Change
The Text category looks for text and changes it into new text or applies formatting. A simple Find/Change works with text only.
To set the Find/Change text strings:
- To find and change within a specific text frame or linked frames, click to place an insertion point within the text.
- In the Find What field, type or paste the text you want to search for.
- In the Change To field, type or paste the text to be inserted.
- In the Search pop-up list, choose where the search should be performed
 :
:
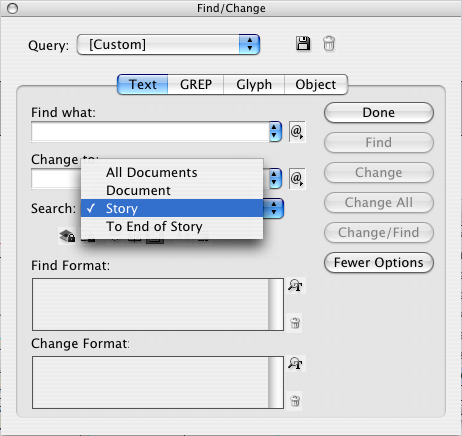 The Search list lets you choose which documents or stories should be searched.
• All Documents checks all open documents.
• Document checks the entire document.
• Story checks all the linked frames of the selected text.
• To End of Story checks from the insertion point.
• Selection checks only the selected text.
- Select Case Sensitive to limit the search to text with the same capitalization
 . For instance, a case-sensitive search for “InDesign” does not find “Indesign.”
 Use the case and whole word controls to modify the parameters of a text Find/Change.
 - Select Whole Word to disregard the text if it is contained within another word . For instance, a whole-word search for “Design” omits the instance in “InDesign.”
- Click Find. InDesign looks through the text and selects each matching text string.
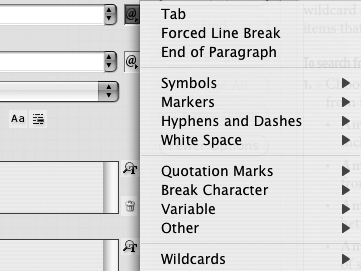
![]() The Find What list lets you enter the special characters to look for in a search.
The Find What list lets you enter the special characters to look for in a search.
InDesign also lets you search for special characters such as spaces, hyphens, paragraph returns, tab characters, or inline graphic markers. These are called metacharacters.
To Find/Change metacharacters:
- Choose the character you want to look for in the Find What menu
 . The codes are entered in the Find What field
  .
.
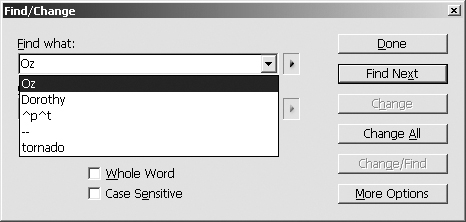
 An example of the metacharacter codes. Here the dashes around a > character are replaced using the codes for thin spaces.
 - Choose the codes you want to substitute in the Change To menu.
- Use the control buttons to run the Find/Change routine.
With the Find/Change dialog box expanded, you can set the formatting options for either the Find or Change field.
To set the Find/Change formatting options:
- Click the Format button in the Find Format Settings area of the Find/Change dialog box. This opens the Find Format Settings dialog box
 .
.
 Click the formatting icons to add specific formatting to the Find/Change queries.
 - Choose those formatting categories on the left side of the Find Format Settings dialog box
 .
.
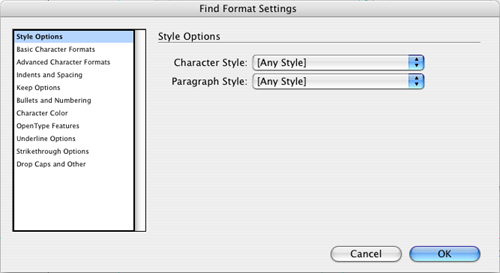 The Find Format Settings for the Find or Change search criteria.
 - Enter the criteria you want to search for in the fields for the chosen category.
- Click OK. The search criteria are displayed in the Find Style Settings area
 .
.
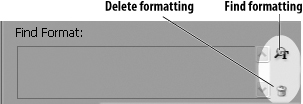
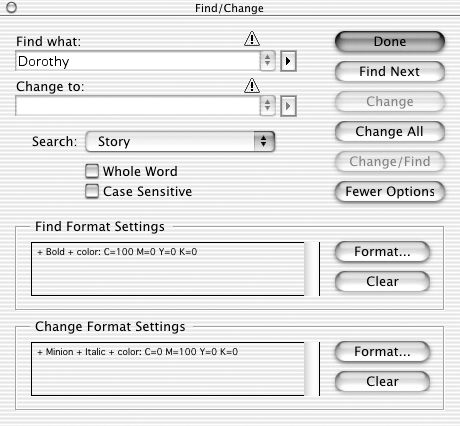 The results of the Find Format Settings are displayed in the Find Format area.
To delete the formatting options:
• Click the Delete icon to delete all the formatting in the Find Format Settings or Change Format Settings area.
Using the GREP Find/Change
- Click the GREP tab in the Find/Change dialog box
 .
.
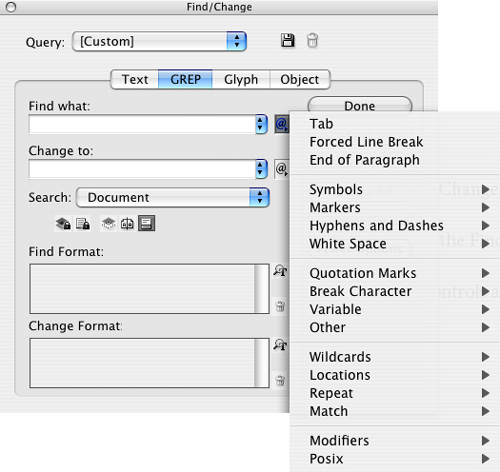 The menu for the GREP codes.
 - Insert the GREP search codes in the Find what or Change to fields.
- Set the rest of the dialog box controls the same way as for the Text Find/Change.
Although it may sound like a rude noise heard after a full meal, GREP stands for Global Regular Expression Parser. This is a set of commands that looks for patterns in text (called regular expressions) and allows you to replace those patterns. While a complete GREP tutorial is way beyond the scope of this book, here’s a simple GREP lesson to help you automate your Find/Change routines.
Let’s say you want to set all the text that is between parentheses as italic. You couldn’t do it with an ordinary Text Find/Change since you don’t know what text is between the parentheses.
The regular expressions in GREP let you insert symbols that stand in for the real text. For instance, to search for any text between two parentheses, you would type ([dlus]*) in the Find what field. Here’s how that search string breaks down:
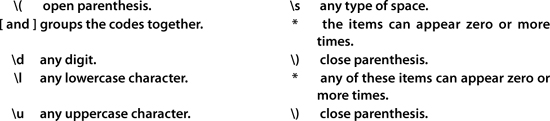
In ordinary talk this translates into find any letters, numbers, or spaces that may or may not appear any number of times between two parentheses. Once you’ve found the text, it’s a simple matter to style it as italic.
Here’s a special offer for readers of this book: You can download a PDF step-by-step tutorial on GREP that I wrote for InDesign Magazine. It also includes files that you can use to follow along as well as a complete list of all the GREP variable codes. Go to http://downloads.indesignmag.com/grep/IDM_GREP.pdf. Download the files and enjoy!
Using the Glyph Find/Change
As mentioned in Chapter 3, characters can have alternate glyphs used for fractions, ligatures, and other letter forms. The Glyph Find/Change area lets you search for these alternate glyphs using special codes as well as visual identification ![]() .
.
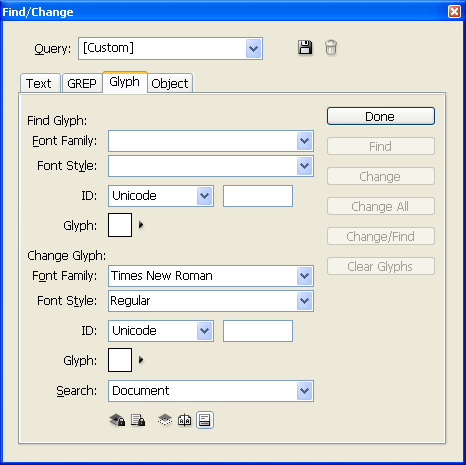
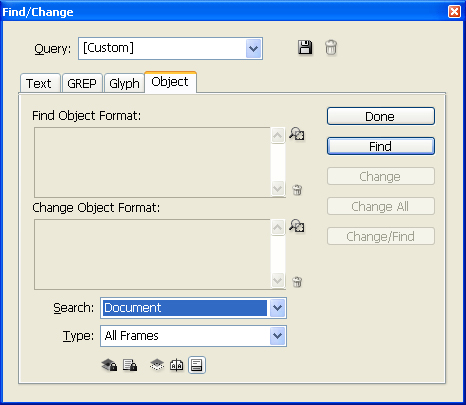
![]() The Glyph category of the Find/Change dialog box.
The Glyph category of the Find/Change dialog box.
- Click the Glyph tab in the Find/Change dialog box.
- Use the Find Glyph and Change Glyph fields to choose one or more of the following:
• Font Family chooses the typeface.
• Font Style chooses the style.
• ID lets you choose either the Unicode or the cid/gid numbering system. Then enter that number in the following field.
• Glyph opens a version of the Glyphs panel, which lets you visually choose the letterform
 .
. The Glyphs panel lets you visually choose the specialized glyphs to find and change.
 - Set the rest of the dialog box controls as described in the earlier section for Text Find/Change.
Using the Object Find/Change
The Object Find/Change lets you search for objects with certain attributes and change them to something else.
To perform object attribute searches:
- Click the Object tab in the Find/Change dialog box
 .
.
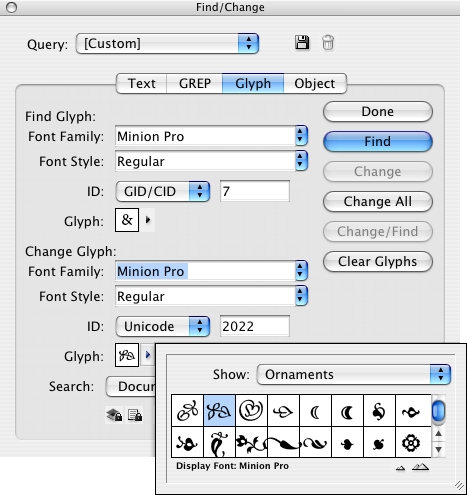
 The Object category of the Find/Change dialog box.
 - Click the Find Formatting icons in the Find Object and Change Object fields. The Object Format Options dialog box opens
 .
.
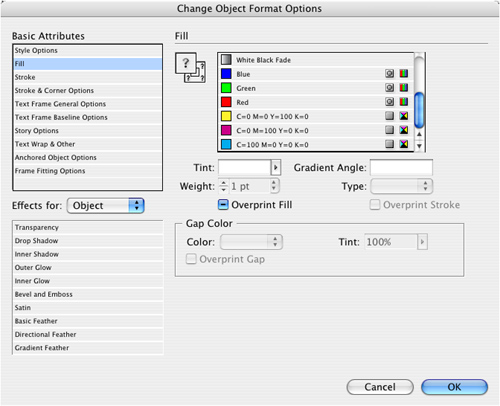 The Object Format Options dialog box lets you choose the attributes to search for or change.
 - Click each of the categories under the Basic Attributes to choose the object style or object attributes .
- Use the Type list to choose Text Frames, Graphic Frames, or Unassigned Frames
 .
.
 Use the Type list to choose a specific type of object frame to search for.
Saving Searches
You can save your searches so you don’t have to type the codes and choose the attributes over and over.
- Click the Save Query icon
 .
.
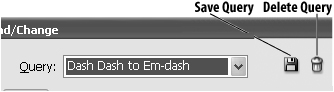 Use the Query controls list to save, apply, and delete Find/Change searches.
 - Name the search.
To apply saved searches:
• Choose the saved search from the Query pop-up list.
- Choose the search you want to delete from the Query list.
- Click the Delete Query icon.
Using the Story Editor
For people like me, one of the good things about electronic page layout is that I edit text as it appears on the page.
For others, one of the bad things about electronic page layout is that they edit text as it appears on the page. Those people like to edit text without seeing images, typefaces, sizes, and other design elements. For those people, InDesign has a Story Editor ![]() .
.
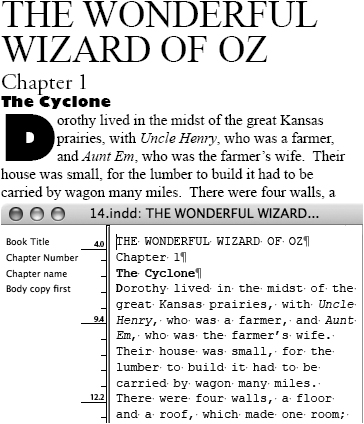
![]() Text is displayed in the Story Editor without most of its special formatting. This makes it easier to make changes to the text.
Text is displayed in the Story Editor without most of its special formatting. This makes it easier to make changes to the text.
- Select the text frame that contains the text you want to edit, or place your insertion point inside the text.
- Choose Edit > Edit in Story Editor. The Story Editor opens.
- Use the right side of the Story Editor to make changes to the text. Any changes you make in the Story Editor appear on the document page.
- Use the left side of the Story Editor to view the paragraph styles that may have been assigned to the text
 .
.
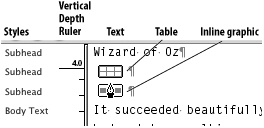 The Story Editor displays the various elements within the story.
 - If your text is overset inside the text frame, the overset text indicator displays where the overset appears
 .
.
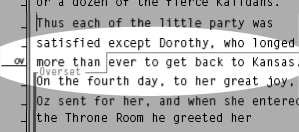 The Overset Text indicator shows where the text extends outside the visible area of the text frame.
Tip
The Story Editor appears as a separate window from your document page. You don’t have to close the Story Editor to move back to the document. Just click the document page to work on it; then click to move back to the Story Editor.
Bullets and Numbering
InDesign can also automatically add bullets and numbers in front of paragraphs. This makes it easier to create and format those paragraph lists.
To apply bullets to paragraphs:
• Click the Bullets icon in the Control panel ![]() .
.
![]()
![]() The Bullets icon in the Control panel quickly applies bulleted lists.
The Bullets icon in the Control panel quickly applies bulleted lists.
or
Choose Type > Bulleted & Numbered Lists > Apply Bullets.
You will most likely want to format your own custom bullets.
To format the bullets in a paragraph:
- Choose Bullets and Numbering from the Paragraph panel menu. The Bullets and Numbering dialog box appears
 .
.
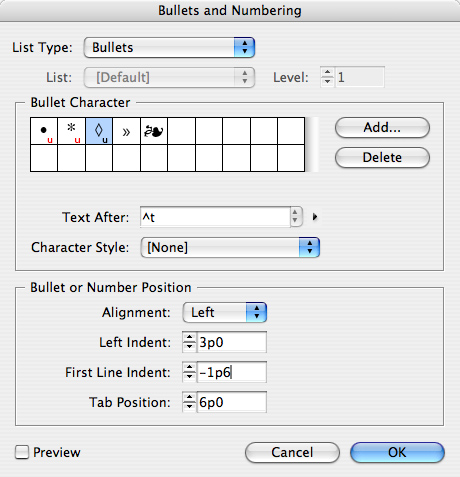 The Bullets options of the Bullets and Numbering dialog box let you select and format bullets automatically.
 - Choose Bullets from the List Type menu. This displays the bullets options.
- Choose a bullet from the Bullet Character glyph display.
- Use the Text After field to type which characters you want to separate the bullet from the start of the text.
- If desired, use the Character Style list to choose a character style to format the bullets. (See Chapter 15, “Styles” for more information on character styles.)
To add custom bullet characters:
- Click the Add button in the Bullets and Numbering dialog box. The Add Bullets dialog box opens
 .
.
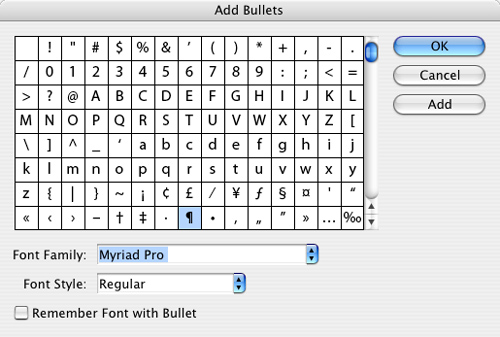 The Add Bullets dialog box lets you add new bullet characters.
 - Use the glyphs area to choose the character for the bullet.
- If you want, choose the Font Family and Font Style for the bullet.
- To set the bullet to a specific font, click Remember Font with Bullet.
- Click Add or OK to add the character to the bullet list and choose new characters.
Bullets are just one type of character that can be added to paragraphs. You can also automatically create numbered lists with the Bullets and Numbering controls.
To apply numbers to paragraphs:
• Click the Numbers icon in the Control panel ![]() .
.
![]()
![]() The Numbers icon in the Control panel quickly applies numbered lists.
The Numbers icon in the Control panel quickly applies numbered lists.
or
Choose Type > Bulleted & Numbered Lists > Apply Numbers.
To format numbers in paragraphs:
- In the Bullets and Numbering dialog box, choose Numbers from the List Type menu to display the numbers options
 .
.
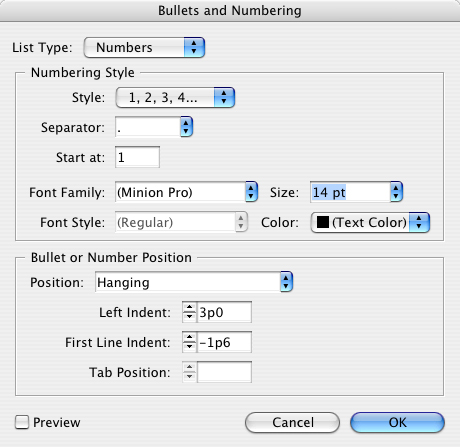 The Numbers options of the Bullets and Numbering dialog box let you select and format numbers automatically.
 - Use the Style list to choose Roman or Arabic numerals, or letters for the list.
- Use the Separator control to choose a character that follows the number. You can also type your own character.
- Use the Start At field to designate what number the list should start with.
- Use the Font Family, Font Style, Size, and Color controls to style the number.
One of the benefits of the automatic bullets and numbers is that you don’t have to worry about inserting tab characters or setting the left and first line indents. The Bullet or Number Position area lets you control those positions.
To set the position of bullets or numbers:
- Open the Bullets and Numbering dialog box.
- Use the Alignment list to choose Left, Center, or Right alignment
 .
.
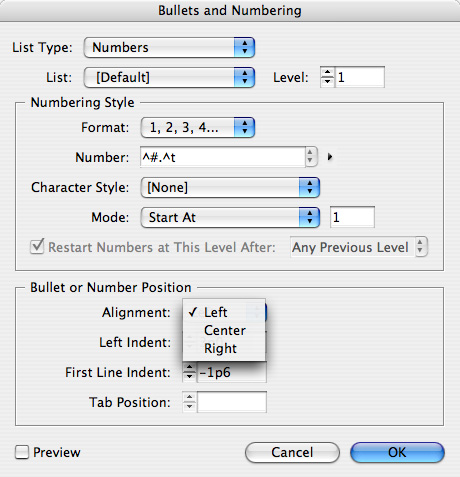 The Position controls of the Bullets and Numbering dialog box.
 - Use the Left Indent field to set how the left margin of the text is indented.
- Use the First Line Indent to set how the first line should be indented separately from the left indent.
- Use the Tab Position field to set the position of the first character after the bullet or number.
There may come a time when you want the automatic bullets or numbers to become ordinary text and stop responding to the automatic controls.
To convert bullets or numbers to ordinary text:
- Select the text.
- Choose Type > Bulleted & Numbered Lists > Convert [Bullets or Numbering] To Text.
Footnotes
Footnotes are the tiny reference markers inserted into text that correspond to comments usually inserted at the bottom of that column of text. InDesign makes it easy to insert, format, and update footnotes.
To insert a footnote into text:
- Position the insertion point where you want the footnote reference to appear.
- Choose Type > Insert Footnote. The reference appears in the text and the insertion point appears in the footnote position at the bottom of the text
 .
.
 Footnotes within text allow you to easily insert reference markers and the footnote text.
 - Type or paste the text for the footnote.
You can also format the style for the reference and the footnote.
To format the style of the footnote:
- Choose Type > Document Footnote Options.
- Click the Numbering and Formatting tab to display those options
 .
.
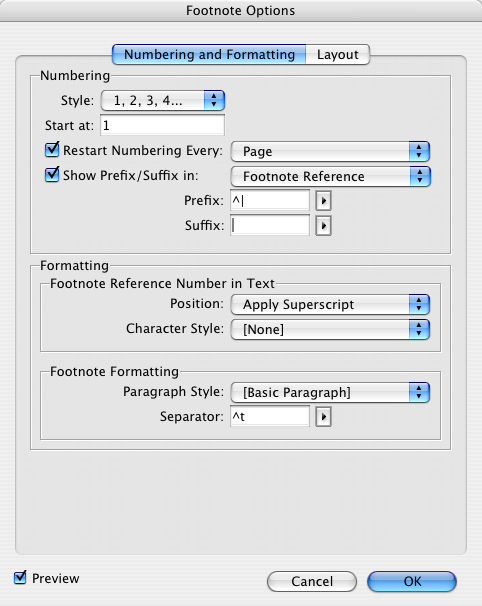 The Numbering controls of the Footnote Options dialog box.
 - Use the Style list to choose Roman or Arabic numerals, symbols, letters, or asterisks for the reference
 .
.
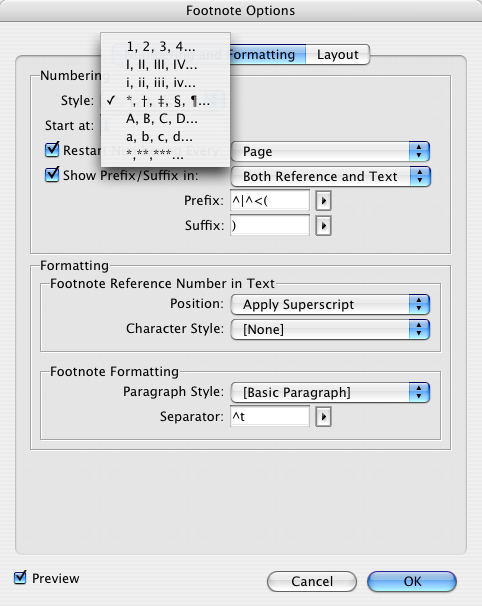 The Style options for the footnote reference.
 - Use the Start At field to set what number the footnotes should start with.
- If desired, click the options for Restart Numbering Every and then choose Page, Spread, or Section.
- If desired, turn on the option for Show Prefix/Suffix in and then choose Footnote Reference, Footnote Text, or Both Reference and Text.
- Use the Prefix field to choose a special character or to type in your own prefix for the reference.
- Use the Suffix field to choose a special character or to type in your own suffix for the reference.
You can also control the appearance of the reference and the footnote text.
- Click the Numbering and Formatting tab to open the Formatting controls
 .
.
 The Formatting controls of the Footnote Options dialog box.
 - Use the Position list to Apply Superscript, Apply Subscript, or Apply Normal position.
- Use the Character Style list to apply a previously defined character style.
- Click the Numbering and Formatting tab to open the Formatting controls .
- Use Paragraph Style list to apply a previously defined paragraph style.
- Use the Separator field to enter a tab or space between the footnote reference and the footnote text.
You can also control the appearance and position of the layout of the footnote.
To control the spacing options for the footnote:
- Click the Layout tab of the Footnote Options dialog box to open the Layout controls
 .
.
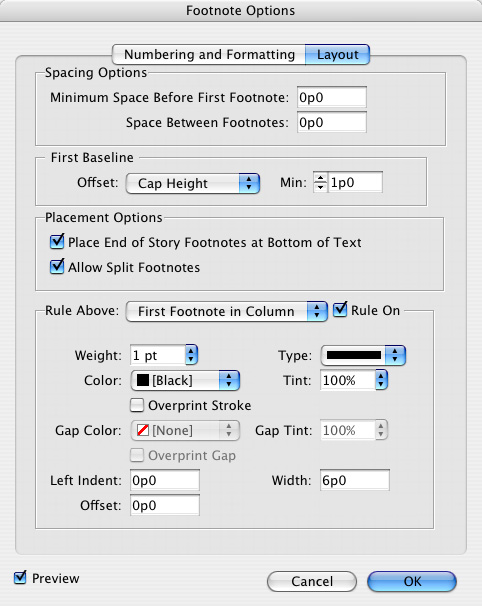 The Layout controls of the Footnote Options dialog box.
 - Use the Minimum Space Before First Footnote field to control how much space separates the bottom of the column and the first footnote.
- Use the Space Between Footnotes field to control the distance between the last paragraph of one footnote and the first paragraph of the next.
You can also control the position of the first baseline of the footnote.
To set the first baseline of the footnote:
- Use the Offset list to choose the vertical alignment for the baseline.
- Use the Min. field to increase or decrease this setting.
- Check Place End of Story Footnotes at Bottom of Text to force a footnote that appears at the end of a story to the bottom of the text frame.
- Check Allow Split Footnotes to permit long footnotes to flow from their original column to the next.
To set the controls for the footnote rule:
- Choose if a separator rule is applied to one of the following:
• First Footnote in Column applies the rule to the first footnote in the text column
 .
.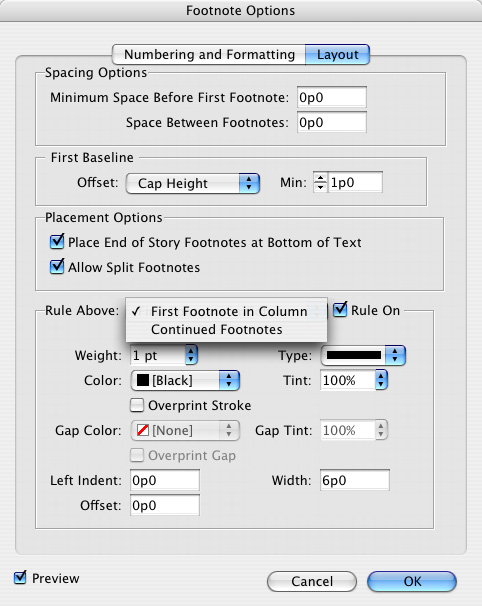 The Layout controls of the Footnote Options dialog box.
• Continued Footnotes applies the rule to footnotes that are continued from previous columns or pages
. - Check Rule On to apply the rule.
- Use the rest of the controls to style the appearance of the rule.
Creating Tagged Text
If you import text from Microsoft Word, InDesign reads the paragraph and character styles applied in Word. But what happens if you want to import text from an application such as a database that doesn’t have style sheets? Tags let you add the codes for styles ![]() so that the correct formatting imports with the text
so that the correct formatting imports with the text ![]() .
.

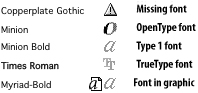
![]() The tagged text codes as they appear outside InDesign.
The tagged text codes as they appear outside InDesign.

![]() The same text as it appears on the InDesign page.
The same text as it appears on the InDesign page.
You can learn the correct tags for different formatting by exporting tags from InDesign.
- Select the text you want to export.
- Choose File > Export.
- Choose Adobe InDesign Tagged Text from the Save as File Type (Win) or Format (Mac) menu.
- Click Save. The Export Options dialog box appears
 .
.
 The Export Options dialog box for setting the Tagged Text options.
 - Choose the type of tag:
• Verbose shows the longer version of the tags.
• Abbreviated shows the short version of the tags.
- Choose the type of encoding
 :
:
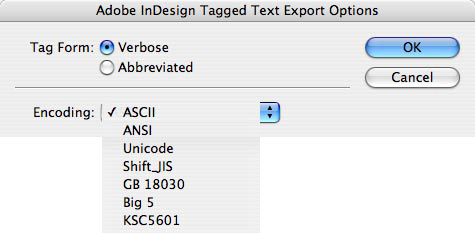 The Encoding menu for how tagged text should be exported.
• ASCII, for most English language files.
• ANSI, for most international characters.
• Unicode, a standard for most languages.
• Shift-JIS, for Japanese characters.
• GB 18030, for Chinese characters.
• Big 5, for Taiwan and Hong Kong traditional Chinese characters.
• KSC5601, for Korean characters.
You can import tagged text as ordinary text. However, there are some special import options for tagged text.
- Choose File > Place.
- Navigate to find the text-only file with the tagged text codes.
- If you want to control how the text is placed, click Show Import Options.
- Click Open. The Adobe InDesign Tagged Text Import Options dialog box appears
 .
.
 The Adobe InDesign Tags Import Options dialog box controls how tagged text is imported.
The tagged-text import options control how any conflicts and missing tags are treated ![]() .
.

![]() The Revolve Text Style Confl icts Using menu lets you determine how two conflicting styles should be resolved.
The Revolve Text Style Confl icts Using menu lets you determine how two conflicting styles should be resolved.
To set tagged-text import options:
- Check Use Typographer’s Quotes to import text with the proper smart quotes.
- Check Remove Text Formatting to import the text without any local formatting applied.
- Use the Resolve Text Style Conflicts Using list to choose how to treat conflicts between the styles in the original document and those in the tagged text file. (See Chapter 15, “Styles,” for more information on working with styles.)
• Publication Definition uses the style as it is already defined in the document.
• Tagged File Definition uses the style as defined in the tagged text. This adds a new style to the document with the word “copy” added to the style name.
- Check Show List of Problem Tags before Place to display a list of incorrect or unrecognized tags.
Using Find Font
In addition to the Find/Change commands for text, InDesign lets you make global changes for font families. This helps if you open documents that contain missing fonts.
To make changes using Find Font:
- Choose Type > Find Font. The Find Font dialog box appears
 .
.
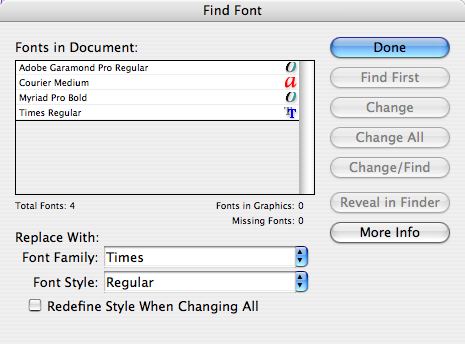 The Find Font dialog box lets you make global changes to the fonts in a document.
 - Select the font that you want to change.
- Use the Replace With controls to choose a replacement for the selected font.
- Click Find First to find the first instance of the font. InDesign highlights the first place the font is used.
- Click one of the following options:
• Find Next skips that instance.
• Change replaces that instance.
• Change/Find replaces that instance and finds the next instance.
• Change All changes all the instances of the font.
- Use the More Info button to find more information, such as if the fonts can be embedded in PDF documents
 .
.
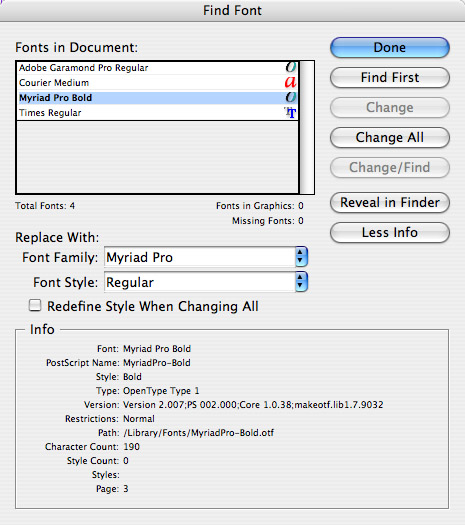 The Info area of the Find Font dialog box gives you more information about the font.
 - Use Reveal in Finder (Mac) or Explorer (Windows) to locate where the font is on the computer.
- Open the document. If fonts are missing, an alert box appears.
- Click Find Font to open the Find Font dialog box.
- Choose the missing font and follow the steps in the previous exercise.
Keeping Lines Together
Another automation technique is to specify how many lines of text must remain together in a column or page. InDesign does this using the Keep Options controls.
To set the keep options for a paragraph:
- Choose Keep Options from the Paragraph panel menu. This opens the Keep Options dialog box
 .
.
 The Keep Options dialog box controls how paragraphs break across columns or pages.
 - Enter a number in the Keep With Next Lines field to force the last line in a paragraph to stay in the same column or page with the specified number of lines.
- Click Keep Lines Together and set one of these options
 :
:
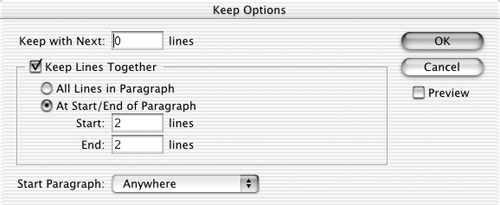 The Keep Lines Together controls of the Keep Options dialog box.
• All Lines in Paragraph prevents the paragraph from ever breaking.
• At Start/End of Paragraph lets you set the number of lines that must remain together for the start and the end of the paragraph.
- Use the Start Paragraph menu to choose where the lines must jump to
 .
.
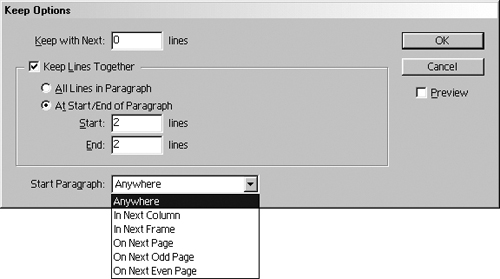 The Start Paragraph list lets you choose where the next lines of the paragraph appear.
• Anywhere allows the text to jump anywhere.
• In Next Column forces the text to the next column or page.
• In Next Frame forces the text to the next frame or page.
• On Next Page forces the text to the next page.
• On Next Odd Page forces the text to the next odd-numbered page.
• On Next Even Page forces the text to the next even-numbered page.
Using the Eyedropper on Text
The Eyedropper tool lets you quickly grab the formatting from one part of the text and apply it to another.
To set the eyedropper options for text:
- Double-click the Eyedropper tool in the Tools panel
 . This opens the Eyedropper Options dialog box.
 The Eyedropper tool in the Tools panel lets you sample and apply text formatting.
 - Click the triangle control to open the Paragraph Settings from the list
 .
.
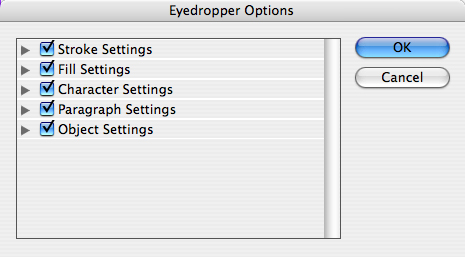 The Eyedropper Options dialog box contains the controls for text as well as object styling.
 - Check which paragraph attributes you want the Eyedropper tool to sample.
- Click the triangle control to open the Character Settings from the list
 .
.
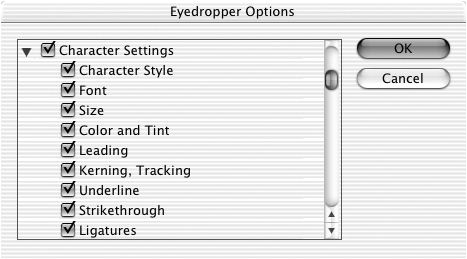 Use the checkboxes to set the Paragraph Settings or the Character Settings.
 - Check which character attributes you want the Eyedropper tool to sample.
Once you have set the eyedropper options, you can sample and apply paragraph or character attributes.
To sample and apply paragraph attributes:
- Choose the Eyedropper tool.
- Click the white eyedropper inside the paragraph that you want to sample
 . The eyedropper changes from white to black.
 - Click the black eyedropper inside the paragraph that you want to change
 . This changes the paragraph attributes.
- Click the eyedropper inside any additional paragraphs that you want to change.

![]() Click the white eyedropper to sample the right alignment of the paragraph attributes.
Click the white eyedropper to sample the right alignment of the paragraph attributes.

![]() Click the black eyedropper to apply the right alignment of the paragraph attributes.
Click the black eyedropper to apply the right alignment of the paragraph attributes.
To sample and apply character attributes:
- Choose the Eyedropper tool.
- Click the white eyedropper inside the text that you want to sample
 . The eyedropper changes from white to black.
 Click the white eyedropper to sample local character attributes.
 - Drag the black eyedropper across the exact text you want to change. This highlights the text
 .
.
 Drag the black eyedropper to apply character attributes to text.
 - Release the mouse to apply the changes.
To sample new text attributes:
- Hold the Opt/Alt key as you click the Eyedropper tool. The Eyedropper cursor changes to white.
- Click the eyedropper inside the new text that you want to sample.
Using Scripts
Perhaps the most powerful way to automate working in InDesign is with AppleScripts on the Macintosh or VisualBasic scripts in Windows. You can also use JavaScripts, which work on both platforms. While you need to know code to write scripts, it’s very easy to run scripts in InDesign. Writing code is much too difficult for me. Running scripts is totally easy. (Honestly, if I can do it, anyone can!)
- Place the script file or the folder containing the script file inside the following directory path:
InDesign Application Folder: Scripts: Scripts Panel.
- Choose Windows > Automation > Scripts to open the Scripts panel
 .
.
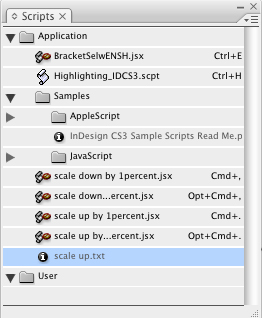 Use the Scripts panel to run scripts from within InDesign.
 - If you have placed a folder inside the Scripts directory, click the triangle controller to open the scripts in the folder.
- Double-click the script that appears in the panel. This prompts the start of the script.
Tip
Certain scripts require an object or text to be selected. Follow any onscreen prompts that occur.
My favorite script was written for me by Peter Truskier of Premedia Systems (www.premediasystems.com). This script automates the process of creating the special spotlight used on certain screen shots in this book. (See page 351, figure ![]() for an example of the effect.)
for an example of the effect.)
With Peter’s marvelous script, I can do in just a single click that which used to take me almost a minute for each illustration. Ordinarily, it costs big bucks to hire people to write scripts for you, but if you go to the Adobe Studio Exchange, (www.adobestudioexchange.com) you will find other similarly wonderful scripts that are free to download.