Chapter 18. Interactive PDF
At the risk of sounding like an old codger, I can remember when a page-layout program only laid out print files. The idea of creating “push buttons” that sent you flying to other pages—or even other documents—was totally unfathomable. After all, how was someone supposed to press on a weather summary on the front page of a newspaper to jump to the full weather map on the last page?
So it is with some amazement that I write this chapter. Page layout no longer refers to just printed pages. InDesign has a wealth of features that let you create interactive elements for electronic documents.
These interactive features may be simple links that let readers move from one page to another. They may be hyperlinks to Web pages. They may also be special bookmarks that can be used as navigational tools. They may even be rollover buttons that can play movies and sounds in a PDF document.
Of course, if you have no interest whatsoever in creating these types of interactive elements, feel free to skip this chapter entirely. Who cares if this is the future of publishing!
Types of Interactive Elements
There are three different types of interactive elements you can add to InDesign documents: Hyperlinks, Bookmarks, and Buttons. Each has its own particular uses, but some of the features may overlap. Before you start work, decide which type of interactive element is right for you.

Defining Hyperlinks
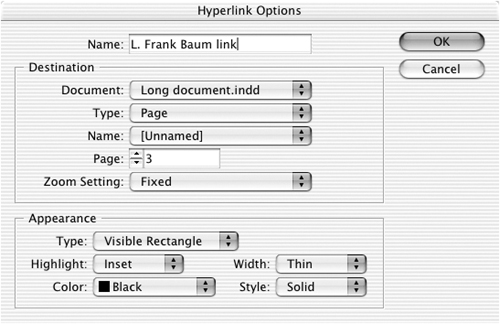
A hyperlink is an area of a page that can be clicked to send the reader to a new page, open a new document, move to a Web page, or send an e-mail message. There are two parts to creating a hyperlink. The source is the object or text that you click to trigger the hyperlink. The destination is the page or Web link you go to.
To choose the type of hyperlink:
- Choose Window > Interactive > Hyperlinks. This opens the Hyperlinks panel
 .
.
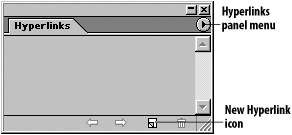 The Hyperlinks panel is used to define both the destinations and the hyperlinks.
 - Choose New Hyperlink Destination from the Hyperlinks panel menu. This opens the New Hyperlink Destination dialog box
 .
.
 The New Hyperlink Destination dialog box lets you set a page destination.
 - Choose the type of hyperlink from the Type menu as follows
 :
:
• Page creates a page destination that links to a specific page in the document. This is the only type of hyperlink that lets you set a magnification for the link.
• Text Anchor creates a link to a selected area of text. This option is only available if you have selected text.
• URL lets you link to an Internet page.
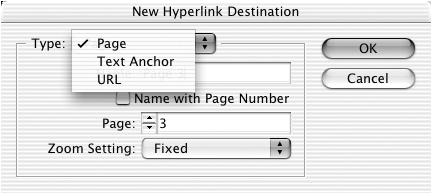 The Type menu lets you choose the type of hyperlink destination.
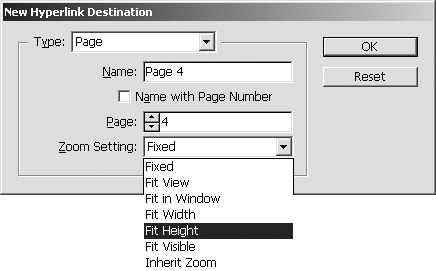
A page destination specifies the page and the magnification to use when you move to the link.
- Choose New Hyperlink Destination in the Hyperlinks panel menu to open the New Hyperlink Destination dialog box.
- Choose Page from the Type menu. This opens the settings for the page destination
 .
.
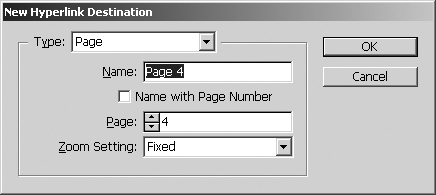 The New Hyperlink Destination dialog box set for a Page destination.
 - Use the Page controls to enter the page number that you want to jump to.
- If desired, use the Name field to enter a descriptive name for the page.
or
Check the Name with Page Number option to automatically name the destination with its page number and whatever Zoom setting has been chosen.
- Choose the Zoom settings as follows
 :
:
• Fixed displays the page as it was when the link was created.
• Fit View displays the visible portion of the page.
• Fit in Window displays the entire page in the document window.
• Fit Width or Fit Height displays the width or height of the page.
• Fit Visible displays the areas that contain text or graphics.
• Inherit Zoom displays the same magnification that was active when the link was clicked.
 The Zoom Setting menu controls the magnification of the destination page.
 - Click OK to create the destination.
The second type of hyperlink is a text anchor. A text anchor destination allows you to link to a specific area of text on a page.
To create a text anchor destination:
- Highlight the text that you want as the destination.
- Choose New Hyperlink Destination in the Hyperlinks panel menu. This opens the New Hyperlink Destination dialog box.
- Choose Text Anchor from the Type menu
 .
.
 The New Hyperlink Destination dialog box set for a Text Anchor destination.
 - Use the default name, which comes from the selected text.
or
Enter a name for the destination.
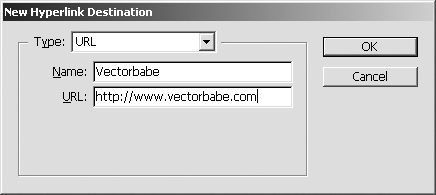
The third type of hyperlink is a URL (uniform resource locator). These are the links that can be used to open Web pages, send e-mail, or transfer files.
- Choose New Hyperlink Destination in the Hyperlinks panel menu to open the New Hyperlink Destination dialog box.
- Choose URL from the Type menu
 .
.
 The New Hyperlink Destination dialog box set for a URL destination.
 - Enter a name for the destination.
- Enter the URL information.
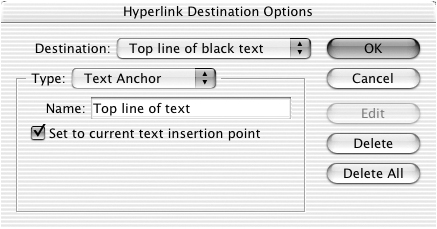
You can use the Hyperlink Destination Options dialog box to edit the destinations that you create for the document. This is also the place where you can see which destinations have been defined for your document.
- Choose Hyperlink Destination Options in the Hyperlinks panel menu to open the dialog box.
- Choose a previously defined destination from the Destination menu.
- Click the Edit button
 . The controls for the destination become active.
 Use the Hyperlink Destination Options dialog box to edit the destinations in a document.
 - Make whatever changes you want to the destination.
or
Click the Delete button to delete the destination from the document.
or
Click the Delete All button to delete all the destinations from the document.
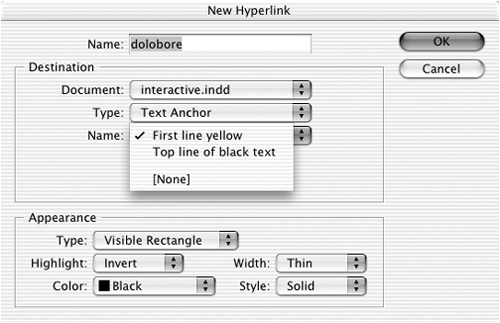
Once you have set the hyperlink destinations, you can then create the hyperlink sources that link to those destinations.
To create a hyperlink from an existing destination:
- Select the text or graphic that you want to be the hotspot or trigger area for the link.
- Click the New Hyperlink button in the Hyperlinks panel.
or
Choose New Hyperlink from the Hyperlinks panel menu. The New Hyperlink dialog box appears
 .
. The New Hyperlink dialog box lets you link to destinations as well as set the appearance of the hotspot area.
 - Use the Name field to name the hyperlink. This is the name that appears in the Hyperlinks panel.
- Set the hyperlink destination as described later in this chapter.
- Set the Appearance as described later in this chapter.
- Click OK to create the hyperlink. The link appears in the Hyperlinks panel.
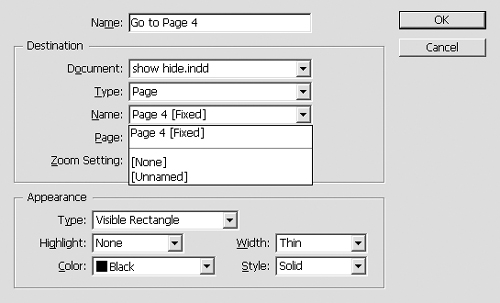
- In the New Hyperlink dialog box, choose Page from the Type menu. This opens the Page Destination area
 .
.
 The Page Destination area of the New Hyperlink dialog box lets you set the destinations for hyperlinks.
 - Use the Document menu to choose the destination document. This adds any destinations that were defined in that document to the Name menu.
- Choose a previously defined page destination from the Name menu
 .
.
 The Name menu lets you choose previously defined page destinations for a hyperlink.
Of course, it’s possible to create a hyperlink without having previously defined a page destination.
To create an unnamed page destination:
- In the New Hyperlink dialog box, choose Page from the Type menu. This opens the Page Destination area.
- Choose [Unnamed] from the Name menu. This allows you to define an unnamed destination.
- Use the Page controls to set the page number.
- Set the Zoom Setting for Hyperlinks as described earlier in this chapter.
To choose a text anchor destination:
- In the New Hyperlink dialog box, choose Text Anchor from the Type menu.
- Use the Document menu to choose the destination document. This adds any destinations that were defined in that document to the Name menu.
- Choose a previously defined text anchor destination from the Name menu
 .
.
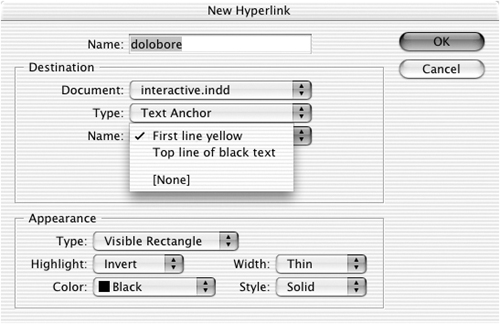 The Name menu lets you choose a previously defined text anchor as a destination for a hyperlink.
To choose a previously defined URL destination:
- In the New Hyperlink dialog box, choose URL from the Type menu. This opens the URL Destination area
 .
.
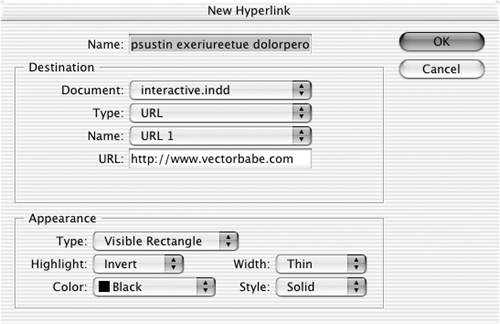 The URL Destination area of the New Hyperlink dialog box lets you set the destinations for URL hyperlinks.
 - Use the Document list to choose the destination document. This adds any destinations that were defined in that document to the Name menu.
- Choose a previously defined URL destination from the Name menu
 .
.
 The Name menu lets you choose previously defined URL destinations for a hyperlink.
You can easily create a URL destination without having previously defined a URL destination.
To create an unnamed URL destination:
- In the New Hyperlink dialog box, choose URL from the Type menu. This opens the URL Destination area
 .
.
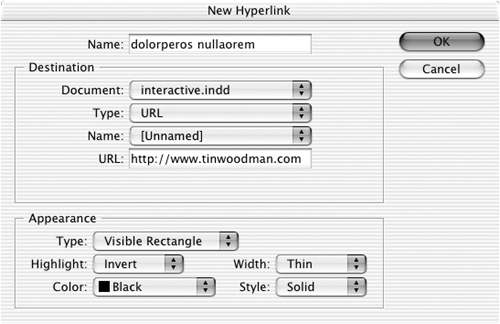 The URL Destination area lets you create an unnamed destination.
 - Choose [Unnamed] from the Name menu. This allows you to define an unnamed destination.
- Enter the URL in the URL field.
Tip
The term [Unnamed] only applies to the destination. The hyperlink itself still has the name you enter at the top of the New Hyperlink dialog box.
To choose the appearance of a hyperlink:
- Use the Type menu in the Appearance area to choose a setting for the visibility of the rectangle around the hotspot
 .
.
• Visible Rectangle creates a rectangular area that can be seen.
• Invisible Rectangle creates a hotspot area that is not shown.
 The Appearance area of the New Hyperlink dialog box lets you set how hyperlinks are displayed in the document.
 - Use the Highlight menu to choose the appearance of the hotspot area when clicked
 :
:
• None creates no highlight on the area.
• Invert creates the effect of inverting the colors of the hotspot area.
• Outline creates an outline rectangle around the hotspot area.
• Inset creates the effect of a 3D cutout in the hotspot area.
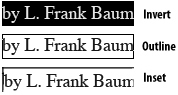 Examples of the three Highlight effects applied to links.
 - Use the Width menu to choose the thickness of the visible rectangle
 :
:
• Thin is the most tasteful setting.
• Medium is a more obvious setting.
• Thick is really too ugly to use.
 Examples of the three Width settings applied to links.
 - Use the Style menu to choose the type of line for the visible rectangle
 :
:
• Solid is the most tasteful setting.
• Dashed doesn’t look as nice.
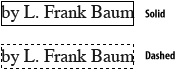 Examples of the Style settings applied to links.
 - Choose a color from the Color menu.
As you work, you can edit the settings for the hyperlink source.
- Double-click the hyperlink entry in the Hyperlinks panel.
or
Choose Hyperlink Options in the Hyperlinks panel menu. This opens the Hyperlink Options dialog box
 .
. The Hyperlink Options dialog box lets you edit the settings for hyperlinks.
 - Make changes in the Hyperlink Options dialog box.
Once you have created a hyperlink, you can change or reset the text selection or frame that was used as the source object.
To reset the hyperlink source:
- Highlight the text or select the frame that you want to be the new hyperlink source.
- In the Hyperlinks panel, select the hyperlink that you want to change.
- Choose Reset Hyperlink from the Hyperlinks panel menu. The original source object is changed to the new selection.
If you have named an external document as a destination, you may need to update the hyperlink to that external document. For instance, if the page name or location has changed, the hyperlink needs to be updated.
To update the hyperlink to an external document:
- Select the Hyperlink in the Hyperlinks panel.
- Choose Update Hyperlink from the Hyperlinks panel menu.
- Choose Reset Hyperlink from the Hyperlinks panel menu.
Working with Hyperlinks
Once you have set up your destinations and hyperlinks, you can use the Hyperlinks panel to navigate through the document. This lets you easily move to specific locations in your InDesign document.
- Select the hyperlink in the Hyperlinks panel
 .
.
 You can use the Hyperlinks panel to navigate through the document.
 - Choose Go to Source from the Hyperlinks panel menu.
or
Click the Go to Source icon in the Hyperlinks panel.
To move to a hyperlink destination:
- Select the hyperlink in the Hyperlinks panel.
- Choose Go to Destination from the Hyperlinks panel menu.
or
Click the Go to Destination icon in the Hyperlinks panel.
To delete a hyperlink destination:
- Select the hyperlink in the Hyperlinks panel.
- Choose Delete Hyperlink from the Hyperlinks panel menu.
or
- Click the Delete Hyperlink icon in the Hyperlinks panel.
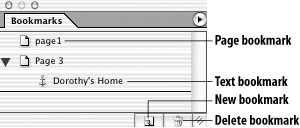
Working with Bookmarks
Bookmarks provide a different way to navigate within a document. Instead of elements on the page, bookmarks are displayed in the Acrobat or Reader Bookmark pane ![]() . The reader clicks each bookmark to move to that position in the document. One of the advantages to using bookmarks is that the bookmark pane can be always visible next to the area being read.
. The reader clicks each bookmark to move to that position in the document. One of the advantages to using bookmarks is that the bookmark pane can be always visible next to the area being read.
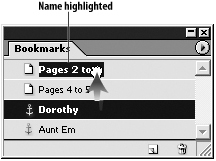
![]() The Bookmarks pane in Acrobat displays the bookmarks created in InDesign.
The Bookmarks pane in Acrobat displays the bookmarks created in InDesign.
- Choose Window > Interactive > Bookmark to open the Bookmarks panel
 .
.
 The Bookmarks panel holds the bookmarks created for the document.
 - Do one of the following to create the destination for the bookmark:
• Place the insertion point at a point within the text. This creates a text bookmark.
• Select the text. This creates a text bookmark named with the selected text.
• Select a frame or graphic. This creates a page bookmark.
• Double-click a page in the Pages panel. This creates a page bookmark.
- Click the New Bookmark icon in the Bookmarks panel.
or
Choose New Bookmark from the Bookmarks panel menu. The bookmark is added to the Bookmarks panel.
Tip
Icons show the difference between text and page bookmarks, although there are no such differences in Acrobat.
New bookmarks are created with the name Bookmark 1, Bookmark 2, and so on. You can rename the bookmark with a more descriptive name to help readers know what is located there.
- Select the bookmark in the Bookmarks panel.
- Choose Rename Bookmark from the Bookmarks panel menu. This opens the Rename Bookmark dialog box
 .
.
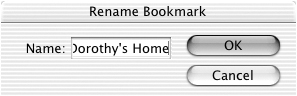 Use the Rename Bookmark dialog box to change the bookmark names.
 - Enter a new name in the field and Click OK.
You can also rename a bookmark directly in the list area of the Bookmarks panel.
To rename a bookmark in the list area:
- Click once to select the bookmark in the Bookmarks panel.
- Click again to open the field that contains the bookmark name
 .
.
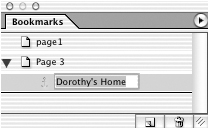 Click the bookmark name to type a new name directly in the Bookmarks panel.
 - Type the new name.
- Press Return/Enter or click a different bookmark to apply the new name.
You can also delete bookmarks you no longer want in the document.
- Select the bookmark in the Bookmarks panel.
- Choose Delete Bookmark from the Bookmarks panel menu.
or
Click the Delete Bookmark icon in the Bookmarks panel.
Bookmarks don’t have to appear in the order that you create them. You can move important bookmarks up to the top of the list, even if they refer to pages that are at the end of your document.
To move bookmarks to new positions:
- Drag the bookmark up or down the list to the new position.
- When you see a black line appear, release the mouse button. The bookmark moves to the new position
 .
.
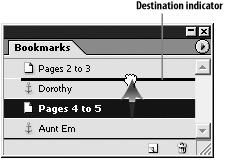 Drag the bookmark up to move it to a new position in the Bookmarks panel.
You can also nest, or move bookmarks so they are contained within others. The top bookmark is called the parent; the nested bookmark is called the child. This allows you to have a very long bookmark list that can be expanded as necessary.
- Drag the bookmark you want to nest onto the name of the parent bookmark.
- When the name is highlighted, release the mouse
 . The child bookmark is indented under the parent. A triangle controller appears that lets you open or close the parent bookmark.
 Drag the bookmark onto the name to nest it under another bookmark.
- Drag the child bookmark out from the parent so that the black line is no longer indented below the parent bookmark
 .
.
 Drag the bookmark up until you see the black line to unnest it from a bookmark.
 - Release the mouse button. The child bookmark is no longer nested.
Adding Sounds
Despite the mind-bending concept of adding sound to a page layout, it’s actually very simple to add sounds to an InDesign document. Just remember, you won’t actually play the sound in InDesign. The sound is played as part of a PDF, when repurposed as part of an XML document.
- Choose File > Place and then choose the sound file you want to import. The cursor changes into the Sound Clip cursor
 .
.
 The Sound Clip cursor indicates you are importing a sound file.
 - Click the Sound Clip cursor on the document. This adds a sound clip object to the document
 .
.
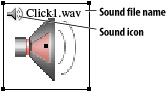 A Sound Clip object created by clicking the Sound Clip cursor.
You can also add an empty sound clip that can be filled with a sound at some other time.
- Draw a frame.
- Choose Object > Interactive > Sound Options. This opens the Sound Options dialog box
 .
.
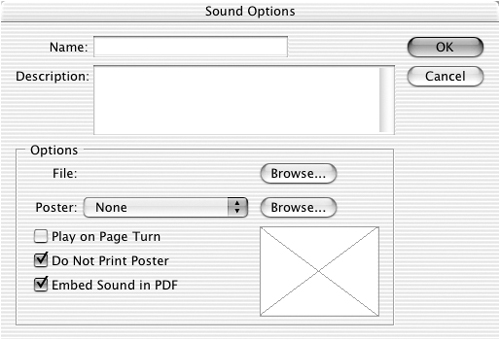 A Sound Options dialog box for an empty sound clip. Notice there is no file specified under Options.
 - Enter a name in the Name field and Click OK. The frame has been converted to an empty sound clip.
If you have an empty sound clip, you use the Sound Options dialog box to fill it with a sound and set the other sound properties.
Tip
You can also edit a filled sound clip by modifying the settings in the Sound Options dialog box.
- Open the Sound Options dialog box by double-clicking the sound clip.
or
Select the sound clip and choose Object > Interactive > Sound Options.
- Enter a name for the sound clip in the Name field
 .
.
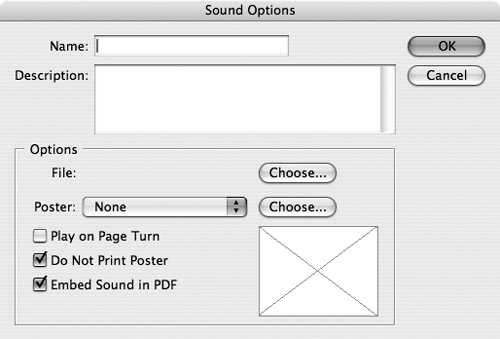 You can set a name and description for a sound in the Sound Options dialog box.
 - If desired, enter a description that can be read by hearing-impaired users.
- Use the Choose button to add a sound to the sound clip or to change the sound in the clip.
- Use the Poster menu to choose an image that will be used to show where the sound is in the document
 :
:
• None leaves the sound clip frame empty.
• Standard uses the standard icon
.• Choose Image as Poster lets you import a custom image to use as the sound poster.
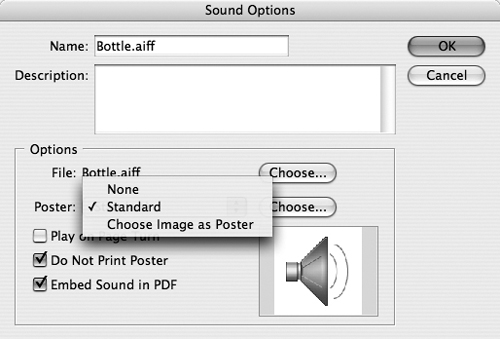 The Sound Options Poster menu lets you choose the image that is displayed in a sound clip.
 - Use the Choose button to choose the custom image
 .
.
 The Options controls for a sound in the Sound Options dialog box.
 - Check Play on Page Turn to have the sound automatically play when the page is opened .
- Check Do Not Print Poster to prevent the poster image from printing .
- Check Embed Sound in PDF to add the sound file to the PDF. If this is unchecked, you will have to make sure the sound file is kept with the PDF document .
Adding Movies
Movies can be easily added to an InDesign document. Just remember, you won’t actually play the movie in InDesign. The movie is played as part of a PDF, when repurposed as part of an XML document, or when packaged for a GoLive Web page. Consider what it would be like if this book came as a PDF. Instead of the static images, you would see little movies that showed how things work.
- Choose File > Place and then choose the movie file you want to import. The cursor changes into the Movie Clip cursor
 .
.
 The Movie Clip cursor indicates that you are importing a sound file.
 - Click the movie cursor on the document
 . This adds a Movie Clip object to the document.
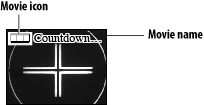 A Movie Clip object appears when you click to import a movie.
You can also add an empty movie clip that can be filled with a movie at some other time or used as the placeholder for a movie connected via a URL.
- Draw a frame.
- Choose Object > Interactive > Movie Options. This opens the Movie Options dialog box.
- Enter a name in the Movie Options dialog box and Click OK. The frame holds an empty movie clip
 .
.
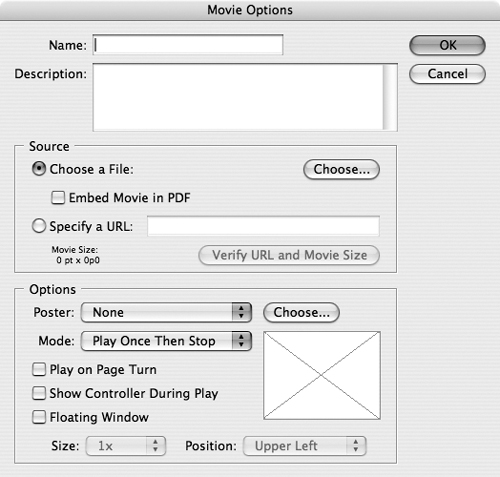 The Movie Options dialog box for an empty movie clip frame.
If you have an empty movie clip, you use the Movie Options dialog box to fill it with a movie and set the other movie properties.
Tip
You can also edit a filled movie clip by modifying the settings in the Movie Options dialog box.
To set the name and movie description:
- Open the Movie Options dialog box by double-clicking the movie clip.
or
Select the movie clip and choose Object > Interactive > Movie Options.
- Enter a name for the movie clip in the Name field
 .
.
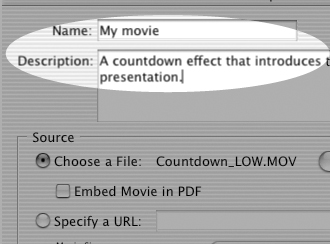 Use the Movie Options dialog box to set the Name and Description for a movie.
 - If desired, enter a description to help identify the movie . This description is used if the movie cannot be played or for visually impaired users who use screen readers to hear the description of the file.
The movie source is the movie clip that will be played. You have several options for how to choose the movie source ![]() .
.
![]() The Source controls set to play a local file within the document.
The Source controls set to play a local file within the document.
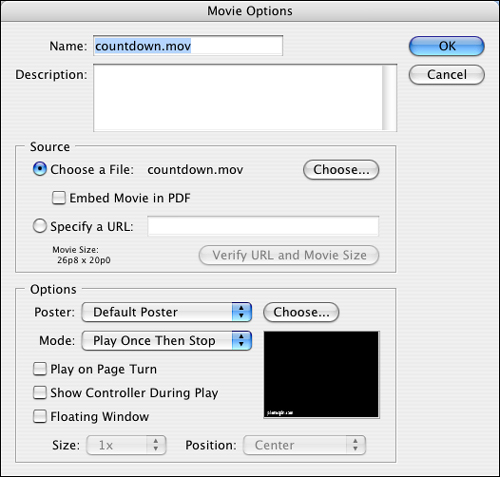
To add a movie to the document movie clip:
- In the Movie Options dialog box, click Choose a File.
- Click the Choose button to navigate to find the movie you want to add to the document.
- Click Embed Movie in PDF to add the movie to the exported PDF.
You can also play streaming media in your PDF document. This avoids all problems with file sizes. However, it does mean that an Internet connection must be available when the movie is played.
To choose a URL connection for a movie:
- Create an empty movie frame and then open the Movie Options dialog box.
- In the Movie Options dialog box, click Specify a URL
 .
.
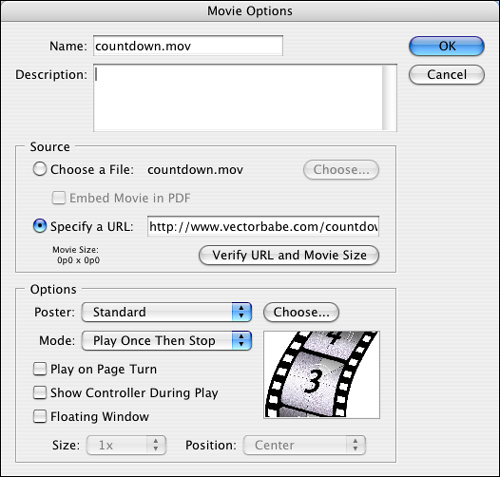 The Source controls set to play a URL-based movie within the document.
 - Type the URL where the movie can be accessed.
- If you have an active Internet connection, click Verify URL and Movie Size to make sure the settings are correct.
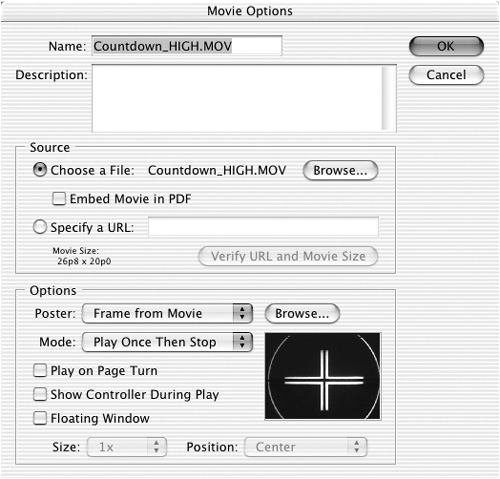
Movie Display Options
You can also set the poster options for the movie. This allows you to set an image that fills the space in the frame for the movie clip.
To set the movie poster options:
• In the Movie Options dialog box, choose one of the following from the Poster menu ![]() :
:
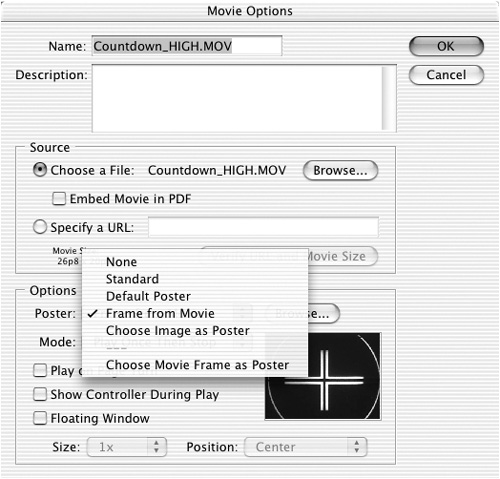
![]() Use the Poster menu to choose the image that is displayed on the static page.
Use the Poster menu to choose the image that is displayed on the static page.
• None sets no poster for the movie.
• Standard uses the image from the StandardMoviePoster.jpg file in InDesign application folder: Presets: Images. This file can be swapped for any other image you want to use.
• Default Poster uses the poster image that was created when the movie was edited.
• Choose Image as Poster lets you navigate to choose an image to use as the poster.
• Choose Movie Frame as Poster opens a dialog box that lets you advance through the movie to choose the poster ![]() . When this option is chosen, the listing Frame from Movie is checked in the menu.
. When this option is chosen, the listing Frame from Movie is checked in the menu.
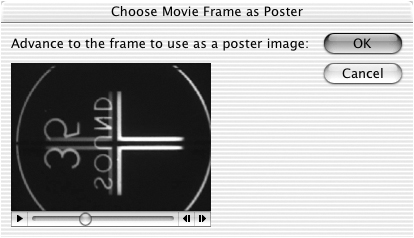
![]() Use the Choose Movie Frame as Poster dialog box to choose the frame you want to add as the movie poster.
Use the Choose Movie Frame as Poster dialog box to choose the frame you want to add as the movie poster.
You can also set the options for how often the movie plays.
To set the play options for the movie:
• In the Movie Options dialog box, choose one of the following from the Mode menu ![]() :
:
• Play Once Then Stop plays the movie a single time.
• Play Once Stay Open plays the movie, then leaves the movie player open to play again.
• Repeat Play sets the movie to play over and over in a loop.
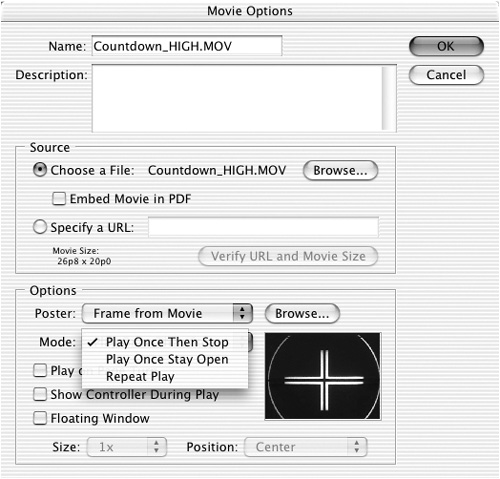
![]() Use the Mode menu to choose how often the movie plays.
Use the Mode menu to choose how often the movie plays.
You can also set the rest of the options for how the movie plays ![]() .
.
![]() The settings at the bottom of the Movie Options dialog box that control how the movie plays.
The settings at the bottom of the Movie Options dialog box that control how the movie plays.
To set the movie display options:
- Check Play on Page Turn to have the movie automatically play when the page is opened.
- Check Show Controller During Play to display the user controls that let you start, stop, rewind, forward, and change the sound of the movie
 .
.
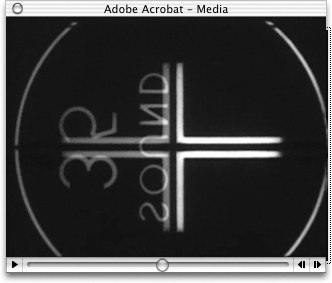 The Controller is displayed at the bottom of the movie.
 - Check Floating Window to display the movie in a separate window that appears above the Acrobat document.
- If you check Floating Window, use the Size menu to set the dimensions of the movie window
 .
.
 Use the Size menu to set the size of a movie that plays in a floating window.
Tip
The size options for a floating window movie are listed in multiples of the original movie size. ½x means one-half times the size of the original. 3x means three times the size of the original. Max means the maximum size to fit the monitor.
- If you check Floating Window, use the Position menu to set where the movie plays in relation to the Acrobat document
 .
.
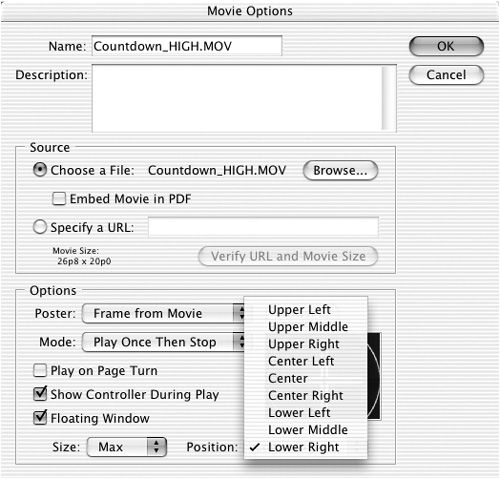 Use the Position menu to choose where a movie that plays in a floating window is displayed.
Creating Buttons
Buttons go much further than links. Links let you move to destinations or open Web pages. Buttons contain the code that can send you to destinations, flip pages, open Web pages, play movies, show and hide other buttons, and other tricks. The first thing you want to do is create a button and assign a simple action.
- Select the Button tool in the Tools panel
 .
.
 The Button tool in the Tools panel.
 - Drag across the page to create the button object. The button appears on the page with a button icon and name
 .
.
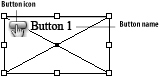 A Button object displays a button icon and a button name.
Tip
Buttons are drawn like any other object. Use all the same modifier keys and techniques that you use when drawing objects. (See Chapter 4, “Working with Objects,” for more information on drawing objects.)
To create a button numerically:
- Select the Button tool in the Tools panel.
- Click with the Button tool on the page. This opens the Button dialog box
 .
.
 You can use the numerical controls in the Button dialog box to set the size of a button.
 - Enter the width and height for the button.
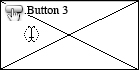
You can also convert any existing object into a button. This makes it easy to turn images or text into buttons ![]() .
.
![]()
![]() An example of how a button can contain text or an image.
An example of how a button can contain text or an image.
To convert an object into a button:
- Select the object that you want to make into a button.
- Choose Object > Interactive > Convert to Button. The button icon and name appear inside the converted object.
You can also add content, such as text or images, to existing buttons.
- Move the Text tool over the button. The cursor changes to curved edges
 . This indicates that text can be added to the button.
 The curved text cursor indicates that you can click to add text to a button.
 - Click the Text tool. A blinking insertion point indicates that you can type text in the button.
- Select the button.
- Choose File > Place and select the text file you want to import. The text flows into the button
 .
.
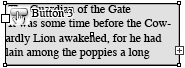 Text can be imported into a button. The overflow symbol lets you flow the text out to another text frame.
- Select the button.
- Choose File > Place and select the image file you want to import. The image appears inside the button
 .
.
 An image can be imported into a button.
General Button Properties
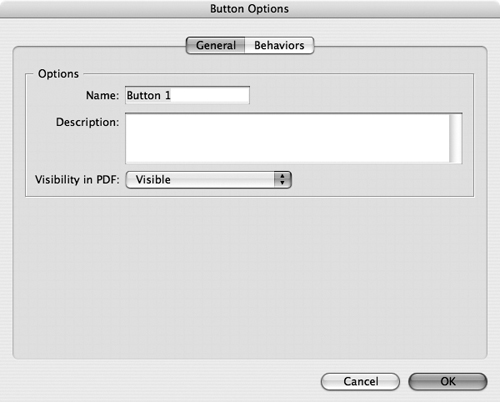
Once you have created a button, you can set its properties. These are divided into two sections. General properties let you name the button and control how it is viewed in the PDF. The other section is the Behavior properties, which let you apply actions to the button.
To set the General controls of the Button Options:
- Double-click the button to open the Button Options dialog box
 .
.
 The Button Options dialog box set to the General control.
or
Select the button and choose Object > Interactive > Button Options.
- Click the General control.
- Choose a name for the button or leave the default name in place.
- Enter a description for the button. This description is visible when the mouse passes over the button in Acrobat. It is also used as the alternate text heard by visually impaired users
 .
.
 Enter a description in the General Button Options that the viewer can see while holding the cursor over the button in the PDF viewer.
 - Choose one of the following from the Visibility in PDF menu
 :
:
• Visible displays the button. This is the most common setting.
• Hidden hides the button. This setting can be overridden by the Show/Hide Fields behavior.
• Visible but Doesn’t Print allows the button to be seen but keeps it from cluttering up any printouts of the page.
• Hidden but Printable allows you to add information to a printout without cluttering up your onscreen page.
 The Visibility in PDF menu in the Button Options dialog box.
Setting the Button States
Part of the fun of using interactive buttons in PDF documents is that you can make the buttons change their appearance when the viewer passes the mouse over them or clicks the button. Each different appearance for the button is called a button state. InDesign lets you add states and control their appearance.
- If it’s not already open, choose Window > Interactive > States to open the States panel
 .
.
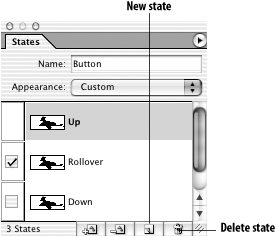 Use the States panel to add new states to the button display.
 - Select the button. Unless you have already modified it, only the Up state is listed in the States panel.
- Click the New State icon to add the Rollover state.
or
Choose New State from the States panel menu.
- Click the New State icon again to add the Down state.
- Select the state you want to delete.
- Click the Delete State icon.
or
Choose Delete State from the States panel menu.
Instead of deleting states, which tosses out their content, it may be easier to change whether or not the state is exported with the PDF. This is called disabling the state.
To enable a state:
• Click the checkbox next to the name of the state ![]() . If the check mark is visible, it means the state is enabled and will export with the PDF.
. If the check mark is visible, it means the state is enabled and will export with the PDF.
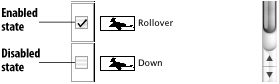
![]() The check marks next to the state names indicate if the state is enabled or disabled.
The check marks next to the state names indicate if the state is enabled or disabled.
or
Choose State Options and check Enable State in the State Options dialog box.
To disable a state:
• Click the checkbox next to the name of the state. If the check mark is not visible, it means the state is disabled and will not export with the PDF.
or
Choose State Options and uncheck Enable State in the State Options dialog box ![]() .
.
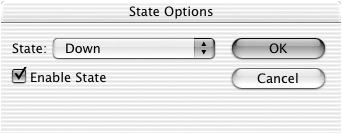
![]() The State Options dialog box lets you convert states or change their enable setting.
The State Options dialog box lets you convert states or change their enable setting.
If you have only a Down state or a Rollover state, you can turn one type of state into another.
- Select the state you want to convert.
- Choose State Options from the States panel menu.
- Use the State menu to change the Down state to Rollover or vice versa.
One of the reasons you want to create button states is so that the button changes appearance as the mouse cursor passes over or clicks the button. There are two ways to accomplish this. The first way is to use imported artwork to change the appearance of each state. The second way is to modify the art inside the button using InDesign’s effects.
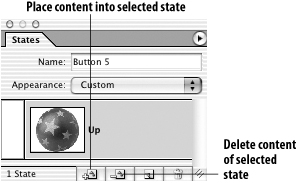
To create new states using imported artwork:
- Create a button. The Up state is automatically selected.
- Click the Place Content into Selected State icon
 . This opens the dialog box that lets you add imported artwork into the Up state.
 Use the States panel to change the artwork in button states.
 - Click the New State icon. This creates a Rollover state that contains the same artwork as the Up state.
- With the Rollover state selected, click the Place Content into Selected State icon. This changes the artwork in the Rollover state
 .
.
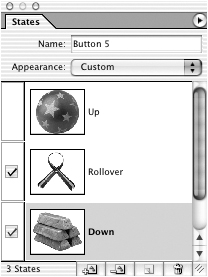 You can change the artwork from one state to another.
or
Choose Place Content into State from the States panel menu.
- Click the New State icon to create the Down state.
- With the Down state selected, click the Place Content into Selected State icon. This changes the artwork in the Down state .
You can use the commands to place content at any time to modify the appearance of a button state.
To edit button states using imported artwork:
- Select the button state you want to modify.
- Click the Place Content into Selected State icon to import new artwork into the button state.
The second way to change the appearance of a button is to directly select the object inside the button frame.
To change a button state by selecting the object:
- Select the button you want to modify.
- Select the state, in the States panel, that you want to modify.
- Use the Direct Selection tool to select the object inside the button frame.
- Use any of InDesign’s styling features to add a fill, stroke, or effect to the object
 .
.
 Each one of the states in this button was modified by selecting the text inside the button and making changes.
You can also delete the artwork from any state.
To delete the content from a button state:
- Select the state.
- Click the Delete Content of Selected State icon. This deletes all the original artwork as well as any effects that you have applied to the state.
or
Choose Delete Content from State from the States panel menu.
You don’t have to work too hard to create different appearances for the button states. Adobe has created three appearance themes that you can instantly apply to buttons. The themes apply different looks to each of the button states.
To apply the appearances to buttons:
- Select the button.
- Choose one of the themes from the Appearance menu in the States panel
 :
:
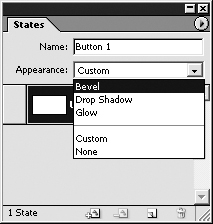 Use the Appearance menu in the States panel to apply preset themes to button states.
• Bevel colors the inside of the button and applies a gradient stroke around the edge of the object, creating the look of a beveled rectangle
 .
. The appearance themes for the button states.
• Drop Shadow colors the inside of the button and applies a drop shadow to the area inside the button frame
.• Glow applies a multicolored gradient to the object inside the button
.Tip
The themes delete any imported images or custom content that was applied to the button states, and they apply their own styled content.
You can modify the appearance themes that you apply to buttons.
- Select the button state.
- Use the Direct Selection tool to select the object inside the button.
- Use any of the style techniques to change the appearance of the theme
 .
.
 Use the Direct Selection tool to customize the appearance of a button state. Here the Down state of the Drop Shadow theme has been modified by changing the gradient and drop shadow effect.
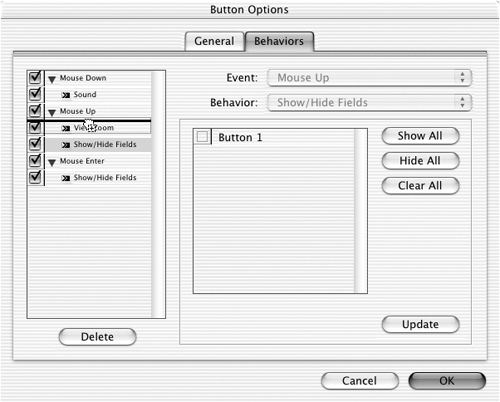
Applying Behaviors
A button without a behavior is like a light switch that is not connected to a lamp. You can press the button all you want, but nothing changes on the page. Behaviors let your buttons move pages, play movies, or change the appearance of thePDF page.
To apply a behavior to a button:
- Select the button.
- Open the Button Options dialog box.
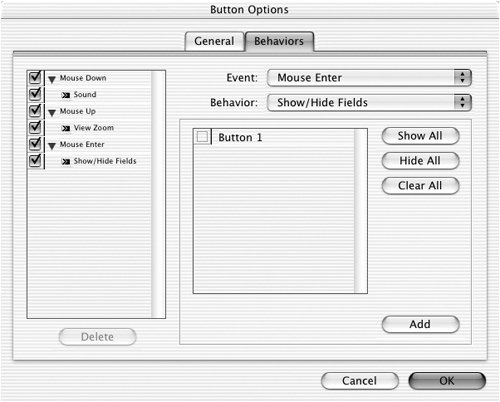
- Select the Behaviors control in the Button Options
 .
.
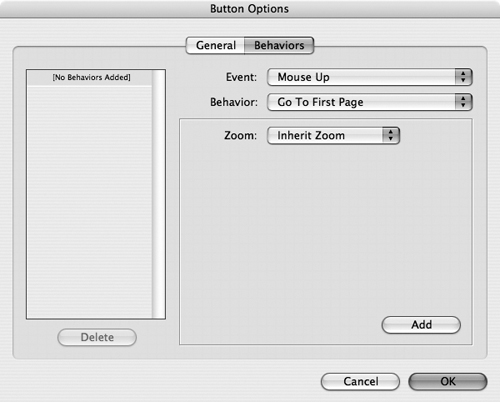 The Behaviors section of the Button Options dialog box.
 - Choose the mouse event that will apply the behavior
 :
:
• Mouse Up applies the behavior when the mouse button is released after a click.
• Mouse Down applies the behavior as the mouse button is pressed down.
• Mouse Enter applies the behavior when the mouse cursor is moved over the button.
• Mouse Exit applies the behavior when the mouse cursor is moved away from the button.
• On Focus applies the behavior when the button is prompted by tabbing through the fields.
• On Blur applies the behavior when tabbing takes the focus off the button.
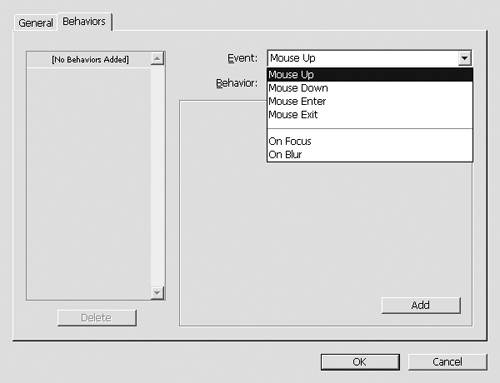 The Events menu lets you set which mouse trigger applies the behavior.
 - Choose the behavior from the Behavior menu
 .
.
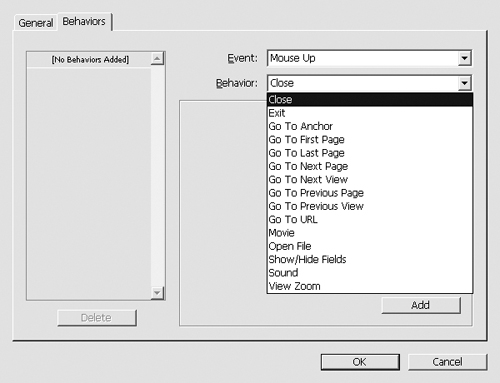 The Behavior menu lets you set which behavior is applied to the button.
 - Depending on the behavior, set any additional controls for the behavior.
- Click the Add button in the Behaviors panel. The event and behavior appear in the list on the left of the dialog box
 .
.
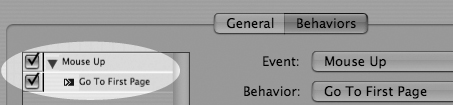 The behavior list shows the events and behaviors that have been applied to the button.
 - If desired, you can apply additional behaviors to the button.
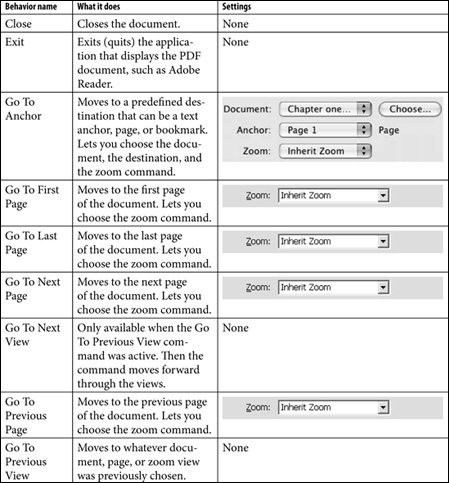
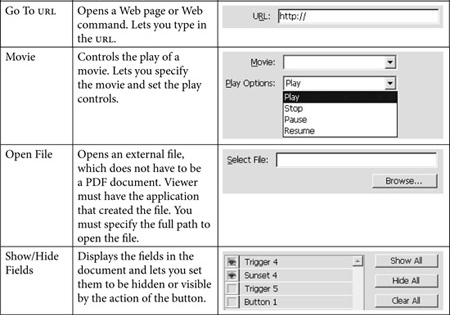
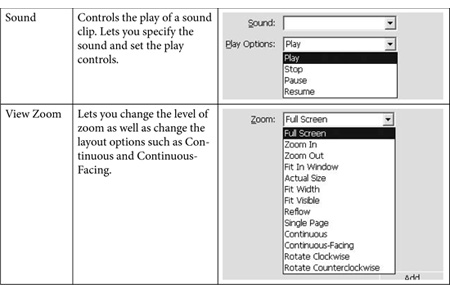
Button Behaviors
Use this chart as a guide to how to apply button behaviors.
Modifying Behaviors
The most sophisticated buttons are those that apply multiple behaviors. You can apply multiple behaviors to the same mouse event or to separate mouse events.
To apply multiple behaviors to a button:
- Select the button and open the Button Options dialog box.
- Select the Behaviors tab.
- Choose the event and behavior settings and then click the Add button. The behavior appears in the list on the left side of the dialog box.
- Choose an additional event and behavior settings, and click the Add button.
- Choose the behavior in the behavior list that you want to edit.
- Make whatever changes you want to the behavior settings.
- Click the Update button.
To change the position of a behavior:
• Drag the behavior up or down in the behaviors list ![]() . The behaviors are applied in the order that they appear in the list.
. The behaviors are applied in the order that they appear in the list.
![]() You can drag a behavior to a new position or to a different event.
You can drag a behavior to a new position or to a different event.
To change the event associated with a behavior:
• Drag the behavior from one event to another in the behaviors list.
You may have applied a behavior that you no longer want applied to the button. Fortunately, you can delete behaviors from the button.
- Select the behavior in the behaviors list that you want to delete.
- Click the Delete button. The behavior will be deleted from the behaviors list
 .
.
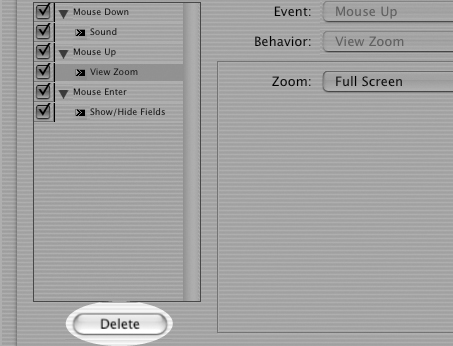 The Delete Button lets you delete behaviors or events from the behaviors list.
Instead of deleting behaviors that you have so carefully defined, you can deactivate them so they are still in the behaviors list but don’t get applied to the final PDF. You can also deactivate all the behaviors under a mouse event.
To deactivate a behavior or mouse event:
- Select the behavior or the mouse event in the behaviors list.
- Click the checkbox next to the behavior or the event
 . This deactivates the behavior or event from the exported PDF.
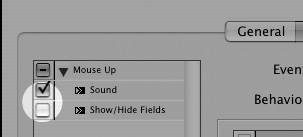 Click the checkbox next to a behavior or an event to deactivate the behavior or event.
Exporting Interactive PDFS
There are a few settings you must be aware of when exporting interactive and multimedia PDFs from InDesign. (See Chapter 20, “Exporting,” for the complete instructions on exporting PDF files from InDesign.)
To set the interactive/multimedia export controls:
- Choose File > Export and then choose Adobe PDF for the format.
- Name the file and click the Save button. This opens the Export Adobe PDF dialog box.
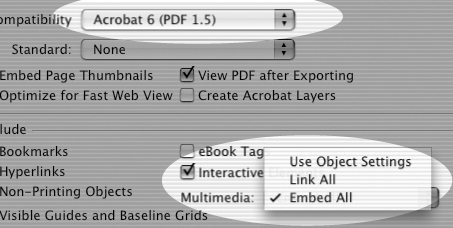
- Check Bookmarks, Hyperlinks, and Interactive Elements to make sure they are part of the final PDF document
 .
.
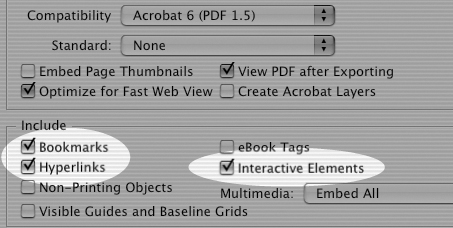 Remember to include Bookmarks, Hyperlinks, and Interactive Elements when you export the PDF document.
 - Use the Multimedia menu to use or override the object embed settings
 .
.