Chapter 3. An Introduction to the Tools
Man is a tool-using animal. Without tools he is nothing, with tools he is all.
—Thomas Carlyle
Stop Me If You’ve Heard This One Before
This book is about the techniques of using tests to guide the development of object-oriented software, not about specific technologies. To demonstrate the techniques in action, however, we’ve had to pick some technologies for our example code. For the rest of the book we’re going to use Java, with the JUnit 4, Hamcrest, and jMock2 frameworks. If you’re using something else, we hope we’ve been clear enough so that you can apply these ideas in your environment.
In this chapter we briefly describe the programming interfaces for these three frameworks, just enough to help you make sense of the code examples in the rest of the book. If you already know how to use them, you can skip this chapter.
A Minimal Introduction to JUnit 4
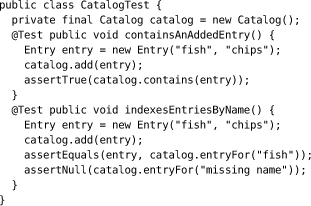
We use JUnit 4 (version 4.6 at the time of writing) as our Java test framework.1 In essence, JUnit uses reflection to walk the structure of a class and run whatever it can find in that class that represents a test. For example, here’s a test that exercises a Catalog class which manages a collection of Entry objects:
1. JUnit is bundled with many Java IDEs and is available at www.junit.org.
Test Cases
JUnit treats any method annotated with @Test as a test case; test methods must have neither a return value nor parameters. In this case, CatalogTest defines two tests, called containsAnAddedEntry() and indexesEntriesByName().
To run a test, JUnit creates a new instance of the test class and calls the relevant test method. Creating a new test object each time ensures that the tests are isolated from each other, because the test object’s fields are replaced before each test. This means that a test is free to change the contents of any of the test object fields.
NUnit Behaves Differently from JUnit
![]()
Those working in .Net should note that NUnit reuses the same instance of the test object for all the test methods, so any values that might change must either be reset in [Setup] and [TearDown] methods (if they’re fields) or made local to the test method.
Assertions
A JUnit test invokes the object under test and then makes assertions about the results, usually using assertion methods defined by JUnit which generate useful error messages when they fail.
CatalogTest, for example, uses three of JUnit’s assertions: assertTrue() asserts that an expression is true; assertNull() asserts that an object reference is null; and assertEquals() asserts that two values are equal. When it fails, assertEquals() reports the expected and actual values that were compared.
Expecting Exceptions
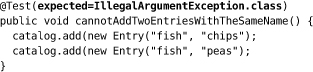
The @Test annotation supports an optional parameter expected that declares that the test case should throw an exception. The test fails if it does not throw an exception or if it throws an exception of a different type.
For example, the following test checks that a Catalog throws an IllegalArgumentException when two entries are added with the same name:
Test Fixtures
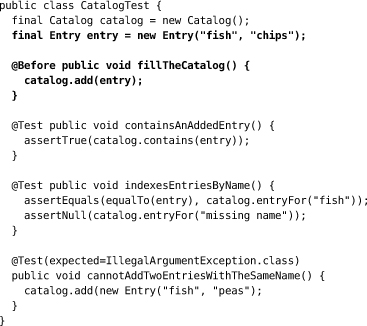
A test fixture is the fixed state that exists at the start of a test. A test fixture ensures that a test is repeatable—every time a test is run it starts in the same state so it should produce the same results. A fixture may be set up before the test runs and torn down after it has finished.
The fixture for a JUnit test is managed by the class that defines the test and is stored in the object’s fields. All tests defined in the same class start with an identical fixture and may modify that fixture as they run. For CatalogTest, the fixture is the empty Catalog object held in its catalog field.
The fixture is usually set up by field initializers. It can also be set up by the constructor of the test class or instance initializer blocks. JUnit also lets you identify methods that set up and tear down the fixture with annotations. JUnit will run all methods annotated with @Before before running the tests, to set up the fixture, and those annotated by @After after it has run the test, to tear down the fixture. Many JUnit tests do not need to explicitly tear down the fixture because it is enough to let the JVM garbage collect any objects created when it was set up.
For example, all the tests in CatalogTest initialize the catalog with the same entry. This common initialization can be moved into a field initializer and @Before method:
Test Runners
The way JUnit reflects on a class to find tests and then runs those tests is controlled by a test runner. The runner used for a class can be configured with the @RunWith annotation.2 JUnit provides a small library of test runners. For example, the Parameterized test runner lets you write data-driven tests in which the same test methods are run for many different data values returned from a static method.
2. By the time of publication, JUnit will also have a Rule annotation for fields to support objects that can “intercept” the lifecycle of a test run.
As we’ll see below, the jMock library uses a custom test runner to automatically verify mock objects at the end of the test, before the test fixture is torn down.
Hamcrest Matchers and assertThat()
Hamcrest is a framework for writing declarative match criteria. While not a testing framework itself, Hamcrest is used by several testing frameworks, including JUnit, jMock, and WindowLicker, which we use in the example in Part III.
A Hamcrest matcher reports whether a given object matches some criteria, can describe its criteria, and can describe why an object does not meet its criteria. For example, this code creates matchers for strings that contain a given substring and uses them to make some assertions:
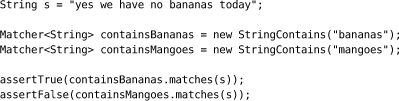
Matchers are not usually instantiated directly. Instead, Hamcrest provides static factory methods for all of its matchers to make the code that creates matchers more readable. For example:
assertTrue(containsString("bananas").matches(s));
assertFalse(containsString("mangoes").matches(s));
In practice, however, we use matchers in combination with JUnit’s assertThat(), which uses matcher’s self-describing features to make clear exactly what went wrong when an assertion fails.3 We can rewrite the assertions as:
3. The assertThat() method was introduced in JUnit 4.5.
assertThat(s, containsString("bananas"));
assertThat(s, not(containsString("mangoes"));
The second assertion demonstrates one of Hamcrest’s most useful features: defining new criteria by combining existing matchers. The not() method is a factory function that creates a matcher that reverses the sense of any matcher passed to it. Matchers are designed so that when they’re combined, both the code and the failure messages are self-explanatory. For example, if we change the second assertion to fail:
assertThat(s, not(containsString("bananas"));
the failure report is:
java.lang.AssertionError:
Expected: not a string containing "bananas"
got: "Yes, we have no bananas"
Instead of writing code to explicitly check a condition and to generate an informative error message, we can pass a matcher expression to assertThat() and let it do the work.
Hamcrest is also user-extensible. If we need to check a specific condition, we can write a new matcher by implementing the Matcher interface and an appropriately-named factory method, and the result will combine seamlessly with the existing matcher expressions. We describe how to write custom Hamcrest matchers in Appendix B.
jMock2: Mock Objects
jMock2 plugs into JUnit (and other test frameworks) providing support for the mock objects testing style introduced in Chapter 2. jMock creates mock objects dynamically, so you don’t have to write your own implementations of the types you want to mock. It also provides a high-level API for specifying how the object under test should invoke the mock objects it interacts with, and how the mock objects will behave in response.
Understanding jMock
![]()
jMock is designed to make the expectation descriptions as clear as possible. We used some unusual Java coding practices to do so, which can appear surprising at first. jMock’s design was motivated by the ideas presented in this book, backed by many years of experience in real projects. If the examples don’t make sense to you, there’s more description in Appendix A and at www.jmock.org. We (of course) believe that it’s worth suspending your judgment until you’ve had a chance to work through some of the examples.
The core concepts of the jMock API are the mockery, mock objects, and expectations. A mockery represents the context of the object under test, its neighboring objects; mock objects stand in for the real neighbors of the object under test while the test runs; and expectations describe how the object under test should invoke its neighbors during the test.
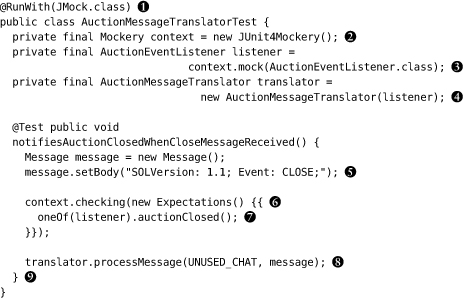
An example will show how these fit together. This test asserts that an AuctionMessageTranslator will parse a given message text to generate an auctionClosed() event. For now, just concentrate on the structure; the test will turn up again in context in Chapter 12.
![]() The
The @RunWith(JMock.class) annotation tells JUnit to use the jMock test runner, which automatically calls the mockery at the end of the test to check that all mock objects have been invoked as expected.
![]() The test creates the
The test creates the Mockery. Since this is a JUnit 4 test, it creates a JUnit4Mockery which throws the right type of exception to report test failures to JUnit 4. By convention, jMock tests hold the mockery in a field named context, because it represents the context of the object under test.
![]() The test uses the mockery to create a mock
The test uses the mockery to create a mock AuctionEventListener that will stand in for a real listener implementation during this test.
![]() The test instantiates the object under test, an
The test instantiates the object under test, an AuctionMessageTranslator, passing the mock listener to its constructor. The AuctionMessageTranslator does not distinguish between a real and a mock listener: It communicates through the AuctionEventListener interface and does not care how that interface is implemented.
![]() The test sets up further objects that will be used in the test.
The test sets up further objects that will be used in the test.
![]() The test then tells the mockery how the translator should invoke its neighbors during the test by defining a block of expectations. The Java syntax we use to do this is obscure, so if you can bear with us for now we explain it in more detail in Appendix A.
The test then tells the mockery how the translator should invoke its neighbors during the test by defining a block of expectations. The Java syntax we use to do this is obscure, so if you can bear with us for now we explain it in more detail in Appendix A.
![]() This is the significant line in the test, its one expectation. It says that, during the action, we expect the listener’s
This is the significant line in the test, its one expectation. It says that, during the action, we expect the listener’s auctionClosed() method to be called exactly once. Our definition of success is that the translator will notify its listener that an auctionClosed() event has happened whenever it receives a raw Close message.
![]() This is the call to the object under test, the outside event that triggers the behavior we want to test. It passes a raw
This is the call to the object under test, the outside event that triggers the behavior we want to test. It passes a raw Close message to the translator which, the test says, should make the translator call auctionClosed() once on the listener. The mockery will check that the mock objects are invoked as expected while the test runs and fail the test immediately if they are invoked unexpectedly.
![]() Note that the test does not require any assertions. This is quite common in mock object tests.
Note that the test does not require any assertions. This is quite common in mock object tests.
Expectations
The example above specifies one very simple expectation. jMock’s expectation API is very expressive. It lets you precisely specify:
• The minimum and maximum number of times an invocation is expected;
• Whether an invocation is expected (the test should fail if it is not received) or merely allowed to happen (the test should pass if it is not received);
• The parameter values, either given literally or constrained by Hamcrest matchers;
• The ordering constraints with respect to other expectations; and,
• What should happen when the method is invoked—a value to return, an exception to throw, or any other behavior.
An expectation block is designed to stand out from the test code that surrounds it, making an obvious separation between the code that describes how neighboring objects should be invoked and the code that actually invokes objects and tests the results. The code within an expectation block acts as a little declarative language that describes the expectations; we’ll return to this idea in “Building Up to Higher-Level Programming” (page 65).
There’s more to the jMock API which we don’t have space for in this chapter; we’ll describe more of its features in examples in the rest of the book, and there’s a summary in Appendix A. What really matters, however, is not the implementation we happened to come up with, but its underlying concepts and motivations. We will do our best to make them clear.