
I said in the Chapter One intro that I generally pull the names of my chapters from titles of movies, TV shows, and songs, and while there probably is a song named “High Times,” I’m actually pulling this name from the magazine of the same name—High Times. Now, I can’t swear that this magazine (who as best as I could tell was targeting illegal drug aficionados) is still being published. If I had an Internet connection, I would check it out, but I’m writing this on a flight to New York, and they seem to frown on accessing the Internet at 37,000 feet. That amazes me, because every year for the past five years, you read an article that they’re going to start having Internet access on airplanes. Every article makes it sound like it’s just a few more weeks away, and they’re always saying stuff like, “On a number of test flights from Stockholm to Toronto last week, such-and-such an airline tested their in-flight Internet service, and it worked flawlessly,” but yet, not only have I not been on a flight with Internet access, I’ve never met anyone who has, and I’m starting to believe that the entire thing has just been made up to divert us from the fact that since the 1980s there has been a magazine for people who use illegal drugs and nobody in our government even realizes it. If they did, by now they would have bought the High Times subscriber list, and assigned agents to follow these people around (like they don’t already, right?), until they ultimately lead the agents to an undisclosed location where people wearing hemp t-shirts meet in closed door sessions to decide how to keep creating enough seemingly realistic delays to ensure that no one actually gets Internet access on a commercial flight, until the original publishers of High Times are too old to stand trial. This is the stuff that keeps me up at night. This and cannabis. Kidding!
For the HDR (High Dynamic Range) technique to work, you have to “shoot for HDR” (in other words, you have to set up your camera to shoot exposure-bracketed shots that can be used by Photoshop to create an HDR image). Here, I’m going to show you how to set up both Nikon and Canon cameras (the two most popular dSLR brands) to shoot three- and five-stop brackets, so all you have to do is hold the shutter button and your camera will do the rest.
Step One:
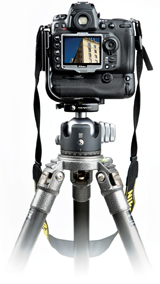
When you’re shooting for HDR, you’re going to be shooting multiple shots of the exact same scene (at different exposures), and since these images need to be perfectly aligned with one another, you really need to be shooting on a tripod. Now, that being said, Photoshop does have an Auto-Align feature that does an amazingly good job, so if you don’t have a tripod, or you’re in a situation where you can’t use one, you can try hand-holding—just make sure you’re shooting in a well-lit area, so your shutter speed will be fast enough that your images won’t be blurry.
SCOTT KELBY AND BRAD MOORE
Step Two:
We’ll need to vary our exposure as we take each HDR shot, but we can’t vary the f-stop or our depth of field will change from shot to shot, so instead we vary our shutter speed (actually, the camera will do this for us). So, switch your camera to Aperture Priority mode (the A mode on Nikon cameras like a D300, D200, D700, D2X, and D3, and the Av mode on Canon cameras like the 50D, 40D, 30D, 5D, 5D Mark II, 1D Mark III, etc.). In Aperture Priority mode, we choose an aperture (like f/8 or f/11 for outdoor shots), and then the camera will vary the shutter speed for us.
Step Three:
Go ahead and compose your shot, and focus on the scene you want to shoot. Once it’s in focus, go ahead and switch your lens to Manual focus. That way, while your camera is taking multiple shots, it doesn’t accidentally change focus. Now, just so we’re clear, you’re not going to manually focus—you’re going to go ahead and use Auto focus just like always, but once it’s focused on your scene, just switch off Auto focus, and then don’t touch the lens.

BRAD MOORE
Step Four:
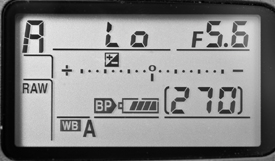
Now we set up the camera to shoot bracketed, which tells the camera to shoot the regular exposure, and then extra photos that are exposed both brighter and darker. The minimum number of exposures you can use for HDR is three, but I generally use five bracketed photos to make an HDR image (although some folks use as many as nine). So, with five, I wind up with one shot with my normal exposure, then two darker shots (one 1 stop under exposed and one 2 stops underexposed), followed by two brighter ones (one 1 stop overexposed and one 2 stops overexposed). Here’s how to set up your camera to shoot bracketed (we’ll start with a Nikon D300, for example): To turn on bracketing on a Nikon D300, press the Fn (function) button on the front of the camera, below the lens. Then use the main command dial to choose how many exposures to bracket (the control panel on the top of the camera shows the bracketing settings; choose 5F, so you get five bracketed shots). Use the sub-command dial (in front of the shutter button) to set the bracketing amount to 1 stop (as seen here).
Step Five:
Now, switch your Nikon camera to Continuous Low shooting mode, and just press-and-hold the shutter button until it takes all five bracketed shots for you. That’s it. Okay, on to the setup for Canon cameras.

BRAD MOORE
Step Six:
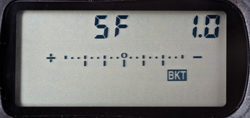
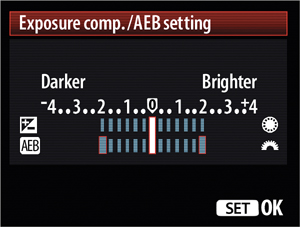
To turn on bracketing for a Canon camera (like the Canon 50D or 40D), start by going to the Camera Tab menu in the LCD on the back of the camera, then scroll down to Expo Comp/AEB (Auto Exposure Bracketing), and press the Set button. Now, use the Main Dial to choose 2 stops brighter, then press the Set button again (this automatically sets the bracketing to also shoot 2 stops darker). Now set your camera to Low-Speed Continuous Shooting mode, and then press-and-hold the shutter button and your camera will automatically shoot all five bracketed photos (once all five are taken, you can release the shutter button). That’s all there is to it.
Now, before we go through all this, I’ve got to be straight with you—Photoshop’s built-in HDR functionality is surprisingly lame (and that’s being terribly kind). It actually does a decent job of compiling the three or five photos in an HDR file, but it’s Photoshop’s HDR tone mapping (which is where the HDR file gets it look) that’s so weak. This is why most folks start in Photoshop (to compile the HDR file), but then do their tone mapping in a separate program (which I’ll talk about after this project). So first, here’s how the built-in HDR works (then you’ll see what I mean):
Step One:
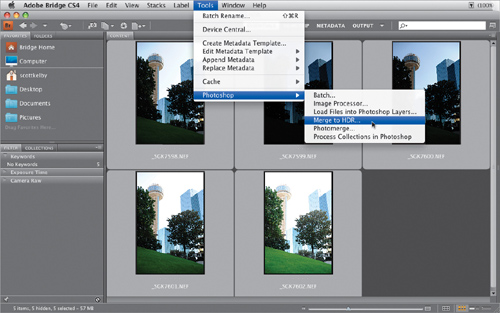
If you shot for HDR (like I talked about in the previous tutorial), you can take those images straight from Bridge CS4 to Photoshop’s Merge to HDR function. In the example here, I’ve selected five shots I bracketed with my camera (again, you can use as few as three shots, or as many as nine, but for most images, nine just seems like overkill and it takes that much longer to process, so I’ve pretty much stayed away from nine for a while). Once you’ve selected them, go under Bridge’s Tools menu, under Photoshop, and choose Merge to HDR (as shown here).
SCOTT KELBY
Step Two:
This launches Photoshop, and brings up the Merge to HDR dialog you see here. Your image will generally look pretty horrible, but don’t let that throw you—it gets better later in the process. The thumbnails in the left column show your bracketed shots: the one in the middle shows 0.00 (that’s the standard exposure), and the ones above it show 1 stop brighter, and 2 stops brighter (the ones below are –1 and –2). There’s really only one control here, and that’s the Set White Point Pre view slider, which appears under the histogram. If your photo’s highlights look really blown out, you could drag this slider to the right until you reach the end of the black graph, but I haven’t been able to see any significant difference when I do this, so I don’t do anything here—I just click OK.

Step Three:
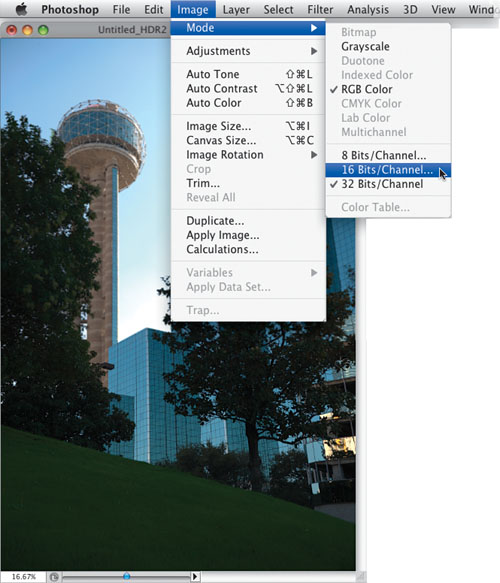
This opens your compiled image in Photoshop, but it still looks pretty lame. One reason is because you’re in 32-bit mode (which is outside the range of what today’s monitors can display. Well, outside the range of any monitor I could buy, anyway), so to get this puppy fixed up, you’ll need to convert it to 16-bit (or even 8-bit) mode by going under the Image menu, under Mode, and choosing 16 Bits/Channel (as shown here).
TIP: Using Only Three of the Five
Because of the way most cameras are designed, you’ll need to shoot five bracketed shots, but you don’t actually need to use all five to make your HDR file (in fact, many HDR pros just use three of the five bracketed photos—(1) the original “base” exposure, and then (2) the 2-stop darker photo, and (3) the 2-stop brighter photo). Those three contain enough depth to make the file, no problem, and by only using three photos, the processing is much faster. Give it a try yourself.
Step Four:
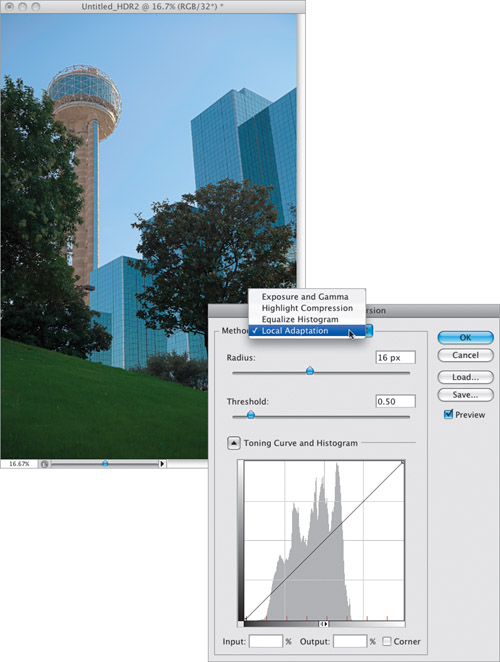
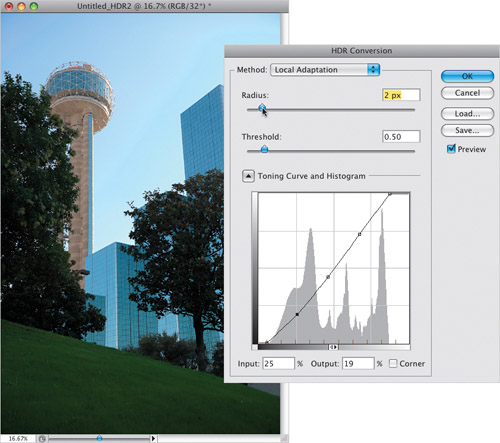
When you do this, your photo still doesn’t look good, but luckily the HDR Conversion dialog appears so you can tweak its look. Start by clicking on the little down-facing triangle that appears to the left of Toning Curve and Histogram, so those options appear (seen here). The default Method will be set to Exposure and Gamma, but you’ll need to click on that Method pop-up menu and choose Local Adaptation (as shown here). Just choosing Local Adaptation does wonders for the look of your image, so you finally start to make some progress toward getting an HDR look to your photo, but we still have some processing to do.
Step Five:
To balance out the tones in your image and maximize the tonal range, you’re going to drag the two points (one in the top-right corner of the Toning Curve and one in the bottom left) in toward the histogram graph (which looks like some steep mountains). So, click on the top-right corner point and drag it to the left until it reaches the right edge of the graph (as seen here) to increase the highlights. Next, click on the bottom-left corner point and drag it to the right until it reaches the left edge of the graph (as shown here) to really pump up the shadows. Now things are starting to look a lot better.
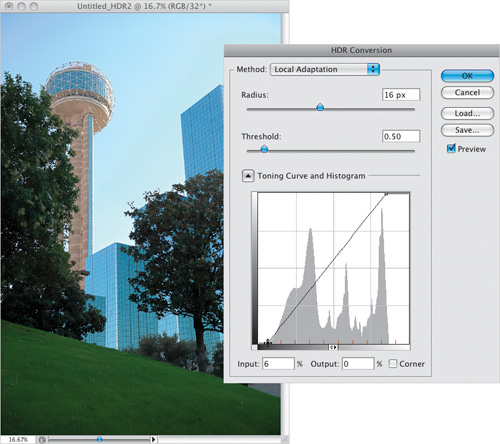
Step Six:
If you want to add more points to the graph (like a center point to control the midtones, or quarter-tone points between the top point and the center point, so you can add more contrast like we learned earlier in Chapters 3 and 7), just click on the curve, then use the Up/Down Arrow keys on your keyboard to adjust the points. Remember: The steeper the curve, the more contrast is adds. Also, one thing to look out for are little halos that appear around the edges of things in your image, which make things look kind of blurry. Because of this, I usually wind up lowering the Radius amount quite a bit, just to retain detail and avoid those halos (as shown here). Now click OK to apply these changes.
Step Seven:
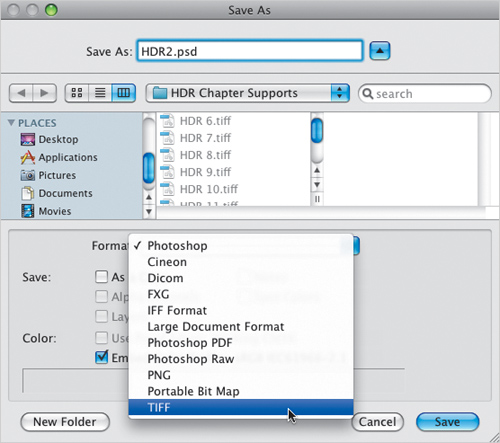
Let’s save the file, so press Command-S (PC: Ctrl-S) to bring up the Save As dialog (seen here). For the next step to work, you have to save the file in TIFF format (because we’re going to open this image next in Camera Raw for final processing, and Camera Raw only opens TIFFs, JPEGs, and of course, RAW photos. It won’t open the default format for this photo, which is PSD, so you have to change it to save as a TIFF from the Format pop-up menu, as shown here). Now, name your new image, click the Save button, and then close your image.
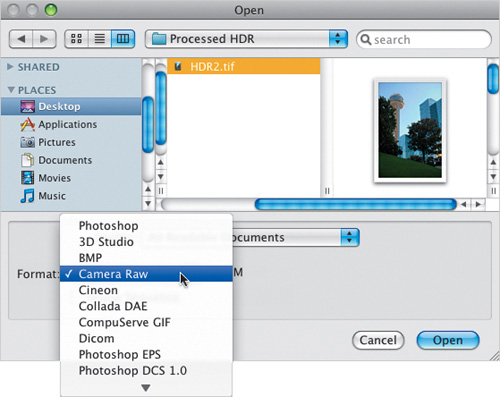
Step Eight:
Go under Photoshop’s File menu and choose Open (PC: Open As). When the Open dialog appears, click on the TIFF photo you just saved, and from the File Format (PC: Open As) pop-up menu at the bottom of the dialog, choose Camera Raw (as shown here) to have the TIFF image open for processing in Camera Raw, and then click Open.
Step Nine:
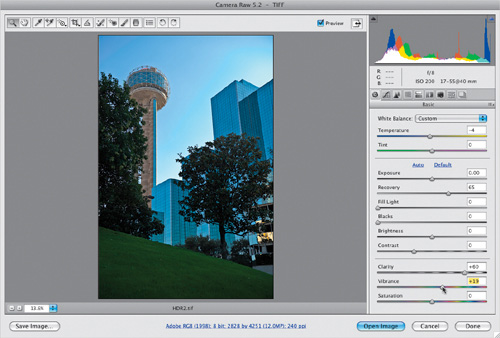
Now for some final tweaks in Camera Raw: To make the clouds more dramatic, drag the Recovery slider over to around 65, then increase the Clarity to around +60. If you want the blue sky to be more blue, drag the Temperature slider to the left, towards blue, until it reads –4, then increase the Vibrance amount to +19 (as shown), and click the Open Image button. Of course, the final step is (as always) to add some sharpening, so go under the Filter menu, under Sharpen, and choose Unsharp Mask. Then, for Amount, enter 120%; for Radius, enter 1.0; and for Threshold, enter 3, and click OK.
Step 10:
The final HDR-processed image is shown here, along with the original regular exposure image. As you can see, it looks somewhat better, but only somewhat, and it’s not the trademark “HDR Look” you’ve probably been hoping for, and that’s because (as I said in the beginning), Photoshop’s built-in HDR functionality is pretty lame. However, on the next page, you’ll learn a much better workflow that will give you the tools to create the popular HDR look.
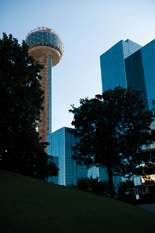
Original regularly exposed image
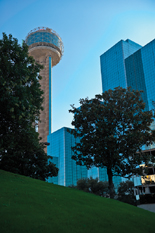
HDR-processed image
I was teaching a Photoshop seminar, and I asked the crowd for a show of hands, “How many of you shoot HDR photos?” Hands went up all over the room. Then I asked, “How many of you use Photomatix Pro to process your photos?” Not a single hand went down. Everybody chuckled, but it speaks volumes. Everybody I know shooting HDR uses Photomatix Pro, because it’s vastly better and easy to use. It costs $99, but you can download a free trial version from www.hdrsoft.com Do that now, so you can follow along and see the amazing difference it makes.
Step One:
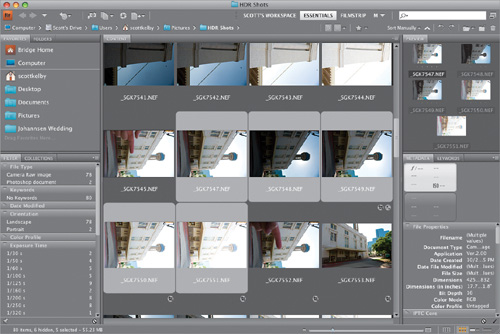
You actually start this process in Bridge doing a little image clean up, then you jump over to Photoshop and let it compile the initial HDR image for you, and you’ll save that .hdr file and open it in Photomatix Pro for the fun part—tone mapping (it sounds hard, but don’t worry, it’s easy). Start by selecting your HDR-bracketed photos in Bridge (as shown here).
SCOTT KELBY
TIP: Quickly Finding HDR Shots
If you want to be able to quickly identify which shots from your shoot are HDR-bracketed shots, right before you take your first bracketed shot, take a single shot with your index finger in the frame and then take another one once you’re done (as seen here). Then when you see a shot with your finger in it, you’ll instantly know that the next five shots are your HDR-bracketed shots.
Step Two:
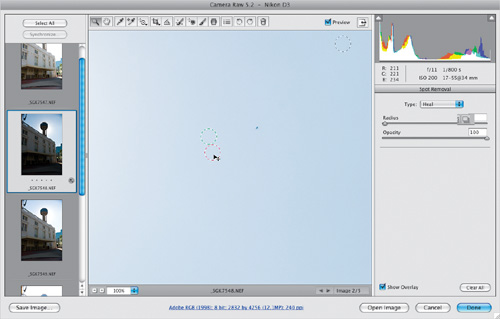
Now press Command-R (PC: Ctrl-R) to open your bracketed images in Camera Raw (as seen here). There are three things you need to do here: (1) if your photos need rotating, do that now using Rotate Image in the Toolbar (the circular arrows, or just press the R or L key), (2) use the Spot Removal tool (B) to remove all the spots (as shown here) that were on your lens or sensor, because HDR will just amplify those big time, and (3) remove any lens vignetting, which also gets exaggerated once your file is processed as HDR.
Step Three:
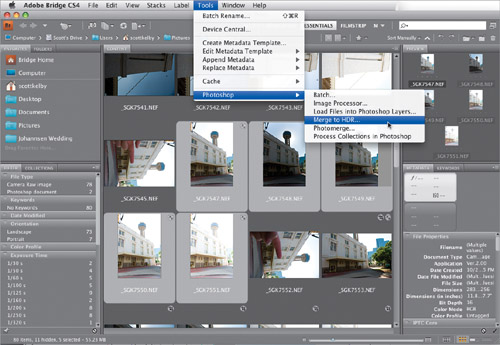
Click the Done button in Camera Raw to save your changes and close the images. When you look in Bridge, you’ll see the updated thumbnails (you can see here the photos have been rotated). Now go under Bridge’s Tools menu, under Photoshop, and choose Merge to HDR (as shown here).
Step Four:
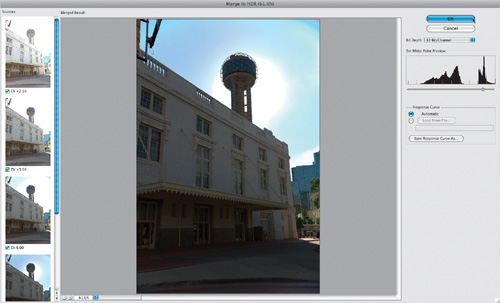
Just like in the previous project, this launches Photoshop CS4 and brings up the Merge to HDR dialog (and your image is going to look pretty awful in the big preview window). Don’t do anything here; just click OK (for more on why, go back to Step Two in the previous project).
Step Five:
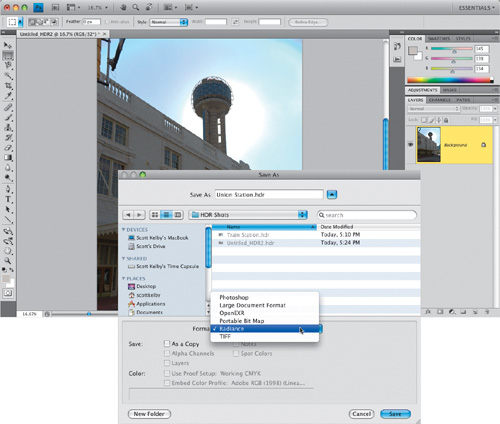
Clicking OK opens your compiled HDR image in Photoshop and, if at all possible, your image looks even worse, but don’t sweat it (it will get better very soon). We don’t need to do anything else to the photo here in Photoshop, but you do need to save it in a specific file format, so you can process it in Photomatix Pro. To do that, go under the File menu, and choose Save As. When the Save As dialog appears, from the Format pop-up menu choose Radiance (as shown here), which adds “.hdr” to the end of the filename. Name your HDR and then click the Save button. Now you’re done with the Photoshop part (so you can close your image), and it’s time to jump over to Photomatix Pro.
Step Six:
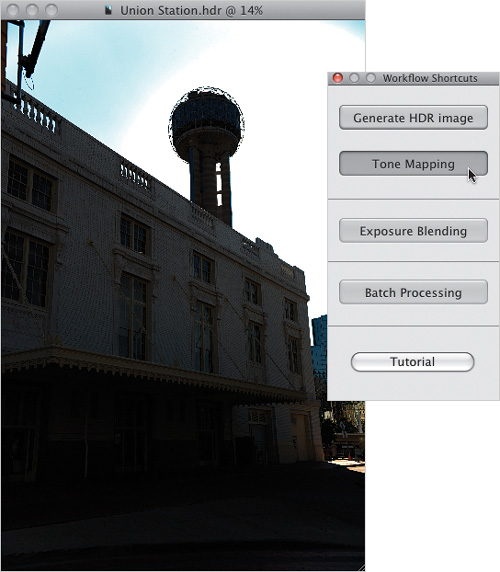
Now launch Photomatix Pro (don’t forget—if you don’t have it, you can download a free fully-working trial copy at www.hdrsoft.com. The trial never expires, but it does apply a watermark to your final images), go under the File menu, choose Open, find the HDR image you just saved out of Photoshop, and click the Open button. Once the photo opens in Photomatix (looking more awful than ever), click the Tone Mapping button (as shown here, in the Workflow Shortcuts panel), or just press the shortcut Command-T (PC: Ctrl-T) to enter the Tone Mapping function.
TIP: Rotating in Photomatix
If you didn’t do any touch up in Camera Raw, and your HDR image is portrait (tall) orientation, it might appear in Photomatix horizontally (like it’s lying on its side). Before you enter the Tone Mapping function (or do anything else), go under Photomatix’s Utilities menu, under Rotate, and choose the rotation direction you need (90° Clockwise or 90° Counterclockwise). If you don’t rotate it now, once you enter Tone Mapping, the rotation options are grayed out.
Step Seven:
Once your image appears in the Tone Mapping Preview dialog, finally, and at long last your image looks like an HDR image (as seen here) with some of the depth and dimension you’ve been holding out for. There are a few essential controls here I want to go over, so we’ll start at the top, in the Details Enhancer tab. The Strength slider is critical because it helps determine the balance between a realistic look and more of a fantasy look, where your HDR image takes on more of an illustrative surreal look (which my buddy, Matt Kloskowski, calls the “Harry Potter look”). Both looks (the real and fantasy) are popular—you just have to choose which one you want. The farther you drag the Strength slider to the right, the farther your image is drawn into the fantasy realm (like the way I worded that?). I usually like something more in-between myself, so I usually set the Strength at around 50 to 60, but in our example shown here, I cranked it up to 70 so the effect would be more apparent.
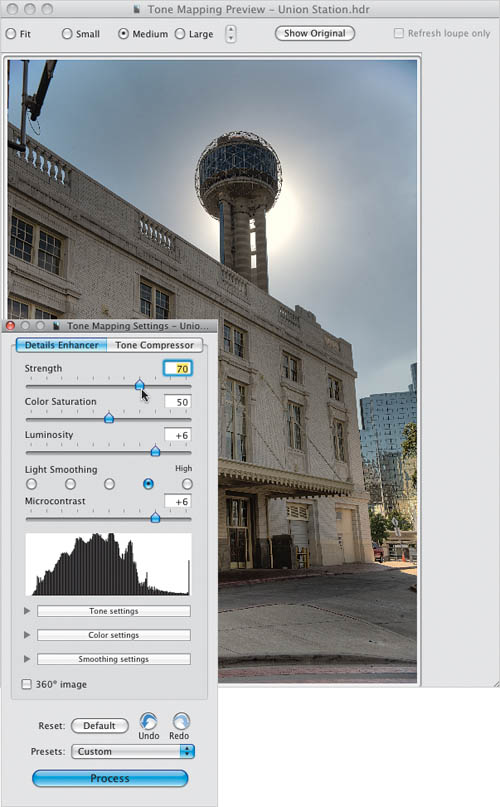
Step Eight:
The Color Saturation slider also plays into the fantasy look—the farther you drag it to the right, the more saturated your colors become. I dragged the slider over quite a bit here, and you can see how much more saturated the colors look now. Again, this is one of those “drag it ‘till it looks good to you” kind of adjustments, so it’s your call on how vivid you want your colors. In this particular image, the colors were pretty drab to start with, so even with dragging the Color Saturation slider pretty far to the right, the color still looks fairly tame.

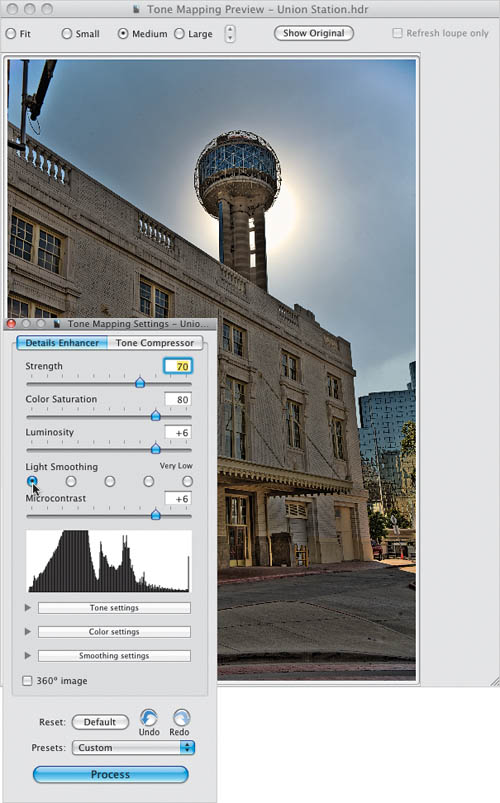
Step Nine:
The third part of the “Harry Potter look” triad is the Light Smoothing radio buttons. There are five buttons, and if you click the far-left button, you get “Maximum Potter.” As you click each button moving to the right, the fantasy effect is lessened, with the far-right button having the least Harry Potter look to it. I usually use the second to the last button on the right, because I do like a little bit of what the Light Smoothing brings to the overall look. Again, how far you want to take things is totally up to you. If you’re a child of the 60s, click the far-left button (sorry, I couldn’t help myself). As a rule of thumb, for more realistic images, set your Strength below 50, and click the fourth or fifth Light Smoothing radio button. If you’re into the Harry Potter look, raise the Strength to 90 or 100, and click the first or second Light Smoothing radio button.
Step 10:
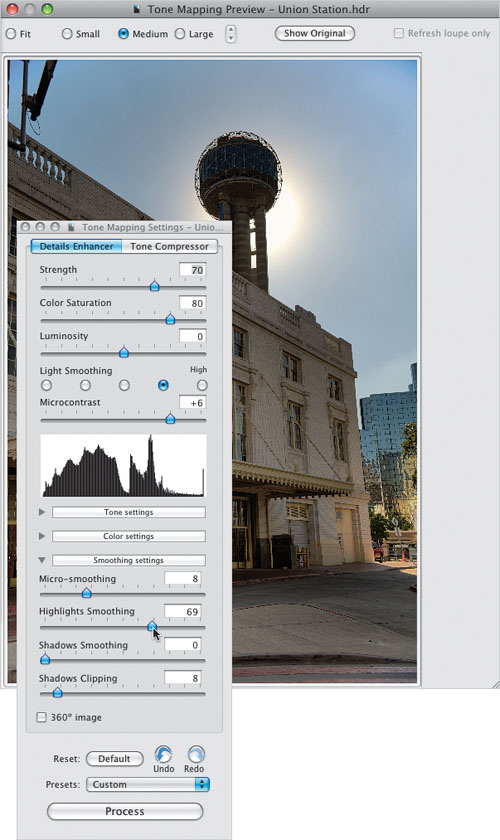
There are really just three other controls here you need to know about: (1) The Luminosity slider, which is kind of like the Fill Light slider in Camera Raw, but because HDR images tend to be somewhat noisy, be careful when dragging this slider to the right, or you’ll increase any noise already in the photo. (2) The Microcontrast slider is well-named, as it controls how much contrast appears in the smallest detail areas of your photo—the farther to the right you drag, the more contrast you’ll see there. (3) If you start to see halos appear around edges in your photos, especially in bright areas (more likely if you went the Harry Potter route), you can usually tame them by clicking on the Smoothing Settings button near the bottom of the panel, and then dragging the Highlights Smoothing slider to the right (as shown here) until they go away.
Step 11:
You could continue tweaking your image here in Photomatix Pro, and if you look beneath the histogram in the Tone Mapping Settings panel, and click on the Tone Settings button, a new section of controls appears. The three sliders seen here (White Point, Black Point, and Gamma) are pretty much like Photo shop’s Levels sliders for highlights, shadows, and midtones. I normally do this type of tweaking in Photoshop itself, so at this point, I save the file and jump over to Photoshop to finish up, because I’m pretty much done with what I came here to do, which was to create the HDR look. So, click the Process button at the very bottom of the Tone Mapping panel, and Photomatix Pro processes your HDR photo in its final form.

Step 12:
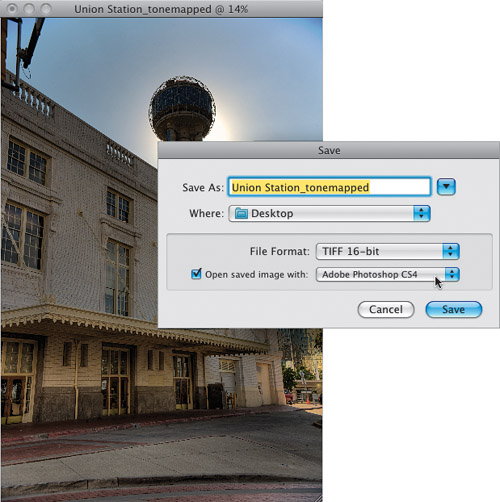
When your processed image appears in Photomatix Pro, choose Save As from the File menu. Near the bottom of the Save dialog, from the File Format (PC: Save as Type) pop-up menu, choose TIFF 16-bit (which is what you’ll want for editing in Photoshop), then turn on the Open Saved Image With checkbox, and choose Adobe Photoshop CS4 from the pop-up menu (as shown here). Now click the Save button and your image is saved and opened in Photoshop automatically for your final tweaks, and for you to save it in its final format (JPEG, TIFF, etc.).
Step 13:
Here’s the tone-mapped image opened in Photoshop CS4 for the final tweaks. In this case, I think it just needs a little more contrast first, so in the Adjustments panel, click on the Levels icon (the second icon from the left at the top), and drag the center midtones slider a bit to the left to brighten the midtones (so you can see the face of the building a bit better). Then, drag the shadows slider (on the left) to the right to darken the shadows (and keep the photo from looking washed out). You can also use the Clone Stamp tool (S) to get rid of that little bit of vignetting in the upper-right corner. Then lastly, apply an Unsharp Mask filter (from the Filter menu, choose Sharpen, then Unsharp Mask. I’d use a high amount of sharpening, like Amount: 120, Radius: 1, Threshold: 3, for a detailed image like this) and save the file (if you want to save it as a JPEG, you’ll have to convert it to 8-bit first by going under the Image menu, under Mode, and choosing 8 Bits/Channel). On the next page are a before and afters.

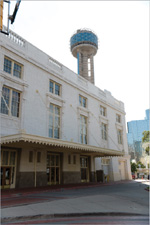
The original, standard exposure image, as taken by the camera (without bracketing)
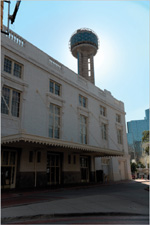
Here’s how it looks if you process it using Photoshop’s HDR alone (no Photomatix Pro)
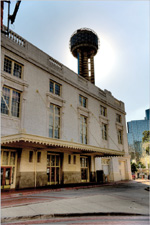
The final image tone mapped in Photomatix Pro, and with a Levels and sharpening tweak in Photoshop