
3: Importing
Lesson overview
Lightroom allows a great deal of flexibility in importing your photos; you can download images directly from a camera, import them from your hard disk or external storage media, or transfer them between catalogs on different computers. During the import process you can organize your folders, add keywords and metadata to make your photos easy to find, make backup copies, and even apply editing presets.
This lesson will familiarize you with the many options available to you as you add more photos to your Lightroom library:
• Importing images from a camera or card reader
• Importing images from a hard disk or removable media
• Choosing file handling options
• Evaluating images before importing
• Organizing, renaming, and processing images automatically
• Applying keywords and metadata as part of the import process
• Initiating backup strategies
• Creating and saving import presets
• Setting Lightroom to import automatically
• Transferring images between computers and catalogs You’ll probably need between one and two hours to complete this lesson.
![]() You’ll probably need between one and two hours to complete this lesson.
You’ll probably need between one and two hours to complete this lesson.
Lightroom starts helping you to organize and manage your growing photo library from the moment you click the Import button; you can make backups, organize folders, inspect images at high magnification, apply editing presets, and add keyword tags and other info that will save you hours of work sorting and searching your image library later—all before your photos even reach your catalog!
Getting started
Before you begin, make sure that you have correctly copied the Lessons folder from the CD in the back of this book onto your computer’s hard disk and created the LR3CIB Library Catalog file as detailed in “Copying the Classroom in a Book files” on page 2 and “Creating a catalog file for working with this book” on page 3.
1 Start Lightroom.
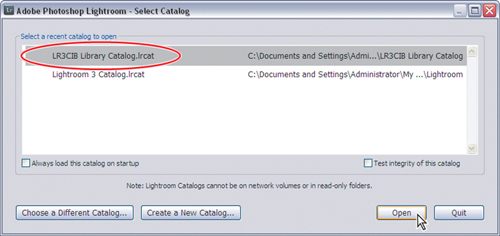
2 In the Adobe Photoshop Lightroom - Select Catalog dialog box, make sure the file LR3CIB Library Catalog.lrcat is selected under Select A Recent Catalog To Open, and then click Open.
3 Lightroom will open in the screen mode and workspace module that were active when you last quit. If necessary, click Library in the Module Picker to switch to the Library module.

The import process
Lightroom allows a great deal of flexibility in the import process. You can download images directly from a digital camera or card reader, import them from your hard disk or external storage media, and transfer them from another Lightroom catalog or from other applications.
Import at the click of a button, use a menu command, or simply drag and drop. You can have Lightroom launch the import process when you connect your camera or even import automatically when you move files into a watched folder.
Whether you’re downloading photos from a camera or importing them from a hard disk or DVD, you’ll be working with the Import dialog box, so we’ll begin there.
Lightroom 3 introduces a new Import dialog box that operates in either a compact or expanded mode, providing flexibility in the process from the very beginning. The top panel of the Import dialog box, common to both modes, presents the basic steps in the import process, arranged from left to right: choose an import source, specify how Lightroom is to handle the files you’re importing, and set an import destination—whether that’s a folder (or folders), or simply your library catalog.
In expanded mode, the Import dialog box works very much like the Lightroom workspace modules. The Source panel at the left provides easy access to your files on any available drive. The Preview pane displays images from the source selection as thumbnails in Grid view or enlarged in Loupe view. Depending on the type of import, the right panel group offers a Destination panel that mirrors the Source panel, and a suite of controls for processing your images as they’re imported.
Importing photos from a digital camera
If you have a digital camera or a memory card reader at hand, you can step through this exercise using your own photos. If not, you can simply read through the steps and study the illustrations—most of the information in this exercise is equally applicable to importing from other sources.
To begin with, you’ll configure the Lightroom preferences so that the import process is triggered automatically when you connect your camera or a memory card to your computer.
1 Choose Edit > Preferences (Windows) / Lightroom > Preferences (Mac OS). In the Preferences dialog box, click the General tab. Under Import Options, activate the option Show Import Dialog When A Memory Card Is Detected by clicking the checkbox.
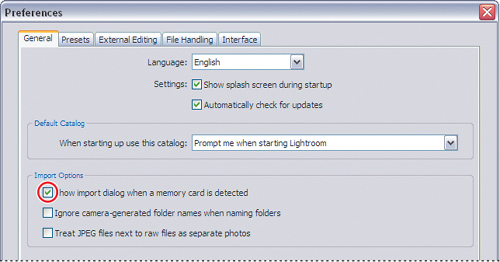
Some cameras generate folder names on the memory card. If you don’t find these folder names helpful for organizing your images, activate the option Ignore Camera-Generated Folder Names When Naming Folders. You’ll learn more about folder naming options later in this lesson.
If your camera records Raw images, it may also generate a JPEG version of each photo. If you wish to import both files, activate the option Treat JPEG Files Next To Raw Files As Separate Photos; otherwise, Lightroom will display only the Raw images in the Import Photos dialog box.
![]()
![]() Note: You’ll find more options relating to the creation of DNG files during import on the File Handling preferences tab, but for this exercise, you can ignore those settings. For information on DNG files, see “About file formats” on page 93.
Note: You’ll find more options relating to the creation of DNG files during import on the File Handling preferences tab, but for this exercise, you can ignore those settings. For information on DNG files, see “About file formats” on page 93.
2 Click OK / the Close button ![]() to close the Preferences dialog box.
to close the Preferences dialog box.
3 Connect your digital camera or card reader to your computer, following the manufacturer’s instructions.
4 This step may vary depending on your operating system and the image management software on your computer:
• On Windows, if the dialog box shown in the illustration at the right appears, click Cancel.
• If you have more than one Adobe image management application—such as Adobe Bridge—installed on your computer and the Adobe Downloader dialog box appears, click Cancel.
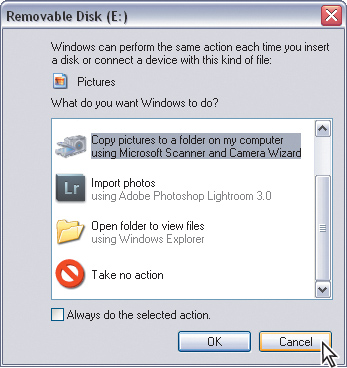
• If the Import dialog box appears, continue to step 5.
• If the Import dialog box does not appear, choose File > Import Photos, or click the Import button below the left panel group.
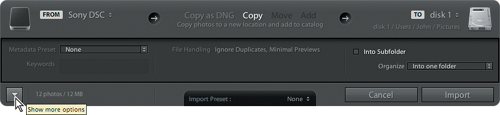
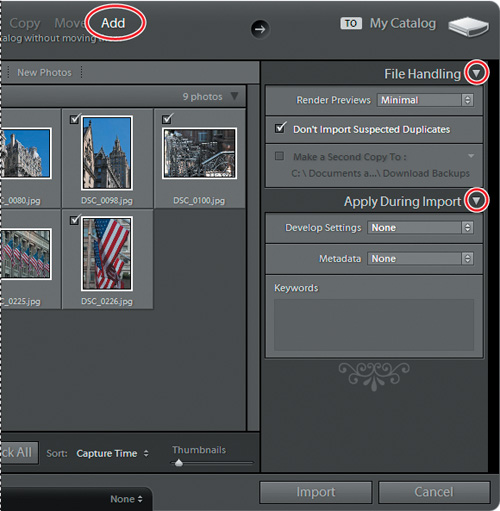
5 If the Import dialog box appears in compact mode, click the Show More Options button at the lower left of the dialog box to see all the options in the expanded Import dialog box.
The top panel of the Import dialog box—which is visible in both the compact and expanded modes—presents the three basic steps in the import process, arranged from left to right:
• Select the source location of the images you wish to add to your catalog.
• Specify the way you want Lightroom to handle the files you’re importing.
• Choose the destination to which the image files will be copied and any develop presets, keywords, or other metadata that you would like applied to your photos as they are added to your catalog.
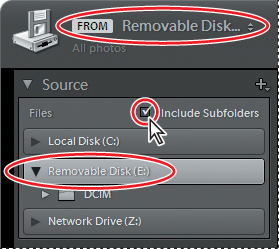
Your camera or memory card is now shown as the import source in the FROM area at the left of the top panel and under Devices in the Source panel at the left of the Import dialog box.

Depending on your computer setup, it’s possible that your camera’s memory card will be recognized as a removable storage disk. If this is the case, you may see some differences in the options available in the Import dialog box, but these differences will not affect the actions you’ll take in the remainder of this exercise.
6 If your memory card is listed as a removable disk—rather than a device—in the Source panel, click to select it from the Files list and make sure that the Include Subfolders option is activated.
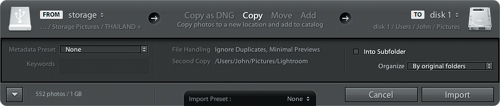
7 From the import type options in the center of the top panel, choose Copy to copy your photos to your hard disk and add them to your catalog, leaving the original files intact on your camera’s memory card.
Lightroom displays a brief description of the action that will be taken for whichever option is currently selected, as shown in the illustration below.
![]() Note: If your memory card has been recognized as a removable disk, the Move and Add options may not be disabled; these options will be discussed later in this lesson.
Note: If your memory card has been recognized as a removable disk, the Move and Add options may not be disabled; these options will be discussed later in this lesson.
![]()
8 Move your pointer over each of the options shown in the bar across the top of the Preview pane to see a tool tip describing the option. For this exercise, leave the default All Photos option selected. Don’t click the Import button yet.
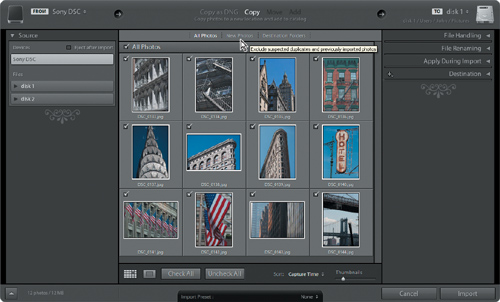
A check mark in the top left corner of an image cell indicates that the photo will be imported. By default, all the photos on your memory card will be check-marked for import; you can exclude an image from the selection to be imported by clicking its checkbox to remove the check mark.
![]() Tip: Use the slider below the preview pane to change the size of the thumbnails.
Tip: Use the slider below the preview pane to change the size of the thumbnails.
You can select multiple images and then change all their check marks simultaneously. To select a contiguous range of images, select the first image in the range by clicking the thumbnail or the surrounding image cell, then hold down the Shift key and select the last image in the range. Select individual additional photos by Ctrl-clicking / Command-clicking their thumbnails. Click the check mark of any image in a multiple selection to change the import status for the entire selection.
When you import photos from your hard disk or from external storage media, the Import dialog box offers you the option to add them to your catalog without moving them from their current locations. This is possible because Lightroom does not actually import the image files themselves; it only adds entries to the library catalog to record their locations. However, because memory cards are expected to be erased and reused, images on your camera don’t have very permanent addresses. For this reason, you’re not offered the Add or Move options when you import from a camera—Lightroom expects to copy your photos from your camera to a more permanent location before it adds their addresses to the library catalog.
Therefore, the next step in the process of importing from a camera is to specify a destination folder to which your photos should be copied. This is the time to give some thought to how you are going to organize your photos on your computer hard disk. For now, leave the Import Photos dialog box open; you’ll choose a destination folder and deal with the rest of the import options in the following exercises.
Organizing your copied photos in folders
Although there’s no technical reason why you can’t choose a different destination folder for each import, it will be much easier to keep your hard disk organized if you create a single folder to contain all the images that are associated with a particular catalog. Within this folder you can create a new subfolder for each batch of images downloaded from your camera or copied from other external media.
Before beginning the lessons in this book, you created a folder named LR3CIB inside your [username]/My Documents (Windows) or [username]/Documents (Mac OS) folder on your computer. This folder already contains subfolders for your LR3CIB Library Catalog file and for the image files used for the lessons in this book. For the purposes of this exercise, you’ll create a subfolder inside the LR3CIB folder as the destination for the images that you import from your camera’s memory card:
1 In the right panel group of the Import dialog box, collapse the File Handling, File Renaming, and Apply During Import panels; then, expand the Destination panel.
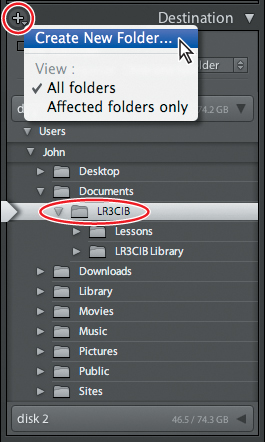
2 In the Destination panel, navigate to your LR3CIB folder. With the LR3CIB folder selected, click the Create New Folder button ![]() at the left of the Destination panel header and choose Create New Folder from the menu.
at the left of the Destination panel header and choose Create New Folder from the menu.
3 In the Browse For Folder / Create New Folder dialog box, navigate to and select your LR3CIB folder, if it’s not already selected. Click the Make New Folder / New Folder button, type Imported From Camera as the name for your new folder, and then press Enter (Windows) / click Create (Mac OS).
4 Make sure the new Imported From Camera folder is selected in the Browse For Folder / Create New Folder dialog box, and then click OK / Choose. Note that the new folder is now listed, and already selected, in the Destination panel.
The name of the new destination folder also appears in the TO area at the right of the top panel of the Import dialog box.

The Organize menu, near the top of the Destination panel, offers various options to help you organize your photos into folders as you copy them onto your hard disk:
• Into One Folder With the current settings, the images would be copied into the new Imported From Camera folder. You could then use the Into Subfolder option to create a new subfolder for each import.
![]() Note: If your memory card has been recognized as a removable disk, you may also see the Organize option By Original Folders; this option will be discussed later in this lesson.
Note: If your memory card has been recognized as a removable disk, you may also see the Organize option By Original Folders; this option will be discussed later in this lesson.
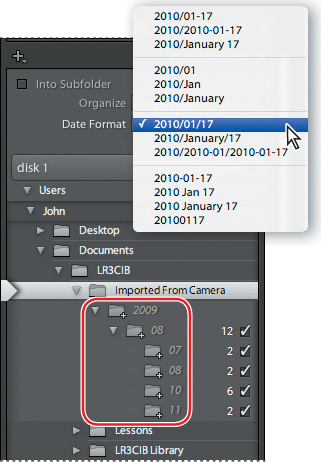
• By Date:[Date Format] The remaining options are all variations on organizing your photos by capture date. Your images would be copied into the Imported From Camera folder and placed into one or more subfolders, depending on your choice of date format. Choosing the date format “2010/01/17,” for example, would result in one folder per year, containing one folder per month, containing one folder per day for each capture date, as shown in the illustration at the right.
You should think about which system of folder organization best suits your needs before you begin to import photos from your camera for your own purposes and maintain that system for all your camera imports.

5 For the purposes of this exercise, choose the option Into One Folder from the Organize menu.
6 Click the Put In Subfolder checkbox and type Lesson 3 Import in the adjacent text box as the name for the new subfolder.
Backup strategies
Your next choice is whether or not to make backup copies of the images from your camera at the same time as Lightroom creates primary copies in the location you’ve just specified and adds them to the library catalog. It’s a good idea to create backup copies on a separate hard disk or on external storage media so you don’t lose your images should your hard disk fail or in case you accidently delete them.
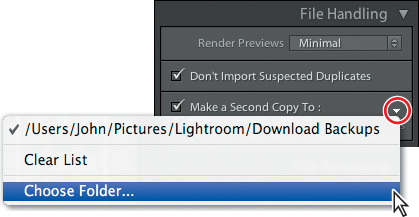
1 In the right panel group of the Import Photos dialog box, expand the File Handling panel and activate the option Make A Second Copy To by clicking the checkbox.
2 Click the small triangle to the right and select Choose Folder to specify a destination for your backup copies.
3 In the Browse For Folder / Choose Folder dialog box, navigate to the folder in which you wish to store the backup copies of your images, and then click OK / Choose.
The purpose of this backup is mainly as a precaution against loss of data due to disk failure or human error during the import process; it’s not meant to replace the standard backup procedure you have in place—or should have in place—for the files on your hard disk.
It’s worthwhile to archive each photo shoot by burning your images to a DVD, which you can store separately. This will also help you organize your image library in Lightroom because you’ll feel more secure trimming your collection down to the best images knowing that you have a backup before you press the Delete key.
Renaming files as they are imported
The cryptic file names created by digital cameras are not particularly helpful when it comes to sorting and searching your photo library. Lightroom can help by renaming your images for you as they are imported. You can choose from a list of predefined naming options, or create your own customized naming templates.
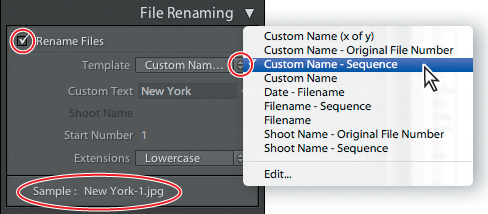
1 In the right panel group of the Import Photos dialog box, expand the File Renaming panel and activate Rename Files. Choose Custom Name - Sequence from the Template menu and type a descriptive name in the Custom Text box (we used New York), and then press the Tab key on your keyboard. A sample name at the bottom of the File Renaming panel shows how your settings will be applied for the first image imported.
![]() Tip: An option you should consider, if it’s supported by your camera, is to set the camera to generate file names with unique sequence numbers. When you clear your memory card, or change memory cards, your camera will continue to generate unique sequence numbers rather than start counting from one again. This way, the images you import into your library will always have unique file names.
Tip: An option you should consider, if it’s supported by your camera, is to set the camera to generate file names with unique sequence numbers. When you clear your memory card, or change memory cards, your camera will continue to generate unique sequence numbers rather than start counting from one again. This way, the images you import into your library will always have unique file names.
You can enter a number other than 1 in the Start Number text box; this is useful if you’re importing more than one batch of images from the same series.
2 Click the small triangle to the right of the Custom Text box; your new text has been added to a list of recently entered names. You can choose from this list if you import another batch of files that belong in the same series. This not only saves time and effort but helps you ensure that subsequent batches are named identically. Should you wish to clear the list, choose Clear List from the menu.
3 Choose Custom Name (x of y) from the Template menu. Note that the sample name at the bottom of the File Renaming panel is updated to reflect the change.
4 Choose Edit from the Template menu to open the Filename Template Editor.
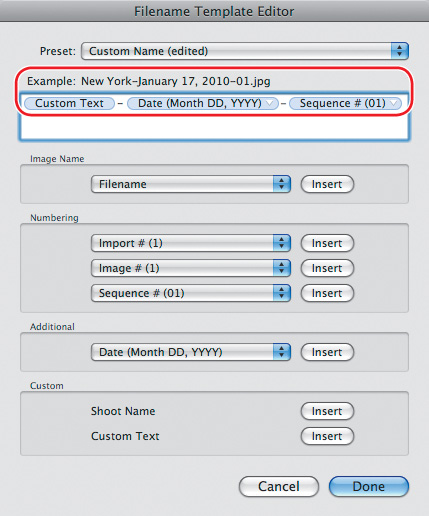
In the Filename Template Editor dialog box you can set up a filename template that makes use of metadata information stored in your image files—such as file names, capture dates, or ISO settings—adding automatically generated sequence numbers and any custom text you specify. A filename template includes placeholders—or tokens—that will be replaced by actual values during the renaming process.
For example, you could rename your photos New York-January 17, 2010-01, New York-January 17, 2010-02, and so on, by setting up a filename template with a custom text token, a date token, and a 2-digit sequence number token, separated by typed hyphens.
After closing the Filename Template Editor you would type New York in the Custom Text box; “New York” would replace the custom text token in the filename template. The date token will be replaced by the capture date from the images’ metadata and the sequence number will be added automatically.
![]() Tip: For more information on using the Filename Template Editor please refer to Lightroom Help.
Tip: For more information on using the Filename Template Editor please refer to Lightroom Help.
5 Click Cancel to close the Filename Template Editor without making any changes.
Despite all of the options available for renaming your images during the import process, there’s only so much information you can squeeze into a single file name. It might be better to take a minimal approach to renaming your photos and instead take advantage of the other file management capabilities of Lightroom. Metadata and keyword tags are far more powerful and versatile tools for organizing and searching your image library.
You’ll learn about using metadata and keyword tags in the following exercises and in Lesson 5, “Organizing and Selecting.”
About file formats
Camera raw formats Camera raw file formats contain unprocessed data from a digital camera’s sensor. Most camera manufacturers save image data in a proprietary camera format. Lightroom reads the data from most cameras and processes it into a full-color photo. You can use the controls in the Develop module to process and interpret the raw image data for your photo. For a list of supported cameras and camera raw formats, see www.adobe.com/go/learn_ps_cameraraw.
Digital Negative format (DNG) The Digital Negative (DNG) file format is a publicly available archival format for raw files generated by digital cameras. DNG addresses the lack of an open standard for the raw files created by individual camera models, helping ensure that photographers will be able to access their files in the future. You can convert proprietary raw files to DNG from within Lightroom. For more information about the Digital Negative (DNG) file format, visit www.adobe.com/dng
TIFF format Tagged-Image File Format (TIFF, TIF) is used to exchange files between applications and computer platforms. TIFF is a flexible bitmap image format supported by virtually all paint, image-editing, and page-layout applications. Also, virtually all desktop scanners can produce TIFF images. Lightroom supports large documents saved in TIFF format (up to 65,000 pixels per side). However, most other applications, including older versions of Photoshop (pre-Photoshop CS), do not support documents with file sizes greater than 2 GB. The TIFF format provides greater compression and industry compatibility than Photoshop format (PSD), and is the recommended format for exchanging files between Lightroom and Photoshop. In Lightroom, you can export TIFF image files with a bit depth of 8 bits or 16 bits per channel.
JPEG format Joint Photographic Experts Group (JPEG) format is commonly used to display photographs and other continuous-tone images in web photo galleries, slide shows, presentations, and other online services. JPEG retains all color information in an RGB image but compresses file size by selectively discarding data. A JPEG image is automatically decompressed when opened. In most cases, the Best Quality setting produces a result indistinguishable from the original.
Photoshop format (PSD) Photoshop format (PSD) is the standard Photoshop file format. To import and work with a multi-layered PSD file in Lightroom, the file must be saved in Photoshop with the Maximize PSD and PSB File Compatibility preference turned on. You’ll find the option in the Photoshop file handling preferences. Lightroom saves PSD files with a bit depth or 8 bits or 16 bits per channel.
CMYK files Lightroom imports CMYK files but adjustments and output are performed in the RGB color space.
Video files Lightroom 3 will import video files from most digital cameras. You can tag, rate, filter and include video files in collections, but editing is not supported. Click the camera icon on the thumbnail of a video file to launch an external viewer such as QuickTime or Windows Media Player.
File format exceptions Lightroom does not support the following types of files: PNG files; Adobe Illustrator® files; Nikon scanner NEF files; files with dimensions greater than 65,000 pixels per side or larger than 512 megapixels.
Note: To import photos from a scanner, use your scanner’s software to scan to TIFF or DNG format, and then import those files into Lightroom.
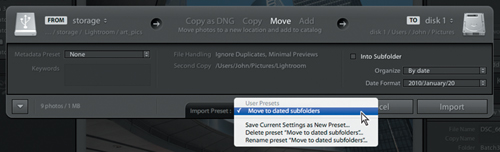
Creating import presets
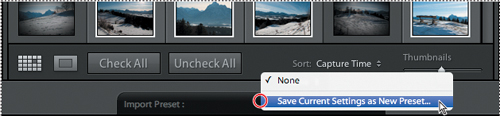
When you import photos on a regular basis, you’ll probably find that you’re setting up the same configurations of options over and over. Lightroom 3 enables you to streamline your import workflow by saving your preferred settings as import presets. To create an import preset, set up your import in the expanded Import dialog box, and then choose Save Current Settings As New Preset from the Import Preset menu below the Preview pane.
Type a descriptive name for your new preset, and then click Create.
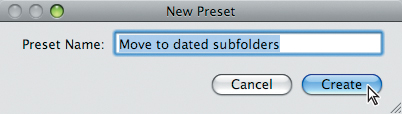
Your new preset will include all of your current settings: the source, import type (Copy asDNG, Copy, Move, or Add), file handling and renaming options, develop and metadata presets, keywords, and destination. You might set up one preset to move photos from a single folder on your hard disk into dated subfolders, and another to create a single folder of renamed black-and-white copies.
Create separate import presets tailored to the characteristics of different cameras, so you can quickly apply your favorite noise reduction, lens correction and camera calibration settings during the import process, saving yourself time in the Develop module later.
Using the Import dialog box in compact mode
Once you’ve created the presets you need, you can speed up the process even more by using the Import dialog box in compact mode, where you can use your import preset as a starting point, and then change the source, metadata, keywords, and destination settings as required.
You have now completed this exercise in importing photos from a digital camera or a memory card. You will learn about the remaining options available in the Import dialog box in the exercises to follow.
6 For now, click Import if you wish to bring your photos into the LR3CIB catalog, or Cancel to close the Import dialog box without actually importing any images.
Importing images from a hard disk
When you import photos from your hard disk or from external storage media, Lightroom offers you more options for organizing your image files than are available when importing from a camera.
If you wish, you can still choose to copy your images to a new location during the import process as you did in the previous exercise, but you also have the option to add them to your catalog without moving them from their current locations. You might choose to do this if the images you wish to import are already well organized in a folder hierarchy.
For images that are already located on your hard disk you have an extra option: to move them to a new location, removing them from the original location at the same time. This option might appeal if the images on your hard disk are not already organized in a satisfactory manner.
1 To import images from your computer hard disk—or from a CD, DVD, or other external storage media—either choose File > Import Photos, press Ctrl+Shift+I / Command+Shift+I, or simply click the Import button below the left panel group in the Library module.
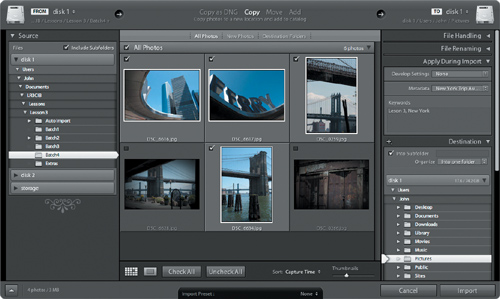
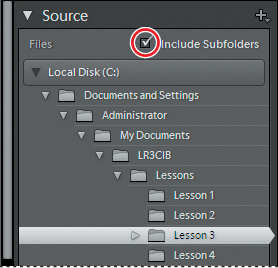
2 In the Source panel at the left of the Import dialog box, navigate to the Lessons folder you’ve already copied into the LR3CIB folder on your hard disk. Select the Lesson 3 folder and click the checkbox at the top right of the Source panel to activate the Include Subfolders option.
An image count in the lower left corner of the Import dialog box shows that the Lesson 3 folder and its subfolders contain a total of 28 photos with a combined file size of 27 MB.
![]()
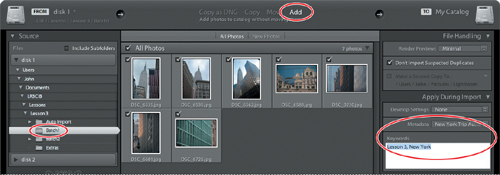
3 From the import type options in the center of the top panel, choose Add to add your photos to your catalog without moving them—an option that is not available when importing images from a camera. Do not click Import yet!
![]()
4 Use the scrollbar at the right of the Preview pane to view all of the images in the Lesson 3 folder and its subfolders. Drag the Thumbnail slider below the Preview pane to the left to reduce the size of the thumbnails so that you can see as many of the images as possible in the Preview pane.
5 In the Source panel, disable the Include Subfolders option. The Preview pane now displays only the nine images in the Lesson 3 folder and the image count in the lower left corner of the Import dialog box reads: 9 photos / 9 MB.
In the next exercise, you’ll apply keywords and other metadata to these images to make them easier to organize once you’ve added them to your catalog. For now, you can review the import type options above the Preview pane.
6 Click each of the import type options in turn, from left to right:
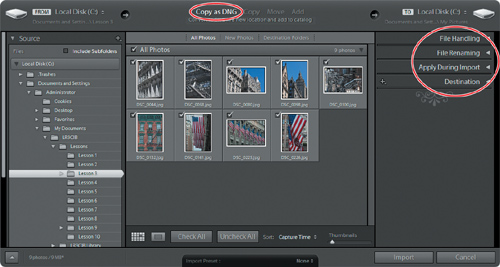
• Choose the option Copy As DNG to create copies of your images in DNG (Digital Negative) file format, which will be stored in a new location, and then added to your catalog. Collapse all of the panels in the right panel group. For the Copy As DNG, Copy, and Move options, the right panel group offers the same suite of panels—File Handling, File Renaming, Apply During Import, and Destination.
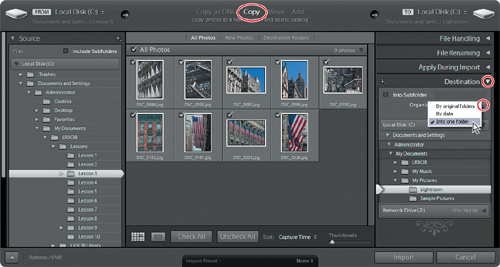
• Choose the option Copy to create copies of your images in a new location and add them to your catalog, leaving the originals in their current locations and preserving their original folder hierarchy. As you learned in the previous exercise, you can specify a destination for your copies in the Destination panel. Expand the Destination panel and click the Organize menu. When you import from your hard disk or external storage media using the options Copy As DNG, Copy, or Move, the Organize menu offers the choice to copy the photos into a single folder, into subfolders based on their capture dates, or into a folder structure that replicates their original arrangement.
• Choose the option Move to move the images to a new location on your hard disk and delete them from their original locations. For this option, you can also select one of the three folder arrangements from the Organize menu.
• Choose the option Add to add the images to your catalog without moving or copying them from their current locations, or altering the folder structure in which they are stored. Note that for the Add option, the right panel group offers only the File Handling and Apply During Import panels; you cannot rename the original source images during import, and there is no need to specify a destination because the files will remain where they are. Expand the File Handling and Apply During Import panels to see the options available.
Applying metadata
Lightroom uses the metadata information attached to image files to enable you to quickly find and organize your photos. You can search your image library and filter the results by keyword, creation date, flag status, color label, shooting settings, or any combination of a wide range of other criteria. You can also choose specific information about your images from this metadata and have Lightroom display it as a text overlay applied to each image in a slideshow, web gallery, or print layout. Some metadata is automatically generated by your camera when you take a photo. You can also add your own information as part of the import process, making it even easier to locate and organize your images on your own terms.
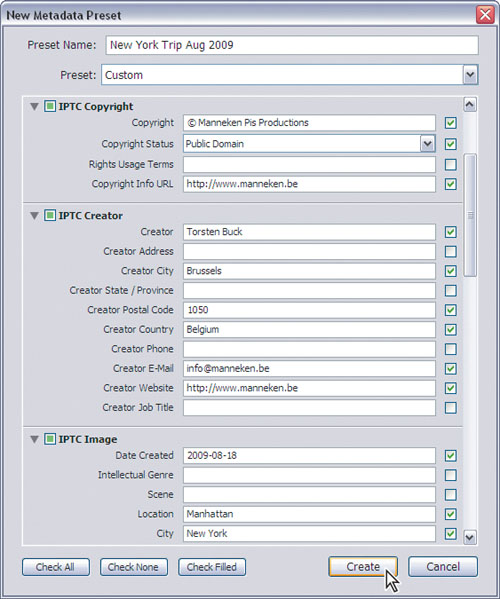
1 In the Apply During Import panel, choose New from the Metadata menu.
2 In the New Metadata Preset dialog box, type a descriptive name for these nine photos in the Preset Name box (we used “New York Trip Aug 2009”); then, enter metadata information that is applicable to the images as a group, such as copyright information. You can customize the metadata for each individual image in Lightroom later, adding information such as titles and captions.
3 Click Create to close the New Metadata Preset dialog box, and then confirm that your new metadata preset is selected in the Metadata menu.
You can edit your metadata presets by choosing Edit Presets from the Metadata menu in the Apply During Import panel. In the Edit Metadata Presets dialog box you can edit, rename, or delete presets, or save modified settings as a new preset.
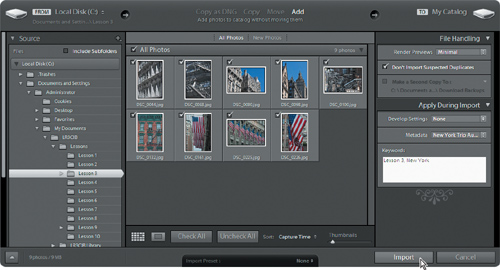
4 In the Apply During Import panel, choose None from the Develop Settings menu, and then type Lesson 3, New York in the Keywords text box.
5 In the File Handling panel, choose Minimal from the Render Previews menu. Check that your settings are the same as those shown in the illustration below, and then click Import.
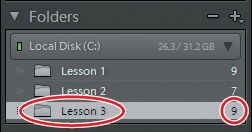
The nine photos from the Lesson 3 folder are imported into your library catalog and thumbnails of the images appear in the Grid view and the Filmstrip in the Library module.
6 Right-click / Control-click any of the images in the Grid view and choose Go To Folder In Library from the context menu. In the Folders panel in the left panel group, the Lesson 3 folder is highlighted and the image count indicates that it contains 9 photos.
7 Right-click / Control-click the Lesson 3 folder in the Folders panel, and then choose Show In Explorer / Show In Finder from the context menu.

8 The Lessons folder opens in a Windows Explorer / Finder window, with the Lesson 3 folder highlighted. Leave the Windows Explorer / Finder window open for use in the next exercise.
Importing via drag and drop
Perhaps the easiest way to add photos to your image library is to simply drag a selection of files—or even an entire folder—directly into Lightroom.
1 The Windows Explorer / Finder window showing your Lesson 3 folder should still be open from the previous exercise. Position the window so that you can see the Grid view in the Lightroom workspace beside it.
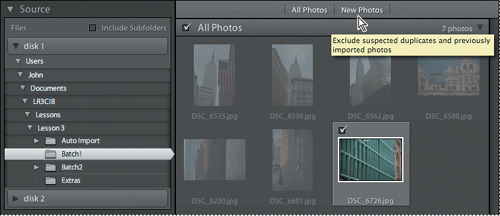
2 Open your Lesson 3 folder, if necessary, and drag the Batch1 folder from the Windows Explorer / Finder window onto the Grid view.
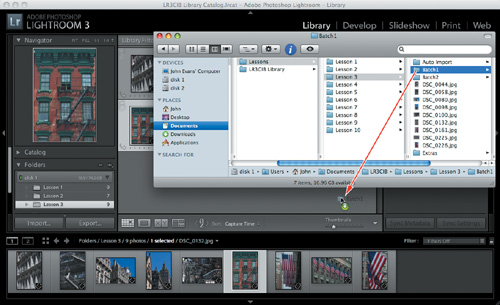
The Import dialog box opens. The Batch1 subfolder is now selected in the folder list in the Source panel and the seven photos stored in that folder are displayed in the Preview pane, but the rest of the settings from your last import remain unchanged.
3 Don’t click Import yet; keep the Import dialog box open for the next exercise.
Evaluating photos before importing
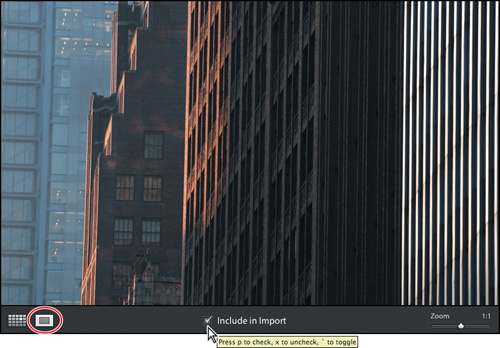
Lightroom 3 makes it easier to decide which of your photos you wish to import by providing an enlarged Loupe view in the Import dialog box; you can examine each image in detail so that you can choose between similar images or exclude a photo that is out of focus.
1 Double-click any of the thumbnails to see the photo in Loupe view, or select the thumbnail and click the Loupe view button ![]() below the preview pane; the image is enlarged to fit the preview area and the pointer becomes a magnifying glass cursor
below the preview pane; the image is enlarged to fit the preview area and the pointer becomes a magnifying glass cursor ![]() .
.
2 Click the image again to further magnify the image to a zoom ratio of 1:1. Use the Zoom slider below the preview pane to see even more detail. Drag the enlarged image in the preview pane to inspect portions of the photo that are not currently visible.
While you’re examining the photo in Loupe view, you can check mark the image for import or un-check it to exclude it by clicking the Include In Import check box below the preview pane. Alternatively, press the P key to check-mark the photo, the X key to un-check it, or the Tilde key (~) to toggle between the two states.
3 Drag the Zoom slider all the way to the left to return to the Fit view where the entire image is visible. Double-click the image, or click either the Loupe view button or the Grid view button beside it to return to the thumbnail display.
4 For the purposes of this exercise, un-check one of the images to exclude it, and then click Import.
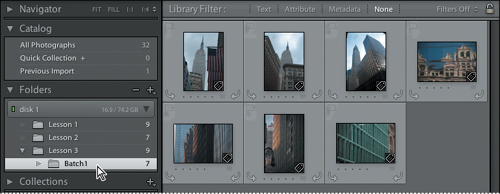
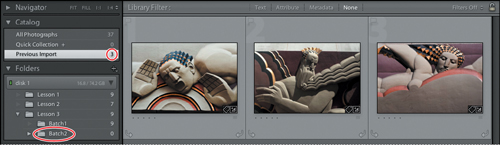
5 In the Folders panel, click the triangle beside the Lesson 3 folder, if necessary, to see the listing for the Batch1 subfolder inside it.
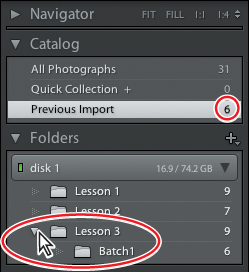
Both the Batch1 subfolder and the Previous Import listing in the Catalog panel show an image count of 6 and the six newly imported photos are displayed in the Grid view and the Filmstrip.
6 Switch back to Windows Explorer / the Finder and drag the Batch1 folder onto the Grid view in the Library module again.
In the Import dialog box, the six photos already imported are dimmed and unavailable for import. Clicking New Photos above the Preview pane would remove them from view entirely.
7 Click Import to add the remaining Batch1 photo to your library catalog.
8 In the Folders panel, the Batch1 folder now shows an image count of 7; click the Batch1 folder to see all seven photos in the Grid view and the Filmstrip.
Importing to a specific folder
From within the Library module, you can import photos directly to a folder in the Folders panel without going to the trouble of specifying a destination in the Import dialog box.
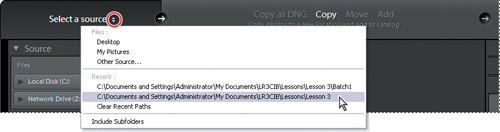
1 In the Folders panel, right-click / Control-click the Batch1 folder and choose Import Into This Folder from the context menu.
2 In the Import dialog box, click Select A Source at the left of the top panel, above the Source panel, and choose the path to the Lesson 3 folder from the list of recent sources in the menu.
3 Expand the Source panel; then expand the Lesson 3 folder so that you can see the subfolders inside it. Select the folder Extras. In the Preview pane, you can see that the Extras folder contains two photos.
4 In the top panel, choose Move from the import type options to move the photos from the Extras folder to the destination folder and add them to your catalog. Check that your previous settings are still active in the Apply During Import panel. You may need to re-type Lesson 3, New York in the Keywords box.
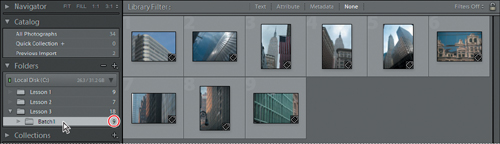
5 Expand the Destination panel, if necessary. You can see that the Batch1 folder has been automatically selected as the destination to which the photos from the Extras folder will be moved. Click Import. Thumbnails of the two images appear in the Grid view and the Filmstrip in the Library module.
6 In the Folders panel, the Batch1 folder now shows an image count of 9. Click the Batch1 folder to see all nine images together in the Grid view and the Filmstrip.
7 In the Folders panel, right-click / Control-click the Lesson 3 folder and choose Show In Explorer / Show In Finder from the context menu. In the Windows Explorer / Finder window, open the Extras folder inside the Lesson 3 folder; the two image files have been removed and the Extras folder is now empty.
Importing from other catalogs
If you work on a laptop while you’re on location and need to merge your new photos with the Lightroom library on your desktop computer, or if you work in a situation where more than one person will be using the same images in Lightroom on different computers, you can move photos from one computer to another using the Export As Catalog and Import From Catalog commands. Your images will be transferred with all of your edits, adjustments, and settings in place—including any keywords or other metadata you may have added.
Lesson 10, “Backup and Exporting” will discuss exporting photos as a catalog; for this lesson you’ll import photos from a catalog you’ll find in the Batch2 folder inside the Lesson 3 folder on your hard disk.
1 Choose File > Import From Catalog.
2 In the Import From Lightroom Catalog dialog box, navigate to the Batch2 folder inside the Lesson 3 folder on your hard disk. Select the file Batch2 Catalog.lrcat in the Batch2 folder and click Choose.
3 In the Import From Catalog dialog box, choose Add New Photos To Catalog Without Moving from the File Handling menu, and then click Import.

![]() Tip: The option Don’t Import New Photos in the File Handling menu is useful when you’ve exported images from one computer, modified the files on a different computer, and then wish to re-import them without importing any new images.
Tip: The option Don’t Import New Photos in the File Handling menu is useful when you’ve exported images from one computer, modified the files on a different computer, and then wish to re-import them without importing any new images.
4 If you see the Photo Is Missing icon (![]() ) in the top right corner of the image cells in the Grid view, click the icon on the first image, and then click Locate in the Confirm dialog box. Navigate to the Images folder inside the Batch2 folder, select the missing photo, activate the Find Nearby Missing Photos option, and then click Select.
) in the top right corner of the image cells in the Grid view, click the icon on the first image, and then click Locate in the Confirm dialog box. Navigate to the Images folder inside the Batch2 folder, select the missing photo, activate the Find Nearby Missing Photos option, and then click Select.
Re-importing existing photos
If you wish to re-import photos that already exist in your library, select from the following options in the Existing Photos area of the Import From Catalog dialog box:
• From the Replace menu, choose Metadata, Develop Settings, And Negative Files to override all the settings in the current catalog. If you choose this option, activate the option Preserve Old Settings As A Virtual Copy to keep a backup. You can also activate the option Replace Non-Raw Files Only to avoid replacing raw negatives. If changes to raw negative files affect only metadata, selecting this option helps save time.
• From the Replace menu, choose Metadata And Develop Settings Only to leave the negative files (the source photos) unchanged. If you choose this option, activate the option Preserve Old Settings As A Virtual Copy to keep a backup.
• From the Replace menu, choose Nothing to import only new photos.
• If photos in the current catalog are missing and can be found in the imported catalog, indicate whether you want to update the metadata and Develop settings for these files. Activate the option Preserve Old Settings As A Virtual Copy to keep a backup. If the photos missing in the current catalog appear in the imported catalog, specify whether the missing files should be copied and where they should be copied to.
—From Lightroom Help
5 The Batch2 subfolder is now listed in the Folders panel and three newly imported photos are displayed in the Grid view and the Filmstrip.
When you import images from a Lightroom catalog, you don’t have the option to apply develop settings or to add keywords and other metadata during the import process as you do when you import from your camera or hard disk.
Lightroom preserves the keywords and other metadata that were exported in the catalog with the images; once the photos have been added to your catalog, you can modify the metadata as you wish.
6 Select one of the images in the Grid view. In the Keywording panel in the right panel group, you can see that the keywords “Lesson 3” and “New York” have already been applied. If you wished, you could add more keywords—such as Sculpture or Art Deco—to the images individually.
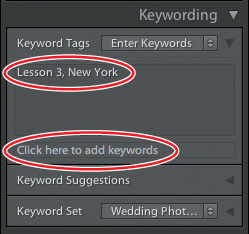
7 Expand the Metadata panel in the right panel group. If necessary, collapse the other panels in the group or scroll down so that you can see the contents of the Metadata panel. Note that the New York trip Aug 2009 metadata preset has already been applied to the images. You can edit the metadata to your liking.
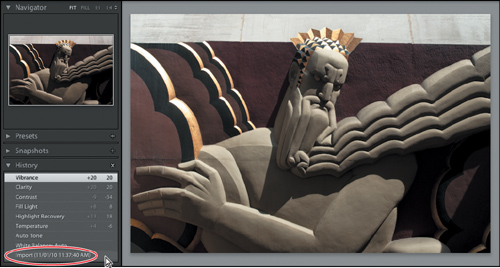
The imported images have also been edited. Lightroom records every editing operation performed on an image in the entry for that image in the library catalog file. When images are exported in a catalog their entire edit history is exported with them.
8 Select one of the images in the Grid view, and then switch to the Develop module. If necessary, scroll down in the left panel group so that you can see the contents of the History panel. Click the Import entry at the bottom of the History panel to see how the image looked originally. Then, choose Edit > Undo to return to the edited version.
9 Switch back to the Library module in readiness for the next exercise.
Importing from a watched folder
Designating a folder on your hard disk as a watched folder can be a very convenient way to automate the import process. Once you’ve nominated a folder that is to be watched, Lightroom will detect any photos that are placed or saved into it, then automatically move them to a specified location and add them to the catalog. You can even have Lightroom rename the files and add metadata in the process.
1 Choose File > Auto Import > Auto Import Settings.
2 In the Auto Import Settings dialog box, click the first Choose button to designate a watched folder.
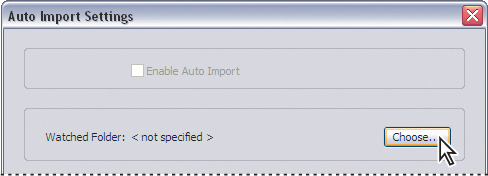
3 In the Browse For Folder / Auto-Import From Folder dialog box, navigate to the Lesson 3 folder. Open the Auto Import folder and select the subfolder named Watched Folder; then, click OK / Choose.
4 Now that you have designated a watched folder, you can click the checkbox at the top of the Auto Import Settings dialog box to enable Auto Import.
5 Click the second Choose button under Destination to specify a folder to which Lightroom will move your photos in the process of adding them to the library catalog.
6 In the Browse For Folder / Choose Folder dialog box, navigate to the Lessons folder. Select the Lesson 3 folder (you’ll set up a subfolder inside the Lesson 3 folder in the next step), and then click OK / Choose.
7 Still in the Destination section in the Auto Import Settings dialog box, type Batch3 in the Subfolder Name text box. Lightroom will create this subfolder inside the Lesson 3 folder.
![]() Tip: Once you’ve set a watched folder, you can activate or disable Auto Import at any time, without opening the Auto Import Settings dialog box, by choosing File > Auto Import > Enable Auto Import. A check mark beside this menu command indicates that the Auto Import feature is currently enabled.
Tip: Once you’ve set a watched folder, you can activate or disable Auto Import at any time, without opening the Auto Import Settings dialog box, by choosing File > Auto Import > Enable Auto Import. A check mark beside this menu command indicates that the Auto Import feature is currently enabled.
8 Choose Filename from the File Naming menu.
9 Under Information, choose the metadata preset you created earlier in this lesson from the Metadata menu and type Lesson 3, New York in the Keywords text box. Choose None from the Develop Settings menu and Minimal from the Initial Previews menu. Click OK to close the Auto Import Settings dialog box.
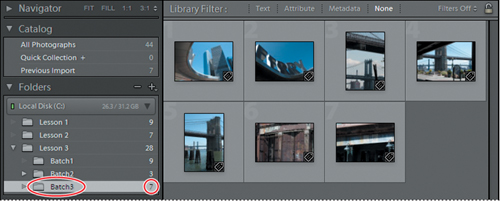
10 Switch to Windows Explorer / the Finder and navigate to the Lesson 3 folder. Note that as yet there is no Batch3 folder inside the Lesson 3 folder. Open the folder Auto Import and drag the seven image files inside it to the Watched Folder. When Lightroom has finished importing, you’ll see the newly created Batch3 folder inside the Lesson 3 folder. The Watched Folder is empty once more and the seven lesson images have been moved into the Batch3 folder.
11 Return to Lightroom; the Batch3 folder is now listed in the Folders panel and the newly imported photos are displayed in the Grid view and the Filmstrip.
You can now import images into your Lightroom library by simply dragging them onto the watched folder. This makes importing photos directly from a camera or memory card reader even easier; there’s no need to attend to a dialog box and yet your images can be renamed and have custom metadata added automatically.
Specifying initial previews when importing
As photos are imported, Lightroom can immediately display a photo’s embedded preview, or display higher-quality previews as the program renders them. You can choose the rendered size and quality for previews using the Standard Preview Size and Preview Quality menus in File Handling tab of the Catalog Settings (choose Edit > Catalog Settings / Lightroom > Catalog Settings). Please keep in mind that embedded previews are created on-the-fly by cameras and are not color managed therefore they don’t match the interpretation of the camera raw files made by Lightroom. Previews rendered by Lightroom are color managed.
In the Import Photos dialog box, do one of the following:
• To immediately display images using the smallest previews embedded in the photos, choose Initial Previews > Minimal. Lightroom renders standard-size previews when needed.
• To display the largest possible preview available from the camera, choose Initial Previews > Embedded & Sidecar. This may take longer to display than a Minimal preview but is still faster than rendering a standard-size preview.
• To display previews as Lightroom renders them, choose Initial Previews > Standard. Standard-size previews use the ProPhoto RGB color space.
• To display previews that are a 1 to 1 view of the actual pixels, as in the Develop module, choose Initial Previews > 1:1.
—From Lightroom Help
Tethered shooting
Many modern digital cameras support tethered shooting, a process where you connect—or tether—your digital camera to your computer and save images to the computer’s hard disk rather than to the camera’s memory card. With tethered shooting you can view a photo on your computer screen immediately after you shoot it—a vastly different experience from seeing it on your camera’s LCD screen.
For a range of DSLR cameras including many models from Canon and Nikon, you can capture photographs directly into Lightroom 3 without the need for any third-party software. If your camera allows tethered shooting, but is not on the list of models supported by Lightroom, you can still capture images into your Lightroom library using either the image capture software associated with the camera or any of a number of third-party software solutions.
![]() Tip: To see a list of cameras for which integrated tethered shooting is currently supported, please refer to Lightroom Help.
Tip: To see a list of cameras for which integrated tethered shooting is currently supported, please refer to Lightroom Help.
You can have Lightroom name the photos, add metadata, apply developing settings, and organize them in your library then and there. If necessary, you can adjust your camera settings (white balance, exposure, focus, depth of field, and others), or even change cameras, before taking the next shot. The better the quality of the captured image the less time you’ll need to spend adjusting it later.
Tethered shooting with a supported camera
1 Connect your camera to the computer.
2 In the Library module, choose File > Tethered Capture > Start Tethered Capture.
3 In the Tethered Capture Settings dialog box, type a name for your shooting session. Lightroom will create a folder with this name inside the destination folder of your choice; this session folder will appear in the Folders panel.
![]() Note: Depending on your camera model and the operating system your computer uses, you may also need to install the necessary drivers for your camera.
Note: Depending on your camera model and the operating system your computer uses, you may also need to install the necessary drivers for your camera.
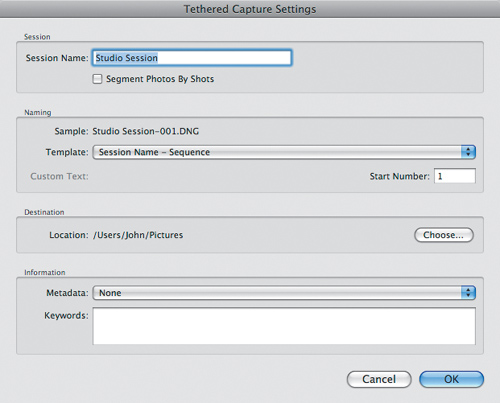
4 Chose a naming scheme for your shots, select a destination folder, and specify any metadata or keywords that you want Lightroom to apply as the newly captured images are imported.
5 Click OK to close the Tethered Capture Settings dialog box. The tethered capture control bar appears.

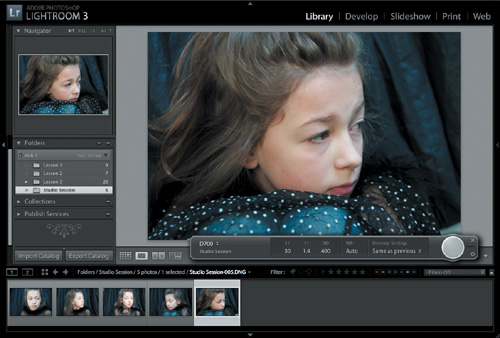
The control bar displays the model name of the connected camera, the name you entered for the shooting session, and the current camera settings. You can choose from a wide range of Develop presets in the Develop Settings menu at the right. Trigger the shot either with the shutter button on your camera or by clicking the large circular button at the right of the control bar.
As you shoot, the images captured will appear in both the Grid view and the Filmstrip. To see each captured photo as large as possible, use the Loupe view and hide unwanted panels—as shown in the illustration below—or chose Window > Screen Mode > Full Screen And Hide Panels.
Tethered shooting with Other cameras
If your camera allows tethered shooting, but is not on the list of models for which the process is integrated in Lightroom, you can still capture images into your Lightroom library by using the image capture software associated with your camera—or a third-party software solution—to save your photos to a watched folder. Lightroom will remove the images from the watched folder and add them to your catalog as soon as it detects them.
![]() Tip: To find out about third-party image capture software compatible with your camera, search “tethered shooting” on the Internet or in Adobe Community Help.
Tip: To find out about third-party image capture software compatible with your camera, search “tethered shooting” on the Internet or in Adobe Community Help.
1 Choose File > Auto Import > Auto Import Settings. In the Auto Import Settings dialog box, click the first Choose button to choose a watched folder. Once you’ve designated a folder to be watched, you can click the checkbox at the top of the Auto Import Settings dialog box to enable Auto Import.
2 Click the second Choose button under Destination to specify a folder to which Lightroom will save your photos in the process of adding them to the library catalog. Type a name for your photo shoot in the Subfolder Name text box; Lightroom will create this subfolder inside the designated destination folder.
3 Choose a naming option for your images from the File Naming menu. Under Information, you can choose a metadata preset and enter any keywords that you wish Lightroom to apply as your newly captured images are imported. If you wish, you can also choose a developing preset and specify a preview option. Click OK to close the Auto Import Settings dialog box.
4 Use your camera’s image capture software to designate your new watched folder as the destination to which the camera will save your photos.
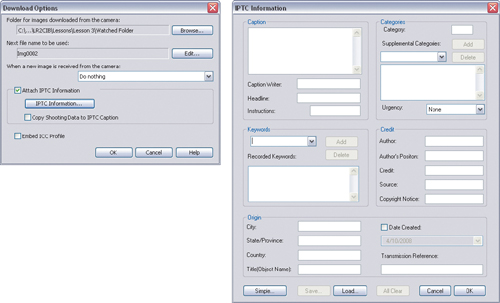
By way of an example, this illustration shows the download and metadata options from the Camera Control component of Nikon’s Capture NX software.
5 Before you begin shooting, make sure that you are in the Library module. In the Folders panel, select the subfolder you created for your tethered shoot in step 2, so that your newly captured photos will be displayed as they are imported.
Review Questions
1 When would you choose to copy imported images to a new location on your hard disk and when would you want to add them to your library catalog without moving them?
2 Which file formats are supported by Lightroom?
3 What is DNG?
4 When would you use the Import dialog box in compact mode?
5 How can you transfer photos between Lightroom libraries on separate computers?
Review answers
1 You don’t have the option to import photos from a camera at their current location; Lightroom needs to record a location for each file in the library catalog, and as memory cards are expected to be erased and reused the images need first to be copied to a more permanent location. Copying or moving images might also be useful when you want Lightroom to organize the files into a more ordered folder hierarchy during the import process. Images that are already arranged in a useful way on the hard disk or removable media can be added to the library catalog in their current locations.
2 Lightroom supports the following file formats: most camera raw formats, Digital Negative (DNG), TIFF, JPEG, and Photoshop PSD. and CMYK files, Lightroom does not support PNG files, Adobe Illustrator® files, Nikon scanner NEF files, or files with dimensions greater than 65,000 pixels per side or larger than 512 megapixels.
3 The Digital Negative (DNG) file format is a publicly available archival format intended to address the lack of an open standard for raw files generated by cameras. Converting raw files to DNG in Lightroom will help ensure that you’ll be able to access your raw files in the future even if the original proprietary format is no longer supported.
4 Once you’ve created import presets to suit your workflow, you can speed up the import process by using the Import dialog box in compact mode. Use your import preset as a starting point, and then modify the settings as required.
5 On one computer, export the images from Lightroom as a catalog file. On the other computer, choose File > Import From Catalog to import the photos into the Lightroom library together with their develop settings and metadata.