
In This Chapter
Making video slideshows
Panning and zooming in on still images
Working with stop-motion video
Seeing double
Creating freeze-frames
Making video look old
Reshaping video image using mattes
Adding fake lens flares
Removing audio hums
Zooming in on video images
Adobe didn't design Premiere Elements for professional video editors. Premiere Elements is primarily aimed at video hobbyists, people who have digital camcorders and want to turn their raw video into fun, personalized movies. But Premiere Elements brings a level of pro-caliber video-editing capabilities heretofore unseen in affordable video-editing programs, and I think it's only natural that you'll want to use this better software to make better movies.
Moviemaking is an art, and as with any art there's no single formula or magic technique to guarantee a great movie. At least with Premiere Elements your creativity probably won't be limited by the software. Premiere Elements has so many features and capabilities that you'll probably come up with editing tricks and techniques all your own. But if you lack inspiration at the moment or just want to practice more advanced techniques, this chapter is for you. Here I've collected some (ten, to be precise) advanced editing techniques that didn't quite seem to fit anywhere else in the book.
Once upon a time — back before Flickr.com, before PowerPoint presentations, and way before digital cameras — the slideshow was a time-honored tradition for sharing vacation photos. You'd invite all your friends and family over, close the curtains, dim the lights, and fire up your slide projector. Your audience was enthralled (or bored) by your narrated photo presentation.
Most people don't shoot slides anymore, and the bulb in your slide projector probably burned out 15 years ago. But it's still possible to enthrall (or bore) your friends with personalized slideshows. Premiere Elements can help you create a slideshow that, when burned onto a DVD, can be viewed on any TV.
In Chapter 7, I show you how to put clips — both video and stills — into the Timeline. The most basic way to create a slideshow is to drop a series of still images in the Timeline, add some transitions (Chapter 9) and titles (Chapter 13), and burn the finished "movie" to a disc (Chapter 16). Creating a slideshow manually is time consuming, so I recommend that you instead use the SlideShow feature in the Adobe Organizer. Here's how:
Launch Premiere Elements, and click Organize on the splash screen.
In the Organizer, choose File

Browse to the still images you want to use in your slideshow, select the desired images, and click Get Media.
The still images are imported into the Adobe Organizer.
In the Organizer, select the photos you want to use in the slideshow.
Ctrl+click or Shift+click to select multiple photos.
Click the Create tab on the right side of the Organizer, and then click Slide Show.
Choose slideshow settings, and then click OK.
You can choose the length of time images play, the length and style of transitions, the background color, and more. Choose Apply Pan & Zoom to All Slides to add motion and visual appeal to the slideshow.
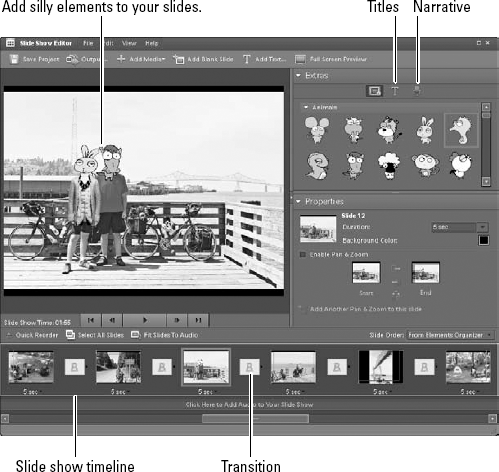
In the Slide Show Editor that appears, as shown in Figure 17-1, click a slide in the slideshow Timeline to customize that slide.
Under Extras, click the Titles or Narration buttons to add those elements, or click-and-drag graphics to an image. In Figure 17-1, two animals and a frilly shirt have been added to the slide. You can also enable or disable Pan & Zoom for individual slides, or change the background color.
Click a transition in the Timeline to open transition controls.
Click-and-drag slides left or right in the Timeline to change the playback order.
Click Output, choose an output format and file size, and click OK.
Enter a filename for the slideshow and click Save.
It may take a few minutes to export the slideshow.
When motion pictures first appeared in the 19th century, some people probably thought it meant the end of still photography. But still photos have stubbornly refused to go away, and you may find that you sometimes want to use photos in your movie projects.
The problem with still photos is that they're just so, well, still. To help still photos fit in better with your movies, I recommend adding some subtle pan-and-zoom effects. Slowly zooming or panning across an image makes that image come alive and feel more natural in your movie. To pan or zoom, click the Edit tab on the Task pane and then click Effects. In the categories menu, choose Presets, and then choose one of the following categories from the subcategories menu. The pan and zoom subcategories are
Horizontal Image Pans: These presets pan horizontally left-to-right or right-to-left across the image.
Horizontal Image Zooms: These zoom in or out on the image along a horizontal plane.
Vertical Image Pans: These presets pan vertically up or down the image.
Vertical Image Zooms: These zoom in or out on the image along a vertical plane.
Drag and drop an image pan or zoom preset to a still image in the Timeline, just like any other effect. These presets modify the image's Motion settings. As with most effects, you may have to experiment to get just the desired effect. And of course, preview your edits carefully.
If you love to make movie magic, stop-motion video should definitely be in your spell book. Stop-motion video is one of the oldest special effects techniques in all of moviemaking, and it's used to create a variety of visual illusions. Remember those claymation shows like Gumby and Frosty the Snowman you used to watch when you were a kid? Stop-motion animation was used to make the clay figures in those shows appear to move on their own. Stop-motion video can also be used to speed up something that would otherwise happen very slowly, such as the blooming of a flower.
Premiere Elements makes it easy for you to create your own stop-motion video. To make your stop-motion idea successful, follow these steps:
Plan the video shoot carefully.
You may be tempted to try to shoot a series of still photos, but I recommend that you just use your video camera and record video instead. You can then select individual frames later in Premiere Elements. Important elements for a successful stop-motion video shoot include:
Use a tripod. This is absolutely mandatory for successful stop-motion video capture. When you shoot, be extremely careful not to bump the tripod or move the camera. Tiny camera movements will be jarringly obvious in the final stop-motion video. See Chapter 19 for tips on choosing a tripod.
Maintain constant lighting. If you're shooting a blooming flower outside, you probably don't have any control over the sun. But watch out for shadows or other lighting changes because they will appear as flashes in your stop-motion video.
Let the camera roll. Don't try to stop recording between each "frame" of stop-motion video. Just record video as normal. This saves time and minimizes the risk of bumping the camera. If you need to stop and restart recording, use the camera's remote control.
Clear your schedule. Even if you use five frames from every minute of video (an ambitious goal), one hour of recorded video will yield only about ten seconds of stop-motion video.
Open the video capture window, as described in Chapter 5.
At the top of the Capture window, choose Stop Motion, and then click Create New Stop Motion in the Capture window.
Place a check mark next to Time Lapse, click Set Time, and then choose an interval for capturing frames.
Time lapse capture works well if you want to capture frames automatically at regular intervals.
Click Play to start playing the video, and click the Grab Frame button whenever you want to grab a frame.
Click Stop, and close the Capture window when you're done capturing frames.
Click Yes when you are prompted to save the images as a video file, and then enter a name for the file.
Premiere Elements creates an AVI video file of the frames you captured, and it appears as a video clip in the Organizer. You can then drop it into the Timeline and edit it just like you would with any other video clip.
Have you ever wondered if you have an evil twin somewhere in the world? With some simple videography tricks and Adobe Premiere Elements, you can easily make your evil twin a visual reality, as shown in Figure 17-2. No human cloning is necessary for this effect. You shoot the two scenes quickly, and then edit them together as a single scene in Premiere Elements.
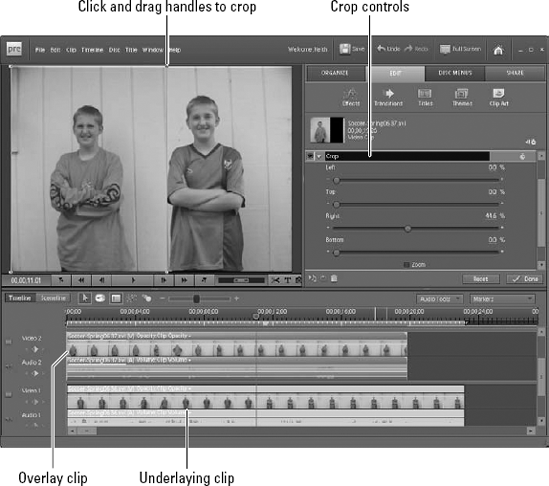
To make this effect work, you first shoot one-half of the image, and then shoot the other half. This gives two clips that will be combined to make a single scene. One clip is placed in track Video 1, and the other clip — call it the overlay clip — is placed in track Video 2, as shown in Figure 17-2.
You then apply the Crop effect to the overlay clip so it only covers half the screen. Notice in Figure 17-2 that I have cropped 44.6% off the right side of my overlay clip. To apply the Crop effect, follow these steps:
Click the Edit tab, and then click Effects.
Scroll down to the Transform category of video effects.
Click-and-drag the Crop effect from the Edit pane to an overlay clip in the Timeline.
An overlay clip should be in track Video 2 or higher.
Click the overlay clip in the Timeline to select it.
Click Edit Effects at the bottom of the Edit pane.
Alternatively, right-click the overlay clip in the Timeline and choose Show Properties from the menu that appears.
Expand the Crop effect options, as shown in Figure 17-2.
When you select the Crop effect, handles appear around the corners of the video image in the Monitor.
Click-and-drag a corner of the video image to crop it.
When you crop a video image in an overlay track, video images in underlying tracks show up in the cropped area. To make the "seeing double" effect successful, follow these simple rules:
Use a tripod. A tripod is absolutely mandatory to make this effect work. You won't be able to hold the camera steady enough by hand, and a jiggling camera ruins the results.
Don't move the camera between shots. The camera must remain absolutely still between each clip. If you have to reposition the camera, or if someone bumps it, reshoot both scenes. If your camcorder has a remote control, use it to start and stop recording so that even the slight touch of your finger doesn't move the camera.
Shoot the "before" and "after" scenes quickly. If you're shooting outdoors, shadows and lighting can change quickly. Even subtle light changes will be apparent when you edit the two scenes together later. So stop reading and start shooting. Now!
Don't disturb the rest of the scene. If your subject moves a chair or picks up an object between the "before" and "after" shots, the scenes will appear inconsistent when edited together.
Have you ever watched those old "Road Runner" cartoons where Wile E. Coyote attempts to chase down the Road Runner? You probably remember a scene that appeared early in each cartoon — Road Runner would momentarily freeze, and its scientific name (Acceleratii Incredibilus or something along those lines) would appear on the screen.
You can add momentary freeze-frames to your video as well. To momentarily freeze a frame of video in the middle of a clip, and then make it play again, follow these steps:
In the Timeline, move the CTI to the frame that you want to freeze.
Tip
Use the left- and right-arrow keys to move one frame at a time.
Click the clip in the Timeline that you want to freeze to select it.
Choose Timeline
The clip splits into two.
Choose File
In the Export Frame dialog box that appears, give the exported frame a filename and click Save.
The exported frame now appears in your Organizer as a still image.
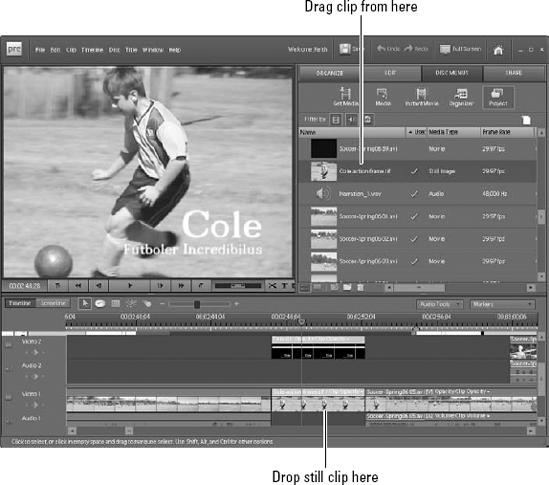
On the Edit tab, click Project, and then click-and-drag the still image and drop it on the Timeline at the location of the CTI.
The still image is inserted between the two clips you created when you split the original clip in Step 3.
Click the inserted still image in the Timeline to select it, and choose Clip
In the Time Stretch dialog box, enter the length of time that you want the frozen frame to appear next to Duration.
If you want the frame to freeze for three seconds, for example, enter
00;00;03;00.If an empty space appears in the Timeline after the still clip, right-click the empty space and choose Delete and Close Gap.
Your Timeline will end up looking similar to the Timeline shown in Figure 17-3. When you play the Timeline, the frame appears to freeze momentarily.
Motion pictures have been around for well over a century now. You can pay homage to the history of cinema by using some "old" (or at least old-looking) footage in your movie projects. Thankfully, creating old-looking footage doesn't require a trip to some dank film vault deep beneath a Hollywood studio. You can easily simulate old-fashioned film by following these tips:
Beware the anachronism! Pay attention to your subjects and the scene. For example, cowboys of the Old West didn't carry cell phones at their hips, nor was the sky filled with condensation trails left by jet airplanes. Remove objects from the scene that don't fit the period you are trying to simulate, and make sure that the background doesn't depict modernity.
Remove color from the clip. Perhaps the easiest way to convert a color image to grayscale is to use the Black & White filter in the Image Control category of Video Effects (click Effects on the Edit tab), although I prefer to use the Color Balance (HLS) effect. Adjust the saturation level to −100 to desaturate all colors in the clip. See Chapter 10 for more on adjusting video color.
Tip
One advantage of using the Color Balance (HLS) effect is that you can use keyframes to change the effect in the middle of a clip.
Note
Grayscale is just a fancy way of saying black and white. Grayscale is a more technically accurate term because black-and-white video images are actually made using various shades of gray.
"Weather" the video image. Film tends to deteriorate over time, so if you're trying to simulate old footage, you should simulate some of that deterioration. Use the Noise effect under Stylize to add some graininess to the video image. Video effects are described in Chapter 12.
Reduce audio quality and if possible use a mono setting. Audio recordings made 75 years ago did not use 16-bit stereo sound. To reduce quality, reduce the sampling rate of the audio when you export your movie (see Chapters 14, 15, and 16 for more on movie export settings).
Use the Old Film effect. One of the NewBlue effects (see Chapter 12) that comes with Premiere Elements is the Old Film effect. If you don't feel like spending a lot of time manually aging your video images, simply click-and-drag this effect to your clips. It instantly adds 75 years to any video image.
TV screens are usually rectangular, and so most video images are rectangular, as well. But you can make a video image of virtually any shape you want by using mattes. Matte is simply a fancy name for a solid-colored screen or a screen with a monochrome shape. To use mattes, follow these steps:
In a graphics program such as Photoshop Elements, create an image file with the shape you want to use for your matte.
I recommend creating a matte with just two contrasting colors (black and white provide the best contrast). Also, follow the guidelines I give in Chapter 5 for creating still images for use in movies. Save the image as a PSD (Photoshop Document) file.
Choose File
I describe how to import media into Premiere Elements in Chapter 5.
Add the matte image to an overlay track in the Timeline, and click Yes when you are asked if you want to apply Videomerge to the clip.
Note
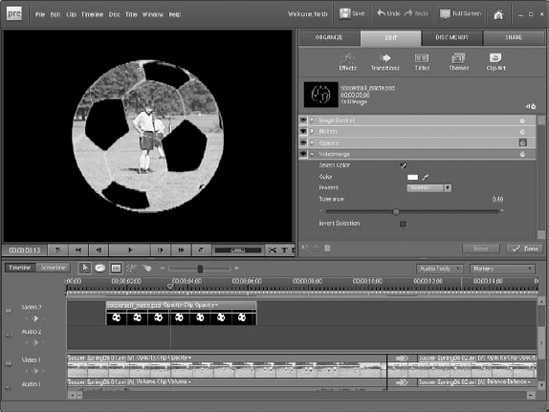
Overlay tracks are tracks Video 2 or higher. In Figure 17-4, I have inserted a matte image that is shaped like a soccer ball.
Make sure the CTI in the Timeline is somewhere on the overlay clip so that it appears in the Monitor window, as shown in Figure 17-4.
Right-click the matte clip in the Timeline and choose Show Properties from the menu that appears.
In the effect controls that appear, click the arrow next to Videomerge to expand Videomerge settings.
Place a check mark next to Select Color.
Click the eyedropper icon under Select Color, and then click a portion of the matte that you want to make transparent.
The selected color becomes transparent, as shown in Figure 17-4.
Click-and-drag the tolerance slider to fine-tune the matte's appearance.
If desired, place a check mark next to Invert Selection.
Choose Done to close the clip properties and save your changes.
Camera lenses, whether in still cameras or camcorders, are made of glass and are designed to collect light. Despite advanced lens coatings, those glass lenses can still reflect light when they're supposed to be collecting it. This phenomenon is especially common when the sun shines directly onto a camera's lens. Intense sunlight causes sharp reflections called lens flares.
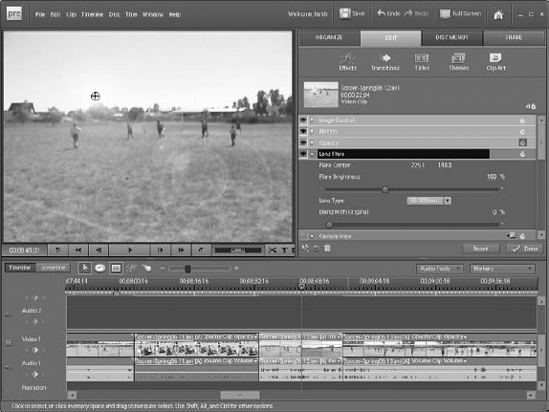
Generally, lens flares are to be avoided. Higher-quality camcorders often incorporate large lens hoods to prevent lens flares. But sometimes a lens flare can be used for dramatic effect. Consider many recent movies that feature computer animation. Faux lens flares are often used to make the animated image seem more real. And in real video images that are washed out from too much sun, you can add manufactured lens flares to accentuate color and detail. Or you may want to add a lens flare to a properly lit desert scene simply to draw attention to the fact that the sun is blazing brightly overhead. To add a lens flare, follow these steps:
In the Timeline, move the CTI to a frame where the sun appears or where you would otherwise like the sun to appear to appear.
Click the Edit tab, and then click Effects.
Click-and-drag the Lens Flare effect (in the Generate category) to a clip to which you want to add a lens flare.
A fake lens flare appears on your video image.
Click Edit Effects on the Edit tab, and then click the arrow next to Lens Flare to open Lens Flare effect settings.
Click Lens Flare to select the effect.
A circle with cross hairs appears in the middle of the lens flare in the Monitor window, as shown in Figure 17-5.
Click-and-drag the cross-hairs to reposition the lens flare.
Notice that as you move the center of the lens flare around the screen, the fake reflections move and adjust as well.
Adjust the brightness of the flare, using the Flare Brightness slider.
Choose a lens type, using the Lens Type menu.
Each lens type gives a slightly different lens flare appearance. Experiment with each one, as well as with the Brightness slider and the flare center to achieve just the right look.
Adjust the Blend With Original slider to reduce the flare's intensity.
This is a setting that calls for experimentation.
Click Done when you are done fine-tuning your lens flare.
Tip
If the camera's view pans across a scene, the lens flare should appear to "move" with the lens. Use keyframes to change the position of the lens flare as the clip plays. I show how to use effect keyframes in Chapter 12.
As I point out in Chapter 8, audio is too often overlooked when editing video. One common editing problem is constant-frequency humming that sometimes occurs in audio recordings. The humming may be caused by interference from a fluorescent light or other electric device, or a flaw in the microphone or recording device.
Whatever the cause, if you have an audio recording with an annoying hum, Premiere Elements has a tool that may help you remove that hum. That tool is the Notch effect, which can be found in the list of Audio Effects on the Edit tab (click Effects on the Edit tab and choose Audio Effects from the category menu). The Notch effect removes all audio at or near a given frequency within the clip. Here's how to use it:
Click and drag the Notch effect to the humming clip, and then click Edit Effects at the bottom of the Edit tab to open the Effect Controls.
Expand the Notch controls.
Adjust the Center slider to find the frequency causing the hum.
If the hum comes from a poorly shielded power cord, adjust the Center slider to 60 Hz if you live in an area that uses NTSC video, or 50 Hz if video equipment in your area uses PAL.
Adjust the Q slider to broaden the frequency range of the sound that is removed.
Be careful not to broaden the range too much or the audio quality will diminish considerably.
As I mention in Chapter 18, constantly zooming in and out with your camcorder's zoom lens is one of the most common mistakes made by amateur videographers. But sometimes zooming can have a desirable dramatic effect, especially when you want to show that the emphasis of the scene is suddenly shifting to a single point. Often, you realize that a shot or scene calls for a zoom effect only after you've shot your video and are using Premiere Elements to edit and fine-tune the project.
Adobe Premiere Elements can come to your rescue! Using the Camera View effect, you can quickly zoom in on a specific point in a video image. The Camera View effect is located in the Transform category of the Video Effects folder (click Effects on the Edit pane and scroll down to the Transform category). Here's what you do to zoom in:
Click-and-drag the Camera View effect to a clip, and then click Edit Effects at the bottom of the Edit tab.
Expand the Camera View effect, and then adjust the Zoom slider.
The default zoom level on the slider is 10.
To zoom in, drag the Zoom slider to the left.
Use keyframes (see Chapter 12 for more on controlling video effects using keyframes) to change the level of zoom as the clip plays.
Note
You can zoom out on video images as well by using the Camera View effect, but keep in mind that as you zoom out, the edges of the video screen will become empty. Choose a fill color for the empty areas, using the Fill Color control. Black works best most of the time. And if you zoom in on a video image, the picture may start to look pixilated and blocky.