Introducing Adobe Premiere Elements
Taking the grand tour
Making your first movie
Home movies have been around for more than half a century. But until recently there wasn't much you could do with home movies except pop a tape in your VCR (or feed film into your projector) and watch raw, unedited footage. Movie editing was reserved for elite professionals with access to expensive studio hardware. But a revolution has taken place in recent years, a revolution that is putting the moviemaking arts within reach of almost anyone. The revolution has occurred in three phases:
Mega-powerful computers with huge hard drives have become both available and downright affordable. This has changed the rules of video editing, because almost any modern PC can edit video.
Affordable digital camcorders came onto the market, making it easy for anyone to collect high-quality video. New high definition (HD) camcorders deliver video quality that even the pros could only dream about just a few years ago.
High-end video-editing programs like Adobe Premiere Pro and Apple Final Cut Pro brought pro-caliber video editing to desktop computers, and simpler programs like Apple iMovie and Windows Movie Maker made editing software affordable.
I hesitate to call Adobe Premiere Elements the next step in the video-editing revolution, but it's definitely a step forward. Premiere Elements delivers about 90 percent of the power of high-end programs like Adobe Premiere Pro for a retail price of less than $100. Since its first release in 2004, Premiere Elements has been the value leader in video editing.
This chapter introduces you to Adobe Premiere Elements by showing you what this program is designed to do and what it has to offer. You get a tour of Premiere Elements to help you find your way around this feature-packed program; I even guide you through your first movie project!
You already know that Adobe Premiere Elements is a video-editing program. But what does that mean? It means that using Adobe Premiere Elements, you can quickly take video from your digital camcorder, delete and rearrange scenes, add special effects and credits, and then export your movie to a DVD or the Internet.
You can find lots of video-editing programs on the market, even at the $100 price point of Adobe Premiere Elements. But several important features set Premiere Elements apart from the others:
Easily import video from almost any digital camcorder, including the latest high-def cameras.
Automatically enhance the picture and sound quality of your movies, or fine-tune the quality by using pro-style editing tools.
Analyze video to detect and identify shaky or blurry images. Smart Tagging offers face detection, motion tracking, and other content recognition.
Use up to 99 separate video tracks for advanced edits and compositing. Find out about compositing video tracks in Chapter 11.
Add and edit up to 99 audio tracks to your program. Use SmartMix to automatically adjust the volume of soundtrack music to better complement narration and other audio tracks.
Create advanced, professional-style titles and add still graphics to your movie projects. Then you can animate these titles and graphics.
Apply effects and transitions, which can be used in any video track.
Add royalty-free background music by using SmartSound.
Preview edits immediately, in real time, without having to render effects first. (Rendering is a time-consuming finalization process.)
Upload movies directly to YouTube, or export them in Web-friendly formats like Flash, QuickTime, and Windows Media.
Create interactive DVD menus and burn your movies to DVD or Blu-Ray.
Integrate Premiere Elements with Adobe Photoshop Elements to quickly burn your still-image collections onto slideshow DVDs.
Even these hefty capabilities are only a smattering of what you can do with Premiere Elements. It's one of the most versatile programs you'll ever use.
Adobe developed Premiere Elements on the foundations of Premiere Pro, and one of their primary design goals was to make Premiere Elements much easier to use, especially if you don't have any experience with video-editing programs. Still, even though the user interface has been simplified, I wouldn't call Premiere Elements a "dumbed-down" version of Premiere Pro. Little has been left out — you are probably going to have more options than you need. And the quality of the tools is great; the basic aspects of a high-quality video-editing program are all there. In short, I think that video newbies and veterans alike will feel right at home with Premiere Elements.
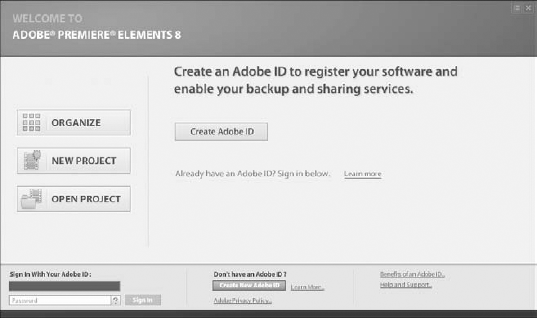
When you first launch Premiere Elements, you see the welcome screen shown in Figure 1-1. To launch Premiere Elements and get started, follow these steps:
Click the Start button to open the Start menu, and choose All Programs

Most of the welcome screen is dedicated to advertising
Photoshop.commembership (Photoshop.comis an online photo and video hosting site offered by Adobe; visit Chapter 15 for more about this service).If you have a membership, use the log-on box in the lower-left corner of the screen to sign in to
Photoshop.com. Otherwise, just ignore the log-on box for now.On the left side of the welcome screen are three important buttons:
Organize: Click this to launch a handy tool for organizing your media. I describe the Elements Organizer in Chapter 5.
Open Project: Click here to open a previously created project.
New Project: You've probably already figured out that this is where you click to start a new project.
Go ahead and click New Project to start a new project and continue your tour of Premiere Elements. Enter a project name in the dialog box shown in Figure 1-2; any name will work for now. Click OK to open the Premiere Elements workspace.
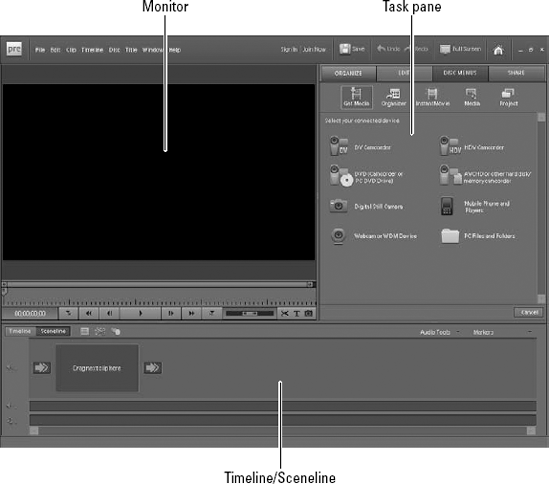
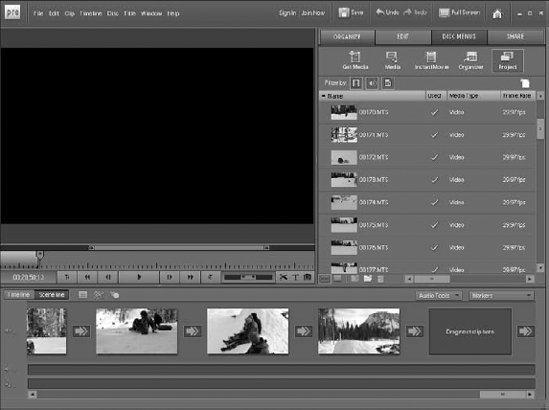
Although the exact appearance varies, you see at least the three fundamental panes that make up the Premiere Elements interface — the Task pane, the Timeline/Sceneline, and the Monitor, as shown in Figure 1-3. These panes are explained in greater detail in the following sections.

Note
The exact appearance of your workspace depends upon the current screen resolution setting on your computer, but the basic appearance should resemble Figure 1-3.
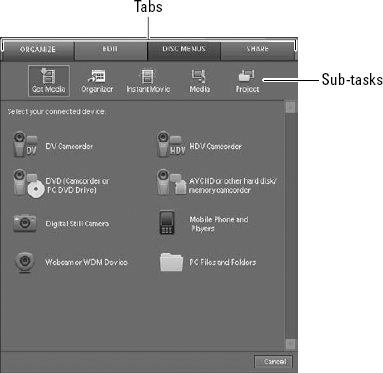
The upper-right section of the Premiere Elements screen is called the Task pane. It's called the Task pane because you'll use this area for almost every moviemaking task in Premiere Elements. Tasks are organized into tabs along the top of the Task pane. When you click a tab, a row of buttons appears showing subtasks (see Figure 1-4). Click one of these buttons to view a list of related tasks. The tabs on the Task pane are:
Organize: This tab is a good place to start. Here you can get media from your camcorder, import files on your hard drive, organize media files, and review files that are used in your current project.
Edit: When it's time to perform video edits, this tab is where you find tools to add transitions, titles, special effects, themes, and more.
Disc Menus: If you plan to share your movies on disc, navigation menus should be an important part of your project. This tab is where you design and modify disc menus.
Share: If you want to share your movies on YouTube, DVD, Blu-Ray, iPod, videotape, or various other digital formats, use this tab. Premiere Elements supports almost any means of sharing video except carrier pigeon and telepathy.
The heart and soul of Premiere Elements is the strip along the bottom half of the screen. This area is called the Sceneline or Timeline, depending on your view mode. Use the buttons in the upper-left corner of the window to switch between the Sceneline and Timeline. Each one is useful for different tasks:
Sceneline: This mode offers a simplified view of your project and is a good place to start working. Simply drag and drop clips from Organizer into Sceneline to put scenes in the order you want them. You can also quickly add transitions and soundtrack music in Sceneline. I show you how to use Sceneline later in this chapter.
Timeline: When you're ready to spend a little more time fine-tuning your project, switch over to Timeline. Timeline allows you to add titles, trim unwanted portions of clips, add special effects, and make other advanced adjustments. Most of the tasks in this book use Timeline rather than Sceneline.
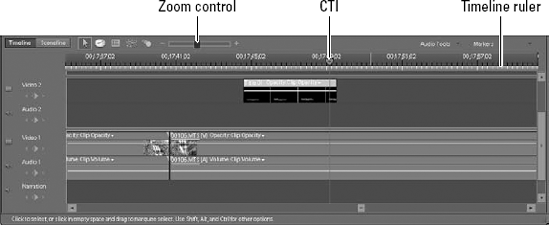
Timeline is shown in Figure 1-5. I can't completely explain Timeline here. That could fill a chapter all by itself. (In fact, it does — Chapter 7.) However, I do want you to know that by using Timeline, you can
Figure out where you are in the project by using the Timeline ruler.
Use the Current Time Indicator (CTI) to set the current playback and editing location in Timeline.
Control aspects of a clip directly. For example, you can change the timing of video effects or adjust audio levels. (Chapter 8 shows you how to work with audio; flip to Chapter 12 for more on working with effects.)
Use the Zoom control to zoom your view of Timeline in and out.
Move clips by simply dragging and dropping them to new locations in Timeline. If your clip calls for effects and transitions, you can add them by dragging them to Timeline as well.
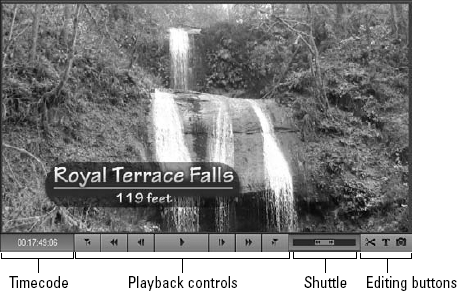
Imagine trying to edit video without being able to look at it. Would it be possible? Perhaps. Beethoven did compose his epic "Ninth Symphony" while completely deaf. But most of us aren't Beethovens and we need to directly experience our work. Thankfully, Premiere Elements makes sure that you can always see exactly what your movie looks like as you work on it. Monitor is where you
Play through clips after you add them to Sceneline or Timeline. As you play each clip, you decide which portions to keep in the movie by setting In points and Out points. When you set In and Out points, only the portions of the clip between those two points remain in your movie.
Play through your edits to view transitions and effects in real time.
As shown in Figure 1-6, Monitor has standard playback controls like Play, Rewind, and Fast Forward. It also has specialized playback controls, which I show you how to use in Chapter 6.
Tip
Adobe Premiere Elements is fairly advanced and has some unique interface features that can confuse even experienced computer users at first. Here are some helpful tips for using Premiere Elements more effectively:
Find your missing Taskbar: If you have set up Windows to auto-hide the Taskbar (the bar at the bottom of the screen with the Start button and clock), you'll find that it doesn't want to reappear when you're working in Premiere Elements. If you run into this problem, reveal the Taskbar either by pressing the Windows key on your keyboard (this opens the Start menu), or press Alt+Tab to switch to another program.
Resize windows: As shown in Figure 1-3, the Premiere Elements program screen is divided into three main parts: the Monitor, the Task pane, and the Sceneline/Timeline. To resize any of these parts, simply click-and-drag the border between the parts. For example, if you need to see more of the Timeline, click-and-drag its top border up to expand the Timeline and shrink the Task pane and Monitor.
Tip
Choose Window
Use the Window menu: If you ever have a hard time finding a certain program window ("How do I open the Narration tool again?"), open the Window menu on the Premiere Elements menu bar. The Window menu gives you quick access to all windows and tools in Premiere Elements.
Sometimes the best way to get to know a program is to just dig in and get your hands dirty with it, actually putting its features to use as the designers intended. If you have a digital camcorder handy with video already recorded, and you have installed Adobe Premiere Elements on your computer, you're ready to start making movies.
Tip
If you've never used Premiere Elements or even edited a movie on your computer, the following sections should serve as a good introduction.
Your first step in making a movie is perhaps the most obvious one. Launch Premiere Elements, and when the welcome screen appears (refer to Figure 1-1) click New Project. Enter a name for your project in the New Project dialog box — any old name will do, as long as it's something you will remember later — and click OK. Premiere Elements creates your project and opens to the basic Premiere Elements screen. Wasn't that easy?
Note
Premiere Elements works with both standard and high-definition digital camcorders. When you create a new project, you should choose project settings that match the format used by your camcorder. See Chapter 4 for more on changing project settings.
After you've created a new project in Premiere Elements, you need some source footage to work with. For now I assume that you have a digital camcorder and you've already recorded video that you want to edit. The process of getting video from the camcorder into your computer is called capturing. To capture video, follow these steps:
Connect your digital camcorder to your computer.
You should use either a FireWire (IEEE-1394) or USB 2.0 port. If you're not sure which one to use, see Chapter 2 as well as your camcorder's documentation. Premiere Elements can capture video from almost any digital camcorder or camera.
Turn the camcorder on to Play mode.
If Windows automatically opens a window stating that a digital video device was detected, click Cancel to close the window.
Click the Organize tab in Premiere Elements, and then click Get Media.
A list of device types appears.
Click the button that most closely matches your camera.
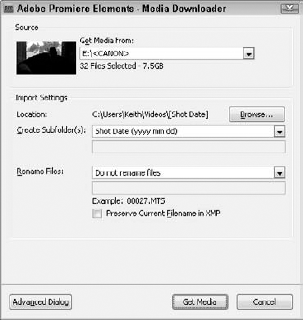
If you have a hard drive–based high-definition camcorder, for example, click the AVCHD option. (See Chapter 2 for more on different types of camcorders.) The window you see next will vary depending on the type of device you have. If you have a DV or HDV tape-based camcorder, you'll see a Capture window that looks a lot like the Premiere Elements Monitor window. If you have a DVD, hard drive, or memory card-based camcorder, you see a Media Downloader window like the one shown in Figure 1-7.
For the sake of simplicity, I'm going to assume for now that you are capturing from a DVD, hard drive, or memory card-based camcorder. See Chapter 5 for complete instructions on capturing video from tape-based camcorders and other devices.
Select your camera in the Get Media From menu.
Note
If your camera doesn't appear in the Get Media From menu, make sure that the camera's power is turned on and that you clicked the correct type of device in Step 4. After powering the camera on, choose Refresh List.
Accept the default location and file naming options for now, and click Get Media.
A dialog box appears, showing you the copying status for the video files. If you want to fiddle with the filenames or saving location, pay a visit to Chapter 5.
You now see a collection of video clips in the Organizer window, as shown in Figure 1-8. These are the video clips that you captured from the camera, and they are ready to be used in a movie project.

After you've captured some video, turning your footage into a movie is easy. (Of course, I'm skipping the fancy stuff that you can do, using later chapters in this book.) Follow these steps:
On the Organize tab, click the Project button.
Tip
Your video clips are listed on the right side of the Premiere Elements screen. If Premiere Elements imported all your video as one gigantic video clip, picking and choosing scenes won't be easy. Use Premiere's Scene Detect feature, which I describe in Chapter 5.
To preview a clip, double-click it.
The clip opens in a Preview window. Click Play to start playing the clip, and click the Close (X) button to close the Preview window when you're done.
Click Sceneline to reveal the Sceneline, as shown in Figure 1-9.
Click-and-drag some clips and drop them on the Sceneline, as shown in Figure 1-9.
The order in which clips are placed in the Sceneline is the order in which they will play in your finished movie. You can insert clips between clips that are already in the Sceneline. To remove a clip, click it once to select it and press Delete on your keyboard.
Click Play in the Monitor window to preview the movie you have put together in the Sceneline.
Premiere Elements makes the processes of adding and customizing transitions, titles, music, and special effects to your movies easy. Sometimes you're in a hurry and don't have time for even the most basic edits. You could just output your raw clips as-is, but the movie will lack panache. How do you make a stylish movie without spending a lot of time and energy on editing?
InstantMovie to the rescue! Premiere Elements includes a cool feature called InstantMovie that automatically applies some predefined transitions, titles, background music, and other effects that enhance and stylize your movie. To apply an InstantMovie theme, follow these steps:
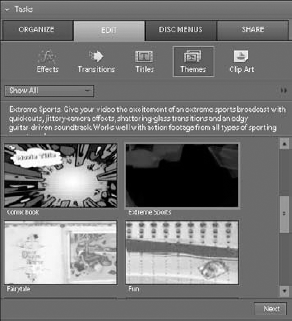
Click the Edit tab, and then click the Themes button.
Scroll through the list of themes, shown in Figure 1-10, and click a theme to play a small preview of it.
If you don't see any themes in the list, they might not be installed on your computer. If you have a Premiere Elements installation disc, use the setup program on that disc to install themes. If you purchased a download version of Premiere Elements, visit
www.adobe.comand click the "Your Account" link near the top of the screen to log on and download Premiere Elements Content files.Click a theme to select it, and then click Next in the lower-right corner of the Organizer.
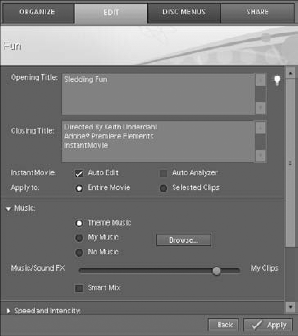
Enter Opening and Closing titles, as shown in Figure 1-11.
The opening title appears at the beginning of the movie and should be a short, general title. The closing title usually contains ending credits.
Click the arrow next to Music, and choose what kind of background music you want:
Adjust the slider to decide whether the music or the regular clip audio should be louder.
Moving the slider closer to My Clips (shown in Figure 1-11) makes the background music softer so that viewers can hear the movie clip's audio better.
Click the arrow next to Duration and decide whether the movie should be adjusted to match your music, to last a certain duration, or to simply use all video clips.
Click the arrow next to Theme Content and decide which parts of the theme you want to use.
For example, if you applied your own special effects to clips and you don't want the theme's effects to replace your own, remove the check mark next to Replace Existing Effects.
When you're done making adjustments, click Apply.
You may be asked to confirm a couple of the changes that InstantMovie will make. Accept those changes and let InstantMovie work its magic. When it's done, click Play in the Monitor window to see your finished InstantMovie.
After you've put together a basic movie in Sceneline and made some edits (or applied an InstantMovie theme), Premiere Elements helps you quickly upload your finished movie to YouTube. YouTube is the Internet's most popular video-sharing site, and Adobe has partnered with YouTube to make sharing your movies simple. Best of all, you don't have to worry about converting your movie to any special format because Premiere Elements and YouTube take care of that conversion for you. To upload your movie, follow these steps:
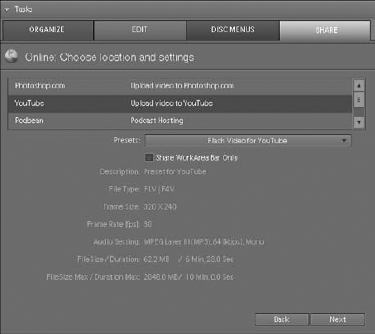
Click the Share tab, and then click Online under the sharing options.
In the screen that appears, shown in Figure 1-12, choose YouTube.
Tip
Note the size and duration of your movie listed next to File Size/Duration. The maximum size and time limit allowed by YouTube is listed underneath. If your movie exceeds these maximums, you'll either need to shorten it or upload it in chunks. See Chapter 15 for steps to output only certain portions of your finished movie.
Click Next.
In the next screen that appears, enter your YouTube user name and password to log on to YouTube.
If you don't have a YouTube account, click the Sign Up Now link and follow the instructions on YouTube's Web site to create an account.
Enter a Title and Description for your movie.
The title and description are mandatory when uploading to YouTube. The Tags and Category fields are also mandatory, but you can just accept the default choices there for now.
Click Next.
Choose whether you want to publicly share your movie, and then click Share.
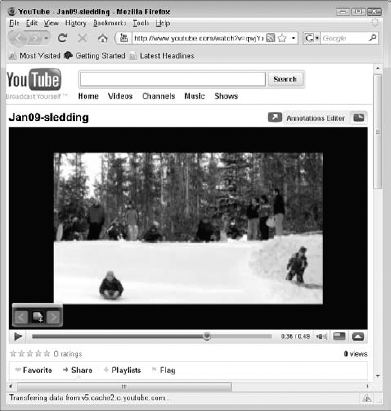
Your movie is automatically rendered and uploaded to YouTube. Needless to say, you need an active Internet connection to complete the upload, and the upload time varies depending on your movie size and Internet connection speed. When the upload is finished, a message appears saying, "Share Complete!" On the screen, click the link to view your movie on YouTube, as shown in Figure 1-13. You can also click a link to e-mail your movie's link to friends and family.