
When Microsoft introduced the first version of the .NET Framework in 2002 it added a new abstraction for the development of web applications called ASP.NET Web Forms. Where traditional Active Server Pages (ASP) had up until this point operated like simple templates containing a mix of HTML markup and server-side code, Web Forms was designed to bring the web application development experience closer to the desktop application programming model. This model involves dragging components from a toolbox onto a design surface and then configuring those components by setting property values and writing code to handle specific events.
Although Web Forms has been and continues to be very successful, it is not without criticism. Without strong discipline it is easy for business logic and data-access concerns to creep into the user interface, making it hard to test without sitting in front of a browser. It heavily abstracts away the stateless request/response nature of the Web, which can make it frustrating to debug. It relies heavily on controls rendering their own HTML markup, which can make it difficult to control the final output of each page.
In 2004, the release of a simple open source framework for building web applications called Ruby on Rails heralded a renewed interest in an architectural pattern called Model-View-Controller (MVC). The MVC pattern divides the parts of a user interface into three classifications with very well-defined roles. This makes applications easier to test, evolve, and maintain.
Microsoft first announced the ASP.NET MVC framework at an ALT.NET conference in late 2007. This framework allows you to build applications based on the MVC architecture while taking advantage of the .NET framework's extensive set of libraries and language options. ASP.NET MVC has been developed in a very open manner with many of its features shaped by community feedback. In fact, in April 2009 the entire source code for the framework was release as open source under the Ms-PL license.
Note
Microsoft has been very careful to state that ASP.NET MVC is not a replacement for Web Forms. It is simply an alternative way of building web applications that some people will find preferable. Microsoft has made it very clear that it will continue to support both ASP.NET Web Forms and ASP.NET MVC into the future.
If you have never heard of it before you might be surprised to learn that this "new" Model-View-Controller architectural pattern was first described in 1979 by Trygve Reenskaug, a researcher working on an implementation of SmallTalk.
In the MVC architecture, applications are separated into the following components:
Model: The model consists of classes that implement domain-specific logic for the application. Although the MVC architecture does not concern itself with the specifics of the data access layer, it is understood that the model should encapsulate any data access code. Generally, the model will call separate data access classes responsible for retrieving and storing information in a database.
View: The views are classes that take the model and render it into a format where the user can interact with it.
Controller: The controller is responsible for bringing everything together. A controller processes and responds to events, such as a user clicking a button. The controller maps these events onto the model and invokes the appropriate view.
These descriptions aren't really helpful until you understand how they interact together. The request life cycle of an ASP.NET MVC application normally consists of the following:
The user performs an action that triggers an event, such as entering a URL or clicking a button. This generates a request to the controller.
The controller receives the request and invokes the relevant action on the model. Often this will cause a change in the model's state, although not always.
The controller retrieves any necessary data from the model and invokes the appropriate view, passing it the data from the model.
The view renders the data and sends it back to the user.
The most important thing to note here is that both the view and controller depend on the model. However, the model has no dependencies, which is one of the key benefits of the architecture. This separation is what provides better testability and makes it easier to manage complexity.
Note
Different MVC framework implementations have minor variations in the preceding life cycle. For example, in some cases the view will query the model for the current state, instead of receiving it from the controller.
Now that you understand the Model-View-Controller architectural pattern, you can begin to apply this newfound knowledge to building your first ASP.NET MVC application.
This section details the creation of a new ASP.NET MVC application and describes some of the standard components. To create a new MVC application, go to File
Note
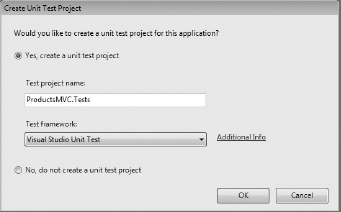
Visual Studio 2010 is able to create test projects for MVC applications using a number of unit testing frameworks. The default choice (shown in Figure 21-1) is to use the built-in unit testing tools in Visual Studio. If you prefer to use a different unit testing technology, see the vendor for instructions on how to add to this list.
When an ASP.NET MVC application is first created, it generates a number of files and folders. In actual fact, the MVC application that is generated from the project template is a complete application that can be run immediately.
The folder structure that is automatically generated by Visual Studio is shown in Figure 21-2 and includes the following folders:
Content: A location to store static content files such as CSS files and images.
Controllers: Contains the Controller files. Two sample controllers called
HomeControllerandAccountControllerare created by the project template.Models: Contains model files. This is also a good place to store any data access classes that are encapsulated by the model. The MVC project template does not create an example model.
Scripts: Contains JavaScript files. By default, this folder contains script files for JQuery and Microsoft AJAX along with some helper scripts to integrate with MVC.
Views: Contains the view files. The MVC project template creates a number of folders and files in the Views folder. The Home subfolder contains two example view files that are invoked by the
HomeController. The Shared subfolder contains a master page that is used by these views.
Visual Studio also creates a Default.aspx file, which is simply a placeholder that is needed to ensure IIS loads the MVC application correctly. There is also a Global.asax file, which is used to configure the routing rules (more on that later).
Finally, if you elected to create a test project this will be created with a Controllers folder that contains two unit test stubs for the HomeController and AccountController, respectively.
Although it doesn't do much yet, you can run the MVC application by pressing F5. When it opens in Internet Explorer it will first render the Index view with a link that allows you to navigate to the About view. Neither of these views is particularly interesting, because they just render static content.
In the previous section it was noted that the MVC project template does not create a sample model for you. In fact, the application is capable of running without a model altogether. While in practice your applications are likely to have a full model, MVC provides no guidance as to which technology you should use. This gives you a great deal of flexibility.
The model part of your application is an abstraction of the business capabilities that the application provides. If you are building an application to process orders or organize a leave schedule, your model should express these concepts. This is not always easy. It is frequently tempting to allow some of these details to creep in the View-controller part of your application.
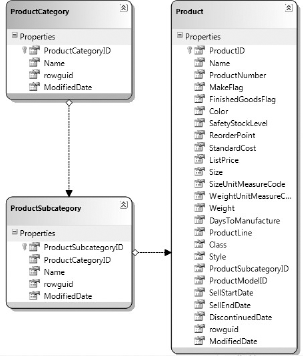
The examples in this chapter use a simple LINQ to SQL model based on a subset of the AdventureWorksDB sample database as shown in Figure 21-3. You can download this sample database from http://msftdbprodsamples.codeplex.com/.
The next section explains how you can build your own controller, followed by some interesting views that render a dynamic user interface.
A controller is a class that responds to some user action. Usually, this response involves updating the model in some way and then organizing for a view to present content back to the user. Each controller is capable of listening for and responding to a number of user actions. Each of these is represented in the code by a normal method referred to as an action method.
Begin by right-clicking the Controllers folder in the Solution Explorer and selecting Add

Note
You can quickly add a controller to your project by using the Ctrl+M, Ctrl+C shortcut as well.
New controller classes inherit from the System.Web.Mvc.Controller base class, which performs all of the hefty lifting in terms of determining the relevant method to call for an action and mapping of URL and POST parameter values. This means that you can concentrate on the implementation details of your actions, which typically involves invoking a method on a model class and then selecting a view to render.
A newly created controller class will be populated with a default action method called Index. You can add a new action simply by adding a public method to the class. If a method is public, it will be visible as an action on the controller. You can stop a public method from being exposed as an action by adding the System.Web.Mvc.NonAction attribute to the method. The following listing contains the controller class with the default action that simply renders the Index view, and a public method that is not visible as an action:
- C#
public class ProductsController : Controller
{
  //
  // GET: /Products/

  public ActionResult Index()
{ return View(); } [NonAction] public void NotAnAction() { // This method is not exposed as an action. } }- VB
Public Class ProductsController
    Inherits System.Web.Mvc.Controller

    '
    ' GET: /Products/

    Function Index() As ActionResult
        Return View()
    End Function

    <NonAction()>
    Sub NotAnAction()
        ' This method is not exposed as an action.
    End Sub

End Class
Note
The comment that appears above the Index method is a convention that indicates how the action is triggered. Each action method is placed at a URL that is a combination of the controller name and the action method name formatted like /controller/action. The comment has no control over this convention but is used to indicate where you can expect to find this action method. In this case it is saying that the index action is triggered by executing an HTTP GET request against the URL /Products/. This is just the name of the controller because an action named Index is assumed if one is not explicitly stated by the URL. This convention is revisited in the section on routing.
The result of the Index method is an object that derives from the System.Web.Mvc.ActionResult abstract class. This object is responsible for determining what happens after the action method returns. A number of standard classes inherit from ActionResult that allow you to perform a number of standard tasks, including redirection to another URL, generating some simple content in a number of different formats, or in this case, rendering a view.
Note
The View method on the Controller base class is a simple method that creates and configures a System.Web.Mvc.ViewResult object. This object is responsible for selecting a view and passing it any information that it needs to render its contents.
It is important to note that Index is just a normal .NET method and ProductsController is just a normal .NET class. There is nothing special about either of them. This means that you can easily instantiate a ProductsController in a test harness, call its Index method, and then make assertions about the ActionResult object it returns.
Before moving on, update the Index method to retrieve a list of Products and pass them onto the view, as shown in the following code listing:
- C#
public ActionResult Index()
{
    List<Product> products;

    using (var db = new ProductsDataContext())
    {
        products = db.Products.ToList();
    }

    return View(products);
}
- VB
Function Index() As ActionResult
  Dim products As New List(Of Product)

  Using db As New ProductsDataContext
    products = db.Products.ToList()
  End Using

  Return View(products)
End Function
Now that you have created a model and a controller all that is needed is to create the view to display the UI.
In the previous section you created an action method that gathers the complete list of products and then passes that list to a view. Each view belongs to a single controller and is stored in a subfolder in the Views folder, which is named after the controller that owns it. Additionally, there is a Shared folder, which contains a number of shared views that are accessible from a number of controllers. When the view engine is looking for a view it checks the controller-specific area first and then checks in the shared area.
Note
You can specify the full path to a view as the view name if you need to refer to a view that is not in the normal view engine search areas.
Each view looks very similar to a standard ASP.NET Web Forms Page or Control having either an .aspx or .ascx extension. They contain a mix of HTML markup and code blocks. They can even have master pages and render some standard controls. However, a number of important differences exist that need to be highlighted.
First, a view doesn't have a code-behind page. As such, there is nowhere to add event handlers for any controls that the view renders, including those that normally happen behind the scenes. Instead, it is expected that a controller will respond to user events and that the view will expose ways for the user to trigger action methods. Second, instead of inheriting from System.Web.Page, a view inherits from System.Web.Mvc.ViewPage. This base class exposes a number of useful properties and methods that can be used to help render the HTML output. One of these properties contains a dictionary of objects that were passed into the view from the controller. Finally, in the markup you will notice that there is no form control with a runat="server" attribute. No server form means that there is no View State emitted with the page. The majority of the ASP.NET server controls must be placed inside a server form. Some controls such a Literal or Repeater control will work fine outside a form; however, if you try to use a Button or DropDownList control, your page will throw an exception at run time.
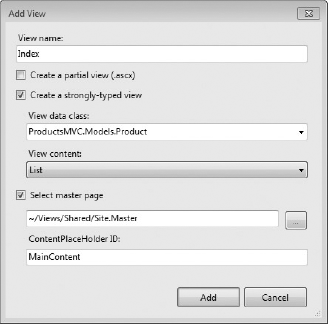
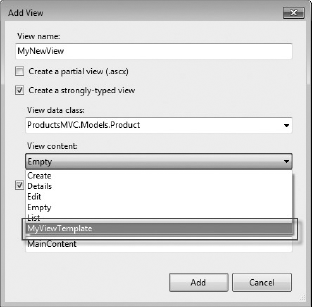
You can create a View in a number of ways, but the easiest is to right-click the title of the action method and select Add View, which brings up the Add View dialog shown in Figure 21-5.
Note
You can use the shortcut Ctrl+M, Ctrl+V when the cursor is inside an action method to open the Add View dialog as well.
This dialog contains a number of options. By default, the name is set to match the name of the action method. If you change this, you need to change the call to View to include the view name as a parameter. Check the box to create a strongly typed view and then choose Models.Product from the View Data Class drop-down. If you don't see the Product class straight away you might need to build the application before adding the view.
Note
If you do not opt to create a strongly typed view, it will contain a dictionary of objects that will need to be converted back into their real types before you can use them. It is recommended to always use strongly typed views. If you require your views to be weakly typed and you are using C#, you should create a strongly typed view of the new dynamic type and pass it ExpandoObject instances.
Finally, change the View Content drop-down to List. This tells Visual Studio to generate a list page for Product objects. When you click Add, the view should be generated and opened in the main editor window. It will look like this:
- C#
<%@ Page Title="" Language="C#" MasterPageFile="~/Views/Shared/Site.Master"
Inherits="System.Web.Mvc.ViewPage<IEnumerable<CSProductsMVC.Models.Product>>" %>

<asp:Content ID="Content1" ContentPlaceHolderID="TitleContent" runat="server">
    Index
</asp:Content>

<asp:Content ID="Content2" ContentPlaceHolderID="MainContent" runat="server">

    <h2>Index</h2>

    <table>
        <tr>
            <th></th>
            <th>ProductID</th>
            <th>Name</th>
            <th>ProductNumber</th>
            <th>MakeFlag</th>
            <th>FinishedGoodsFlag</th>
            <th>Color</th>
            <th>SafetyStockLevel</th>
            <th>ReorderPoint</th>
            <th>StandardCost</th>
            <th>ListPrice</th>
            <th>Size</th>
            <th>SizeUnitMeasureCode</th>
            <th>WeightUnitMeasureCode</th>
            <th>Weight</th>
            <th>DaysToManufacture</th>
            <th>ProductLine</th>
            <th>Class</th>
            <th>Style</th>
            <th>ProductSubcategoryID</th>
            <th>ProductModelID</th>
            <th>SellStartDate</th>
            <th>SellEndDate</th>
            <th>DiscontinuedDate</th>
<th>rowguid</th> <th>ModifiedDate</th> </tr> <% foreach (var item in Model) { %> <tr> <td> <%= Html.ActionLink("Edit", "Edit", new { id=item.ProductID }) %> | <%= Html.ActionLink("Details", "Details", new { id=item.ProductID })%> </td> <td><%= Html.Encode(item.ProductID) %></td> <td><%= Html.Encode(item.Name) %></td> <td><%= Html.Encode(item.ProductNumber) %></td> <td><%= Html.Encode(item.MakeFlag) %></td> <td><%= Html.Encode(item.FinishedGoodsFlag) %></td> <td><%= Html.Encode(item.Color) %></td> <td><%= Html.Encode(item.SafetyStockLevel) %></td> <td><%= Html.Encode(item.ReorderPoint) %></td> <td><%= Html.Encode(String.Format("{0:F}", item.StandardCost)) %></td> <td><%= Html.Encode(String.Format("{0:F}", item.ListPrice)) %></td> <td><%= Html.Encode(item.Size) %></td> <td><%= Html.Encode(item.SizeUnitMeasureCode) %></td> <td><%= Html.Encode(item.WeightUnitMeasureCode) %></td> <td><%= Html.Encode(String.Format("{0:F}", item.Weight)) %></td> <td><%= Html.Encode(item.DaysToManufacture) %></td> <td><%= Html.Encode(item.ProductLine) %></td> <td><%= Html.Encode(item.Class) %></td> <td><%= Html.Encode(item.Style) %></td> <td><%= Html.Encode(item.ProductSubcategoryID) %></td> <td><%= Html.Encode(item.ProductModelID) %></td> <td><%= Html.Encode(String.Format("{0:g}", item.SellStartDate)) %></td> <td><%= Html.Encode(String.Format("{0:g}", item.SellEndDate)) %></td> <td><%= Html.Encode(String.Format("{0:g}", item.DiscontinuedDate)) %></td> <td><%= Html.Encode(item.rowguid) %></td> <td><%= Html.Encode(String.Format("{0:g}", item.ModifiedDate)) %></td> </tr> <% } %> </table> </asp:Content> <%= Html.ActionLink("Create New", "Create") %> </p> </asp:Content>
- VB
<%@ Page Title="" Language="VB" MasterPageFile="~/Views/Shared/Site.Master"
Inherits="System.Web.Mvc.ViewPage(Of IEnumerable (Of ProductsMVC.Product))" %>

<asp:Content ID="Content1" ContentPlaceHolderID="TitleContent" runat="server">
    Index
</asp:Content>

<asp:Content ID="Content2" ContentPlaceHolderID="MainContent" runat="server">

    <h2>Index</h2>

    <p>
        <%=Html.ActionLink("Create New", "Create")%>
    </p>

    <table>
        <tr>
            <th></th>
            <th>ProductID</th>
            <th>Name</th>
            <th>ProductNumber</th>
            <th>MakeFlag</th>
            <th>FinishedGoodsFlag</th>
            <th>Color</th>
            <th>SafetyStockLevel</th>
            <th>ReorderPoint</th>
            <th>StandardCost</th>
            <th>ListPrice</th>
            <th>Size</th>
            <th>SizeUnitMeasureCode</th>
            <th>WeightUnitMeasureCode</th>
            <th>Weight</th>
            <th>DaysToManufacture</th>
            <th>ProductLine</th>
            <th>Class</th>
            <th>Style</th>
            <th>ProductSubcategoryID</th>
            <th>ProductModelID</th>
            <th>SellStartDate</th>
            <th>SellEndDate</th>
            <th>DiscontinuedDate</th>
            <th>rowguid</th>
            <th>ModifiedDate</th>
        </tr>

    <% For Each item In Model%>

        <tr>

            <td>

                <%=Html.ActionLink("Edit", "Edit", New With
                {.id = item.ProductID})%> |
<%=Html.ActionLink("Details", "Details", New With {.id = item.ProductID})%> </td> <td><%= Html.Encode(item.ProductID) %></td> <td><%= Html.Encode(item.Name) %></td> <td><%= Html.Encode(item.ProductNumber) %></td> <td><%= Html.Encode(item.MakeFlag) %></td> <td><%= Html.Encode(item.FinishedGoodsFlag) %></td> <td><%= Html.Encode(item.Color) %></td> <td><%= Html.Encode(item.SafetyStockLevel) %></td> <td><%= Html.Encode(item.ReorderPoint) %></td> <td><%= Html.Encode(String.Format("{0:F}", item.StandardCost)) %></td> <td><%= Html.Encode(String.Format("{0:F}", item.ListPrice)) %></td> <td><%= Html.Encode(item.Size) %></td> <td><%= Html.Encode(item.SizeUnitMeasureCode) %></td> <td><%= Html.Encode(item.WeightUnitMeasureCode) %></td> <td><%= Html.Encode(String.Format("{0:F}", item.Weight)) %></td> <td><%= Html.Encode(item.DaysToManufacture) %></td> <td><%= Html.Encode(item.ProductLine) %></td> <td><%= Html.Encode(item.Class) %></td> <td><%= Html.Encode(item.Style) %></td> <td><%= Html.Encode(item.ProductSubcategoryID) %></td> <td><%= Html.Encode(item.ProductModelID) %></td> <td><%= Html.Encode(String.Format("{0:g}", item.SellStartDate)) %></td> <td><%= Html.Encode(String.Format("{0:g}", item.SellEndDate)) %></td> <td><%= Html.Encode(String.Format("{0:g}", item.DiscontinuedDate)) %></td> <td><%= Html.Encode(item.rowguid) %></td> <td><%= Html.Encode(String.Format("{0:g}", item.ModifiedDate)) %></td> </tr> <% Next%> </table> </asp:Content>
This view presents the list of Products in a simple table. The bulk of the work is done by a for each loop, which iterates over the list of products and renders an HTML table row for each one.
- C#
<% foreach (var item in Model) { %><tr> <!-- ... --> <td><%= Html.Encode(item.ProductID) %></td> <td><%= Html.Encode(item.Name) %></td> <!-- ... --> </tr> <% } %>- VB
<% For Each item In Model%><tr> <!-- ... --> <td><%= Html.Encode(item.ProductID) %></td> <td><%= Html.Encode(item.Name) %></td> <!-- ... --> </tr> <% Next%>
Note
Visual Studio is able to infer the type of model because you created a strongly typed view. In the page directive you can see that this view doesn't inherit from System.Web.Mvc.Page. Instead, it inherits from the generic version, which states that the model will be an IEnumerable collection of Product objects. This in turn exposes a Model property with that type. Note that you can still pass the wrong type of item to the view from the controller. In the case of a strongly typed view this will result in a run time exception.
Each of the properties of the products is HTML encoded before it is rendered using the Encode method on the Html helper property. This prevents common issues with malicious code injected into the application masquerading as valid user data. ASP.NET MVC is able to take advantage of the new <%: ... %> markup, which uses a colon in the place of the equals sign in ASP.NET 4 to more easily perform this encoding. Here is the same snippet again taking advantage of this technique:
- C#
<% foreach (var item in Model) { %><tr> <!-- ... --><td><%: item.ProductID %></td><td><%: item.Name %></td><!-- ... --> </tr> <% } %>- VB
<% For Each item In Model%> <tr> <!-- ... --><td><%: item.ProductID %></td><td><%: item.Name %></td><!-- ... --> </tr> <% Next%>
In addition to the Encode method there is one other Html helper method being used by this view. This is the ActionLink helper. This method will emit a standard HTML anchor tag designed to trigger the specified action. Two forms are in use here. The simplest of these is the one designed to create a new Product record:
- C#
<p>
<%= Html.ActionLink("Create New", "Create") %></p>- VB
<p>
<%=Html.ActionLink("Create New", "Create")%></p>
The first parameter is the text that will be rendered inside the anchor tag. This is the text that will be presented to the user. The second parameter is the name of the action to trigger. Because no controller has been specified the current controller is assumed.
The more complex use of ActionLink is used to render the edit and delete links for each product.
- C#
<td><%= Html.ActionLink("Edit", "Edit", new { id=item.ProductID }) %> |<%= Html.ActionLink("Details", "Details", new { id=item.ProductID })%></td>- VB
<td>
<%=Html.ActionLink("Edit", "Edit", New With {.id = item.ProductID})%> |<%=Html.ActionLink("Details", "Details", New With {.id = item.ProductID})%></td>
The first two parameters are the same as before and represent the link text and the action name, respectively. The third parameter is an anonymous object that contains data to be passed to the action method when it is called.
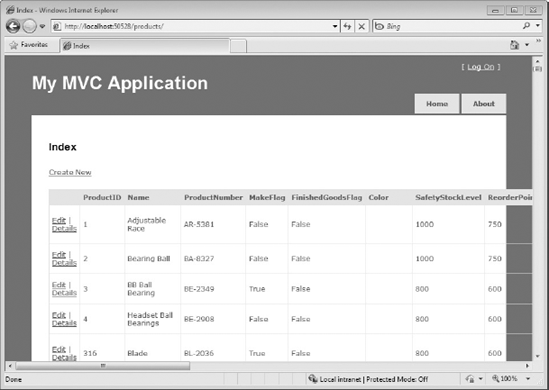
When you run the application and enter /products/ in your address bar you will be presented with the page displayed in Figure 21-6. Trying to click any of the links will cause a run time exception because the target action does not yet exist.
Note
Once you have a view and a controller you can use the shortcut Ctrl+M, Ctrl+G to toggle between the two.
This section provides an overview for some of the more advanced features of ASP.NET MVC.
As you were navigating around the MVC site in your web browser you might have noticed that the URLs are quite different from a normal ASP.NET web site. They do not contain file extensions and they do not match up with the underlying folder structure. These URLs are mapped to action methods and controllers with a set of classes that belong to the routing engine, which is located in the System.Web.Routing assembly.
Note
The routing engine was originally developed as a part of the ASP.NET MVC project but was released as a standalone library before MVC shipped. Although it is not described in this book it is possible to use the routing engine with ASP.NET Web Forms projects.
In the previous example you created a simple list view for products. This list view was based on the standard List template, which renders the following snippet for each Product in the database being displayed:
- C#
<td>
<%= Html.ActionLink("Edit", "Edit", new { id=item.ProductID }) %> |<%= Html.ActionLink("Details", "Details", new { id=item.ProductID })%></td>- VB
<td>
<%=Html.ActionLink("Edit", "Edit", New With {.id = item.ProductID})%> |<%=Html.ActionLink("Details", "Details", New With {.id = item.ProductID})%></td>
If you examine the generated HTML markup of the final page you should see that this becomes the following:
HTML
<td>
  <a href="/Products/Edit/2">Edit</a> |
  <a href="/Products/Details/2">Details</a>
</td>
These URLs are made up of three parts:
"Products" is the name of the controller. There is a corresponding
ProductsControllerin the project."Edit" and "Details" are the names of action methods on the controller. The
ProductsControllerwill have methods calledEditandDetails."2" is a parameter that is called "id."
Each of these components is defined in a route, which is set up in the Global.asax.cs file (or the Global.asax.vb file for VB) in a method called RegisterRoutes. When the application first starts it calls this method and passes in the System.Web.Routing.RouteTable.Routes static collection. This collection contains all of the routes for the entire application.
- C#
public static void RegisterRoutes(RouteCollection routes)
{
    routes.IgnoreRoute("{resource}.axd/{*pathInfo}");

    routes.MapRoute(
        "Default",
        "{controller}/{action}/{id}",
        new { controller = "Home", action = "Index", id = "" }
    );

}
- VB
Shared Sub RegisterRoutes(ByVal routes As RouteCollection)
    routes.IgnoreRoute("{resource}.axd/{*pathInfo}")

    routes.MapRoute( _
        "Default", _
        "{controller}/{action}/{id}", _
        New With {.controller = "Home", .action = "Index", .id = ""} _
    )

End Sub
The first method call tells the routing engine that it should ignore all requests for .axd files. When an incoming URL matches this route the engine will completely ignore it and allow other parts of the application to handle it. This method can be very handy if you want to integrate Web Forms and MVC into a single application. All you need to do is ask the routing engine to ignore .aspx and .asmx files.
The second method call defines a new Route and adds it to the collection. This overload of MapRoute method takes three parameters. The first parameter is a name, which can be used as a handle to this route later on. The second parameter is a URL template. This parameter can have normal text along with special tokens inside of braces. These tokens will be used as placeholders that are filled in when the route matches a URL. Some tokens are reserved and will be used by the MVC routing engine to select a controller and execute the correct action. The final parameter is a dictionary of default values. You can see that this "Default" route matches any URL in the form /controller/action/id where the default controller is "Home," the default action is "Index," and the "id" parameter defaults to an empty string.
When a new HTTP request comes in, each route in the RouteCollection tries to match the URL against its URL template in the order that they are added. The first route that is able to do so fills in any default values that haven't been supplied. Once these values have all been collected then a Controller is created and an action method is called.
Routes are also used to generate URLs inside of views. When a helper needs a URL it will consult each route (in order again) to see if it is able to build a URL for the specified controller, action, and parameter values. The first route to match will generate the correct URL. If a route encounters a parameter value that it doesn't know about, it becomes a query string parameter in the generated URL.
The following snippet declares a new route for an online store that allows for two parameters: a category and a subcategory. Assuming that this MVC application has been deployed to the root of a web server, requests for the URL http://servername/Shop/Accessories/Helmets will go to the "List" action on the "Products" controller with the parameters Category set to "Accessories" and Subcategory set to "Helmets."
- C#
public static void RegisterRoutes(RouteCollection routes)
{
  routes.IgnoreRoute("{resource}.axd/{*pathInfo}");

  routes.MapRoute(
"ProductsDisplay", "Shop/{category}/{subcategory}", new { controller = "Products", action = "List", category = "", subcategory = "" } ); routes.MapRoute( "Default", "{controller}/{action}/{id}", new { controller = "Home", action = "Index", id = "" } ); }
- VB
Shared Sub RegisterRoutes(ByVal routes As RouteCollection)
  routes.IgnoreRoute("{resource}.axd/{*pathInfo}")

  routes.MapRoute( _
    "ProductsDisplay", _
    "Shop/{category}/{subcategory}", _
    New With { _
    .controller = "Products", .action = "List", _
    .category = "", .subcategory = "" _
    })

  routes.MapRoute( _
    "Default", _
    "{controller}/{action}/{id}", _
    New With {.controller = "Home", .action = "Index", .id = ""} _
  )

End Sub
Note
Once a Route in a RouteCollection matches the URL no other Route gets the opportunity. Because of this, the order in which Routes are added to the RouteCollection can be quite important. If the previous snippet had placed the new route after the Default one, it would never get to match an incoming request because a request for /Shop/Accessories/Helmets would be looking for an Accessories action method on a ShopController with an "id" of "Helmets." Because there isn't a ShopController the whole request will fail. If your application is not going to the expected controller action method for a URL, you might want to add a more specific Route to the RouteCollection before the more general ones or remove the more general ones altogether while you figure out the problem.
Finally, you can also add constraints to the Route that will prevent it from matching a URL unless some other condition is met. This can be a good idea if your parameters are going to be converted into complex data types such as date times later on and require a very specific format. The most basic kind of restraint is a string, which is interpreted as a regular expression that a parameter must match for the route to take effect. The following route definition uses this technique to ensure that the zipCode parameter is exactly five digits:
- C#
routes.MapRoute( "StoreFinder", "Stores/Find/{zipCode}", new { controller = "StoreFinder", action = "list" }, new { zipCode = @"^d{5}$" } );- VB
routes.MapRoute( _
 "StoreFinder", _
 "Stores/Find/{zipCode}", _
 New With {.controller = "StoreFinder", .action = "list"}, _
 New With {.zipCode = "^d{5}$"} _
)
The other type of constraint is a class that implements IRouteConstraint. This interface defines a single method Match that returns a Boolean value indicating whether the incoming request satisfies the constraint. There is one implementation of IRouteConstraint out of the box called HttpMethodConstraint. This constraint can be used to ensure that the correct HTTP method, such as GET, POST, HEAD, or DELETE is used. The following route only accepts HTTP POST requests:
- C#
routes.MapRoute( "PostOnlyRoute", "Post/{action}", new { controller = "Post" }, new { post = new HttpMethodConstraint("POST") } );- VB
routes.MapRoute(
  "PostOnlyRoute", _
  "Post/{action}", _
  New With {.controller = "Post"}, _
  New With {.post = New HttpMethodConstraint("POST")} _
)
The URL routing classes are very powerful and flexible, and allow you to easily create "pretty" URLs. This can aid users navigating around your site and even improve your site's ranking with search engines.
All of the action methods in previous examples do not accept any input from outside of the application to perform their tasks; they rely entirely on the state of the model. In real-world applications this is an unlikely scenario. The ASP.NET MVC framework makes it very easy to parameterize action methods from a variety of sources.
As mentioned in the previous section, the "Default" route exposes an "id" parameter, which defaults to an empty string. To access the value of the "id" parameter from within the action method you can just add it to the signature of the method itself as the following snippet shows:
- C#
public ActionResult Details(int id)
{
  using (var db = new ProductsDataContext())
  {
    var product = db.Products.SingleOrDefault(x => x.ProductID == id);

    if (product == null)
      return View("NotFound");

    return View(product);
  }
}
- VB
Public Function Details(ByVal id As Integer) As ActionResult
  Using db As New ProductsDataContext
    Dim product = db.Products.FirstOrDefault(Function(p As Product)
    p.ProductID = id)

    Return View(product)
  End Using
End Function
When the MVC framework executes the Details action method it will search through the parameters that have been extracted from the URL by the matching route. These parameters are matched up with the parameters on the action method by name and then passed in when the method is called. As the details method shows, the framework is even able to convert the type of the parameter on the fly. Action methods can also retrieve parameters from the query string portion of the URL and from HTTP POST data using the same technique.
Note
If the conversion cannot be made for any reason, an exception is thrown.
Additionally, an action method can accept a parameter of the FormValues type that will aggregate all of the HTTP POST data into a single parameter. If the data in the FormValues collection represents the properties of an object, you can simply add a parameter of that type and a new instance will be created when the action method is called. The Create action, shown in the following snippet, uses this to construct a new instance of the Product class and then save it:
- C#
public ActionResult Create()
{
  return View();
}

[HttpPost]
public ActionResult Create([Bind(Exclude="ProductId")]Product product)
{
  if (!ModelState.IsValid)
    return View();

  using (var db = new ProductsDataContext())
  {
    db.Products.InsertOnSubmit(product);
    db.SubmitChanges();
  }
  return RedirectToAction("List");
}
- VB
<HttpPost()>
Function Create(<Bind(Exclude:="id")> ByVal product As Product)

  If (Not ModelState.IsValid) Then
    Return View()
  End If

  Using db As New ProductsDataContext
    db.Products.InsertOnSubmit(product)
    db.SubmitChanges()
  End Using
  Return RedirectToAction("List")
End Function
Note
There are two Create action methods here. The first one simply renders the "Create" view. The second one is marked up with an HttpPostAttribute, which means that it will only be selected if the HTTP request uses the POST verb. This is a common practice in designing ASP.NET MVC web sites. In addition to HttpPostAttribute there are also corresponding attributes for the GET, PUT, and DELETE verbs.
The process of creating the new Product instance is the responsibility of a model binder. The model binder matches properties in the HTTP POST data with properties on the type that it is attempting to create. This works in this example because the template that was used to generate the "Create" view renders the HTML INPUT fields with the correct name as this snippet of the rendered HTML shows:
HTML
<p>
  <label for="ProductID">ProductID:</label>
  <input id="ProductID" name="ProductID" type="text" value="" />
</p>
<p>
  <label for="Name">Name:</label>
  <input id="Name" name="Name" type="text" value="" />
</p>
A number of ways exist to control the behavior of a model binder including the BindAttribute, which is used in the Create method shown previously. This attribute is used to include or exclude certain properties and to specify a prefix for the HTTP POST values. This can be very useful if multiple objects in the POST collection need to be bound.
Model binders can also be used from within the action method to update existing instances of your model classes using the UpdateModel and TryUpdateModel methods. The chief difference is that TryUpdateModel will return a Boolean value indicating whether or not it was able to build a successful model and UpdateModel will just throw an exception if it can't. The Edit action method shows this technique:
- C#
[HttpPost]
public ActionResult Edit(int id, FormCollection formValues)
{
  using (var db = new ProductsDataContext())
  {
    var product = db.Products.SingleOrDefault(x => x.ProductID == id);

    if (TryUpdateModel(product))
    {
      db.SubmitChanges();
      return RedirectToAction("Index");
    }
    return View(product);
  }
}
- VB
<HttpPost()>
Function Edit(ByVal id As Integer, ByVal formValues As FormCollection)
  Using db As New ProductsDataContext
Dim product = db.Products.FirstOrDefault(Function(p As Product)
    p.ProductID = id)

    If TryUpdateModel(product) Then
      db.SubmitChanges()
      Return RedirectToAction("Index")
    End If
    Return View(product)
  End Using
End Function
An area is a self-contained part of an MVC application that manages its own models, controllers, and views. You can even define routes specific to an area. To create a new area, select Add
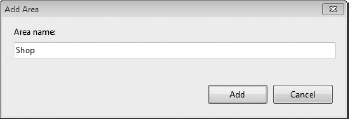
After you click Add, many new files are added to your project to support the area. Figure 21-8 shows a project with two areas added to it named Shop and Blog, respectively.
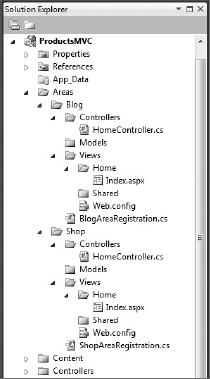
In addition to having its own controllers and views, each area has a class called AreaNameAreaRegistration that inherits from the abstract base class AreaRegistration. This class contains an abstract property for the name of your area and an abstract method for integrating your area with the rest of the application. The default implementation registers the standard routes.
- C#
public class BlogAreaRegistration : AreaRegistration
{
  public override string AreaName
  {
    get
    {
      return "Blog";
    }
  }

  public override void RegisterArea(AreaRegistrationContext context)
  {
    context.MapRoute(
      "Blog_default",
      "Blog/{controller}/{action}/{id}",
new { action = "Index", id = "" } ); } }
- VB
Public Class BlogAreaRegistration
  Inherits AreaRegistration

  Public Overrides ReadOnly Property AreaName() As String
    Get
      Return "Blog"
    End Get
  End Property

  Public Overrides Sub RegisterArea(ByVal context As AreaRegistrationContext)
    context.MapRoute( _
      "Blog_default", _
      "Blog/{controller}/{action}/{id}", _
      New With {.action = "Index", .id = ""} _
    )
  End Sub
End Class
Note
The RegisterArea method of the BlogAreaRegistration class defines a route in which every URL is prefixed with /Blog/ by convention. This can be useful while debugging routes but is not necessary as long as area routes do not clash with any other routes.
In order to link to a controller which is inside another area, you need to use an overload of Html.ActionLink that accepts a routeValues parameter. The object you provide for this parameter must include an area property set to the name of the area which contains the controller you are linking to.
- C#
<%= Html.ActionLink("Blog", "Index", new { area = "Blog" }) %>- VB
<%= Html.ActionLink("Blog", "Index", New With {.area = "Blog"})%>
One issue that is frequently encountered when adding area support to a project is that the controller factory becomes confused when multiple controllers have the same name. To avoid this issue you can limit the namespaces that a route will use to search for a controller to satisfy any request. The following code snippet limits the namespaces for the global routes to MvcApplication.Controllers, which will not match any of the area controllers.
- C#
routes.MapRoute(
  "Default",
  "{controller}/{action}/{id}",
  new { controller = "Home", action = "Index", id = "" },
  null,
  new[] { "MvcApplication.Controllers" }
);
- VB
routes.MapRoute( _
  "Default", _
  "{controller}/{action}/{id}", _
  New With {.controller = "Home", .action = "Index", .id = ""}, _
  Nothing, _
  New String() {"MvcApplication.Controllers"} _
)
Note
The AreaRegistrationContext automatically includes the area namespace when you use it to specify routes so you should only need to supply namespaces to the global routes.
In addition to just creating or updating it, a model binder is able to decide whether the model instance that it operating on is valid. The results of this decision are found in the ModelState property. Model binders can pick up some simple validation errors by default, usually with regard to incorrect types. Figure 21-9 shows the result of attempting to save a Product when the form is empty. Most of these validation errors are based on the fact that these properties are non-nullable value types and require a value.

The user interface for this error report is provided by the Html.ValidationSummary call, which is made on the view. This helper method examines the ModelState and if it finds any errors it renders them as a list along with a header message.
You can add additional validation hints to the properties of the model class by marking them up with using the attributes in the System.ComponentModel.DataAnnotations assembly. Because the Product class is created by LINQ to SQL you should not update it directly. The LINQ to SQL generated classes are defined as partial so you can extend them but there is no easy way to attach metadata to the generated properties this way. Instead, you need to create a metadata proxy class with the properties you want to mark up, provide them with the correct data annotation attributes, and then mark up the partial class with a MetadataTypeAttribute identifying the proxy class. The following code snippet shows this technique being used to provide some validation metadata to the Product class:
- C#
[MetadataType(typeof(ProductValidationMetadata))]
public partial class Product
{
}

public class ProductValidationMetadata
{
    [Required, StringLength(256)]
    public string Name { get; set; }

    [Range(0, 100)]
    public int DaysToManufacture { get; set; }
}
- VB
Imports System.ComponentModel.DataAnnotations

<MetadataType(GetType(ProductMetaData))>
Partial Public Class Product

End Class

Public Class ProductMetaData
    <Required(), StringLength(256)>
    Property Name As String

    <Range(0, 100)>
    Property DaysToManufacture As Integer
End Class
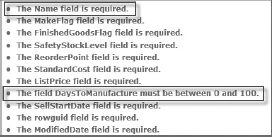
Now, attempting to create a new Product with no name and a negative "Days to Manufacture" produces the errors shown in Figure 21-10.
Note
You might notice that along with the error report at the top of the page, for each field which has a validation error, the textbox is colored red and has an asterisk after it. The first effect is caused by the Html.TextBox helper, which accepts the value of the property that it is attached to. If it encounters an error in the model state for its attached property, it adds an input-validation-error CSS class to the rendered INPUT control. The default stylesheet defines the red background. The second effect is caused by the Html.ValidationMessage helper. This helper is also associated with a property and renders the contents of its second parameter if it detects that its attached property has an error associated with it.
At times you have large areas of user interface markup that you would like to reuse. In the ASP.NET MVC framework a re-usable section of view is called a partial view. Partial views act very similar to views except that they have an .ascx extension and inherit from System.Web.Mvc.ViewUserControl. To create a partial view, check the Create a Partial View checkbox on the same Add View dialog that you use to create other views.
To render a partial view you can use the Html.RenderPartial method. The most common overload of this method accepts a view name and a model object. Just as with a normal view, a partial view can be either controller-specific or shared. Once the partial view has been rendered, its HTML markup is inserted into the main view. This code snippet renders a "Form" partial for the current model:
- C#
<% Html.RenderPartial("Form", Model); %>- VB
<% Html.RenderPartial("Form", Model) %>
Note
You can call a partial view directly from an action using the normal View method. If you do this, only the HTML rendered by the partial view will be included in the HTTP response. This can be very useful if you are returning data to jQuery.
When you use the Add View dialog to add items to your project, Visual Studio 2010 is actually executing a T4 template, which determines the code that will be generated. The View Content drop-down determines which template will be run. If you want to edit them you can find them in the C:Program FilesMicrosoft Visual Studio 10.0Common7IDEItemTemplateslanguageWebMVCv2CodeTemplatesAddView folder where language is either "CSharp" or "VisualBasic."
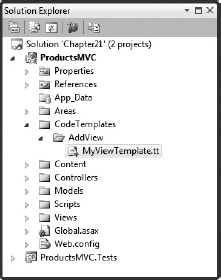
Editing these files directly will make the change across all MVC projects on the local machine, but you cannot use this technique to create project-specific templates. It is also very hard to version control these files effectively with the rest of your application. You can get around both of these issues by creating a CodeTemplatesAddView folder under the root of your project and copying the T4 templates into it as shown in Figure 21-11 When the Add View dialog is populating the View Content drop-down list it will use these templates instead of the global ones.
Additionally, you can create your own templates by adding T4 template files into this folder. Figure 21-11 shows the template file MyViewTemplate.tt and Figure 21-12 shows "MyViewTemplate" showing up in the drop-down list.
Custom templates can be host specific and the Host is of type MvcTextTemplateHost, which contains all of the properties defined by the Add View dialog. See Chapter 14, "Code Generation with T4," for more information about creating T4 templates.
Dynamic Data is a feature of ASP.NET Web Forms that allows you to render UI based on metadata associated with the model. Although ASP.NET MVC does not integrate directly with Dynamic Data, a number of new features in ASP.NET MVC 2.0 are similar in spirit. Templates in ASP.NET MVC 2.0 are able to render parts of your model in different ways, whether they are small and simple such as a single string property or large and complex like the whole product class. The templates are exposed by Html helper methods. There are templates for display and templates for editing purposes.
The Details view that is created by the Add View dialog contains code to render each property. Here is the markup for just two of these properties:
- C#
<p>
  ProductID:
  <%= Html.Encode(Model.ProductID) %>
</p>
<p>
  Name:
  <%= Html.Encode(Model.Name) %>
</p>
- VB
<p>
  ProductID:
  <%= Html.Encode(Model.ProductID) %>
</p>
<p>
  Name:
  <%= Html.Encode(Model.Name) %>
</p>
With the new templates feature you can change this to the following:
- C#
<p>
<%= Html.LabelFor(x => x.ProductID) %><%= Html.DisplayFor(x => x.ProductID) %></p> <p><%= Html.LabelFor(x => x.Name) %><%= Html.DisplayFor(x => x.Name) %></p>- VB
<p>
<%: Html.LabelFor(Function(x As ProductsMVC.Product) x.ProductID)%><%: Html.DisplayFor(Function(x As ProductsMVC.Product) x.ProductID) %></p> <p><%: Html.LabelFor(Function(x As ProductsMVC.Product) x.Name)%><%: Html.DisplayFor(Function(x As ProductsMVC.Product) x.Name) %></p>
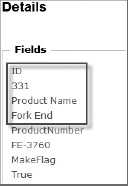
This has a number of immediate advantages. First, the label is no longer hard coded into the view. Because the label is now strongly typed it will be updated if you refactor your model class. In addition to this you can apply a System.ComponentModel.DisplayName attribute to your model (or to a model metadata proxy) to change the text that is displayed to the user. This helps to ensure consistency across the entire application. The following code snippet shows the Product metadata proxy with a couple of DisplayNameAttributes and Figure 21-13 shows the rendered result:
- C#
public class ProductValidationMetadata { [DisplayName("ID")] public int ProductID { get; set; } [Required, StringLength(256)] [DisplayName("Product Name")] public string Name { get; set; } [Range(0, 100)] public int DaysToManufacture { get; set; } }- VB
Public Class ProductMetaData
    <DisplayName("ID")>
    Property ProductID As Integer

    <Required(), StringLength(256)> _
    <DisplayName("Product Name")>
    Property Name As String

    <Range(0, 100)>
    Property DaysToManufacture As Integer
End Class
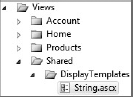
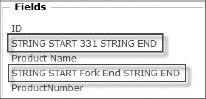
The DisplayFor helper is also providing a lot of hidden flexibility. It is selecting a template based on the type of the property that it is displays. You can override each of these type-specific views by creating a partial view named after the type in the SharedDisplayTemplates folder. Figure 21-14 shows a String template and Figure 21-15 shows the output result.
- C#
<%@ Control Language="C#" Inherits="System.Web.Mvc.ViewUserControl" %>

STRING START
<%= Html.Encode(ViewData.TemplateInfo.FormattedModelValue) %>
STRING END
- VB
<%@ Control Language="VB" Inherits="System.Web.Mvc.ViewUserControl" %>

STRING START
<%= Html.Encode(ViewData.TemplateInfo.FormattedModelValue) %>
STRING END
Note
You can also create controller-specific templates by putting them inside a DisplayTemplates subfolder of the controller-specific Views folder.
Although the display template is selected based on the type of the property by default you can override this by either supplying the name of the template to the DisplayFor helper or applying a System.ComponentModel.DataAnnotations.UIHintAttribute to the property. This attribute takes a string that identifies the type of template to use. When the framework needs to render the display for the property it tries to find the display template described by the UI Hint. If one is not found it looks for a type-specific template. If a template still hasn't been found, the default behavior is executed.
If you are simply applying LabelFor and DisplayFor for every property on your model, you can use the Html.DisplayForModel helper method. This method renders a label and a display template for each property on the model class. You can prevent a property from being displayed by this helper by annotating it with a System.ComponentModel.DataAnnotations.ScaffoldColumnAttribute passing it the value false.
Note
If you want to change the way the DisplayForModel is rendered, you can create a type-specific template for it. If you want to change the way it renders generally, create an Object display template.
A number of built-in display templates are available that you can use out of the box. Be aware that if you want to customize the behavior of one of these you will need to re-create it from scratch.
String: No real surprises, just renders the string contents itself. This template does HTML encode the property value, though.
Html: The same as string but without the HTML encoding. This is the rawest form of display that you can have. Be very careful using this template because it is a vector for malicious code injection such as Cross Site Scripting Attacks (XSS).
Url: Renders a URL as an HTML anchor.
HiddenInput: Does not render the property at all unless the
ViewData.ModelMetaData.HideSurroundingHtmlproperty isfalse.Decimal: Renders the property to two decimal places.
Boolean: Renders a read-only checkbox for non-nullable values and a read-only drop-down list with True, False, and Not Set options for nullable properties.
Object: Renders complex objects and null values.
It probably comes as no surprise that there are corresponding EditorFor and EditorForModel Html helpers that handle the way properties and objects are rendered for edit purposes. Editor templates can be overridden by supplying partial views in the EditTemplates folder. Edit templates are able to use the same UI hint system that display templates use. Just as with display templates, you can use a number of built-in editor templates out of the box:
String: Renders a standard textbox, initially populated with the value if provided and named after the property. This ensures that it will be used correctly by the model binder to rebuild the object on the other side.
Password: The same as string but renders an HTML
PASSWORDinput instead of a textbox.MultilineText: Creates a multi-line textbox. There is no way to specify the number of rows and columns for this textbox here. It is assumed that you will use CSS to do that.
HiddenInput: Similar to the display template, renders an HTML
HIDDENinput.Decimal: Similar to the display template but renders a textbox to edit the value.
Boolean: If the property type is non-nullable this renders a checkbox control. If this template is applied to a nullable property it renders a drop-down list containing the same three items as the display template.
Object: Renders complex editors.
Note
Brad Wilson has a good, multi-part, in-depth tutorial on ASP.NET MVC 2.0 Templates on his blog starting at http://bradwilson.typepad.com/blog/2009/10/aspnet-mvc-2-templates-part-1-introduction.html.
jQuery is an open-source JavaScript framework that is included by default with the ASP.NET MVC framework. The basic element of jQuery is the function $(). This function can be passed a JavaScript DOM element or a string describing elements via a CSS selector. The $() function returns a jQuery object that exposes a number of functions that affect the elements contained. Most of these functions also return the same jQuery object so these function calls can be chained together. As an example, the following snippet selects all of the H2 tags and adds the word "section" to the end of each one:
JavaScript
$("h2").append(" section");To make use of jQuery you need to create a reference to the jQuery library found in the /Scripts folder by adding the following to the head section of your page:
HTML
<script type="text/javascript" src="/Scripts/jquery-1.3.2.js"></script>
It is possible to use jQuery to make an HTTP request by using the $.get and $.post methods. These methods accept a URL and can optionally have a callback function to provide the results to. The following view renders the time inside two div tags called server and client, respectively. There is also a button called update, which when clicked makes a GET request to the /time URL. When it receives the results it updates the value displayed in the client div but not the server one. In addition to this it uses the slideUp and slideDown functions to animate the client time in the UI.
C#
<%@ Page Language="C#" Inherits="System.Web.Mvc.ViewPage<System.String>" %>
<!DOCTYPE html PUBLIC "-//W3C//DTD XHTML 1.0 Transitional//EN"
"http://www.w3.org/TR/xhtml1/DTD/xhtml1-transitional.dtd">
<html xmlns="http://www.w3.org/1999/xhtml">
<head runat="server">
  <title>Index</title>
  <script type="text/javascript" src="/Scripts/jquery-1.3.2.js"></script>
  <script type="text/javascript">
    $(document).ready(function () {
      $('#updater').click(UpdateNow);
    });
    function UpdateNow() {
      $.get('/time', function (data) {
        $('#clientTime').slideUp('fast', function () {
          $('#clientTime').empty().append(data).slideDown();
        });
      });
    }
  </script>
</head>
<body>
    <div>
        <h2>
            Server</h2>
<div id="serverTime">
<%:Model %></div>
<h2>
Client</h2>
<div id="clientTime">
<%:Model %></div>
<input type="button" value="Update" id="updater" />
</div>
</body>
</html>

Here is the action method that controls the previous view. It uses the IsAjaxRequest extension method to determine if the request has come from jQuery. If it has, it returns just the time as a string, otherwise it returns the full view.
- C#
public ActionResult Index()
{
  var now = DateTime.Now.ToLongTimeString();
  if (Request.IsAjaxRequest())
    return Content(now);
  return View(now as object);
}
- VB
Function Index() As ActionResult
  Dim timeNow = Now.ToString()
  If Request.IsAjaxRequest() Then
    Return Content(timeNow)
  End If
  Return View(CType(timeNow, Object))
End Function
jQuery is a rich client-side programming tool with an extremely active community and a large number of plug-ins. For more information about jQuery including a comprehensive set of tutorials and demos see http://jquery.com.
The ASP.NET MVC framework makes it easy to build highly testable, loosely coupled web applications that embrace the nature of HTTP. The 2.0 release has a lot of productivity gains including Templates and Visual Studio integration. For more information about ASP.NET MVC, see http://asp.net/mvc.