
Managing project tasks
Visualizing source code repository changes
Creating build configurations
Reporting progress
Customizing process templates
Software projects are notoriously difficult; very few are delivered successfully on time, within budget, and up to the desired quality levels. As software projects get larger and require larger teams, the processes involved in managing them gets even more complicated, and not just for the manager, but for the developers, the testers, the architects, and the customer. Over time there have been many approaches to solving software project management problems, including quality models like CMMI, methodologies such as RUP, or Agile Practices, Scrum, and Continuous Integration. Clearly a tool to help support all the pieces necessary to ensure more successful software projects should be desired.
The most basic requirement for a software project, even for the smallest one-person project, is to have a source control repository. For bigger ones more sophisticated features are needed, such as labeling, shelving, branching, and merging. Project activities need to be created, prioritized, assigned, and tracked, and at the end of the day (or better yet even before every change is checked in to your repository) you need to ensure that everything builds and all tests are passing. To make this process smoother and improve team communication, a way to report to project managers or peer developers is also required.
Team Foundation Server (TFS) 2010 allows you to do all this. In this chapter you see how version control works, how it integrates with work item tracking, and how each change can be checked to ensure it is working before it is checked in. You also see how project managers can see reports to get a better understanding of the project status and how they can work using Excel and Project to assign work items. The team can interact using the project's portal in SharePoint and different stakeholders can get the information they need through the report server or configure it to get their reports directly by e-mail.
Note
TFS 2010 has a few new features that make it easier to get up and running, including reduced requirements and streamlined installation. You can even install it on a client operating system like Windows 7.
To begin working with TFS you need to create a team project. A team project contains all of the information about your project, including source code, tasks that need to be performed, instructions for building your application, documentation, quality metrics, and planning information. Each team project can also have its own SharePoint collaboration portal.
In Visual Studio 2010, team projects are grouped together under team project collections. All of the projects with a team project collection share basic infrastructure such as a data warehouse, a work item schema, and a pool of IDs (for work items and changeset numbers). If you have logical groups of projects within your enterprise, it is a good idea to create a team project collection for each one.
Note
You cannot back up and restore individual projects. This can only be done at the project collection level.
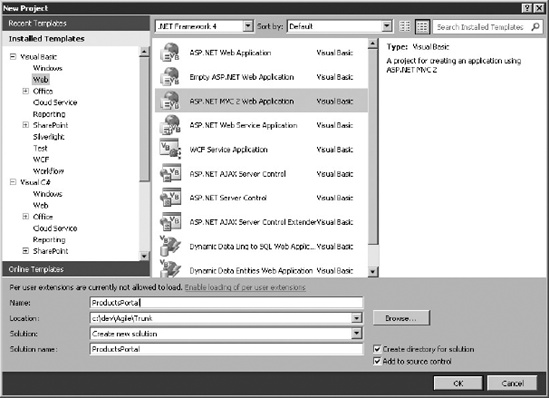
When you create a new team project, you need to select the process template, which defines the way in which you intend to use the tool. Select the one that better suits your organization's process or methodology. Out of the box, Team Foundation Server comes with two templates, both based on the Microsoft Solution Framework. One flavor is for Agile Development and the other is for CMMI Process Improvement. Both options are great as starting points, but if your company has a defined process it can be incorporated into TFS or you can use a third-party process template. Figure 57-1 shows the process template selection process. The rest of this chapter uses MSF for Agile Software Development and refers to the CMMI version when necessary.
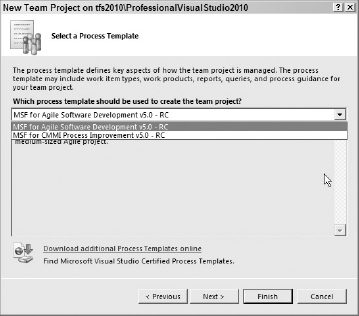
A process template creates the environment for the team project. This usually consists of defining work item types (as you see in the section titled "Work Item Tracking"), creating default groups and permissions, preparing a version control repository, and configuring reports and a custom SharePoint portal with document structure and process guidance. A different process could omit some of these or add custom tasks.
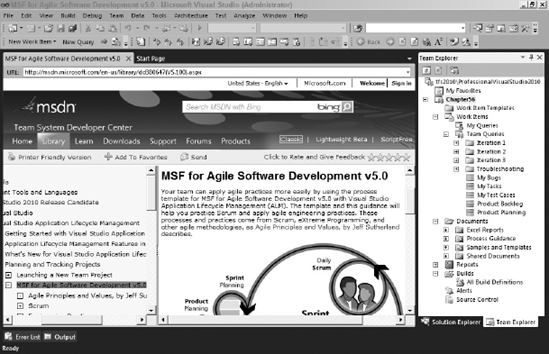
When the wizard finishes it opens the Guidance Page, which details the process used, defines the responsibilities of the roles involved, explains the different types of work items, and provides step-by-step guidance about specific tasks like "How to create a Vision Statement." Figure 57-2 shows the Project Guidance and the Team Explorer windows.
You navigate to the different features of TFS through the Team Explorer tool window. It has Work Item Queries, a convenient way to access the documents stored in the Team Portal, links to Reports, a list of the Team Builds, and the Source Control node.
Team Foundation Server allows you to manage activities using work items. As you see in the following sections, you can search for work items using work item queries and you manage them using Visual Studio, Excel, Project, or Team System Web Access. Different types of work items are defined by your process template.
Note
One of the most requested features leading up to TFS 2010 was hierarchical work items. TFS now provides this capability, so you can create sub-tasks and parent tasks. You can also create predecessor and successor links between work items, which enables you to manage task dependencies. These new work item links will even synchronize with Microsoft Excel and Microsoft Project providing even greater flexibility for managing work items.
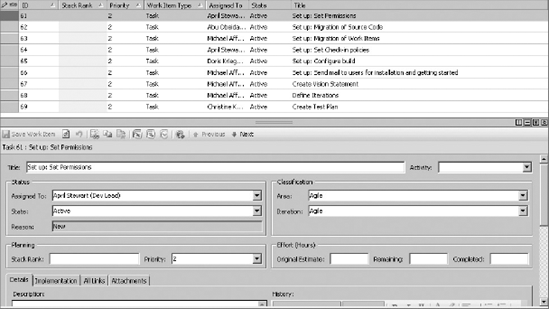
The work items shown in Figure 57-3 are all tasks in the selected team project. You can look for different work items using the work item queries from Team Explorer. The template process includes 14 team queries (Figure 57-2) such as Active Bugs, Open Issues, or My Work Items.
Note
There is a folder of queries called Workbook Queries, which are used to support some of the Excel workbook reports found in the Documents area.
Most of the time those queries will be enough, but you have the option to create new ones. If you're a project administrator you can add new team queries to make them available to everyone with access to this project. If you can modify the process template, you can add new team queries, so projects created with the edited templates will include them. Changes in the templates don't apply to team projects already created. If you don't have these permissions or you want to create a personal query, you can do that, too.
Note
When you notice you are creating the same queries over and over from one project to another, you should add those to your process templates. Over time, there will be less need to create custom queries.
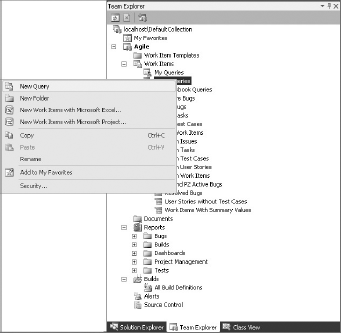
To create a new query, right-click the My Queries node and select New Query (Figure 57-4).
Now you can visually design your query. In this case you only care about the work items of the selected project, assigned to the current user and under Iteration 1. You specify this using the @me and @Project variables. You can also specify which columns you want visible in the grid and sorting options (Figure 57-5). You can then run the new query to see a sub-list of the work items.
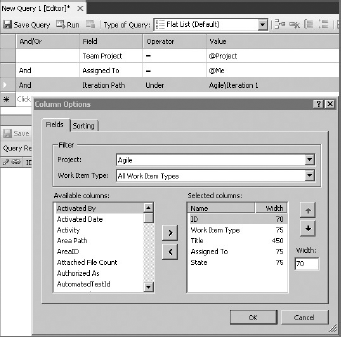
In Team Foundation Server 2010, queries can take advantage of the new hierarchical work item structure to show work items that are directly related, allowing you to see the impact of cutting a feature or the required tasks necessary to complete a feature. You can also show query results in a flat list, a list of work items and their direct links, or a tree of work items. Each of these is identified by a small icon that appears next to the query in the Team Explorer. You can create folder structures for your work item queries and each query or folder can be secured separately.
Note
Although a folder of work item queries can be secured, there is nothing stopping unauthorized users from duplicating the queries for themselves.
In MSF for Agile Development you have six types of work items: bugs, issues, shared steps, tasks, test cases, and user stories. Each work item has different fields depending on its type. For example, a bug will have test information and a system info field, whereas a task contains effort information about estimated, remaining, and completed hours. Contrasting it with the MSF for CMMI template, you have a change-request work item, which doesn't exist in the Agile version. CMMI also has a bug work item, but in this case it is not so simple; it now requires repro steps and has other fields such as severity, priority, probability, and estimate. All these fields are customizable either at a template or team-project level.
The basic way of adding work items is via the Team

When you do it this way you will usually create a bug and also create a link between it and the selected test. You can navigate from the bug to the test or see the test and its related work items (Figure 57-7). If the test fails again, you can see the work items associated with it and track it back to their related change sets, as you will see later in the "Version Control" section. Visual Studio 2010 is able to associate IntelliTrace information with the work item; that way the developer assigned to correct the bug can easily reproduce it.

Each work item can be related to many others with links. Team Foundation Server 2010 understands several different types of links, including Parent, Child, Predecessor, and Successor. To add a link, click the All Links tab and click the Link To button. You can also create a new work item directly linked to the current one with the New Linked Work Item button.
During your normal daily activity, you will be working on tasks that are described by work items that are assigned to you. Each work item is described by a simple state machine that determines the allowed new states for any given state. This state machine is a part of the work item definition and is decided by the process template. Whenever a new state is selected you can provide a reason for the state transition. For example, the Bug work item in MSF for Agile can go from Active to Resolved to Closed. It can then go back to Active again with a reason of Regression or Reactivated. The reason field allows you to differentiate between the bugs that are active because they are new and those that are active because they have re-occurred.
Looking at, adding, or editing work items can get a bit complicated and won't scale well when you have hundreds of tasks. This can be problematic especially for project managers who are not used to working inside Visual Studio. They usually prefer to work from Excel or Project. This integration is really easy using the provided add-ins.
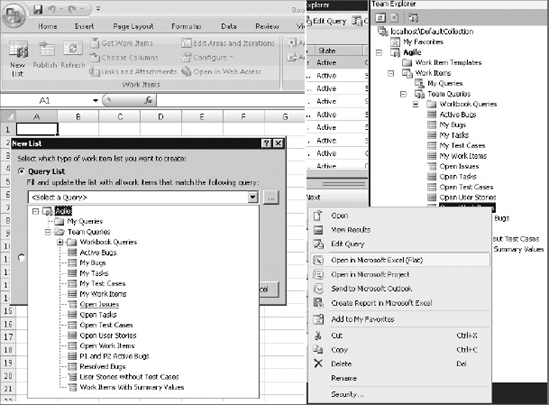
From the Ribbon, simply click New List and choose a Team Project and Work Item Query. This will retrieve all the information from a web service and display it in Excel. Once it's there you can sort, filter, edit, and publish changes back to the server, refresh the changes made by others, add links or attachments, and choose columns to be displayed.
Another way of doing this is from Team Explorer. From a work item query's context menu, select Open in Microsoft Excel. This will create a new Excel worksheet with the information. Figure 57-8 shows both options and Figure 57-9 shows the results in Excel.

The MSF for Agile template creates a number of standard work item Excel workbooks, which are hosted on the SharePoint Portal. These are found in the Documents node under Excel Reports.
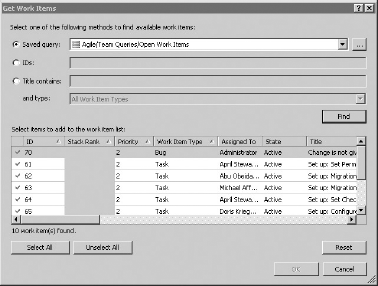
There is also an add-in for Project. Similar to when you use Excel, you can connect to a server, choose a team project, and select a work item query, but instead of using the entire list, you have to choose each of the work items you want to import to your project, as shown in Figure 57-10.
Once your work items are imported, you can edit each of their fields directly in Project. This is possible thanks to the column mappings between TFS fields and MS Project Columns. For example, Resource Names in Project will map to the Assigned To field in TFS. Fields that exist only in Team System will be mapped to Text Fields in Project; for example, Work Item Type is mapped to Text 24. This is preconfigured in the process template.
You can add new work items, nest them in iterations or areas, assign them to people, choose a work item type, balance workloads between resources, see project reports, and refresh the progress from the server after each developer changes the work remaining or work item state.
Unlike the previous version of TFS, the 2010 edition does understand the notions of hierarchical work items and successor and predecessor tasks. When the work items are loaded into Project, it is able to take advantage of these links to create a normal Project experience. As new associations are created and updated, Project is even able to return the updated data to TFS in a form it can understand.
Important differences still exist that make the integration a bit tricky:
In Project you can have many resources for the same activity, but TFS only accepts one entry. One approach could be to add a custom field to the work item type, but then the mapping won't work because you would need to have one column in Project mapped to two fields in TFS. The workaround is to add the activity once for each resource.
There's no Project server/TFS integration out of the box. A couple of third-party tools are available that do this for you. The next version of Team System will include it, as well as project management improvement across multiple projects for load balancing of resources.
Note
If you are going to use Project with TFS you should look at the article "Quick Tips and Operational Differences when Tracking Tasks using Office Project and Team Foundation" on MSDN at http://msdn.microsoft.com/en-us/library/dd380701(VS.100).aspx.
Version Control (sometimes called Source Control) is a tool that allows you to manage, share, and retain a history of changes to your source code. To interact with the TFS version control system, you use the Source Control Explorer window, shown in Figure 57-11. You can open this window from the Team Explorer window or View
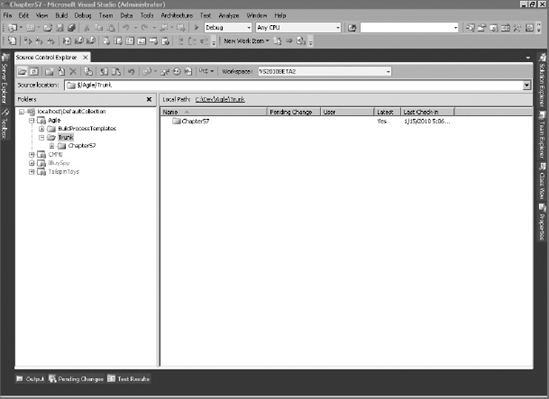
To work with files on your machine, you will need a workspace that defines a set of mappings between paths on your local file system and the remote system. You can define a different local folder for each path, but a good practice is to have only one mapping; this helps keep all the solutions and projects relative to each other even between different team projects. To define this mapping, open the workspace combo box and select Workspace.
Once your workspace is set up, you can get the latest version of the source code and start working with it, add files, check out files (mark as edit) or check in (upload/persist) changes, view change history, and compare folders.
Note
In previous versions of TFS, each workspace was limited to a single user on a single machine. Visual Studio 2010 introduces the concept of a public workspace that can be shared among multiple users on the same machine.
When you create a new project you have the option to add it to Source Control. Team System will automatically bind it and add it according to the mapping previously defined. That's why you need to set the location to a folder inside your workspace (the local path you mapped to), as shown in Figure 57-12.
The Solution Explorer you are used to working with in Visual Studio will be the main place to interact with your source control system. Every time you add a new file to the solution, it will be added to source control; when you open a file and VS detects you're editing it, it will be automatically checked out for you. Once you are done working, you can simply right-click the solution and choose Check In to persist your changes in the server. See the section "Source Control" in Chapter 13 for more information on the common tasks; this chapter explains the specifics of Source Control as it relates to Team Foundation Server 2010.
Note
Though it is common to work directly with TFS source control via the Solution Explorer, this can have some disadvantages because it means that Visual Studio is only able to manipulate the files that are referenced by your solution. If you have other items in source control that are not part of your solution, you need to manage these from the Source Control Explorer window.
Files under source control are by default read-only; in TFS terms you would say the file is checked in. To start editing a file you need to check it out. This is done for you automatically when you modify it from VS. When the file is a text file (that is, a C#, VB, or XML file), the IDE will do a shared check-out; if it's a binary file (that is, a Word document, SQL Server Compact Edition Database, or another resource) an exclusive check-out will be made.
Shared check-outs allow two or more developers to modify a file at the same time, whereas an exclusive check-out prevents a second developer from checking out the file. You can choose to do an exclusive check-out on a text file if you need to prevent anyone from modifying it. This is not a recommended practice, and you should only use it when you really need it. A good example of this is when you are about to update the data for a WCF reference. This sort of information is textual, but not easy to merge because many files are all updated at once. By using exclusive check-outs you can ensure that no one else is modifying the reference at the same time as you.
Note
If you install the TFS2010 Power Tools you can check files in and out directly from Windows Explorer.
To preserve your changes in the server, you will need to check in the edited files. You can select which files to include in this changeset, add comments to it, associate it with work items, and add check-in notes (Figure 57-13).
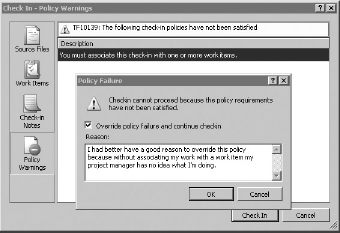
Depending on the policies defined for the team project, you might need to associate your check-in with a work item, run code analysis, have it pass tests, or at least successfully build the solution. To modify a team project's policies, open the Source Control Settings window (Team

Note
You should check in a group of files related to a logical change at the same time rather than one at a time. The set of files associated with a check-in along with any notes and work item associations become a changeset. Changesets make managing project history and merging much easier.
Although shared check-outs allow multiple developers to work on the same file, this can lead to conflicts. These can easily be resolved with the help of Visual Studio. From the Pending Changes - Conflicts window (Figure 57-15) you can compare versions and look at all the changes to that file. To resolve it, you can use Auto Merge and let Visual Studio merge the changes for you, undo your local changes, discard server changes, or merge changes manually in the merge tool.
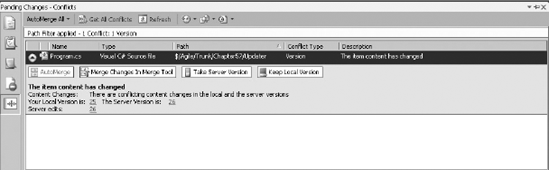
When the changes were made in different parts of the file (for example, two different methods), VS can automatically resolve changes, but if changes were made in the same line you have to either choose a version or manually merge both files using the Merge Changes tool.
Note
Visual Studio will compare text to determine if changes overlap, but this will not guarantee the resulting file will even compile or behave as expected. This option is really useful, but has to be used with caution. Over time, you will have more confidence in choosing which files to auto-merge to save time and which are worth a quick look just to be sure.
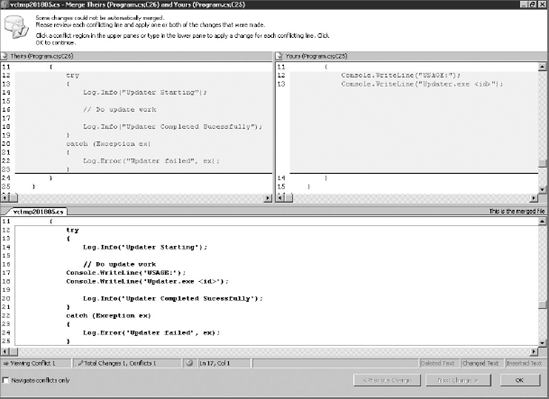
In the Merge Changes tool (Figure 57-16), you will have a view of "their" version (that is, the server version), your version, and a merged version. You can navigate easily between changes and conflicts. In the case of conflicts, you can manually edit the offending lines or select a version to keep. When all conflicts are resolved, you can accept the changes, keep the new file as your current version, and proceed to check-in.
Note
After resolving conflicts, it is recommend that you run the automated tests again to ensure there are no breaking changes. As you will see in the "Team Foundation Build" section, this test can be run automatically in the server before each check-in, but it's best to get the feedback as early as possible.
Team Foundation Server uses HTTP and web services and can work perfectly through the Internet and allow for collaboration of distributed teams, but in case you don't have an available connection VS will allow you to work offline when you try to open a bound project.
All files under Source Control are read-only. When you save a file you will be warned and should simply choose Overwrite. When the connection with TFS can be reestablished, you can select to go online from Solution Explorer or by right-clicking the solution. VS will look for files in the solution without the read-only attribute; if those are not in Source Control it will add them, and if they exist it will check them out.
Note
Files modified outside the solution won't be detected and you have to manually check them out. To make this easier, you can compare your local copy to the latest version by right-clicking a folder in the Source Control Explorer.
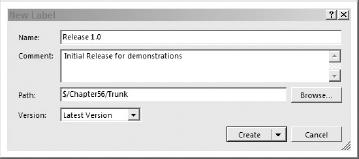
Labeling a specific version allows you to refer to it easily. To create a label you simply right-click a folder in Source Control Explorer that you want to mark, add additional files if necessary, and write a Name and optionally a Comment (Figure 57-17). Similarly, you can get to a specific version using the label. The perfect use for this is to release a version.
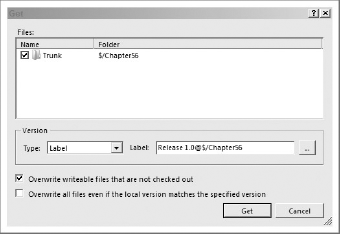
To get a labeled version, right-click a file or folder in Source Control Explorer and select Get Specific Version from the context menu. On the Type combo box in the Get window (Figure 57-18) select Label. You can search for labels by name, team project, and owner. Once you find the label, to be sure you are getting the exact labeled version, you will probably choose to overwrite writable files.
Note
You should undo, shelve, or check-in any pending changes before getting a specific version to separate the latest changes in your workspace from the labeled version.
If you want to get the version in a different location, you can create a branch. You see this later in the chapter.
Every change you make is persisted in the server and you can get to any specific version of a file; a great way to do it is through the History window. Simply right-click a file in Source Control or Solution Explorer and select View History. From there you can see how a file has evolved over time (Figure 57-19). When you right-click any version, you can compare it to your version, open it, and view details of the changeset (including the comments and related work items).

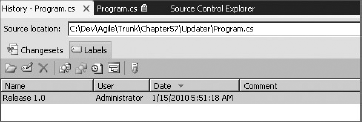
Toward the top of Figure 57-19 is a tab to switch between Changesets and Labels. Switching to Labels view, shown in Figure 57-20, displays a list of all of the labels that have been applied to the file. This can be very useful to quickly see all of the changes made between two versions.
The annotate command enables you see when and who edited each line of code (Figure 57-21). From each of the changes made, you can get to each particular changeset to see details, get that particular version, compare it to its previous version, locate the file in the History window, or annotate from that version.

When you check in a file, that change is automatically made available to others. Sometimes you need to persist your changes without affecting everyone — a scenario that can happen when you need to work from another computer and want to upload your changes and send them somewhere else, or when you are in the middle of something and are assigned a new task.
Shelving persists your changes in the server. You can associate a shelveset to work items and add comments and check-in notes, much as you would when checking in. You can optionally evaluate check-in policies before shelving and choose to undo local changes after the shelve is done. The latter is useful when you need to work on some other work item without the shelved changes interfering with what you are doing. Shelving changes is also useful if you are moving to another machine and don't want to have to make the same change in both places. To get to the changes, you can unshelve your shelveset and your files will be checked out again.
Each shelveset is a read-only snapshot of the files at the time when it was created. Because of this, each shelveset is not versioned and if you save a new shelveset with the same name as an existing one it will simply overwrite it. This can be extremely handy for common tasks such a Work In Progress or For Review.
Note
Shelvesets are uniquely identified by a combination of their name and the name of the user who created them, so even if you use the same naming scheme for your shelvesets as another team member you won't be able to overwrite each other's work.
Although the default behavior is for you to see the shelvesets that you have created, you can see the shelvesets that other people have created and even retrieve them, which can be useful if you need a colleague to review some code before it is checked in or to hand a task off to someone when it is not in a state that is ready to be checked in.
There is an option hidden behind the Details when unshelving a shelveset to Preserve Shelveset on Server. If you uncheck this option the shelveset is deleted from the server as you retrieve it. You can also delete shelvesets without retrieving them from the Unshelve dialog. It is a good idea to clean out shelvesets regularly that you don't need any more to make it easier for you to find the ones you actually use.
A branch, in source control terms, is a parallel version of your code. This is useful for different purposes. Here are a couple of examples:
Hot fixes or bugs for stable versions while working on new ones. When you release 1.0 you label all your source code and start working on 2.0. Then a critical bug is found but version 2.0 is months away from being ready. You will branch from version 1.0 (you can get to this version using the label). Then you can fix the bug in the new branch and release version 1.1. Later you can merge the change made and integrate it with the main branch.
Creating a branch from the latest version to do a big refactoring or a change you are not sure will work and thus don't want to affect the main branch. If it works you can merge it with the main branch and if it doesn't you can simply delete it.
You have to choose wisely what branching strategy is better for your organization, type of product, and process, or when you could substitute by simply labeling a version or shelving a change. Abuse of branching can exponentially complicate source-code management. Codeplex hosts branching guidance that provides additional scenarios (http://www.codeplex.com/TFSBranchingGuideII).
To create a new branch, right-click the folder you want to branch from and select Branching and Merging
Note
Branches have become first class features in TFS 2010 so the tools are able to take full advantage of them. You can mark an existing folder as a branch by supplying the required metadata, which allows branches from previous versions to take advantage of this as well.
Once you have a few branches you can use the Branch Visualization (Figure 57-22) tool to see the hierarchy of your branches by selecting View Hierarchy from the Branching and Merging drop-down in the Source Control Explorer. You can initiate merges from this tool by dragging from one branch to a valid target branch.

Another new tool in TFS 2010 is Changeset Tracking, which allows you to see where the changes in a particular changeset have come from. It has two views: Timeline Tracking (which is shown in Figure 57-23) and Hierarchy Tracking, which shows the hierarchy between the branches in a clearer fashion. Just as with the Branch Visualization view, you can initiate a merge by dragging a changeset from one branch to another.

Team Foundation Build is a tool, part of TFS, and its responsibility is to get the latest version from source control to a local workspace, build the projects as configured, run tests, do other tasks, and finally report the results and leave the output in a shared folder. Each machine that is able to build a project for you is called a build agent. TFS 2010 also introduces the concept of a build controller, which is responsible for coordinating the activities of several build agents. The information that each build agent needs to do its job is called a build definition.
To create a new build definition, right-click the Builds folder in Team Explorer and select New Build Definition (Figure 57-24). In the General tab you need to write the build name and optionally a description.

By default the build has to be manually queued, but in the Trigger tab you can modify this behavior. You have five options, as shown in Figure 57-25. The new option for TFS 2010 is the Gated Check-in option. When you have build definitions that are triggered this way, check-ins will not necessarily go straight into source control. Instead they will be shelved (you will be prompted about this) and built by a build agent first. If the build succeeds, the shelveset is saved into the source control repository. If it does not, you are notified and it is up to you to retrieve the shelveset, make any required changes, and check it in again. Using this type of build definition prevents the situation where the contents of the source control repository do not compile, which can significantly impact the rest of the team.
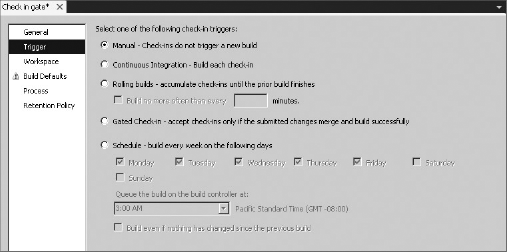
Depending on how big your project is, how long it takes to build and run the tests, and how often the team checks in, this option may cause some overhead. The third option, Rolling Builds, will definitely help alleviate the workload, but it's better to wait until you find you need it.
Configuring the workspace will be used in complex scenarios where you have dependencies between team projects, so the defaults in that tab might be enough. In the build defaults page, you can choose a build controller and a shared folder to drop the output into. These will be used for triggered builds, but for manual builds this can be overridden.
The Process tab, shown in Figure 57-26, allows you to configure the build process. Here you must select at least one project or solution and a configuration (like x86|Debug or AnyCPU|Release). The rest of the values are optional but include information allowing you to specify the location of any automated test assemblies, whether or not to perform code analysis, if the build agent should publish the project symbols anywhere, how to format the build number, and more.
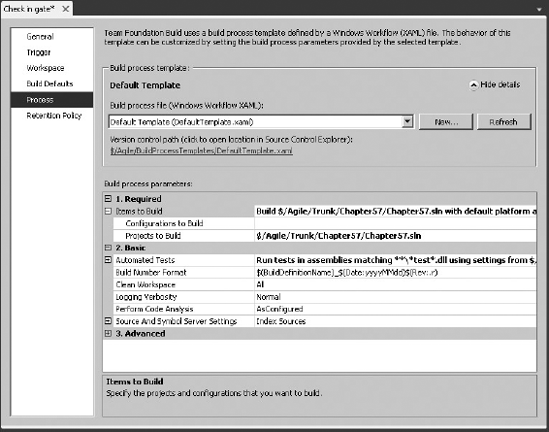
TFS 2010 build processes are based on a process template that is defined with Windows Workflow 4.0. You can create your own custom process template by copying the default one and making changes to it. A number of custom activities are related to Team Build and you can always create your own. If you have a build definition from a previous version of Team Build you should use the Upgrade Template, which only requires a path that contains the legacy TfsBuild.proj file.
Note
By default the build process templates are located in the $/TeamProjectName/BuildProcessTemplates folder in the source control repository.
The retention policy lets you choose how many of the builds left in the shared folder will be kept before some are deleted. It is recommended to use the Keep All option, at least for successful builds, until you need to reduce the number of files being kept around. There are two sets of settings. The ones under Private relate to builds that form a part of a gated check-in and are not as important to keep around.
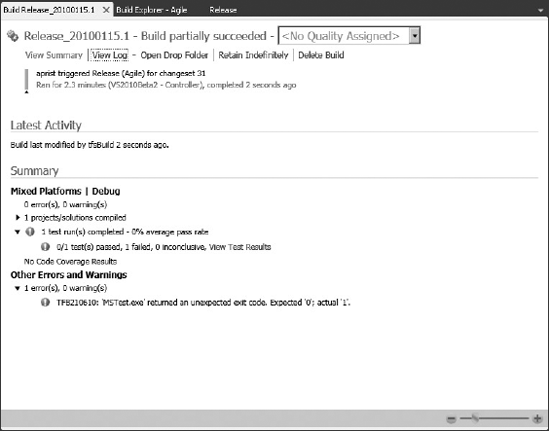
To start a build manually, you can right-click the Builds node in the Team Explorer and select Queue New Build. Once the build is queued you can open it by double-clicking it in the Build Explorer. This opens the new Build Report, which has been greatly improved from the previous version. This report, shown in Figure 57-27, includes information on current activity, previous build statuses and durations, and provides links to a number of other areas and activities related to this build.
Note
If you want to be notified of build events while you work, there is a Build Notifications system tray application that is installed with Team Explorer. Once configured, this application will adjust its icon based on whether any builds you are watching are broken, building, or if everything is built successfully.
TFS uses Report Server, which is part of Microsoft SQL Server, to provide useful information for project managers, customers, and developers. Reports can be accessed directly from Team Explorer, the reports site (http://mytfs/reports/), SharePoint, or Team System Web Access, or they can be configured as a subscription from the Reports site to be left in a Windows file share or sent through e-mail.
The great benefit these have is that developers can focus on their work instead of manually filling out reports. All the information is collected during their daily work, checking out and checking in code, fixing bugs, and relating what they are doing to work items. This way project managers and stakeholders can get to the information they need from the reports TFS provides.
Each process template provides its own set of reports. The CMMI version provides three additional reports and templates like Scrum for Team System from Conchango, and has reports appropriate for the Scrum methodology like Delta Report and Burndown Charts. Again, we will focus on MSF for Agile Development here.
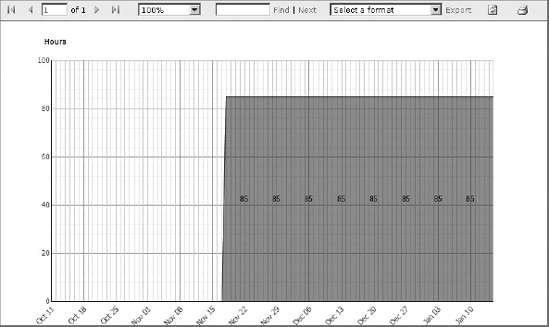
Some of the reports included are Burndown and Burn Rate, Stories Progress, Build Success Over Time, Build Quality Indicators, Test Case Readiness, Test Plan Progress, Bug Status, Bug Trends, and Reactivations. Figure 57-28 shows how the work has been resolved over a couple of years and how much work is left. In the report you can filter by dates, work item type, iteration, and area. You can export to XML, CSV, TIFF, PDF, Web, and Excel.
You don't need two years of information to get useful reports. Depending on the nature of the data displayed, you might not see anything at the beginning. For example, the Test Failing reports will need to have at least one test in your team build process, or to have data for the Regressions report you need Passing tests that are now failing. Similarly, the Scenarios Details report will need you to register at least a Scenario Work Item. After a couple of iterations of working with TFS you will have a lot of useful metrics for free.
Note
Microsoft has been very clear that you should not be accessing the data in the TFS databases directly, but should instead be using the reports and tools provided. In TFS 2010 there are new Data Warehouse Views, which have been added over the tables in each TFS database. There is some guarantee that these views will not change moving forward and they have been designed so you can create your own reports.
Team Foundation uses SharePoint to create a portal for each team project. It has all the benefits of SharePoint, but is customized for each process template. The home in each team portal will include the most important reports, latest announcements, and useful links. TFS 2010 also includes the ability to create custom dashboards, which can be for specific users or for everyone on the project. To navigate to the project portal, right-click the team project in the Team Explorer and select Show Project Portal.
Depending on the process template, certain documents will be included as templates. For example, MSF for Agile Software Development includes Word documents for creating personas and scenarios. These documents are also available from the Team Explorer's document folder.
Inside SharePoint are documents that define the process that your project adheres to. This guidance is available to all developers on the team.
You can have picture libraries, discussion boards, surveys, announcements, links, events, contacts, and custom lists. This will help improve team collaboration.
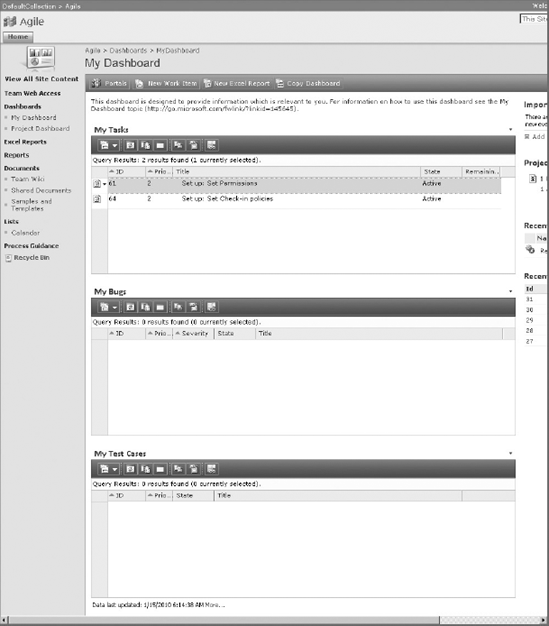
Dashboards are SharePoint Web Part pages that have been preconfigured with useful Web Parts to give you an overview of a project's status. The MSF for Agile process template defines two dashboards out of the box including My Dashboard (Figure 57-29), which contains lists of Tasks, Bugs, and Test Cases that are assigned to you; and Project Dashboard, which contains metrics and information about the progress of the entire team. Using the SharePoint UI, you can copy an existing dashboard and make changes to the web parts that are displayed.
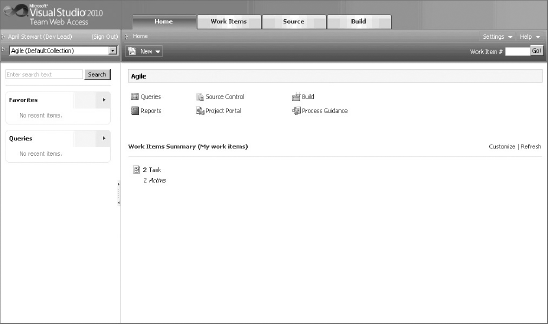
This is a separate, free tool from Microsoft that integrates with TFS and allows you to do pretty much everything you can do from VS, but in a web interface (Figure 57-30). You can create and modify work items as well as work item queries, see the reports and documents, and initiate and monitor builds. The only area with limited functionality is Source Control. You can see history and changeset details, but you can't check out/check in documents due to the web client nature.
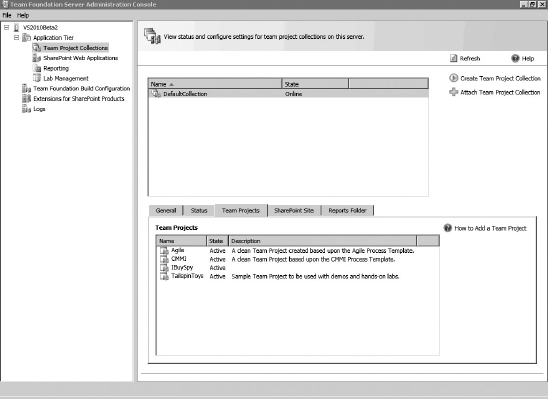
Keeping track of all of the settings, web sites, databases, and accounts that TFS requires can be a hassle. The Team Foundation Server Administration Console (Figure 57-31) aggregates a lot of the information about your TFS installation into one place. It also provides capabilities for many common tasks including managing project collections and configuring build controllers and agents.
Throughout this chapter, you have seen how the process templates define most of the behavior of TFS; for example, they define work item types, process guidance, and reports. To close the chapter, we briefly introduce how you could customize a process template or edit work item types.
To edit either work item types or process templates, you could modify the XML that defines them, but it's easier to use the Process Editor, which is part of the Team Foundation Server Power Tools, downloadable from the Microsoft site.
From the Tools
Note
It is recommended that you have a team project dedicated to testing changes before importing or editing work item types in active team projects.
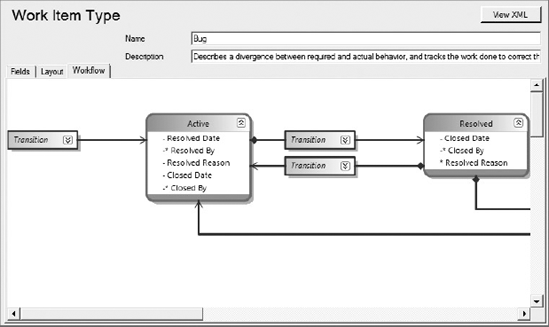
Once you are editing a work item type, either directly from a team project or from a file, you will have three tabs to work with — Fields, Layout, and Workflow (Figure 57-32).
The first tab has a list of fields with their data types and a reference name. The reference name is used to uniquely identify fields from different work item types. For example, a title for a bug and a title for a task have the same "System.Title" reference name; other fields might have the same names but refer to different things.
The second tab allows you to modify the layout. You don't have a visual designer here, but you can work in a tree designer to nest groups, columns, and controls. Each control will be mapped to a field name using the reference name. There is also a Preview Form button that allows you to see what the end product will look like.
On the third tab you can modify the workflow, and from the Toolbox you can add states and transition links. The bug shown in Figure 57-32 shows how it can transition between active and resolved. If you double-click the transition, you can define reasons, actions, and fields. The last is used to set default values to fields after a transition; for example, when the bug transitions from active to resolved, it is assigned to the person who created the bug, the Resolved By field is set to the current user, and the Resolved Date is set to the server's current date.
In the next section you see how you can include work item types on a process template.
To serve as an example for process template customization, you will modify MSF for Agile Development. To create a local copy you need to open the Process Template Manager from the Team
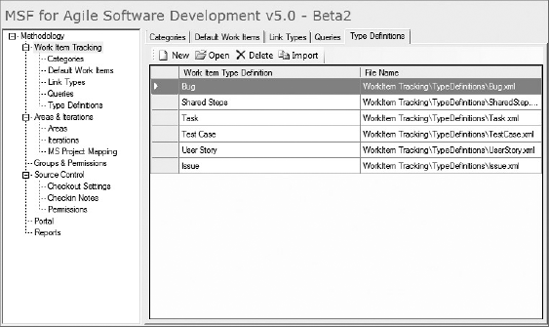
In the Process Template Editor window (Figure 57-33) you have a tree view to configure the different areas of a team project. In the Work Item Tracking node you can modify the Default Work Item List, create default work item queries, and import work item types. In Areas & Iteration you can configure default values for these lists and specify the field and column mappings for Microsoft Project Integration. You can specify permissions and settings under Source Control. In the Portal node, you can add documents that will be added to Document Libraries for SharePoint, and finally in the Reports node you can add Report Definition files.
Although this tool can tremendously simplify the required work, you will need to edit the XML files for several tasks. For example, there's no way to specify a SharePoint template for the portal.
In this chapter, you saw how Team Foundation Server can help you get the work done by integrating the different roles involved. The project managers will be filing and monitoring work items in either Excel or Project, while architects, developers, and testers will be working with the Visual Studio Projects using the version control features, easily relating changes to their assigned work items. Optionally, each change will trigger a team build that will ensure the quality standards are met. TFS will be monitoring everything and generating metrics for reports that can be viewed through the different interfaces like Visual Studio, Team Portal, and Team System Web Access. At the end of the chapter, you saw how the whole process can be customized by modifying the process templates and work item types to better suit each organization's needs.