
Working with source control
Creating, adding, and updating code in a source repository
Defining and enforcing code standards
Adding contracts to your code
If you are building a small application by yourself, it's very easy to understand how all the pieces fit together and to make changes to accommodate new or changed requirements. Unfortunately, even on such a small project the code base can easily go from being very well structured and organized to being a mess of variables, methods, and classes. This problem is amplified if the application is large, complex, and has multiple developers working on it concurrently.
In this chapter, you will learn about how you and your team can use features of Visual Studio 2010 to write and maintain consistent code. The first part of this chapter is dedicated to the use of source control to assist you in tracking changes to your code base over time. Use of source control facilitates sharing of code and changes among a team but more importantly gives you a history of changes made to an application over time.
In the remainder of the chapter you will learn about FxCop and StyleCop, which can be used to set up and enforce coding standards. Adhering to a set of standards and guidelines ensures the code you write will be easier to understand, leading to fewer issues and shorter development times. You'll also see how you can use Code Contracts to write higher quality code.
Many different methodologies for building software applications exist, and though the theories about team structure, work allocation, design, and testing often differ, one point that they agree on is that there should be a repository for all source code for an application.
Source control is the process of storing source code (referred to as checking code in) and accessing it again (referred to as checking code out) for editing. When we refer to source code, we mean any resources, configuration files, code files, or even documentation that is required to build and deploy an application.
Source code repositories also vary in structure and interface. Basic repositories provide a limited interface through which files can be checked in and out. The storage mechanism can be as simple as a file share, and no history may be available. Yet this repository still has the advantage that all developers working on a project can access the same file, with no risk of changes being overwritten or lost. More sophisticated repositories not only provide a rich interface for checking in and out, they also assist with file merging and conflict resolution. They can also be used from within Visual Studio to manage the source code. Other functionality that a source control repository can provide includes versioning of files, branching, and remote access.
Most organizations start using a source control repository to provide a mechanism for sharing source code between participants in a project. Instead of developers having to manually copy code to and from a shared folder on a network, the repository can be queried to get the latest version of the source code. When a developer finishes his or her work, any changes can simply be checked into the repository. This ensures that everyone in the team can access the latest code. Also, having the source code checked into a single repository makes it easy to perform regular backups.
Version tracking, including a full history of what changes were made and by whom, is one of the biggest benefits of using a source control repository. Although most developers would like to think that they write perfect code, the reality is that quite often a change might break something else. Being able to review the history of changes made to a project makes it possible to identify which change caused the breakage. Tracking changes to a project can also be used for reporting and reviewing purposes, because each change is date stamped and its author indicated.
Visual Studio 2010 does not ship with a source control repository, but it does include rich support for checking files in and out, as well as merging and reviewing changes. To make use of a repository from within Visual Studio 2010, it is necessary to specify which repository to use. Visual Studio 2010 supports deep integration with Team Foundation Server (TFS), Microsoft's premier source control and project tracking system. In addition, Visual Studio supports any source control client that uses the Source Code Control (SCC) API. Products that use the SCC API include Microsoft Visual SourceSafe, and the free, open-source source-control repositories Subversion and CVS.
Note
You would be forgiven for thinking that Microsoft Visual SourceSafe is no longer available, considering that all the press mentions is TFS. However, Microsoft Visual SourceSafe 2005 is still available and compatible with Visual Studio 2010. There will, however, be a new licensing option for TFS, which is specifically designed for small development teams as a replacement for SourceSafe.
To make Visual Studio 2010 easy to navigate and work with, any functionality that is not available is typically hidden from the menus. By default, Visual Studio 2010 does not display the source control menu item. To get this item to appear, you must configure the source control provider information under the Options item on the Tools menu. The Options window, with the Source Control tab selected, is shown in Figure 13-1.
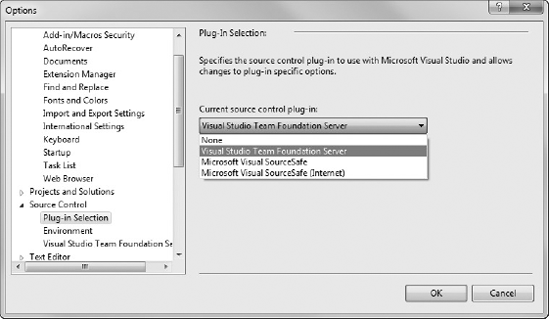
Initially, very few settings for source control appear. However, once a provider has been selected, additional nodes are added to the tree to control how source control behaves. These options are specific to the source control provider that has been selected.
The remainder of this chapter focuses on the use of Visual SourceSafe with Visual Studio 2010. Chapter 57 covers the use of Team Foundation, which offers much richer integration and functionality as a source control repository.
Note
The Internet-based version of Visual SourceSafe uses a client-server model that runs over HTTP or HTTPS, instead of accessing the source code repository through a file share. Additional setup is required on the server side to expose this functionality.
Once a source control repository has been selected from the plug-in menu, it is necessary to configure the repository for that machine. For Visual SourceSafe, this includes specifying the path to the repository, the user with which to connect, and the settings to use when checking files in and out of the repository.
Most source control repositories define a series of settings that must be configured for Visual Studio 2010 to connect to and access information from the repository. These settings are usually unique to the repository, although some apply across most repositories.
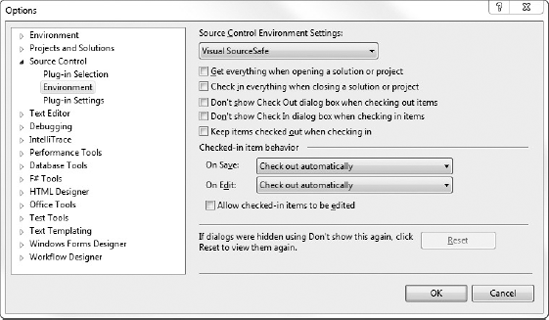
In Figure 13-2 the Environment tab is shown, illustrating the options that control when files are checked in and out of the repository. These options are available for most repositories. The drop-down menu at the top of the pane defines a couple of profiles, which provide suggestions for different types of developers.
Many source control repositories need some additional settings for Visual Studio 2010 to connect to the repository. These are specified in the Plug-in Settings pane, which is customized for each repository. Some repositories, such as SourceSafe, do not require specific information regarding the location of the repository until a solution is added to source control. At that point, SourceSafe requests the location of an existing repository or enables the developer to create a new repository.
This section walks through the process of adding a solution to a new Visual SourceSafe 2010 repository, although the same principles apply regardless of the repository chosen. This process can be applied to any new or existing solution that is not already under source control. We also assume here that Visual SourceSafe is not only installed, but that it has been selected as the source control repository within Visual Studio 2010.
The first step in placing a solution under source control is to create a repository in which to store the data. It is possible to place any number of solutions in the same repository, although this means that it is much harder to separate information pertaining to different projects. Furthermore, if a repository is corrupted, it may affect all solutions contained within that repository.
To begin the process of adding a solution to source control, navigate to the File menu and select Source Control
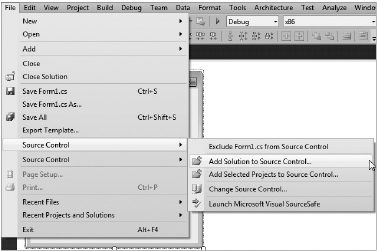
If this is the first time you have accessed SourceSafe, this opens a dialog box that lists the available databases, which at this stage will be empty. Clicking the Add button initiates the Add SourceSafe Database Wizard, which steps you through either referencing an existing database, perhaps on a server or elsewhere on your hard disk, or creating a new database.
To create a new SourceSafe database you need to specify a location for the database and a name. You must also specify the type of locking that is used when checking files in and out. Selecting the Lock-Modify-Unlock model allows only a single developer to check out a file at any point in time. This prevents two people from making changes to the same file at the same time, which makes the check-in process very simple. However, this model can often lead to frustration if multiple developers need to adjust the same resource. Project files are a common example of a resource that multiple developers may need to be able to access at the same time. In order to add or remove files from a project, this file must be checked out. Unless developers are diligent about checking the project file back in after they add a new file, this can significantly slow down a team.
An alternative model, Copy-Modify-Merge, allows multiple developers to check out the same file. Of course, when they are ready to check the file back in, there must be a process of reconciliation to ensure that their changes do not overwrite any changes made by another developer. Merging changes can be a difficult process and can easily result in loss of changes or a final code set that neither compiles nor runs. This model offers the luxury of allowing concurrent access to files, but suffers from the operational overhead during check in.
Once a SourceSafe repository has been created, the Add to SourceSafe dialog appears, which prompts you for a location for your application and a name to give it in the repository. SourceSafe works very similarly to a network file share — it creates folders under the root ($/) into which it places the files under source control.
Note
Although it is no longer required with SourceSafe, many development teams align the SourceSafe folder structure to the directory structure on your computer. This is still considered a recommended practice because it encourages the use of good directory and folder structures.
The Source Code Control (SCC) API assumes that the .sln solution file is located in the same folder or a direct parent folder as the project files. If you place the .sln solution file in a different folder hierarchy than the project files, then you should expect some "interesting" source control maintenance issues.
The first difference that you will see after adding your solution to source control is that Visual Studio 2010 adjusts the icons within the Solution Explorer to indicate their source control status. Figure 13-4 illustrates three file states. When the solution is initially added to the source control repository, the files all appear with a little padlock icon next to the file type icon. This indicates that the file has been checked in and is not currently checked out by anyone. For example, the Solution file and Properties have this icon.
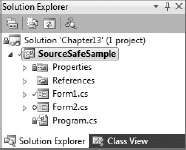
Once a solution is under source control, all changes are recorded, including the addition and removal of files. Figure 13-4 illustrates the addition of Form2.cs to the solution. The plus sign next to Form2.cs indicates that this is a new file. The tick next to the SourceSafeSample project and Form1.cs signifies that the files are currently checked out. In the scenario where two people have the same file checked out, this will be indicated with a double tick next to the appropriate item.
Files can be checked in and out using the right-click shortcut menu associated with an item in the Solution Explorer. When a solution is under source control, this menu expands to include the items shown on the left in Figure 13-5.
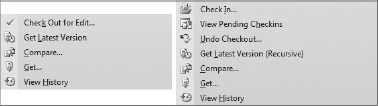
Before a file can be edited, it must be checked out. This can be done using the Check Out for Edit menu item. Once a file is checked out, the shortcut menu expands to include additional options, including Check In, View Pending Checkins, Undo Checkout, and more, as shown on the right in Figure 13-5.
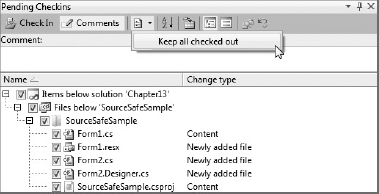
In a large application, it can often be difficult to see at a glance which files have been checked out for editing, or recently added or removed from a project. The Pending Checkins window (accessible from the right-click context menu off the Solution Explorer or via the View menu), shown in Figure 13-6, is very useful for seeing which files are waiting to be checked into the repository. It also provides a space into which a comment can be added. This comment is attached to the files when they are checked into the repository so that the reason for the change(s) can be reviewed at a later date.
To check a file back in, you should ensure that there is a check against the file in the list, add an appropriate comment in the space provided, and then select the Check In button. Depending on the options you have specified, you may also receive a confirmation dialog prior to the item's being checked in. If the Keep All Checked Out option shown in Figure 13-6 is checked, the files being checked in will remain in the checked out state, even after the check in has completed successfully. This can be useful if you are in the middle of a set of changes and want to commit your current changes so that other developers can access them.
One option that many developers prefer is to set Visual Studio to automatically check out a file when it is edited. This saves the often unnecessary step of having to check the file out before editing. However, it can result in files being checked out prematurely; for example, if a developer accidentally makes a change in the wrong file. Alternatively, a developer may decide that changes made previously are no longer required and wish to revert to what is contained in the repository. The last button on the Toolbar contained within the Pending Checkins window is an Undo Checkout button. This retrieves the current version from the repository, in the process overwriting the local changes that were made by the developer. This option is also available via the right-click shortcut menu.
Before checking a file into the repository, it is a good idea for someone to review any changes that have been made. In fact, some organizations have a policy requiring that all changes be reviewed before being checked in. Selecting the Compare Versions menu item brings up an interface that highlights any differences between two versions of a file. Figure 13-7 shows that a Form Load event handler has been added to Form1.vb. Although not evident in Figure 13-7, the type of change is also color coded; additions (such as the Say_HelloButton_Click method) are highlighted in green text, and red and blue lines indicate deleted and changed lines.
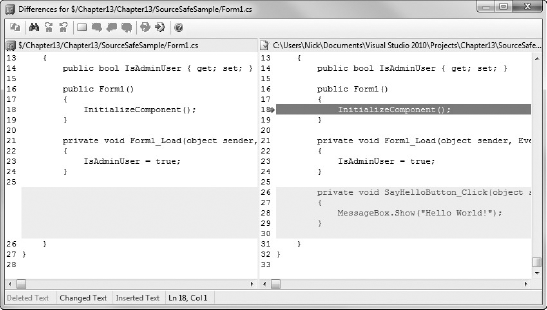
Because source files can often get quite large, this window provides some basic navigation shortcuts. The Find option can be used to locate particular strings. Bookmarks can be placed to ease navigation forward and backward within a file. The most useful shortcuts are the Next and Previous difference buttons. These enable the developer to navigate through the differences without having to manually scroll up and down the file.
Occasionally, changes might be made to the same file by multiple developers. In some cases, these changes can be automatically resolved if they are unrelated, such as the addition of a method to an existing class. However, when changes are made to the same portion of the file, there needs to be a process by which the changes can be mediated to determine the correct code.
Figure 13-8 illustrates the Merge dialog that is presented to developers when they attempt to check in a file that has been modified by another developer. The top half of the dialog shows the two versions of the file that are in conflict. Each pane indicates where that file differs from the original file that the developer checked out. The left pane shows what is now in the source repository, while the right pane shows the changes the developer has made. In this case, both versions had a message box inserted, and it is up to the developer to determine which of the messages is correct.
Unlike the Compare Versions dialog, the Merge dialog has been designed to facilitate developer interaction. From the top panes, changes made in either version can be accepted or rejected by simply clicking the change. The highlighting changes to indicate that a change has been accepted, and that piece of code is inserted into the appropriate place in the code presented in the lower pane. The lower pane also allows the developer to enter code, although it does not support IntelliSense or error detection.
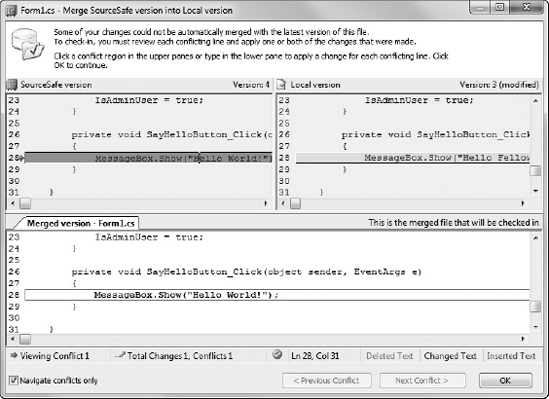
Once the conflicts have been resolved, clicking the OK button saves the changes to your local file. The merged version can then be checked into the repository.
Any time a file is checked in and out of the SourceSafe repository, a history is recorded of each version of the file. Use the View History option on the right-click shortcut menu from the Solution Explorer to review this history. Figure 13-9 shows a brief history of a file that had four revisions checked in. This dialog enables developers to view previous versions, look at details (such as the comments), get the particular version (overwriting the current file), and check out the file. Additional functionality is provided to compare different versions of the file, pin a particular version, roll the file back to a previous version (which will erase newer versions), and report on the version history. When you select View History, you can also constrain the list by a date range and/or by user.

The History window (refer to Figure 13-9) can be used to pin a version of the file. Pinning a version of a file makes that version the current version. When a developer gets the current source code from the repository, the pinned version is returned. Pinning a version of a file also prevents anyone from checking out that file. This can be useful if changes that have been checked are incomplete or are causing errors in the application. A previous version of the file can be pinned to ensure that other developers can continue to work while the problem is resolved.
Visual Studio 2010 provides built-in offline support for Visual SourceSafe when the source code repository is not available. A transient outage could occur for many reasons — the server may be down, a network outage may have occurred, or you could be using your laptop at home.
If you open a solution in Visual Studio that has been checked into Visual SourceSafe, and the source code repository is not available, you are first prompted to continue or select a different repository. You may also be asked if you want to try to connect using HTTP. Assuming you select No for both of these prompts, you are presented with four options on how to proceed, as shown in Figure 13-10.

If the issue is transient, you should select the first option: Temporarily Work Offline in Disconnected Mode. This allows you to check out files and continue editing source code.
Note
The first time you attempt to check out a file while working in disconnected mode, you are presented with a very large dialog box that displays a small essay. The basic gist of this message is that Visual Studio will actually be simulating a checkout on your behalf, and you may need to manually merge changes when you go to check code back in.
The next time you open the solution and the source code repository is available, Visual Studio automatically checks out any "simulated" checkouts that occurred while working in disconnected mode.
Many of the source control operations are not available while working in disconnected mode. These are operations that typically depend on direct access to the server, such as Check In, Merge Changes, View History, and Compare Versions.
As software development projects and teams grow, there is a tendency for code to rapidly become a mixed-bag of styles, standards, and approaches. This can lead to a maintenance nightmare, often resulting in new features being parked due to an abundance of bugs and issues that need to be addressed. Luckily, some great tools are both built into Visual Studio 2010 and available as Addins that can enforce things like naming conventions, ordering of methods, and ensure appropriate comments are written. In this section you learn about some tools that can be used to improve the consistency of the code you and your team write.
Over several iterations of the .NET Framework and Visual Studio, Microsoft has put together a set of coding standards that development teams can choose to adhere to. These are well documented under the topic of Code Analysis for Managed Code Warnings on MSDN (http://msdn.microsoft.com) and can be enforced using a tool called FxCop, which you can download from the Microsoft download site.
Note
Visual Studio 2010 Premium edition and above include the Managed Code Analysis tool, which is essentially a version of FxCop that is integrated into the IDE. This is discussed in Chapter 55.
Once you have downloaded and installed FxCop you need to run it as a standalone tool from the Start menu. If you want to run FxCop as part of your build process you can run it from the command line using the FxCopCmd.exe found in the install folder. When FxCop launches, it automatically creates and opens a new project. Start by saving the project into the folder alongside the solution file for your application. Then from the Project menu, select Add Targets and select the assemblies (dlls and exes) that make up your application. Click the Analyze button to run the code analysis over your application; the result should look similar to Figure 13-11.

As you can see from Figure 13-11, there are three errors (including one marked as critical) and one warning. Although you can ignore the warnings, they quite often indicate an area of concern, either to do with the architecture or security of your code, so it is wise to try to minimize or eliminate where possible the number of warnings and errors. In this example, the first error is easy to resolve; you can just code sign the application and the error will go away. However, it may not be possible to mark your assembly with the CLSCompliant attribute, which is what the second error is requiring. So that this error doesn't appear each time in the active errors list, you can right-click the error and select Exclude. You'll be prompted to add a comment so that you can justify the exclusion of that error. Once you click OK, the excluded error will appear in the Excluded In Project tab, as shown in the background of Figure 13-12. Double-clicking this error opens the details for the error, in which you can find your comment in the Notes section.
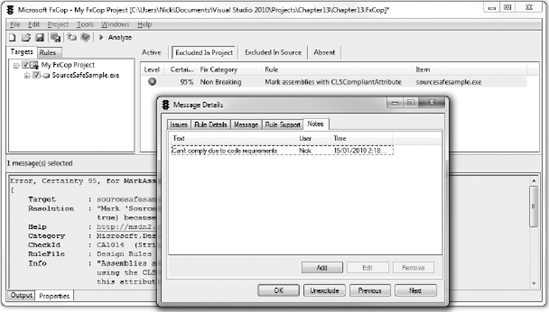
The third error in Figure 13-11 points out that the MessageBoxOptions parameter hasn't been specified. In this case, this is by design so you want to exclude the error in source. To do this, add the SuppressMessage attribute to the method calling MessageBox.Show as in the following code. The parameters supplied are the Category, CheckId, and Name of the error as found in the Message Details window for the error.
- C#
[System.Diagnostics.CodeAnalysis.SuppressMessage("Microsoft.Globalization", "CA1300:SpecifyMessageBoxOptions", Justification="MessageBoxOptions omitted intentionally")] private void SayHelloButton_Click(object sender, EventArgs e){ MessageBox.Show("Hello World!"); }- VB
<System.Diagnostics.CodeAnalysis.SuppressMessage("Microsoft.Globalization",
                                              "CA1300:SpecifyMessageBoxOptions",
                    Justification:="MessageBoxOptions omitted intentionally")>
Private Sub SayHelloButton_Click(ByVal sender As System.Object, _
                     ByVal e As System.EventArgs) Handles SayHelloButton.Click
    MessageBox.Show("Hello World!")
End Sub
To get FxCop to notice the SuppressMessage attribute, you also need to set the CODE_ANALYSIS compilation flag. You do this by adding the CODE_ANALYSIS keyword to the Custom Constants textbox in the Advanced Compile Options dialog (from the Compile tab of the project properties page) for VB, or by adding the same keyword to the Conditional compilation symbols textbox (on the Build tab of the project properties page) for C#. After saving, rebuilding your application and rerunning the Analysis (note that you don't need to restart or even reload the project within FxCop) you will see that the error has been moved to the Excluded in Source tab. Again, double-clicking the error and going to the Notes tab reveals the contents of the Justification parameter specified as part of the SuppressMessage attribute (you may need to import the System.Diagnostic.CodeAnalysis namespace to use this attribute).
You have two other ways to control how FxCop is applied to your code. The first is to use the Targets window to enable/disable the running of rules on sections of code. The left image of Figure 13-13 shows the Targets window with the SourceSafeSample expanded to view the IsAdminUser property. In this example the checkboxes have been unchecked to indicate that rules should not be run on this property.

In the right image of Figure 13-13 you can see the Rules list that has been expanded to show the Mark assemblies with NeutralResourcesLanguageAttribute rule. This was the rule that was generating a warning in Figure 13-11 and has been unchecked to prevent this rule being used in the analysis.
Note
Excluding an entire rule is generally not a good practice because it can hide errors at a later date. For example, if an assembly is added to the project, this rule will never be run on that assembly, even though it may be important for the rule to be applied to that assembly.
FxCop comes with a large selection of rules that may or may not align with the way you and your team write code. If you want to enforce your own standards you can extend the default set of rules by writing your own, using the FxCop SDK that comes with FxCop as a reference.
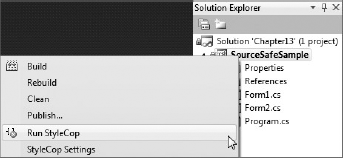
Although FxCop is great for picking up issues relating to the way that you write your code, it doesn't do much for maintaining a common coding style. For this, you need to download and install StyleCop, which is available by searching for StyleCop on the MSDN code gallery (http://code.msdn.microsoft.com). Unlike FxCop, which runs as a standalone tool, StyleCop integrates into the Visual Studio 2010 IDE, allowing you to invoke the analysis from Solution Explorer, as shown in Figure 13-14.
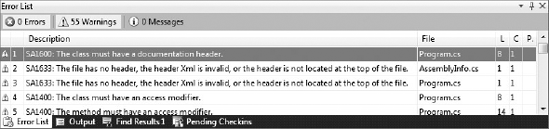
After running StyleCop, you will see that any issues are by default reported as warnings, as in Figure 13-5. If you want to enforce StyleCop you need to tell Visual Studio 2010 to treat warnings as errors.
As with FxCop you can elect to ignore rules via the StyleCop settings, or suppress rules in specific instances by adding the SuppressMessage attribute. You will most likely have to right-click the warning and select Show Error Help to access the Category, CheckId, and Name of the warning you are going to suppress. The format for the SuppressMessage arguments are ("[Category]", "[CheckId]:[Name]"), so for example, ("Maintainability Rules", "SA1400:AccessModifierMustBeDeclared").
The last tool that we're going to cover is Microsoft Code Contracts, which at the time of writing is currently available as a download from the Code Contracts project at Microsoft DevLabs (http://msdn.microsoft.com/devlabs). After downloading and installing this tool, you will need to restart Visual Studio 2010 to get the IDE extensions to appear. Once you have reopened your project you will also need to add a reference to Microsoft.Contracts, which should be on the .NET tab of the Add References dialog (right-click the project in Solution Explorer and select Add References).
Now you can add contracts in the form of pre- and post-conditions to your code. In the following example you can see a pre-condition set for the Divide method that requires (using Contract.Requires) that the denominator is not zero. Similarly, there is a post-condition that ensures (using Contract.Ensure) the Add method increments the field currentValue by the correct amount.
- C#
private double currentValue; private double Divide(double denominator){ Contract.Requires(denominator != 0); return currentValue / denominator; } private void Add(double valueToAdd){ Contract.Ensures(currentValue == Contract.OldValue(currentValue) + valueToAdd); // Do nothing so that contract fails } private void InvokeDivision(){ currentValue = 7.0; double c = Divide(0); // fails validation because b == 0 } private void InvokeAddition(){ currentValue = 13.0; Add(6); }- VB
Private currentValue As Double
Private Function Divide(ByVal denominator As Double) As Double
    Contract.Requires(denominator <> 0)
    Return currentValue / denominator
End Function
Private Sub Add(ByVal valueToAdd As Double)
    Contract.Ensures(currentValue = Contract.OldValue(currentValue) + valueToAdd)
    ' Do nothing so that contract fails
End Sub

Private Sub InvokeDivision()
    currentValue = 7.0
    Dim c = Divide(0.0) 'fails validation because b == 0
End Sub

Private Sub InvokeAddition()
    currentValue = 13.0
    Add(6)
End Sub
With these contracts in place, you need to enable contract verification via the Code Contracts tab of the project properties page, as shown in Figure 13-16. Now when you build and run your application, you will see an Assert dialog thrown when either InvokeDivision or InvokeAddition are called, reflecting the contract that has been violated.

Here you can see that run time checking has been enabled and that it has been set to raise an Assert on Contract Failure. If you disable this option a ContractException is raised instead, which you can handle via code.
Note
In Figure 13-16, there is space in the middle for Static Checking options. These are available if you install Code Contracts for Visual Studio 2010 Premium and above. This enables further static checking to attempt to ensure contracts are not violated at design time, rather than waiting for them to fail at run time.
This chapter demonstrated Visual Studio 2010's rich interface for using a source control repository to manage files associated with an application. Checking files in and out can be done using the Solution Explorer window, and more advanced functionality is available via the Pending Changes window.
Although SourceSafe is sufficient for individuals and small teams of developers, it has not been designed to scale for a large number of developers. It also doesn't provide any capability to track tasks or reviewer comments against a set of changes. Chapter 57 discusses the advantages and additional functionality that is provided by Team Foundation Server, an enterprise-class source control repository system.
This chapter also introduced you to FxCop, StyleCop, and Code Contracts, which can all be used to improve the quality, reliability, and consistency of your code. Their close integration into or with Visual Studio 2010 makes them invaluable tools for development teams of any size.