Chapter 19. Managing Inventory
As you record inventory purchases and sales in QuickBooks, the program keeps track of your inventory behind the scenes, just as the point-of-service systems at the grocery stores do when a cashier scans the items you buy. The seemingly automatic tracking in QuickBooks isn’t truly automatic. This chapter begins by reviewing the setup tasks that make the program work its magic.
Good inventory management means more than updating the number of items that QuickBooks thinks you have on hand. To keep the right number of items in stock, you also need to know how many you’ve sold and how many are on order. To make decisions like how much to charge or which vendor to use, you have to evaluate your purchases and the prices you pay for your inventory. In this chapter, you’ll learn how to make the most of the inventory reports that QuickBooks provides.
Another important yet challenging aspect of inventory is keeping your QuickBooks records in sync with what’s sitting on the shelves in your warehouse. Inventory can go missing due to theft and damage of all kinds, so you might not have as many products in stock as you think you do. QuickBooks can’t help much with the dusty business of rifling through boxes and counting carafes, coffee mugs, and the occasional centipede. But after the counting is complete, QuickBooks can help you adjust its records to match the reality in your warehouse. Adjusting inventory works for more than inventory counts. You can use this process to write off inventory that you have in your warehouse but can’t sell because it’s dented, dirty, or too darned ugly.
The QuickBooks Inventory Process
Before you look at the tools that QuickBooks has to manage your inventory, here’s a quick review of how QuickBooks tracks inventory as you buy and sell products.
Setting Up Inventory Items
As you learned in Chapter 4, you set the stage for tracking when you create inventory items in QuickBooks. Inventory items in your Item List include purchase costs, sales prices, and accounts, all of which direct the right amount of money into the right income and expense accounts as you buy and sell inventory.
Here are the fields in an item record that QuickBooks uses to track your inventory:
Cost. What you pay for one unit of the item.
Sales Price. The price you typically charge for the item (for the same unit size you used in the Cost field).
Asset Account. The asset account that holds the value of the inventory you buy.
Income Account. The account for the income you receive when you sell this item.
COGS Account. The account to which you post the item’s cost when you sell it (known as cost of goods sold).
Note
As you sell inventory, QuickBooks deducts dollars from the inventory asset account and adds them to the cost of goods sold account. For a refresher on how inventory postings work, see the box on Product Items.
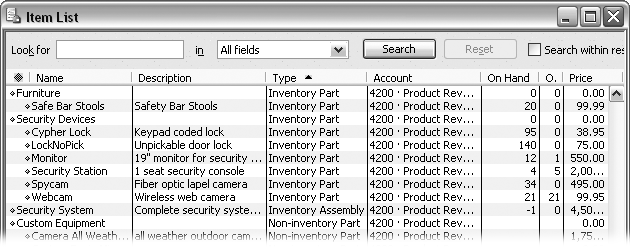
When you sell your time, you can always try to squeeze another work hour into your day. But when you run low on inventory, the only solution is to buy more. For products that you keep in stock, knowing how many you have on hand is essential. QuickBooks keeps a running total of how many units you’ve purchased and how many you’ve sold. The difference between these two numbers conveniently tells you how many should be in your warehouse. The running total of inventory on hand stays with the item in your Item List, as Figure 19-1 shows.
Purchasing and Selling Inventory
Unless you practice just-in-time inventory management, you need inventory in your warehouse to fill customer orders. Here’s a quick review:
Ordering inventory. Companies typically create purchase orders for inventory products they buy (Creating Purchase Orders). These business forms don’t change anything in your QuickBooks company file (that’s why they’re called non-posting transactions). But they’re useful for verifying that the shipments you receive match what you ordered—not unlike opening a pizza box before you leave the parlor to make sure you didn’t get an anchovy and garlic pizza by mistake. Chapter 9 explains how to order inventory and then pay for the inventory you receive.
Purchasing inventory. When you receive a shipment, you record it in QuickBooks so you know you have products to sell. The program increases the number of products on hand by the number in the shipment and adds the value of the shipment to the inventory asset account.
Selling Inventory. Finally, when you sell some of your inventory, the income makes all your bookkeeping seem worthwhile. When you create invoices (Chapter 10), sales receipts, or other sales forms (Chapter 11), QuickBooks deducts the units you sold from the item’s On Hand value. The income from the sale posts to an income account, while the cost of the units you sold moves from the inventory asset account to a cost of goods sold account.
When you sell inventory, the program also compares the new On Hand value to your Reorder Point (Inventory Part Fields). When the inventory on hand drops below your reorder point, QuickBooks reminds you that it’s time to order more. The box below tells you how to shut off reminders for items you aren’t selling at the moment.
Running Inventory Reports
Checking the vital signs of your inventory is the best way to keep it healthy. When products are hot, you have to keep them in stock or you’ll lose sales. And, if products grow cold, you don’t want to get stuck holding the bag (or the lime-green luggage). For all other temperatures, most companies keep tabs on inventory trends and compare them to what’s going on in sales. For example, when the value of your inventory is increasing faster than sales, sales could be poor because your prices are too high, competition is encroaching on your market, or the Salvador Dali Chia Pets simply didn’t catch on.
Good inventory management means keeping enough items in stock to meet your sales, but not so many that your inventory grows obsolete before you can sell it. The inventory reports in QuickBooks aren’t fancy, but they tell you most of what you need to know. You can run any of the inventory reports by choosing Reports → Inventory and then picking the report you want.
Note
The QuickBooks inventory reports show only the active inventory items in your Item List. If you run inventory reports without reactivating all your inventory items (Deleting Items), the inventory values in the reports won’t be correct. By contrast, financial statements such as the Balance Sheet include your total inventory value for active and inactive inventory items alike.
Inventory Valuation: How Much Is Inventory Worth?
QuickBooks includes two reports that tell you how much your inventory is worth: the Inventory Valuation Summary and Inventory Valuation Detail. Here’s what each one does.
Inventory Valuation Summary report
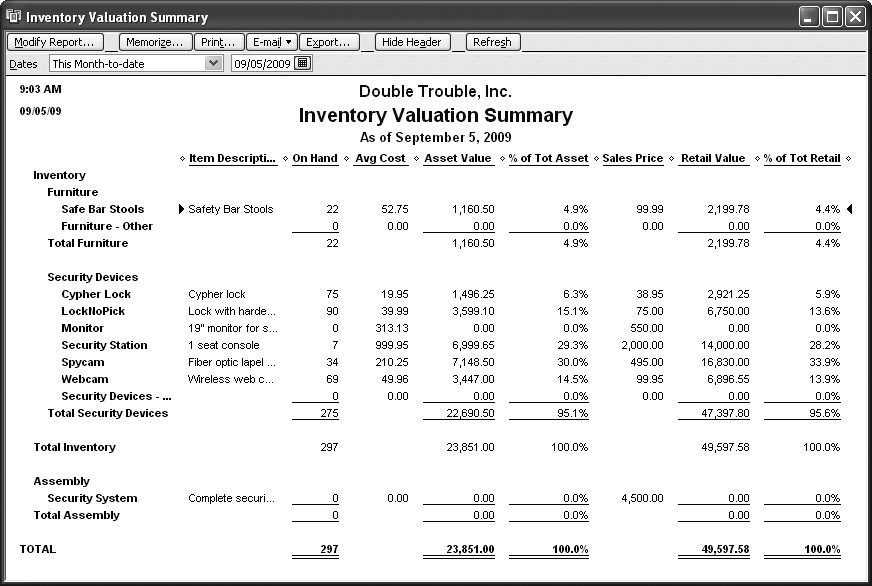
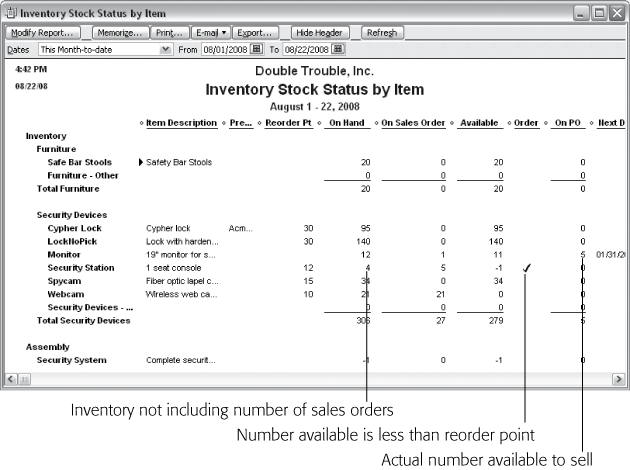
The Inventory Valuation Summary report, shown in Figure 19-2, is a tidy overview of the inventory you have on hand, what it’s worth as an asset, and what it’s worth when you sell it. (See the box on the next page if your inventory isn’t worth as much as it used to be.) The first column in these reports shows the names of the inventory items from your Item List. Subitems appear indented beneath their parent items. QuickBooks initially uses the current month-to-date for the date range for this report.
Here are the other columns in the report and why they are (or aren’t) important to inventory health:
Item Description. This text is the description you entered in the item record in the “Description on Purchase Transactions” box. A description doesn’t help manage your inventory, but it does identify which inventory item you’re looking at, particularly when you use part numbers or abbreviations for item names.
On Hand. To calculate the On Hand value, QuickBooks subtracts the number of products you sold and adds the number of products you received. You can quickly check for items that are close to being out of stock. However, items sell at different rates, so the reorder point reminder (Inventory Part Fields) is a better indication that something is perilously close to selling out.
Note
When you add an out-of-stock item to an invoice, QuickBooks warns you but doesn’t prevent you from selling products you don’t have. When the On Hand value is negative, you know it’s time to order more—and to ask for express shipping. Negative numbers can also remind you to record in QuickBooks inventory items you received at the warehouse (Receiving Inventory Before the Bill).
Avg Cost. Average cost is the only method of valuing inventory that QuickBooks can handle. QuickBooks uses the price you paid for every unit you’ve purchased to calculate the average cost of an inventory item. If you want to watch price trends so you can adjust your sales prices accordingly, review your most recent bills for inventory purchases.
Asset Value. Asset Value is the average cost multiplied by the number on hand. Although changes in asset value over time are more telling, a snapshot of asset value can show trouble brewing. An excessive asset value for one item is a sign that inventory might be obsolete—the item hasn’t sold, so you have too many on hand. If you know that the item is selling, streamlining your purchasing process can reduce the number you need to keep on hand.
% of Tot Asset. This column shows the percentage of an item’s asset value compared to the total asset value of all inventory items. Higher percentages might mean that a product isn’t selling well and you have too much in stock, but higher percentages can also mean a product is a significant part of your sales strategy. This measurement has meaning only in light of your business strategy and performance.
Sales Price. You set this price in the item record, but it’s meaningless if you regularly change the item’s price or charge different prices to different customers. If you didn’t set a sales price for an item, you’ll see 0.00 in the report.
Retail Value. Because the retail value is the sales price multiplied by the number on hand, this value is useful only if the value in the Sales Price column is the typical sales price for the item.
% of Tot Retail. This percentage is what the item’s retail value represents of your total inventory’s retail value. Different products sell at different profit margins, which you can see when the retail percentage differs from the asset value percentage.
Inventory Valuation Detail report
The Inventory Valuation Detail report lists every transaction that increases or decreases the number of items you have on hand. Although it can grow lengthy, this report can help you figure out where your inventory went (and perhaps jog your memory about inventory transactions that you forgot to add in QuickBooks). As in other reports, you can double-click a transaction to see its details.
Inventory Stock Status
As you might expect, Inventory Stock Status reports tell you where your inventory stands today and how that will change based on your outstanding purchase orders. The “Inventory Stock Status by Item” report is a great place to see which inventory items you need to reorder, as Figure 19-3 shows.
Tip
If you want to use a bar code reader to scan your inventory, go to Intuit’s marketplace (http://marketplace.intuit.com). In the Find Apps search box, type bar code to find third-party bar code reader solutions.
Note
If you upgrade to QuickBooks Premier or Enterprise, the Inventory Stock Status reports also show how many items you’ve added to sales orders for future delivery.
The “Inventory Stock Status by Vendor” report shows the same information, but groups and subtotals items by vendor. If you seem to run low on products from a particular vendor, you might want to increase the reorder point for those products to fine-tune your lead time.
Viewing One Inventory Item
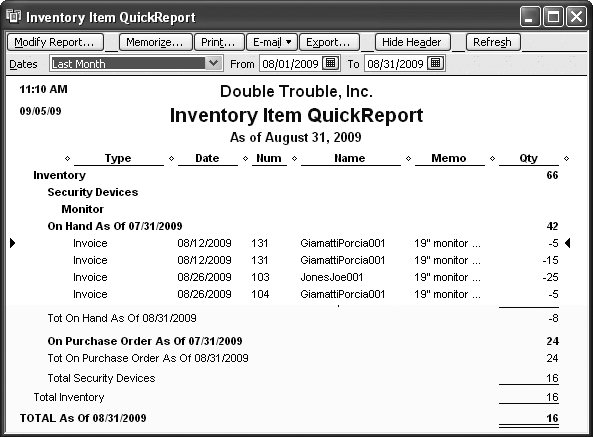
The Inventory Item QuickReport is a fast yet thorough way to see what’s going on with a particular item. In the Item List window, select the item you want to review and press Ctrl+Q.
The Inventory Item QuickReport includes purchase and sales transactions for the item (Figure 19-4). In the On Hand As Of section, invoice transactions represent the sales you’ve made to customers, so the numbers are negative. Bills or Item Receipts are your purchases from vendors, which increase the number on hand. The On Purchase Order As Of section includes the number of products you’ve ordered but haven’t yet received. At the bottom of the report, the TOTAL As Of tells you how many products you’ll have in stock when all your purchase orders are filled.
Performing a Physical Inventory
Although QuickBooks can calculate how many products you have on hand based on your purchases and sales, it has no way of knowing what’s happening in your warehouse. Employees help themselves to products; fire consumes some of your inventory; or a burst pipe turns your India ink sketches into Rorschach tests. Only a physical count of the items you keep in stock tells you how many units you really have to sell.
QuickBooks does the only thing it can to help you count your inventory: It provides the Physical Inventory Worksheet report, which lists each inventory item in your Item List and how many units should be on hand. To see it, choose Reports → Inventory → Physical Inventory Worksheet. The Physical Count column has blank lines, so you can write in how many you find, as you can see in Figure 19-5. (See the box on Adjusting Inventory in QuickBooks to learn how to count inventory while business continues to chug along.)
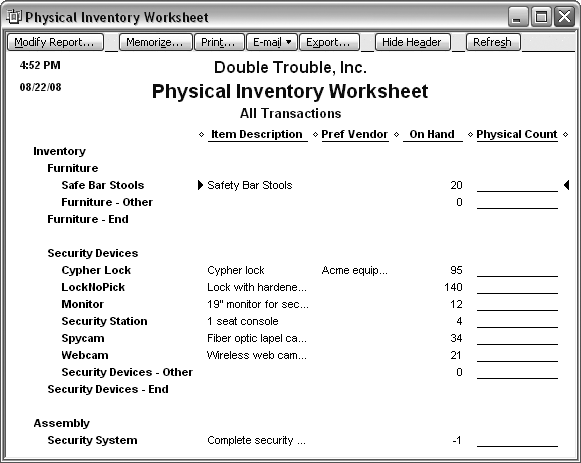
The Physical Inventory Worksheet doesn’t offer any customizable settings. For example, you can’t sort the inventory items, say to list them by the warehouse aisles where they’re kept. To build a worksheet with only the columns you want and with inventory items listed in the order you want, in the toolbar, click Export. Then, in Excel or another program, you can modify the report to your liking. (See Exporting Reports to learn the ins and outs of exporting a QuickBooks report.)
Adjusting Inventory in QuickBooks
As you probably know, inventory can succumb to breakage, theft, and the damage caused by a paintball fight in the warehouse. When these accidents happen, the first response is to report the loss to your insurance company. Adjusting the quantity of inventory in QuickBooks follows close behind. Similarly, if you have inventory that you can’t sell—like personal computers with 10 MB of disk space and 11-inch monitors—adjust the inventory in QuickBooks when you take the computers to the recycling center.
An inventory adjustment is also in order after almost every physical inventory count you perform, because the quantities for inventory in the real world rarely match the quantities in QuickBooks. Shrinkage is the polite name for the typical cause of these discrepancies. To be blunt, employees, repair people, and passersby attracted by an unlocked door may help themselves to a five-finger discount. And you not only take the hit to your bottom line, but you’re stuck adjusting your QuickBooks records to account for the theft. On the other hand, if you have more inventory than you expect, you may have forgotten to ship products to customers.
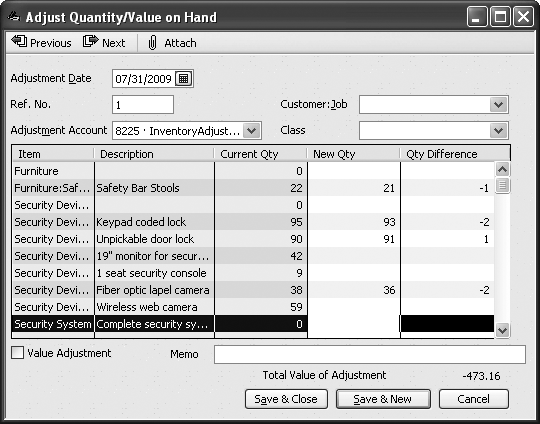
It’s no surprise, then, that QuickBooks has a command for this multipurpose accounting task. Adjusting both the quantity of inventory and its value takes place in the aptly named “Adjust Quantity/Value on Hand” window.
Fiddling with inventory that you already own might not seem like a vendor-related task, but QuickBooks keeps all inventory commands in the same place—the Vendors menu. To open the “Adjust Quantity/Value on Hand” window, choose Vendors → Inventory Activities → “Adjust Quantity/Value on Hand” or on the Home page, click Adjust Quantity On Hand.
When QuickBooks opens the “Adjust Quantity/Value on Hand” window, all you have to enter are the quantities for your inventory items to match what’s in your warehouse or to reflect inventory you’re writing off, as shown in Figure 19-6. QuickBooks uses the average cost of each inventory item to calculate the dollar value that the new quantities represent. By turning on the Value Adjustment checkbox (below the left side of the table), you can enter actual values to mimic “last in/first out” or “first in/first out” costing, which is described on Adjusting Quantities and Values.
Adjusting Quantities
When you adjust inventory quantities, QuickBooks fills in or calculates some of the fields for you. Here are guidelines for filling in the remaining fields of the Adjust Quantity/Value on Hand window:
Adjustment Date. QuickBooks fills in this box with the current date. If you like to keep your journal entries and other bookkeeping adjustments together at the end of a quarter or year, type the date when you want to record the adjustment.
Ref. No. QuickBooks doesn’t require a reference number, but they come in handy when discussing your books with your accountant. QuickBooks increments the number in this box by one each time you adjust inventory.
Adjustment Account. Choose an expense account to which you want to post the cost of the inventory adjustment. For example, if you adjust the quantity of an item to match the physical count, choose an account such as Inventory Adjustment. If you’re writing off obsolete or damaged inventory, choose an expense account, such as Unsalable Inventory. Because you can assign only one account to each inventory adjustment, create one adjustment for physical count changes, and then click Save & New to start an adjustment for write-offs.
Customer:Job. If you want to send products to a customer or job without adding the items to an invoice, choose the customer or job in this drop-down list. QuickBooks assigns the cost of the adjustment to the customer or job.
Class. If you use classes to track sales, choose the appropriate one. For example, if one partner handles sales for the item you’re adjusting, choose the class for that partner so the expense applies to that class.
New Qty. When the Value Adjustment checkbox is turned off, you can type a number in either the New Qty or the Qty Difference cell. If you’re making an adjustment due to a physical count, in the New Qty cell, type the quantity from your physical count worksheet. On the other hand, if you know you lost four cartons of Chivalry Today magazine in a feminist demonstration gone bad, it’s easier to type the number you lost (such as –400) in the Qty Difference cell.
Memo. To prevent questions from your accountant, in the Memo cell, type the reason for the adjustment, such as “2009 end-of-year physical count.”
After you fill in all the boxes, click Save & Close (or Save & New if you want to create a second adjustment, for instance, for write-offs). If you decrease the quantity on hand, QuickBooks decreases the balance in your inventory asset account (using the average cost per item). To keep the double-entry bookkeeping principles intact, the decrease in the inventory asset account shows up as an increase in the expense account you chose. If the adjustment increases the quantity or value of your inventory, your inventory asset account balance increases and the balance in the expense account decreases.
Adjusting Quantities and Values
Calculating inventory value using the average cost for your items is convenient—and in QuickBooks, it’s the only reasonable choice. Using other methods for calculating inventory, like “first in/first out” and “last in/first out” (see the box above) quickly turn into a full-time job. But if that’s what you want, you can make the program do it. Because QuickBooks can handle only average cost for inventory, your sole workaround for achieving LIFO or FIFO costing is to adjust dollar values in the “Adjust Quantity/Value on Hand” window.
When you turn on the Value Adjustment checkbox, QuickBooks displays the Current Value and New Value columns. To adjust the value of an item in inventory, in the New Value column, type the dollar value of the inventory. For example, to write off your entire inventory of pet rocks, in the New Value cell, type 0.00.
Mimicking LIFO or FIFO costing takes some effort because you have to review the bills for all your purchases of the inventory item. Here’s what you have to do to value your inventory using LIFO:
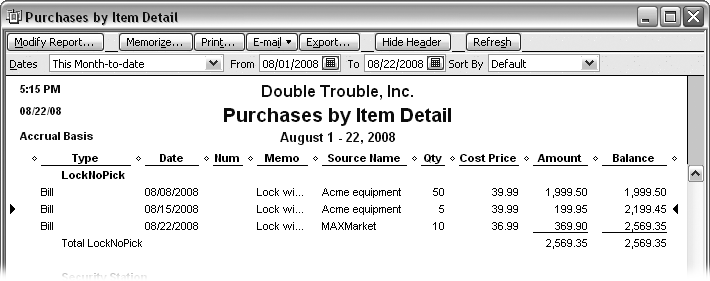
Choose Reports → Purchases → “Purchases by Item Detail“.
QuickBooks generates a report that shows your purchase transactions grouped by inventory item.
For the quantity of the item that you have on hand, add up the prices you paid for your earliest purchases, as shown in Figure 19-7.
Figure 19-7. In the “Purchases by Item Detail” report, the Cost Price column shows your price for an item with each purchase. For example, the first 55 locks cost $39.99 each and the last 10 cost $36.99 each. The LIFO value for 20 locks would be 10 multiplied by $36.99 and 10 multiplied by $39.99, or $769.80. To value the inventory using FIFO, start with the costs for the items purchased first: 20 locks at $39.99, or $799.80.In the “Adjust Quantity/Value on Hand” dialog box in the New Value cell, type the amount you just calculated.
When you click Save & Close, QuickBooks decreases the balance in your inventory asset account using the value in the New Value cell instead of the average cost per item.