Chapter 11. Exception Handling
After completing this chapter, you will be able to:
Explain what exceptions are.
Recognize the different types of exceptions that can be used in C++/CLI.
Describe how to generate exceptions.
Explain how to handle exceptions.
Create your own exception classes.
Now that you know how to construct classes and value types and use them in programming, this chapter introduces you to exception handling, a powerful way of managing errors within C++ applications.
What are exceptions?
Exceptions are an error-handling mechanism employed extensively in C++ and several other modern programming languages. Traditionally, error and status information is passed around by using function return values and parameters, as demonstrated in the following:
// Pass status back as return value
bool bOK = doSomething();

// Pass status back in a parameter
int status;
doSomething(arg1, arg2, &status);
Note
The “&” (ampersand character) denotes a reference in standard C++, in the same way that “%” denotes a tracking reference in C++/CLI.
Although this is a tried-and-tested way of passing status information around, it suffers from several drawbacks:
You can’t force the programmer to do anything about the error.
The programmer doesn’t even have to check the error code.
If you’re deep within in a series of nested calls, you must set each status flag and back out manually.
It’s very difficult to pass back status information from something that doesn’t take arguments or return a value.
Exceptions provide an alternative error-handling mechanism, which gives you three main advantages over traditional return-value error handling:
Exceptions can’t be ignored If an exception isn’t handled at some point, the application will terminate, which makes exceptions suitable for handling critical errors.
Exceptions don’t have to be handled at the point where the exception occurs An error can occur many levels of function call deep within an application, and there might not be a way to fix the problem at the point at which the error occurs. Exceptions make it possible for you to handle the error anywhere up the call stack. (See the upcoming sidebar The call stack and exceptions.)
Exceptions provide a useful way to signal errors when a return value can’t be used There are two particular places in C++ where return values can’t be used: constructors don’t use them, and overloaded operators can’t have their return value overloaded to use for error and status information. Exceptions are particularly useful in these situations because they give you a means to sidestep the normal return-value mechanism.
In .NET, exceptions have one other significant advantage: They can be used across languages. Because exceptions are part of the underlying Microsoft .NET Framework, it’s possible to throw an exception in C++/CLI code and catch it in Microsoft Visual Basic .NET, something that isn’t possible outside the .NET environment.
As is the case with any other error mechanism, you’ll tend to trigger exceptions by making errors in your code. However, you can also generate exceptions yourself if necessary, as you’ll see shortly.
How do exceptions work?
When an error condition occurs, the programmer can generate an exception by using the throw keyword, and the exception is tagged with a piece of data that identifies exactly what has happened. At this point, normal execution stops and the exception-handling code built in to the application begins looking for a handler. It looks in the currently executing routine, and if it finds a suitable handler, the handler is executed and the application continues. If it doesn’t find a handler in the current routine, the exception-handling code moves one level up the call stack and checks for a suitable handler there. This process carries on until either the application finds a handler or it reaches the top level in the call stack—the main function. If nothing has been found by this time, the application terminates with an “unhandled exception” message.
Here’s an example of how an unhandled exception appears to you. You’ve probably seen a lot of these already! Look at the following simple code fragment:
Console::WriteLine("Exception Test");
int top = 3;
int bottom = 0;

int result = top / bottom;
Console::WriteLine("Result is {0}", result);
It’s easy to see that this code is going to cause a divide-by-zero error, and when it is executed, you see the result shown in the following screen shot:

You can see that the divide-by-zero has resulted in an exception being generated. Because I didn’t handle it in the code, the application has been terminated, and the final output never makes it to the screen. Notice the form of the standard message: it informs you as to what happened (a System::DivideByZeroException error), presents an error message, and then gives you a stack trace that directs you to where the error occurred (in this case, in the main function at line 13 in the Exception-Test.cpp file).
System::DivideByZeroException denotes the kind of object that was passed in the exception. A lot of exception classes are provided in the System namespace, and it’s also likely that you’ll make up your own based on the System::Exception base class, as you’ll see later in the chapter.
Exception types
Exception handling is slightly complicated in that you might encounter three different types of exception handling when using C++/CLI: traditional C++ exceptions, C++/CLI exceptions, and Microsoft Windows Structured Exception Handling (SEH). Traditional C++ exceptions form the basis of all exception handling in C++. C++/CLI adds the ability to use managed types (for example, ref classes and value types) in exceptions, and you can mix them with traditional exceptions. C++/CLI also extends exception handling by adding the concept of a finally block, which I discuss in the section The finally block later in the chapter. The third sort of exception handling, SEH, is a form of exception handling built in to Windows operating systems that is independent from C++. I won’t talk any more about SEH here, except to note that you can interact with it from C++.
Throwing exceptions
Let’s start our exploration of exceptions by discussing how to generate, or throw, them. You’ll end up generating far more exceptions by accident than by design, but you need to know how to generate your own when errors occur in your application.
How do you know what to throw? There are a large number of exception classes in the System namespace, all of which derive from Exception. A number of those you’ll commonly encounter are listed in the following table. You should be able to find the exception class to suit your purposes, and if you can’t, it’s always possible to derive your own exception classes from System::Exception.
Exception class | Description |
Thrown when a non-fatal application error occurs. | |
Thrown when one of the arguments to a function is invalid. Subclasses include System::ArgumentNullException and System::ArgumentOutOfRangeException. | |
Thrown to indicate an error in an arithmetic, casting, or conversion operation. Subclasses include Sytem::DivideByZeroException and System::OverflowException. | |
System::Exception | The base class of all exception types. |
Thrown when an array index is out of range. | |
Thrown when an invalid cast or conversion is attempted. | |
Thrown when an attempt is made to dynamically access a member that doesn’t exist. Subclasses include Sytem::MissingFieldException and Sytem::MissingMethodException. | |
Thrown when a method is invoked that isn’t supported. | |
Thrown when an attempt is made to dereference a null reference. | |
Thrown when memory cannot be allocated. | |
The base class for exceptions that the user can be expected to handle. Subclasses include ArgumentException and ArithmeticException. | |
Thrown when the Common Language Runtime (CLR) cannot find an assembly or a type within an assembly, or cannot load the type. Subclasses include System::DllNotFoundException. |
The following exercise shows you how to generate an exception. In the section that follows, you’ll go on to see how to catch and process the exception.
Start Microsoft Visual Studio 2012 and create a new CLR Console Application project named Throwing.
Immediately after the using namespace System; line and immediately before main, add the following function definition:
void func(int a)
{
    if (a <= 0)
        throw gcnew ArgumentException("Aaargh!");
}
This simple function takes an integer argument, and if its value is less than 0, it throws an exception. In this case, I’m creating a new System::ArgumentException object, initializing it with a string, and then throwing it.
Insert code to test the behavior by adding the following code to the main function:
Console::WriteLine("Throw Test");
Console::WriteLine("Calling with a=3");
func(3);
Console::WriteLine("Calling with a=0");
func(0);
Console::WriteLine("All done");
The code calls the function twice, once with a valid value and once with 0, which should trigger the exception.
Compile and run the application, and you should see something similar to the following screen shot:
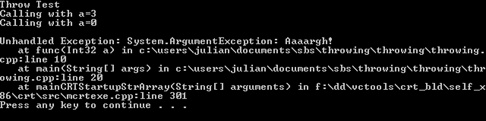
The application has called the function once without incident, but the second call has triggered an exception. As before, you get a message and a stack trace. This time the message is the string used to initialize the exception object and the stack trace has two levels, showing that the exception was triggered at line 10 in the func function, which was called from the main function at line 20.
Handling exceptions
Now that you’ve seen how to generate exceptions, let’s move on to handling them.
Using the try and catch construct
You catch exceptions and process them by using the try/catch construct, which has the following form:
try
{
    // code that may fail
}
catch(TypeOne ^one)
{
    // handle this exception
}
catch(TypeTwo ^two)
{
    // handle this exception
}
Code that you suspect might fail is enclosed in a try block that is followed by one or more handlers in the form of catch blocks. Each catch block looks a little like a function definition, with catch followed by a type in parentheses, which represents the type that will be caught and processed by the catch block. In the preceding code, the first catch block handles exceptions tagged with a TypeOne^ object, whereas the second block handles those tagged with a TypeTwo^ object.
Note
try and catch blocks form a single construct. You can’t have a try block without at least one catch block, you can’t have a catch block without a try block, and you can’t put anything in between them.
You can chain as many catch blocks together as there are exception types to catch, as long as you have at least one.
The following exercise shows you the basics of handling exceptions, using the example from the previous exercise as a basis.
Continue using the project from the previous exercise
Modify the main function to look like the following:
Console::WriteLine("Throw Test");

try
{
    int a = 3;
    Console::WriteLine("Calling with a=3");
    func(a);
    Console::WriteLine("Calling with a=0");
    a = 0;
    func(a);
}
catch(System::ArgumentException ^ex)
{
    Console::WriteLine("Exception was {0}", ex);
}
Console::WriteLine("All done");
The calls to the function are enclosed in a try block, which is followed by a single catch block. When the second call to the function fails, the exception-handling mechanism takes over. It can’t find a handler in the function where the error originated, so it walks one level up the call stack and comes out in the try block.
At this point, the runtime wants to go off looking for a handler. As part of this process, it puts the program stack back to where it was at the start of the try block. In other words, it unwinds the stack, which means that it destroys any variables that have been created on the stack within the try block, so you can’t use them in the catch block. You need to keep this in mind when writing exception handlers and declare any variables you need to use in the catch block outside the corresponding try.
When the stack has been unwound, the code looks at the catch blocks associated with this try block to see whether there is one that has an argument type that matches what was thrown. In this case, you have a match, so the contents of the catch block are executed. If there wasn’t a suitable catch block, the runtime would try to move up another level of the call stack and then would fail and terminate the application.
Execute this code.
You should see something very similar to the following screen shot:
The second function call has generated an exception that has been caught by the catch block, which has printed out “Exception was:” plus the exception details. In contrast to what happened in the previous exercise, the final “All done” message is now printed. This illustrates an important point about exception handling: After a catch block has been executed, application execution continues after the catch block as if nothing had happened. If there are any other catch blocks chained to the one that is executed, they’re ignored.
Try changing the second call so that it passes in a positive value. You’ll find that the catch block isn’t executed at all. If a try block finishes without any exception occurring, execution skips all the catch blocks associated with the try block.

Customizing exception handling
Just printing out the exception object results in the type-plus-message-plus-stack trace that you saw when the exception was unhandled. You can use properties of the Exception class to control what is printed, as shown in the following table:
Here’s a brief exercise that demonstrates the use of Exception class properties:
Continue using the project from the previous exercise. Edit the main function to set a back to zero before the second call to func.
Edit the catch statement in the main function to read as follows:
catch(System::ArgumentException ^ex)
{
    Console::WriteLine("Exception was {0}", ex->Message);
}
Build and run the application.
You should see a result like this:
Exception was Aaargh!
In a similar way, you could use StackTrace to retrieve and print the stack trace information.
Using the exception hierarchy
The exception classes form a hierarchy based on System::Exception, and you can use this hierarchy to simplify your exception handling. As an example, consider System::ArithmeticException, which inherits from System::Exception and has subclasses that include System::DivideByZeroException and System::OverflowException. Now, look at the following code:
try
{
    // do some arithmetic operation
}
catch(System::ArithmeticException ^aex)
{
    // handle this exception
}
catch(System::DivideByZeroException ^dex)
{
    // handle this exception
}
Suppose that a DivideByZeroException is thrown. You might expect it to be caught by the second catch block, but it will, in fact, be caught by the first one. This is because according to the inheritance hierarchy, a DivideByZeroException is an ArithmeticException, so the type of the first catch block matches. To get the behavior you expect when using more than one catch block, you need to rank the catch blocks from most specific to most general.
Tip
The compiler will give you warning C4286 if you have the catch blocks in the wrong order. This works for both managed and unmanaged code.
So, if you just want to catch all arithmetic exceptions, you can simply put in a handler for ArithmeticException, and all exceptions from derived classes will be caught. In the most general case, you can simply add a handler for Exception, and all managed exceptions will be caught.
Using exceptions with constructors
In the section What are exceptions? earlier in this chapter, I mentioned one of the advantages of exceptions is that they make it possible for you to signal an error where there’s no way to return a value. They’re very useful for reporting errors in constructors, which, as you now know, don’t have a return value.
In the following exercise, you’ll see how to define a simple class that uses an exception to report errors from its constructor, and you’ll also see how to check for exceptions when creating objects of this type.
Create a new CLR Console Application project named CtorTest.
Immediately after the using namespace System; line and immediately before main, add the following class definition:
ref class Test
{
    String ^str;
public:
    Test(String ^s)
    {
        if (s == nullptr || s == "")
            throw gcnew System::ArgumentException("Argument null or blank");
        else
            str = s;
    }
};
The ref keyword makes this class managed, and this managed class has one simple data member, a handle to a managed String. At construction time, this handle must not be null or point to a blank string, so the constructor checks the handle and throws an exception if the test fails. If the handle passes the test, construction continues.
Try creating an object in the main function, as shown in the following:
int main()
{
    Console::WriteLine("Exceptions in Constructors");
    // Create a null handle to test the exception handling
    String ^s = nullptr;

    Test ^t = nullptr;

    // Try creating an object
    try
    {
        t = gcnew Test(s);
    }
    catch(System::ArgumentException ^ex)
    {
        Console::WriteLine("Exception: {0}",
                           ex->Message);
    }

    Console::WriteLine("Object construction finished");
    return 0;
}
Notice that the call to gcnew is enclosed in a try block. If something is wrong with the String handle (as it is here), the Test constructor will throw an exception that will be caught by the catch block.
Build and run the application, and you will see the output from the catch block. Try modifying the declaration of the string so that it points to a blank string (initialize it with “”), and then try a nonblank string (for example, “hello”) to check that the exception is thrown correctly.
Nesting and rethrowing exceptions
Now that you’ve seen how to use the try/catch construct, let’s move on to cover some more advanced uses. The first of these are nesting and rethrowing exceptions.
As the name implies, nesting exceptions means including one try/catch construct within another, which can provide a useful way to handle error conditions. It works as you might expect:
try        // outer try block
{
    try      // inner try block
    {
        // Do something
    }
    catch(SomeException ^ex1)
    {
        Console::WriteLine("Exception: {0}", ex1->Message);
    }
}
catch(OtherException ^ex2)
{
    Console::WriteLine("Exception: {0}", ex2->Message);
}
If an exception occurs within the inner try block that is of type SomeException^, it will be handled by the inner catch block and execution will continue after the end of the inner catch block, as usual. The outer catch block will not be executed in this case because the error has already been adequately handled.
If an exception occurs within the inner try block that is of type OtherException^, it won’t be handled by the inner catch block, so it will be passed to the outer try and catch construct, where it is processed by the outer catch block.
Note
You can nest try and catch constructs to several levels, but it’s unusual to go more than two levels deep because it can overcomplicate the structure of the code.
Rethrowing an exception means just that—handling an exception in a catch block and then throwing it again so that it can be handled somewhere else. The following exercise shows how to catch an exception and rethrow it.
Create a new CLR Console Application project named Rethrow.
Immediately after the using namespace System; line and immediately before main, add the following function definition:
void func(int a)
{
    try
    {
        if (a <= 0)
            throw gcnew ArgumentException("Aaargh!");
    }
    catch(ArgumentException ^ex)
    {
        Console::WriteLine("Exception caught in func()");
    }
}
This function is basically the same simple function to which you were introduced at the start of the chapter. It throws a System::ArgumentException when it has passed a negative argument. The difference here is that the exception is being caught within the function.
Modify the main function so that it looks like this:
Console::WriteLine("Throw Test");

try
{
    int n = 0;
    Console::WriteLine("Calling with n=0");
    func(n);
}
catch(ArgumentException ^ex)
{
    Console::WriteLine("Exception caught in main()");
}
Console::WriteLine("All done");
If you run this code, you’ll find that the exception is caught locally in func and the catch block in main doesn’t execute.
Modify the definition of func so that it rethrows the exception after handling it.
void func(int a)
{
    try
    {
      if (a <= 0)
          throw gcnew ArgumentException("Aargh!");
    }
    catch(ArgumentException ^ex)
    {
        Console::WriteLine("Exception caught in func()");
        throw;   // rethrow the exception
    }
}
Using throw without an argument rethrows the current exception, and it can be used in this way only within a catch block. At this point, the runtime goes off looking for another handler, which means moving up the call stack to the main function, where the exception is caught a second time.
Build and run this application.
The “Exception caught in func()” and “Exception caught in main()” messages print, demonstrating that the exception has been handled twice.
Note that you don’t have to rethrow the same exception; it’s quite usual to catch one type of exception, handle it, and then rethrow an exception of another type. You’ll see an example of this in the section Creating your own exception types later in this chapter.
The finally block
C++/CLI adds a new construct to traditional C++ exception handling: the finally block. The purpose of this block is to let you clean up after an exception has occurred, and the following short exercise shows how it works.
Continue using the project from the previous exercise.
Modify the main function so that it looks like the following, adding a finally block after the catch block:
Console::WriteLine("Throw Test");

try
{
    int n = 3;
    Console::WriteLine("Calling with n=3");
    func(n);
    Console::WriteLine("Calling with n=0");
    n = 0;
    func(n);
}
catch(System::ArgumentException ^ex)
{
    Console::WriteLine("Exception was {0}", ex);
}
finally
{
    Console::WriteLine("This is the finally block");
}

Console::WriteLine("All done");
If you try executing the code, you’ll find that the finally block is executed after the catch block.
Modify the main function so that the second call doesn’t cause an exception, either by changing the value or by commenting it out. When you run the application again, you’ll see that the finally block is still executed, even though there was no error.
The purpose of this block is to ensure that if you do something in the try block—such as opening a file or allocating some memory—you’ll be able to tidy up whether an exception occurs or not because the finally block is always executed when execution leaves a try block. This construct gives you a way to clean up what might otherwise require duplicate code.
The catch(…) block
Standard C++ has a construct that can be used to catch any exception that goes past. Here’s how it works:
try
{
    // do some arithmetic operation
}
catch(System::ArithmeticException ^pex)
{
    // handle this exception
}
catch(...)
{
    // handle any exception
}
If an exception doesn’t match the first catch block, it will be caught by the second one, no matter what type it is. The problem is that you lose any information about the exception, because the catch(…) block doesn’t have an argument.
Note
Even though you can’t tell what kind of exception you are handling inside a catch(…) block, if you rethrow from within the block, a properly typed object will be thrown to handlers higher in the call stack.
If you want this functionality when using C++/CLI, use a catch block that has an Exception^ as its argument, which will catch any managed exception object.
Creating your own exception types
You’ve already seen how all the exception types are derived from the System::Exception class. If you can’t find one that suits your needs in the standard exception hierarchy, you can easily derive your own class from Exception and use it in your code. The following exercise shows you how to derive a new exception class and how to use it in code.
Create a new CLR Console Application project named OwnException.
Add the following class definition immediately after the using namespace System; line:
// User-defined exception class
ref class MyException : System::Exception
{
public:
    int errNo;
    MyException(String ^msg, int num) : Exception(msg), errNo(num) {}
};
This custom exception class is a managed class that inherits from System::Exception, and it extends Exception by adding a single field to hold an error number. The class constructor takes a message and a number, and passes the message string back to the base class.
Note
I’ve made the errNo field public. Although you’re normally advised to make all data members of classes private, you can make a case for having public data members in certain circumstances. After you’ve created an Exception object and passed it back to the client, do you care what the client does with it? Exceptions are “fire and forget” objects, and you’re normally not concerned with the integrity of their state after they leave your code in a throw statement.
Add the following function definition immediately after the class definition:
void func(int a)
{
    try
    {
        if (a <= 0)
            throw gcnew ArgumentException("Argument <= 0");
    }
    catch(System::ArgumentException ^ex)
    {
        Console::WriteLine("Caught ArgumentException in func()");
        throw gcnew MyException(ex->Message, 1000);
    }
}
The function checks its argument and throws a System::ArgumentException if it finds a negative value. This exception is caught locally, and a message is printed. Now, I decide that I really want to handle the exception elsewhere, so I create a new MyException object and throw it, initializing it with the message from the original ArgumentException.
Test the exception handling by calling the function in the application’s main routine.
int main()
{
    Console::WriteLine("Custom Exceptions");
    try
    {
        func(0);
    }
    catch(MyException ^ex)
    {
        Console::WriteLine("Caught MyException in main()");
        Console::WriteLine("Message is '{0}'", ex->Message);
        Console::WriteLine("ErrNo is {0}", ex->errNo);
    }

    return 0;
}
Calling the function with a 0 value triggers the exception, which is handled in the function itself, and the exception is then rethrown to be handled in the main function. You can see in the following screen shot how the exception has been caught in both places.

Using safe_cast for dynamic casting
C++ supports casting, which is when you instruct the compiler to convert one type to another for use in an expression. Although casting can be useful, it can also be dangerous because you’re overriding what the code would naturally direct the compiler to do. The safe_cast keyword was introduced in C++/CLI to help make the operation safer. The following code fragment shows how some conversion operations can be unsafe:
// Define the Vehicle and Car classes
ref class Vehicle {};
ref class Car : Vehicle {};
ref class Truck : Vehicle {};
ref class Bus : Vehicle {};
...
Car ^pc = gcnew Car();  // Create a Car
Vehicle ^pv = pc;       // Point to it using a Vehicle handle - OK
...
Car ^pc2 = pv;          // Copy pv into another Car^ handle - not OK!
The compiler raises an error on the last line, complaining that it can’t convert a Vehicle^ to a Car^. The problem is that a Vehicle handle could point to any object derived from Vehicle such as a Truck or a Bus. Implicitly casting from a Car to a Vehicle is fine because a Car is a Vehicle; going the other way doesn’t work because not every Vehicle is a Car. One way around this issue is to use the safe_cast construct, such as in the following:
try
{
    Car ^pc2 = safe_cast<Car^>(pv);
}
catch(System::InvalidCastException ^pce)
{
    Console::WriteLine("Cast failed");
}
At run time, safe_cast checks the object on the other end of the handle to see if it has the same type as the object to which you’re trying to cast. If it does, the cast works; if it doesn’t, an Invalid CastException is thrown.
Using exceptions across languages
One of the great things about managed exceptions in C++/CLI is that they work across languages, so now you can, for example, throw an exception in C++/CLI and catch it in a Visual Basic application. No longer are exceptions simply a C++ feature, and this ability to harmonize error handling across code written in different languages makes mixed-language programming much easier than it has been in the past.
Note
In .NET you should throw exception objects that derive from System::Exception. Standard C++ allows you to throw and catch any kind of value, such as ints and doubles. If you do this and the exception is thrown to non-C++ code, your value will be wrapped in a RuntimeWrappedException object.
In the final example in this chapter, you will create a C++ class in a dynamic-link library (DLL) and then use the class in a Visual Basic.NET application.
Start Visual Studio 2012 and open a new Visual C++ project. This time, choose a Class Library project from the CLR section: this is used when you want to create a DLL rather than an EXE. I called the project MyClass; you can name it what you like, but make a note of the name.
You’ll find that you’ve created a project that defines a namespace called MyClass, containing a single class called Class1. It’s this class that you’ll edit, adding a method that can be called from a Visual Basic client.
The project will contain a number of files, among them MyClass.h and MyClass.cpp, which are used to hold the definition and implementation of the Class1 class. Open MyClass.h and add the Test function so that it looks like the following code:
// MyClass.h

#pragma once

using namespace System;
namespace MyClass
{
    public ref class Class1
    {
    public:
        void Test(int n)
        {
            if (n < 0)
                throw gcnew ArgumentException(
                   "Argument must be positive");
        }
    };
}
The Test method should look familiar by now: it simply checks its argument and throws an exception if it’s less than 0.
Build the project.
You end up with a DLL called MyClass.dll being created in the project’s Debug directory.
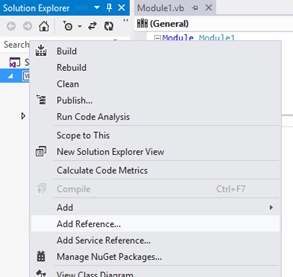
Close the project (by clicking Close Solution on the File menu) and create a new Visual Basic Console Application project named Tester. Before you can use the DLL you just created, you have to add a reference to it to the project. To do so, open Solution Explorer (using the Solution Explorer item on the View menu if it isn’t visible) and right-click the project name.
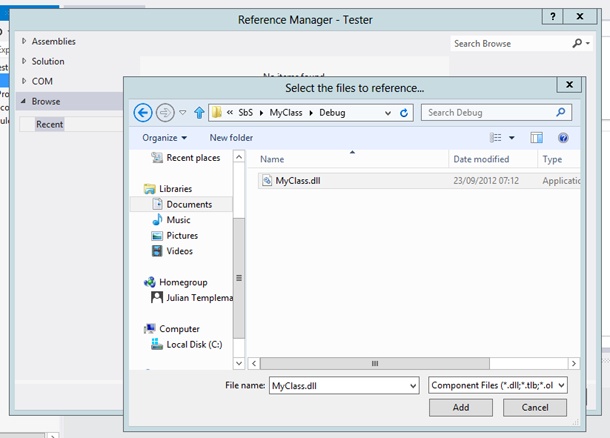
On the shortcut menu that appears, click Add Reference. In the Reference Manager dialog box that opens, click Browse and search for the DLL you built in step 3. Ensure that it’s added to the Selected Components pane and then click OK.
Add the code to the project. Open Module1.vb and edit the Main function so that it looks like the following code:
' Application to demonstrate cross-language exception handling
Imports [MyClass]

Module Module1
  Sub Main()
    Dim obj As New Class1()

    Try
      obj.Test(-1)
    Catch ex As ArgumentException
      Console.WriteLine("Exception: " & ex.Message)
    End Try

    Console.WriteLine("All done")
  End Sub
End Module
The first line imports the MyClass namespace into the application. This line does the same job as using namespace does in C++, so you don’t have to fully qualify the name Class1 when it appears. The first line in the Main function creates a new Class1 object; this is equivalent to creating an object in C++ by using gcnew. The call to the Test function is enclosed in a Try and Catch construct, and you can see the similarity between the way exceptions are handled in Visual Basic and C++. The main difference is that in Visual Basic, the Catch blocks are inside the Try block.
Build the application and execute it.
Passing –1 through as the argument triggers the exception, and you should see the message printed out in the Catch block.