
The Windows 8.1 defaults are designed to work well for people with common levels of vision, hearing, and motor skills. Many people have different levels of abilities, however. The Windows 8.1 accessibility features are designed to make Windows 8.1 and the applications it runs as usable as possible for people with varying capabilities.
For example, many people can’t easily read text on a computer screen. Using the accessibility features in Windows 8.1, users can increase the size of all text, magnify portions of the screen to view individual words and letters close-up, choose high-contrast settings to make the text clearer, or use the Narrator tool to audibly read the text.
Accessibility isn’t only for people with varying physical capabilities. For example, dyslexic users might find that the Narrator tool makes it easier to read text and voice recognition makes it easier to write messages. These features sound simple enough, but don’t underestimate their power; they can change lives.
In this chapter, I’ll start by giving you some examples of specialized hardware used in accessibility scenarios. Then, I’ll walk you through the accessibility features that Windows 8.1 provides. I’ll also mention several great third-party apps that extend Windows accessibility even further.
For some users, adjusting the accessibility settings will be enough for them to happily use their computers. Many users, however, require specialized hardware. For example, a user with a C4 (cervical vertebra 4) injury doesn’t have movement below the collarbone. However, since they can control their neck and head, they can use a head mouse, which controls the pointer by tracking head movement. A head mouse connects to a computer exactly like a traditional mouse; Windows 8.1 simply supports the hardware driver.
Even though these users can control the mouse, they might not have the precision they need to perform some actions, such as swiping or dragging. Switching between applications is a common challenge for users with accessibility issues. Therefore, it’s a good idea to get the largest monitor possible; this allows them to keep multiple desktop applications on the screen simultaneously. Additionally, it leaves more room for the on-screen keyboard, an important tool for users who can’t use a traditional keyboard.
If the user can speak, they can use voice recognition software for text input. While the on-screen keyboard is good for tapping out a few letters, it would be pretty time-consuming to write a book using it. Windows 8.1 includes basic voice recognition capabilities, and a product such as Dragon by Nuance, available at http://www.nuance.com/dragon/, provides more advanced options. To get the most out of voice recognition software, connect a headset that has been designed specifically for voice recognition to the computer.
Windows 8.1 tablets are excellent choices for many vision impaired users because users can easily control the distance and angle of a tablet’s screen. The updated Magnifier and Narrator tools work great with touch, too. Stationary screens with touch support can be very useful to users with a mouse stick, which is a pointing device held in the mouth that allows a user to press keys on the keyboard or touch a screen.
There are as many different accessibility tools as there are capabilities, and many people create specialized tools exactly for a specific person. I won’t try to describe every type of specialized hardware, but it’s important to understand that some of these accessibility features aren’t really designed to be used with a keyboard and mouse, even though they work with keyboard and mouse input.
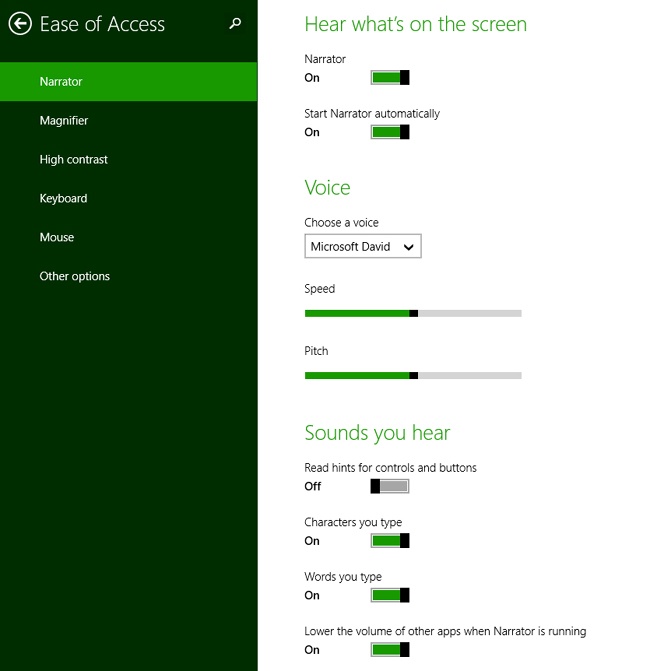
The quickest way to improve accessibility is to run the Ease Of Access wizard, as shown in Figure 7-1. To launch the wizard, search Settings for ease, and then click Let Windows Suggest Ease Of Access Settings.
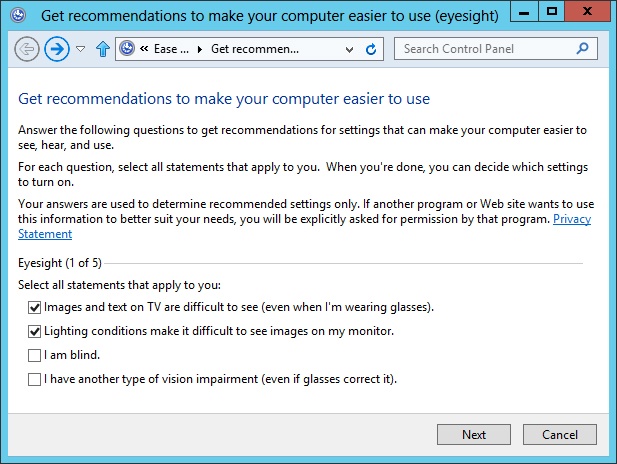
The wizard is a good starting point, but you will need to customize the settings further to optimize Windows to your individual needs. Notably, selecting the reasoning options on the last page does not seem to change any settings. However, following the guidelines near the end of this chapter can help.
Not everyone sees the same way. For many users, text on computer screens is too small to read comfortably, but they can read it if it’s zoomed in larger. Some users can read the text, but only when the text is white on a black background, or vice versa. Other users cannot see at all and must rely on their hearing to get feedback from a computer.
The sections that follow cover visual accessibility tools in more detail.
If a user can see but finds the text on the screen too small, turn on Make Everything On Your Screen Bigger from the Ease Of Access page of the PC Settings screen. This option does what it says, but it works best on high-resolution screens. If your screen is near the minimum resolution for Windows 8.1, some text might get pushed off the screen, reducing readability. If the bigger display isn’t easily readable, you have other options: using Magnifier or scaling screen content within apps.
Despite its name, the Make Everything On Your Screen Bigger option does not change the desktop appearance. To adjust the size of the desktop, search Settings for text size and then select Make Everything On Your Screen Bigger. If the option with the same name is enabled, select it. Windows 8.1 scales the Start screen and apps designed for Windows 8.1 to your high-resolution screen, making tiles, images, and text larger. It does not, however, change the appearance of the desktop. If the Make Everything On Your Screen Bigger option is not enabled, your screen resolution is not high enough to use that option.
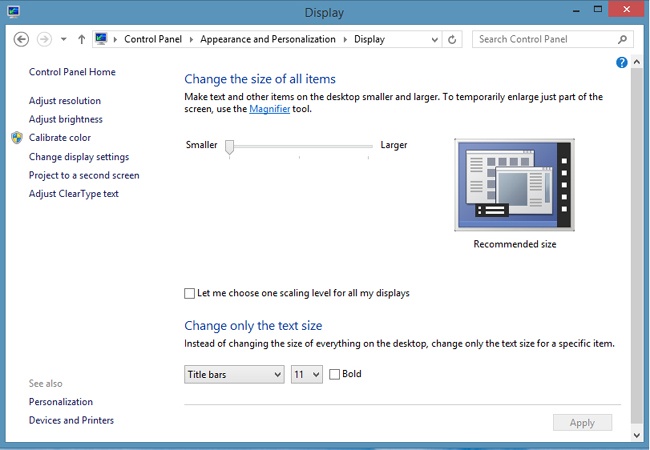
To increase the size of the desktop, search Settings for text size again, and this time select Make Text And Other Items Larger Or Smaller. Select the text size, as shown in Figure 7-2, or click Custom Sizing Options to select a different size. The sizes available to you vary depending on your screen’s resolution. Click Apply, and then sign out and sign back on.
In many apps, a better option is to zoom in within the app. For example, when you zoom in with Internet Explorer (by pressing Ctrl+Plus Sign) or by using the Internet Options selection from the Settings charm), Internet Explorer smoothly scales text and images, making them larger on-screen. Other apps, including e-book reader apps and Microsoft Office, provide similar capabilities.
If a user finds it easier to read black-and-white text rather than text on colored backgrounds, you can enable high contrast mode from the login screen or the Ease Of Access section in PC Settings, as shown in Figure 7-3.

Magnifier is a tool that zooms in to your computer’s display, showing a small part of the screen much larger. This is perfect for users who find it difficult to see small details on the screen or who cannot increase the size of text to be large enough to be readable.
You can adjust Magnifier options from PC Settings, Ease Of Access. Invert Colors changes the screen colors, which makes it more obvious that Magnifier is enabled and can make some text easier to read. Screen colors go back to normal when you close Magnifier. The default settings typically work well for the remaining options—Follow The Keyboard Focus and Follow The Mouse Cursor. You might also want Magnifier to start automatically when you log in, which you can do by enabling the Start Magnifier Automatically option.
Note
Using Magnifier Watch the video at http://aka.ms/WinIO/magnifier.
Inside OUT: Larger but not always clearer with Magnifier
Whereas a real-world magnifying glass allows you to see greater detail, Magnifier doesn’t increase detail; it just shows everything larger. So, as you zoom in with Magnifier, you’re going to experience a great deal of pixilation. Basically, everything gets either blocky or blurry, as Figure 7-4 shows.

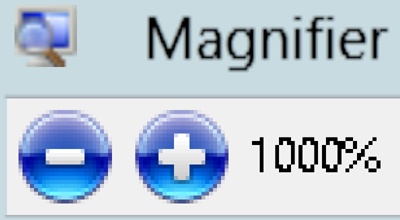
Worst of all, the 1000% text, which appears as black on white when the view is not zoomed in, becomes a mosaic of colors. These colors are there when you are not zoomed in with Magnifier, but most people don’t see them. They’re a font-smoothing technology within Windows, known as ClearType, that uses intermediate colors to smooth the appearance of text and reduce the visibility of individual pixels on computer screens.
While ClearType makes text easier to read at normal zoom levels, it has the opposite effect when using Magnifier. If you search for Performance Options in your computer’s settings, you’ll find the Adjust The Appearance And Performance Of Windows dialog box. Open it and clear the Smooth Edges Of Screen Fonts option. Now, some magnified text appears more readable, as shown in Figure 7-5.
You definitely should turn font smoothing off if you plan to use Magnifier regularly, but be warned: most apps will still use font smoothing. I can’t explain why this is, but even some of the text in the Ease Of Access Center continues to use font smoothing after the setting has been disabled.
Touch devices, and specifically tablet computers, are great for many users with varying visual capabilities. Because you can hold tablet computers in your hand, you can bring them closer to or move them farther from your eyes. You can also easily tilt the screen to reduce reflections and glare, or move the computer into a part of the room with less light.
The Windows 8.1 touch interface provides an entirely new way to use Magnifier. After you turn on Magnifier, you can zoom in and out by touching + and – at each corner, as shown in Figure 7-6. When zoomed in, pan around the screen using the scroll bars along each edge. When a scroll bar disappears, you know you’ve reached the edge of the screen. If you move to the right edge of the screen until the scroll bar disappears, you can swipe in to access the charms.
To quickly zoom in and out with touch, pinch and pull your fingers together along any of the scroll bars at the edge of the screen.
If you get lost, tap on opposite borders of the screen. In other words, tap both the left and right borders at the same time, or tap the top and bottom borders at the same time. This shows the full-screen view, with the portion of the screen you’re looking at highlighted, as shown in Figure 7-7. You can drag the highlighted rectangle around to view a different portion of the screen.
The simplest way to launch Magnifier is at login, by clicking the icon in the lower-left corner of the login screen. After logging on, open Magnifier and configure it to start automatically using the Ease Of Access Center.
By default, Magnifier zooms in 200 percent. Simply move the mouse to the edge of the screen to pan the screen around. To zoom in or out, click the magnifying glass icon and then click the buttons on the Magnifier window.
To quickly see the entire screen (a great way to get your bearings), click the magnifying glass icon and then click Preview Full Screen on the Views menu. You can pan around the screen with the mouse and click to zoom back in.
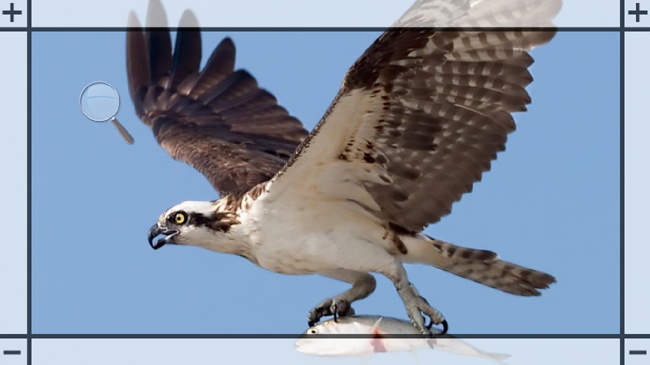
Magnifier also supports lens mode, which shows a small portion of the screen magnified, as shown in Figure 7-8. To switch between modes with a mouse, just select Lens or Full Screen from the Views menu in Magnifier.

Magnifier is definitely easiest to use with either touch or a mouse. However, if you are limited to a keyboard, you can launch Magnifier by pressing Windows+Plus Sign. Press Windows+Plus Sign again to zoom in further, or press Windows+Minus Sign to zoom out. Use Ease Of Access to start it automatically when you log in to Windows.
Press Windows+Esc to cancel Magnifier. When the view is magnified, pan around the screen by holding down both Ctrl and Alt and pressing the arrow keys.
To quickly see the entire screen, press Ctrl+Alt+Spacebar on the keyboard. You can then use the keyboard to pan around the screen.
To open lens mode with a keyboard, press Ctrl+Alt+L. To switch back to full-screen mode (the default), press Ctrl+Alt+F.
If you are using the keyboard with Magnifier, there are a couple of options you’ll want to turn on: Follow The Keyboard Focus and Follow The Mouse Cursor. Selecting these options causes the screen to follow the user’s action as the user tabs between elements. If you were using Magnifier with a mouse, this would quickly become disorienting, however. You can access these options from the PC Settings, Ease Of Access, Magnifier page, as shown in Figure 7-9.

Magnifier is free and well integrated into Windows. Some users might need more powerful features, such as control over screen tinting, help following the mouse pointer, and extended support for multiple monitors. MAGic Screen Magnification provides those features (for a fee). You can purchase MAGic at http://www.freedomscientific.com/products/low-vision/MAGic-screen-magnification-software.asp.
Narrator reads text on the screen and can provide audible descriptions of different user interface elements. Earlier versions of Windows had the Narrator tool, but it has been much improved in Windows 8.1: it’s faster, it supports more languages and voices, it can read more user interface elements, and it has been optimized for touch screens. You can start Narrator from the login screen or the Ease Of Access Center.
On a touch computer, press Windows+Volume Up to start Narrator. Then, you can explore the screen by touching it. Narrator will read a description of the element under your finger. Touch the screen with a second finger to activate the element.
Narrator is useful in Internet Explorer, too. To read an entire webpage, press Windows+Alt+. Pressing Ctrl stops the reading and allows you to click links. Press Windows+Alt+Enter to select a hyperlink, and Windows+Alt+Spacebar to follow the link.
Figure 7-10 shows the Narrator Settings page (accessed from PC Settings, Ease Of Access, Narrator), which you can use to customize different aspects of Narrator’s behavior, as well as accessibility settings that aren’t necessarily directly related to Narrator, such as how long notifications stay on the screen. Many of these settings are very important to customize; because users have very different accessibility needs, the default settings will not be perfectly suited to every user.
You should adjust the voice speed and pitch settings so that you can comfortably understand your favorite of the three voices. Faster speeds can greatly improve your efficiency when using your PC. If you are an accurate typist, you should clear the Characters You Type and Words You Type options.
Note
Using Narrator Watch the video at http://aka.ms/WinIO/narrator.
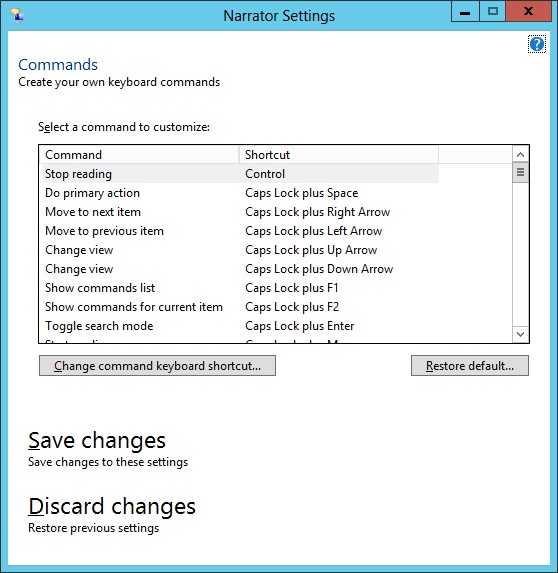
Because many Narrator users also have difficulty with pointing devices such as a mouse, Narrator is designed to be controlled using keyboard shortcuts. You can configure these shortcuts using the Commands settings in the Narrator Settings desktop tool, as shown in Figure 7-11. You can open the tool by typing narrator at the Start screen and selecting the icon with the computer and the voice bubble.
However, for best results, try to learn to use the default keyboard shortcuts. If you rely on customized shortcuts, you might find that your own PC is easier to use, but you’ll be lost if you ever need to use another PC.
Narrator is useful, but app-specific text-to-speech software can be more useful because it can handle the app’s content more intelligently. Browsers are an important example: all popular browsers have several different plug-ins that support text-to-speech; simply visit the browser’s plug-in library and search for the phrase “text-to-speech.”
Only the desktop version of Internet Explorer supports plug-ins. Therefore, if you require text-to-speech with Internet Explorer, you need to use Narrator or switch to the desktop version and use a third-party plug-in.
Third-party screen readers that work with any app within Windows include:
NVDA (NonVisual Desktop Access) screen reader. Available at http://www.nvaccess.org/, NVDA supports 30 languages and a variety of different voices.
Thunder. Free screen-reading software available at http://www.screenreader.net. Thunder supports a handful of languages.
JAWS. It’s not free, but it’s quite powerful and supports Braille output in addition to speech. It also supports optical character recognition (OCR), which can read text that is rendered as an image (a very common problem with webpages). Available at http://www.freedomscientific.com/products/fs/jaws-product-page.asp.
If you’re using someone else’s computer, you can use WebAnywhere to audibly read the contents of a webpage from any browser. The URL is rather complex, so it’s easier simply to search for it. Choose the beta version of WebAnywhere to get the best results. Once it’s loaded, WebAnywhere provides its own address bar at the top of the page. This address bar doesn’t support searching, so you need to type a URL, such as http://bing.com.
If you have difficulty finding the mouse pointer, you can increase the pointer size from PC Settings, Ease Of Access, Mouse. Search Settings for pointer, and then click Make It Easier To See The Mouse Pointer. As shown in Figure 7-12, Windows 8.1 provides options for large and extra-large pointers in several different sizes and styles.
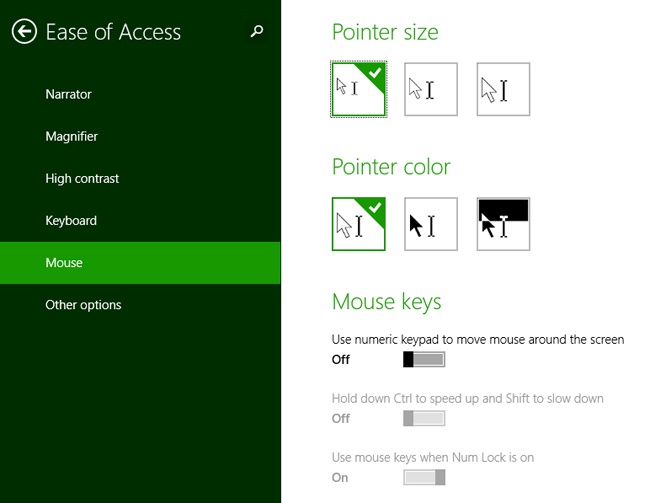
Other useful mouse settings are available. Turning on Use Numeric Keypad To Move Mouse Around The Screen helps users who are more comfortable with buttons than a mouse. You can fine-tune mouse behavior by using the Ctrl and Shift keys to control the speed of the mouse and by enabling the mouse keys to work whether or not Num Lock is on. By default, when Mouse Keys is enabled, it works only when the Num Lock button is off.
Windows 8.1 and Windows 8.1 apps are designed to be used with either touch or a mouse and keyboard. If those options aren’t ideal for you, you can accomplish most tasks using just a keyboard or just a mouse. Additionally, speech recognition is useful for dictation and many common Windows tasks.
If you have difficulty typing a password to sign on to Windows, you might find it easier to use a picture password or a PIN. For information about changing your sign-in settings, refer to Chapter 18.
The login screen’s password field is selected by default. Therefore, users with access to a keyboard but without a mouse can simply type their password and press Enter.
Users who cannot press two keys simultaneously, but who need to type capital letters or symbols in their password, should use Sticky Keys. To activate Sticky Keys, press the Shift key five times and then press the Spacebar to select Yes when prompted to confirm, as shown in Figure 7-13.
Press Tab to access other elements of the login screen, just as you would with most aspects of Windows. By tabbing multiple times, you can access the power button in the lower-right corner to shut down or restart your computer or the Ease Of Access button in the lower-left corner to turn on Narrator, Magnifier, the on-screen keyboard, high contrast, Sticky Keys, or FilterKeys.
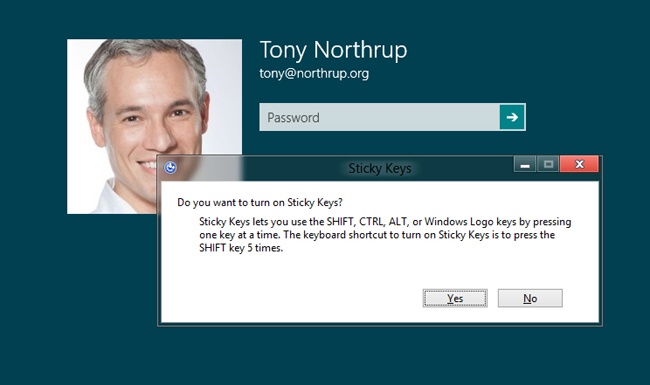
Table 7-1 lists keyboard shortcuts that are particularly useful to users without a mouse. Note that this isn’t the complete list of keyboard shortcuts; these are the most important keyboard shortcuts that can be performed by pressing a single key.
Table 7-1. Accessibility shortcuts
Shortcut | Action |
|---|---|
Tab | Switch between elements. |
Enter | Send the current form data or click OK. |
Esc | Reject the current form data or click Cancel. |
Backspace | Return to the previous page. |
Home | Jump to the beginning of the current line of text. |
End | Jump to the end of the current line of text. |
Page Down | Scroll down one page |
Page Up | Scroll up one page |
Some users, especially those who don’t have steady hands, find it easier to type when they have FilterKeys enabled. FilterKeys is a feature that slows down keyboard input. Basically, you have to hold down a key for a full second before it registers. Enabling FilterKeys reduces the precision required when typing, because if someone briefly bumps the wrong key, Windows ignores the keystroke. To turn on FilterKeys, hold the right Shift key for eight seconds.
To log in without a keyboard, click the Ease Of Access icon in the lower-left corner and then click On-Screen Keyboard. The on-screen keyboard, as shown in Figure 7-14, works exactly like a regular keyboard except that the Shift, Fn, Ctrl, and Alt keys are sticky. So, to type a capital A, you would click Shift and then click A.
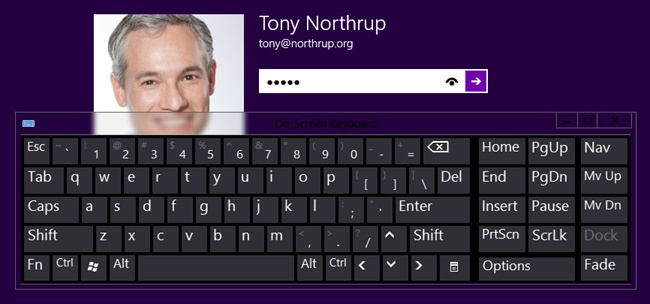
Windows 8.1 hides your password when you type it to make it harder for someone to read it over your shoulder. Typos are easy, though, especially when using the on-screen keyboard. You can double-check what you’ve typed by clicking and holding the eye icon next to the password.
You can control many aspects of Windows 8.1 and Internet Explorer with your voice. Previous versions of Windows have had speech recognition, but it has never been this useful. With Windows 8.1, you really can navigate Windows and perform most common tasks with your voice, without touching a keyboard or mouse.
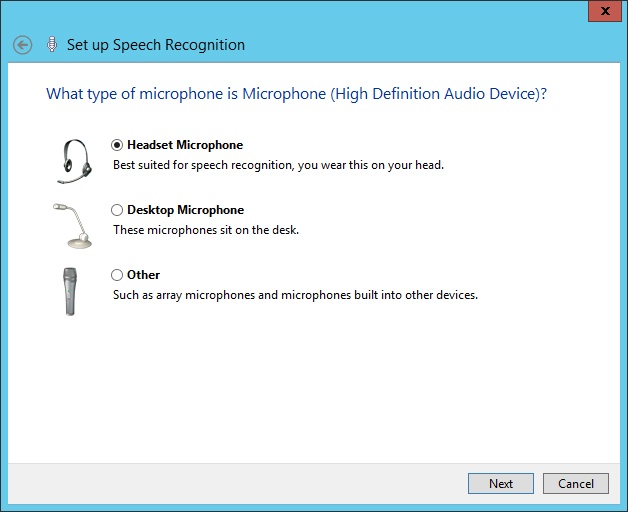
First, you’ll want a good quality headset microphone recommended for use with voice recognition. A headset microphone stays close to your mouth, which helps to reduce the impact of outside noises. It also maintains a more consistent volume level as you move your body and head. Speech recognition works with other types of mics, but it won’t be reliable enough for anything more than occasional use.
To set up speech recognition, type speech at the Start screen, and then click Windows Speech Recognition. The wizard, as shown in Figure 7-15, helps you configure your mic and train speech recognition to understand your voice.
Once you’ve set up speech recognition, you can perform basic tasks such as opening the Start screen (say Start screen), opening apps (say “Start <name of the app>”), scrolling (say “Scroll up” and “Scroll down”), clicking links in Internet Explorer (say “Click <name of link>”), or selecting items in dialog boxes (say the name of the item). There are dozens of commands.
You can also use speech recognition to dictate documents and messages. Once in an app, simply speak, and Windows will do its best to interpret what you say. It doesn’t have grammar skills, so you need to say every piece of punctuation. For example, you might say, “Hello comma world period,” to write “Hello, world.”
Windows 8.1 has a setting that can improve the usability of the touch keyboard by activating keys only once you remove your finger from the keyboard. This allows you to hold your finger against the screen, slide to the right key, and then lift your finger to type the key.
This setting is hidden in a rather unexpected place: Narrator. On the Narrator settings page, turn Narrator on, and then select the Activate Keys On Touch Keyboard When I Lift My Finger Off The Keyboard option, as shown in Figure 7-16. Be sure to configure Narrator to start automatically (as described in the section Narrator earlier in this chapter), even if you must disable Narrator’s other functionality.

Though it has improved over time, using a computer and the Internet still relies heavily on a user’s ability to read and write. This makes using a computer more difficult for many users, especially users with dyslexia and similar conditions.
Narrator translates written text to spoken word. While Narrator is capable of reading just about every aspect of the Windows user interface, many dyslexic users feel comfortable navigating Windows without it. Windows 8.1, in particular, uses icons heavily, reducing the need to rely on the written word for navigation. Where Narrator comes in handy for dyslexic users is with large blocks of text—webpages and e-books, for example.
Speech recognition can make entering large amounts of text easier for dyslexic users. While most won’t want it for entering a few keystrokes (for example, typing their password or using keyboard shortcuts), speech recognition can greatly reduce the time it takes to write papers, emails, and instant messages. It might also improve spelling accuracy.
Speech recognition software is never perfect, however, so you should still reread important messages, even if you use Narrator to do it.
Another way to improve readability for some users is to select specific fonts. For example, a recent study showed that readers with dyslexia made fewer errors when using the Dyslexie type, a type designed specifically for their style of learning. Dyslexie (available at http://www.studiostudio.nl/home/en/) and a similar font named Lexia Readable (available at http://www.k-type.com/?p=520) are currently free for personal use and can be installed in Windows 8.1.
Figure 7-17 contrasts the Segoe font (top) built into Windows 8.1 with Dyslexie (bottom). As you can see, the lowercase q (easily confused with a p, b, or d) is written using an uppercase style. Lowercase b and d are visually weighted at the bottom, preventing them from appearing the same when rotated.

To install fonts that aren’t built in, download them, right-click the font file (with a .otf or .ttf file extension), and then click Install. If you don’t have the option to install a font, many users consider Trebuchet MS, Georgia, and Comic Sans to be the best built-in fonts for readers with dyslexia.
You can’t change the font for all of Windows, but you can select fonts in some applications, including many document and e-book readers. In the desktop version of Internet Explorer, you can choose a default font, but Windows uses it only when the website you are viewing doesn’t specify a font, which is uncommon. So, you also need to configure Internet Explorer to ignore website fonts. Therefore, you need to make two configuration changes from the General tab of the Internet Options dialog box in the desktop version of Internet Explorer:
Click Accessibility, and then select Ignore Font Styles Specified On Webpages.
Click Fonts, and then select your preferred font.
With these few tweaks, PCs can be much more usable to people with dyslexia or other reading conditions.