
Hour 14 Working with Roles
What You’ll Learn in This Hour:
![]() Overview of roles
Overview of roles
![]() Setting up ASP.NET role provider
Setting up ASP.NET role provider
![]() Modify the host and local service to support roles
Modify the host and local service to support roles
![]() Modify the workflow to support roles
Modify the workflow to support roles
This hour covers roles, which are used to validate external access to workflows.
Workflows wait for other systems to raise events and, in turn, workflows respond. Some workflows may support processes that take days, weeks, or even years. During the time they await response from external systems, the workflow must be able to ensure that the systems contacting it are authorized to do so. WF’s HandleExternalEvent and other event-receiving (WebServiceInput and ReceiveActivity) activities contain a Roles property that when used ensures only authorized systems can access WF workflows.
Valid roles—those authorized to interact with the workflow—must be placed in the WorkflowRoleCollection collection. The WorkflowRoleCollection then must be bound to the Roles property of a WF event-receiving activity. If an external system attempts to access the workflow without credentials contained in one of the valid roles, the workflow will not allow the external system access.
Two types of roles can be placed into the WorkflowRoleCollection: ASPNET and Active Directory. ASPNET roles are supported through the WebWorkflowRole type, and Active Directory roles are supported through the ActiveDirectoryRole type. Both role types must be populated with a role, such as Level1Approver, and then placed in the WorkflowRoleCollection collection. Their implementations are similar.
![]()
The ASPNET role provider can be used by nonweb applications. It simply accesses a SQL Server database of names and roles.
Only the WebWorkflowRole type is covered in this hour. As mentioned, the ActiveDirectoryRole implementation is similar, so most of the WebWorkflowRole information covered in this hour is relevant to implementing the ActiveDirectoryRole type as well.
Implementing roles in WF involves three steps:
1. Populating the EventArgs class with an identity property.
2. Configuring the event-receiving activities.
3. Instantiating the WorkflowRoleCollection collection and populating it with WebWorkflowRole types in the workflow code-beside.
You should also write code to handle the exception WF raises if an invalid identity is passed. We will catch this in the host aborted event in this hour, where all workflow uncaught exceptions wind up. You will learn other exception handling options in Hour 16, “Working with Exceptions, Compensation, and Transactions.”
Before actually implementing roles, you need to know a couple of housekeeping items. The first is a brief description of the solution used. The second is instructions to set up an ASPNET role provider.
The OrderEscalationSolution in the C:SamsWf24hrsHoursHour14RolesOrderEscalationSolutionCompeteWRoles directory contains a workflow project, a Windows Forms host, a local service, and a Windows Forms project named UserAndRoleManagement that can be used to add users and roles to the ASPNET membership database.
First, check to see if you have the ASPNET role provider installed. If not, you need to install it. Then you add the roles and users used to process roles.
1. Open the OrderEscalationSolution in the C:SamsWf24hrsHoursHour14RolesOrderEscalationSolutionCompeteWRoles directory.
2. Click on View, Server Explorer, Data Connections, and look for the ASPNET database.
3. If you see the ASPNET database, skip to the “Adding Roles and Users” section.
4. Go to your .NET Framework directory. For instance, C:WINDOWSMicrosoft.NETFrameworkv2.0.50727. If you have a different directory or version of the framework, substitute them as required.
5. Double-click the ASPNET_REGSQL.exe file.
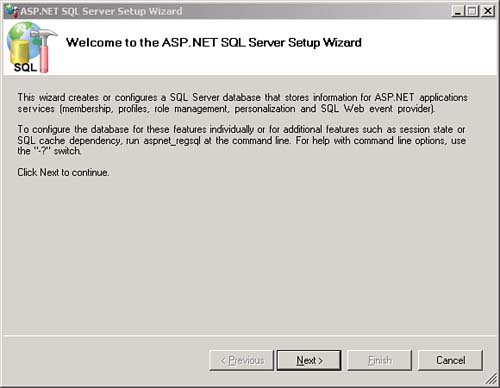
6. Click Next on the Welcome to ASP.NET SQL Server Setup Wizard shown in Figure 14.1.
7. Choose the Configure SQL Server for Application Services option on the Select a Setup Option form. Click Next.
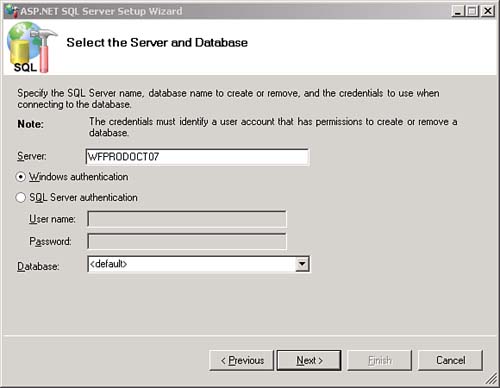
8. Enter your server name (for example, localhost), choose your authentication scheme, and select the <default> choice in the Database drop-down on the Select a Server and Database form (Figure 14.2). Click Next.
9. Click Next on the Confirm Your Settings form and click Finish on The Database Has Been Created or Modified screen.
You now have an ASP.NET role provider setup.
Follow the next steps to prepare for processing, in which you will add two roles: Level1Role and Level2Role. Then you will add two users to each role.
1. Right-click the OrderEscalationWorkflows project and select Unload Project. (This project is not yet complete and will prevent you from performing the task in the next step.)
2. Set the UserAndRoleManagement project as the startup project and then run the project.
3. Enter Level1Role into the Role text box, click the Add Roles button, and accept the confirmation dialog.
4. Enter Robert into the Users to Add text box, click the Add Users to Role button (do not remove the data from the Role text box), and accept the confirmation.
5. Enter Patricia into the Users to Add text box, click the Add Users to Role button (do not remove the data from the Role text box), and accept the confirmation.
6. Enter Level2Role in the Role text box, click the Add Roles button, and accept the confirmation dialog.
7. Enter Brian into the Users to Add text box, click the Add Users to Role button (do not remove the data from the Role text box), and accept the confirmation.
8. Enter Janet into the Users to Add text box, click the Add Users to Role button (do not remove the data from the Role text box), and accept the confirmation.
9. Exit the form.
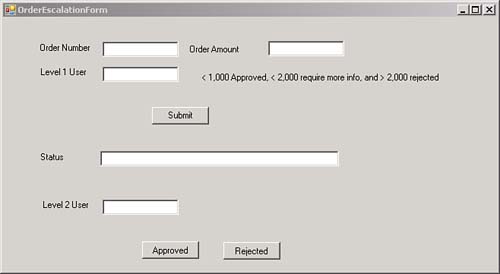
The host form named OrderEscalationForm that you use to work with roles contains a Leve1User and a Lever2User (as shown in Figure 14.3). The Level1User is input along with the order and validated when the order is received. Level2User will be used in the Add Level2Role Support section.
Follow the next steps to update the EventArgs class to support roles.
1. The only programmatic change made to the host for role processing is to add the identity to the EventArgs passed to the workflow. Uncomment the following line of code in the buttonSubmitOrder_Click handler:
eventArgs.Identity = securityIdentifier;
![]()
In a production system, the credentials of the logged in user would be used. To facilitate working with roles across multiple users, the host form creates Windows identities. The securityIdentifer variable in the preceding code snippet is just that—a manufactured Windows identity. I used the code from the WF WebWorkflowRole SDK sample to produce this identity. The steps to produce the identity are not covered because they are used solely to enable demo or testing and are not relevant to a production system. See the additional code in the buttonSubmitOrder_Click handler if you are interested in how to programmatically create a Windows identity.
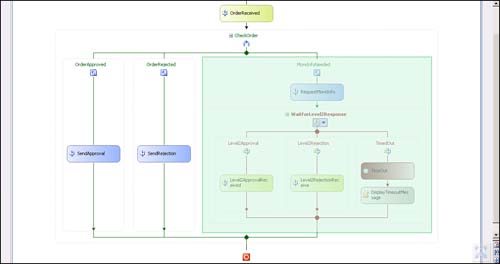
The workflow you will use is shown in Figure 14.4. It receives an order and approves or rejects it. The MoreInfoNeeded branch is not used yet and is therefore not enabled. It will be used in the Add Level2Role support section. The condition on the Rejection branch is also temporarily set to true to make it act as an else. The rejection branch must catch all orders that are not approved until Level2Role support is added.
Follow the next steps to add member variables.
1. Right-click the OrderEscalationWorkflows project and select Reload Project.
2. Add the following code below the OrderAmount DependencyProperty:
// Collection that valid workflow roles will be stored in
public WorkflowRoleCollection ValidRoles =
new WorkflowRoleCollection();
// Workflow roles where valid roles are stored
WebWorkflowRole Role1;
WebWorkflowRole Role2;
The main topic of interest here is binding the Roles property of the OrderReceived activity to the ValidRoles (WorkflowRoleCollection) variable. The OrderReceived activity will no longer process events unless the identities contained in the EventArgs payload are members of the roles contained in the ValidRoles collection.
Follow the next steps to add handlers to the workflow and the HandleExternalEventActivity in which to evaluate the roles.
1. Click the workflow designer away from any activity and enter OnWorkflowInitialized in the Initialized property to create a workflow initialized handler. Then press Enter.
2. Click the OrderReceived activity, click its Roles property, and click the Ellipsis. Now click the Bind to an Existing Member tab, select ValidRoles, and click OK.
3. Enter OrderReceivedInvoked in the Invoked property and press Enter to create the handler.
Our workflow model now validates roles on its one HandleExternalEvent activity.
The two new role-related items covered in this section are the following:
![]() In the
In the OnWorkflowInitialized handler, you add the valid WebWorkflowRoles to the ValidRoles collection.
![]() Retrieve the identity from
Retrieve the identity from OrderReceivedInvoked handler to make it available to the workflow.
Follow the next steps to add code to the handlers you just created:
1. Add the following code to the OnWorkflowInitialized workflow initialized handler to initialize the roles and update the valid roles when the workflow is created.
// Initializing the two WebWorkflowRole varaibles to the
// two valid approvers. These roles must exist in the role
provider
// which is ASPNET in our case
Role1 = new WebWorkflowRole("Level1Role");
Role2 = new WebWorkflowRole("Level2Role");
// Because both roles can create the initial order, they are
// both added to the ValidRoles collection because both roles
// may initiate the order.
ValidRoles.Add(Role1);
ValidRoles.Add(Role2);
2. Now when the host raises the event and starts the workflow, the OrderReceived activity executes. At this time we can extract the identity contained in the EventArgs. Then we display the identity in a message box to show it has been received. Add the following code to the OrderReceivedInvoked handler:
// Extracting identity from EventArgs
string user =
(e as
OrderEscalationLocalService.OrderEscInitEventArgs).Identity;
OrderNumber =
(e as
OrderEscalationLocalService.OrderEscInitEventArgs).OrderNumber;
OrderAmount =
(e as
OrderEscalationLocalService.OrderEscInitEventArgs).OrderAmount;
MessageBox.Show
("Order number: " + OrderNumber + " received for " + user);
1. Set the OrderEscalationFormHost project as the startup project and run it.
2. Enter any order number and amount. Enter Patricia as the user.
3. The workflow should return approved if you entered an amount less than 1,000; otherwise, it returns rejected.
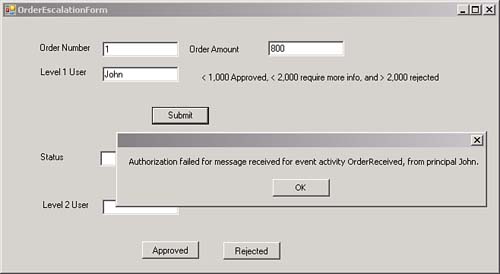
4. Now enter any order number and amount again. This time enter John as the user. You should see the dialog shown in Figure 14.5. The workflow threw an exception. Because we do not have any exception handling in the workflow, our host Terminated event caught the exception and displayed the dialog.
When the workflow requires additional information, only users in the Level2Role role must either approve or reject the order. We will now need to make the MoreInfoNeeded branch of the workflow functional, which requires the following:
![]() Setting the
Setting the MoreInfoNeeded Enabled property to true
![]() Binding the
Binding the Roles property of the Level2ApprovalReceived and Level2RejectionReceived activities to the ValidRoles variable
![]() Changing the
Changing the OrderRejected Condition property’s handler
![]() Removing the Level1Role from the ValidRoles collection
Removing the Level1Role from the ValidRoles collection
Follow the next steps to add Level2Role support to the workflow activities.
1. Click the MoreInfoNeeded activity, the third branch of the CheckOrder activity, and set its Enabled property to true.
2. Click the Level2ApprovalReceived activity and bind its Role property to the ValidRoles variable.
3. Click the Level2RejectionReceived activity and bind its Role property to the ValidRoles variable.
Follow the next steps to add Level2Role support to the workflow code-beside.
1. Replace the code in the RejectedCondition method that always sets e.Result to true with the following, which sets it to true if the OrderAmount > 2000.
e.Result = OrderAmount > 2000;
2. Add the following code to the SendMoreInfoInvoking method to remove Role1 from the ValidRoles collection.
ValidRoles.Remove(Role1);
Follow the next steps to run the application, and when you enter an amount between 1000 and 2000, level 2 approval should be requested.
1. Run the OrderEscalationFormHost project.
2. Enter any order number and an amount of 1200. Enter Patricia as the user. Click OK on the dialog.
3. The OrderEscalationForm should show that second-level approval is required, as shown in Figure 14.6.

4. Enter Brian as the Level 2 User and click Approved. The workflow should flash a Level 2 Approved dialog. Click OK.
5. Enter any order number and an amount of 1200. Enter Patricia as the user. Click OK on the dialog.
6. The OrderEscalationForm should show that second-level approval is required.
7. Enter Brian as the Level 2 User and click Approved. The workflow should flash a Level 2 Approved dialog. Click OK.
8. Now make sure to start at the top and submit an order; then approve or reject it. If you click Approved again without first submitting the order, you will get an exception when raising the event to the host.
9. Enter any order number and an amount of 1200. Enter Patricia as the user. Click OK on the dialog.
10. The OrderEscalationForm should show that second-level approval is required.
11. Enter Sarah as the Level 2 User and click Approved. The workflow should flash an Authorization failed for... message.
That’s it for roles in WF.
Roles were covered this hour. Event-receiving activities can authenticate external systems raising events on workflows via roles. WF ships with OOB Roles support for both Active Directory and the general purpose ASPNET role provider.